72 Monte Carlo
-
Posts
179 -
Joined
-
Last visited
-
Days Won
4
Content Type
Profiles
Articles
Forums
Gallery
Events
Everything posted by 72 Monte Carlo
-
72 Monte Carlo instrument cluster gauges conversion
72 Monte Carlo replied to 72 Monte Carlo's topic in Electrical Tech
Does anyone have a good used working glove box light socket assembly for sale? It looks like mine is missing a contact for the bulb. Thanks! -
72 Monte Carlo instrument cluster gauges conversion
72 Monte Carlo replied to 72 Monte Carlo's topic in Electrical Tech
Has anybody on here converted the heater control panel 1445 push in bulb socket to a 194 bulb push in socket connector? If so, which one did you use? Thanks! -
72 Monte Carlo instrument cluster gauges conversion
72 Monte Carlo replied to 72 Monte Carlo's topic in Electrical Tech
Getting closer to being done with the small mechanical stuff. I only have a few things left to do; 1. heater control panel LED bulb, and LED glove box bulb 2. install a new throttle cable. 3. install new bushings in the rear control arms. 4. Paint the dash with SEM interior Black paint - it's currently factory green, but I'm going with Black Interior Then it's finish the body work on both front fenders, and passenger door, and then it's ready for etching primer on the bare metal body. -
72 Monte Carlo instrument cluster gauges conversion
72 Monte Carlo replied to 72 Monte Carlo's topic in Electrical Tech
Update - I removed the new circuit board from the left half of the dash and gently laid it over to the passenger side and then removed the two bottom screws that hold the tach gauge into the gauge housing. There was a cardboard tube that's painted white on the inside that is supposed to isolate the oil light from getting any ambient light from the tach gauge lights. That tube was not in the correct position, so I relocated it to it's proper position and re-installed everything, and now the gauges are lit up without the oil light getting any ambient light from the other bulbs in the cluster. I re-installed the dash by myself again, and checked all the lights again, and it's good to go, and now on to the next small mechanical task to get done, and then it's finish a little bit of body work and spray some etching primer on the bare metal body. -
72 Monte Carlo instrument cluster gauges conversion
72 Monte Carlo replied to 72 Monte Carlo's topic in Electrical Tech
I would leave it alone, but it seems as though there should have been some kind of separation wall or tube internally behind the tach gauge to keep the tach gauge bulbs from illuminating the oil light when the instrument cluster lights are on. -
72 Monte Carlo instrument cluster gauges conversion
72 Monte Carlo replied to 72 Monte Carlo's topic in Electrical Tech
Well since all of know just how much of a PITA it is to get the instrument cluster out of our Monte's, I'm thinking of taking a model car paint brush with some flat black paint to just cover the backside of the oil light lense, as I fear that electrical tape might fall off some time down the road. -
72 Monte Carlo instrument cluster gauges conversion
72 Monte Carlo replied to 72 Monte Carlo's topic in Electrical Tech
This is how it illuminates with just the marker lights on. What's the best way to make an oil light delete plate?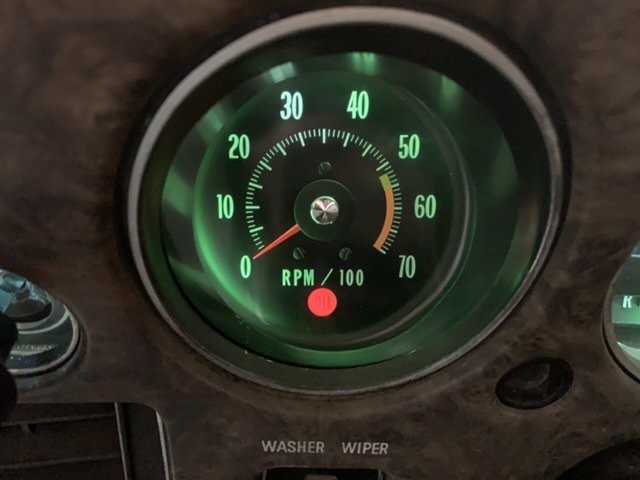
-
72 Monte Carlo instrument cluster gauges conversion
72 Monte Carlo replied to 72 Monte Carlo's topic in Electrical Tech
Okay, more troubleshooting and mystery bulb solved. After looking at the bulb in question, finding out there is continuity on both sides of the bulb socket to both the #6 & #7 dash plug pins, that Instrument cluster bulb sits behind for the oil light to light up in case the engine gets low on oil. I have an aftermarket oil gauge in the car, so I don’t need that bulb to light up at all. I ran a continuity test between the old oil sensor wire in the engine bay to the back of the instrument cluster bulb, and yep it flows all the way through just fine. With the lights on the market light position, that oil light window is just barely lit up because of the other bulbs being on in the gauge cluster. What’s the best way to eliminate that oil pressure light from getting any residual light from the other gauge cluster bulbs so it doesn’t illuminate? Thanks for all your help! -
72 Monte Carlo instrument cluster gauges conversion
72 Monte Carlo replied to 72 Monte Carlo's topic in Electrical Tech
-
72 Monte Carlo instrument cluster gauges conversion
72 Monte Carlo replied to 72 Monte Carlo's topic in Electrical Tech
The bulb is in the holder correctly. I can put the bulb and holder in another spot, and it will light up fine. -
72 Monte Carlo instrument cluster gauges conversion
72 Monte Carlo posted a topic in Electrical Tech
I installed Sonnie24's tach/gauges conversion kit, and it has the lower right bulb for the tach that will not light up. The new circuit board has it coming from the #7 pink wire location at the dash plug and goes to the left side stud behind the speedo, than it goes down to the tach lower right side bulb location. It branches off that stud and goes to the lower right bulb of the speedo and then heads over to the right side stud of the horizontal block behind the fuel gauge, and then it heads up underneath the vertical block that gets installed behind the temp gauge. According to my manual that pink wire actually used to be for the seat belt buzzer and the seat belt warning light. I don't see a seat belt warning light on the instrument cluster bezel though. The bulbs are all new LED bulbs and all the other bulbs light up just fine. I tried swapping the bulb holder and bulb with another one, and it does the same exact thing. I would think that when you pull the headlight switch to the marker light position, that the pink wire circuit path should have power to lite up the positive side of the bulb behind the lower right side of the tach. Here is a simple picture I drew up. The Red circuit path is coming from #7 pink wire (not lit up when lights pulled to marker light location) location of the dash plug and the first bulb is the one that's not working. The Blue circuit path comes from #6 and heads to that problematic first bulb that's not working. My test light shows no power coming from #7 but it has power coming from #2 Gray and a couple more have power. The bulbs are circled in Orange. Here's how I have the dash plug re-wired per Sonnie's instructions; 1. Double Light Blue - not moved from original spot 2. Grey - not moved from original spot 3. Black/White 4. Black 5. Light Green 6. Blue 7. Pink 8. Tan - not moved from original spot 9. Brown 10. Dark Green 11. Tan 12. Double Dark Blue - not moved from original spot Anyone have any ideas?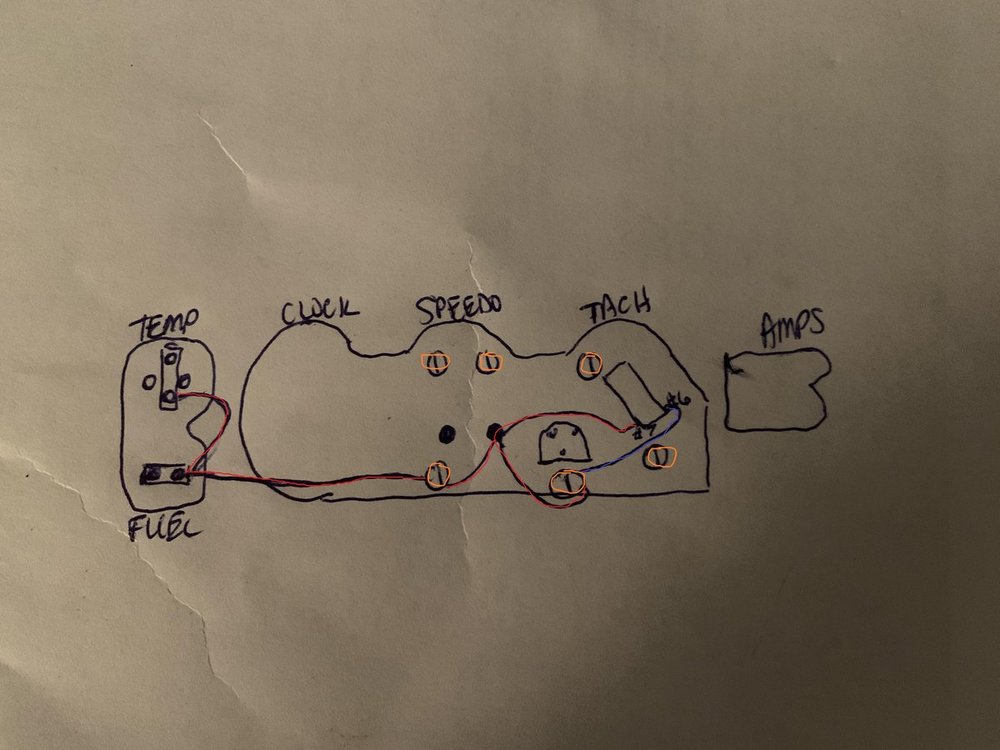
-
72 Monte under-hood wire identification help
72 Monte Carlo replied to 72 Monte Carlo's topic in Electrical Tech
This is a factory A/C car. ***I found out it's the "Green" wire that goes to the temp gauge, so I will get it wired up to the temp sensor -
72 Monte under-hood wire identification help
72 Monte Carlo replied to 72 Monte Carlo's topic in Electrical Tech
Nobody?......crickets..... -
72 Monte under-hood wire identification help
72 Monte Carlo replied to 72 Monte Carlo's topic in Electrical Tech
Since the idiot light temperature sensor has two wires from the factory - Green, and Green/White, how do you wire it for a gauge style single spade temp sensor that only needs one wire going to it? Where's the best spot to wire up an electric choke? Thanks!
-
Trying to get tach working on 72 Monte Carlo
72 Monte Carlo replied to Ooltewahman's topic in Electrical Tech
Dan, Thank you very much! -
Trying to get tach working on 72 Monte Carlo
72 Monte Carlo replied to Ooltewahman's topic in Electrical Tech
Dennis, Thank you for the instructions. Your instructions say for 70-71 but is the 72 Monte Carlo wiring the same or different than the previous two years? I'm working on my 72 and want to be sure that the wiring will be wired up correctly. Thanks, Doug -
Trying to get tach working on 72 Monte Carlo
72 Monte Carlo replied to Ooltewahman's topic in Electrical Tech
Dennis, Could you please email me the wiring instructions for Sonnie's kit? My email is silveradok5blazer@gmail.com I've called him at his phone number 3 times already and left voicemails, and emailed him twice, and he doesn't seem to want to respond to anything. I seemed to have misplaced his instructions and I'm trying to finish wiring up a few of the wiring after moving them around in the firewall plug. Thanks, Doug -
72 Monte under-hood wire identification help
72 Monte Carlo replied to 72 Monte Carlo's topic in Electrical Tech
Thank you willie! -
72 Monte under-hood wire identification help
72 Monte Carlo replied to 72 Monte Carlo's topic in Electrical Tech
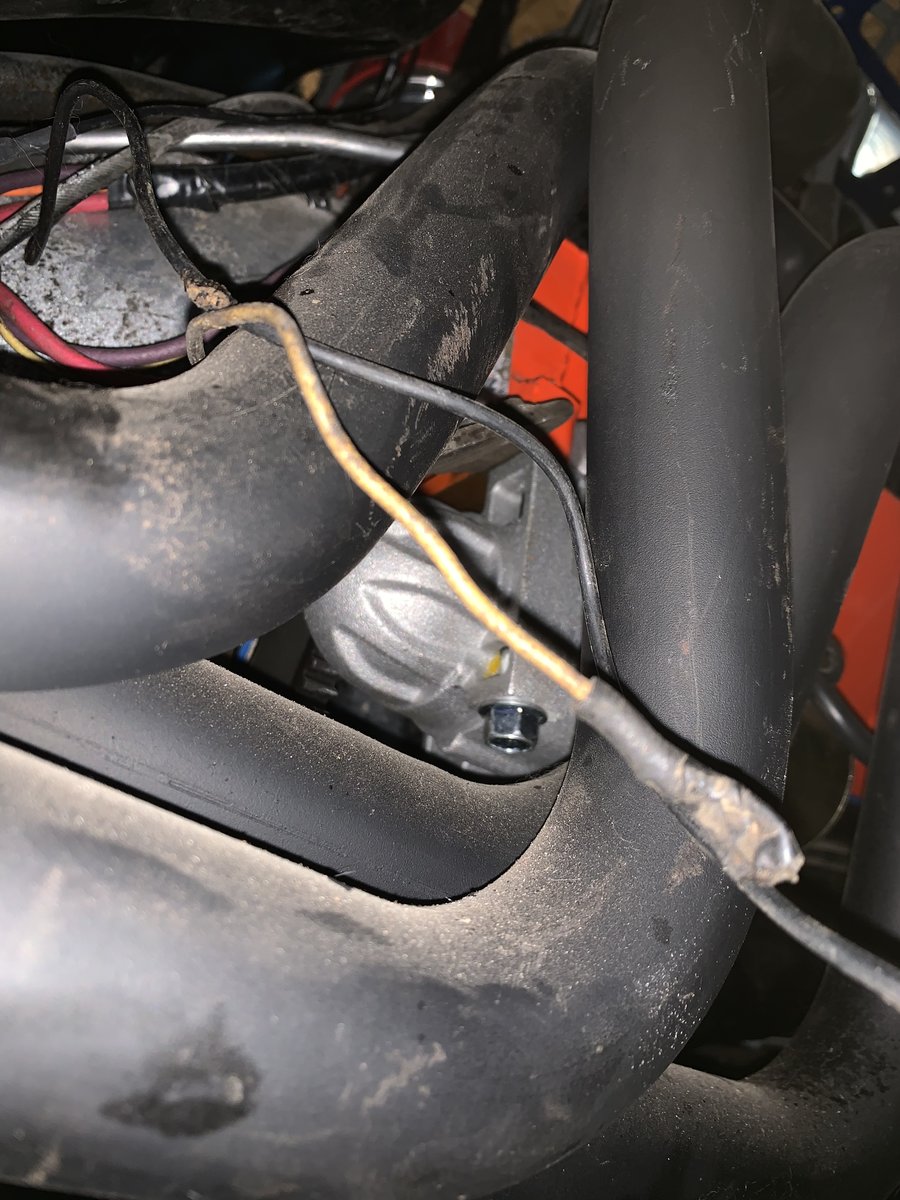
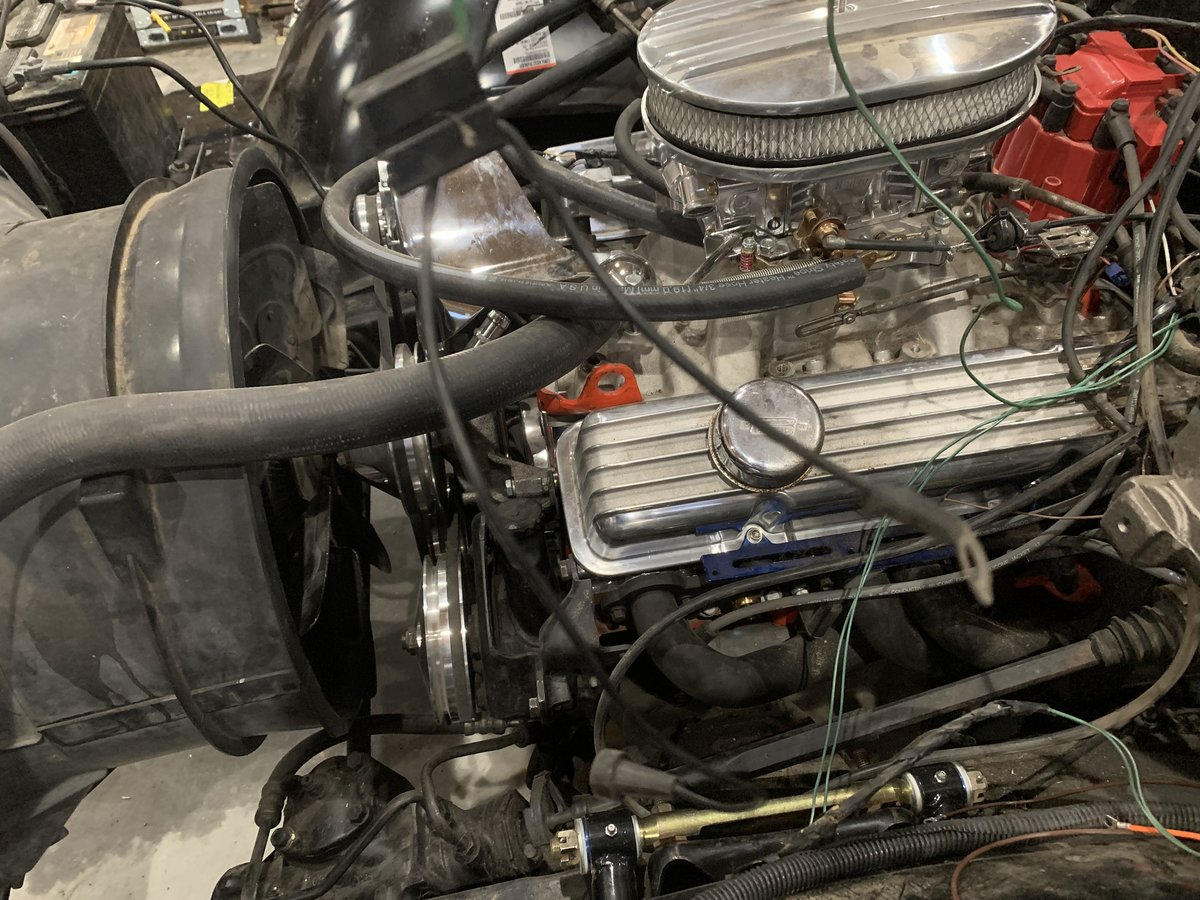
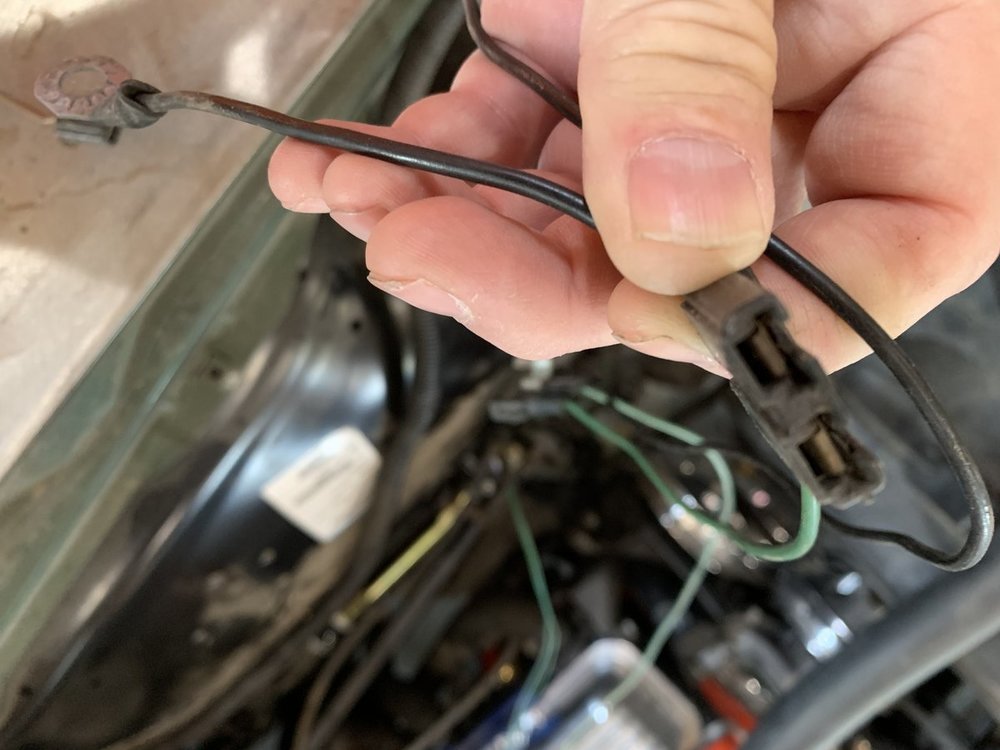
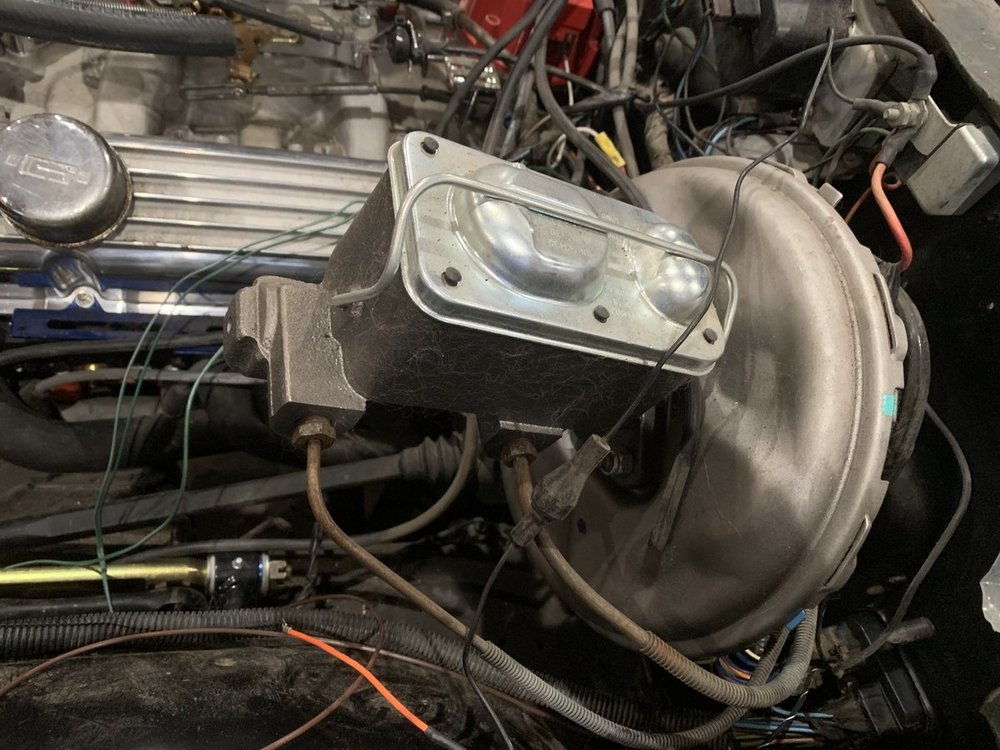
Down at my mini high torque starter, I have the purple exciter wire going to the solenoid. There’s a red wire going to the solenoid also. Hanging down is a yellow looking wire and a black wire. Are these two wires something that the previous owner added or were they there from the factory?
-
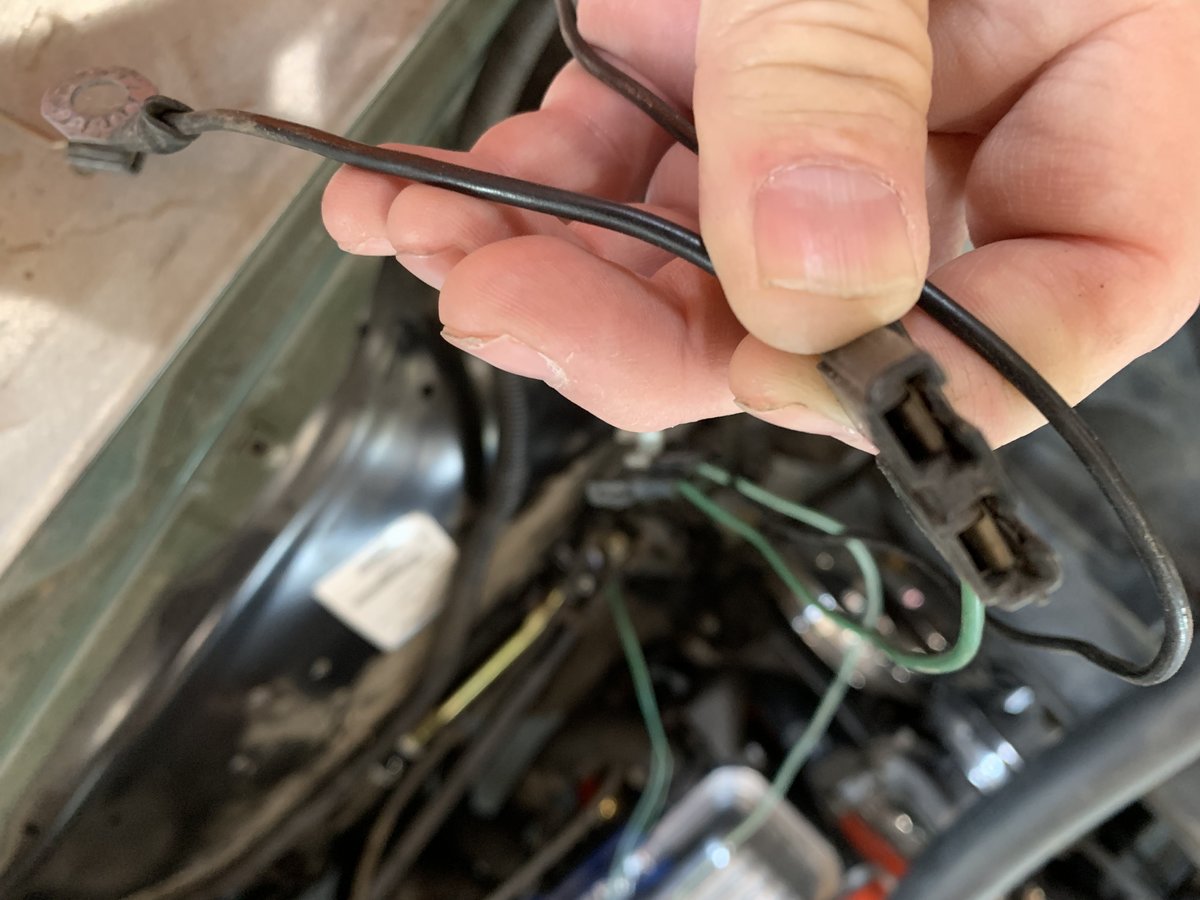
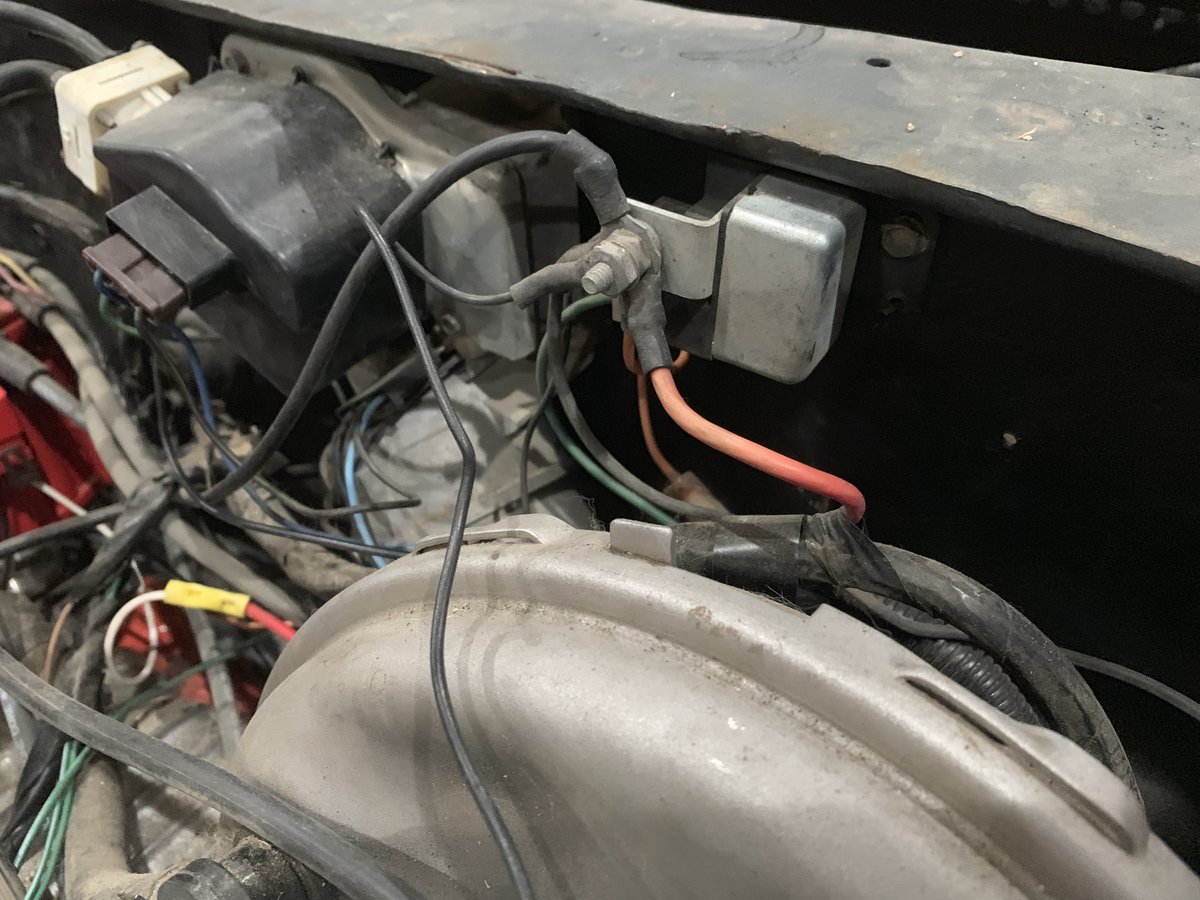
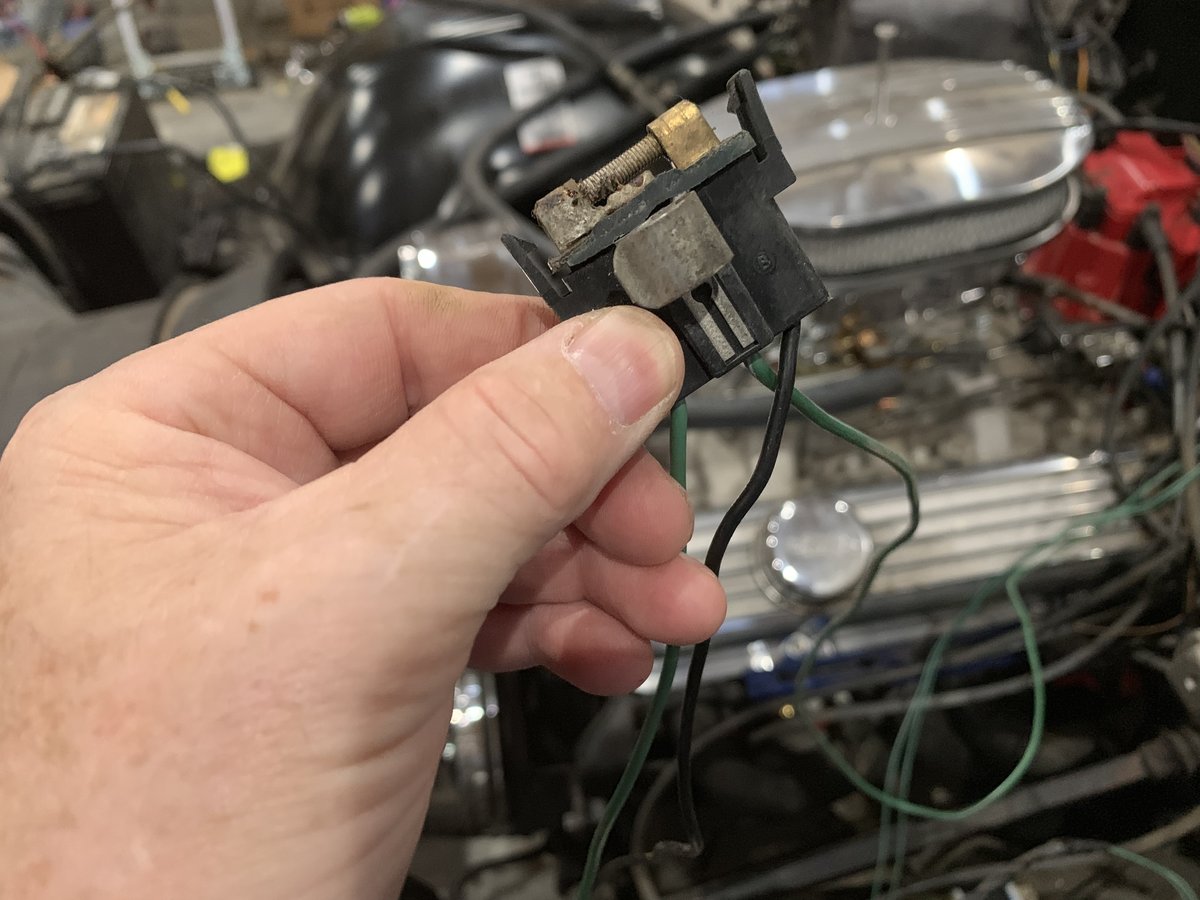
72 Monte under-hood wire identification help
72 Monte Carlo replied to 72 Monte Carlo's topic in Electrical Tech
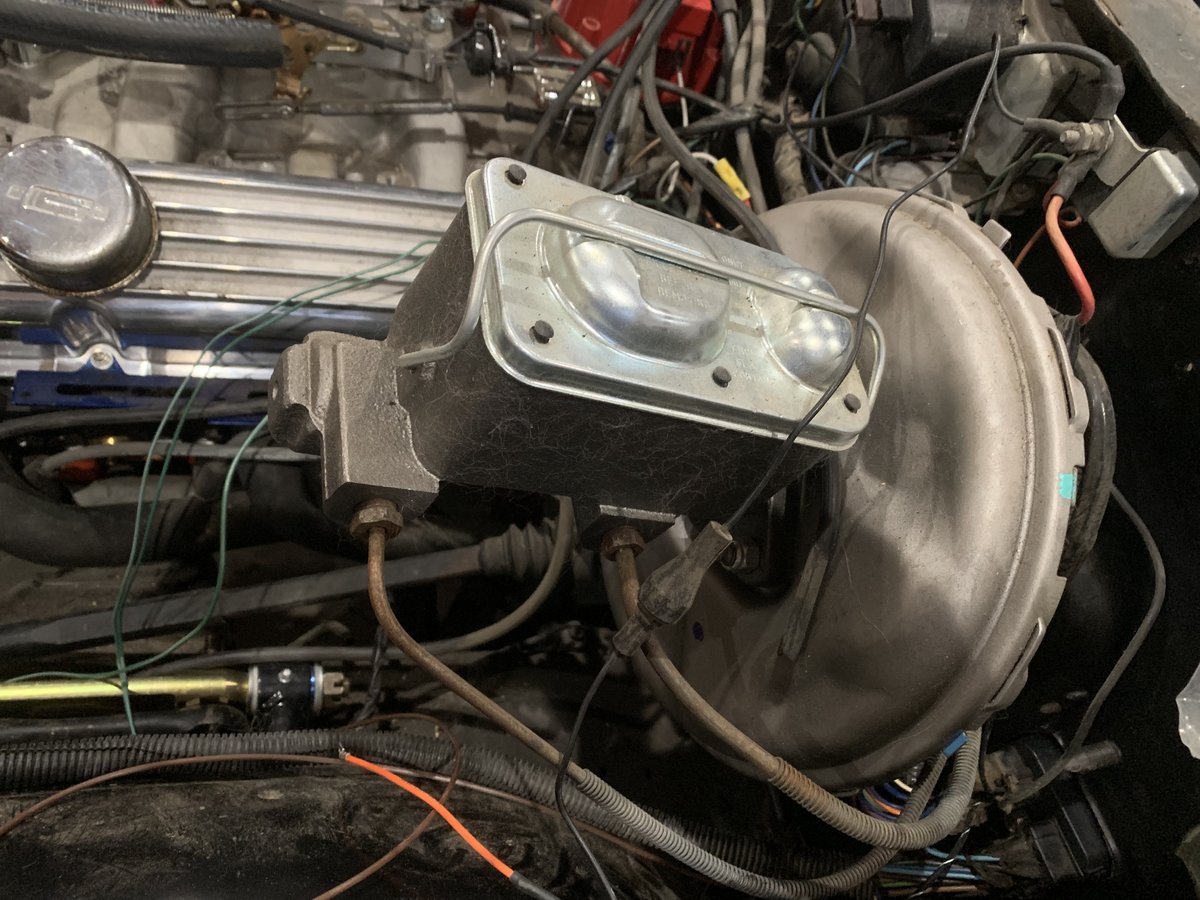
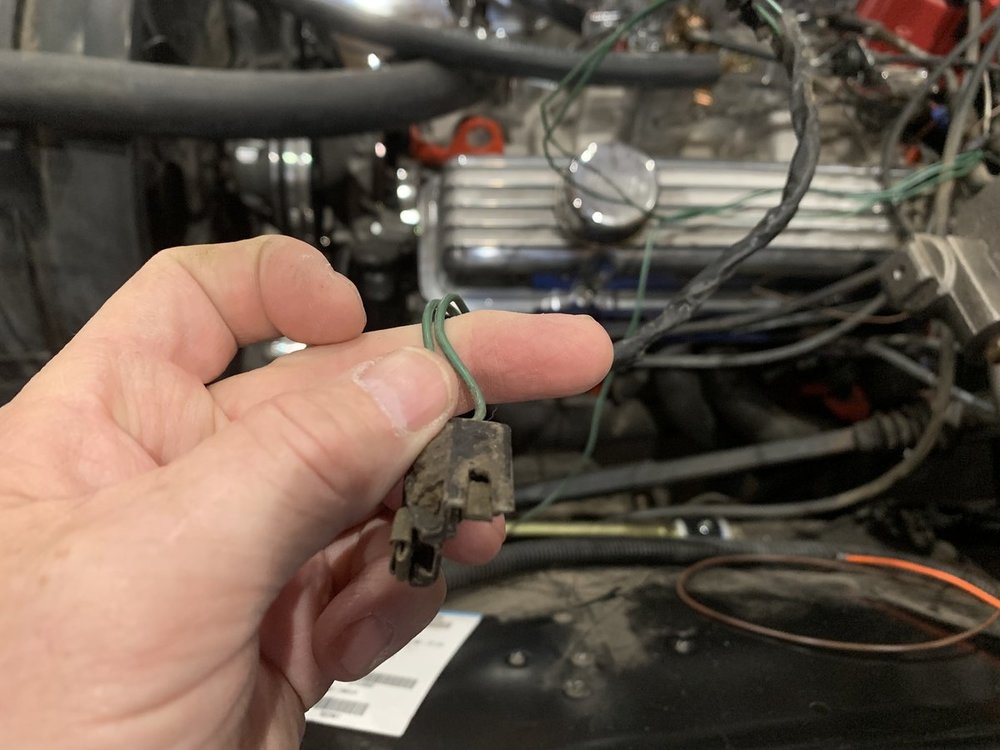
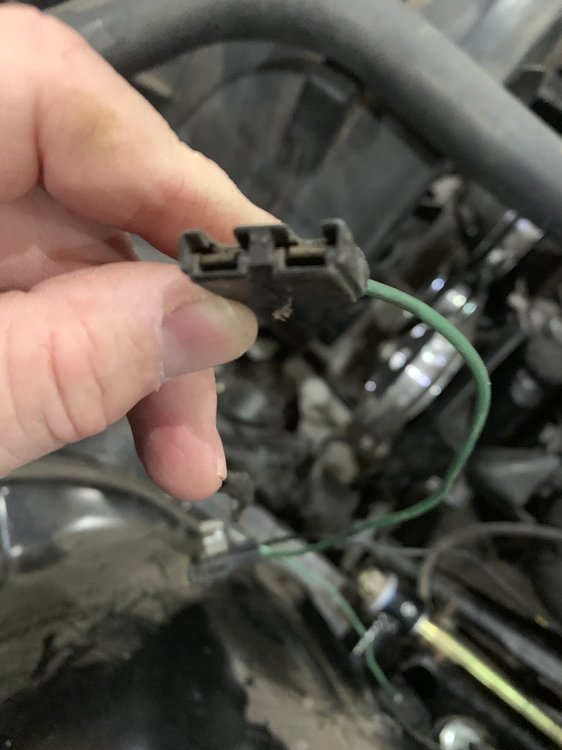
Here are some pics of the terminals. 1st pic - the brown wire. Is that for the idle control solenoid on the Quadrajet carb? 2nd pic - Is the connector for the A/C compressor? It has a ground eye on the end. 3rd pic - black wire with a round female pin connector. Is that one for the brake proportioning valve? I have a brown wire with a round style female pin connector on the proportioning valve right now, so where does that one go? 4th pic - Looks like a dark green or blue wire that I think went to the temp sensor on the head?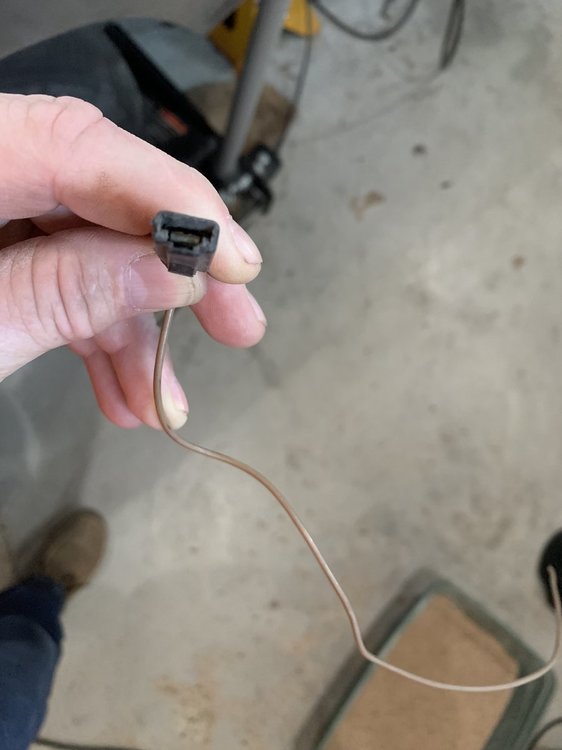
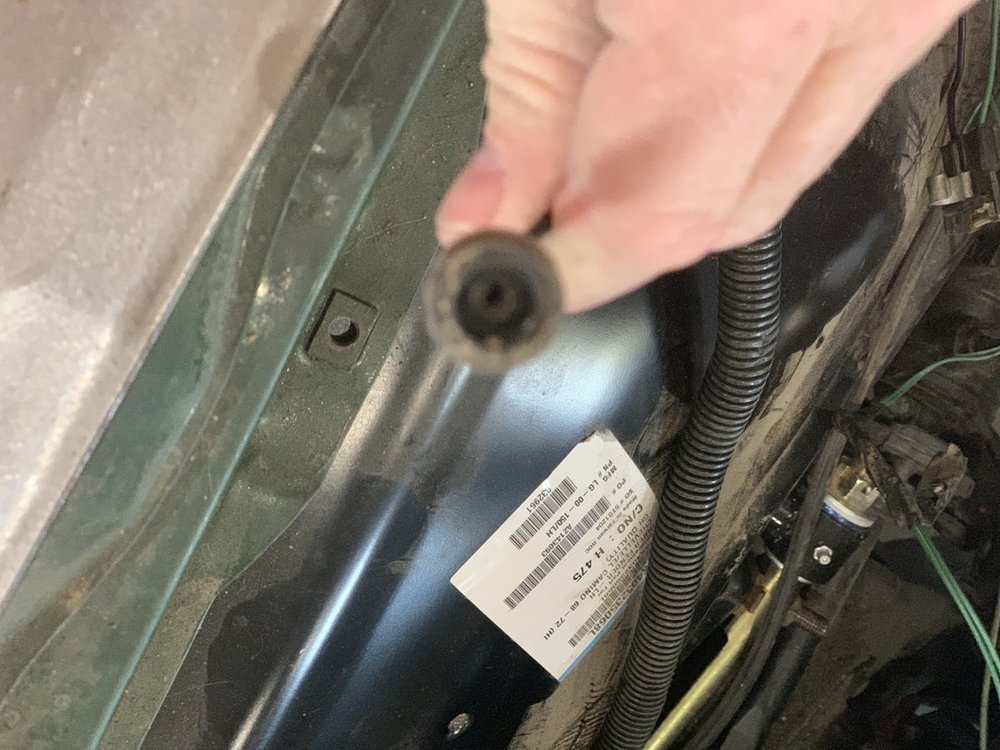
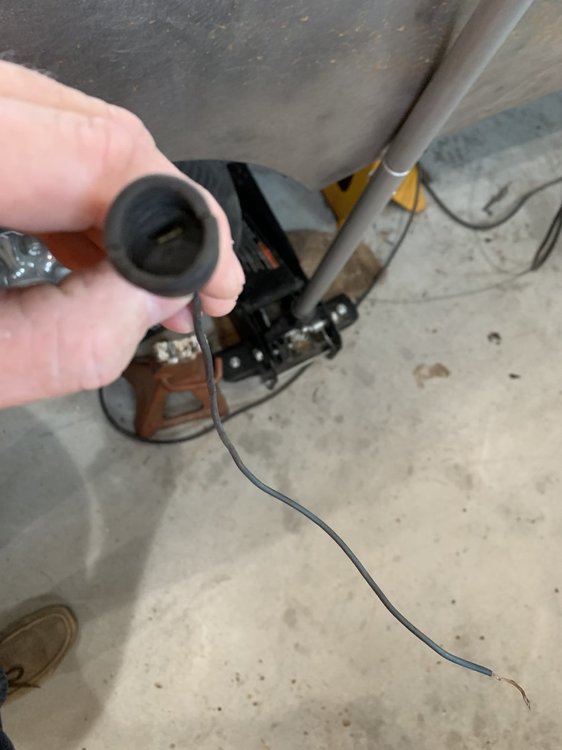
-
When I got my 72 MC 2 yrs ago, it was missing the engine and radiator. I’m trying to finish some under-hood wiring before finishing up what little body work is left to do before giving the car body an etching primer coat base on the bare metal. Here the wires I need to know where they go;


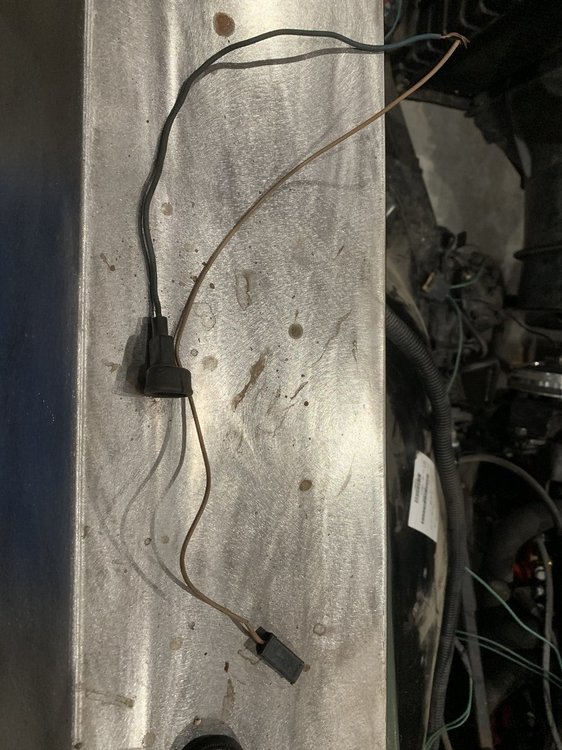
-
Installing tach in instrument cluster
72 Monte Carlo replied to 72 Monte Carlo's topic in Interior Tech
I already bought the tach separately last year, so I bought sonnie’s kit without the tach. I don’t need two tach’s. I will be doing the normal idiot light to gauges conversion when the parts show up. -
Installing tach in instrument cluster
72 Monte Carlo replied to 72 Monte Carlo's topic in Interior Tech
I can't find a lens without the clock hole, so I just bought the conversion kit from sonnie24 without the tach, and then ordered a new lens from him as well. -
Installing tach in instrument cluster
72 Monte Carlo replied to 72 Monte Carlo's topic in Interior Tech
I already have the brand new tach itself, and I was going to replace the clock with the tach, but then it would leave the clock knob hole in the lense. -
Installing tach in instrument cluster
72 Monte Carlo replied to 72 Monte Carlo's topic in Interior Tech
Thanks for the info guys! I just had to remove the one bolt above the steering column and then carefully lift up just a little bit, and then the dash slid rearward to get the cluster out. Luckily I already have the White 194 LED bulbs to put back into the dash. So is the consensus here to just do the gauge conversion even for the price tag that it's at?