

Slaman
-
Posts
164 -
Joined
-
Last visited
Content Type
Profiles
Articles
Forums
Gallery
Events
Everything posted by Slaman
-
What did you do to your Monte Carlo today?
Slaman replied to Canuck's topic in General 70-72 Monte Carlo Forum
Not sure why my pics didn't show up, let's try this.
-
What did you do to your Monte Carlo today?
Slaman replied to Canuck's topic in General 70-72 Monte Carlo Forum
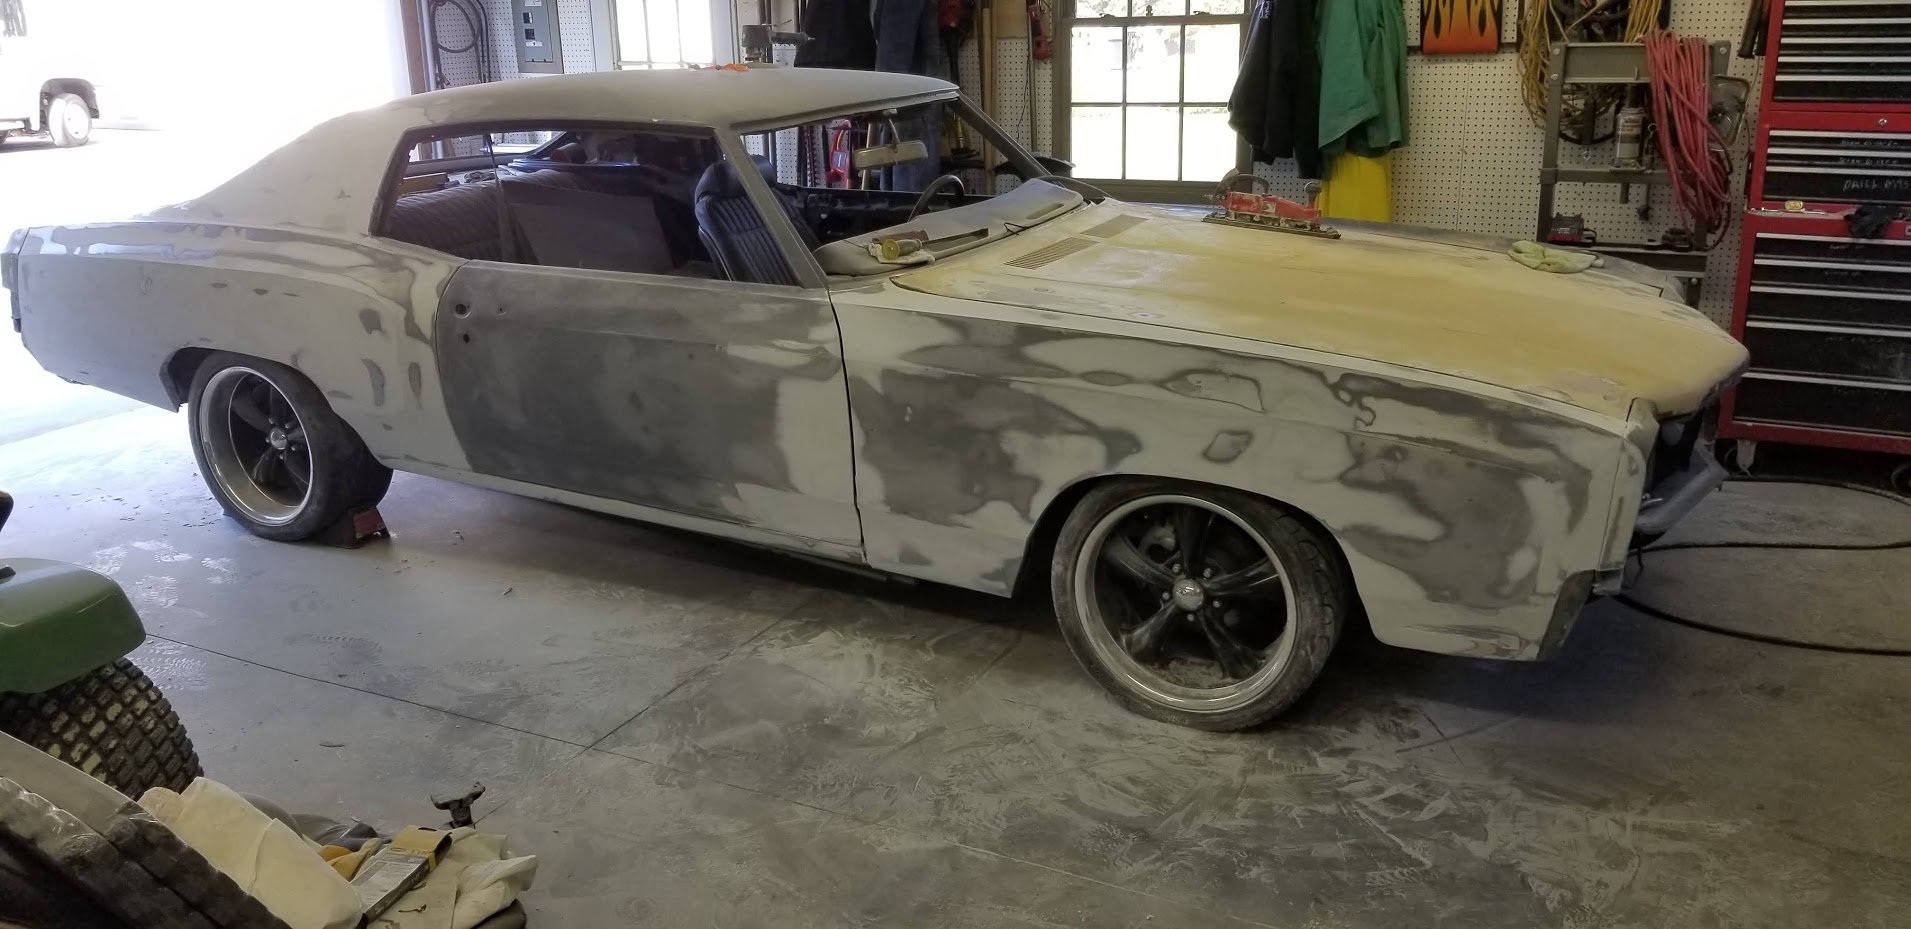
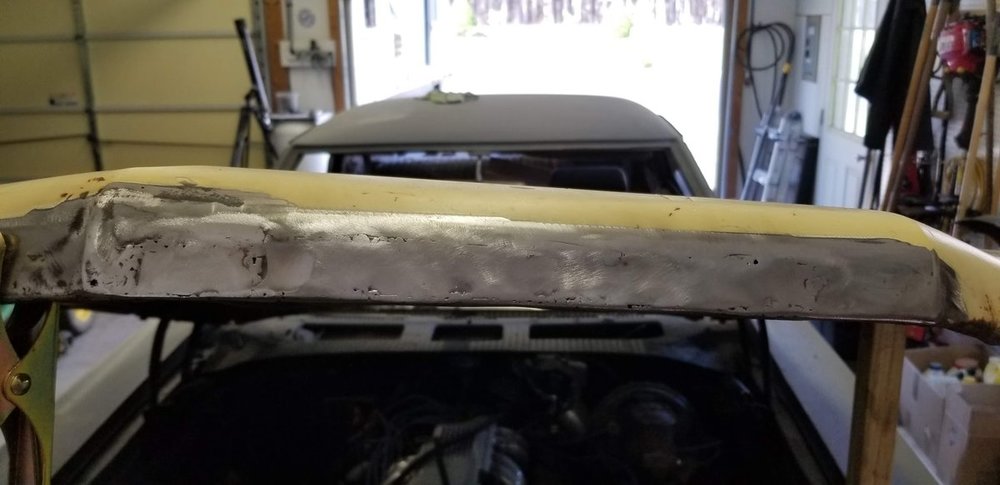
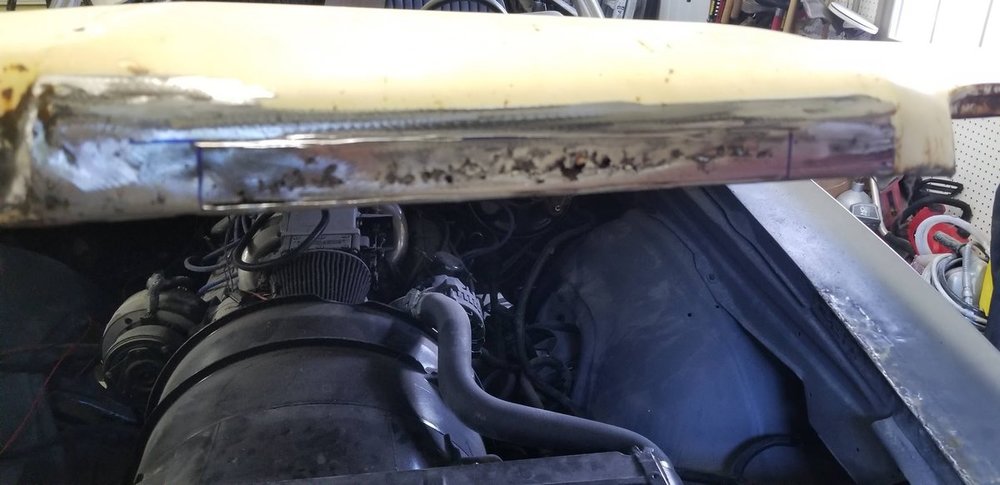
Over the last few days I got the fender and door ready for some polyester primer and replaced some rotted metal on the front of the hood and began sanding it down. -
Thanks everyone. Sounds like I'd be better off piecing it together from the different distributors.
-
I see where people are discussing the Legendary and PUI seat covers but did not see any topics on interior kits. Does anyone have some input on the best bang for the buck? I'm talking bucket seat and rear foam, seat covers, headliner, door panels, dash pad, carpet,sun visors etc... I have looked at OPGI and like thier most complete kit but know they've had issues with back orders in the past. Any recommendations would be great. I've let my project set idle way too long and need to get back to it. I'm also looking to replace all of the weather stripping. Thanks, Steve
-
I put a 200-4R in my Monte out of an 85 Monte SS. Can't say much about it yet as it has only been to the end of my court and back so far. But I have 3.73's and the lock up with TPI so I'm hoping to get around 20 mpg with it.
-
No but I currently have 2" drop springs all the way around on mine. I'm considering adding the drop spindles to get the look I want. I will use the type set-up for stock disc brakes with the ability to upgrade latter. The picture of mine in the primer in my sig is how it looks with 2" drop.
-
No. They are not. Simular but they do not work. Be there tried it. Didn't work.
-
I took a piece of sheet metal and made my own, using what was left of the orginal as a template. It's not exact but my car is more of a restomod anyway. Steve
-
Looking good Scott.
-
Lots of progress already. Another one saved. And if I missed it earlier. Welcome.
-
It's actually sail panel is too long and needs to taper into the top of the quarter quicker. Its a 20* angle instead of 25* like the other side. Thanks on the praise though. I'm really an amature at body work and pretty much have been self taught through trial and error and reading forumns and watching videos on the computer.
-
Thanks Scott, but after looking at it a little last night I think Imay have been a little premature in tacking it in. I put the angle finder on it an found I am about 5* off on the angle from the cut on the window channel down to where it meets the top of the quarter. I hope to massage it some to fix it without having to cut it back off but I may end up doing just that, or I met a guy a couple weeks ago at a local cruise in with a nice 70 that said he had a parts car and that I would be welcome to anything he did not want. He did say it was a rusty though so don't know the condition of the quarter but it would be nice if I could get the quater up to the factory seam on the sail and tail panel to really do this right... But I really want to start seeing some serious progress, it seems to have stalled and is becoming a very slow build... For rims I am thinking about going with some Boss 338's, 18x8 on the front and 18x9.5 on the rear with the machine lip and black centers. Here is a link to some I'm looking at: Link to wheels
-
Pretty sad I have not gotten back to it sooner but I finally got a chance to work on my Monte a couple time during my time off this week. I got the sail panel patch trimmed, and tacked into place, as well as some repairs to the under-structure from the orginal quarter replacement all those years ago. Sorry, I did not take pics of the structure repairs but I have a couple of the sail patch tacked into place: As you can see in these pic's I have also rough trimmed the filler panel patch I fab'd up and have it clamped into place.: And one more, I got basically stole an almost new pair of Toyo Proxies 275-35-18's off of CL that I mocked up to see how it would look. Yes, I'm going for the pro-touring look. Thinking about doing a s-10 rear brake swap in the future too. I think a 275-40-18 may fill the wheel well better and may even have room for 295's depending on the backspacing. I'll be getting the rims in early December hopefully. But as for this pair of tires I couldn't pass up the price... $50 for the pair... :)If nothing else they will just be the "Sacrafical Set" Steve
-
Thanks everyone. I hope to get them instaled before soon, but it's not looking like I will get anytime off for the next couple weeks that will not already be accounted for somehow. My baby has her sweet 16 and her cousin is getting married the next day so lots of stuff to do on the couple days I will have off. Not a whole lot of time after work either when you work 12 hour rotating shifts...
-
That I did not know. Thanks for that info.
-
I did not get the inner structure fixed yet at the sail panel/trunk filler area but I did make a patch for the sail panel. Here are a few pictures. Sorry my camera's batteries were dying so I did not get as many pics as I would have liked, plus I forgot to stop a few times to take them... Here is were I used painters tape to start a pattern for it. Then I marked my body lines and bends: Then I laid out the pattern on my sheet metal. Note I had to cut the pattern at a copy of the body lines since it would not lay flat due to the form of the sail area. Here is the sheet metal with the cut and bend lines marked. Note the one side has already been cut and a pair of bends made to set it down into the trunk opening. Here it is with a couple of the first bends made and the trunk filler fitted to it. Mostly done with the trunk filler panel clamped to it for fitting comparrison Clamped in place And a couple more of the almost finished product. Just have to finished welding in the windshield channel, dress it up and then doing the trimming and install. Granted it's not a professional job, but it is better than what I started with I think. I have done a lot of research on making panels and I think it is beginning to pay off. I tried to shrink the bend for the windshield channel using the "Tuck" method but got nowhere that way... All of this was done using simple hand tools, a 4" vise and an 18" metal brake from H.F.
-
Thanks. Going to work on making the sail panel side and fix the under structure today. I hope to at least get some of it done before going back to work tomorrow. I will try to take more pics of the forming process this time.
-
Back when I first went into college after high school I took an auto body course so I could replace the quarter panel on my Monte. Being young and new to the process I listened to my instructor and followed his advice... Which was not that great. He claimed that the hole for the taillight extention was the same on all the Monte's, so just put a bolt through it and not worry about measuring anything at the back just worry about the front... Wrong! I never could get the deck lid centered up, it would actually over lap the quarter panel some. So during this rebuild I have been doing I am tring to make it right... I just wish he would have told me to seperate the sail panel at the factory seam as I had a whole one... Here is a few pics of my progress: Where I had cut the sail panel... A few cuts I have had to make to push the rear of the quarter panel section out about 3/4 of an inch... and: And since we brazed some of the lower window corner I have to redo it now since mig welding won't stick to brass. I made a patch for the filler panel section and will make another one for the sail panel side. Plus fix the rot that taking these peices out revealed. Home made patch: Granted I still have to trim it to fit and weld it in, but I am going to make the other piece first plus some more massaging of the window and trunk openings.
-
The Monte Frame is specific to Monte's. 400 Hp should not hurt that frame in the least unless it already has been weakened by rust etc, IMO
-
Huh? I thought ai had posted to this thread before... Here's a pic of me my youngest daughter and my wife Shanna at the 2011 Daytona 500.
-
If I recall correctly even my 400 sbc that came in my Monte came with a 500 cfm 2 barrel. So yes the 750 is too big unless you have done some major mods to the engine.
-
The front I lifted with the engine hoist with a chain strung in between the upper fender mounts on the firewall. The rear was trickier, I jaked it up with bottle jacks under the rockers, IIRC, until I could get the 4X4 in between the frame and body. then would alternate how high I could get it with the jack, adjust the jackstand, then block up the jack some more... As I said, it scared me a couple times... I also ended up taking the front wheels off and putting the front cross member on a floor jack to get it out from under the rear of the car. Putting it back on I put the engine hoist in through the door opening and used 2 chains in a x pattern between seat belt bolt holes and lifted it that way. Steve
-
What did you do to your Monte today?
Slaman replied to Xxyyzz's topic in General 70-72 Monte Carlo Forum
Replaced a couple leaking o rings on some fuel injectors and put the tpi system back together. Then got it fired up and let it run for a few minutes. It's nice to have it back in the land of the living. -
What did you do to your Monte today?
Slaman replied to Xxyyzz's topic in General 70-72 Monte Carlo Forum
Replaced the ignition switch last night. -
looks good. I have about finished up my mods as well. Just got to see if I can make them sit flush like I want. good job!


