zmanabba
-
Posts
142 -
Joined
-
Last visited
-
Days Won
1
-
It's been awhile but IIRC I used the pulley set from a mid 70's chevy truck. Sourced from Ebay and I don't have a clue on the vendor name but there are plenty out there. The alternator is the same you just need the big block mounting brackets also from the truck
-
Glad that I could help! I'm trying to finish some rust repair in the trunk and passenger fender as well as finish an A/C install on mine. I'm dying to drive it again so it helps me to hear about ones like yours that are on the road
-
Glad to hear that you are buying from Cliff! He's a great guy to deal with. In his book he recommended removing the plugs, tapping threads for different plugs and sealing the threads with JB Weld. I've just applied over the leaking plugs in the past with the JB with no problem. Of course this last carburetor that I did, I did neither. If I start it within 12 hours, I'm fine, otherwise it's dry. So I'll be going back in to seal the plugs that "looked okay " lol
-
I can't help you with the specs on what your 71 is supposed to be but a shorter pump will give you a longer stroke on the accelerator pump and deliver a longer shot of fuel. I couldn't tell you if there would be a significant performance advantage with the rest of the carburetor being stock. Why do you need to change out the pump? Edit: I just saw your other thread. If you're rebuilding the carburetor you will just reuse the rod that it with it and change out the rubber portion of the pump as part of the rebuild. Make sure that you get a pump that is compatible with the Ethanol that is in gas now. IIRC it is green in color. I bought all of my parts from Cliff Ruggles. He has a business rebuilding Rochester carburetors but I don't know how to post a link. Do a search and you will find him. He's very well regarded in the Pontiac community. He's also written an excellent book and rebuilding these carburetors.
-
Digiacomo, Sorry no relation. I actually wasn't supposed to be a Ziemer but my Dad took his step dad's last name years ago. His step dad was named Robert Ziemer and was a wonderful man. Ziemer isn't a common name though so I imagine that they might have been related
-
IIRC it was located towards the front of the car just ahead of the fuel tank. I think that it can be seen without pulling the tank but I'm not sure since it was years ago and I was in the middle of pulling the tank when I found it lol. It will be a single wire fastened to the sheet metal with a small body bolt. If that end is good (not broken, corroded or dirty ) then you will need to pull the tank to check the other end which is soldered to the body of the sending unit.
-
I had the same problem years ago. Doing a visual on the ground wire showed it to be attached to the body. Actually un bolting it showed that there was only one strand of wire holding it to the connector! Thankfully this was the first thing that I did in the process of pulling out the tank. I thought that I had a bad sending unit
-
Chris, Thank you! I will check in to those part numbers. I will need it for when I get to the hood also
-
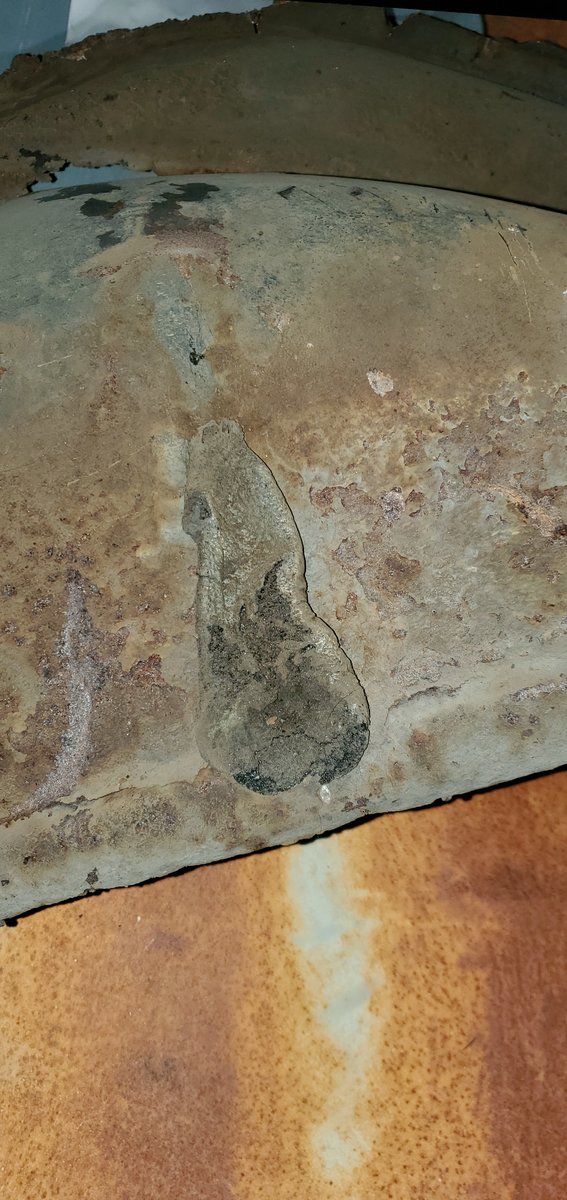
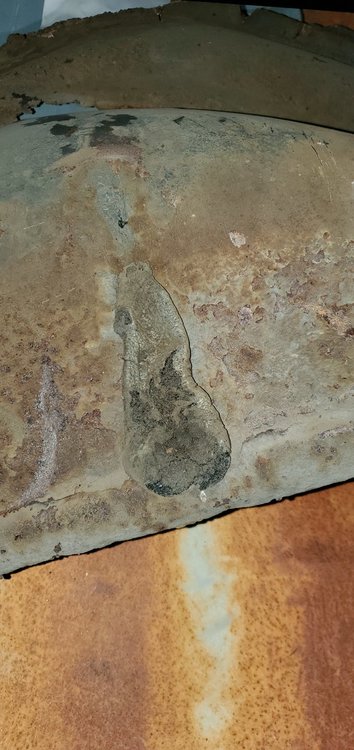
Thank you for replying! I'm not doing a concourse restoration by any means but I know that GM wouldn't spend the extra money and effort to put it there if it wasn't needed. I'm thinking that it's to keep the 1/4 panel from vibrating against the wheel well going down the road. I just needed something that would last another 50 years
-
Replacing the inner rear wheel wells on my 70. This is a picture of an insulating material on the outer wheel well that will contact the quarter panel. I've done Google searches and I can't come up with anything. I might not be using the correct search terms when I did the other side years ago I did it with used parts and I just re used the old one. Not possible this time. I'm going to try the paint store on Monday. Provided that they are open. What have you guys used?
-
I had a small block 400 in my 1970 that I enjoyed for almost 200k miles. It finally gave up the ghost and I swapped over to a 454 and never looked back. The 400 had excellent torque and was a lot of fun but the torque from the 454 was light years ahead. If you do decide to swap your best bet is to get one from a truck. The brackets will be the same and if it's a 2wd you can use the 400 transmission also. You will need a different input shaft for the driveshaft because the truck uses a bolt in shaft. Denny's driveshafts makes them. You will also need to shorten the driveshaft. The holes are in the frame for when you slide the same transmission cross member back for the longer 400 transmission. The frame mounts are the same. You will need a larger radiator. Having said all of that the 383 has been built for years and there are many recipes out there for the power level that you want.
-
The important part is retain the same angle. Unfortunately I haven't done the swap yet on mine but I have done a few other cars. From what I have found out there is ample tunnel clearance so moving things around to get the proper angle won't be a problem
-
Sorry that no one has replied. I will be doing the same swap in the future but not for another year. From what I have gathered so far the stock crossmember can be used by cutting of he mounting tab from the front and switching to the rear. You will probably need to slide the crossmember back also. If it doesn't match up with existing holes in the frame then new ones will need to be drilled. The mounting tab will need to be welded back on. Make sure to keep the 4l80e on the same height as the old set up to maintain the proper drive shaft geometry. Easiest way to do this is to use an angle finder at the back of the transmission. You should be able to download an app for your phone. As a last note make sure that your engine and transmission mounts are in good shape while making measurements, both old and new transmissions. This can throw of the angles and drive shaft vibrations aren't fun.
-
Bad brake booster & poor idling..........are they related?
zmanabba replied to NWmonte71's topic in Engine Tech
There are a couple of things that could be going on here. You could have had a piece of crud between your needle and seat in the carb that got flushed out eventually ( although I wouldn't discount the water theory that you had too. A can or two of heet wouldn't be a bad idea ). The other is that your fuel pump could be on it's way out and the extra fuel that you added is pushing the fuel out the tank easier and helping you with low fuel pressure. I would lean towards the crud. A way to verify this is to change your fuel filter and see what's inside. If your pump is weak you will experience the same running problem as the level goes down. Don't crutch this by keeping the level in the tank up, the pump is only going to get worse. I lean towards the crud and it would be a good idea to change out the filter in any case. Good luck, keep us posted -
Bad brake booster & poor idling..........are they related?
zmanabba replied to NWmonte71's topic in Engine Tech
Also if the engine isn't running well enough at idle then you won't have enough vacuum to make the booster work correctly. I would start by fixing your running issue first (off the top of my head I would check carburetor ). Usually if the booster diaphragm fails your idle will be higher from the vacuum leak. But you can verify that from the test suggested above