FairlyRandom
-
Posts
63 -
Joined
-
Last visited
-
Days Won
1
Content Type
Profiles
Articles
Forums
Gallery
Events
Everything posted by FairlyRandom
-

What did you do to your Monte Carlo today?
FairlyRandom replied to Canuck's topic in General 70-72 Monte Carlo Forum
Show panel installed to hide my non-functioning AC equipment shame
-
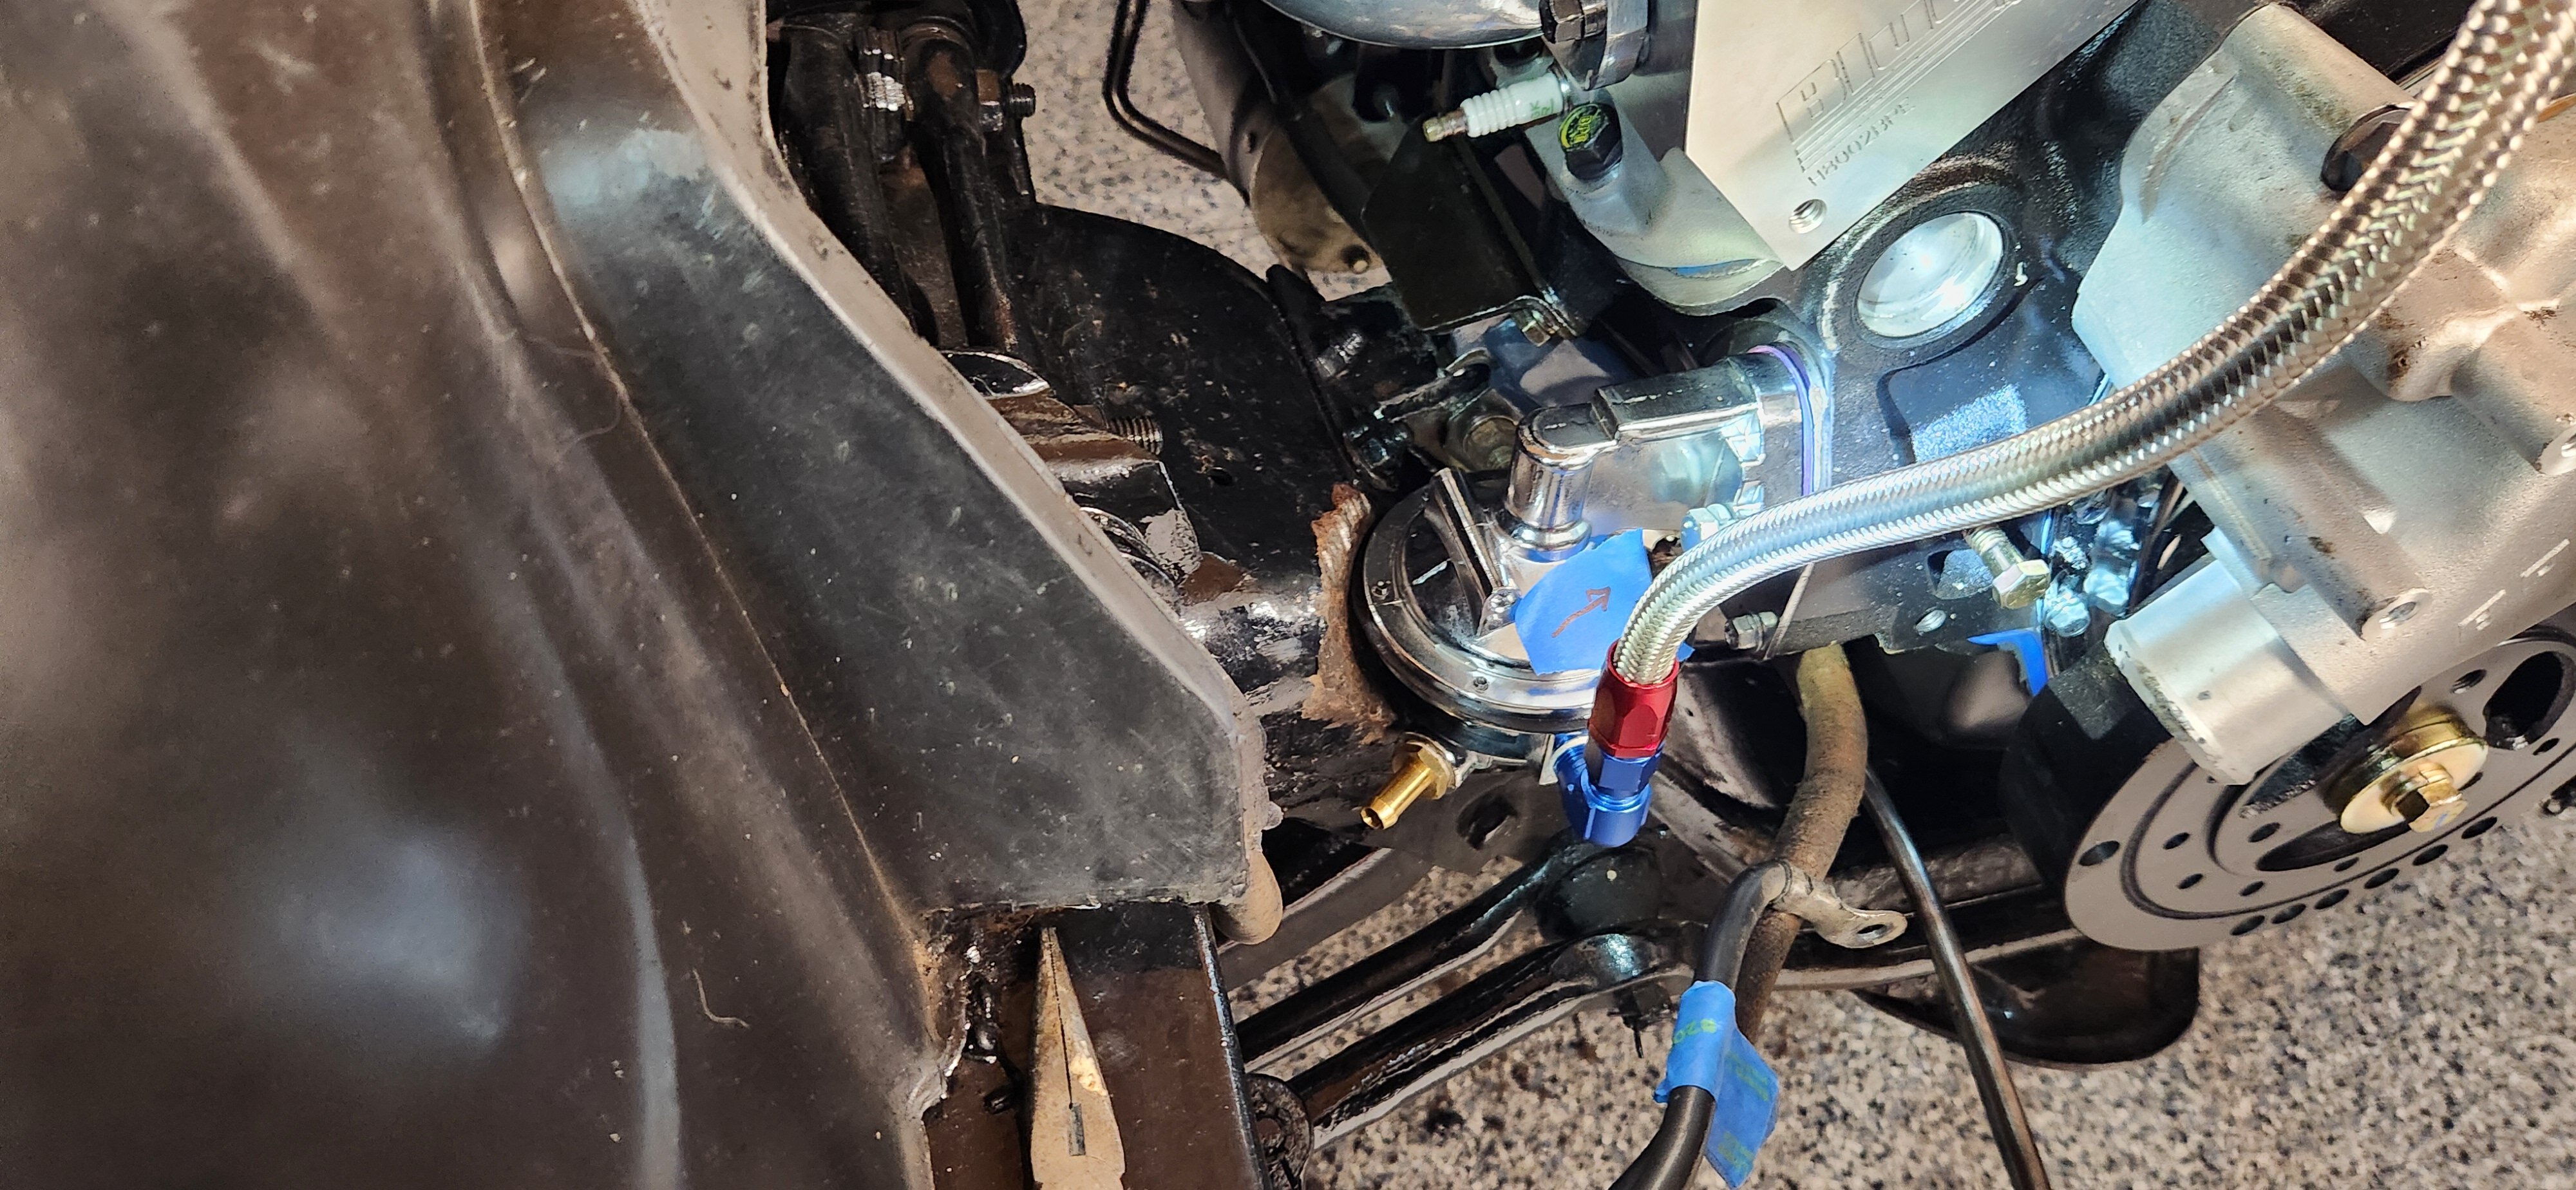
1970 MC ZZ4 fuel pump hits crossmember
FairlyRandom replied to GRAY 70 Monte Carlo's topic in Engine Tech
Lol wish I had found a stock size pump when I was bashing my car and wrecking my eardrums -
1970 MC ZZ4 fuel pump hits crossmember
FairlyRandom replied to GRAY 70 Monte Carlo's topic in Engine Tech
Yes, me. Crate 383 had an oversized mechanical pump. The cutout was about 1/2" too shallow to fit the pump, so out came a handheld propane torch, a 3/4" round steel bar, and a big hammer. Slowly shaped the cutout by heat, bash a little, test fit. Wash, rinse, repeat until I had about 1/4" gap all around. A few passes with a flap disc in the angle grinder cleaned up some of the carnage, and then applied POR15 and glossy Rust-Oleum top coat. With solid engine mounts, that's plenty of space to prevent contact.

-
Thanks for the details fellas!
-
I lied. After pulling the failing alt, I found stamped numbers in the case I missed before as they were covered by the mounting bracket. There's a lot of paint on this case, so the numbers aren't super clear, but it's a Delco-Remy unit, and has "1102463 61" and on a separate line "2CI", or possibly "2C1" and then illegible stampings after that. Not sure if it's worth having it remanned? Hope this info helps someone out there


-
From AutoZone site: "Duralast Platinum EFB (Enhanced Flooded Battery) ...A reinforced retainer, full-frame positive grid and thicker negative grid resist corrosion and extend battery life -1.5 times the cycle life of conventional batteries -Proprietary carbon additive for faster recharge that increases battery life -Greater vibration resistance and enhanced durability" Mostly, it has a 3 year full replacement warranty vs 2 years on lower models
-
Just to close the loop in case this is helpful intel for folks, I started looking at the instructions and other docs related to the various alternator options I was looking at, and noticed gage requirements by output for different amperage alternators in one of the docs. I settled on a 10si case option in a 70 amp output. It's not black, but maybe a rattle can of high heat Rust-Oleum will be employed. According to Powermaster, they state that a 10GA power wire at 4' or shorter is acceptable for 85a and under. THIS LINK WILL DOWNLOAD A PDF WITH THEIR WIRING RECOMMENDATIONS. As far as I can tell, the power wire in my car is indeed 10GA (.16" with housing, verified with calipers), so I should be all good. I've also settled on THIS DURALAST BATTERY to go with it. If anyone sees anything that looks out of whack with this plan, please let me know. As of yet, no wrenches have been turned.
-
That's part of the problem - the alternator in there now has essentially no P/N showing anywhere on it. No label indicating the manufacturer, no serial number, nothing.
-
Yeah, it's definitely smaller than 6...10 is probably right. So, I'm likely going to go with a 50 amp and try to paint it vs tear apart my wiring harness to replace the wire coming off the alt.
-
Thanks fellas. Can anyone confirm the alternator amperage from the factory? Can anyone confirm the wire gage for the power wire coming off the factory alternator? I think those are the main questions preventing me from clicking "order now". The unit i want to put in requires a 6 gage power wire per the manufacturer, but I'm not sure how big the wire in place now is.
-
So, alternator might be dying. The car has never had an issue starting until the other day. I jumped her, and she fired right up and purred like nothing was wrong. I took her for a drive out to the Friday night cruise in, and she was right as rain. But when I went to start her back up to leave after sitting for about 90 mins, wouldn't start again. Hooked up to a multimeter, and idling she was seeing about 13.2 volts at the battery with everything turned on (wipers, high beams, radio blaring, interior light on), and voltage stayed at 13.2. with the engine running, disconnected the positive from the battery and she kept putting along, even with everything on...lights did pulse with the engine rpms though So my issue is: Parts store tester shows the alternator is juuuuust above the "bad" indicator on their machine. Battery also dropped to 8ish volts when tested for load. Battery is probably toast. But is the alternator? I kinda wanna change it just for peace of mind because it's a holdover from before the engine swap. I have no idea how many miles are on it. My 2 questions: Does it make sense to change the alternator? If so, how many amps do I want? From what I can tell, stock is about 50 amps. I'm wanting a black one to match the engine theme, but Im striking out finding one under 80 amps. Will I need to rewire the power system to accommodate that power? From what I've read, having high amp capability is like having a huge fuel tank. You'll only draw what you need. The only time a rewire is really necessary is if you have those amps available AND you draw them all with something like a big bass stereo with subs and amps, and/or an air compressor for a bagged setup. Am I being vain wanting a black alternator, should I just go with a stock looking 50 amp unit? I know I said 2 questions...
-
The Blueprint 383 is an aluminum head, aluminum intake motor. With stainless headers replacing the cast iron manifolds, that motor package probably weighs over 200bs less than the stock small block. My 72 definitely sits an inch or 3 higher after this exact swap (I did not reinstall the AC compressor after the swap though, so I probably dropped another 40lbs or so)
-
What did you do to your Monte Carlo today?
FairlyRandom replied to Canuck's topic in General 70-72 Monte Carlo Forum
More engine bay cleanup...some additional looming of the exposed wires, and routing some of the charcoal and wiper fluid lines under the outer fender. This was about a week ago And today Can't wait to ditch that AC unit...so ugly

-
What did you do to your Monte today.
FairlyRandom replied to Traveler's topic in General 70-72 Monte Carlo Forum
Cleaned up some of the firewall wiring. Went from this: To this: Just added some braided split loom and strategically placed zip ties. I'm happy with it! This was just step 1. Eventually, I want a really clean, tucked looking engine bay. All the mess you see on the driver's side inner fender will get routed between the inner and outer fender. The AC box will come off and I will probably re-remake my plug wires to route behind the back of the block and up from under the headers. Yes, they'll be very long wires, but it's not a drag car, so I'm not trying to wring out every last pony.

-
What did you do to your Monte Carlo today?
FairlyRandom replied to Canuck's topic in General 70-72 Monte Carlo Forum
Trying to convince myself that there will still be some warm days in SW Ohio this year...resisting the urge to put the trickle charger on in the battery, give her one final dusting, and wrap her in a cover for hibernation... -
Jason, your advice was spot on. I did just as you mentioned, first I disconnected the vacuum advance from the distributor. I then connected a vacuum gauge and dropped curb idle till the gauge read juuuust off of zero, indicating the transfer slots were nearly covered. I then attached my timing light which has a digital tach, and fine tuned curb idle to get to about 750 RPMs. The initial timing was spot on the factory spec, at about 12° BTDC, but total was low, only about 29° at 3500 RPMs, so I bumped timing up to 34°. Weirdly, idle RPMs didn't really fluxuate much, only came up about 25, so pulled it back down again with the curb idle screw. I then reset the idle fuel mixture by bottoming the adjustment screws and brought them out 2 full turns. Vac gauge wasn't super steady, but from there I adjusted the mix to get about 13 inches, which was as much as I guess I could hope for with this cam. All that work paid off though. After buttoning everything back up I went for a drive. The stalling issue is gone, and with the transfer slots covered, no more dieseling when shutting her off. But the performance is what really blew me away. The new motor already packed a lot more punch compared to the 350 I pulled out, but tonight the thing really came to life. This car now moves way faster than a vehicle of this weight has any right to lol. The throttle response is great, and it pulls and pulls, even with the 2.73 gear in back. I suppose 5° more timing will do that lol, but disconnecting the vac advance I think also plays into it. The tech at Blueprint said I'd notice it, and he was sure right. I have never been more convinced that I need to do a disc brake conversion in the rear as as am now...she moves quick, now she needs to stop quick too. I will double check my initial timing again because in all my haste, I never checked to make sure that stayed put. Hoping it will, as the distributor is brand new. But I guess I'm officially calling this swap complete. Thanks to all who helped me along the way!
-
Thanks @Jason72 and @1970mcss for the inputs. Looks like I have some work ahead of me! I spoke with the techs at Blueprint, and they said that because they can't possibly predict all of the different setups their crate motors will drop into, they do shockingly little tuning before shipment. Essentially, they drop the distributor and carb onto the finished engine, make basic adjustments to ensure the engine runs, then do two to three dyno pulls to ensure the finished motor makes horsepower and torque numbers within a reasonable range to what is advertised. Luckily, mine made significantly more than advertised. With all that said, the tech also enlightened me about some advice they can't put in writing...due to international laws regarding efficiency and environmental standards, some of the installation guide provides direction that is not as practical in real life as it could be, but is necessary to meet those laws and requirements. They told me I should unplug the vacuum advance, and simply cap that port on the carb. It's possible to have detonation due to the vacuum advance on top of mechanical advance with the cam that's in there. Luckily, I haven't noticed any issues. The tech said that if I was experiencing detonation, I'd know it as it's pretty loud on a stroker and easily distinguishable compared to a healthy V8 sound. I only run 93 octane, never anything less, and he said that means I'm probably fine. 93 should be enough to hold off detonation at anything under 6k RPMs and WOT. I haven't gotten my foot that deep into the engine yet, so I'm probably good. If it weren't for those international laws, there would be no problems. Hopefully I've avoided that problem. The tech ultimately suggested I recheck timing - both base and mechanically advanced, then set the idle mix for maximum vacuum. When I told them about my struggles keeping the car idling in gear, they weren't surprised at all, and suggested I go through that base timing and idle tune set up. Between setting the timing and idle, and unplugging the advance, I will likely overcome the stalling issue. I had assumed that both had already been established and set, which had me leery of adjusting the idle mix myself. Long story short, I purchased a timing light with tach, and already had a vacuum gauge. As soon as I have a few free hours, I will be getting that tune set properly. I will also be doing a vacuum check using carb cleaner on the lines and fittings to ensure that I'm not dealing with a vacuum leak on top of everything else. I'm actually kind of looking forward to this because it's the kind of work that I haven't really been exposed to given that all of the cars I've owned before have all been fuel injected. This will be new knowledge, and I'm excited for that. Wish me luck!
-
Frustration... New torque converter is in, supposedly somewhere near 2200rpm stall. Definitely drives better, doesn't want to stall when idling at a stoplight. The issue is that I'd raised the idle by turning the throttle stop screw on the carb to keep it from stalling while waiting for my appointment at the transmission shop. My assumption was that the stock TC was dragging the engine down at a stop, hence the need to raise the idle. With that idle raised up however, the engine would diesel when shutting it off in park. So, with the new TC, I assumed that I could drop the idle back down. Well, it still wants to stall in gear at a stop with the idle brought back down. The new TC didn't fix that. If I raise the idle using the stop screw, I still have the dieseling issue. Not sure where to turn. I am going to tune my idle mix using the vacuum gauge method. But in theory, the carb tune should be pretty sound considering Blueprint dynos their complete crates. I guess I could have a vacuum leak too, this is probably less likely, but I will try to chase a potential leak using carn cleaner on my vac lines. Many other suggestions I'm not thinking of?
-
Does/did this car belong to anyone on the forums?
-
steel inner fenders
FairlyRandom replied to missing my 72's topic in General 70-72 Monte Carlo Forum
Who is Leo and how can I contact him? -
Thanks for the inputs guys! @420ponies the gauge sensor is in the intake near the t-stat. I know that's not ideal, but the spot in the head is very close to the headers and would be difficult to shield from that heat. But I should invest in an infrared tool. Great suggestion! They did send me a new t-stat that I plan to get in maybe this weekend. Fingers crossed @Jason72 I did fill the system thru the t-stat hole initially, but had to add a good amount (more than a quart at least) after the first start and the system burped. When I have the system open to put in the new unit, I will top off at the opening for sure. I do plan to put the 1/16th hole in the flange as well.
-
Thanks everyone for the details @Scott S. - I guess my concern is that the thermostat is brand new...less than 500 miles after the complete motor swap, so the chances it's gummed up are virtually zero. The rad hoses were rock hard, so there was a good bit of pressure in there. Once I let the engine cool enough that I could crack the cap and release the pressure, the tstat opened. My curiosity was as to whether that cap shouldve bled a bit of that pressure of and allowed the tstat to open I guess it's now possibly irrelevant as Blueprint has shipped me a new tstat and gasket, so that will go on. I will probably also drill a 1/16th inch hole in the tstat flange to act as a permanent pressure bypass. But I appreciate all the advice!
-
Anyone have an opinion on how much rad cap holding PSI I should have with a 383? I've seen caps advertised with anywhere from 22 down to 6 PSI. I'm wondering if part of my issue is that the cap shouldve bled some pressure off allowing the thermostat to open...but maybe my cap holds too much pressure, holding the tstat closed, and lead to the heat issue? Plus there are some cool billet caps with Chevy bowties on em with different pressure ratings...I'm happy for any chance to buy some new bling lol
-
Popped the rad cap just to make sure I hadn't warped my heads and ruined the head gasket. my coolant was NOT full of oil, thankfully. But there was a little black stuff floating on the top inside one of the cores closest to the cap. I dipped a paper towel into it and it came out like gritty dust, not oil (thankfully). From what I've read online, this could be from the old rad hoses breaking down some. Hopefully my radiator isn't full of this stuff. Anyone else ever had this? (Sorry no pics, I'll try to get one later if the paper towel after it dries).
-
Well, I spoke with the warranty folks at blueprint and they didn't outright say it in so many words, but seems like the thermostats in these full-dress crates not opening must happen with some regularity. The guy didn't act very surprised. The thermostats they use do have a bypass, but possibly mine is faulty and isn't allowing it to regulate steam pressure like it's meant to. They're shipping a new one out today with a gasket. Looks like I caught it just in time as I was just shy of what their warranty tech called "the danger zone" with temp. I guess I should be grateful for my paranoia, I feel like I check oil pressure and temp gauges about every 30 secs lol.