Stuckin70s Posted July 29, 2024 Posted July 29, 2024 On 7/27/2024 at 8:10 PM, Canuck said: I’ve been working on small details lately on the 71SS. Today worked on the taillight bezels. Stripped the old red paint of the taillight bezels and repainted them. I scuffed up the horizontal bars so hopefully it lasts longer this time. It has been 8 years since I did it last but I could see it was starting to chip off the chrome. I had some Testors model paint that was the right colour. Ideally spraying would leave a better finish but since I already had this paint I brushed it on. Within the last week or so I also pulled the AM 8-track to get repaired, painted my rear speaker grilles to match the interior, fixed the heater fan and got the courtesy lights working. I have some new decals as well as other small parts on order too. If I keep this up I won’t want to sell the car. 😆 I never noticed the red paint before! Looks sharp. What color is the car? 4 Quote
Canuck Posted July 29, 2024 Author Posted July 29, 2024 6 minutes ago, Stuckin70s said: I never noticed the red paint before! Looks sharp. What color is the car? Thanks! Classic Copper 6 Quote
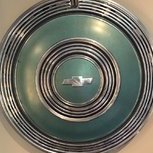
stangeba Posted July 29, 2024 Posted July 29, 2024 I am the original owner of my 71, built in Canada and it never had the chrome horizontal bar painted red. Could be I just don't remember, or it was red and peeled off or it was a cost saving thing to stop painting it. I know paint doesn't adhere to chrome well at all. 2 Quote
Stuckin70s Posted July 29, 2024 Posted July 29, 2024 Since I'm rebuilding all the wiring harness's. It is time to install power salvaged power window regulators. The first regulator did not work at all, the commutator was all carbon tracked. Scotch Brite, box knife and deox cleaned that right up. Since the parts are not available, only the whole aftermarket motor I decided to use rubber restore on the grease seal, softened it up straight away. The drivers motor brushes are pretty worn so I will switch it with one of the back windows. Question: how do you adjust the drag on the motor speed. There is a lock nut and pin that push on the armature. How tight should it be? Any ideas? Thank you. 1 Quote
Stuckin70s Posted July 29, 2024 Posted July 29, 2024 On the same subject for the power window. As I am going through the dash wiring harness the fellows at Buick Performance web site pointed out I need to install a Master power wire tang.https://www.buickperformanceclub.com/PW.htm Since I have a donor harness and plan on adding dashcam, power door lock, alarm, cruise and such. Does anyone have any thought about adding a subpanel on the firewall (if I can find room)? The opening next to the flasher would be a wonderful feed. 2 Quote
Canuck Posted July 29, 2024 Author Posted July 29, 2024 5 hours ago, stangeba said: I am the original owner of my 71, built in Canada and it never had the chrome horizontal bar painted red. Could be I just don't remember, or it was red and peeled off or it was a cost saving thing to stop painting it. I know paint doesn't adhere to chrome well at all. Nearly every low mile unrestored 71/72 I've owned or seen at the meets had some indication of the red. Strange that yours didn't have it. My 11,000 mile Canadian built 72 had nearly all of its red left. My Van Nuys built 72 had some red left when I got it with 55,000 miles. There was a low mile unrestored 71 at the Eastern Meet this year that still had most of the factory red left on it. Here’s a photo of that car below. 6 Quote
Leghome Posted July 29, 2024 Posted July 29, 2024 Does anyone have any thought about adding a subpanel on the firewall (if I can find room) I added a sub panel behind the kick pad about in the center. I have to massage the panel a little every time I remove it which is rarely, but is hardly noticeable to the untrained eye 2 Quote
Stuckin70s Posted July 30, 2024 Posted July 30, 2024 8 hours ago, stangeba said: I am the original owner of my 71, built in Canada and it never had the chrome horizontal bar painted red. Could be I just don't remember, or it was red and peeled off or it was a cost saving thing to stop painting it. I know paint doesn't adhere to chrome well at all. Same here, Canadian built 1972, never noticed if it was ever red... nice touch. I did have to go with aftermarket tail light lens. Not near as nice as original. Quote
Stuckin70s Posted July 30, 2024 Posted July 30, 2024 8 hours ago, Canuck said: Thanks! Classic Copper Beautiful! 3 Quote
Stuckin70s Posted July 30, 2024 Posted July 30, 2024 4 hours ago, Leghome said: Does anyone have any thought about adding a subpanel on the firewall (if I can find room) I added a sub panel behind the kick pad about in the center. I have to massage the panel a little every time I remove it which is rarely, but is hardly noticeable to the untrained eye Behind the kick pad in the center? I am missing something. Do you have picture to share? Thank you, Brad Quote
Leghome Posted July 30, 2024 Posted July 30, 2024 Sorry my explanation was not the best. The second photo shows the bulge the fuse block leaves behind the kick panel 1 Quote
714024SPEED Posted July 30, 2024 Posted July 30, 2024 Congratulations !! Both cars look great. Car show's for a great cause are the bestR.I.P Matt 5 Quote
Stuckin70s Posted July 31, 2024 Posted July 31, 2024 17 hours ago, Leghome said: Sorry my explanation was not the best. The second photo shows the bulge the fuse block leaves behind the kick panel Look good. Like you said, unless someone is looking for it... Quote
RH 70 72 Posted July 31, 2024 Posted July 31, 2024 2 hours ago, 714024SPEED said: Congratulations !! Both cars look great. Car show's for a great cause are the bestR.I.P Matt Kevin, thank you. 1 Quote
Wd71MC Posted August 3, 2024 Posted August 3, 2024 Well I was able to get around to replacing the rear drivers side bumper bolt. I tried a a week ago to replace it but had to figure out about making a wrench to where I could put a cheater pipe on it where it was really rusty I sprayed it so many times with wd40. Well today I made my wrench and broke it loose and where it was so rusty I just took a punch and hammer and knocked it out and installed the new bolt. 9 Quote
72 Monte Carlo Posted August 6, 2024 Posted August 6, 2024 I got my fresh complete rebuilt BB 414 ci engine dialed in and running better. I installed a new radiator fan and fan clutch and converted my shroud to the big block version. I bought a Unispotter 5500 to weld new vinyl top trim clip rivets in all the spots they were missing. Next, I installed a complete new Pypes 2-1/2" true dual exhaust system - no x or h pipe to retain the classic muscle car sound. Now I'm installing brand new aftermarket LED headlights with halo rings, and the LED tail lights from the group buy a few years ago. 4 Quote
S.Maug Posted August 6, 2024 Posted August 6, 2024 absolutely a good day for every fellow monticarlian 1 Quote
Dtret Posted August 6, 2024 Posted August 6, 2024 Good work load for the day. I see you got the rockers adjusted too. 5 1 Quote
72 Monte Carlo Posted August 7, 2024 Posted August 7, 2024 15 hours ago, Dtret said: Good work load for the day. I see you got the rockers adjusted too. It was a few days of work. Yeah, the rockers were a little too tight, so made a couple valve adjustment valve covers, but the oil was squirting over them anyway making a bigger mess than I hoped for....haha. I have cleaned the inner fenders and the headers since then. 1 Quote
Marks71 Posted August 7, 2024 Posted August 7, 2024 5 hours ago, 72 Monte Carlo said: It was a few days of work. Rockers adjusted? I think what Dennis is referring to is the oil residue on the header and heater hoses from possibly adjusting the valves. 5 Quote
madmatt9471 Posted August 9, 2024 Posted August 9, 2024 Been working on the Monte the past few days replacing: (1) Dash Clock - New quartz movement (works flawlessly, really happy with this fix) (2) Gearshift selector indicator - (works flawlessly - my fault, I broke the stock one, ughh!) (3) Replace all dash lights with "White LED's" - (looks fantastic) (4) Replace the Printed circuit board - the old one just was too brittle and practically fell apart (5) Replace all main A/C vents (middle, driver, passenger) (6) Go through all the A/C ducting and seal the joints from previous owner (just wasn't done correctly) (7) Clean everything and put it back correctly and replace any and all missing parts from previous owner (8) Lengthen the grounds for the headlight switch and the other two lower grounds that go to the support brace and install male/female connectors to make removal and installation easier Try not to pass out in the triple digit heat here in Palmdale, California - LOL Note: My wife was kind enough to come out there and assist with the re-installation and "She" is the one who re-installed the SPEEDOMETER Cable - I just couldn't get my big ol' hand and arm back there - LOL. Tina did it in one try and click, bam, done! (Credit where credit is due) Thanks,Matt 13 Quote
1970mcss Posted August 9, 2024 Posted August 9, 2024 Looks like some great work, yes the space behind the cluster is so tight. 2 Quote
madmatt9471 Posted August 9, 2024 Posted August 9, 2024 4 minutes ago, 1970mcss said: Looks like some great work, yes the space behind the cluster is so tight. Thank you - Yeah that is no joke, that had to be by far my biggest challenge and thankfully Tina has small hands and arms and it was a breeze for her! And now I can aim my A/C vents in the direction that I want and they will actually stay pointed in that direction - LOL Thanks,Matt 3 Quote
stangeba Posted August 9, 2024 Posted August 9, 2024 Great job! I remember doing some of the same things years ago. My clock is still working great! I broke the tiny wire to the shift indicator also and I knew all about it but forgot..... 3 Quote

Recommended Posts
Join the conversation
You can post now and register later. If you have an account, sign in now to post with your account.