MC-71 Posted May 29, 2023 Posted May 29, 2023 I bought these years ago. So far it’s a mystery how to install them. Does anyone have a picture or maybe assembly pg number. I have both 70 and 71 books. Check out the pictures I included. 1 Quote
jft69z Posted May 29, 2023 Posted May 29, 2023 They look like the reinforcements used on the rear. In the '71 assembly manual, go to section 2 - FRAME, and page 2B-1 (item #7 will be your parts). They attach at the bolts for the upper & lower control arms. I'll get you a couple pics in a bit, as my car is already on the lift. 4 Quote
Rob Peters Posted May 29, 2023 Posted May 29, 2023 10 minutes ago, jft69z said: I'll get you a couple pics in a bit, as my car is already on the lift. Why would your car be up on a lift, you HATE working on cars rob 2 2 Quote
jft69z Posted May 29, 2023 Posted May 29, 2023 31 minutes ago, Rob Peters said: Why would your car be up on a lift, you HATE working on cars rob Absolutely! But, I parked it there because I need to do a little rewiring for the new type distributor I'm installing. Just in case I needed to access the harness from below, figured it was a good idea to think ahead. I'm half way thru it, but got side tracked cutting down trees the last few days. There's about 6 of them that are dead, and directly in the path of the new building if they fall. 2 Quote
jft69z Posted May 29, 2023 Posted May 29, 2023 In the '72 Assembly manual, it also shows them if you got the LS3- 402 engine. EDIT:I found better pics from when I took the car apart & removed the current pics. The slotted hole in the reinforcement arm, will go to the front lower control arm mount. 1971 Assembly manual: 4 Quote
MC-71 Posted May 29, 2023 Author Posted May 29, 2023 Thanks again. As always you have the answer. I appreciate that. Will I feel a change if I install them. I would think so. Thanks 3 1 Quote
jft69z Posted May 29, 2023 Posted May 29, 2023 41 minutes ago, MC-71 said: Thanks again. As always you have the answer. I appreciate that. Will I feel a change if I install them. I would think so. Thanks You're very welcome Carl, glad to help. 2 Quote
MC1of80 Posted May 30, 2023 Posted May 30, 2023 Sorry, late to the game but all 70-72 montes had them. Only big block Chevelle's and small block Chevelle's 70-72 with the f-41 suspension had them. Quote
riverdogs00 Posted August 19, 2024 Posted August 19, 2024 I'm right in the middle of converting my stockers to aftermarket for my green LS7 car. The way they have a little twist on them, I thought they were bent when I looked under the car a few weeks back. Postng pics of the 2 side by side, and tomorrow when they are in the car. 2 Quote
420ponies Posted August 20, 2024 Posted August 20, 2024 I bought a pair from UMI Performance. I'll have a pair of stock ones.If anyone needs these,I'll ship them to you. 2 Quote
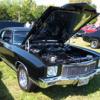
riverdogs00 Posted August 20, 2024 Posted August 20, 2024 New arms installed. This particular car has a Ford 9inch, but I had it made with the stock mounting locations, so it should be very similar to the 10bolt/12 bolt. This car has 3" exhaust. I'd recommend IF doing this with the body/car mostly complete, to raise the rear and support the frame with jack stands. I'd get it well off the ground. Remove the tires, support the pumpkin with a floor jack so you can fine tune as it comes apart/goes together. You may have to remove the coil springs for access to remove/install the bolt that goes through the upper control arm mount. See pic. Loosen both upper and lower attaching control arm bolts for the brace, then fine tune jack to get most of the weight off of the bushing so you can remove the bolt. I removed the upper bolt, then the lower nut, then the brace, leaving the lower control arm bolt in place to keep the arm located. Installed new brace up top and let it hang. Id recommend grinding a point on your new bolts (see pic). it makes it much easier to install/line up. They may need a little encouragement with a few hammer taps or using a ratchet to thread in. Note: New bolts are longer as the brace is thicker. It can be tight at the top clearance wise. I had a stubby 3/4 and a long 3/4. They both came in handy. when taking out the lower bolt, use a 3/4 deep well and extension where it goes through the frame. Easier to keep it in line, and if it does fall off (mine did 2x), its easier to fish out with your fingers. Once lower bolt is off, rotate new brace into location, tap bolt the rest of the way through and install the nut. Don't tighten them with rear end hanging. Once both sides are installed, raise the jack to put the rear end at ride height while the frame is still on the jacks. THEN tighten the upper and lower bolts. Lower the rear end if need be and Tighten the jam nuts on the new arm and you are golden 3 Quote

Recommended Posts
Join the conversation
You can post now and register later. If you have an account, sign in now to post with your account.