overdrive
-
Posts
1,357 -
Joined
-
Last visited
-
Days Won
47
Content Type
Profiles
Articles
Forums
Gallery
Events
Everything posted by overdrive
-
I've had parts restored there before and after the business changed hands. They've done great work for me and I'll use them again soon. Dan
-

70 Rear Bumper Question
overdrive replied to GRAY 70 Monte Carlo's topic in General 70-72 Monte Carlo Forum
It goes between the bracket and the bumper. The rubber piece for the center bracket is the same way. I've never pulled one off any of the 3 years that didn't have it. Dan -
70 Rear Bumper Question
overdrive replied to GRAY 70 Monte Carlo's topic in General 70-72 Monte Carlo Forum
My Van Nuys assembled SS was made in January 1970 and it has the flat rear bumper brackets with the rubber piece at the ends. I've had several '70s that way. The '71s I've had had the round brackets. Dan -
Modifying a true survivor 1970 Monte Carlo
overdrive replied to NavyCPO's topic in General 70-72 Monte Carlo Forum
Sounds like a great car. I'd probably put the 383 in it and save everything I took out. The problem I'd have with just changing the intake, carb, and cam would be that I'd much rather use a roller cam than take a chance with a flat tappet cam. If I was going that far, I might as well just use the 383. If you're just wanting the car for a cruiser, adding dual exhaust and the ignition upgrade would be enough. The 350 with a 2 barrel will run great. Dan -
I'll take the liberty of posting the photos for Clint. He and I have been messaging about this car for a couple of days. These photos were taken by one of our members here (Kurt M) when the car was for sale several years ago in Kentucky, before Clint bought it. A Nova guy named Tony Mills in southern Kentucky had the car for sale and I was interested in it. He had bought it from the daughter of the original owner, who was working at the Flint plant when he ordered it. Kurt sent me these photos, but a bad ice storm kept me from making the trip to see the car. I passed the photos on to Clint yesterday. The car was shipped to him in Idaho, along with another non-SS, that he bought about the same time in southern Missouri. The SS still looks the same, and Clint is just trying to recoup his purchase price. The car also has the tach and gauge dash, tilt column, auxiliary lighting, a 2.56:1 posi-trac 12 bolt rear, and the power trunk release option. It's loaded! If I hadn't bought my '71, 4 speed, I would have bought this car 2 days ago, before the ads were posted. Dan


-
Thanks for taking the time to check. Dan
-
3M #08090. Dan

-
Looking great! You're probably going to wish you had put the trim on the fenders before putting them on the car. Dan
-
Hard to find information. Need help.
overdrive replied to 4spd's topic in General 70-72 Monte Carlo Forum
I don't believe the records you're hoping for exist. You can get that information for the Oshawa, Ontario, assembled cars, but not for the U.S. assembled cars. Dan -
Your car looks great! Welcome, and thanks for posting the photos. I've started a registry for 4 speed Montes. I'll add you and your car to it. I have a '71, 4 speed. There's a thread in the Restorer's forum. Dan
-
A Turbo Fire 400 was only offered with a 2 barrel carb. Dan
-
Thanks! I took a photo last evening. I took the car to a big show at the Lake of the Ozarks last weekend and had a good time talking to a lot people about it. There were several that never knew a Monte Carlo SS454 was available from the factory, some that knew it, but had never actually seen one, and many that didn't know the G67 load leveling option was available from the factory on any Chevrolet. It was a very fun day.

- 328 replies
-
- 10
-

-
WANTED 1970 CONSOLE SHIFT KNOB \ PART # 3922525
overdrive replied to KWick_70MC's topic in Cars and Parts For Sale/Wanted
I think you know that those are available in the aftermarket, correct? If you want an original Chevrolet part, you'll be much more likely to find one in a Chevelle forum or Facebook group. Dan- 1 reply
-
- 2
-
-
3044 hub caps / wheel covers wanted
overdrive replied to Carlos Maldonado's topic in Cars and Parts For Sale/Wanted
I agree with Aaron. The brochure has to be a '71 because it mentions the international symbols, which were not available for '70. Also, the '70 15x7 non-Rally wheel that came with either of the two available full wheel covers was code AF on the build sheets. I've seen in the past where guys would say Chevrolet used black 15x7 Rallys (which would have been code YH for '70, not FW) with the full wheel covers. Not according to the build sheets I've been collecting. Rallys were not behind full wheel covers. I also don't believe Rally wheels were ever black on the front side. Dan -
My passenger side arm rest pad in my '71 is in great shape, but, like many others, the driver side is not. I ordered a pair of them new, but they came as urethane, not a vinyl covered foam pad. They didn't fit and they didn't match the original look. If anyone has a good black driver side arm rest pad, I could use one, or the name of a supplier that hasn't yet changed to the urethane pads. Dan
-
I made corrections. I was surprised to find that the dome light is not centered. I've never bothered to look at that, but you can get behind the car, get low and in line with the trunk lock and the rear view mirror and it's easily seen. Dan
-
Ronnie and I talked today about headliner installations. Afterwards, since the listings that the support rods slide into are always too long, I did some measuring on my '71 original headliner. I laid out the center line on the headliner and measured to the ends of the listings on one side, and then I doubled it to get the total length needed for each listing. I also measured a set of bows that I removed from one of my parts cars. #1 listing/bow is at the front. The photo shows the different bend radius of bows 1 (top) and 2, as was mentioned previously. #1, listing is 42 ½", bow is 48 ⅛" #2, listing is 42 ½", bow is 47 ¾" #3, listing is 42", bow is smaller diameter. #4, listing is 42 ½", bow is 52" #5, listing is 44 ½", bow is 54" I watched a YouTube video recently, and I posted the link to it in a reply I made in another thread in this group. The guy in the video showed that he cut and trimmed the listing for the 3rd bow at each of the plastic clips that the bow snaps into, so that the listing fabric doesn't get trapped between the clip and the bow. I've not seen a factory installed headliner done that way, and I've never done it that way. The bow covered with the listing fabric will snap into the clips without having to trim the listing at each clip. He added an unnecessary step, and that also allows less support of the headliner at each clip. Dan Edit, I doubled checked my measurements and adjusted a couple.

-
True Slap floor shifter detent plates
overdrive replied to overdrive's topic in Cars and Parts For Sale/Wanted
I've topped 1000 sales! What's more important to me is that I've still never had an unhappy customer ask for a refund! Simple is good. Thanks again to all of my customers and supporters! Dan

-
Now that we talked on the phone, I see the 3rd felt guide in your photo when I zoom in. You're right. That one is the problem and it needs to be removed. Dan
-
Driver door, front and rear.


-
I've done 2 and will be doing another. It's not hard to do, but it takes time. Watch some YouTube videos and make a plan, but if you don't have the patience it takes to make it look great, get some references and have a trustworthy professional do the job. I've seen some otherwise very nice cars at shows that had poorly installed headliners. Some were installed by the owner and some by professionals. I'm the type that loves to learn and do my own work, and that's why I do 99% of my restorations myself. I have zero patience for a professional that cuts corners. Many do great work, but it can be a crap shoot, and I can have 100% control of the timeline when I don't have to wait on someone. Paint jail is bs. Also, it's very satisfying when you're at a show and someone starts asking who did the different parts of the restoration. This is a decent video for headliners, but don't watch just one. Pay close attention to how the original headliner was installed as you remove it, and take pics and make good notes. The cloth tubes that the bows slide into are called listings. Instead of doing like this guy with the listings, measure the length of the listings for each bow on the original headliner, and use those measurements for the lengths of the new listings. Cut the extra listing at each end close and parallel to the stitches. You won't want to put any glue on excess listing. I like using the brushable glue. It takes longer, but it makes it much easier to keep glue only where it belongs. Snap the bow next to the dome light in first. Another tip is to put all screws that will end up penetrating the headliner back into their holes before you start hanging the headliner. This makes it very easy to locate the holes that will be needed. Just feel for them after the headliner edges are glued and cut a small X on them with a razor blade. Dan
-
I have the canister and the frame mounted bracket. It's from a '70 that was originally sold in California. It's been awhile since I laid my eyes on it, but it's here. Dan
-
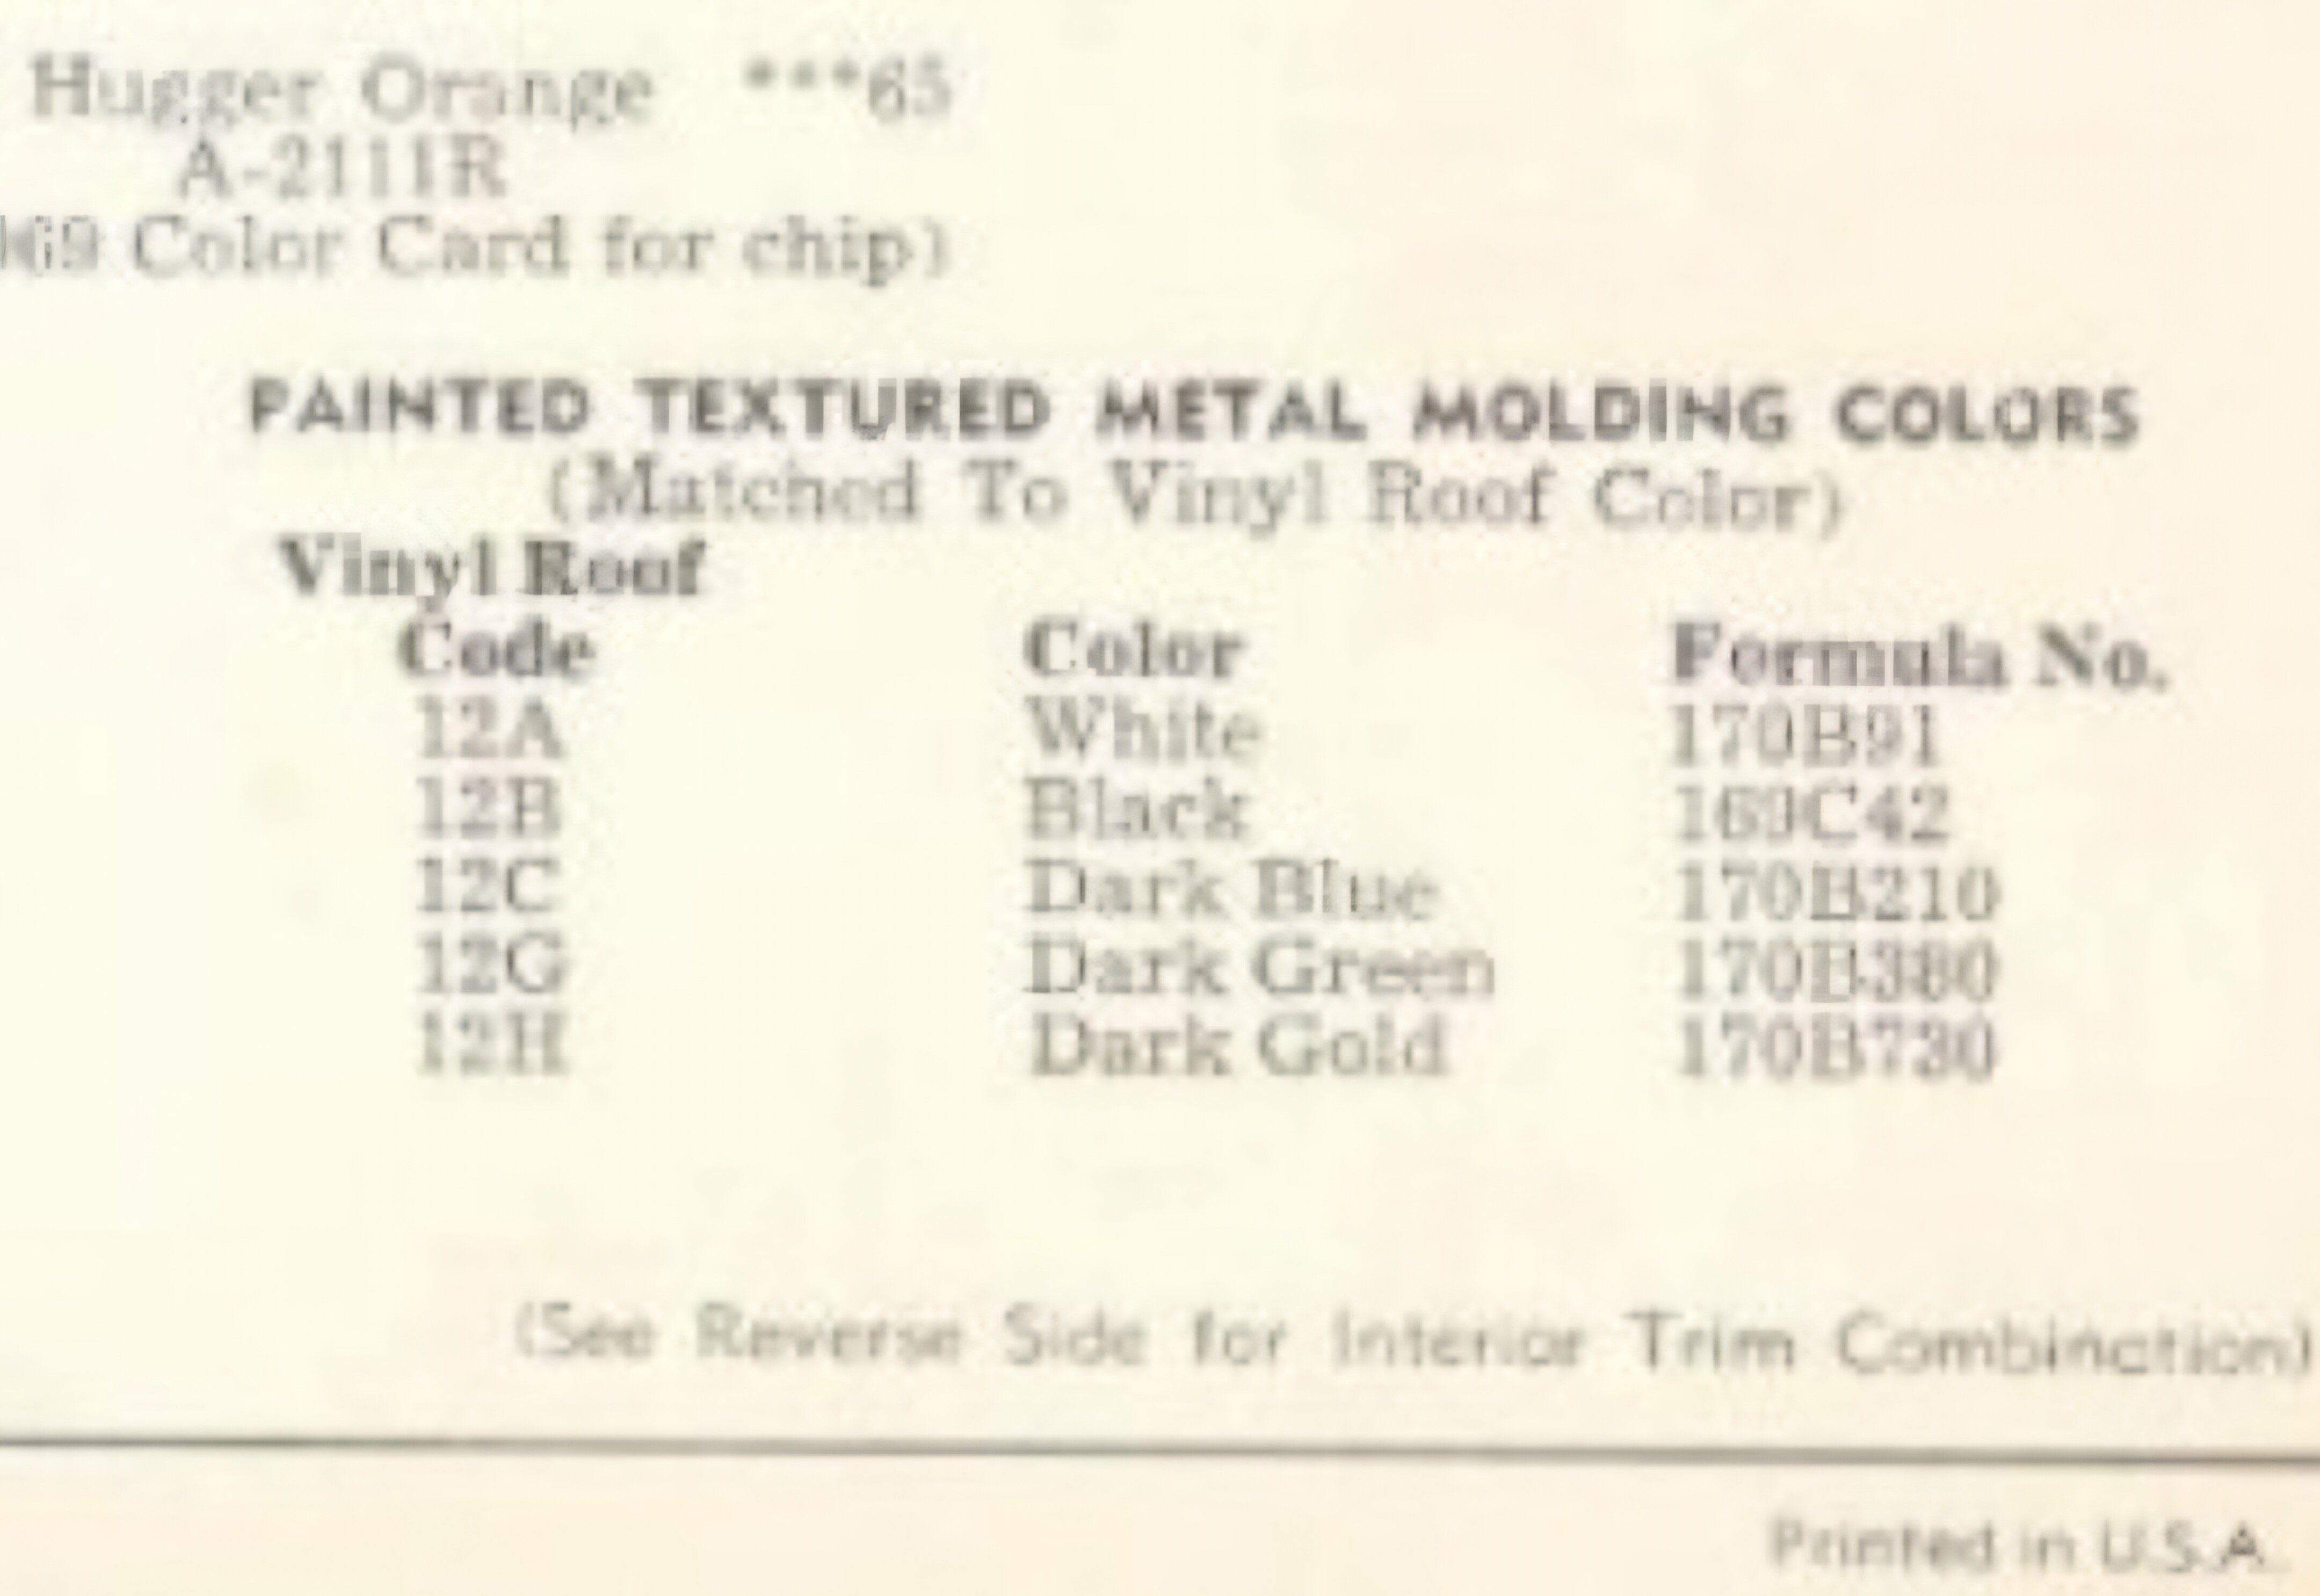
The information for '70 is in the paint codes section of this group website. The information for '71 and '72 is not, but I believe the '70 and '71 dark green tops were the same color. Someone else with more experience with top colors will know. The codes are for the top trim and the interior metal parts, and it's a satin finish. You might be able to get someone with a '70 to get a photo of an original green A pillar trim for comparison. After wet sanding the masked off area with 600 grit, I clean and re-mask the parts. I screw a couple of the the trim retainers to a board so that I can snap a piece on, and then screw the board horizontally to a vertical surface like a post with the taped edge on top. This is to help keep the paint from creeping under the tape. Use a couple of very light coats when you spray paint. The factory didn't use primer, so I didn't. It hasn't been an issue. It builds more thickness and I don't think that's necessary. I like to use a razor blade to lightly follow the edge of the tape before un-masking. I've not had any adhesion issues. Dan


-
Yes, the extension alignment pins are a little different and the area where the 2 bolts attach the fender to the core support is different. That area is flat on a '70 and there's a step between the 2 bolts after '70. Dan