


72MC
-
Posts
673 -
Joined
-
Last visited
-
Days Won
8
Content Type
Profiles
Articles
Forums
Gallery
Events
Everything posted by 72MC
-
Awesome as usual Davey. I may have to look into that setup as I have a Digital 6 Plus box as well. Where did you get the instructions for the setup. I checked out some more of your videos. Very nice. Your buddy was pulling some perfect trees. - Dave
-
You'll have plenty of heat with a 160 thermostat. - Dave
-
I am running MSD 8.5 mm wires with straight plug boots on my Elkie's 402 with 2" primaries. Just like Jim did, they can be easily bent to any angle you desire. Nothing touches any of the headers. - Dave
-
 That is very cool. Love it. - Dave
 -
No I didn't see that info Darren but,... mine have the oval hole. That makes for great news. Maybe mine were originally on an El Camino. Also found GM stamped in the area around the oval hole. Never even thought to look in that area when I first purchased these wheels in 2004. Couldn't find any info on the web back then either. Sadly, these rims have only seen about 15 miles on the road so far for me. I'm real close to getting her back on the road though. - Dave
-
FYI for anyone interested. I found my codes near the valve stem. My code is AU which equates to the 15x7 Z/28 rims from 70-75. Found all the info from "NastyZ28" and Team Camaro. Also found the plant and date code. Appears they are Kelsey Hayes from 1971. The AV code is for the 14 inch rim. - Dave
-
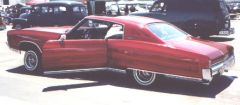
 That's a beauty. Montes make some of the best looking drag cars. - Dave
 -
Dennis, that may be the ones but I was hoping that is not the only code for those wheels. I have a set on my El Camino that I purchased used and refurbished that are 15x7 and the code is JJ. Just curious if they were on a certain type of car off the assembly line or if they were rims purchased at the parts counter. - Dave edit - well it appears I will have to look again at those rims. The JJ code I found is on the rim section covered by the tire. This code seems to be on all the rims and refers to the P/N for the tire cross section. Seems there is a list out there but I am getting conflicting info. Sorry if I hi-jacked this thread.
-
Exactly. Thanks Mark.
-
Darren, would you happen to have access to a list of the wheel codes for the Z/28 SS rims that were also on the Chevelles and El Caminos? They were the dark pewter/gray, five spoke rims with the partial hidden beauty rings. Not sure I have a pic handy to show you but hopefully you know what rims I am describing. Thanks - Dave
-
 Pretty cool pic. - Dave
 -
What did you do to your Monte today?
72MC replied to Xxyyzz's topic in General 70-72 Monte Carlo Forum
Wow, that is some transformation. Looks good. - Dave -
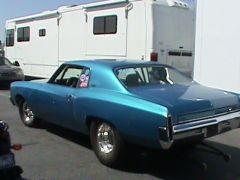
WOW, I am totally diggin that beauty. I would love to be the passenger in that beast on a 1/4 mile pass. - Dave
-
Agree with the above regarding the offender being the intake. Coolant is probably running to the back of the block and following down the crease where the heads mate to the block. I had an issue with intake bolts coming loose from my aluminum heads and fixed it with Stage 8 locking bolts. Much like is used on headers. Haven't had an issue since. - Dave
-
Great times David. Good thing you posted those times. I was getting pressure to spill the beans by today. You know how it is,... inquiring minds want to know. Nice vids too. - Dave
-
Here, let me put a little pressure on you David to get those times posted . I'll just tell everyone they were great times,... even with bad air. Good job David, very consistant. Looks like you are ready for drag weeks. - Dave
-
Well, I'll stick to the notion that I didn't do anything wrong and actually did upgrade. One of my lowers had issues to begin with. BMR uppers will get on there some day. Proof is in the handling and it handles better than it did before. - Dave
-
Scott, I did the same thing as Andreas except I used BMR. I will do the uppers at another time, maybe. I figured I better upgrade the lowers when I went with the QA1 setup. - Dave
-
Awesome news David. Looking forward to some track reports. - Dave
-
Awesome vids Davey. Thanks for sharing and great job on the racing. - Dave
-
Sounds like a blast Davey. I guess if you're going to be runner up, who better than to your friend. Congrats on the great results this weekend. Looking forward to pics and vids. - Dave
-
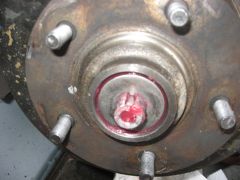 Aaron, I'm not trying to bust your chops here but your final step is wrong, or should I say incomplete. After torqueing the spindle nut to 12 ft lbs, the rotor is to be spun both forward and backwards several times while re-torqueing the spindle nut to 12 ft lbs. After this has been done, the spindle nut is to be loosened just enough to spin the nut by hand. The spindle nut is to then be tighten by hand as far as it will go. Then you insert the cotter pin. Tightening the spindle nut to 12 ft lbs and leaving it that tight will cause premature wear on the bearing. Just thought you would like to know. - Dave
 -
Yea, but it's a dry heat right ?? - Dave
-
McCall, with the double adjustable QA1 coil over spring and shock package I have, like pictured on page 2 of this thread, there is ride height adjustability from 0-3" inches depending on the spring rate you choose. I went with 450 lbs/in and I can adjust my ride height from 0-2" inches in the front. For a strictly street driven machine, I would recommend the 550 lbs/in which would allow ride height adjustments of appx 0-3" inches. I also have a set of 350 lbs/in springs which only give an adjustment of 0-1.5" inches. The 350 springs are a little light for our Montes but were purchased for drag racing. This is the easiest setup I know of for multiple ride height adjustability. - Dave
-
Awesome Davey. Keep up the excellent work. As stated, cool picture. - Dave