colonel
-
Posts
97 -
Joined
-
Last visited
Content Type
Profiles
Articles
Forums
Gallery
Events
Everything posted by colonel
-
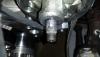
I am finally getting around to looking into the coolant leak problem on my 496 with Brodix aluminum heads that I noticed at the western meet this year. Noticed the leak on the drivers side right at bolt 10 in the torquing sequence. Originally thought it was part of the oil leak problem I found at the meet as well but realized it was coolant. The head gasket is wet in that area only and sometimes it leaks enough to run down block but not much. I initially just did a random check of the head bolts I could reach and found # 15 had stripped out so I then removed the headers and valve train and went through and rechecked all the head bolts and found # 10 had actually stripped out the threads as well. # 6 did the same thing when I was reassembling it just before the meet as I had to get the valve train redone due to mistakenly setting them up into a bind situation. # 6 was successfully repaired as it made it to the 70lb/ft mark that time just like all the other head bolts but now 2 more holes have had the same fate. # 10 of course it right at the point of the leak so figured I found the problem but figured I would take the pass side apart and check it as well. I had never checked that side for a leak in that spot but did find the same problem with coolant soaking the head gasket at the # 11 bolt area so took everything apart on that side and checked the head bolts there. I found none stripped out and only 3 with a slight movement to reach the 70lb/ft mark again so there went my theory about the bolt simply being loose enough to create the leak on the drivers side. So looking for advice on #1 what you think the leak problem may be as it is in the same spot on the block which rules out the head or the gasket as switching them to the other side would put the leak at the front. Perhaps the thread sealant didn't work in exactly the same bolt hole on each side of the block but that seems a bit unlikely although this engine seems to be all about the unlikely. #2 is the thread stripping issue. Do I rip the D/S head off and repair the other 2 holes that have stripped out and hope no more occur?? Or with the combined leak and thread problem just consider this block done and put all the parts in a new block?? A bit of other info. The #6 cylinder has been scored with something as well. Looks like the same type of thing that scored #1 cyl when this block was a 489. I think something went wrong with the rings during installation but never did find out what caused the scoring in #1 the first time around so am only guessing at likely causes.
-
That is a splendid idea. Didn't know it existed. I think I will try and find some for myself as well.
-
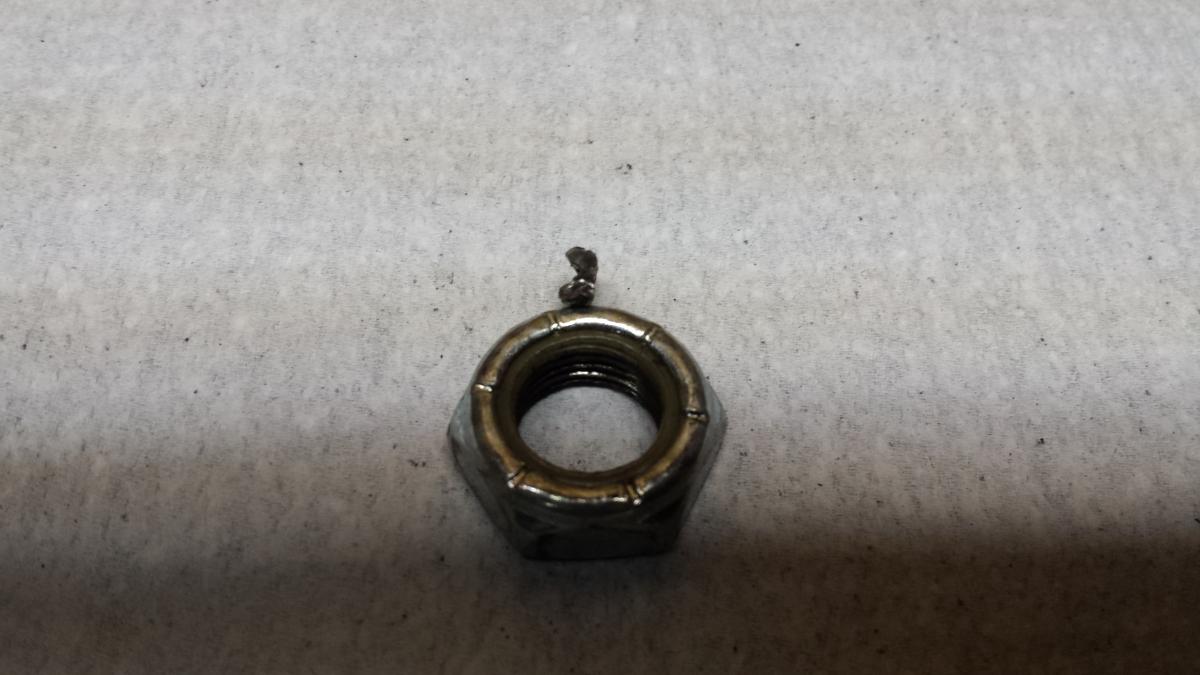
When I get the replacement parts I will put another nut on behind it and loctite them both. Not something I could pull out of a junkyard if it happens again. Good grief what is with starters???? Maybe it is BC as I just spoke with a friend that used to live out there and he had problems with belts over heating and coming off and the same problem Jordan had with HEI caps melting down. We will have to add some honourable mentions to the Hard Luck award I think.
-
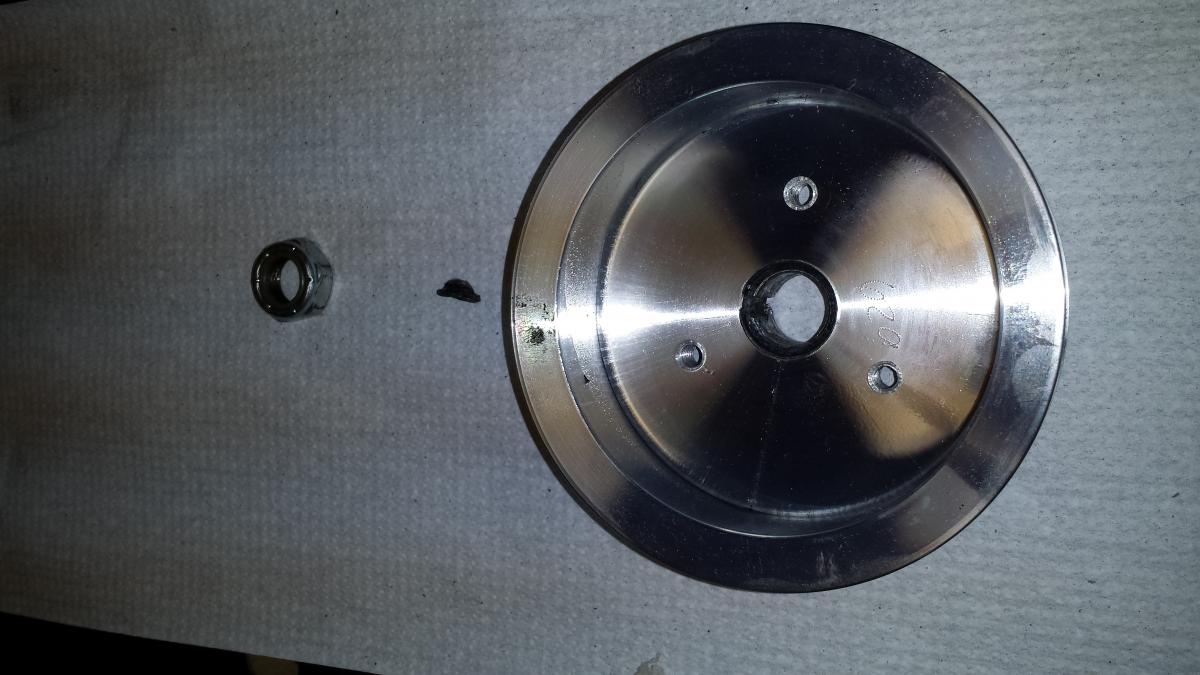
Guess I wasn't the only one with some hard luck on the way back from the Western Meet. I got 80% of the way home and noticed my power steering feeling funny so checked the level and topped it up. I started it up to see if the level would go down and I found that my power steering pump pulley lock nut had come loose and the pulley was wobbling wildy. I was able to get what little woodruff key I had left in place and tighten it back down to keep going but was very close to being stranded if the key had broken or I had not been able to find it as I fell out when I took the pulley off. At any rate we made it home with 6 stops to keep checking it but it never got loose again in the last 2+ hour drive home. Just like my many issues I had at the meet that got taken care of thanks to the help of the group this one had me worried but got through it as well. Has anyone ever had their power steering pulley come loose?? This can't be common but perhaps due to the serpentine system I have it was something I should have checked but never did. I am sure it came from March with the pulley already attached.
-
That was what actually started this whole process was my Ex friend Jim was a dealer for Pro Comp and told me about a sale they had on their aluminum heads so I splurged and ordered a set. When I got them and you placed the intake gaskets on them you could either line up the intake bolt holes on the head or the runners but not both???? He wanted to rework them and I said these are new and are simply not built right. Basically the relationship between the holes and the runners was 1/4 inch off. Thus started the search for a different affordable deal on aluminum heads that lead to changing blocks etc................and here I am.
-
The important thing is I am not making the same mistake twice.
-
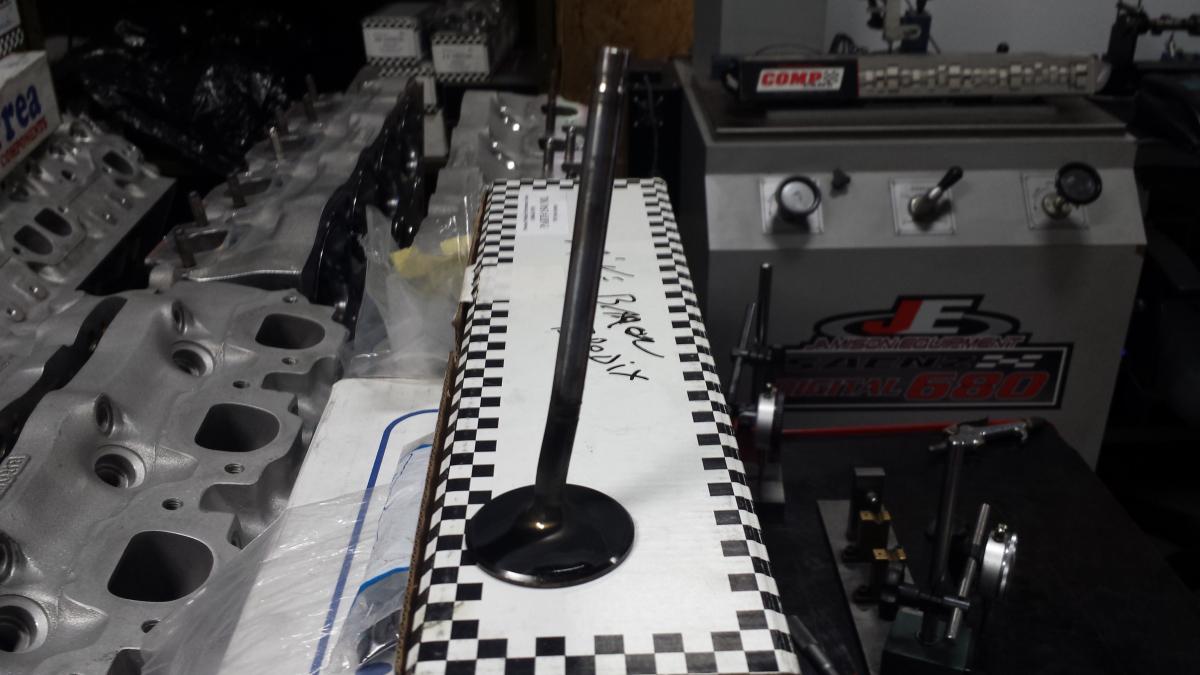
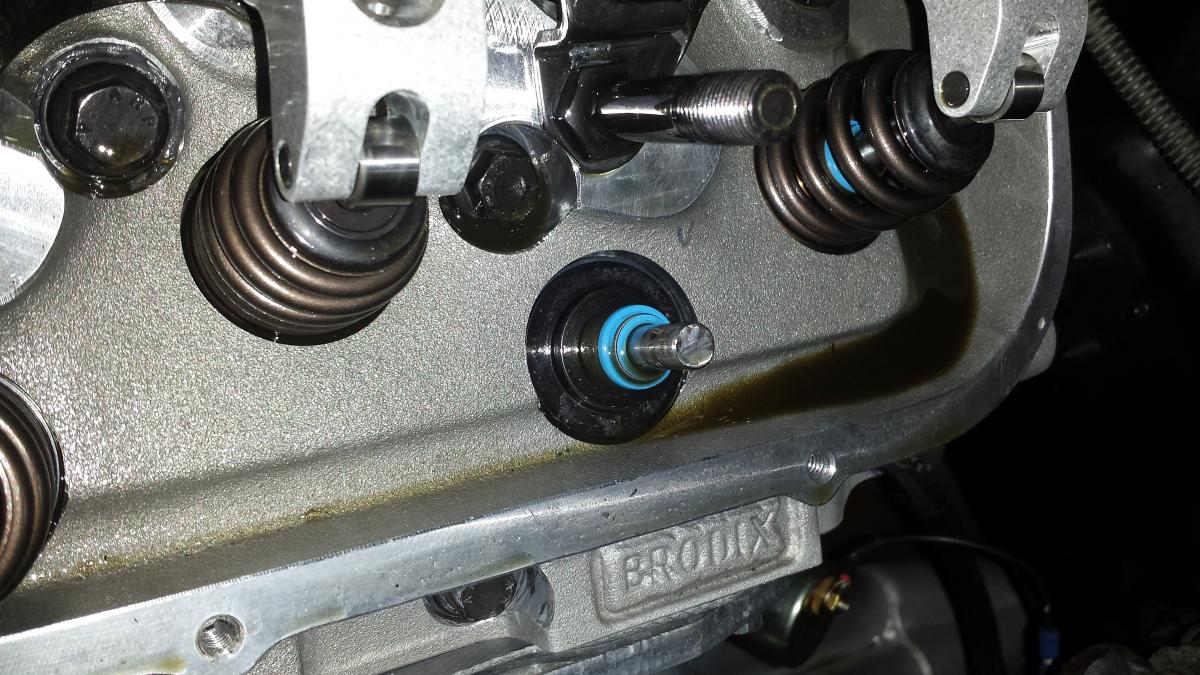
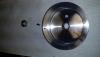
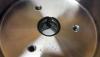
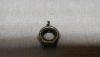
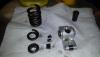
OK. Officially the problem is the springs were binding. It would appear that when I went to set up the new beehive springs with the smaller retainer I failed to notice the smaller retainer fit inside the top of the valve spring height mic rather than on top like the other 4-5 combinations of the wider double spring retainers and locks I tried to get things set up with. So while my measurements of 1.815 to 1.824 would have given me .040-.050 (still not really enough) of room before binding, taking the .125 off the height I measured creates a binding situation that while at low rpm the movement in the lifter plunger could absorb some or all of it but when they pressured up under higher rpm and were providing full lift they had no room to absorb anything. So I am back to it being my fault again!!!!!!!!!!!! At least the problem was discovered prior to catasrophic damage and thankfully having forged pistons in there I should be able to smooth off the marks on the piston and get it all back together. I figured out how to add more pics in so have a look at the piston and see if you agree. Also attached a pic of the custom bendified valve for your amusement.
-
That was my first thought as well when I saw the other retainer. Just rolling the engine over I can get .060 of feeler gauges between a coil near the top and took pics (can't see how to attach more pics on this thread) where you can see the valve through the coils easily but not sure if the plunger is fully up without the engine running? I am trying to find a way to measure the travel of the valve and if it matches the .592 it should have then were are good just can't find a way to mount my magnetic base securily to get a measurment on the aluminum heads. I was loaned a spring compressing tool that works off the rocker stud but it is way too far away to do much more than contact the spring.
-
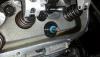
Good news is the head of the valve was still attached to the stem and there is only small contact marks on the top of the piston. Found an additional issue as the exh valve on cyl 3 had broken off about 1/3 of its retainer which was just sitting in the cyl head at the back of the engine so it does appear I didn't do anything wrong to cause this. Yeah for that but now the question is why did these parts fail??? Passenger side had nothing visibly broken.
-
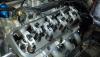
The Brodix Race Right heads were bought preassembled but were taken apart to extrudahone ( however you spell it ) so were disassembled. I ended up only reusing the valves because when I reassembled them the spring pressures varied from 128 to 145 despite the tags saying they were all magically at 150 and the install height of the spring right against the head was below what their stated height was supposed to be. This would change the closed pressures spring rates etc. and the engine was being given the ability to rev if it wanted ( wasn't sure how the cam was going to work as it was a custom grind for the extra cubes and EFI ) so 1 or 2 valve springs that give up at 5000 would not cut it. So I got some help choosing springs from a local shop and got the PAC beehive springs which lightened the retainer weight over dual springs so the advantage of titanium was not as much of a difference ( not that I intented a high enough rpm the make it worth the cost to save the weight anyway ) and used a locater and some shims to get the install height within .001-.0015 of each other and the springs were much more evenly balanced so all was good. I even sent the old springs, retainers and locks back to Brodix so they could verify the install height and spring pressure issue. They checked them and said they were all within their spec which didn't make me feel very confident in their stuff. So I agree bare heads are best choice then fill it with what you need which I ended up doing essentially but still had this problem. I will check with the shop I got the springs from and see if they can tell me anything from looking at them as to what happened to them. I am going to try and get the head off today and see what the situation is in there. Crossing my fingers for minimal damage.
-
May have figured out why those lifters did not have any give. The 2 that had that problem were the 2nd from the back on each side. When I took them out of the 489 I put them in containers full of oil and put the ones at the back in the bottom so the top ones would have been the front ones. I put the top ones in the front when I put them in the 496 so the back ones were at the back again in this engine. I thought I put them in the same side as well but coud have got them on the opposite side this time which would mean the 2nd from the back in the 496 would have been the back ones in the 489. Due to my mixing up the cyl 1 and 2 bearing caps on the 489 and casuing the scoring in cyl 1 there was a lot of metal running around in that engine. So my theory is that despite having a magnetic drain plug, a block off plate so 100% of the oil goes through the canton filter that filters down to 8 microns if I had put the lifters back in on the opposite side this time that means the problem lifters were at the back of the 489 and thus the first ones to get any metal that made it by the magnetic plug and filter. I know the oil was getting through the lifters and on down the line so they were not blocked but perhaps those lifters did get some metal in them that somehow kept the plunger from moving freely this time. Sound plausable?? When I noticed this problem with those 2 particular lifters I didn't have much concern about it. Even if that metal did lock up those plungers it really should have just operated as a mechanical lifter right?? I don't see how them being locked would have caused the valve spring to break. The engine ran really smooth with high vacuum. Perhaps this failure isn't related and I just happened to have a couple lifters that were stuck and matched them up with a bad valve spring. Any thoughts?? Either way it would appear I should have looked into the lifter issue before I put it together and gave the engine a chance to fail. I was delayed by other issues that came up while assembling this engine and was needing to get it together and in the car if I was going to be able to bring it to the Western meet. I needed enough time to either get it tuned with the old EFI system or have the time to get the new EFI system on it and set up. Guess I have a lot more time to get the new EFI on now.
-
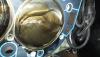
My 3 hour old 496 made an executive decision to use 15V technology custom designed by itself. Attached are the results of its decision. The valve by the way is stuck in that position. Won't move at all. Surprise Surprise. The 6 hour version of the 489 I built last season was my fault but I am not sure if I can blame this one on me. This was however 1 of 2 hydraulic roller lifters that did not seem to have any give when I set the valves as I assembled things. The other one was on the passenger side but there was nothing broken on that side of the engine......yet. Needless to say I won't be bringing the Monte to the Western meet this year in Penticton.
-
It appears at this point that the rods are still in spec. Crank is no worse for wear so if that were the only problem it would be replace the bearings and put it back together. The scoring issue though is what is the big problem. The rods being "pinched" on the crank has put some extra load on the thrust side of the cylinder and while #1 is visibly scored, #2 is also bad once measured. So the engine will need new pistons, it remains to be seen just how big. Shop will try and hone the problem cylinders to 4.29 and see if that clears it up and leave some room for a future rebuild should it ever need it. If they have to go beyond that then 4.31 it is. They measured the pistons in there now (ic789.030 at 4.275) and they are as good as when they went it so are still useful to someone building a 489 so will try and sell them to help reduce the re-rebuilding costs.
-
This is the piston I am using. Says 20cc dome. Should result in 10.6 cr with 115cc combustion chamber. https://www.uempistons.com/index.php?mai...3834e0ec444e0ce P-W clearance if I recall the build sheet info right was .0053 - .0055 depending on cylinder. Engine shop that did machine work installed rings and pistons on rods. I didn't want to screw anything up that way so can't speak to ring gaps and support rails dimples. Did follow shops advise on ring gap positions tough. I pulled it all out again today and tore into it. Found no marks indicating negative clearances anywhere. Could only find a small score is cylinder 1 that seems to coincide with rings so maybe one of them broke or caught some debris somehow. Started moving the rods back and forth and when I got to front throw they wouldn't move. There was a gap but it wasn't even on parting line of #2 cap, .019 on one side and. 024 on other so it seemed twisted to me. Loosening off cap bolts didn't help. Had to separate cap and rod before they would slide. Bearings didn't seem right to me but were in the correctly and crank seemed to be fine with no odd marks. Spoke with engine shop and was asked to check serial # on the 2 rods and caps on first throw. #'s on them ended in 8 and 0 which I had to look really hard to verify that but confirmed I had switched the caps likely after checking with plastigage then doing final assembly. If you asked me if I was sure I did that all correct I would have bet the engine on it as I believed I was being so careful, double checking and going slow with no time pressure when I did this but I obviously I did it. So I will haul it into the engine shop Monday so more experienced eyes can look it over and see if there is any damage to rods and such and hopefully all I need to do is replace the rod bearings and bolt it back up. Of course there is the issue of that small score in cylinder 1 too. I will see what they say about that. Maybe that will be more of a problem than the caps. Still not sure how the cap mix up would make that noise though. Engine sounded like a diesel. I knew forged pistons made more noise than other ones like the hyper eutectic ones in first engine, but this did not sound right. Engine was still sticky to turn by hand even with the first 2 caps loose and sliding on crank like they should. Guess that is why I will take it back to engine shop and see what they say. Don't do this every week so not sure what is normal and what isn't. I wanted to do this myself this time as first engine I did for this car I let the engine shop assemble it rather than take it all home then bring complete engine back for dyno session. It only took a few hundred miles until the one set of roller lifters they put in upside down broke the tie bar and proceeded to eat up the cam and distribute the metal through the engine so I figured I would do it myself this time. It was my first full engine assembly and I learned some things along the way and some things happened that never happen to anyone else but this should not have happened. Oh well. Sob story over. Get on with it and if you have to learn the hard way make sure you only do it once. Hopefully I can get the problems solved easily, quickly and get it all back in the car so I can actually drive the car before winter settles in. Have a late summer going on now for about another week or so up here so will keep my fingers crossed. Thanks for responses.
-
Is there any commonly known things one has to clearance inside a 454 block when making it into a 489?? I used an Eagle 4.25 crank, Eagle 6.385 H beam rods and KB icon Forged pistons. Never noticed anything while assembling it and the people that did the machine work for me don't believe there is anything to clearance thus never said I should check anything. The engine was always tight to turn around when I was putting rods in and dergreeing the cam and such but I never noticed that the tight spots do seem to be at the same point on the crank. Of course now there is a knocking noise throughout the engine which I had believed was lifter/rocker noise but that noise has been fixed and the other one still exists. I did notice when I was putting engine together the counterweights and rods do clear the block but can't say as I ever looked at the inside of the rods to see it they were hitting the bottom of the cylinder bore. So just wondering if anyone has experience with this.
-
Thanks, I guess I will start with those fr5. I can't use the ur5 as it is a .490 reach and taper seat plugs for the stock heads and I gather these aluminum heads use a .75 reach with a gasket seat. Any thoughts about using a FR5 projected insulator vs FR5-1 non projected insulator?? FR5-1 looks like it has more space around the tip to allow more air fuel to immediate area?? How will I know if I have the right heat range....insulator will be light brown color???? If I was ahead of the curve I would have looked into plugs before I put the heads on so I could see just how they fit in the combustion chamber. I certainly don't want any 13/16 size plugs as I can see those being hard to deal with with headers. I have gone to a 1 7/8 primary tube header and the 5/8 ur5 plugs were not a problem to get in and out
-
No power adders other than the right foot. As I said a 489 with aluminum heads, edelbrock fuel injection, MSD Igniton, 4l60E trans, 3:90 gear, no A/C. Car is 99% street 1% track to see if et went down with new modifications. I see now where you guys are getting those NGK #'s as Brodix suggests a R5671A-8 for race gas which this car will never see as it is a street car not a race car.
-
Tried to search but don't appear to know how to do it effectively as I get everything with any of the words in it and using quotes comes up empty so I will ask directly. Putting a new 489 together with aluminum heads and am wondering if they will require something different than the NGK UR5 plugs that were in it. Brodix info suggests Champion RN12YC for pump gas which in NGK terms equates to BPR5ES, among others according to some lists, which is the same heat range as the UR5 I had in there. Thought about those Bosch Platinum plus 4 plugs with the 4 ground lugs on the side. Any advise/experience with playing with heat ranges and types of plugs would be appreciated.
-
Picking up my block today after decking and aligning mains and deck ended up at 9.787 so I would be .0018 out of the hole with the Probe pistons. Will look at some other manufacturers and see if I can find a piston to make thing fit closer to 0 out of the hole with out too much compression. Is .0015 the limit for out of the hole numbers generally??
-
Just trying to do something a bit different and see how it all works. It has become evident that I could measure blocks all I want but even the one I was able to buy that measured good enough to try was unfortunately twisted and will end up with a deck of 9.79 anyway. Being .0015 out of the hole is beyond my comfort zone and I am not willing to buy a new block to give this a try so have had to go back to a 6.385 rod and either keep it a 460 or splurge and get a 489 stroker kit.
-
Had a look at both of those piston manufacturers and they both make pistons that are designed to be used with 6.535 rods but they will create 12 - 13:1 compression ratios with 47 and 51 cc domes which is not exactly streetable in my opinion so that option is out.
-
OK, so you both agree with the .040 piston to cylinder head clearance then as being the number to shoot for when building the engine. Basically I am converting the .250 stroke from the 489 kit to a .150 longer rod but the difference is still .025 over the standard 9.78 kit combination which is where the .005 out of the hole comes from. Being out of the hole before decking is where it develops some concern as the block I use will likely need to be decked but until it is done I don't know how much it will need to true it up. The pistons I am looking at using are Probe with a compression height of 1.27. You say there are other pistons out there that have a clearance height of 1.24. That would give me the room I need to make the deck height what I want rather than hope it isn't too low and leave me with more out of the hole than I am comfortable with. I will look into these other pistons. Thanks.
-
Greetings All: Can't seem to get anywhere using search feature so will ask all you engine builders out there what you feel comfortable with when it comes to piston to cylinder head clearance AKA:Quench. Was trying to build a BBC with stock stroke, 6.535 rod and stroker piston with 1.27 compression hieght. You add all that up and you get 9.805 with a stock deck height on a BBC of 9.8 and using an MLS head gasket that ends up at .037 it only leaves .032. Is that enough with these engines?? Reading up on this it sounds like .040 is a common standard to safely plan on using steel rods and <6000 rpm. Outside that question, I know I am not likely to find an engine that will still have a 9.8 deck as it will likely need to be trued up so that number could easily change. My old block was only rebuilt once and was down to 9.79 which would put the piston out of the hole by .015 which is I believe a tad to far out to be comfortable with but even if it was only .010 it could be made up with a .050 head gasket and all should be OK if you buy into the acceptable clearance number of .040. All this is in an effort to gain .150 in con rod length. A back up plan does allow me to keep the stock stroke, use a 6.385 rod and a piston made specifically for this combo that would net out to only a total height of 9.78 though. So is the potential gain of the slightly longer rod worth the hassle and effort to find a block that is tall and true enough to enable keeping piston only .010 out of the hole and using a thicker gasket or not???? What you figure????
-
Thanks for the tip. I have been thinking about switching to aluminum covers for the sealing ability from my stamped steel ones. I am always paranoid about my valve covers leaking so usually go overkill and silicone both sides. It seemed to work on this engine but found out there wasn't any sealer put on the head or intake bolt threads so there was oil and coolant seeping out through them. I have the usual, at least in my experience, leaks from the front and rear crank seals which annoys me. Do you know of any seals made for these engine that actually work for more than a year??? I noticed the exhaust ports on the RR heads are a D shape instead of the real large ports on the 781's. What headers do you use as mine are a 1 7/8 primary which is much taller than the ports and wonder if that will cause detrimental turbulence. Am I over thinking things here??? Kevin
-
I was hoping they were worth 400 each but if I am out to lunch then I am out to lunch on their value. They have about 10,000 miles on them so I thought they might be worth more with the porting and such. I will ask $300 each and go from there I guess. They will come with the pushrods I have in the engine now and the ARP head bolts as well as I will be installing the Brodix heads with studs. This is a winter project so I won't have any new ET slips to give you until spring. It won't be a straight swap either as I have to do some work on the new heads and then they, along with my intake will go through the extrude hone process to smooth everything out. These heads are also a bit of an anomaly as they were ordered as 115 cc with the cnc combustion chambers but came without the cnc done. So the place I bought them from took them to a machine shop they work with and they made up a cnc program to smooth out the chambers then decked them to get the 115 cc combustion volume back. So they aren't going to be an out of the box head so direct comparisons would be tough. I would really like to bolt everything together and run the engine on a dyno then do the extrude hone thing and see what the diff is for ultimate comparison knowledge but that it not going to happen here. I have some pics of these heads with the cnc chambers if anyone is interested I can send them to you as I don't know how to post them here or even if I should. Thanks for the help and I will provide an update in the spring after I have an official ET slip. Kevin