

quarterbooty
-
Posts
54 -
Joined
-
Last visited
Content Type
Profiles
Articles
Forums
Gallery
Events
Everything posted by quarterbooty
-
It's been several months since my last update, but I've been bust making changes to the car. Just about everything I've been doing is intended to make the car more reliable or enjoyable. Probably the biggest change was swapping in a 200-4R trans. I bought the transmission off of a guy whose project stalled and changed gears (no pun intended) from an SBC/200-4R to an LS3/4L65E. He bought it from Brian Hofer (likely built by Mike Rightings) with the following setup: CK Performance billet forward drum CK Performance hardened input shaft 550 & 400 boost valves 694 GN servo Roller bearings (everywhere factory thrust washers were) Hardened sun shell 10 vane pump with rev kit (hardened rings) Wide red band Alto clutches (3 OD, 7 direct) I had Andre from Edge Racing replicate my TH350 converter for the 200-4R including a lock-up clutch. I'm using a TV cable setup from Bowler, which works extremely well. The bracketry adapts the factory self-adjusting TV cable to my Holley, and it shifted right on the first drive. I'm locking it up with the Bowler lock-up module. It uses a fourth gear pressure switch that triggers the module to lock up the converter 8 seconds later. It works as advertised, but with my cam, the engine isn't happy under 2400 RPM (equates to 75 MPH). For the time being, I wired the lock-up through a manual switch to prevent locking at lower speeds. B&M has a speed sensing lock-up mechanism that I may integrate into my configuration to make things seamless. The conversion itself was relatively straight forward. My car originally came with a TH350. I still use the factory crossmember, which is now mounted through the existing TH400 mounting holes (no drilling was required). The TH350 factory dipstick still works, as does a stock length TH350 drive shaft. The only things I changed were my trans cooler and shifter. I installed the largest cooler I could find to keep the directs happy, and I had to change shifters because my old one wouldn't work with a 4 speed. Sadly, after all of that work (thanks, Scott), the only picture I have is of the new shifter (B&M Pro Ratchet Stealth).
-
Get a Gates 22892 (lower radiator hose for 2003-2010 Dodge Ram trucks). It's a 1-3/4" x 2" with a 24-1/2" centerline length. Its contour is the closest I found to the 20677, which is what all Montes came with originally. See this thread for additional information. Hope that helps. Nick
-
Getting a 10" wide wheel to fit in the back isn't hard. I highly recommend measuring your car on both sides to ensure proper fitment. Otherwise, you'll end up getting a wheel re-hooped like me (I didn't measure the first time; I followed someone else's recommendation). Getting the measurements you need is pretty straightforward. I used a makeshift plumb bob to create a reference line for the wheel opening lip and used a straight edge to measure the distance to the wheel mounting flange. I repeated this process at 4 points across the wheel opening. It's extremely important that you install the brake rotor or drum during this process because these eat up space. My rules of thumb for clearance are 3/8" to the outer lip and 5/8" to the frame rail. These are pretty tight dimensions, but I have a stiff suspension and tires with relatively short, stiff sidewalls. Now, let's say your shortest measurement from the wheel mounting surface to the lip plane is 4-5/8". Subtract off 3/8" for clearance and you're at 4-1/4". The required backspace on a 10" rim then becomes 10" - 4-1/4" = 5-3/4", which is the typical starting point for our cars. You'll then want to verify that you have at least 6-3/8" to the frame rail. Again, tire selection is important. The true section width for a given tire size will vary from manufacturer to manufacturer. I run 285/40/18 Nitto 555s, and the sidewall is damn near perfectly straight on a 10" rim. Most manufacturers will provide as-installed section widths for a particular tire on a range of wheel widths. I hope that helps. Nick
-
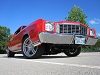
Thanks, Rod. I don't know how incognito it is anymore. I've tried to keep it stock appearing and retain as much of the original look as possible. Hopefully people will think it's just a big cruiser with shiny wheels. Nick
-
I'd say the DSE rear setup is a great match to their front components. I ran the Goodguys autocross at the Kansas event again this year. The car felt very balanced through the course. To be honest though, I was more focused on evaluating the new steering box. The course was quite a bit different than the "peanut" that they usually have. One section had a hard right followed by a hairpin left that was really difficult for my car due to the long wheelbase. The short wheelbase cars (e.g., Camaros) fared much better. The faster steering ratio definitely helped. I still consider the Lee box to be my favorite upgrade to the car. Nick
-
The turning radius of the car is unaffected. The internal stops inside the box are setup to match the steering arm stops against the lower control arms. The steering ratio, however, is reduced from the stock 16:1 to 12.7:1. Nick
-
I made a few other changes this spring to clean things up and hopefully to increase reliability. The stock alternator was probably struggling with fans, fuel pump, etc., so I replaced it with a 94A, 3-wire 12si (internally regulated, external voltage sensing). This allowed me to get rid of the voltage regulator, while retaining maximum voltage at the horn relay. I used an installation kit from MAD Electrical. At the same time, I cleaned up a bunch of the wiring in the engine bay. I figured if I was going to upgrade electrical pieces, now was the time to do it. I replaced my MSD 6AL with a Digital 6AL and installed a Painless F5 PWM dual fan controller to control existing dual 11" Spal fans. I also went ahead and swapped in a Be Cool radiator. Everything seems to work well. The F5 controller works like a charm. I can set the the start temperature for the fans, and they'll come on at 50% speed and ramp up to 100% speed at the upper temperature setpoint. Nick
-
I haven't really had the opportunity to run the new rear components through any hard driving sessions yet. I'll autocross it at Good Guys in a few weeks and will know more after that. It does seem a lot more compliant than the trailing arm-mounted bar. Good luck with your project. It sounds like you're off to a great start. Marcus is definitely the guy to take advice from when it comes to suspension. Nick
-
Thanks. I actually finished up the tank in May and have been driving it all summer. Congrats on mid 11s. Originally Posted By: 502ci Nice...looks expensive though... Yeah...I quit adding up receipts a long time ago. Nick
-
The Lee steering box is great; it's one of the best upgrades I've made to the car. It really changes the car's personality. The steering is tight, quick, and responsive. I've also made quite a few changes to the car since my last post. First, the rear sway bar would interfere with the seam on the front of the fuel tank under suspension compression. I ordered a custom tank from Rick's that slopes the front of the tank to provide additional clearance. The corners are also notched for exhaust clearance, although I don't need it yet. Even though my car is currently carbureted, I went with a tank designed for fuel injected setups to set me up for changes down the road. There's an internal sump that keeps fuel around the pump pickup and Hector added all of the necessary vent connections. The only thing I had to do was bend up some new tubing for the vapor lines. Nick
-
Lower Radiator Hose with Aftermarket Radiator
quarterbooty replied to quarterbooty's topic in Engine Tech
I solved my problem. All Montes used a Gates 20677 for the lower hose. It's a 1-3/4" x 1-1/2" with a 25-3/32" centerline length. Gates tabulates this information for all of their molded hoses in catalog 431-2040. I spent a decent amount of time going through this catalog at O'Reilly looking for hoses with 1-3/4" or 2" ends on both ends, and a centerline length close to that of the 20677. Needless to say, there are numerous matches to these criteria. The catalogs also have pictures of the hose. The pictures helped me narrow down decent matches to 5 or 6 candidates that might have a chance at working, so I ordered them up. The best match I found is a Gates 22892 (lower radiator hose for 2003-2010 Dodge Ram trucks). It's a 1-3/4" x 2" with a 24-1/2" centerline length. Its contour is the closest I found to the 20677. Since the water pump nozzle is 1-3/4", I also picked up a Gates 26392 2" to 1-3/4" hose adapter that fits inside the 2" end. It fits perfectly, and I didn't have to cut it at all. Hope this helps someone else out. Nick -
For you guys with aftermarket radiators, what are you using for a lower radiator hose? I'm replacing a universal Jeg's radiator with a Becool 60008 that's supposed to be direct fit. It does fit really well, but the outlet nozzle is still 1-3/4" (stock is 1-1/2" for both SB and BB I believe). My old Jeg's radiator also has the 1-3/4" nozzle, and it was also angled up for some reason. This necessitated the use of one of the universal fit hoses (the ones that look corrugated). It worked, but I hate how it looked. I was looking forward to using a factory style hose with my new radiator, but I'm stuck unless anyone has a solution. Thanks in advance. Nick
-
Here are some side-by-side pictures of the original Saginaw 800 box next to the Lee-built Deplhi 670. Here it is installed in the car. Although not shown here, I have the pitman arm back on and connected to the center link. I just need to finish making a new return hose (using Aeroquip TFE hose), and I'm done. Everything feels solid; there's no play when you grab the wheel. The box ratio is 12.7:1, and it's 3 turns lock to lock.
-
Thanks for the information, guys. Sucks that they won't fit, but I'm not surprised. Keep us updated on Schoenfelds. Nick
-
Does anyone know if the Dynatech MuscleMAXX headers for SBCs will fit Montes? I've been looking at these for awhile, and AFab finally got smart/desparate enough to include the collector adapters in with the headers to make these reasonably priced. I know of no other header with an 1-3/4" primary that is known to fit the Monte chassis, but these still have hope. Here's a link to their site for reference. Thanks in advance. Nick
-
Thanks for the information everyone. I called Gear Vendors this afternoon, and the tech said that TH350s (what I have) don't require any modification to the cross member to accept the overdrive assembly. He also said that since a TH350 is about 3 inches shorter than a TH400, less clearancing is required to the transmission tunnel. Indentations near the 10 and 2 o'clock positions of the adapter about 1/4" deep and a few inches long are all that is required. Nick
-
Just wanted to ask a few clarifying questions about the Gear Vendors fitment. It sounds like the consensus is to remove the rubber isolators from the transmission cross member to gain clearance. Hammering on the transmission tunnel then may or may not be necessary based on the experiences listed here. What about any other changes to the cross member? I've done some searching and found that some Chevelle installations notched the cross member to clear the sump on the Gear Vendors. Is this necessary? I'm guessing you guys would have mentioned it had you needed to do it. Are there any other installation challenges (especially those that might be lesser known) that anyone has come across? An overdrive is finally making its way to the top of my things to change list. The Gear Vendors seems to be the easiest and dare I say most economical way to get there. Thanks for any insights. Nick
-
Thanks. This type of sway bar is much better than the stock style because it doesn't bind as the rear end travels up or down. The effective spring rate is also much higher (and adjustable). The control arms have conventional bushed ends. The swivel link is located in the tubular member and allows the ends to rotate independently around the tube's axis. The file photo from DSE shows the location better. Where the silver meets the black is where the joint is at. Originally Posted By: Heckeng Does the new steering box look like the stock one? I'll have to get a picture of it. It does look different. It's noticeably smaller (I think it weighs 6-7 lbs less), but all of the ports, mounting holes, and input/output shafts are in the same location as the 800 series box. Nick
-
The new Lee steering box is in, but I decided to work on the rear suspension first. I replaced my existing Metco trailing arms with Swivel Links from DSE. The OEM-style Hellwig sway bar was replaced with a DSE unit that clamps to the rear axle and terminates at the frame via end links. The install went relatively smooth, and I'm real happy with the fit and finish. I haven't driven it yet, but the rear end didn't fall out when I backed the car out of the garage. That's a good sign I guess.
-
A new Lee 670 steering box is on its way courtesy of Marcus at SC&C. I'll post install pictures and feedback once I get it installed. I'm looking forward to increased effort and road feel. I certainly won't miss being able to turn lock-to-lock with my pinkie. Nick
-
The autocross was a blast. I've never done it before, which is evident by my times. I went six times and got faster each run. With a good driver, I think the Monte could have got into the 30's easily. The car's ability was certainly not the limiting factor here! Nick
-
Thanks again for all of the positive feedback, guys! I'm glad you like it. No, the full spring is eliminated in a coilover setup. On the front, the spring is compressed between then the frame pocket and an adjuster nut that's on the shock body. Ride height is fine tuned by turning this nut up or down with a spanner wrench to increase or decrease the spring preload (raises and lowers the vehicle, respectively). Out back, it's a little different. The spring is captured between a cup at the top of the shock and the adjuster nut threaded onto the shock body. Ride height adjustments are similar to the front. That said, the range of ride height adjustability is actually rather limited. You don't get the entire range of the shock body to set the spring compression. There are several reasons for this. In the front, you want the lower control arms to be parallel to the ground with the vehicle at rest and fully loaded to achieve ideal suspension geometry. This doesn't apply to the rear; however, in both cases you have to ensure that the shock will be operating within its travel range or you may over cycle it resulting in damage. I hope that addresses your question. Maybe it'll cause a few more. Nick
-
They're not that bad. Something like $50 a pair. Wait, you're not my wife...
-
Ha! If I knew that we were racing I would have floored it! I still think that you were sand bagging. Nick
-
Thanks, Bill. I had the same questions/concerns when I started looking into the setup. It's a pretty new design from DSE, so there weren't many people running at the time that I was evaluating my options. Over on pro-touring.com, I found a guy with a '66 Impala that installed the equivalent setup on his car and he loved it. I talked to the reps at DSE on multiple occasions, and I was finally convinced that it's a good design. Here's a picture from their site of what's included in the kit: There are heavy gauge steel brackets that bolt into the existing upper shock mount location on the frame with three bolts. There are tabs on this bracket that are used to bolt up the upper eye of the replacement shock. There is an analogous bracket that wraps around the trailing arm mount and ties in to the rear end with four bolts. Two on the back of the trailing arm bracket, one through the original shock mounting hole, and the last via the trailing arm bolt. The shock then sits in a pocket on the new bracket and a bolt goes through the lower eye. Here's a shot from the other side on my car: In my opinion, it's a robust design. I was looking at the welds connecting the factory spring perches to the axles on my car, and I was less than impressed to say the least! Nick
