TheBMan
-
Posts
394 -
Joined
-
Last visited
-
Days Won
3
Content Type
Profiles
Articles
Forums
Gallery
Events
Everything posted by TheBMan
-
Ah, so it will replace one of the existing clock bulbs in the cluster. Someone has clearly been in this dash before, based on some of the things I'm finding. I can't thank you enough for this information. I've been taking a lot of pictures and will document a lot of the things I've done when I have it all back together and working, probably a week or two at most. Thanks again @jft69z!!
-
@jft69z Ah! Makes sense! Fiber optics in the 70s. Who knew?! But where does the light socket plug in? Obviously it's a twist-in and getting its power from the point of attachment but I have no unused sockets on my dash cluster and see no other light socket holes.
-
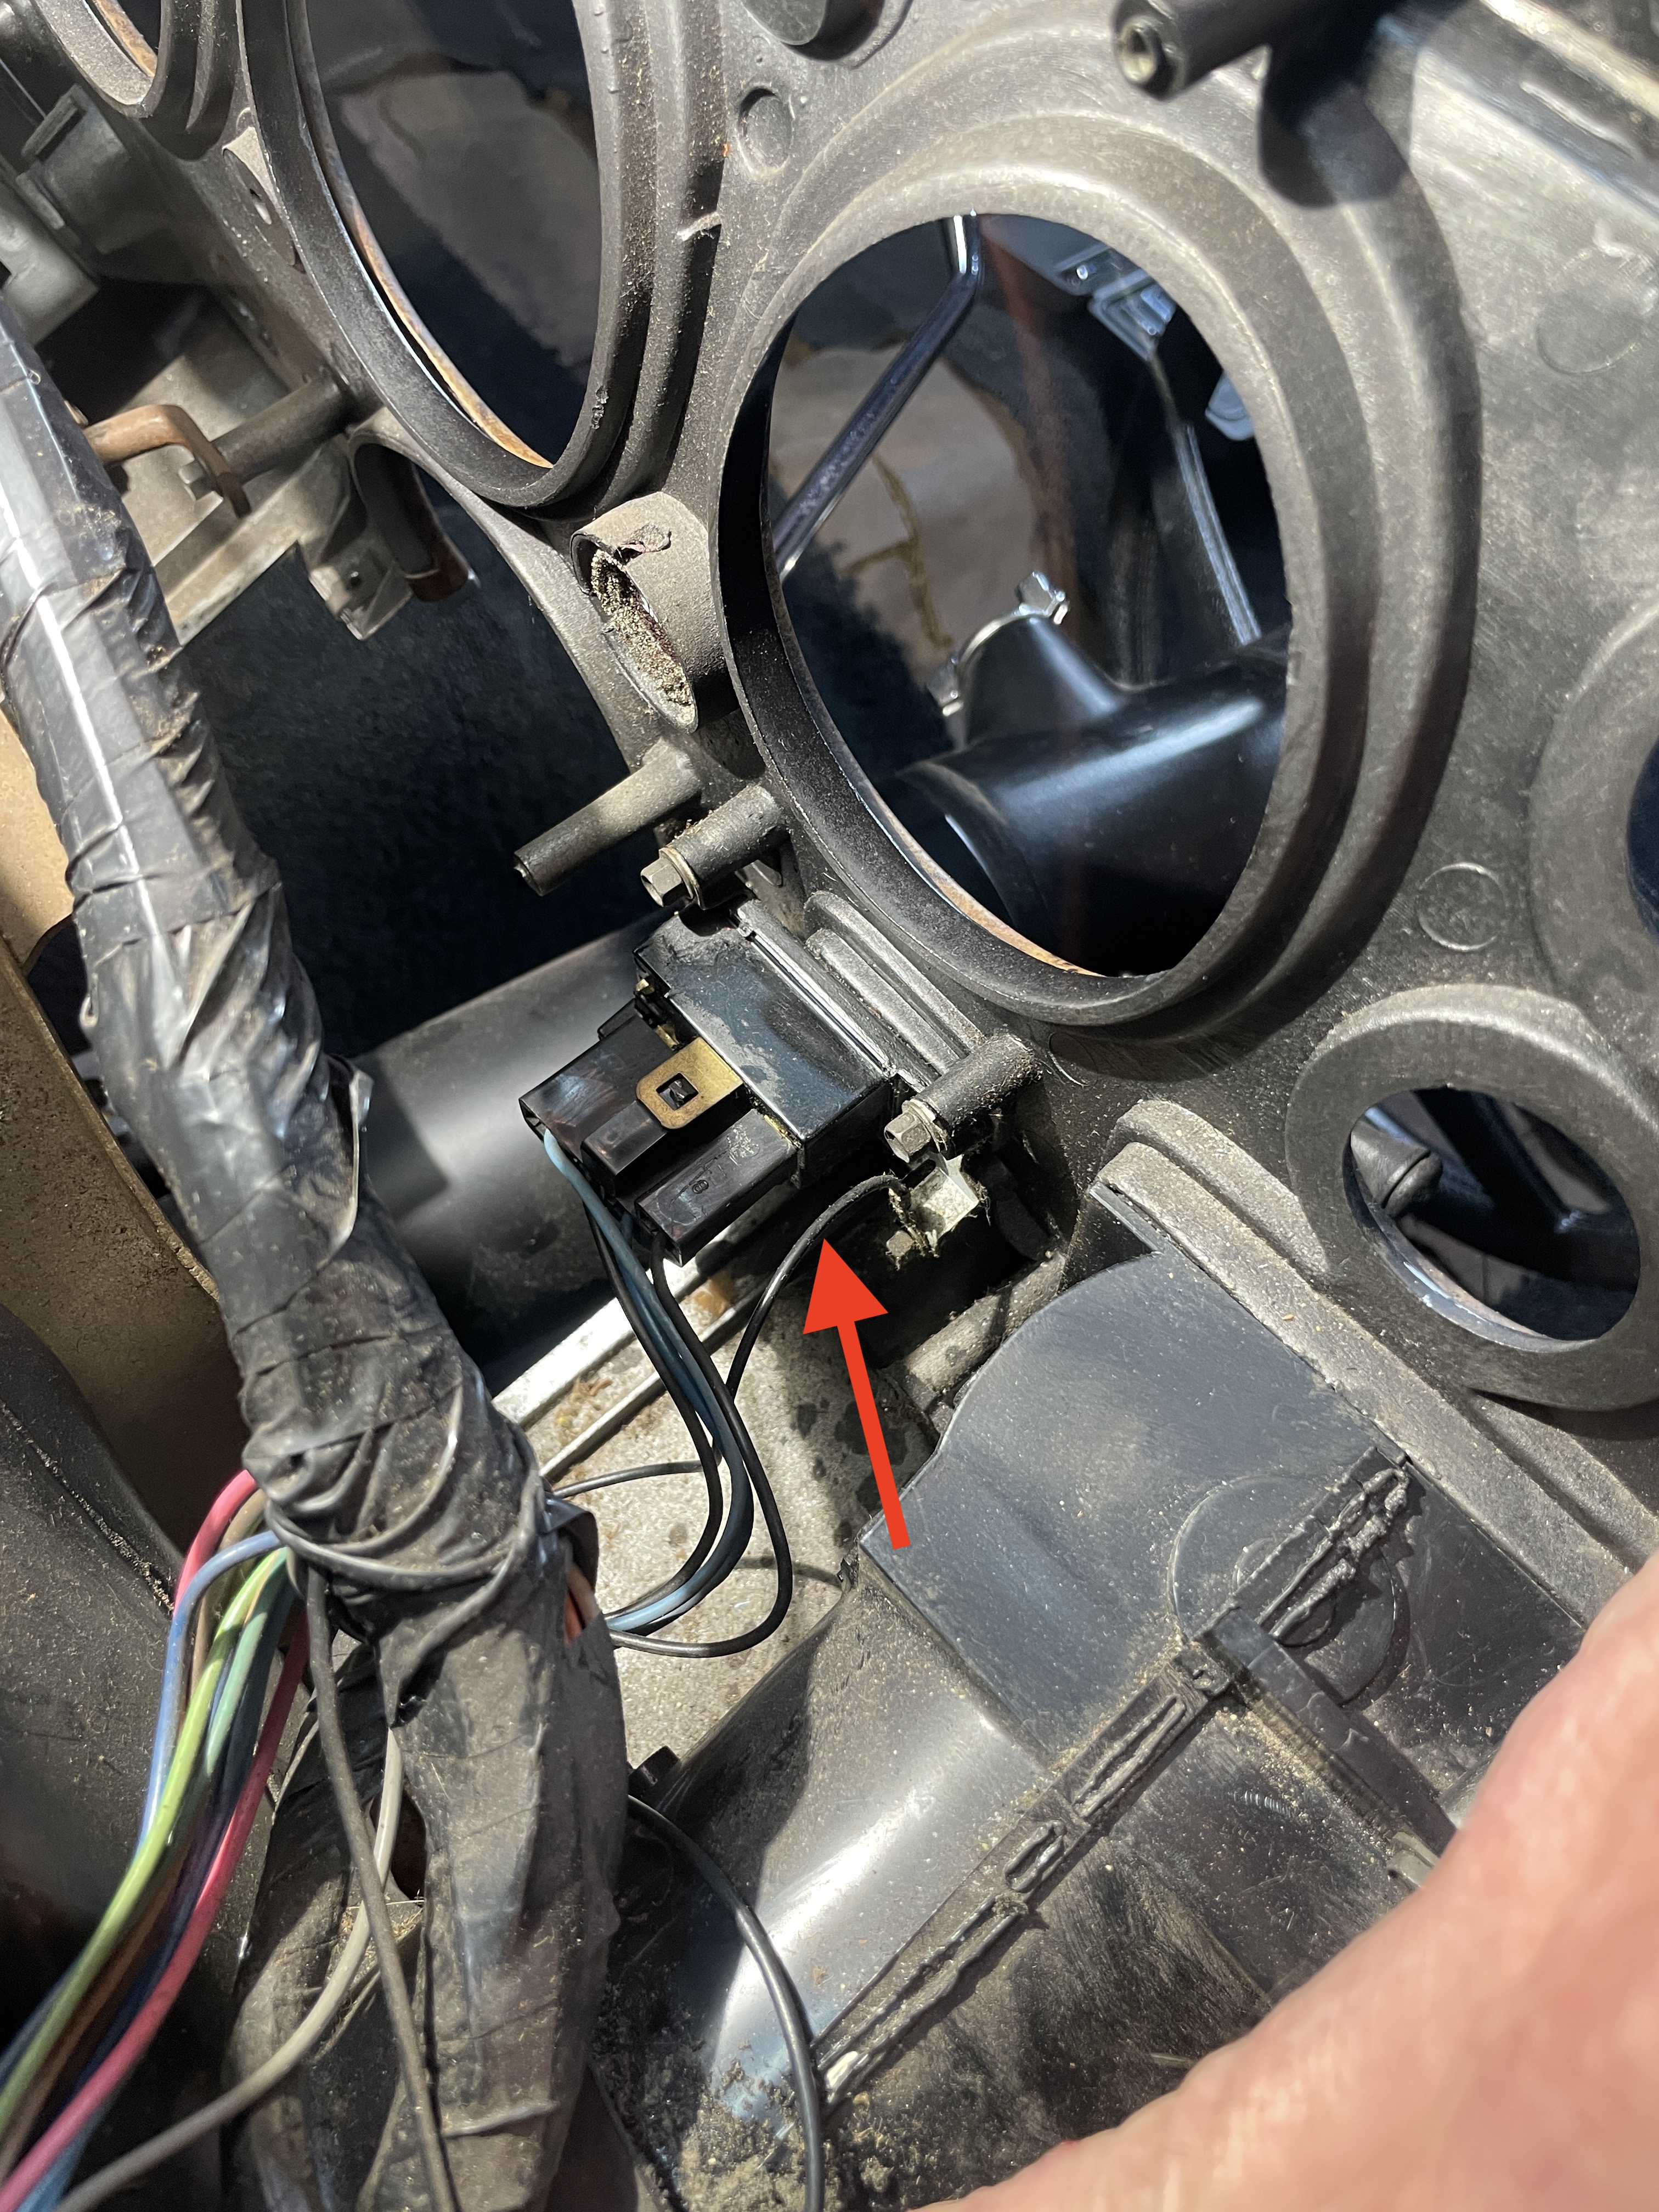
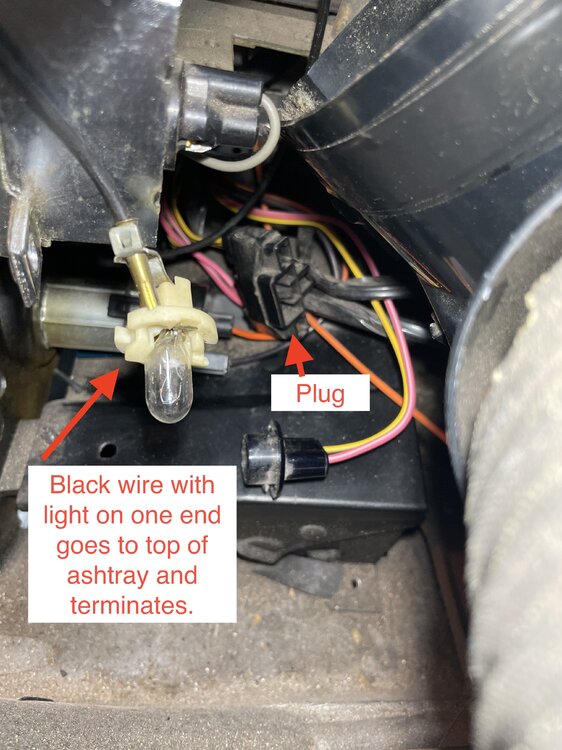
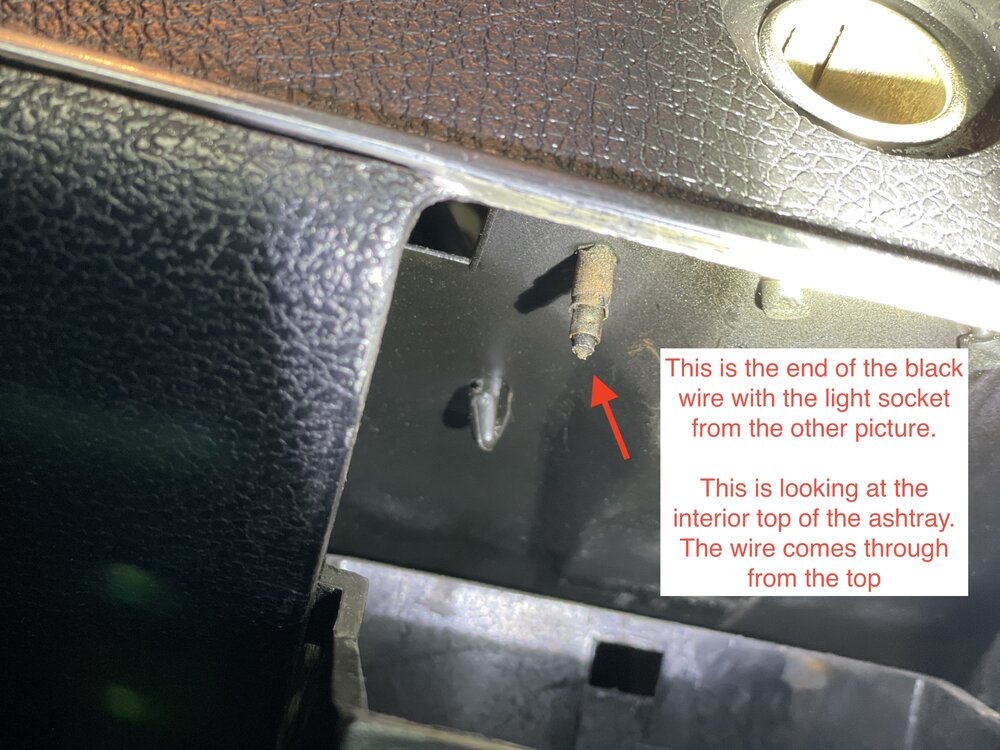
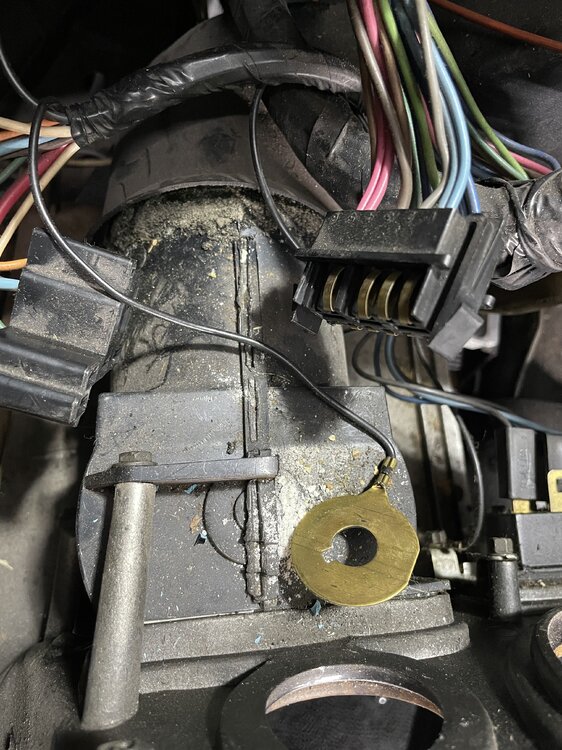
Pictures attached. Dash work on my 72 Monte Carlo continues. Found this wire and plug that I need info on. The first picture is looking down from the top, just above the ashtray, lighter and HVAC controls. The second picture is looking up, into the ashtray housing. The black wire with the light socket is a single wire that comes out of the top of the ashtray. There is no power source. Looking at the other end of the wire where it comes through the top of the ashtray housing, it looks like something is supposed to continue from that wire but perhaps has been cut off? Any ideas what the plug is for? For reference, the car has the ZJ9 Lighting Group. There are courtesy lights in the glove box and at both sides of the dash at the bottom, all of which work. The ashtray light is a mystery.
-
@stangeba Yes, my old switch (and the new one) look exactly like this.
-
Pretty confident I have things sorted out. See attached picture. The ground wire attached to the wiper switch should actually be attached to the cluster housing. The end you can't see attaches to the dash frame where the metal strap part of the headlight ground strap attaches. Then attach the headlight ground strap as it's supposed to be attached - large ring to the headlight switch, metal connector to the wiper switch (two screws) and metal strap to the same ground point as I mentioned before. This would make sense and explain my lighting issue as the cluster housing wasn't properly grounded. I'm waiting on some new parts but as soon as I have it reassembled, I'll take pictures and post for clarity and future reference.

-
This is GREAT! Thanks @jft69z!!!
-
The lens was pretty dull so I broke out the orbital and polished it while I have it apart. Turned out pretty good. I have a Griots G9 random orbital (6") and I used JaxWax Perfect Polish for the first pass and JaxWax Final Finish for the final pass. This works well on plastic headlights, too.

-
@stangeba - Updates. The ground wire I mentioned has continuity. I'm curious about the ground wire you're pointing out since I don't have that. There was nothing attached on my cluster at that position and I have no stray wire(s) that aren't connected.
-
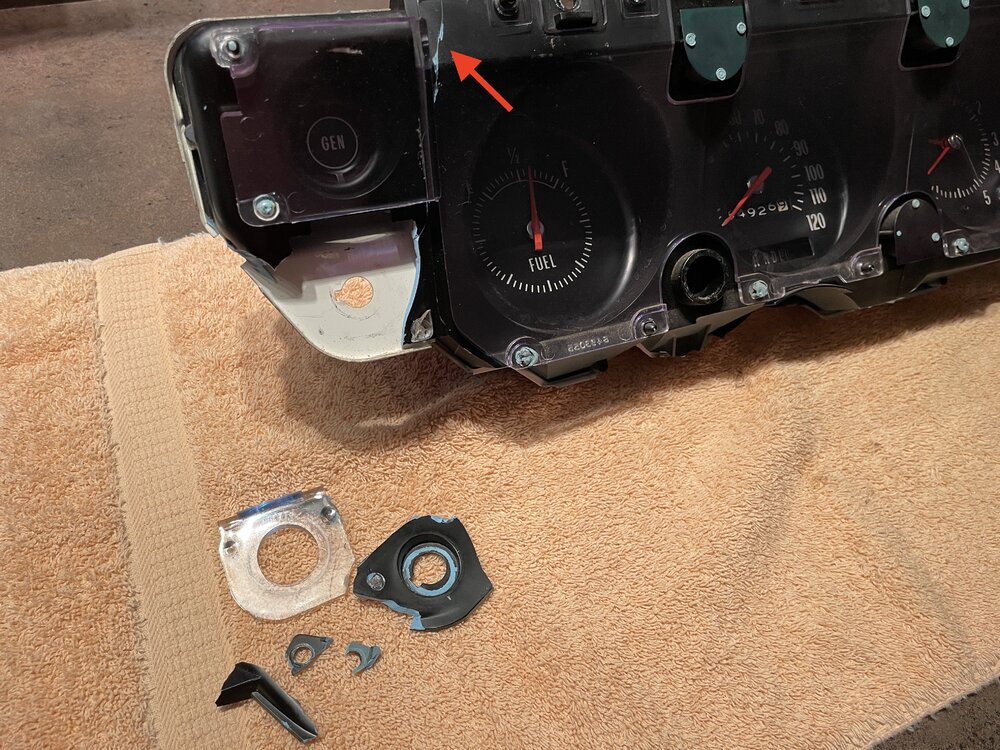
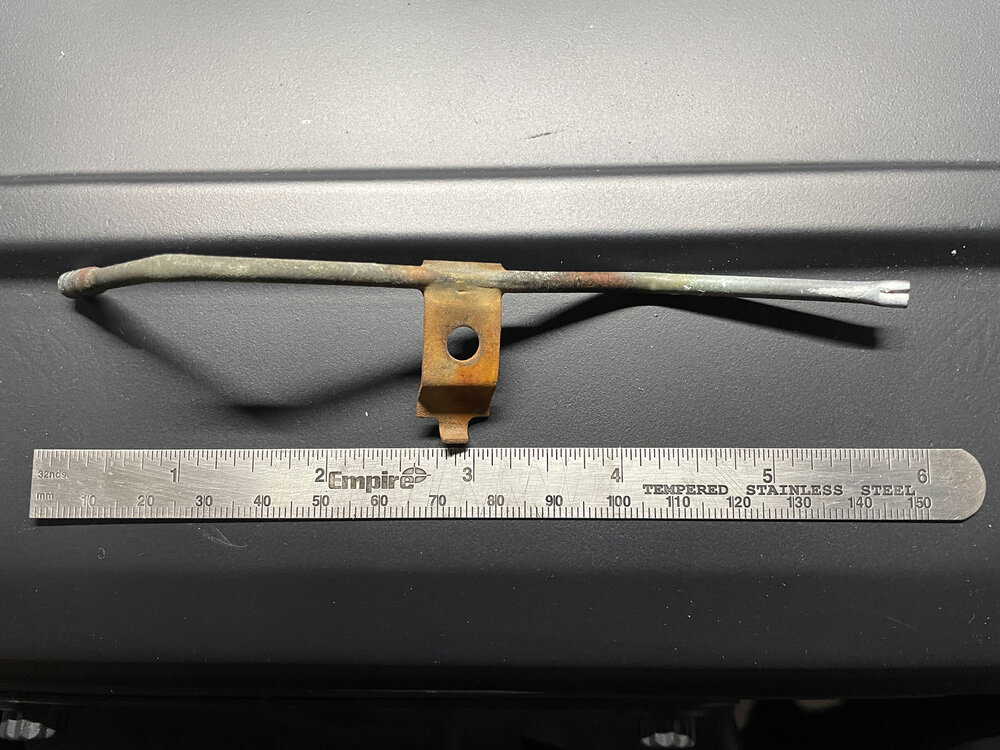
@stangeba - doing it since I bought it. I took the dash pad off today and found some interesting stuff... Pictures attached. 1. The cluster housing was broken at the lower left corner where the headlight switch comes through. Also cracked at the top left. The ground cable was connected but the connection was loose due to the breakage. I tightened it and it was secure but the issue was still there. 2. The ground strap does not look like yours or what I've seen elsewhere. It's the large ring that the headlamp switch goes through, clamped between the metal cluster housing and the switch but it's just a black wire that goes into the harness. There is no metal strap like I see on yours and I've seen on others. I even bought a new ground strap in anticipation of this but it doesn't match what I have. I'll check continuity on the existing ground wire. Update: It did just occur to me that the ground wire that you show in your picture is not present on my car. At least there was nothing attached to that screw anyhow. Going to check that now... 3.) The headlamp switch was disintegrating. See attached picture and note the white litter. And the screw I'm pointing to in the photo was half-way out (not contacting the circuit board). I've purchased a new headlamp switch to replace it. 4.) It's clearly been out before as there were other broken mounting tabs on the cluster housing. Three of the 7 were broken, in fact. I've ordered a new housing. I'm going to make sure everything is grounded when I reassemble and I'm going to replace all of the 194 bulbs while I have it out. If you or anyone else has any thoughts on the unique ground wire, I'd love to hear them.

-
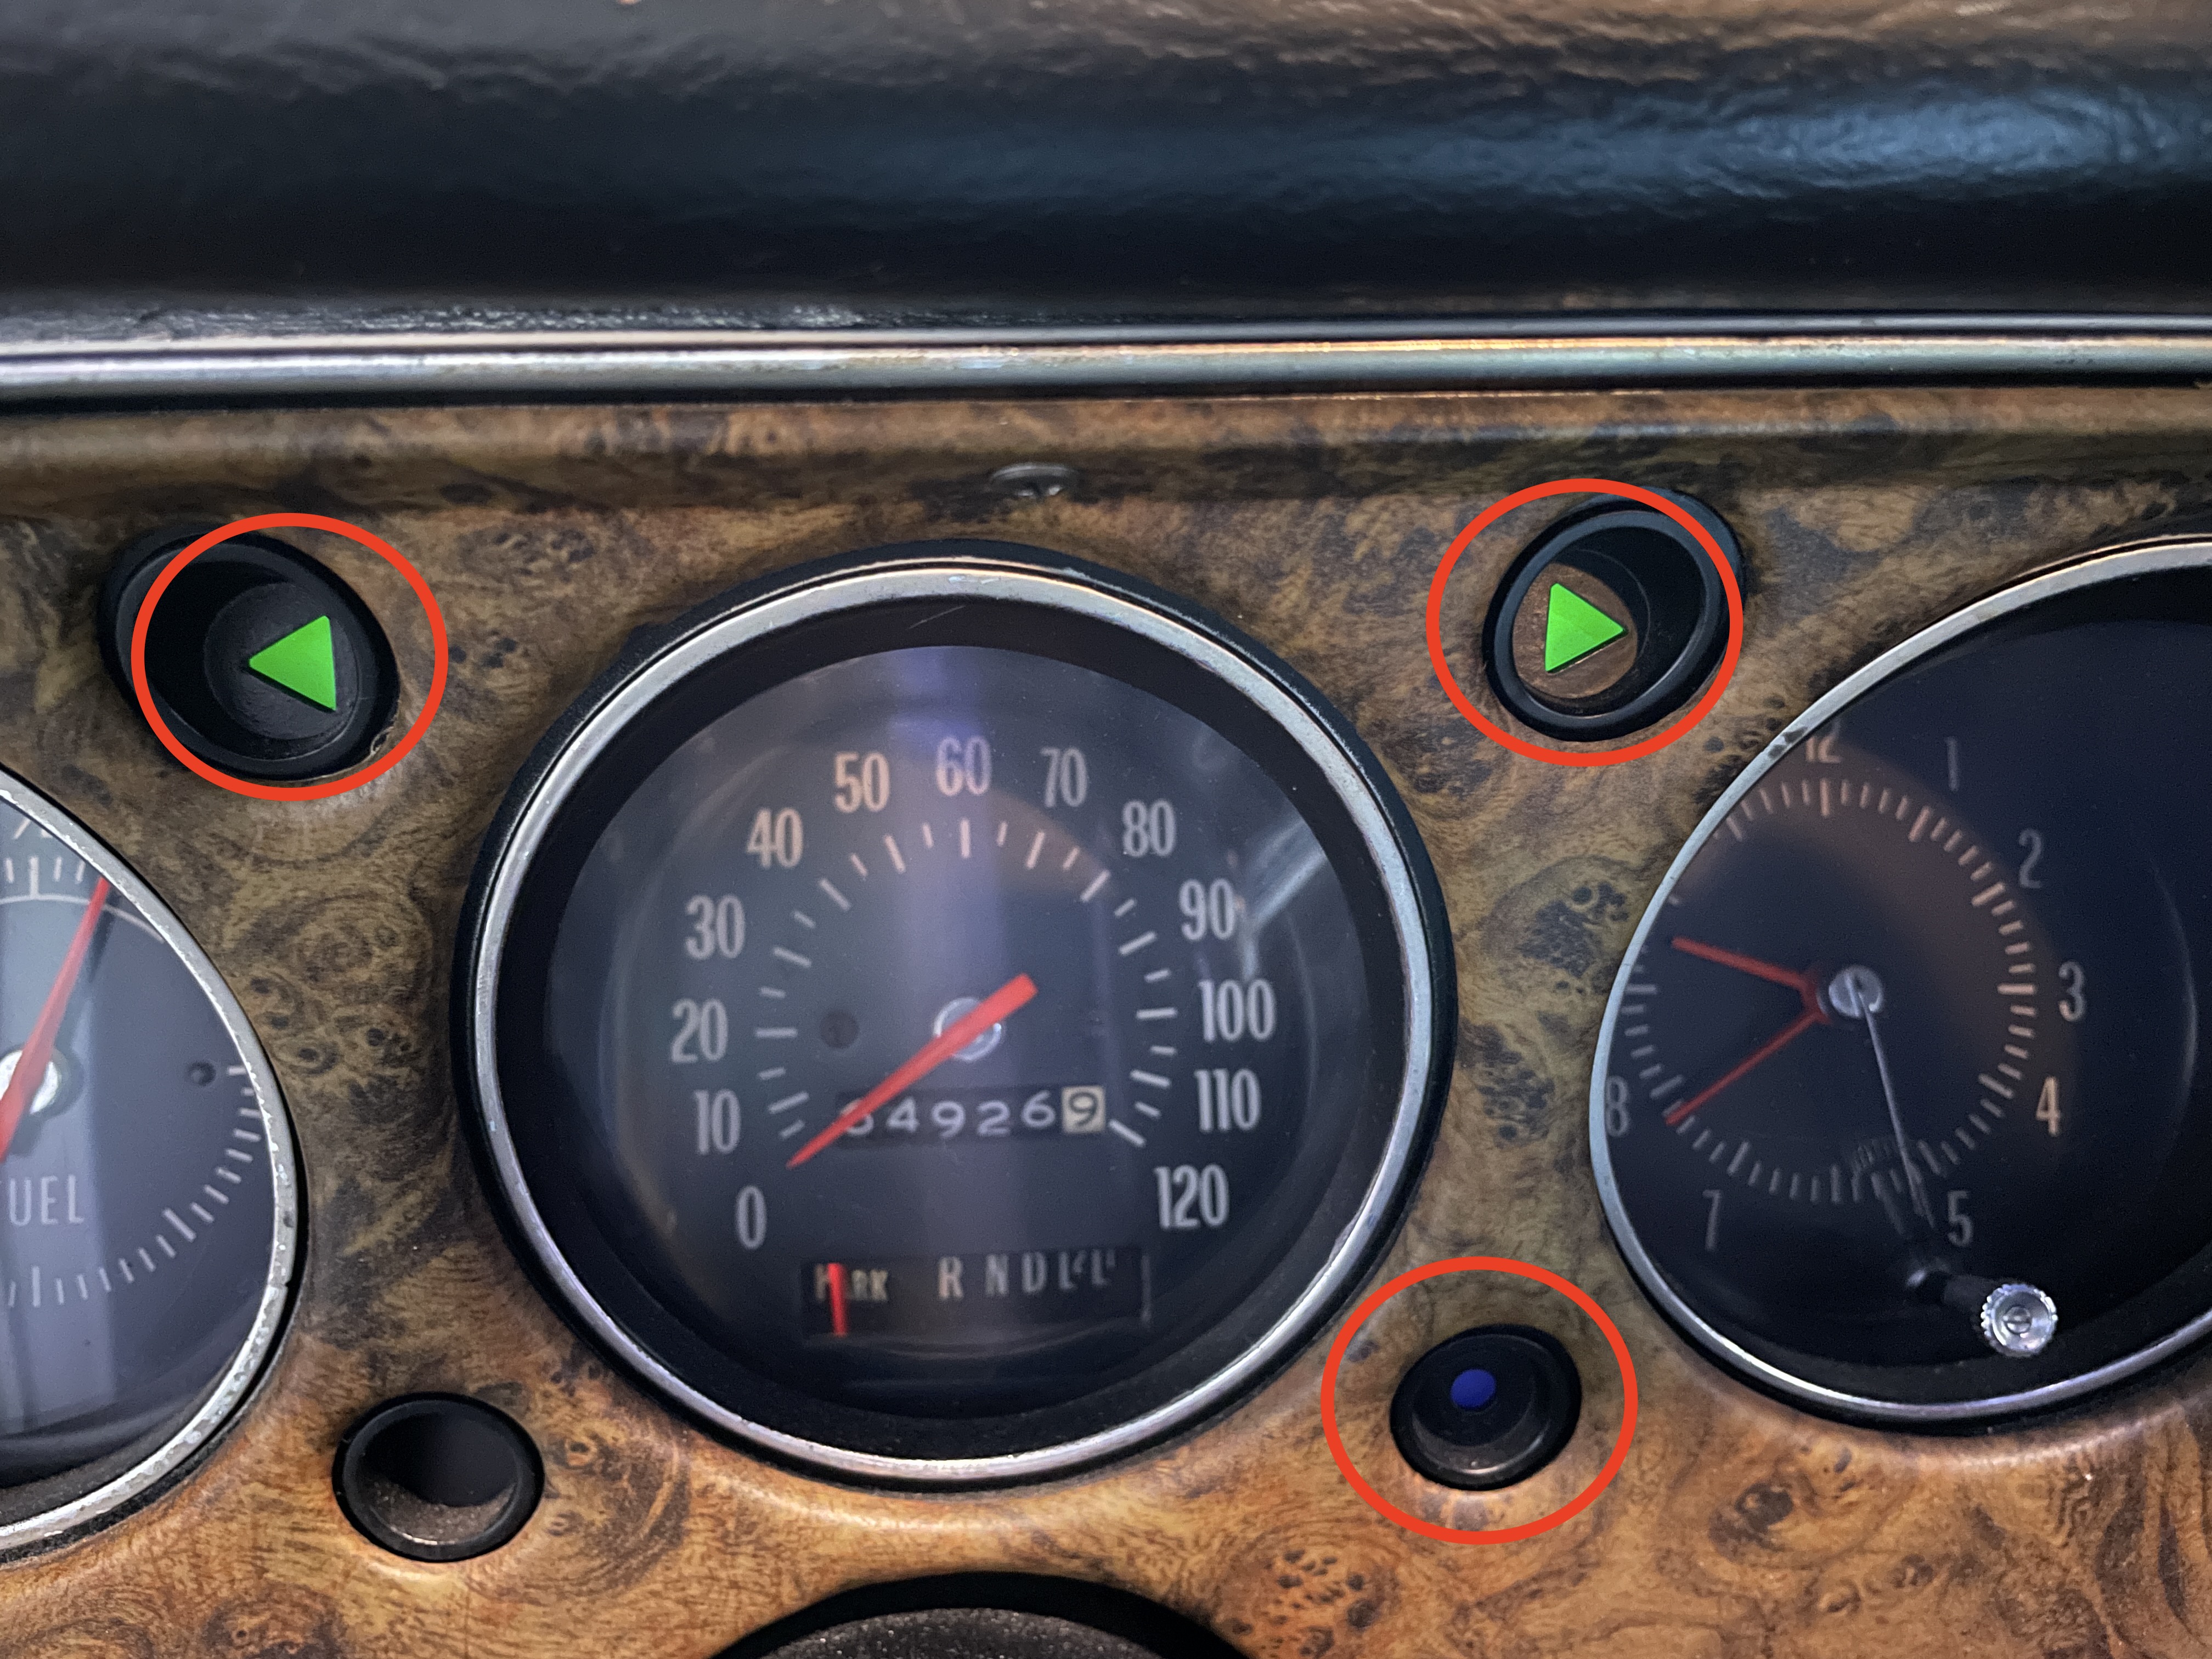
Hello! See attached photo. When I turn on the headlights (72 Monte Carlo Custom with ZJ9 lighting group) the turn signal indicators light up as well as the high beam indicator. All lights work properly otherwise. Hazard lights (four-way flasher) work properly. All fuses are good. Headlight switch is tight in the dash (thinking about the ground strap behind the dash). Toggling the high beams doesn't affect it. This happens when the headlight switch is in the parking light or headlight position. I suspect a bad ground somewhere but thought I would ask in case it's a common thing - save myself a lot of time troubleshooting. Thanks!

-
I'm sure there are many who would like that. I know I would! Thanks @jft69z
-
@Paul Bell - I'm jealous. I'd love to have a parts index for my car. I've looked but only found one that was in horrible condition and basically useless. Having the original part number is so helpful at times.
-
One of them is cracked at the joint where the tube meets the mounting bracket - someone probably tried to bend it for some reason and it cracked at the weakest point. I'll probably never use them, I want the car to be correct and fully functional. I'm pretty confident they are original - the rest of the car is original and they look like others I've seen in pictures of 72's. Just a hunch but pretty confident. Thanks!
-
@cny first gen 71 - Thank so much! I just bought a NOS part on eBay. Yours probably would have been cheaper. LOL I very much appreciate you stepping up. If the eBay item turns out to be wrong, I'll message you for sure. Thanks!
-
YES! Found it on eBay. Last one. NOS part appears to be correct. Not cheap but whatcha gonna do? Does not list it for a Monte Carlo (was listed under 71-72 Chevelle) and technically they should be different, but whatever, I'll take it! Thank you @MC1of80!

-
I need to replace the washer squirter nozzles on my 72 Monte Carlo Custom. They appear to be readily available in the aftermarket but the parts sold do not match what's on my car, which I assume are original. Attached is a photo of what I'm working with. The aftermarket pieces don't have the locating pin, are a different length, and different shape. I've called a couple of the aftermarket suppliers but finding someone who actually wants to figure out a solution is difficult. Does anyone know of a supplier or does anyone have one or two they would like to sell to me? I really just need one but would love a set. Thanks!
-
@72-CLASSIC_RIDE Hey Doug, I PM'd you my Custom info for your database. And yes, there is constant power at the harness connector in the trunk for the light. I ordered a new lamp assembly. Thanks for everything! Bryan
-
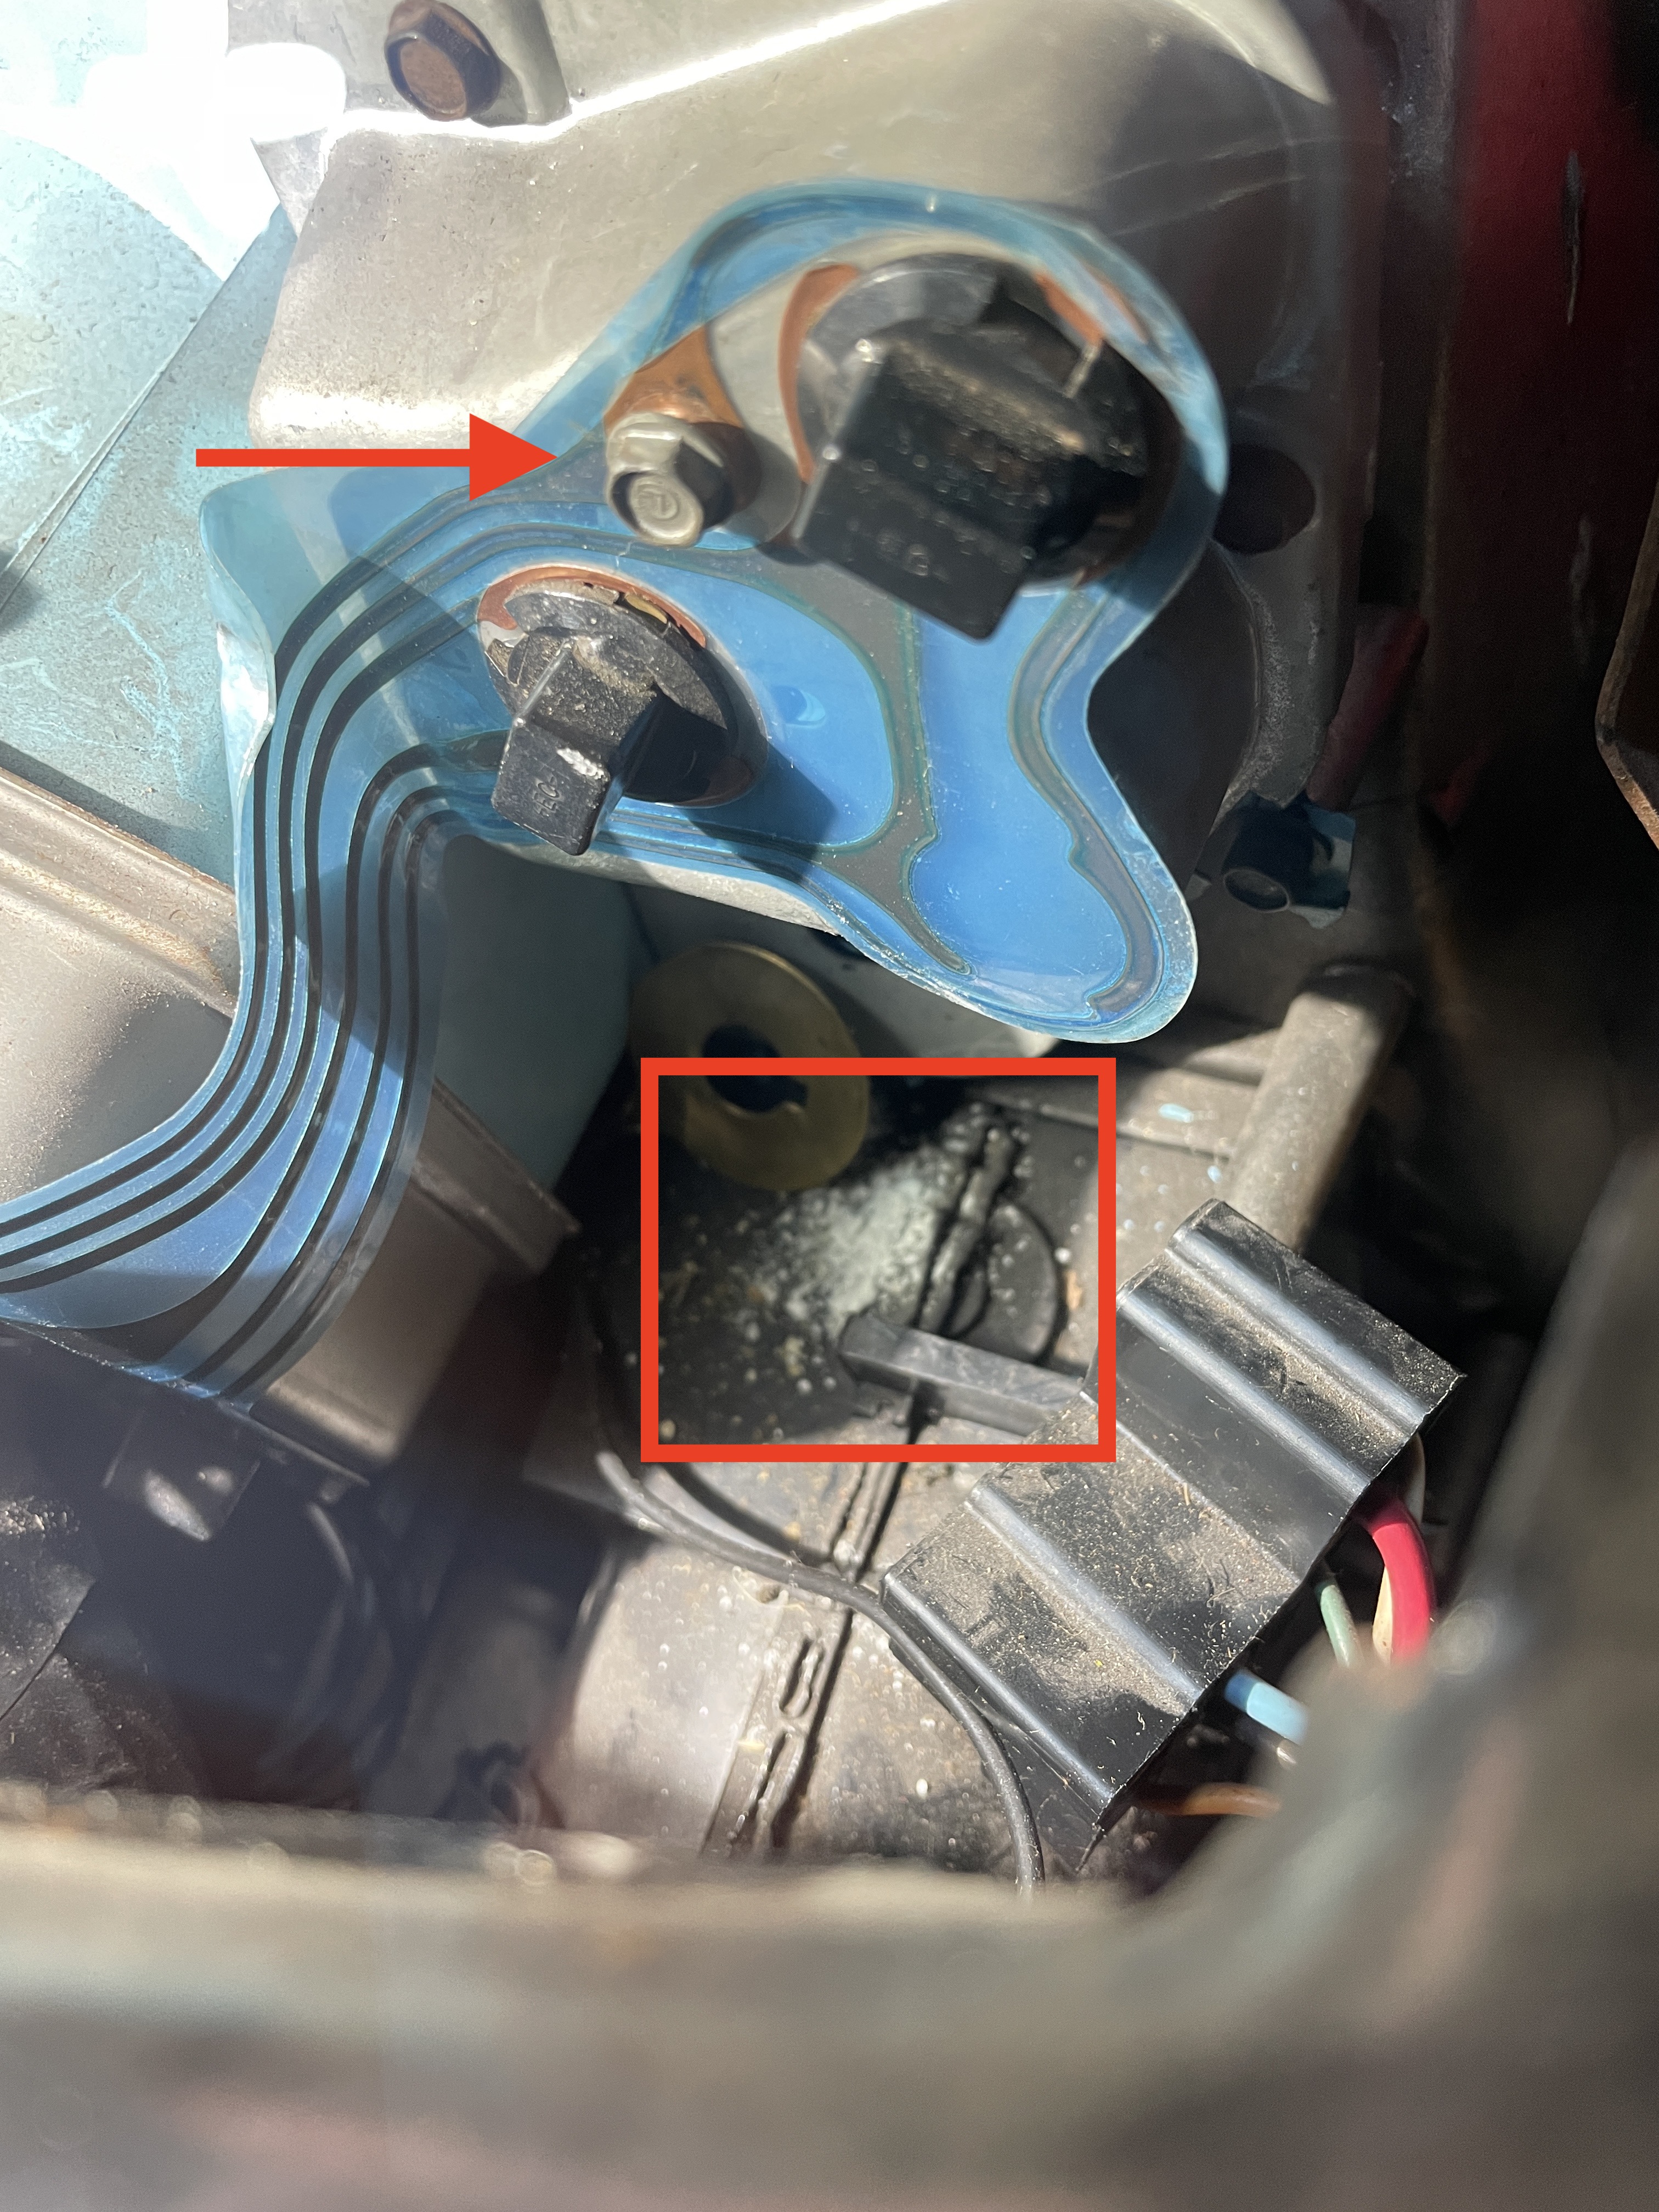
Sooooo... pretty easy diagnosis. See attached image. Wire was tucked up behind the brake booster. Looks like it got cut at some point and exposed the wire, shorting it out and burning the fuse holder. There is a constant 12v at the bulkhead connection so I'd say I just need to either a) fix the wire and fuse connector or b) replace the assembly. I'll probably just get a new assembly since it comes with the wire and fuse holder. The current one is pretty rusty and the wire is brittle. I feel bad for all of the time and advice you guys gave. Had I just looked at this first, it would have been a no-brainer. BUT, I really wasn't aware they were mercury switches so I was stumped on how to turn them off and on. That's how this all started. LOL Regardless, thanks again.
-
@72-CLASSIC_RIDE - yes, it is a Z03 Monte Carlo Custom and included the ZJ9 Lighting Group (straight from the build sheet). I'm going to check the inline fuse, test the connection at the mercury switch as you suggested. Per @Leghome's comment, the bulb sockets are clean, no corrosion. And per @Rob Peters's comments, the trunk light has a steady 12v supply but the lamp doesn't work (bulb tests good). The underhood has no voltage at the socket which leads me back to @72-CLASSIC_RIDE's comments about the inline fuse and connection at the bulkhead. I'm going to check these things but it may not be today. I'll follow up as soon as I do! Thank you very much!
-
@Leghome - this makes perfect sense. The bulbs are good, fuses are good, wires are connected. The housings themselves, especially the underhood light assembly are pretty corroded. I'm guessing the innards are junk. This car is mostly original (numbers matching, too). Just needs some TLC to get it back to 100% proper working order. Thank you!
-
My 72 MC has the ZJ9 Lighting Group which includes, among other lights, an underhood light and a trunk light. Neither of these lights work. My question is - and I've looked for the answer which I can't even find in the original factory owners manual - how to you turn those lights on and off? I've tried the courtesy light position on the headlamp switch which doesn't work and they don't come on and off with the doors. I have tested the bulbs and they are good. I've also tested all fuses, which are good. I feel like it's a silly question but I seriously cannot find the answer!
-
@Canuck - I hadn't noticed the difference in the placement of the sprayers from 70 to 71/72. Thanks for the clarification and now it all makes perfect sense.
-
Very interesting! So mine is correct as it is (once I get the cowl clips). I wonder why they abandoned the earlier 70 style routing? Probably a cost move. I really appreciate your pics and response!
-
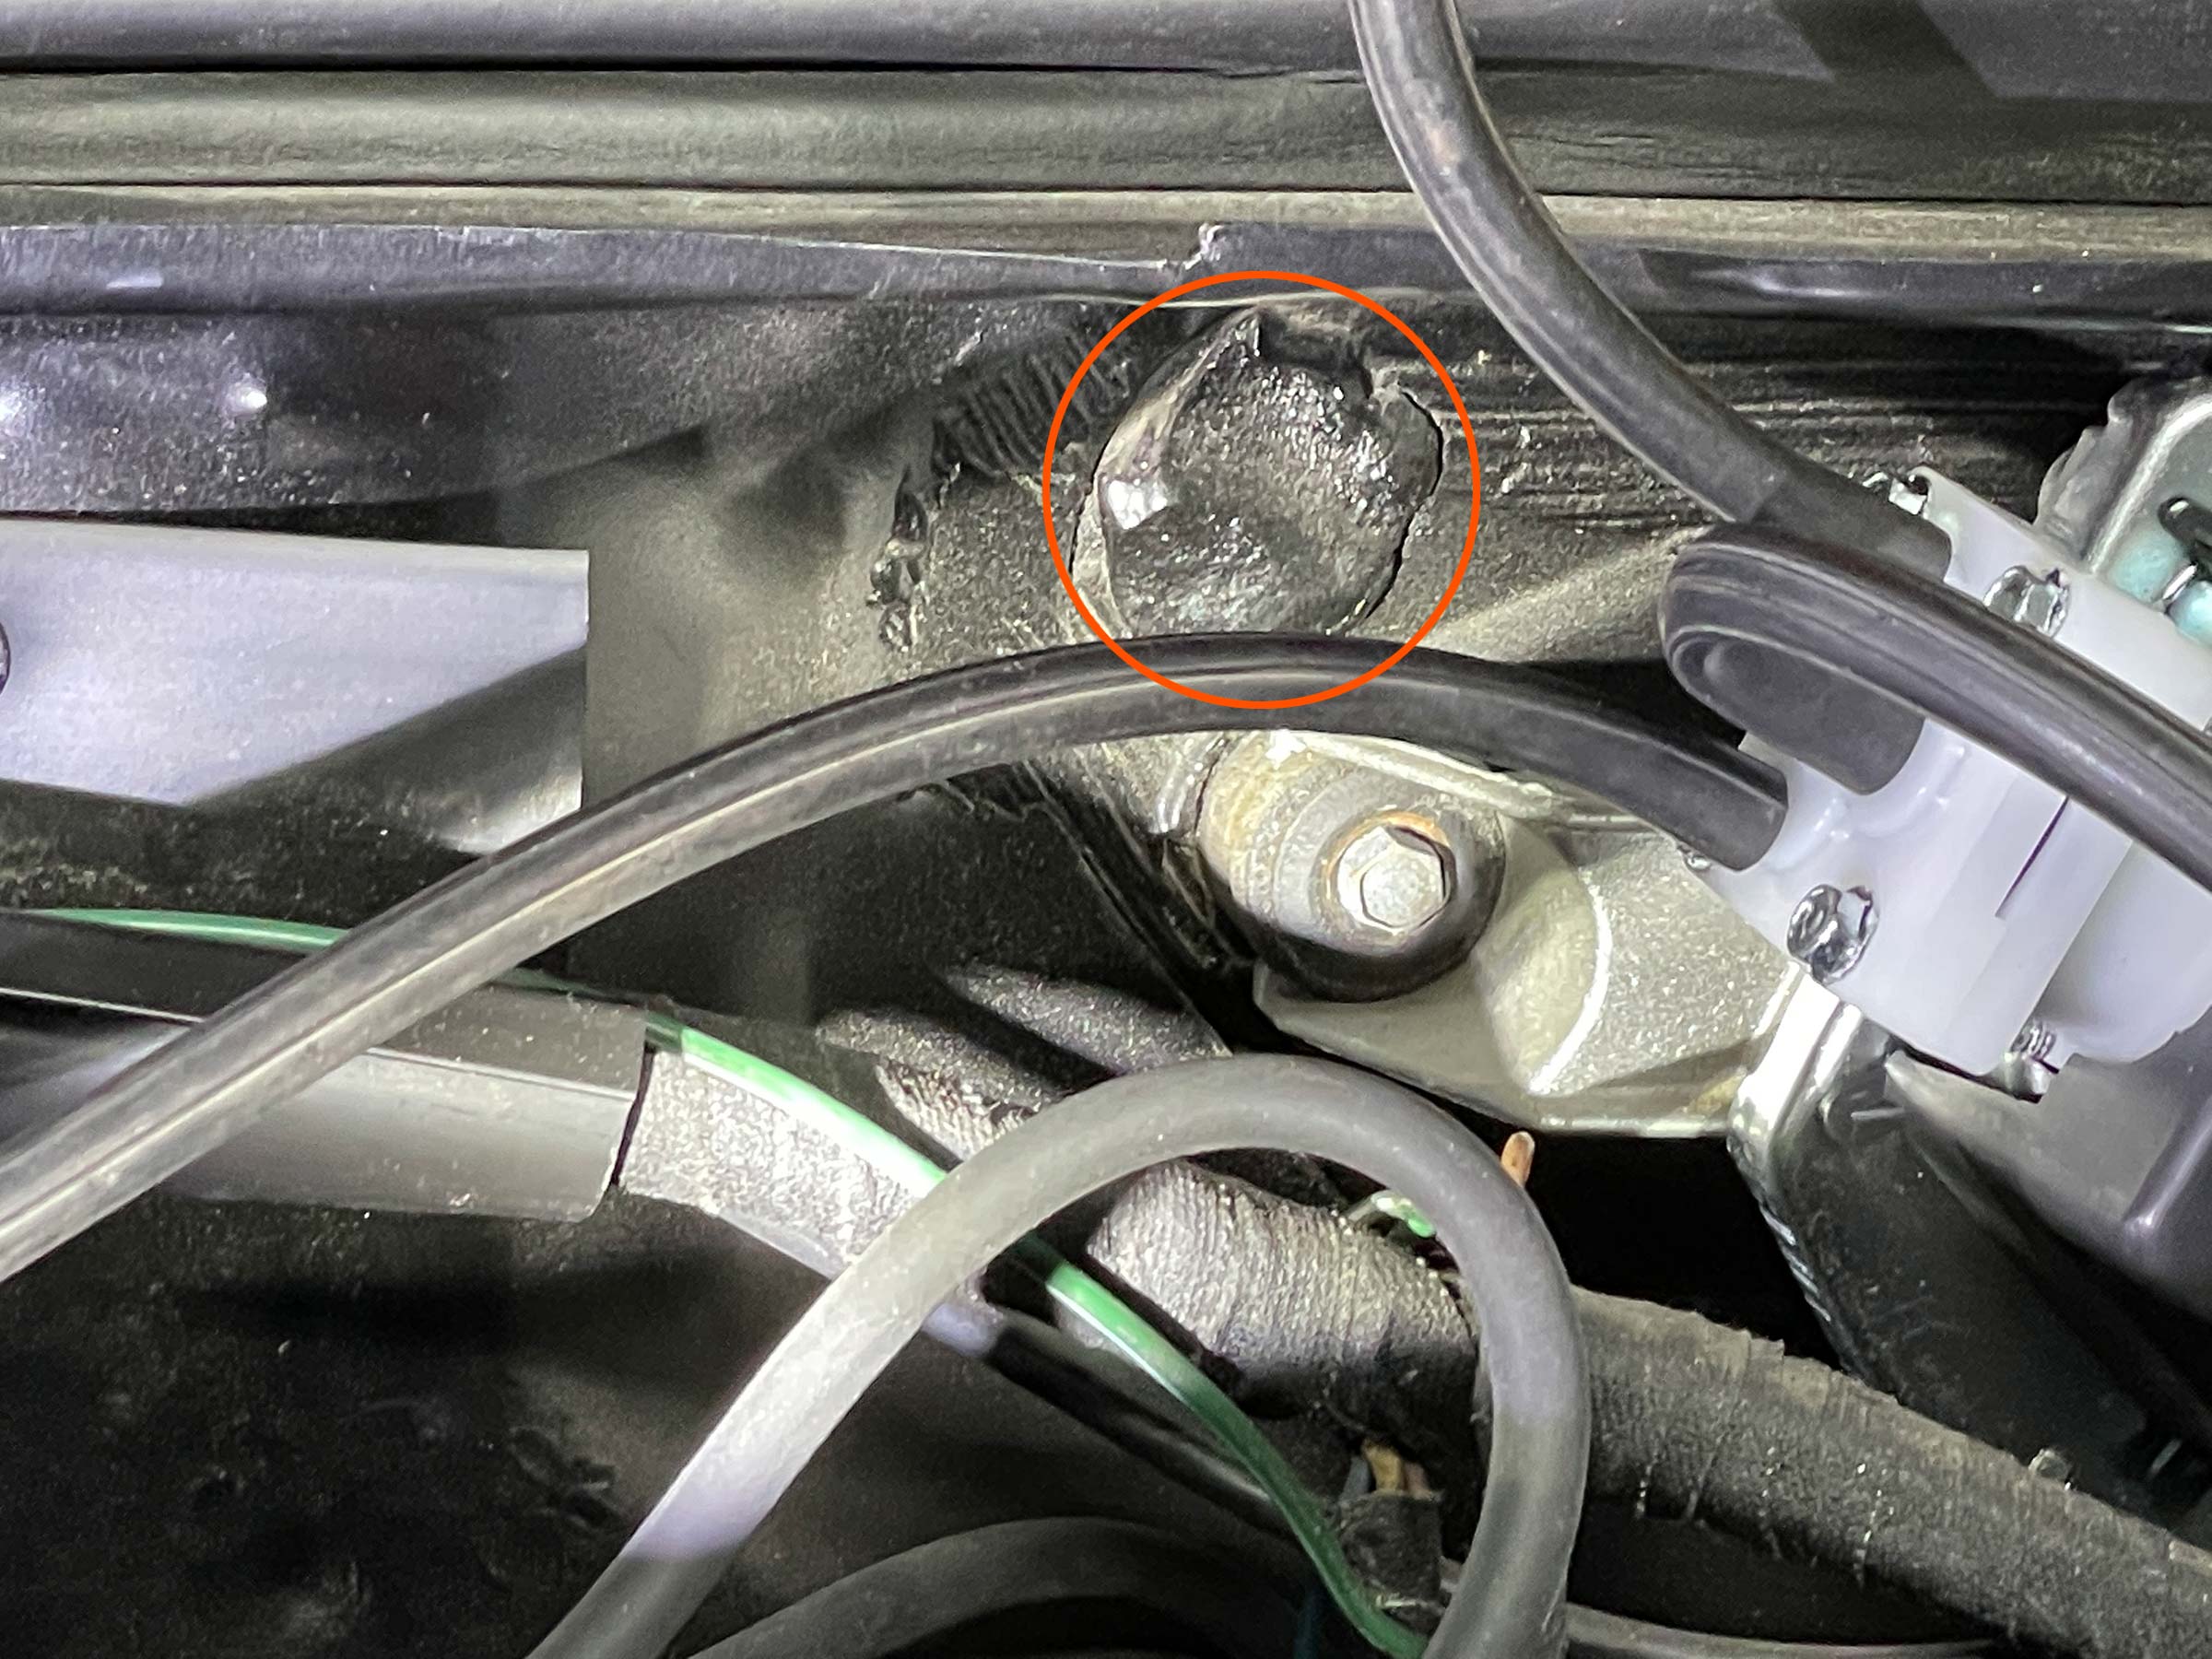
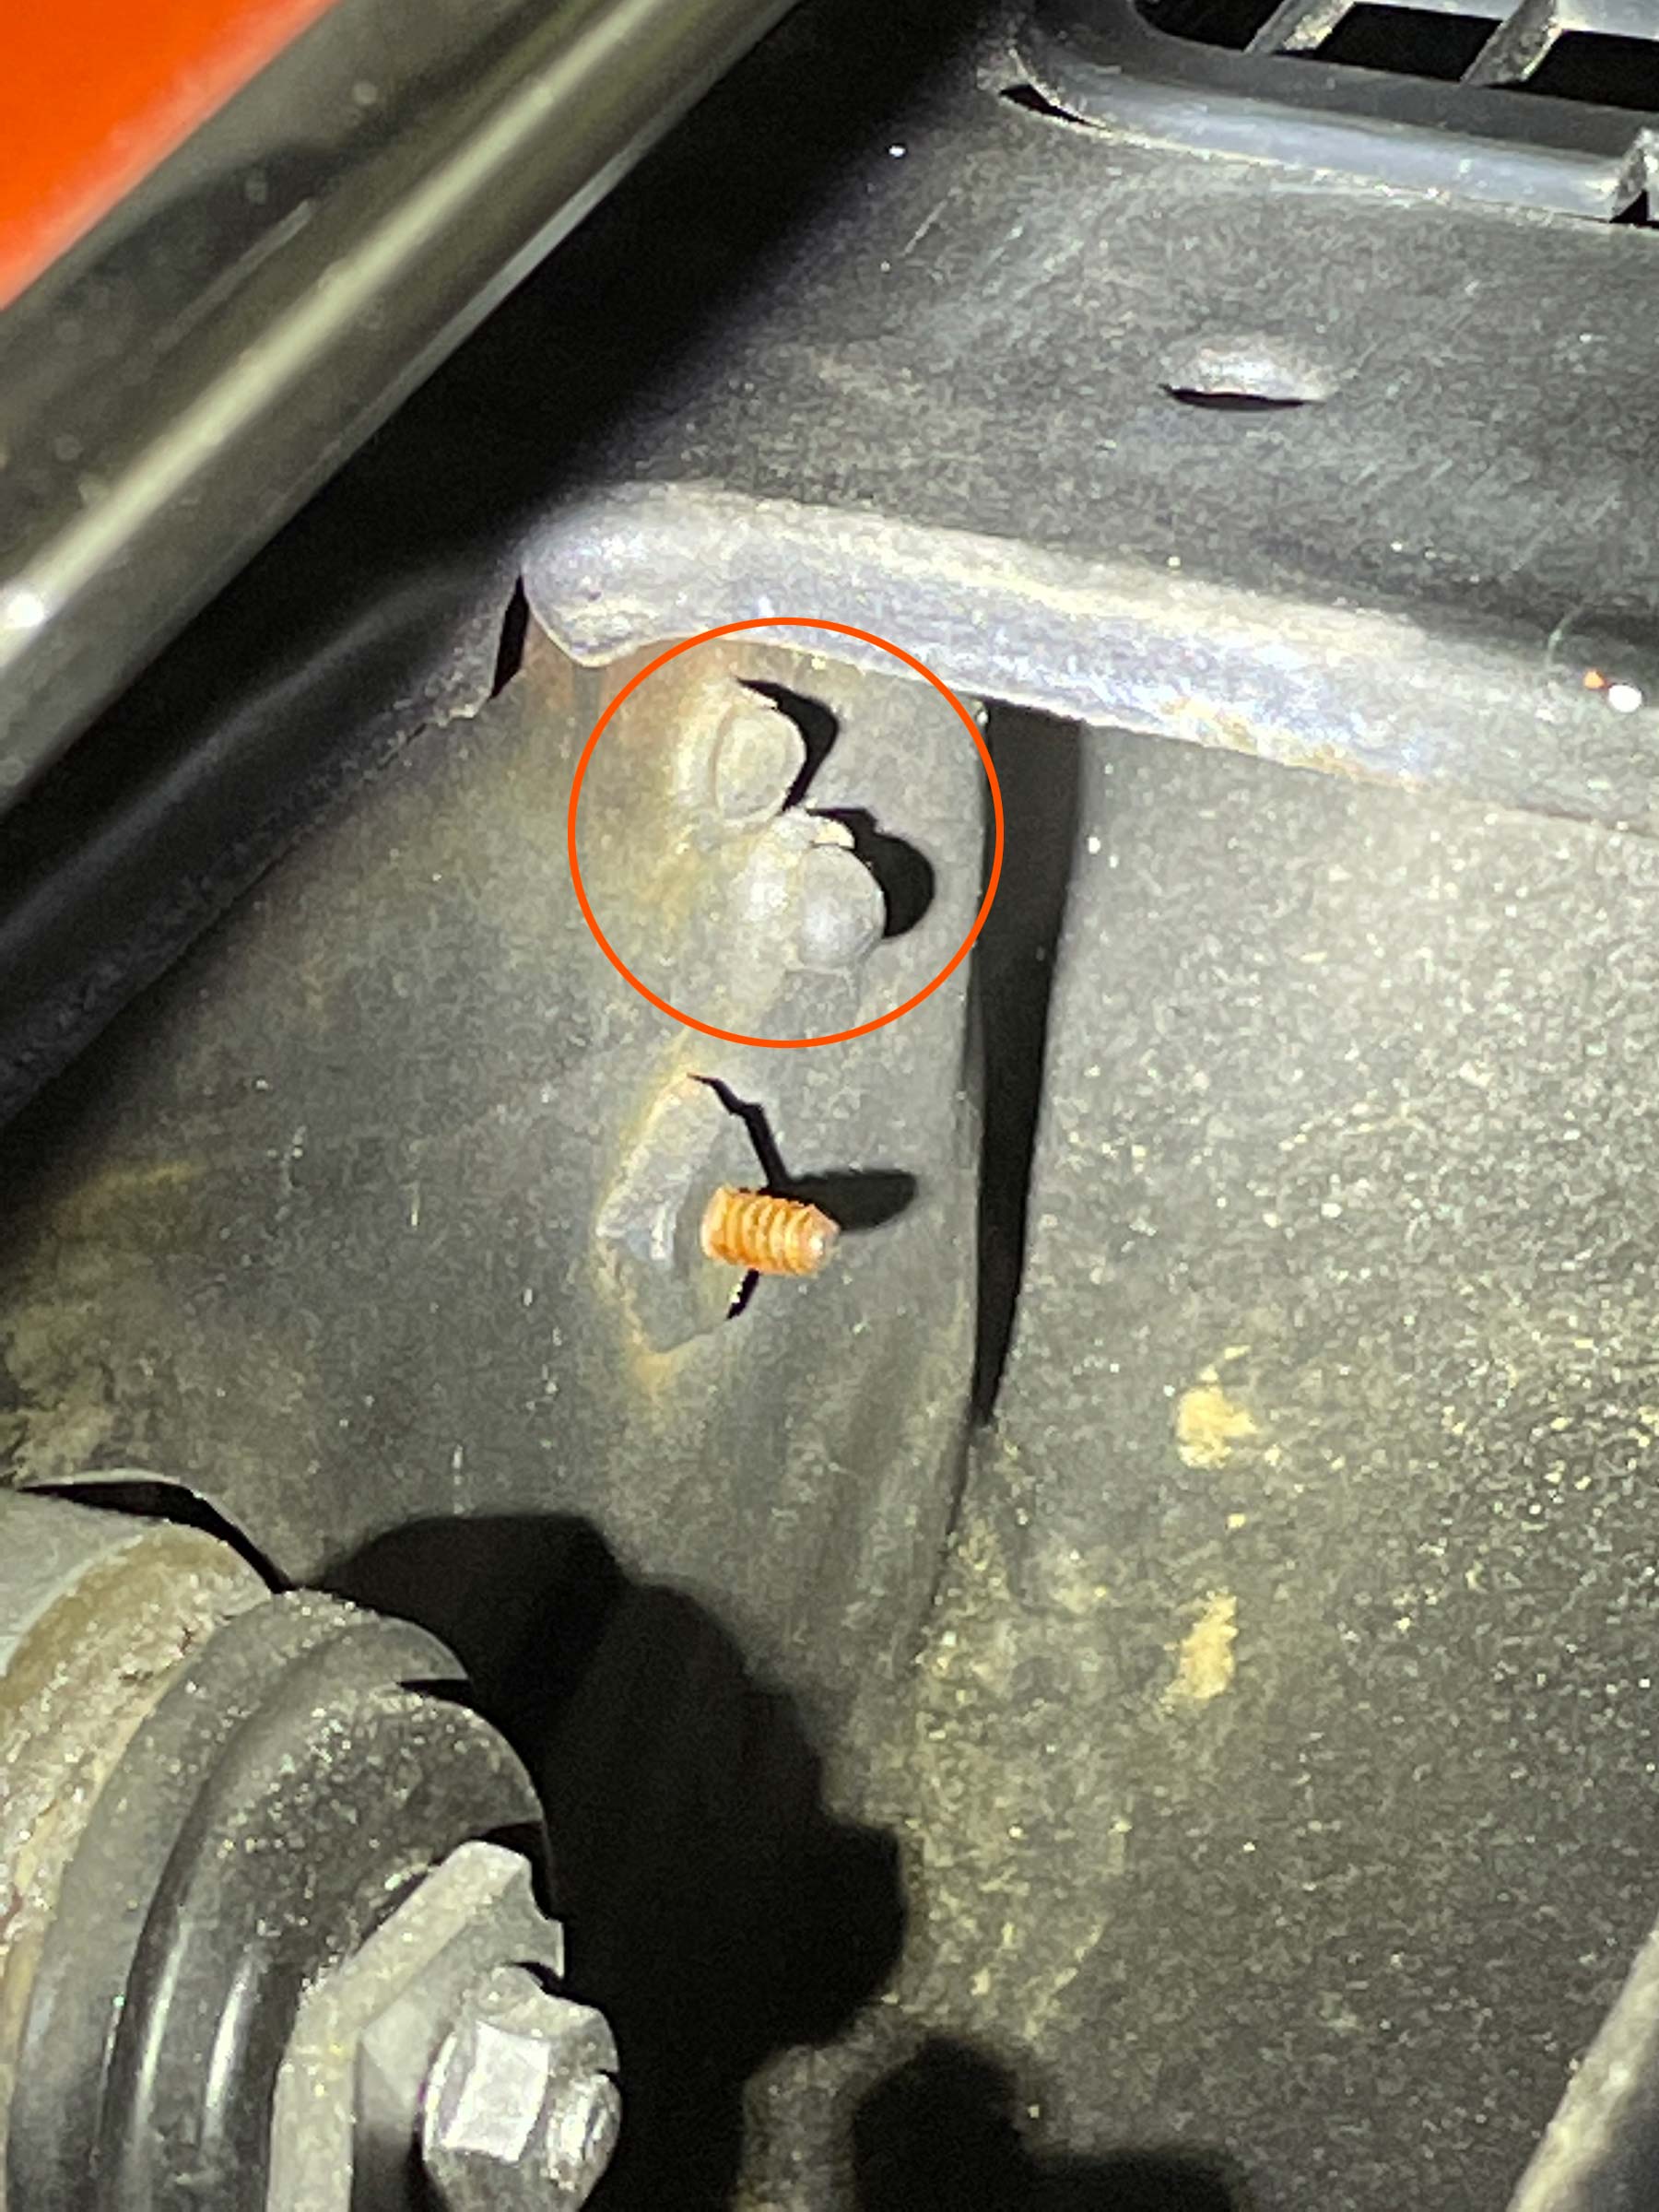
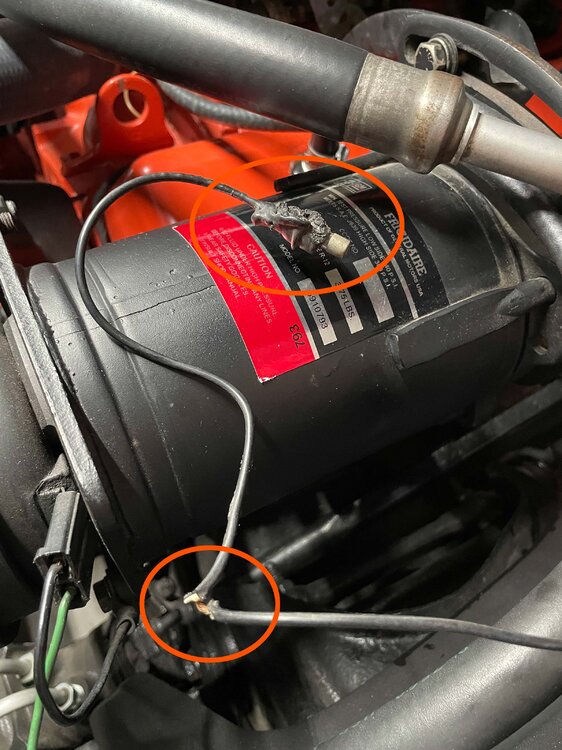
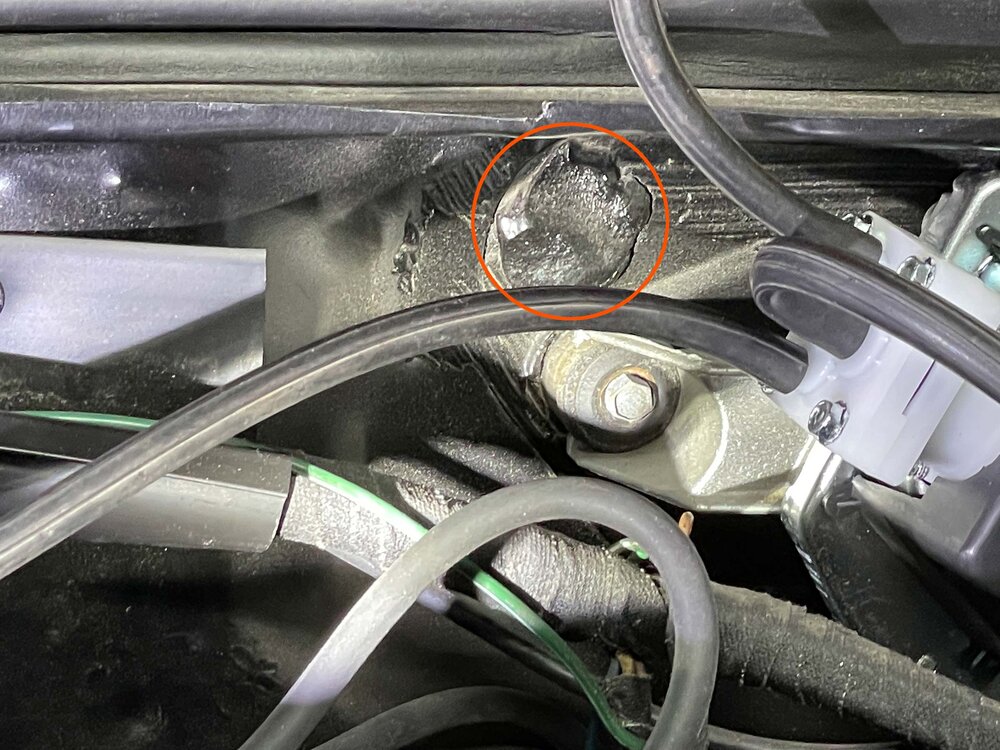
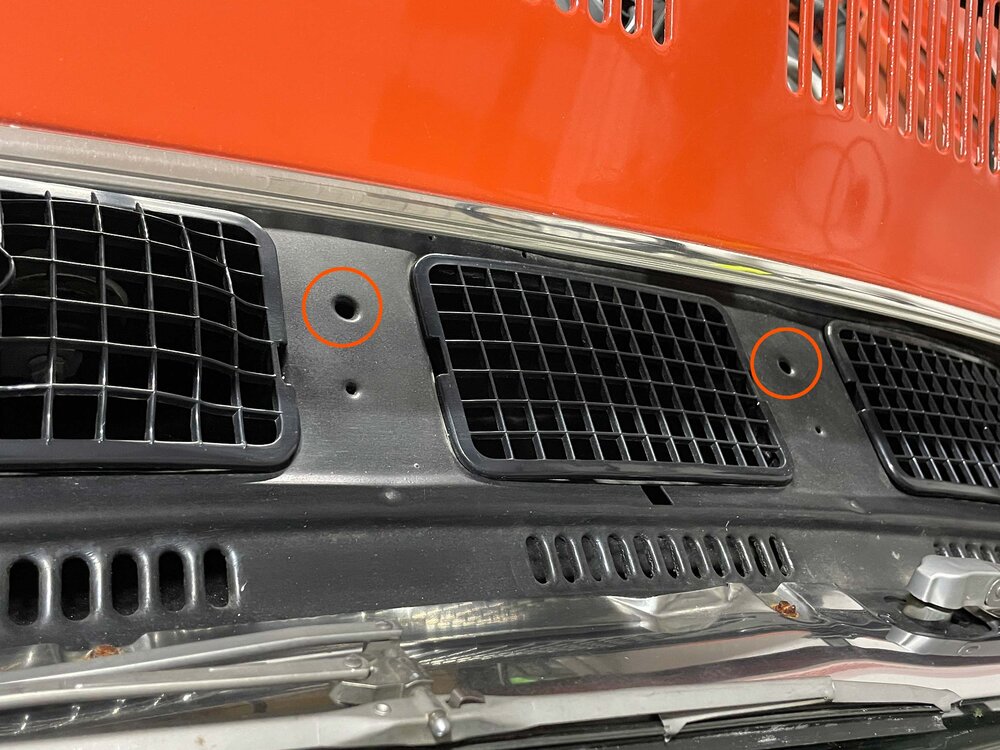
Hello! I hope this is in the right category. Trying to understand the windshield washer hose routing for my 72 Monte Carlo. As you can see in the photos, my washer hoses currently hang free. Apparently there are clips that secure the hose to the lip of the cowl, and I have ordered those, but I'm starting to think that isn't correct for this car. I've seen photos where the hoses run through the two holes in the cowl and then through a hole in the firewall just above the wiper motor/washer pump assembly. I like this solution but as you can see in the photos, the firewall hole has been sealed up with some sort of filler on my car. It appears to be factory filler but I really can't say for sure. Can anyone confirm the proper hose routing for a 72 MC? Are the hoses clipped to the cowl or do they run through the cowl and firewall? I want it to be correct. Thank you!!


-
Thanks! As soon as I get the car where I want it, I'll post some pics. It's pretty nice now but I want to get it just right. 🙂