

MGD72Monte
-
Posts
489 -
Joined
-
Last visited
Content Type
Profiles
Articles
Forums
Gallery
Events
Everything posted by MGD72Monte
-
-
Can anyone recommend good springs ?
MGD72Monte replied to MonteNH's topic in Brakes and Suspension Tech
For mine, rear are Eibach Cargo Coils, front are stock non-AC type from Schucks. I'm happy with the stock look. -
As per Tony's comments, unlike today where two mirrors are the standard. Two became the standard because there very convenient/practical. I would recommend you add one, you'll notice the difference if you don't have it.
-
I did not have to touch the proportioning valve after I replaced the master cylinder and neither later as I replaced the entire front brake system. Theoretically after you bleed the mc then all of the individual brakes (in the proper order) you should have a firm pedal and the booster has nothing to do with that because you bleed the brakes with the engine off.
-
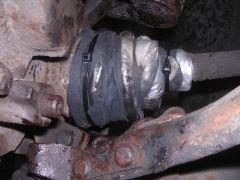
Thanks guys. This pic shows the rear left brake before and the rear right after a new spring set and sandblast and paint with high temp paint of other components. I replaced the shoes not that long ago as well as the drums and the cylinders.
-
Sorry to hear about your doomed fate. It is tough to find someone to trust to do work. In this case though, the work is very simple so you shouldn't have to find an expert. I've never heard of this company but I would say to talk to people about local shops that are in to older cars and go in and talk to them. I would recommend finding someone with grey hair whose been working since when carbs were the norm. Now it's all fuel injection and I'm not convinced the young guys are getting the carb knowledge. Best of luck and good on you for wanting to keep her original.
-
I'm thinking about it, I don't know enough about the process and specs so I'm probably going to order a book. I'm looking at: High Performance Differentials Axles and Drivelines <link> If anyone has previous experience with this or other books to recommend on the topic, I would appreciate.
-
Sandblast that is As part of the rear end refurb I am working on, I am sandblasting some of the undercarriage and suspension parts. To do this I built a booth in my basement. Basically a plastic booth sealed with duct tape. I quickly found that I was engulfed in a sandstorm and couldn't see what I was trying to sandblast. I added a set of furnace filters on each side of the booth and a fan on one side to draw dust out of the air. It's definetly better but the filter gets full pretty fast, still tough to see so you have to take frequent breaks to let the fan catch up. I think I will spring for a cabinet at some point in the future. Here is a photo of the booth before I installed the inlet filter: Here are the parts I sandblasted And then painted
-
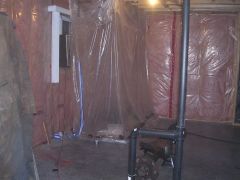 As part of the rear end refurb I built a sandblasting booth in my basement. Basically a plastic booth sealed with duct tape. I quickly found that I was engulfed in a sandstorm and couldn't see what I was trying to sandblast. I added a set of furnace filters on each side of the booth and a fan on one side to draw dust out of the air. It's definetly better but the filter gets full pretty fast, still tough to see so you have to take frequent breaks to let the fan catch up. I think I will spring for a cabinet at some point in the future.
 -
I installed a set of Alpine 4" x 6" model 6204 in the dash in the position of the factory ones years ago. As mentioned above because of the width of the magnet, you have to trim the factory brackets and be a little creative. I also trimmed part of the new speaker frame to get a better fit. Space on the pax side is a non issue but on the driver's side it is extremely tight. Loosening the dash to get them in there and being mindful that you don't pinch the instrument cluster's flexible circuit pad too much are things to watch. Once they are in there though, they sound great. Best of luck
-
Love it! and the birds are OK too.
-
I did not think to check and I've never done that on a rear axle so I'm not sure if I am doing this correctly but I reset up the dial indicator essentially as per my original video, found the lowest point around the hub to zero the reading (ignoring a couple of clear dents) and slowly turned the hub by hand looking at the reading and noting a max of about 11/1000" on the driver's side, did not check pax yet. Is that the correct way to do it and if so, is that a bad reading? Thanks for your help
-
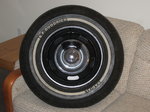
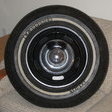
Consider what you have at the back and what the front rim size is before making a decision
-
That is correct.
-
to both of you, looking forward to the pics.
-
Congrats on being back on the road, it is a great feeling. Will probably take a few miles to shake out the bugs. I'm on blocks right now and am looking forward to seeing the road again. Pics?
-
2.5"!!!! no wonder you are scraping every pebble in sight. I have about 8" clearance at the lowest point with my Flowtech (1-5/8" primaries, 3" collector) and although I almost never bottom out, I remember once at about 80mph I hit a bump and scraped the bottom so you need a dramatic increase in clearance if you want to eliminate the problem. Your car doesn't look that much lowered but as was mentioned it looks like you have small drag wheels at the front so that is not helping. Consider taking off the lowest header and bringing it to a shop where they can show you other brands and you might be able to estimate improvement by laying them next to each other. When you hit bottom depending on the force, that header can be taking quite a bit of force and I assume could break but I have not heard any stories of what other type of damage you could incur. Good luck
-
Here is a picture after the two coats of paint, looks better in person. I still have the plastic on there because I want to spray some corrosion control compound after the paint is thoroughly dry.
-
Yeah, I'm hoping one of these gurus will see this post. I have the rear end out as part of a refurb, adding sway bar, changing bushings, LCA, etc... My concern is that I had a warped rim at the back on the driver's side causing a bad vibration then I replaced the rims but am wondering if this could have caused some damage as there still seems to be some vibration at certain speeds. The seals are fine but since I have the rear end out if there is not supposed to be any play, this is probably the time to do something about it. Thanks for the input
-
The diff is a 2.73 non-locking, as per the video with a dial indicator set up I note about 13/1000" of up/down play on the driver's side. The pax side has about 8/1000". Is this normal? acceptable? If not, what is the fix?
-
I would say you don't need to replace the entire sending unit because if it was bad, moving the wire would not make any difference. I would inspect the wire for any flaws, drop the tank down if you have to in order to follow it to the sending unit.
-
Yeah, good decision. Then you can truly say you fixed it!
-
Hi Ben, If your car was built in Oshawa you can write to the plant with your VIN and for a few dollars they will send you a package which will include the exact production date. Otherwise, there is a time build code as part of the "Body and Vehicle Identification Number Serial Plate" better known as trim tag. The time build code can be found on the third row, first set of digits. Should be a number/letter combo such as "03D". In this case it means 4th week of the third month. Good luck
-
Welcome, lot's of help available here. 3 on tree would be a novelty at car shows, I've never seen one. However, agree with the others, from a practical perspective you would probably find a 5 speed to be more enjoyable.
-
Here are some of the pics promissed This is after degreasing and cleaning. This is after two days of wire brushing and another round of degreasing/cleaning. I know it doesn't seem like much of a difference, the pictures don't provide the level of detail. Today after four hours of contorsions I finished the first coat of rust paint. Pics of that in a few days.