


Blackhawk
-
Posts
249 -
Joined
-
Last visited
-
Days Won
4
Content Type
Profiles
Articles
Forums
Gallery
Events
Posts posted by Blackhawk
-
-
-
This may be a pain, but try getting everything warmed up before parking at home and check that you're actually getting voltage at the starter solenoid. You could test at the solenoid or where the purple wire comes out of the firewall bulkhead.
-
The offset shafts are more for fixing the effects of frame sag, where the upper control arm mounts are pulled toward each other. They affect the front and rear stud evenly, while you need to pull the rear of the control arm in to get positive caster. Anything more than 2-3 degrees of positive caster will probably be tough with stock control arms.
-
 1
1
-
-
You can buy rebuilt hinges from Willie W. as well, I think he has a stock of cores so you wouldn't necessarily need to start with a pair.
-
 1
1
-
-
Spent the weekend tightening the exhaust, fixing fuel/brake fittings that were weeping, and aligned the hood while I wait for a cowl hood to show up undamaged. Took it out for a shakedown, but the vehicle speed sensor on the transmission isn't sending a good signal so it won't shift out of first. I'll swap the sensor in a few weeks and see if that fixes it, otherwise it's on to fixing the wiring. Should be the last thing to do before I can see how the LS swap does on the road! It also looks like I may not need any shims to get good camber values with the tall ball joints and Ridetech upper arms.
-
2
-
-
OPGI was always first on my list for finding items, and last for ordering. But I noticed that their prices are better than what they're providing Summit and Jegs with for the items that I was looking at, so I put in an order with them last week for the first time in a long time.
-
For headlights I'm running the OE7 from Dapper Lighting. I haven't had it out at night but it certainly brightens up the shop when testing it.
-
On 7/17/2023 at 7:27 AM, Alex & Keith 72 Monte said:
Hi Gents - completed my restoration and now need an alignment. I didn’t see the alignment specs in the article (3 pages of ?) of this chain. Do you all go with 3 or 5 degrees of positive camber? New front modern suspension (not dropped spindles) and 235 x70s and quick ration power steering. Sounds like A bodies migrated to the MC 73-77 spec but wasn’t sure what everyone recommends. Thanks, Keith.
You'll want as much positive caster as you can get, with stock control arms you'll probably max out at 2-3 degrees. You should be able to get 4-6 degrees with certain aftermarket control arms. I'll be taking these specs to my shop in a few weeks to get an alignment.

Ridetech has great information on tuning your suspension, including adjusting alignment if the car shows certain behaviors.
https://ridetech.com/tech/suspension-tuning-guide-high-performance-vehicles/
-
1
-
-
I spoke to Metro at Back to the Fifties today and they didn't think it would be an issue to make the Monte Carlo inner strips if I sent the originals since the rubber extrusion is the same as the Chevelle. I'm not holding my breath but we'll see.
-
3
-
-
Are you going to be using the original column with a floor shifter? I'm not 100% sure how that works on the newer models, but I'm pretty sure my dad did that with his 67 Chevelle with no problem. He even mounted a tach where the column shifter had been.
-
1
-
-
18 hours ago, BobW said:
How did you do that? I'm installing a B&M megashifter in my '72. Is there room to leave the mechanical rod from the tranny to the column in place along with the cable?
That's how it is from the factory. The column is always hooked up for the key lock and steering wheel lock. You just need the right hardware on the transmission.
-
I had the cable that The Parts Place sells and it was difficult to shift the car. It only got easier after the crimps popped off. I replaced it with the Shift Works cable and it's much better.
-
2
-
-
Thanks for the information. With the condition of my current seals I'll try some weather stripping adhesive on the cracks and recondition the rubber. Metro is now making the outers so maybe they'll have the right inners soon.
-
I would try Shadow Blue, you should be able to get this almost anywhere.
https://www.semproducts.com/product/color-coattm-aerosols/15043
-
1
-
-
Would you be able to find the number of the part from your order? I'm not seeing that seal on their site.
-
These are the seals that go on the inside of the rear quarter window opening. For those who have replaced these seals, where did you get them? I bought the seals from Metro Moulded (ALP 5002-R) thinking that if they fit a Chevelle they would fit the Monte Carlo. The car has notches that seem to correlate to the clips on the back of this seal, but the new seals have the middle clip in a different spot. My stock seals are usable, but they're a bit stiff and starting to split on each end.

-
2 hours ago, jft69z said:
Here's an example of that brake vacuum pump. Mounts on that diagonal brace under the fender, buried behind the hood hinge and brake booster area. Mounted on rubber isolators too. Can't even remember how many hours it took to test fit, fabricate, etc., but it took a lot of time. Naturally, this was needed after I put all the sheet metal back on, which made it that much harder. Even getting to the wiring bulkhead to power it up was harder.
Just small example of how bad do you want to hide it, and how hard it's going to be to accomplish that goal. You'd never know it's there. In fact, the MSD ignition module is buried on the firewall in that general area too, hidden from view. That vacuum pump would be just in front of that MSD box.
That's where I mounted my PCM, except fastened to the firewall.
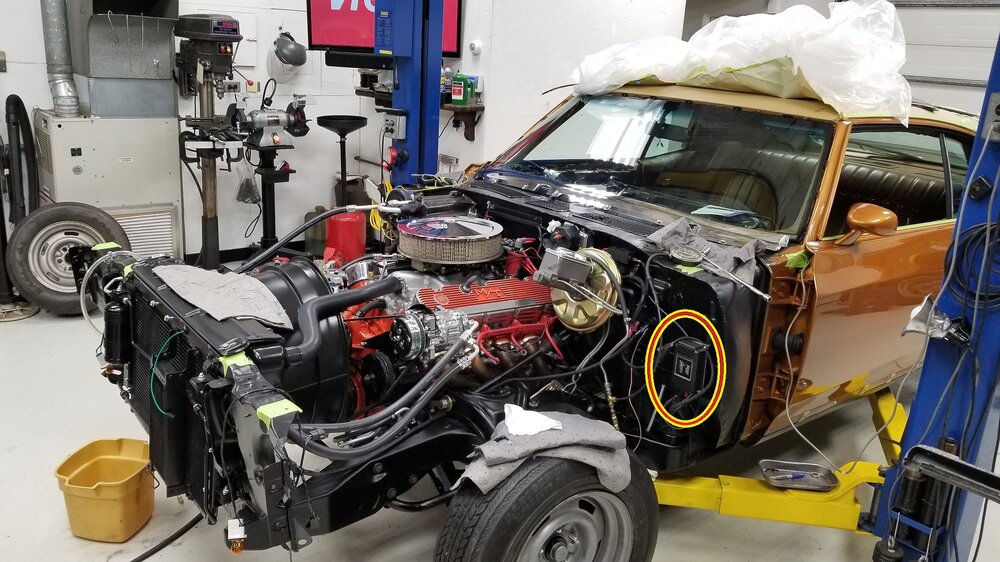
I have a fuse/relay box mounted to the core support where the voltage regulator used to be. Because it's black and has a cover it's hardly noticeable, but also within easy reach for repair or diagnostics. It's pulling power from the horn relay. I can grab some photos this weekend, it's a nice Delphi unit.
-
1
-
-
I'm amazed that those stickers are still hanging on!
-
You could try loosening the panel at the firewall and shifting it more to the driver's side. There's not a lot of play but it may help.
-
I was mistaken on the location, stock wheels should have the code on the face of the wheel near the valve stem.
-
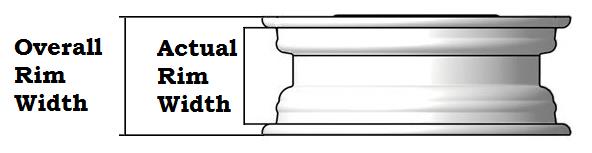
Whether stock of aftermarket, the wheels should have either a code or the offset stamped on the barrel that would allow identification. I believe 15x8" stock rally wheels (for a Corvette) has a backspace of 4". Remember that an 8" wheel will measure about 9" if you go from lip to lip.
I'm running 255/50-17 on 17x8 wheels with a 4.5 backspace in the back, and it's tight but not terrible. You will want to make sure that your body is centered on the frame by locating the alignment holes on the driver's side frame, they're a hole with a slot through it.
-
If you don't care about the panel that you're removing I like to use a flap wheel on a grinder or a cutoff wheel in a die grinder. When you're about to break through to the good panel the metal will start to turn blue, letting you know that it's time to ease up. I pair that with a thin chisel, or you can use a spot weld separator. That helps remove any hidden or doubled up spot welds.
-
Bilstein is a good choice for non-adjustable monotube shocks, and I would think that they would be a good middle ground between soft stock replacement shocks and adjustable monotubes. Adjustable shocks would be great if you were looking to really fine-tune the handling.
For the rear lower control arms you can buy a boxing kit to prepare the arms for mounting sway bars, or you can buy the upgraded arms. There's no need to buy adjustable lower arms.
The rear suspension is made to have some flex, so I would recommend rubber bushings to avoid binding. You could install roto-joints too, I don't think any brand is better than the others for that.
Aftermarket upper front control arms are great for fixing the suspension. The stock suspension has negative caster, which you can make positive with a stack of shims or by changing the control arm. This would give more of a modern car handling. If you go down this route make sure that the arms actually move the ball joint for added caster, the cheap white-box arms rarely do. UMI, some BMR, QA1, Ridetech, or the big names will typically have this added and advertised. A few of the lower control arms adjust the caster as well.
Going to a taller upper ball joint can improve handling as well by fixing the camber curve caused by the short stock spindle.
235/60-15 is a little short compared to the stock sizes of 215/70-15 and 215/75-15. A common size is 255/60-15. I don't think there's much of a difference between the BF Goodrich Radial TA, Cooper Cobra, or the Mastercraft Avenger GT. I'm not aware of any higher-performing tires in a 15" wheel, and the sidewall is going to add quite a bit of compliance to handling.
Going to a Jeep Grand Cherokee or other aftermarket quick-ratio steering box gives a more aggressive feel compared to the 'one-finger' stock steering. In the past people would also use 80's GM steering boxes, but those won't allow the wheels to turn as far.
-
Check the purple wiring going to the solenoid too. Its power path runs from the battery across the core support, back to the firewall, through the ignition switch and neutral safety switch, back to the firewall, and finally across the firewall where it connects to the starter. That's a lot of distance for a small wire that also has 6 connection points.
I would recommend using a heavy relay instead of the extra solenoid. Use the purple wire to trigger the relay and pull power from the starter lug to the solenoid.
-
2
-

sail panel replacement
in Cars and Parts For Sale/Wanted
Posted
I used short strand filler for the sail panel, specifically USC Duraglas.