

MCfan
-
Posts
1,294 -
Joined
-
Last visited
-
Days Won
61
Content Type
Profiles
Articles
Forums
Gallery
Events
Posts posted by MCfan
-
-
Selling off that extra vinyl top might bring the net purchase price down into the reasonable range. They go for around $10K, right? 😄
-
 1
1
-
-
Great looking '70 SS - a twin to the one I owned for eight years! The window sticker lists the "Automatic Seat Back Latch" and the power cord going up into the seat back is visible on the passenger's folded-forward seat back. That seems to be an extremely rare option on first gen Montes. There is no Build Sheet on a Flint assembled car but I believe that was RPO AQ5 in '70. Wonder if anyone has seen that option on other first gens? I installed the after market power seat back latch release kit from Klassic Keyless on my SS and really enjoyed it.
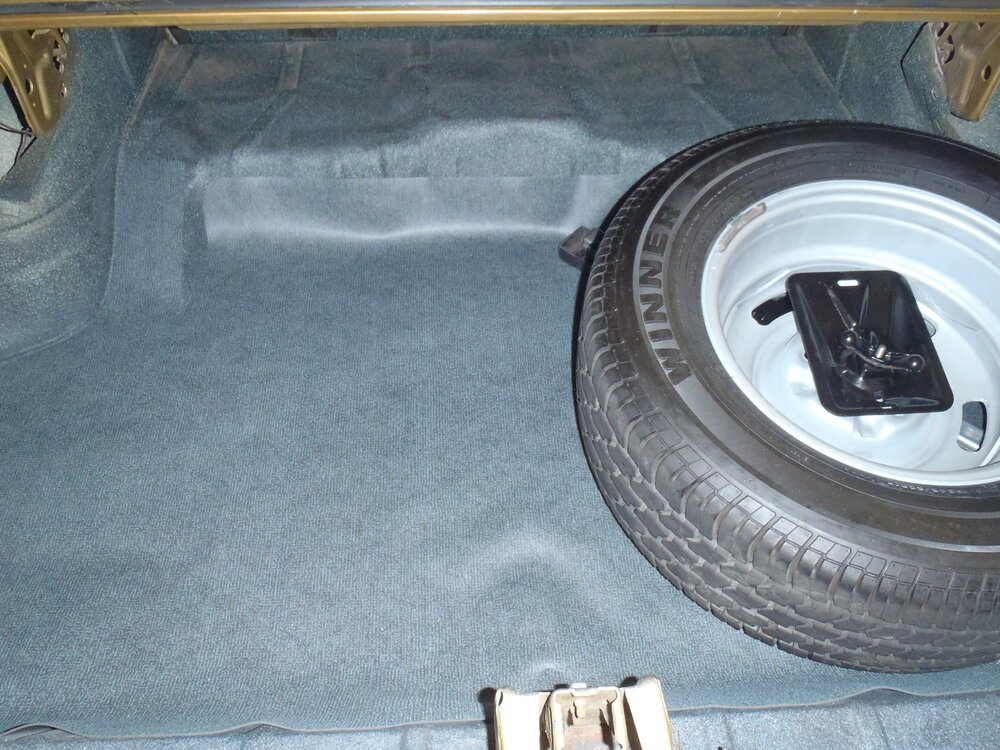
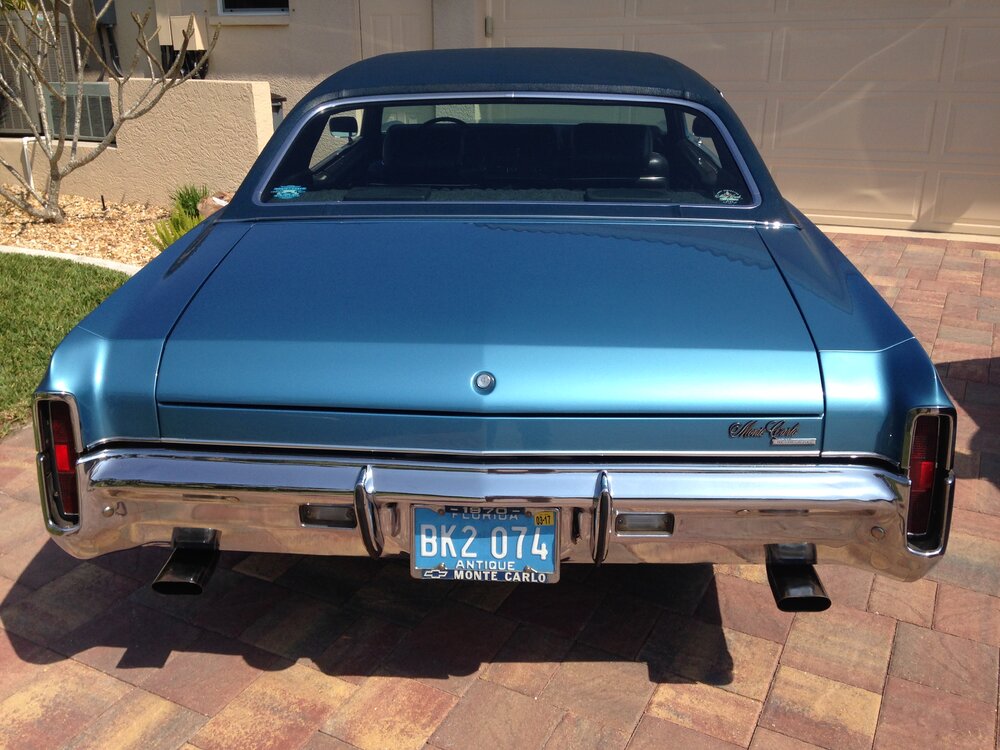
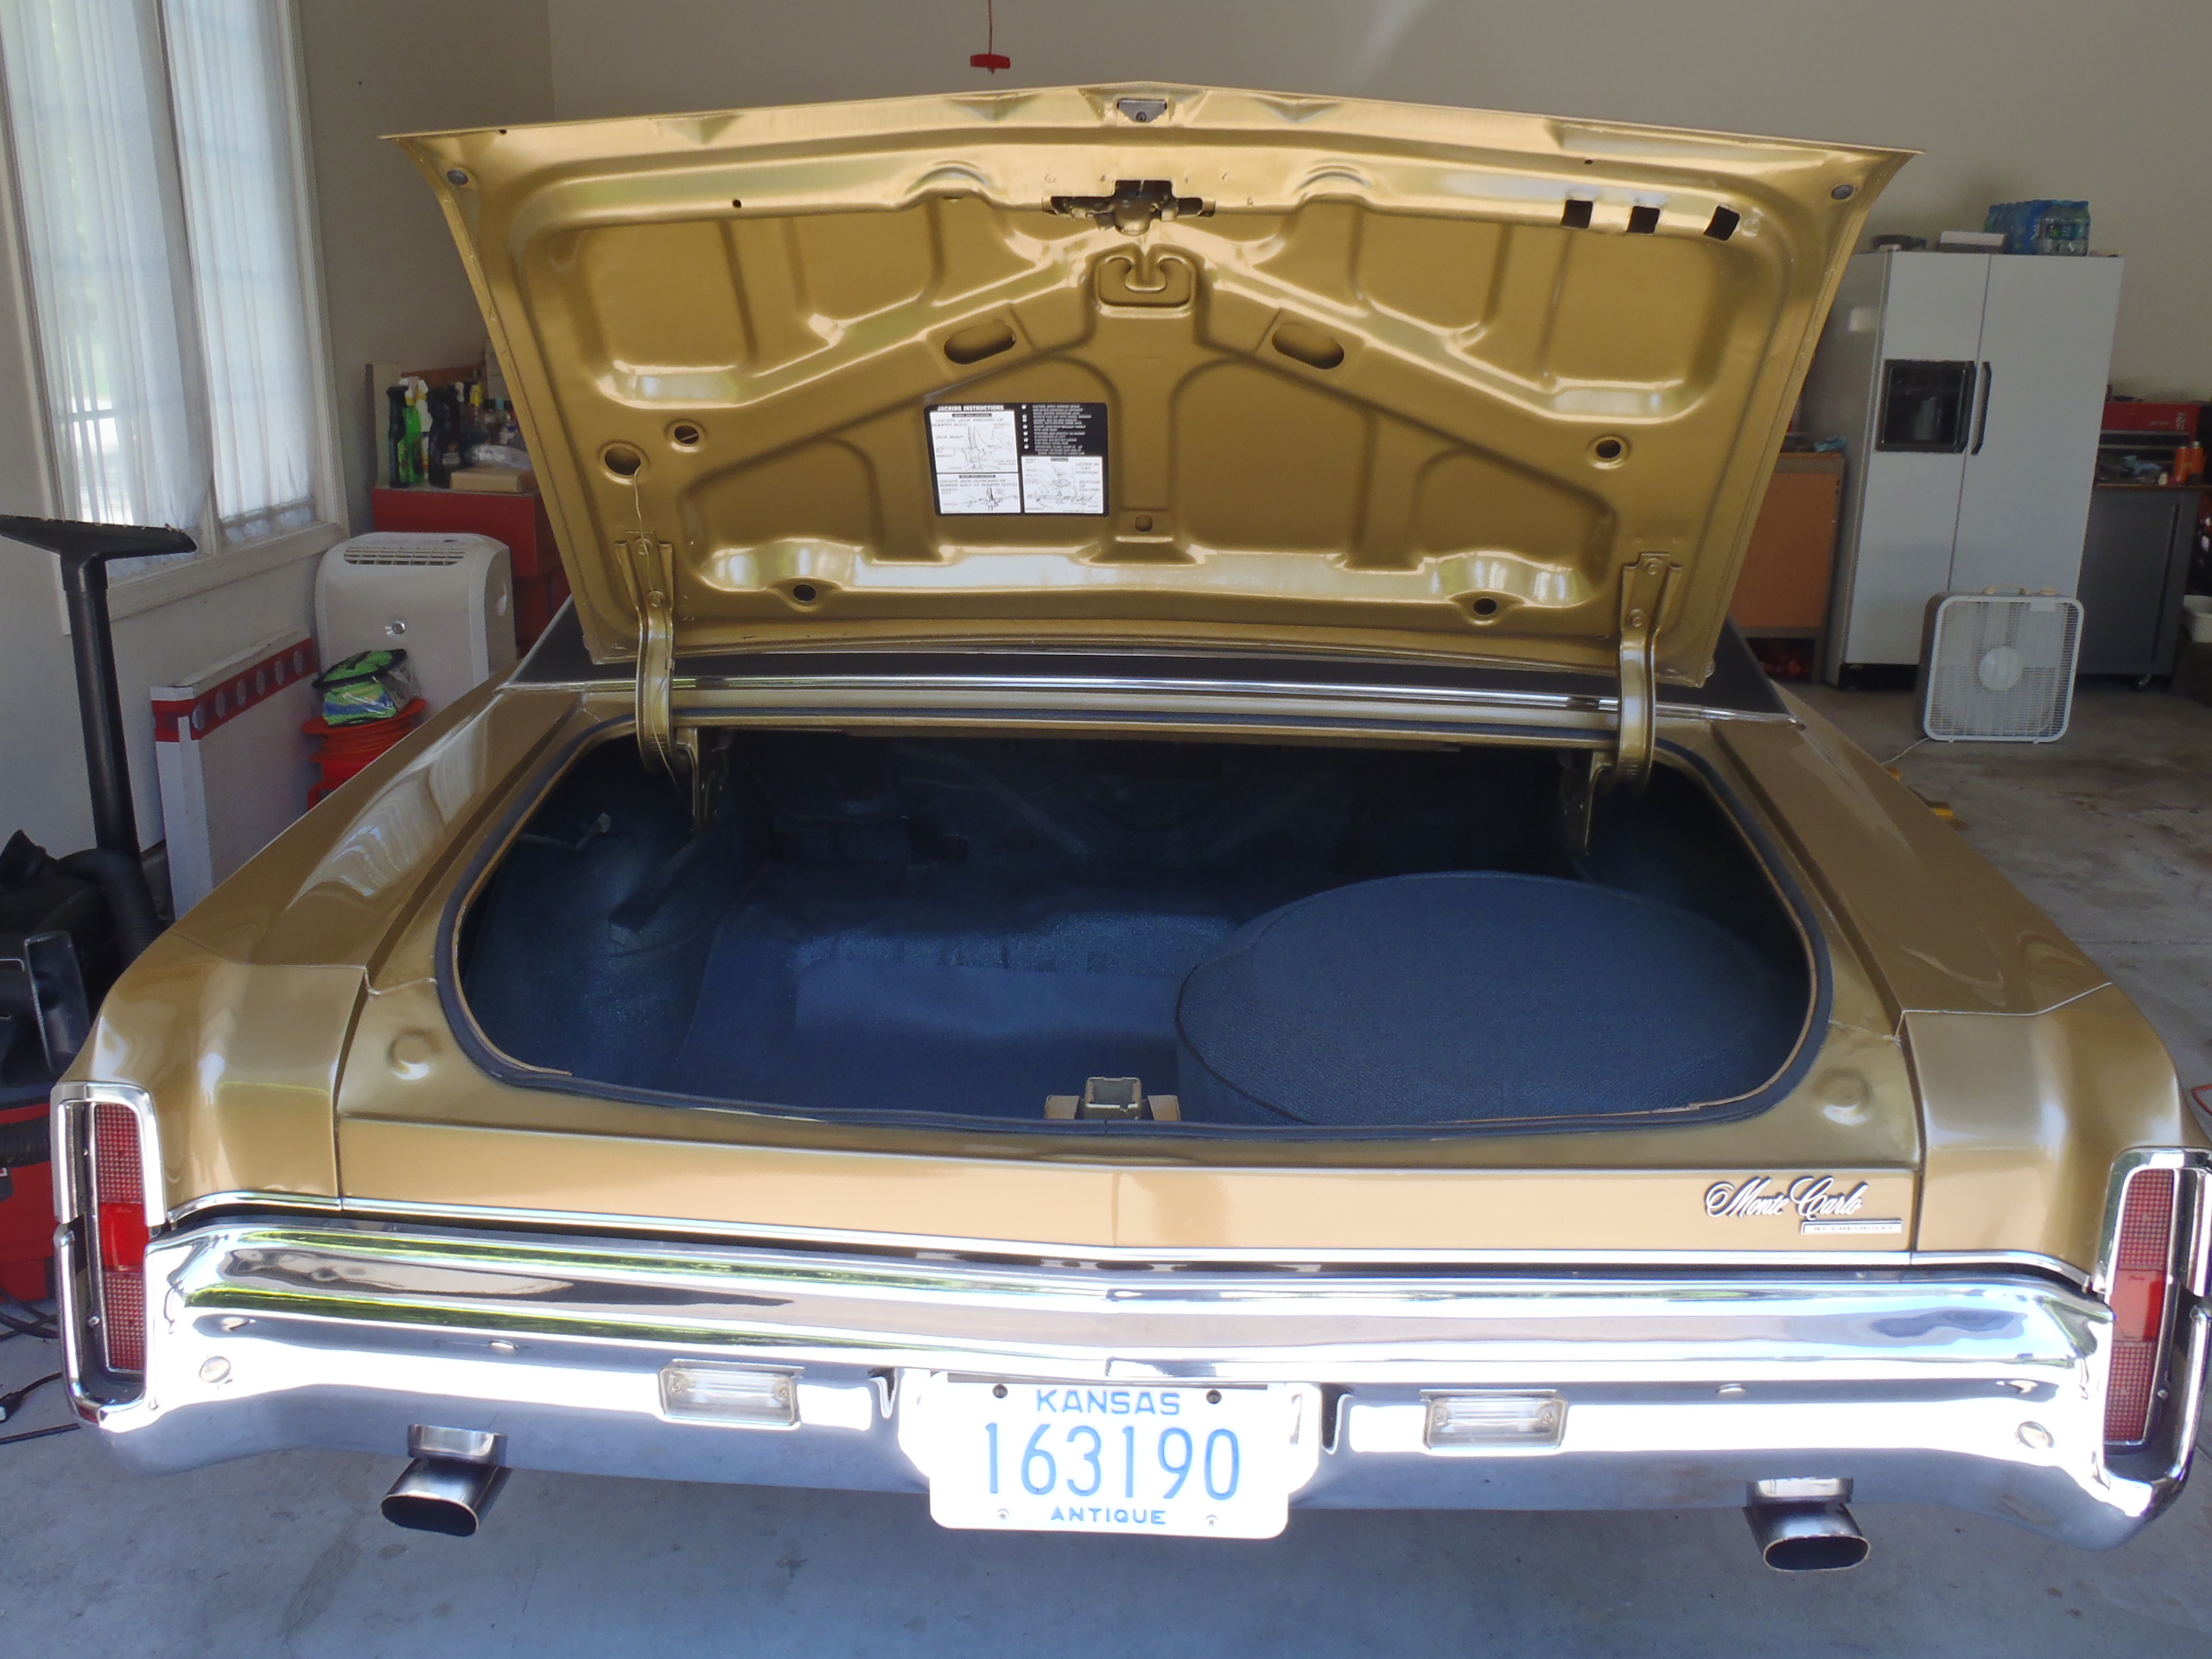
For a fairly heavily optioned car, I'm surprised it does not have power windows. I know prices are rising on first gens (and SS models in particular), but for $48K+ I would expect enough attention to detail to have the correct exhaust tips and the (allegedly) available compressor installed and that ratty looking trunk freshened up. It simply does not take that much effort or money to make it look a whole lot better. Been there, done that.

-
 6
6
-
-
Great to hear from you, Darren, but very sorry to hear you are leaving us ... at least for now! I know I have benefited greatly from your vast and practical knowledge of first gen Montes, as well as, your inspiration to do things right! You have shown us some fine examples of restoring these classics to better than new condition. I feel blessed that your 15 years in the club have totally over-lapped my 12 years so far. It's members like you that make this club so valuable and enjoyable.
I had noticed your absence from our forums in the past several months and wondered how you were doing. Sorry to hear about your son's health challenges which sound as severe or more so than your own. I will keep you and your family in my thoughts and prayers and hope you will keep in touch if/when we can be of any assistance to you.
All the best my friend!!
-
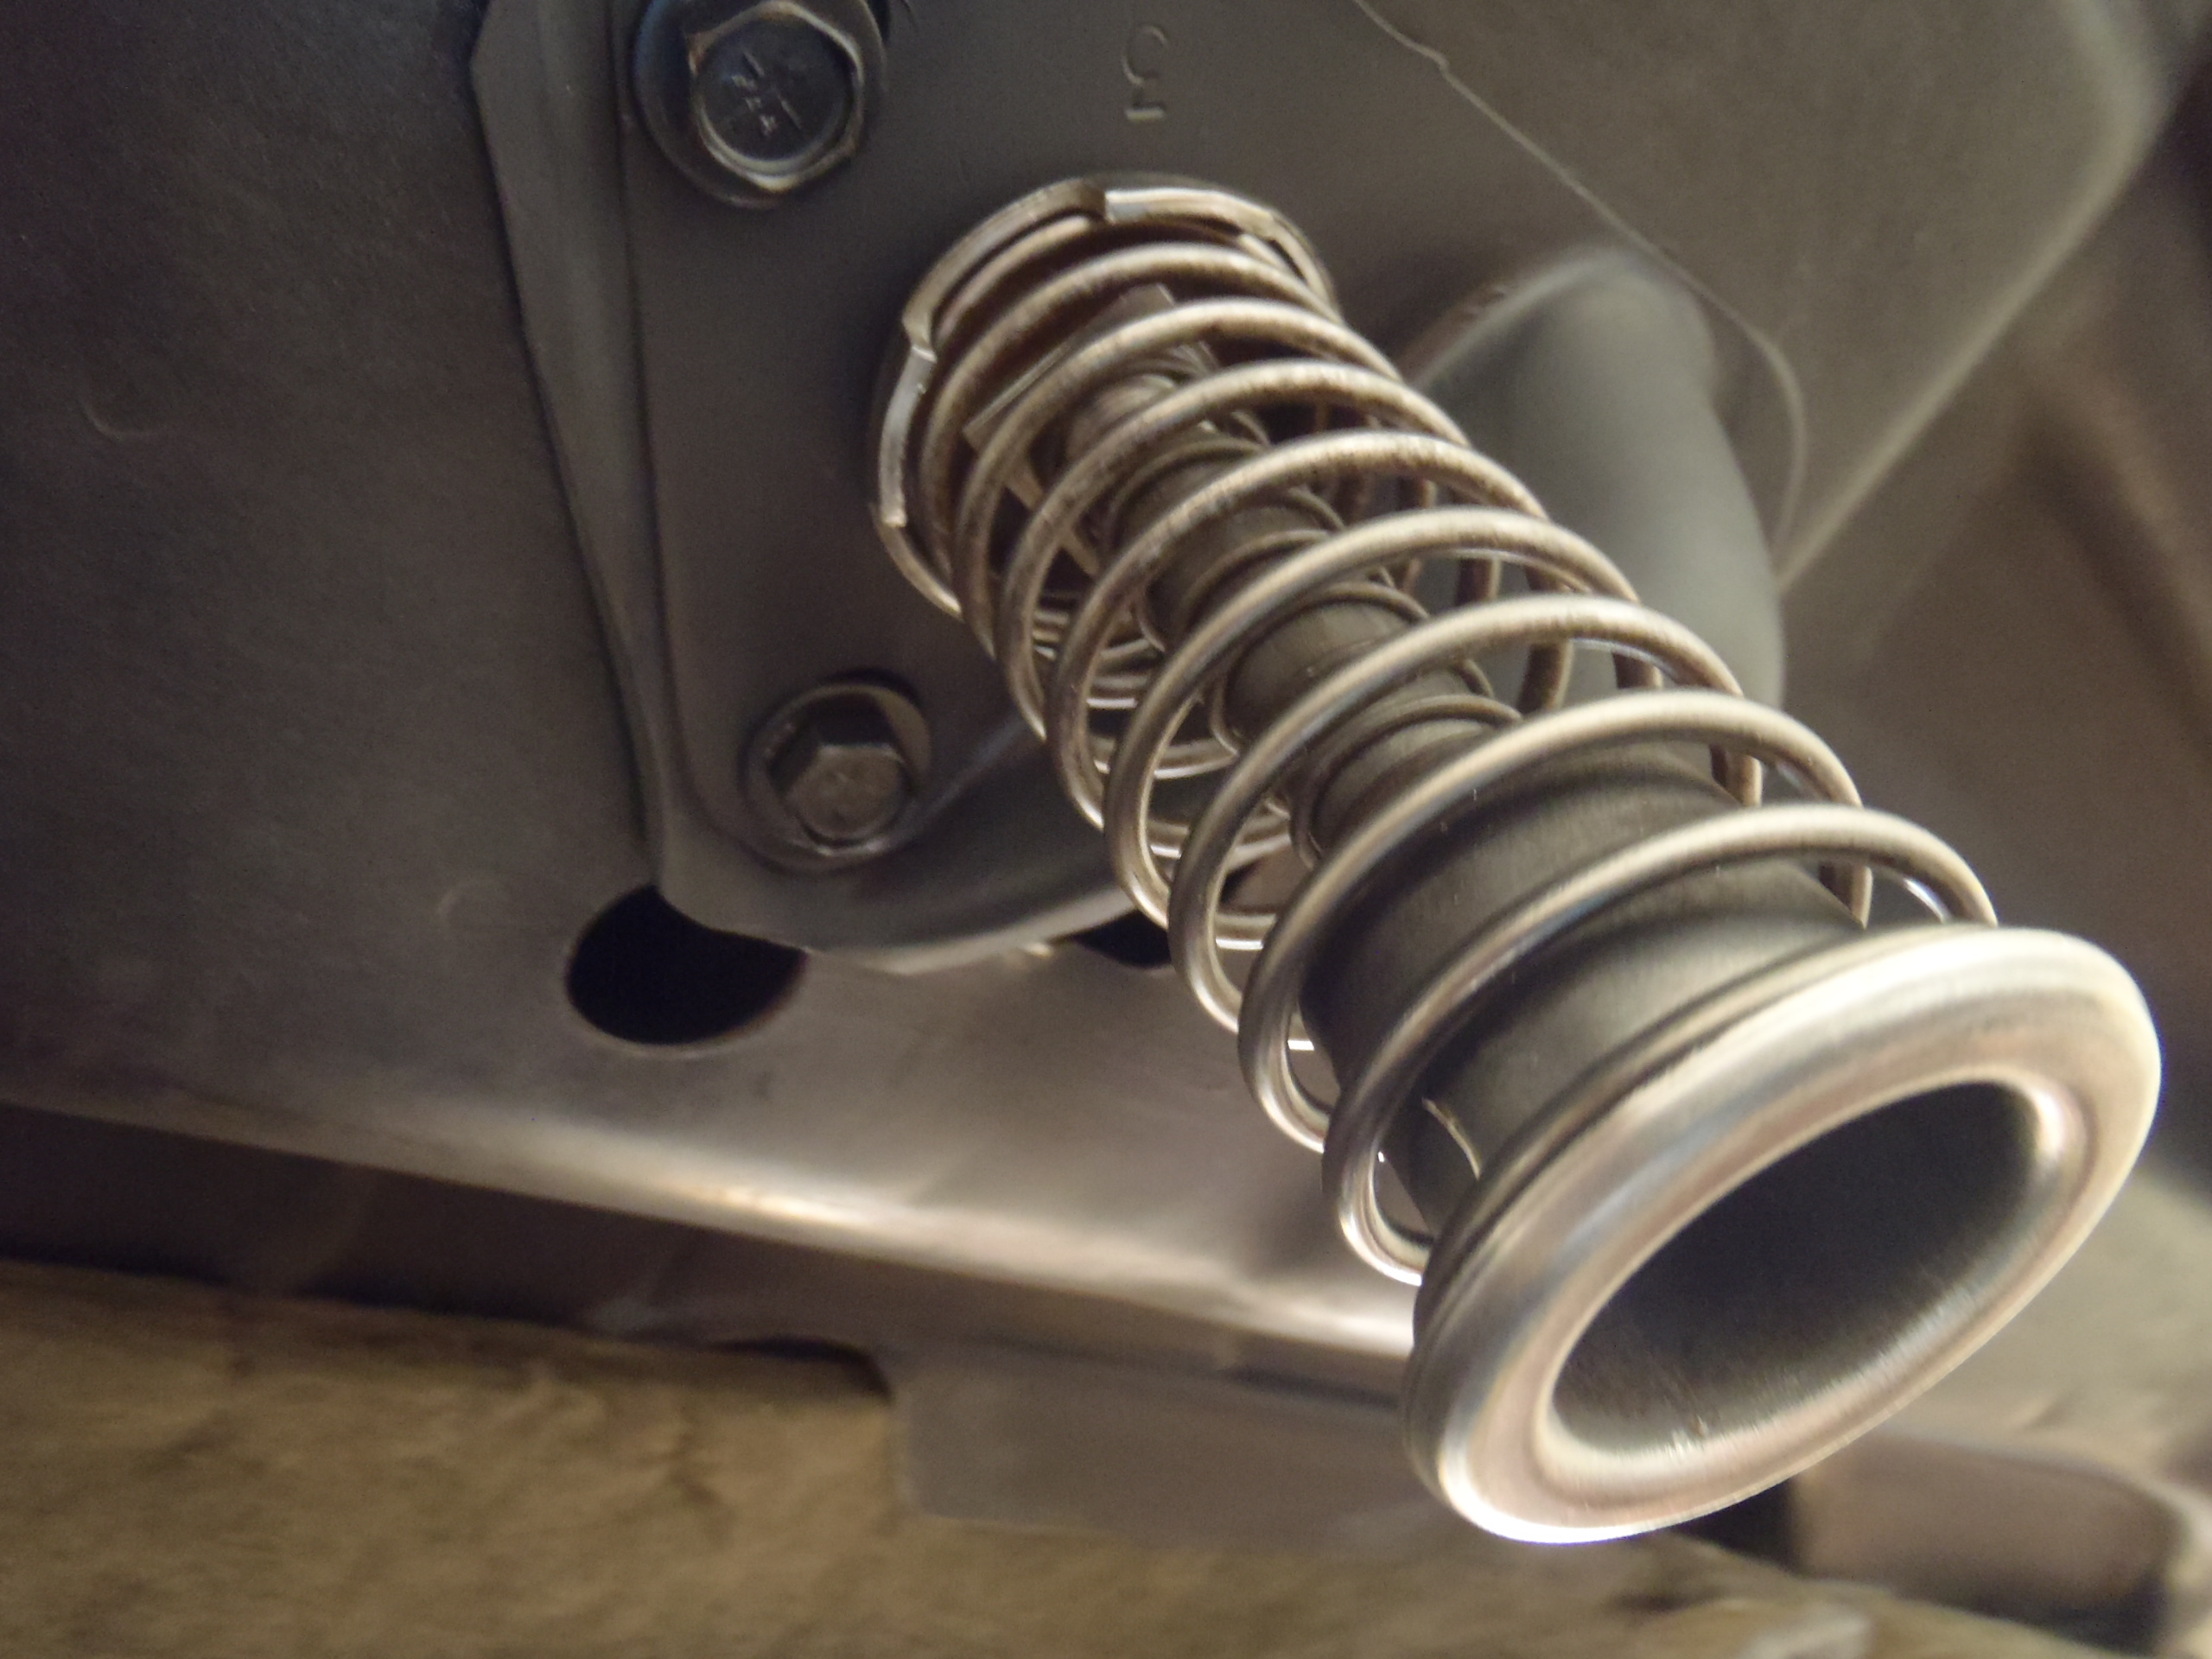
Denny,
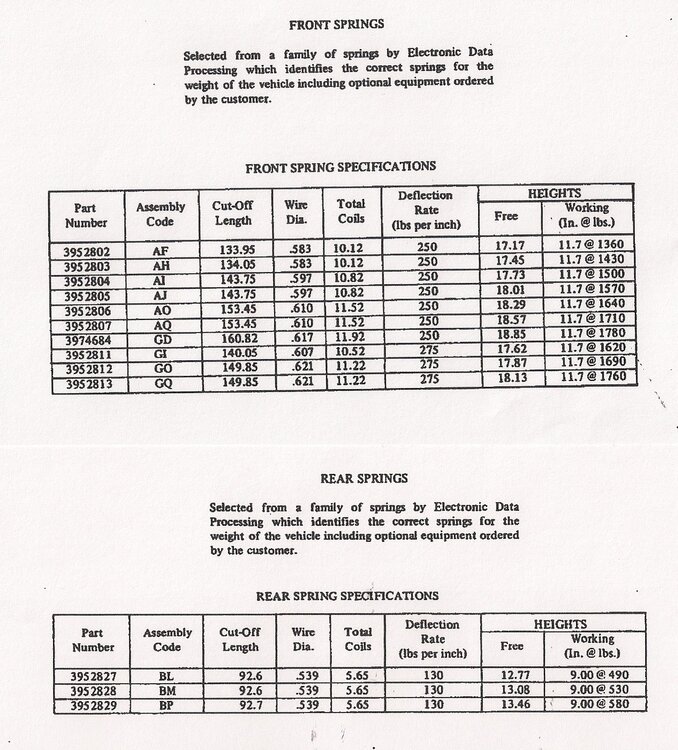
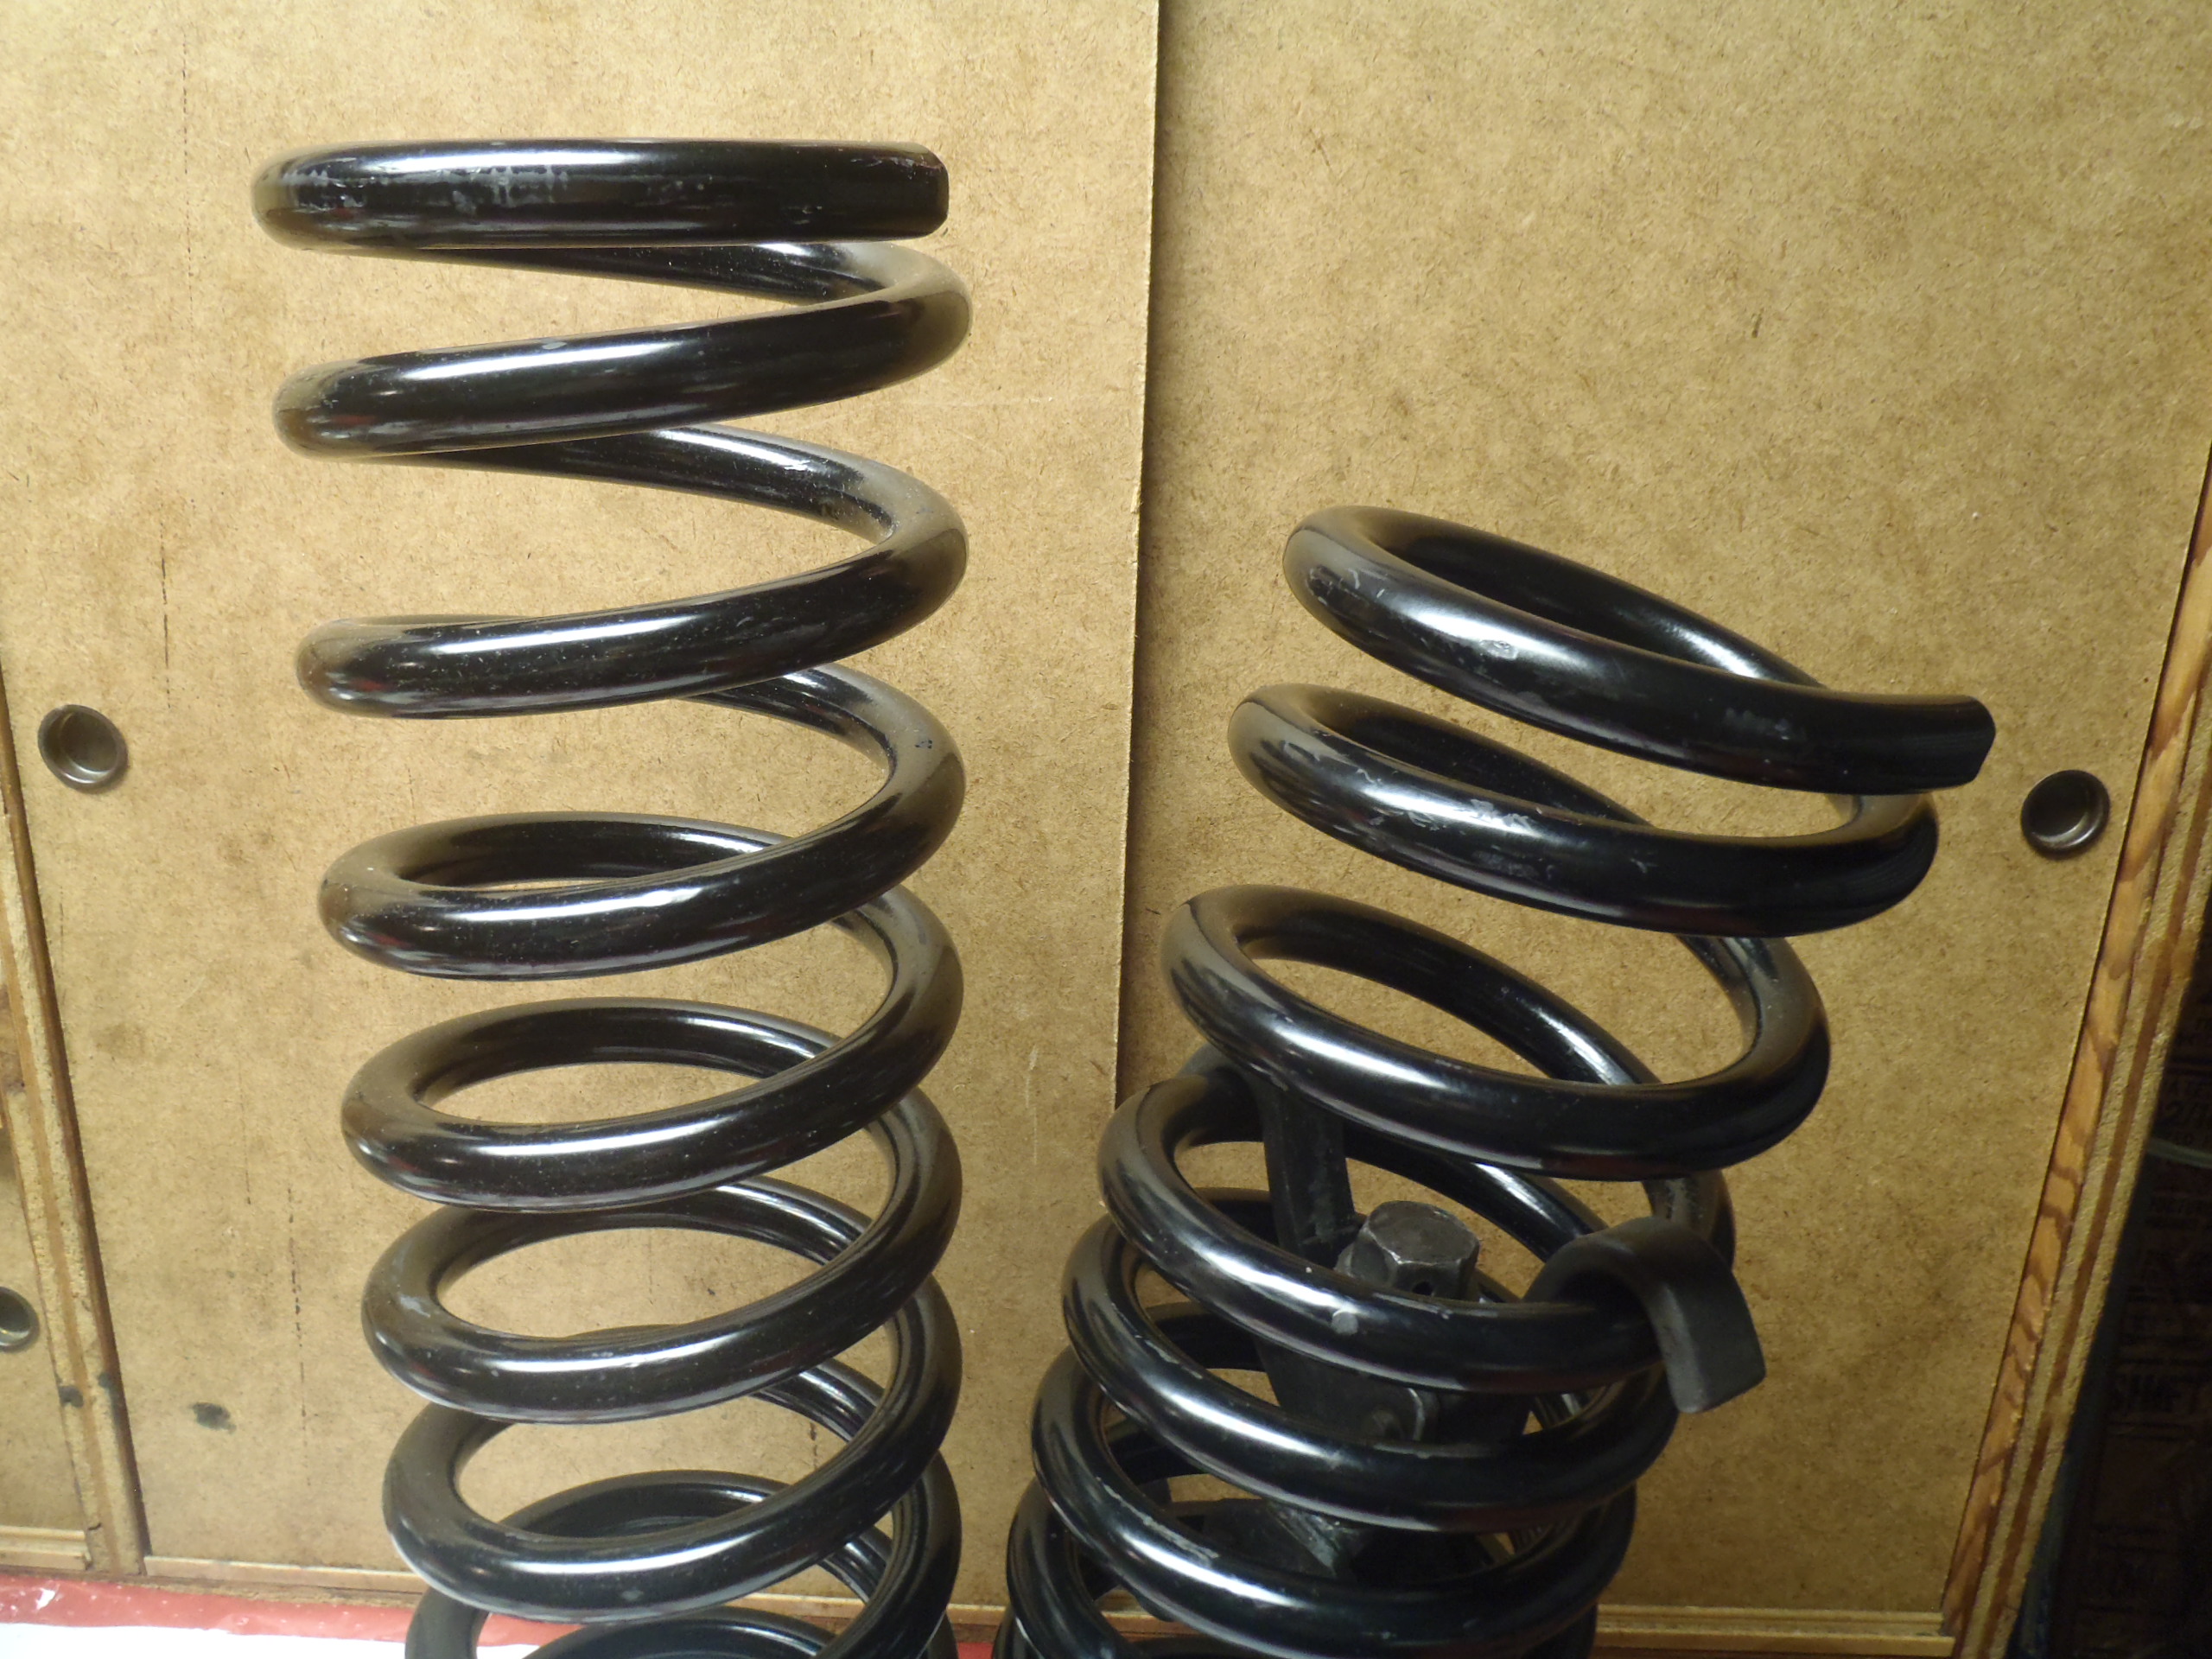
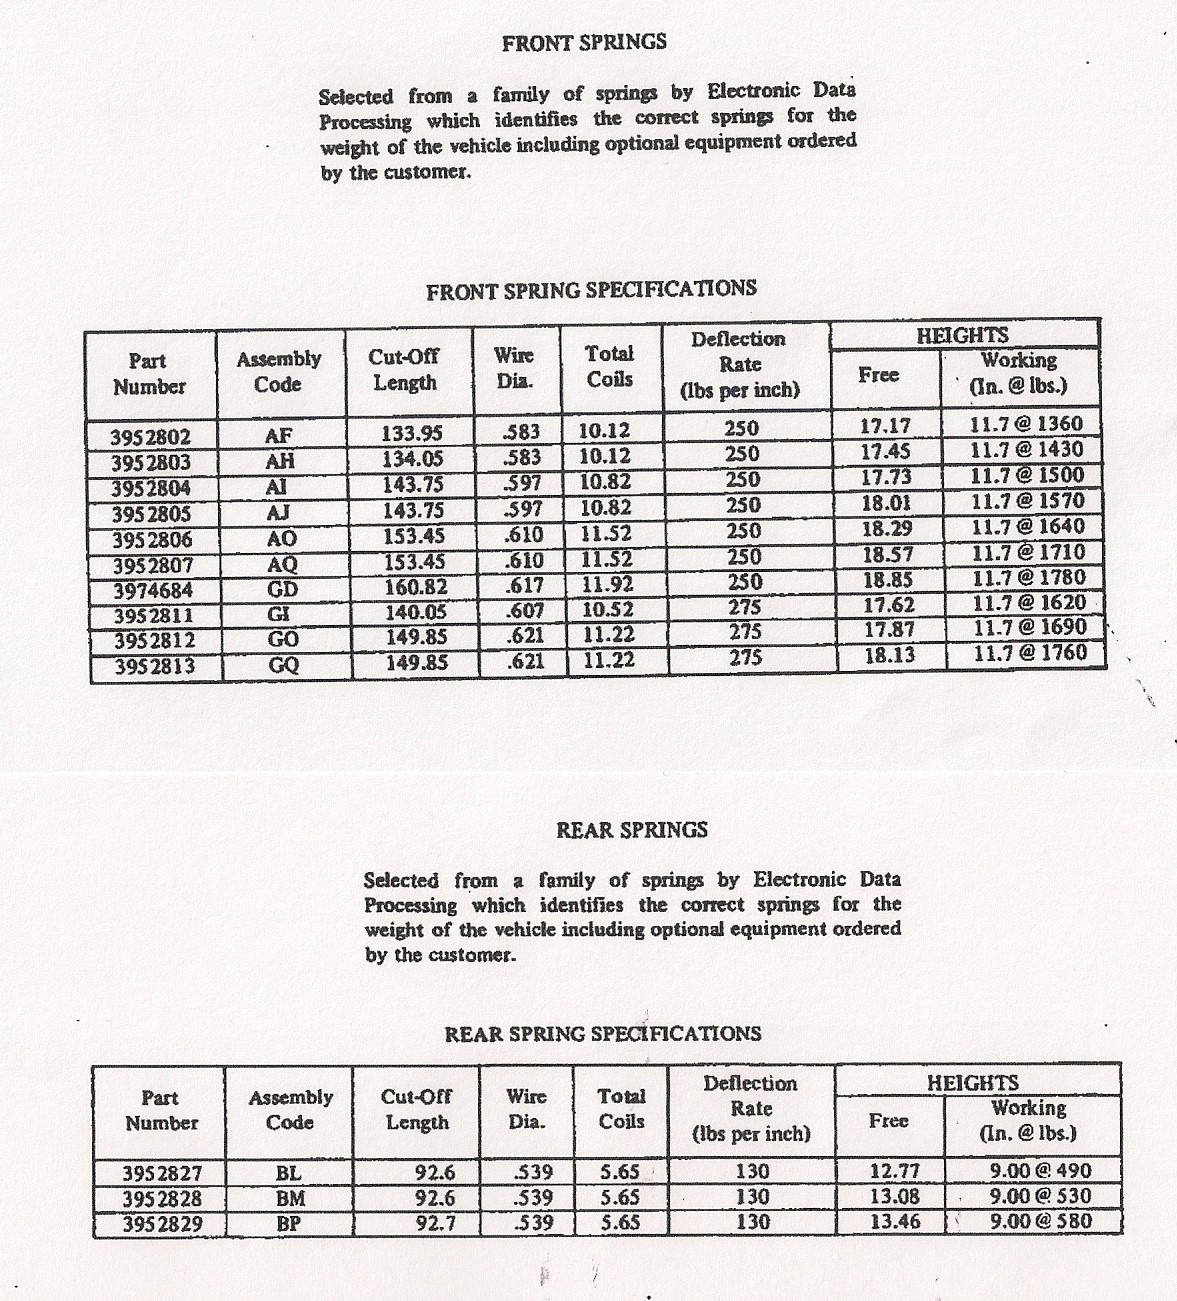
There were 10 different springs (each identified by a two-letter code) that were possible to include in a 1970 Monte Carlo at assembly (see table photo below). The proper spring was "computer selected" based on the weight of that particular vehicle (including all factory installed options). If you have a build sheet for your '70 SS, it will show the front spring code in Box 13. My '70 SS was moderately optioned and was still built with the strongest/heaviest of the ten springs available which was spring code GQ. Assuming yours was also built with that spring, here are the specs:
Part Number = 3952813
Cutoff length = 149.85"
Wire diameter = .621"
Total coils = 11.22
Deflection rate = 275 pounds/inch
Free height = 18.13"
Working height = 11.7"
Preload force = 1760 lbs (18.13" - 11.7") x 275 lbs/inch
It is entirely possible that your original front springs have already been replaced, usually during a front suspension rebuild. If so, the Moog 6331 is a very popular replacement spring since the original part number springs are no longer available. When I rebuilt the front suspension of my '70 SS, I discovered it already had that Moog 6331 installed (the spring number is stamped near one end of each coil). You can google that spring for its specs.
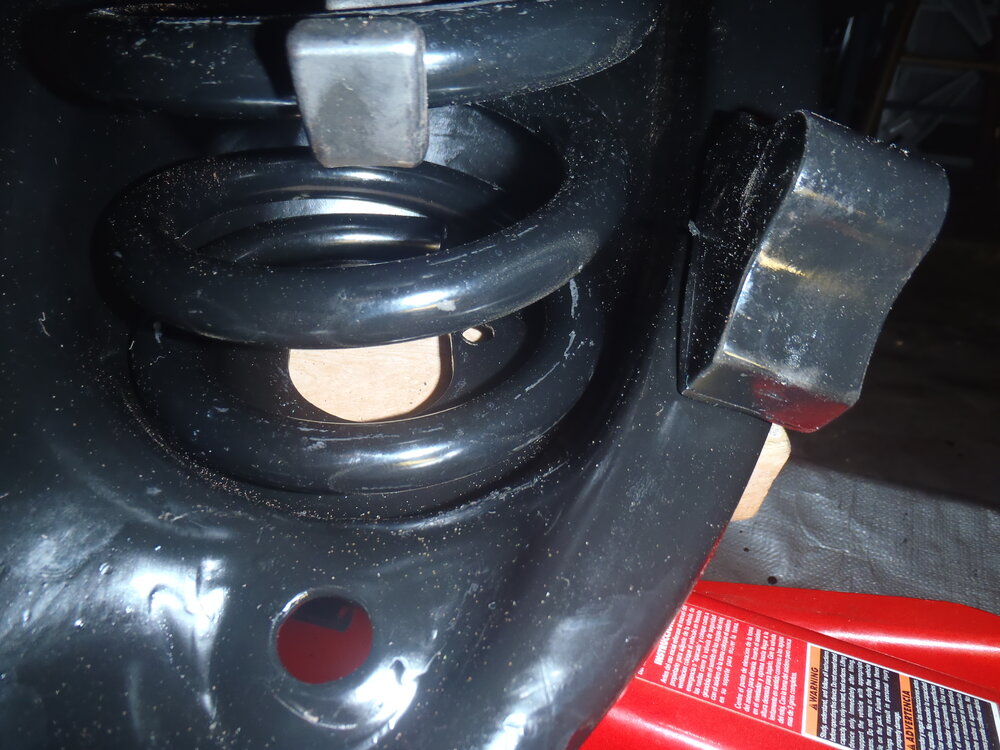
As others have said, there ae no isolators used on the front coils (only the rear coils). However, there are two very important things to observe when re-installing the front coils on a '70 Monte:
1. The top of the coil must be correctly positioned/centered around the tabs that stick down up inside the frame's spring opening.
2. The bottom of the coil must be correctly indexed/clocked so the end of the coil rests between the two small drain holes in the lower control arm.
There are several possible ways to safely install the front coils but I have found using a quality internal spring compressor (carefully positioned on the spring to both compress and shape it) worked best for me. Good luck!

-
2
-
-
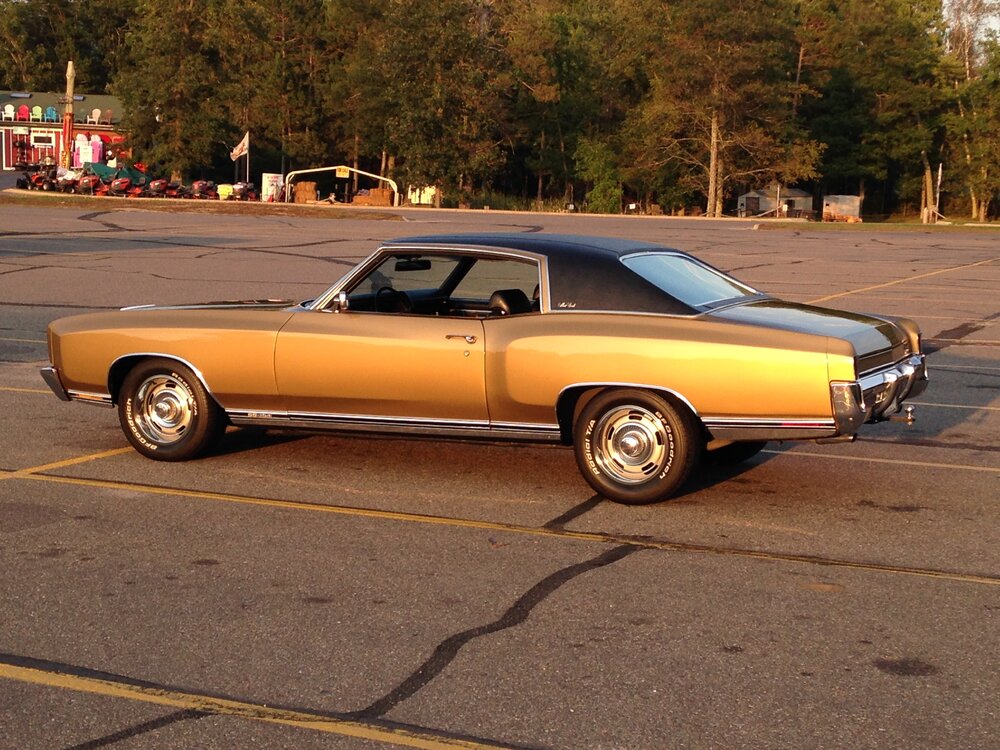
Welcome to the club and forums, Jay! Your '70 is a classic beauty and the exterior color combo is somewhat familiar. I owned an Autumn Gold and Black vinyl top '70 SS454 for eight years and always loved that color. My first new car out of college was an Autumn Gold '70 with a white vinyl top. Looks like your '70 has an upgraded drivetrain and some other tasteful, well-executed mods to add to your enjoyment. Well done!
-
1
-
-
Jeff, careful measurements show (and lots of member experience confirms) that to keep any wheel/tire combo centered within the available factory wheel well opening on a first gen Monte, your wheels need to have + 12 mm of offset in the rear and + 6 mm offset in the front.
A 15 x 8 rim with 4.5" backspace has 0 offset which places the wheel/tire combo 1/2" further outboard than centered. The largest tire you can safely run without modifying the wheel well opening lip is likely 255/60-15. If you go to a 5" back space (+ 12 mm offset) on that rim, you can easily go up to a 275/60-15.
Factory 15 x 7 rally rims have a 4.3" backspace or +8 mm offset. That will also handle up to a 255/60-15 on front or rear.
I personally would not go with 15 x 8 rims all around if they only had 4.5" backspace because it would not allow the larger tires I prefer. Instead, I would choose 15x7 with 4.25 backspace on front and 15x8 with 5" backspace on the rear. That allows up to 255/60s on the front and 275/60s on the rear. However, if a particular wheel you want is only available in one given backspace, then you will need to choose tires whose width will not create clearance problems.
I highly recommend using the excellent online tools at https://tiresize.com/ to decide what tires will work best with any wheel you choose or what wheel specs you will need to run the size of tires you want. Specifically look at their Tire Size Calculator, Tire Size Comparison and Wheel Offset Calculator tools. Determine the exact specs of whatever wheel/tire combos are currently on your Monte and measure the existing clearances. Then, enter that data as your Current Setup and compare every other wheel/tire combo you want to consider as the New Setup. It will show you both visually and quantitatively how your clearances will change with any new setup. Good luck.
-
21 hours ago, Steve G said:
My giant box came in today!!! Half opened with lots missing..... summit has been a great company to deal with... now I get to experience their customer service. But I am very happy with what I do have.. hahaha
That's a real bummer, Steve! It is rare indeed to receive a package of almost any size that has not been damaged or destroyed by the shipper! I've had bad experiences with all three, FedEx, UPS and USPS. They drop severely damaged packages on your doorstep and leave as quickly and quietly as they can. The delivery drivers don't want to be accountable for the careless handling by their gorilla transit guys. And, I'm sure the delivery drivers cause some of the damage themselves, also.
Unfortunately, manufacturers are partly to blame also, because they have not improved their packaging to withstand the rigors of modern day shipping and handling. I hope Summit comes through for you with all the missing parts or an entirely new shipment that is whole. Good luck!
-
1
-
-
I suggest you put aside your initial reaction/attraction and consider the value of this particular vehicle to you longer term. If its current appearance and level of performance is what you would ultimately want to have and live with long term, it may be worth getting it all up front.
If, on the other hand, you don't see yourself needing or living with that level of performance long term, you can surely buy the appearance for less than this seller's asking price. For me personally, it would be worth more without the hood scoop, regardless of its drive train, so including the original hood is a plus. It's a cool ride, for sure, but I could never justify that asking price.
-
1
-
-
1 hour ago, Steve G said:
Did you weld it all up or stick with the clamps? That sounds perfect to me. My motor is a stock 402 so I don’t expect it to sound as mean as yours. Thank you!
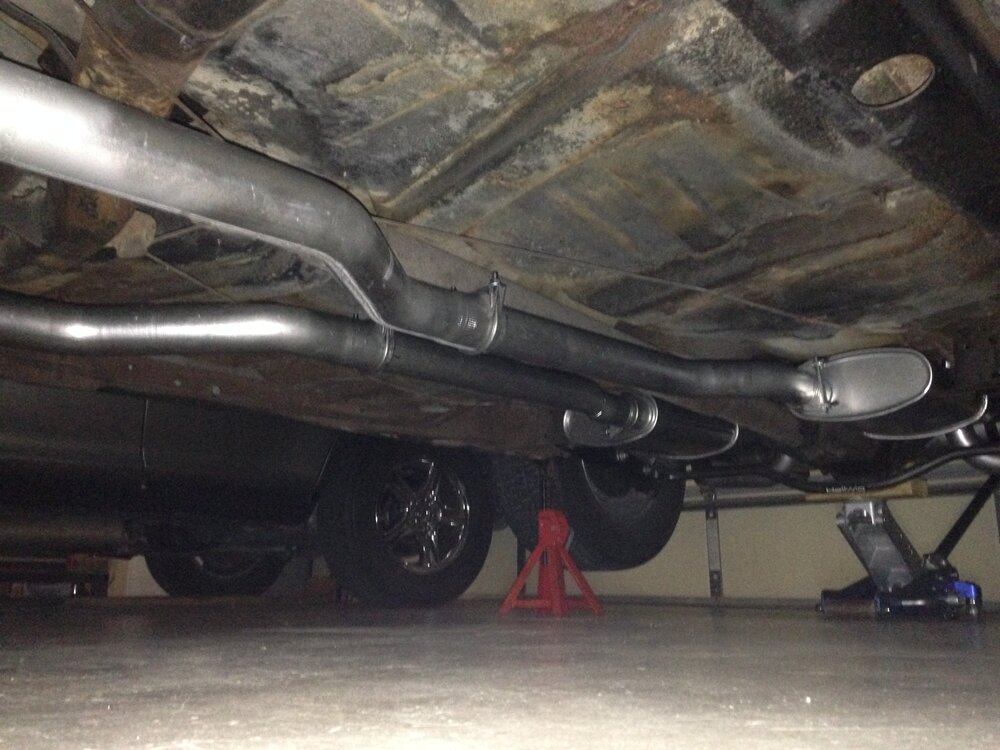
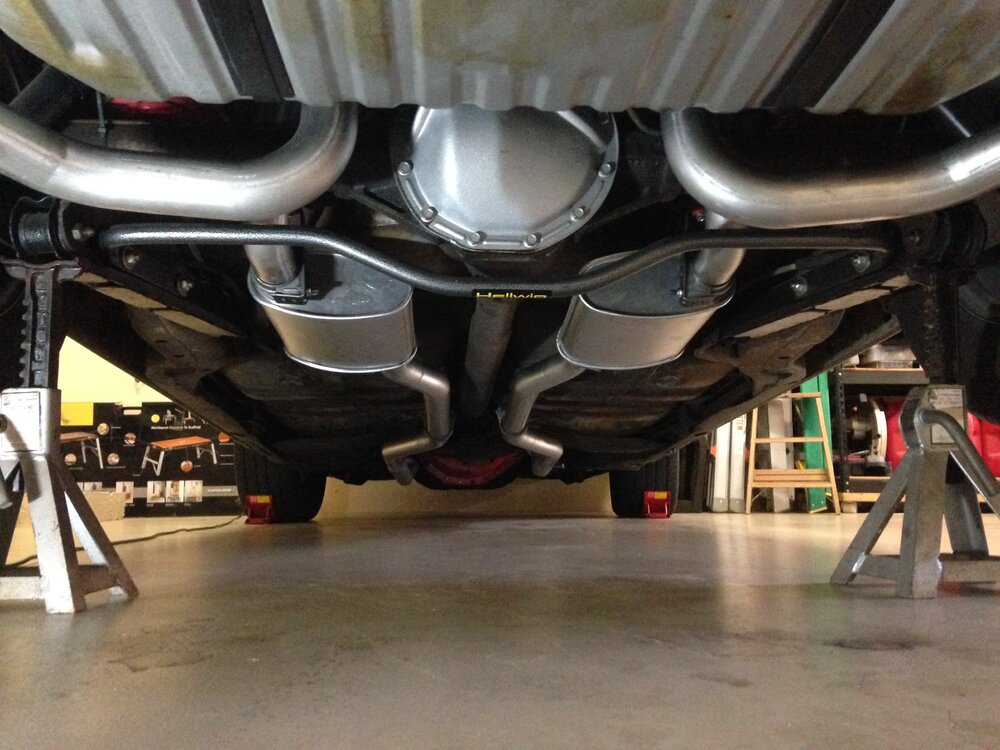
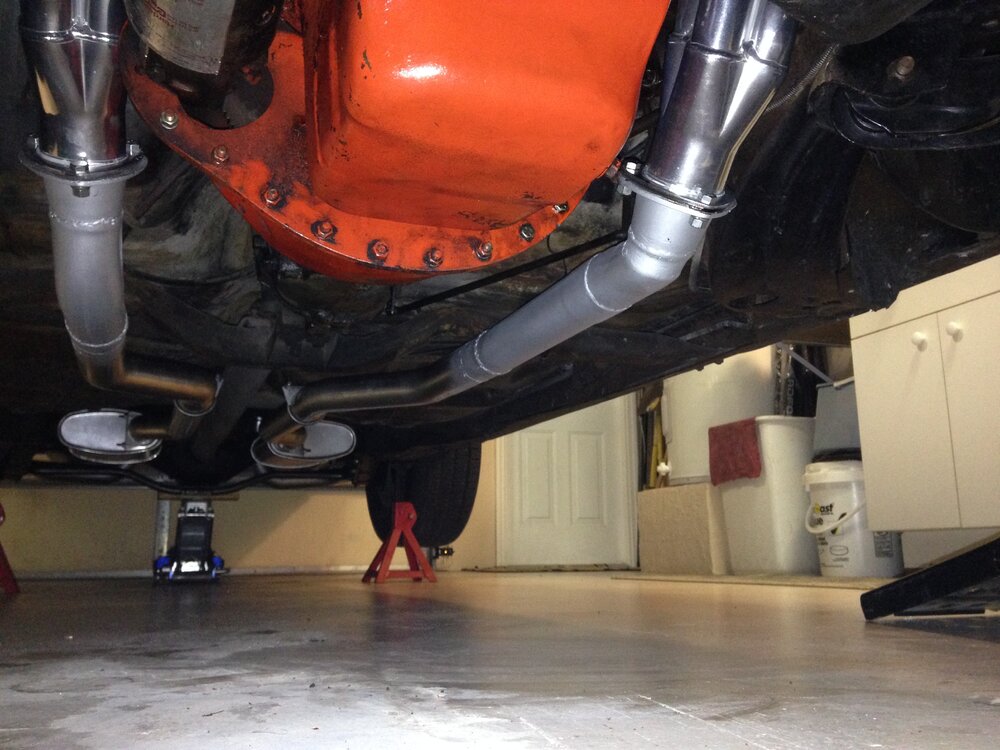
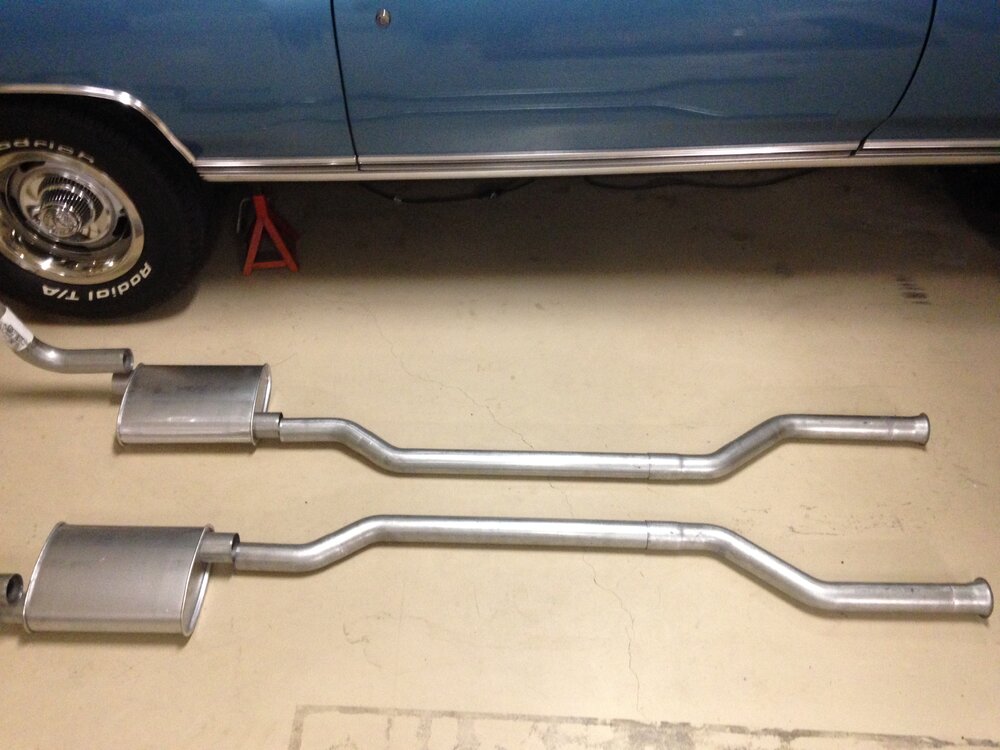
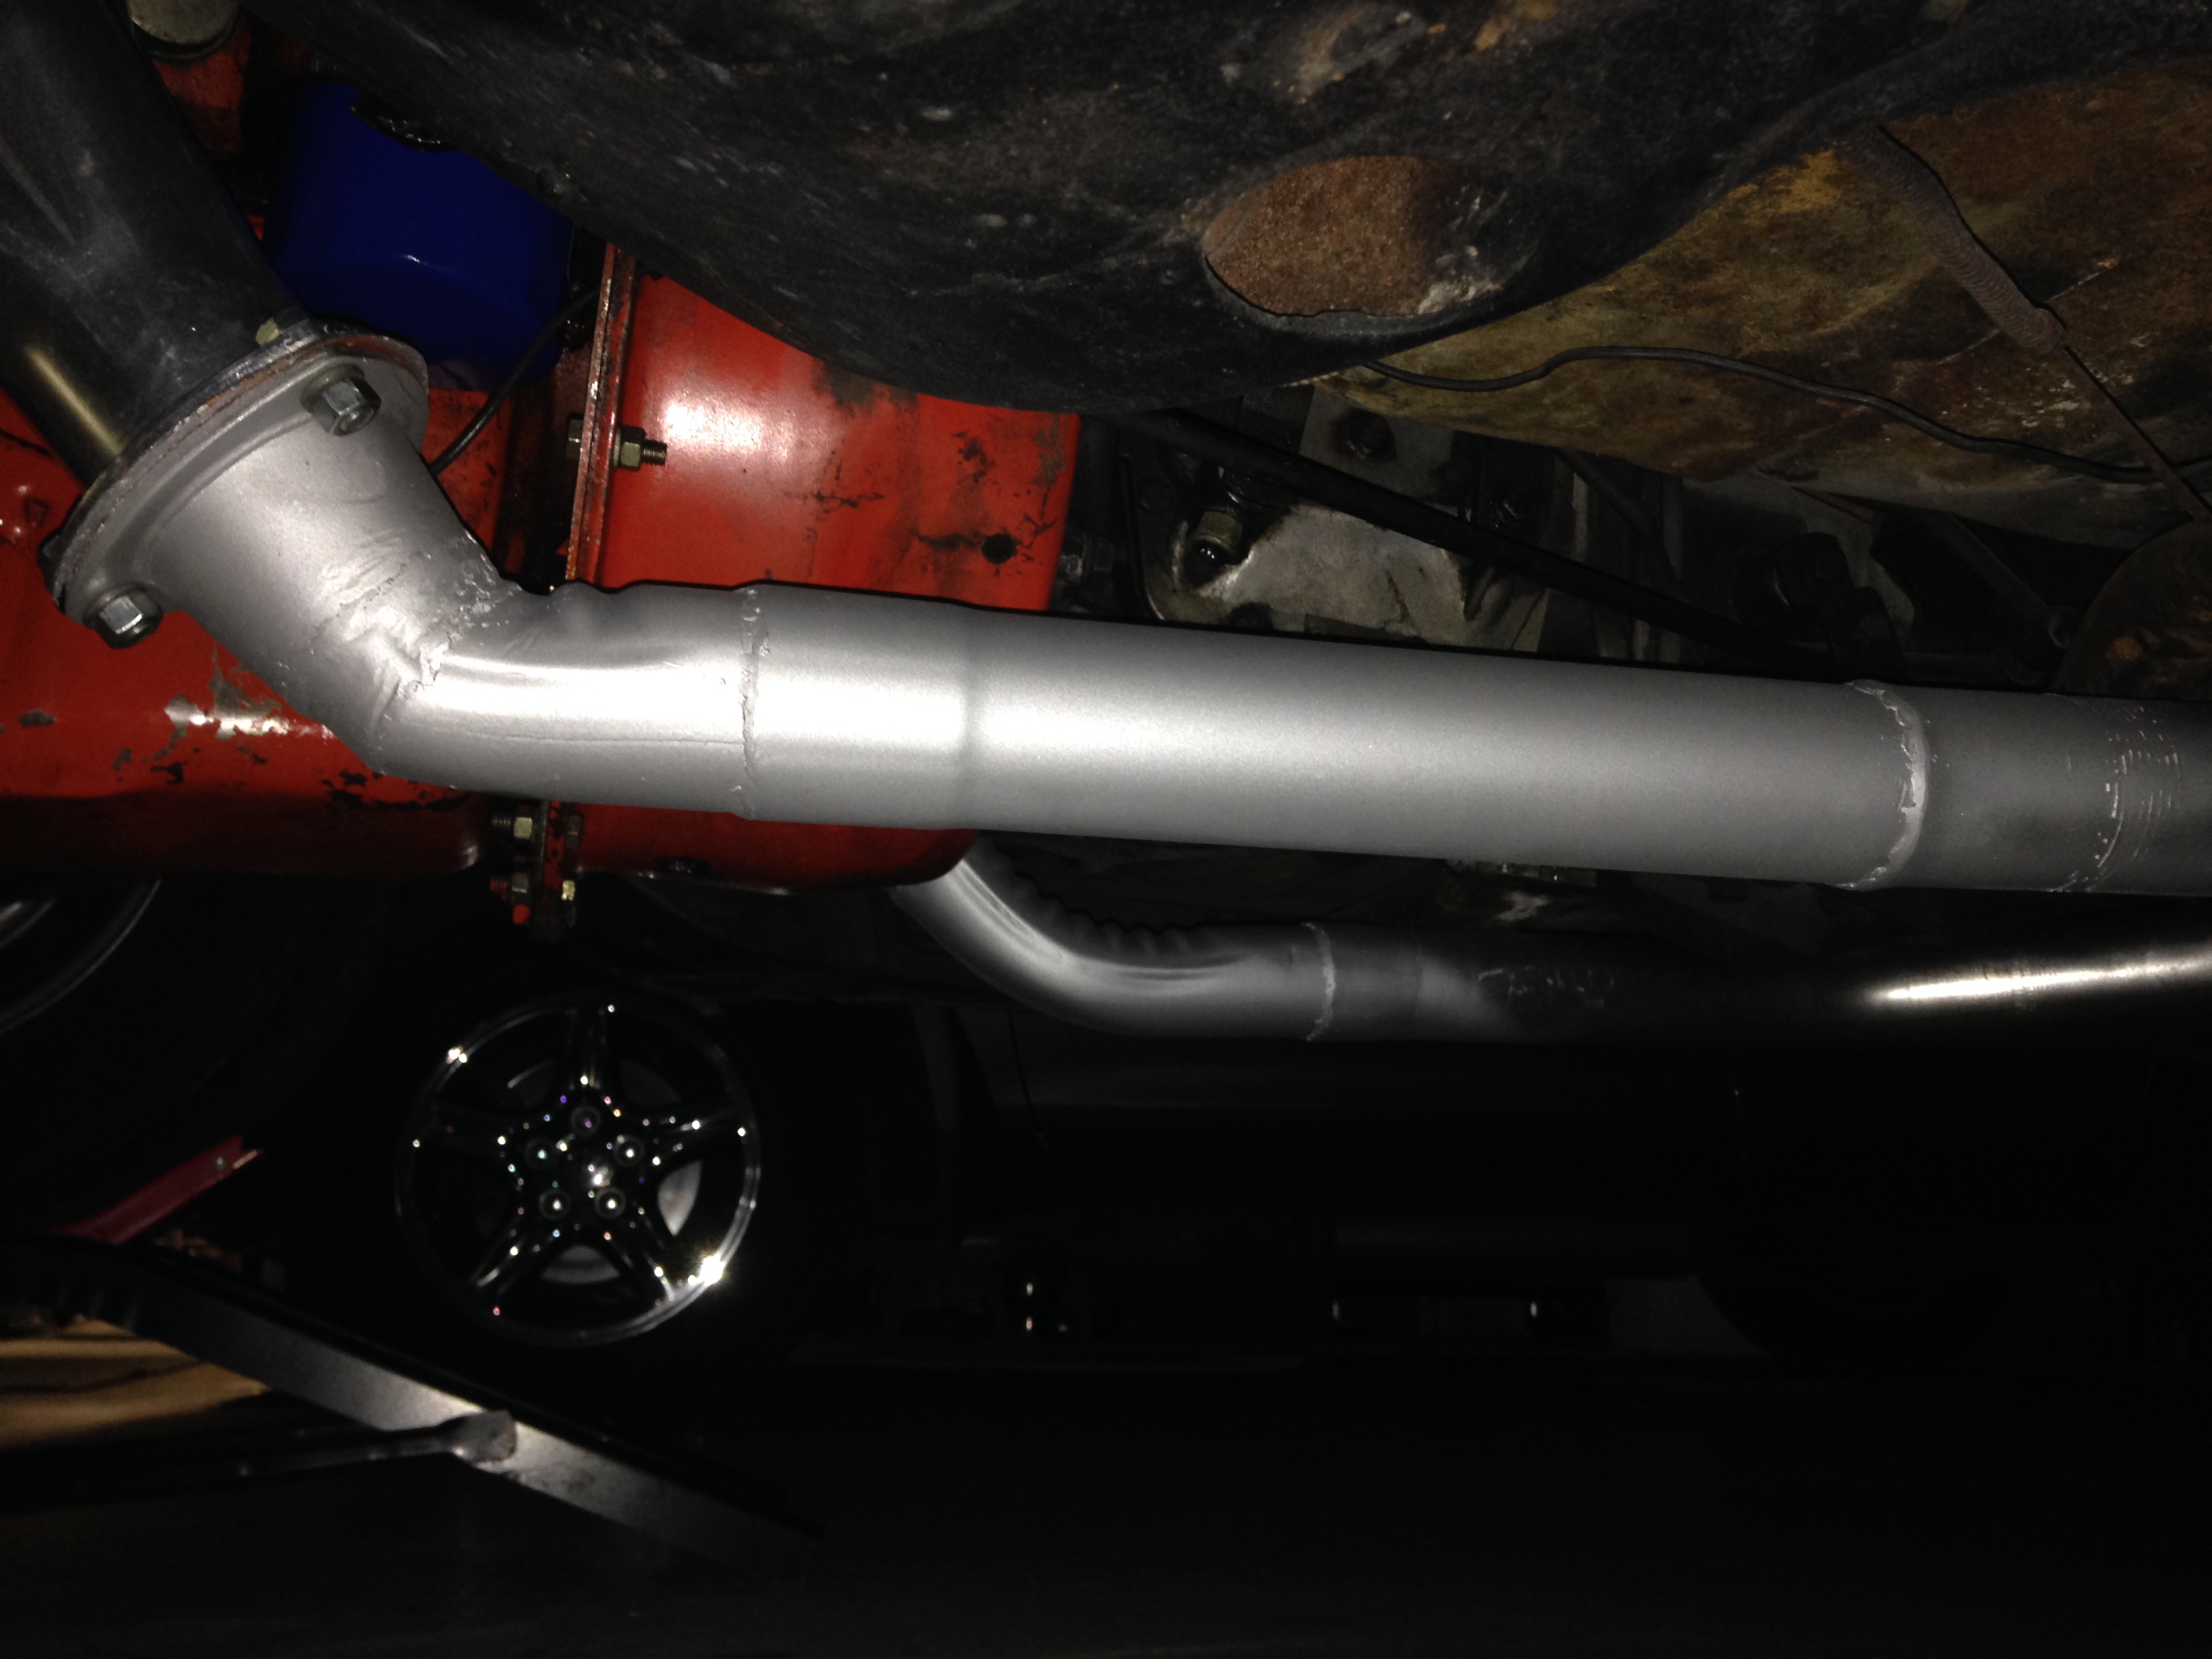
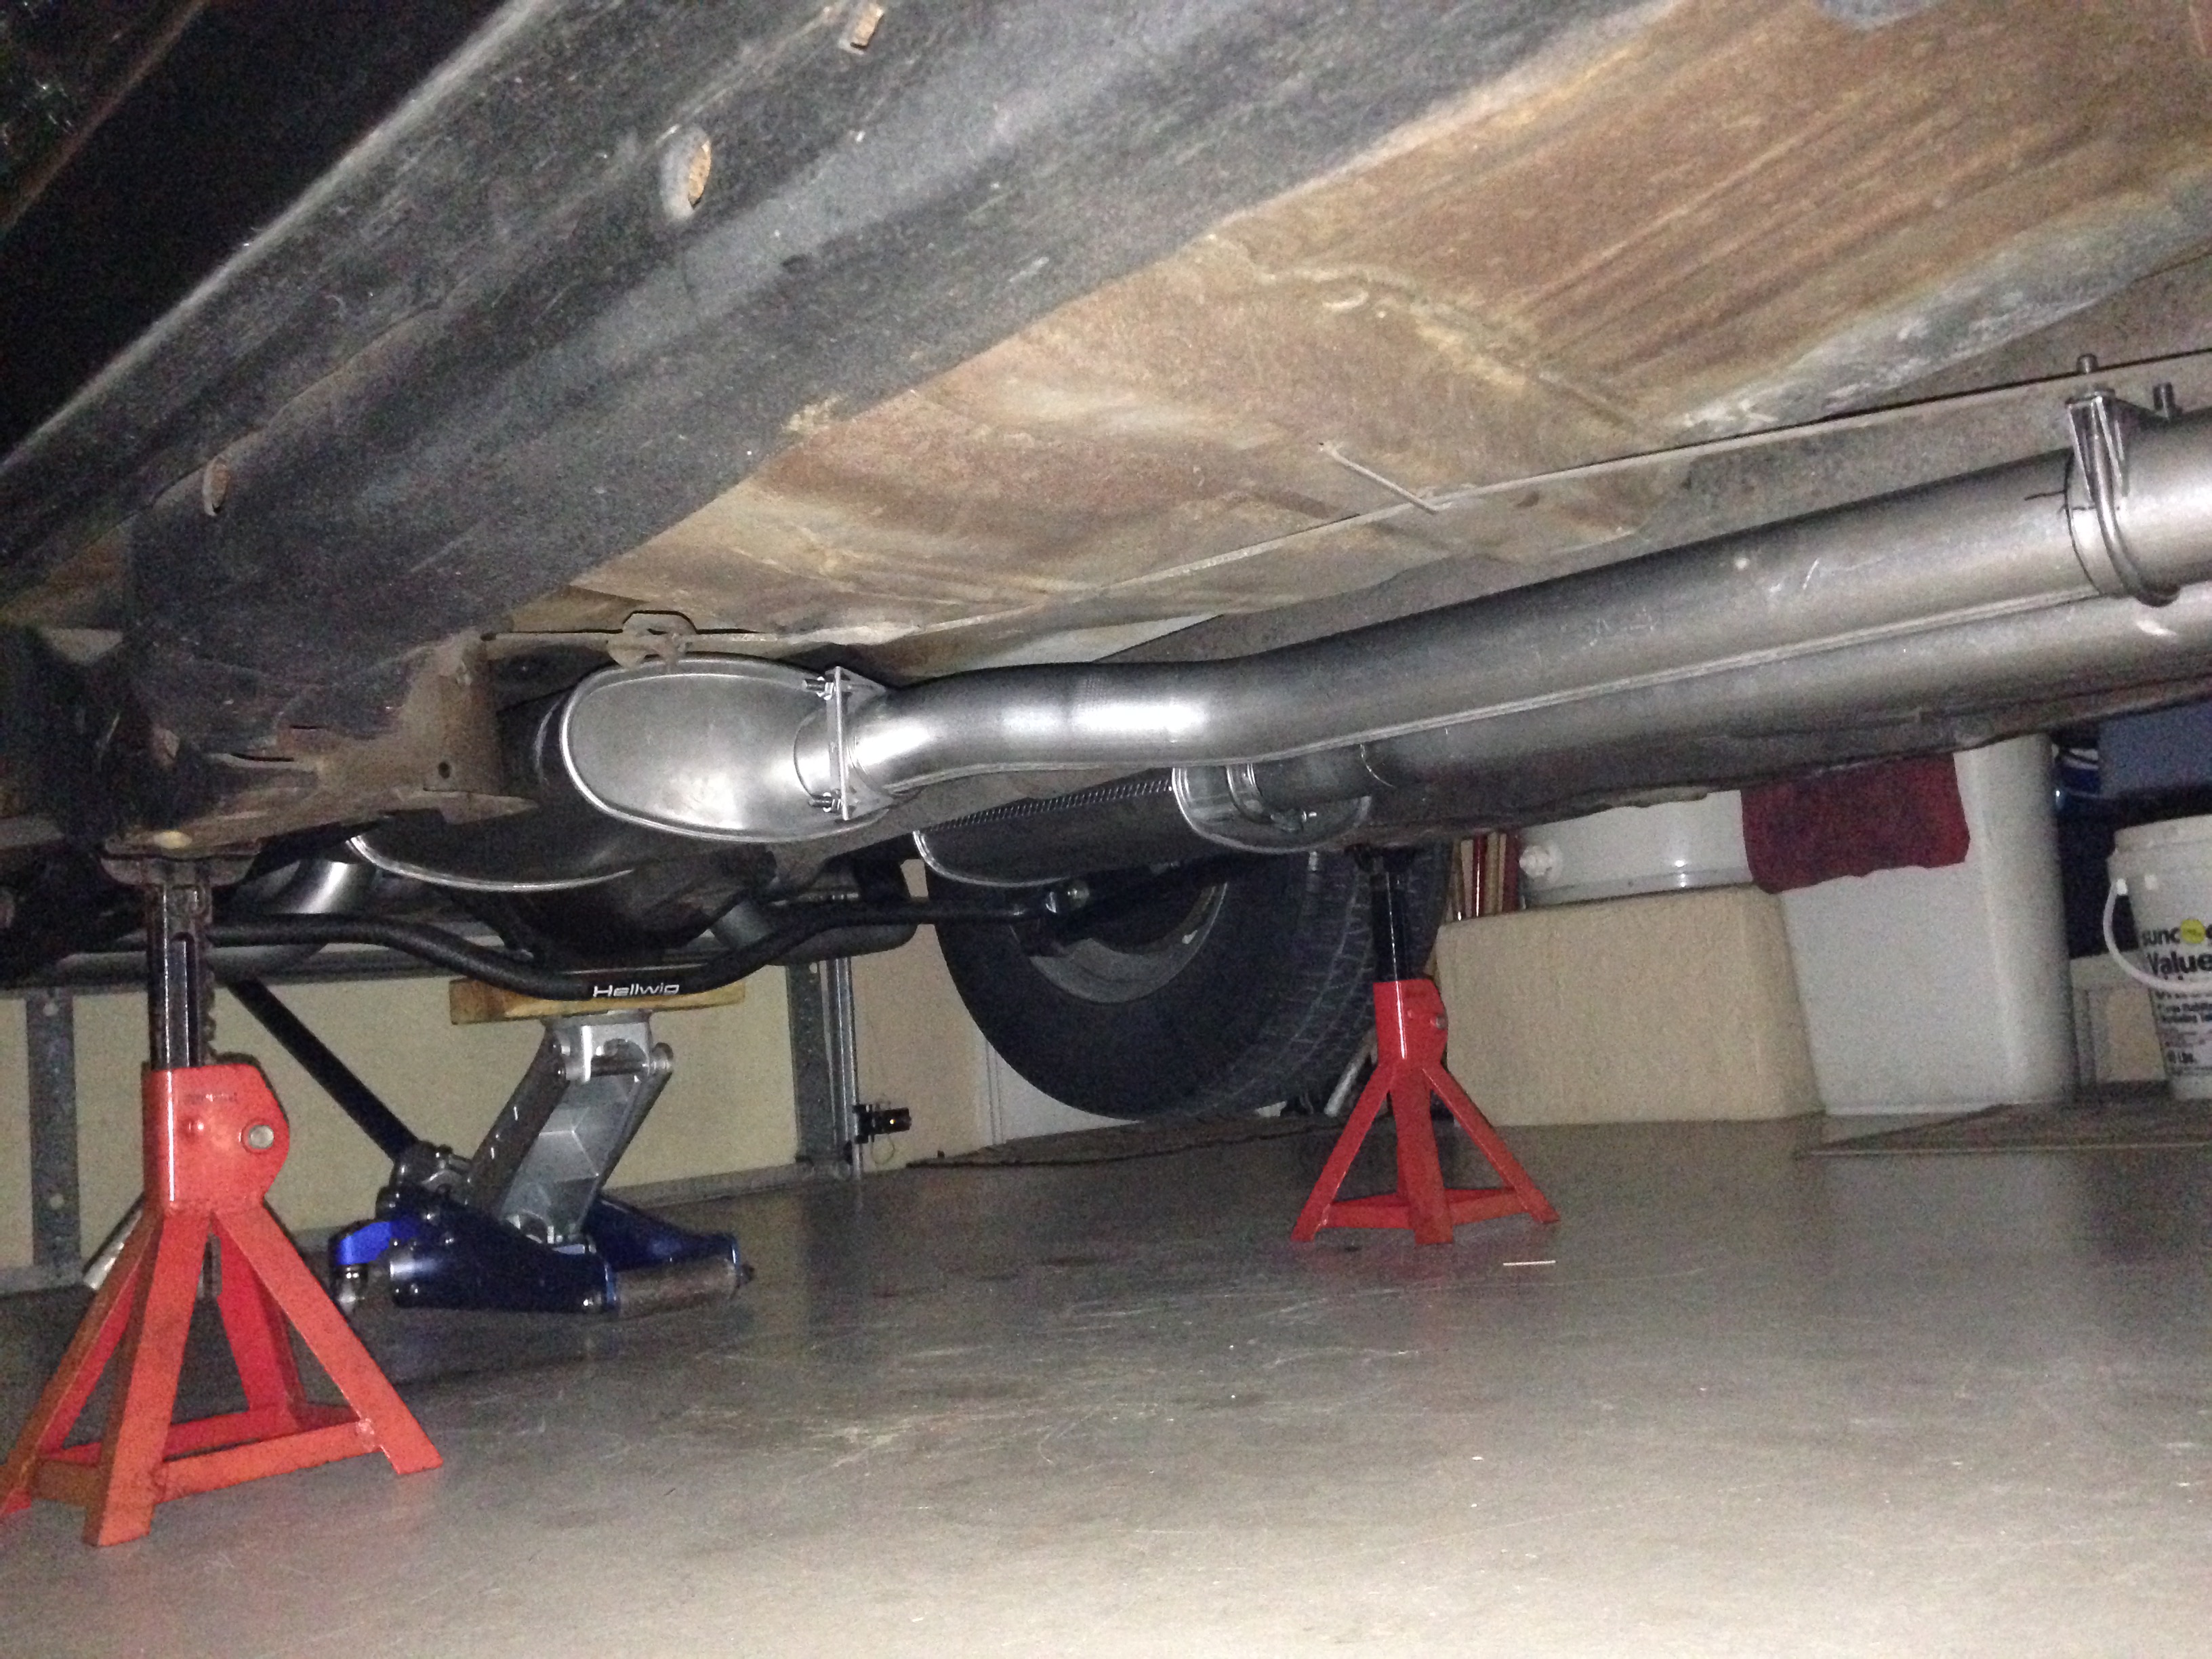
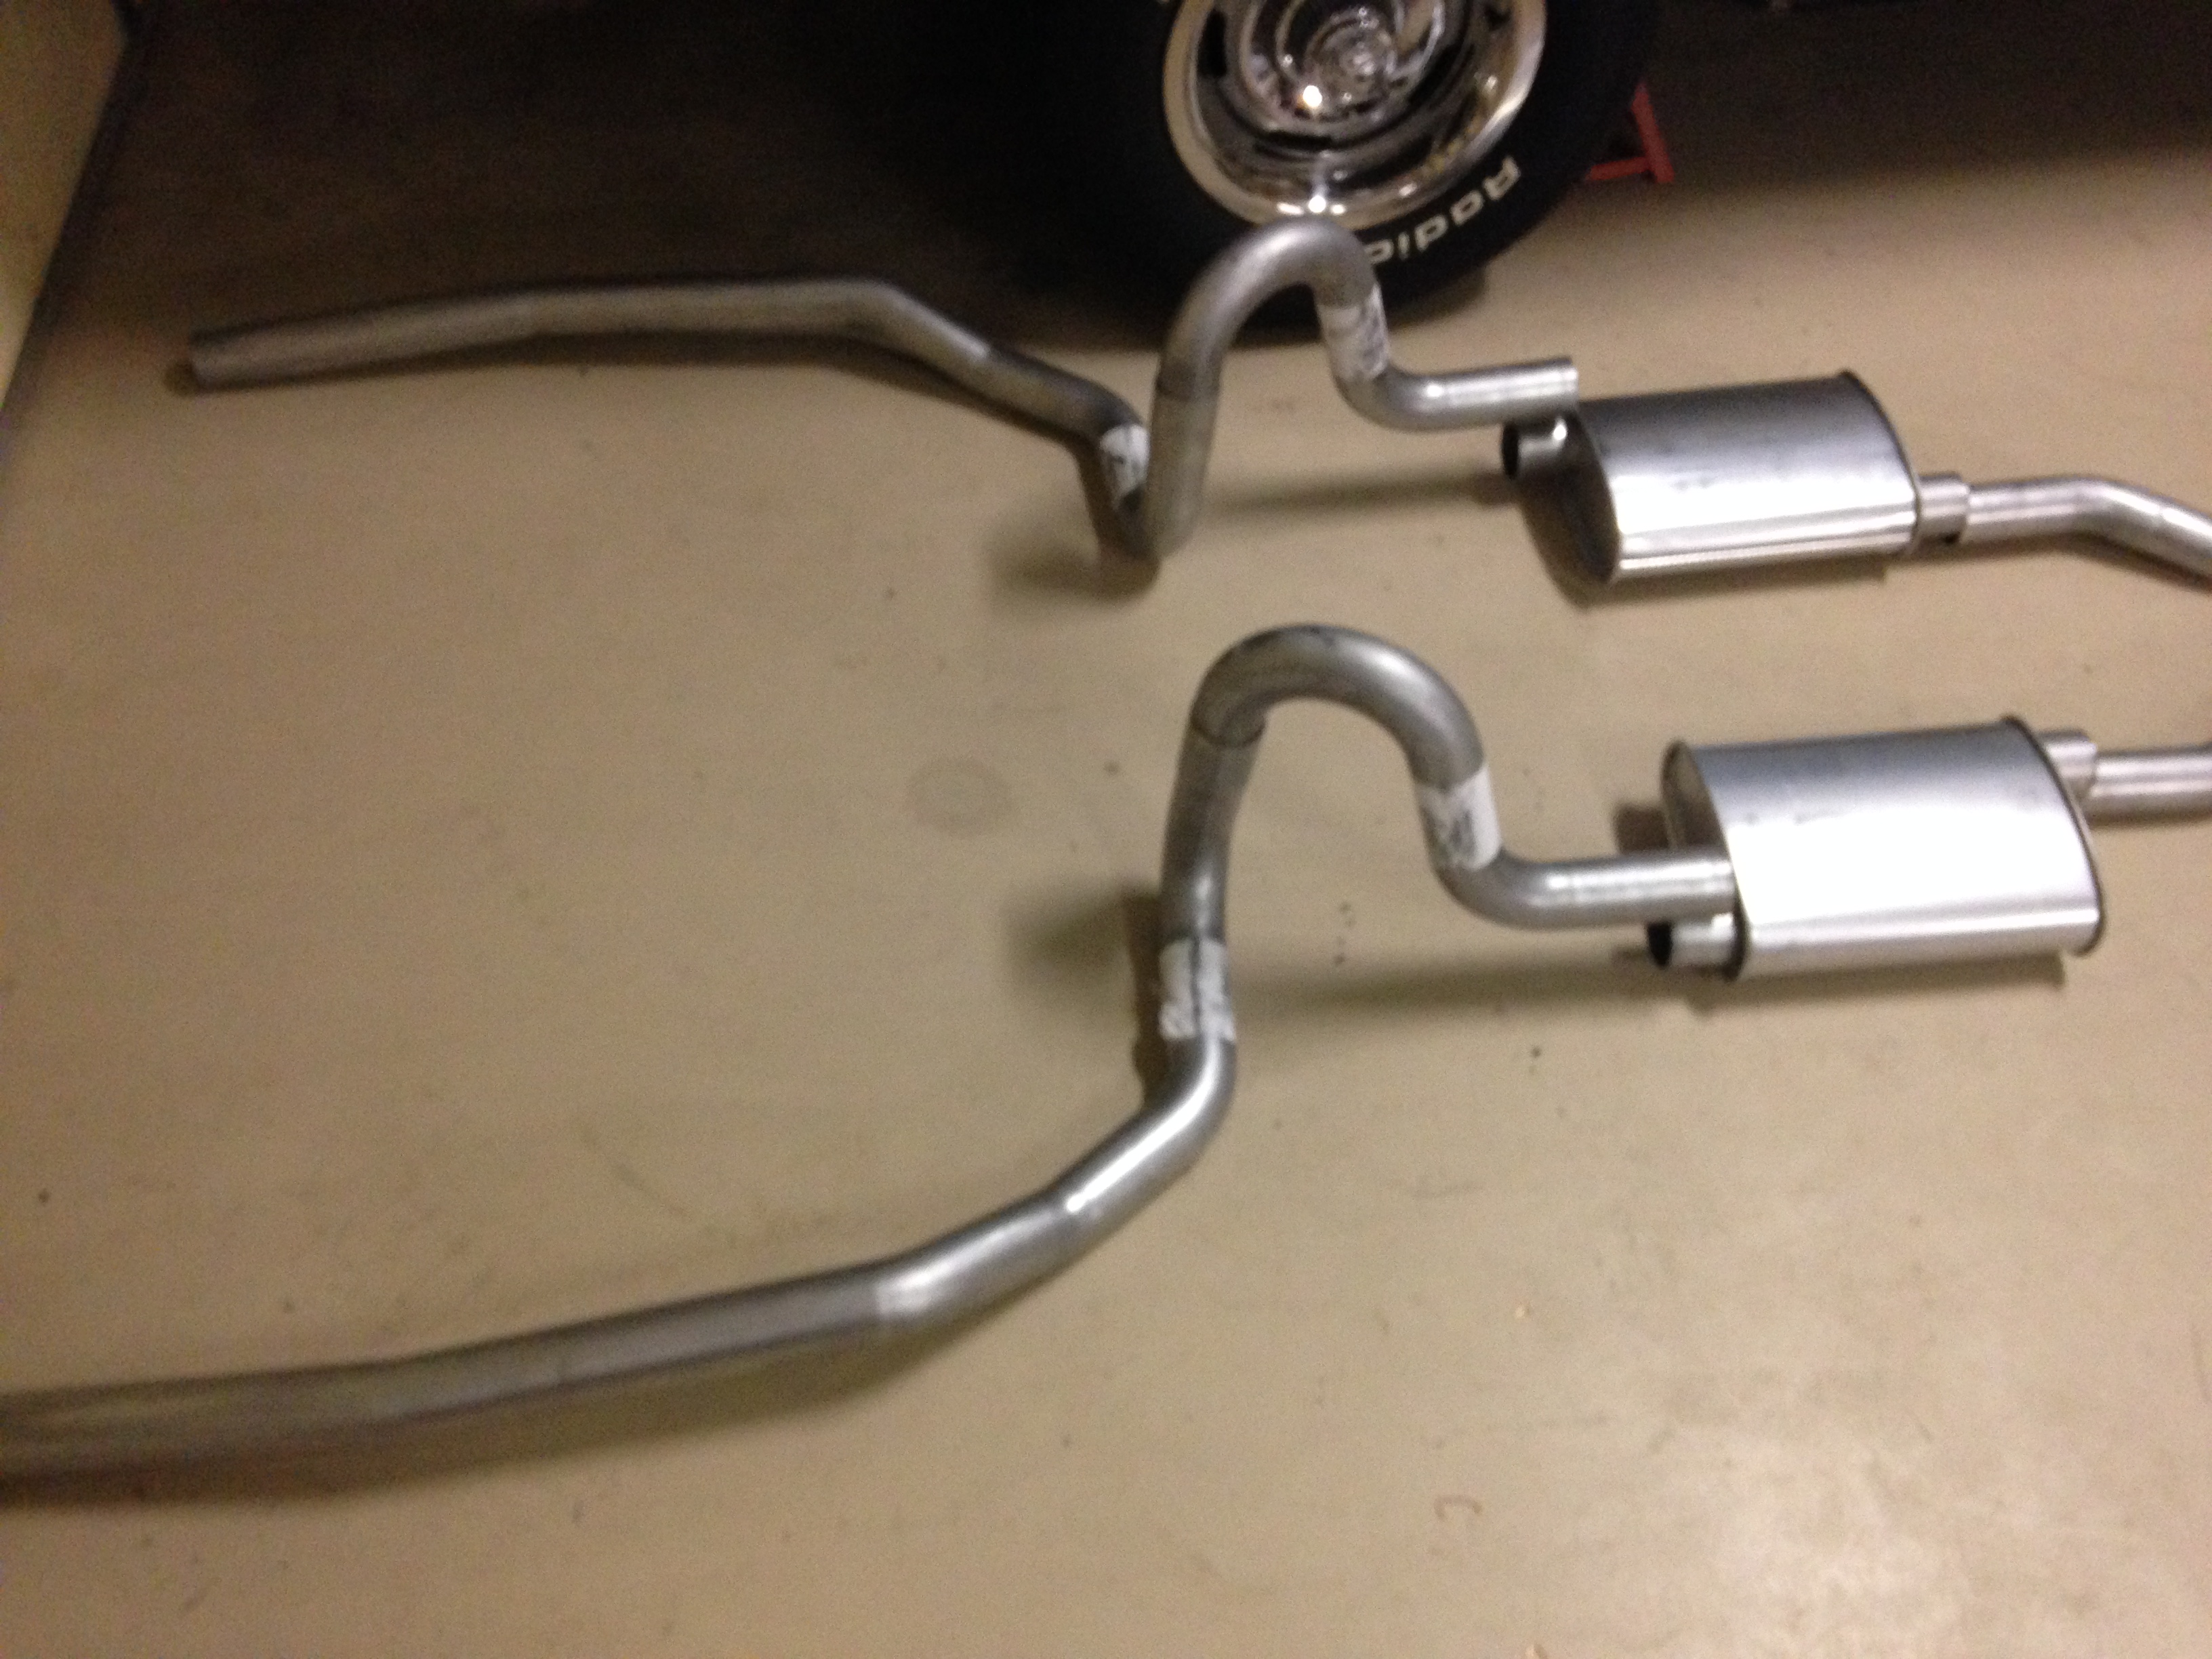
Steve, I used the clamps Summit provided in the kit except that I had to weld the 45 degree adapters onto the head pipes (which I did off the car, of course). If I had kept my old straight-back, full-length headers (badly rusted and heavily "massaged"), I would have avoided welding all together. I am barely a novice at MIG welding, especially thin material, so it was challenging. However, if you are handy at welding and have access to a lift, I'm sure welded joints are a better way to go.
I did learn the importance of tight clamps when the driver's side tail pipe twisted in the hanger clamp behind that muffler, allowing the tailpipe to sag a bit just behind the axle. Nothing was damaged, just looked weird. Easy fix to reposition and retighten - more.
PS. I uploaded the pics in reverse order so they should view in the correct order.


-
1
-
-
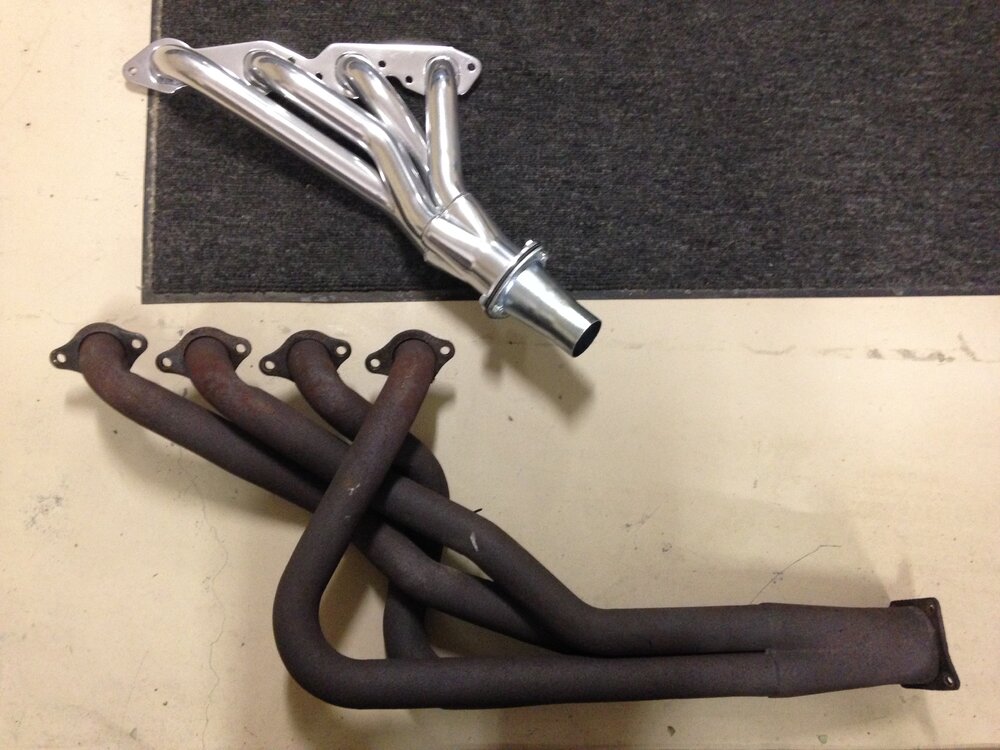
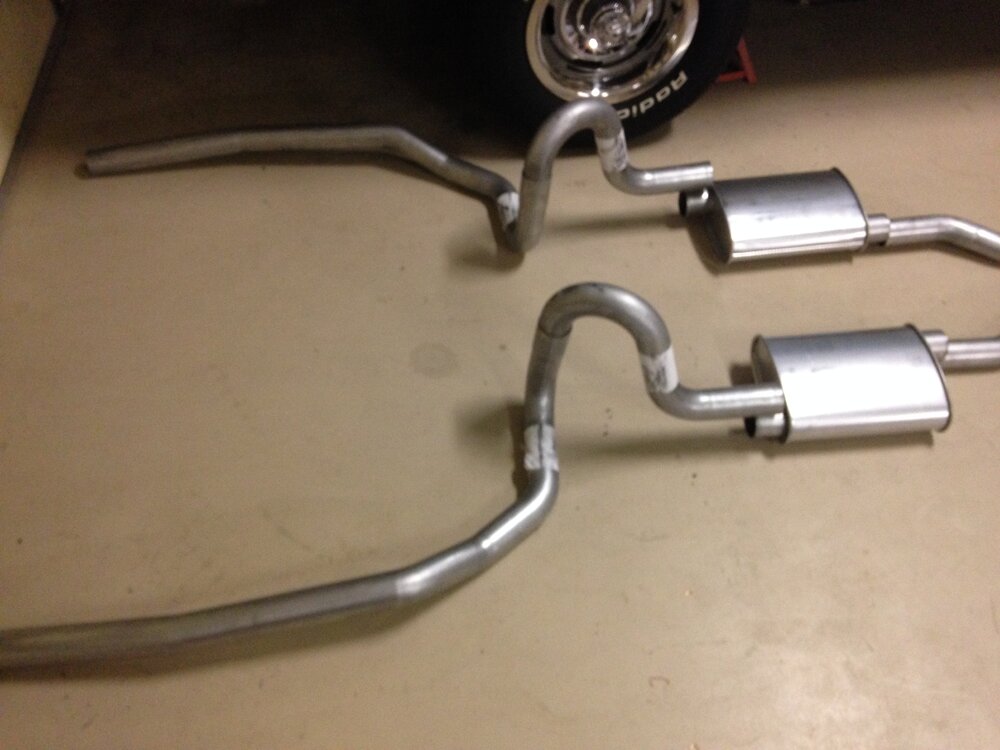
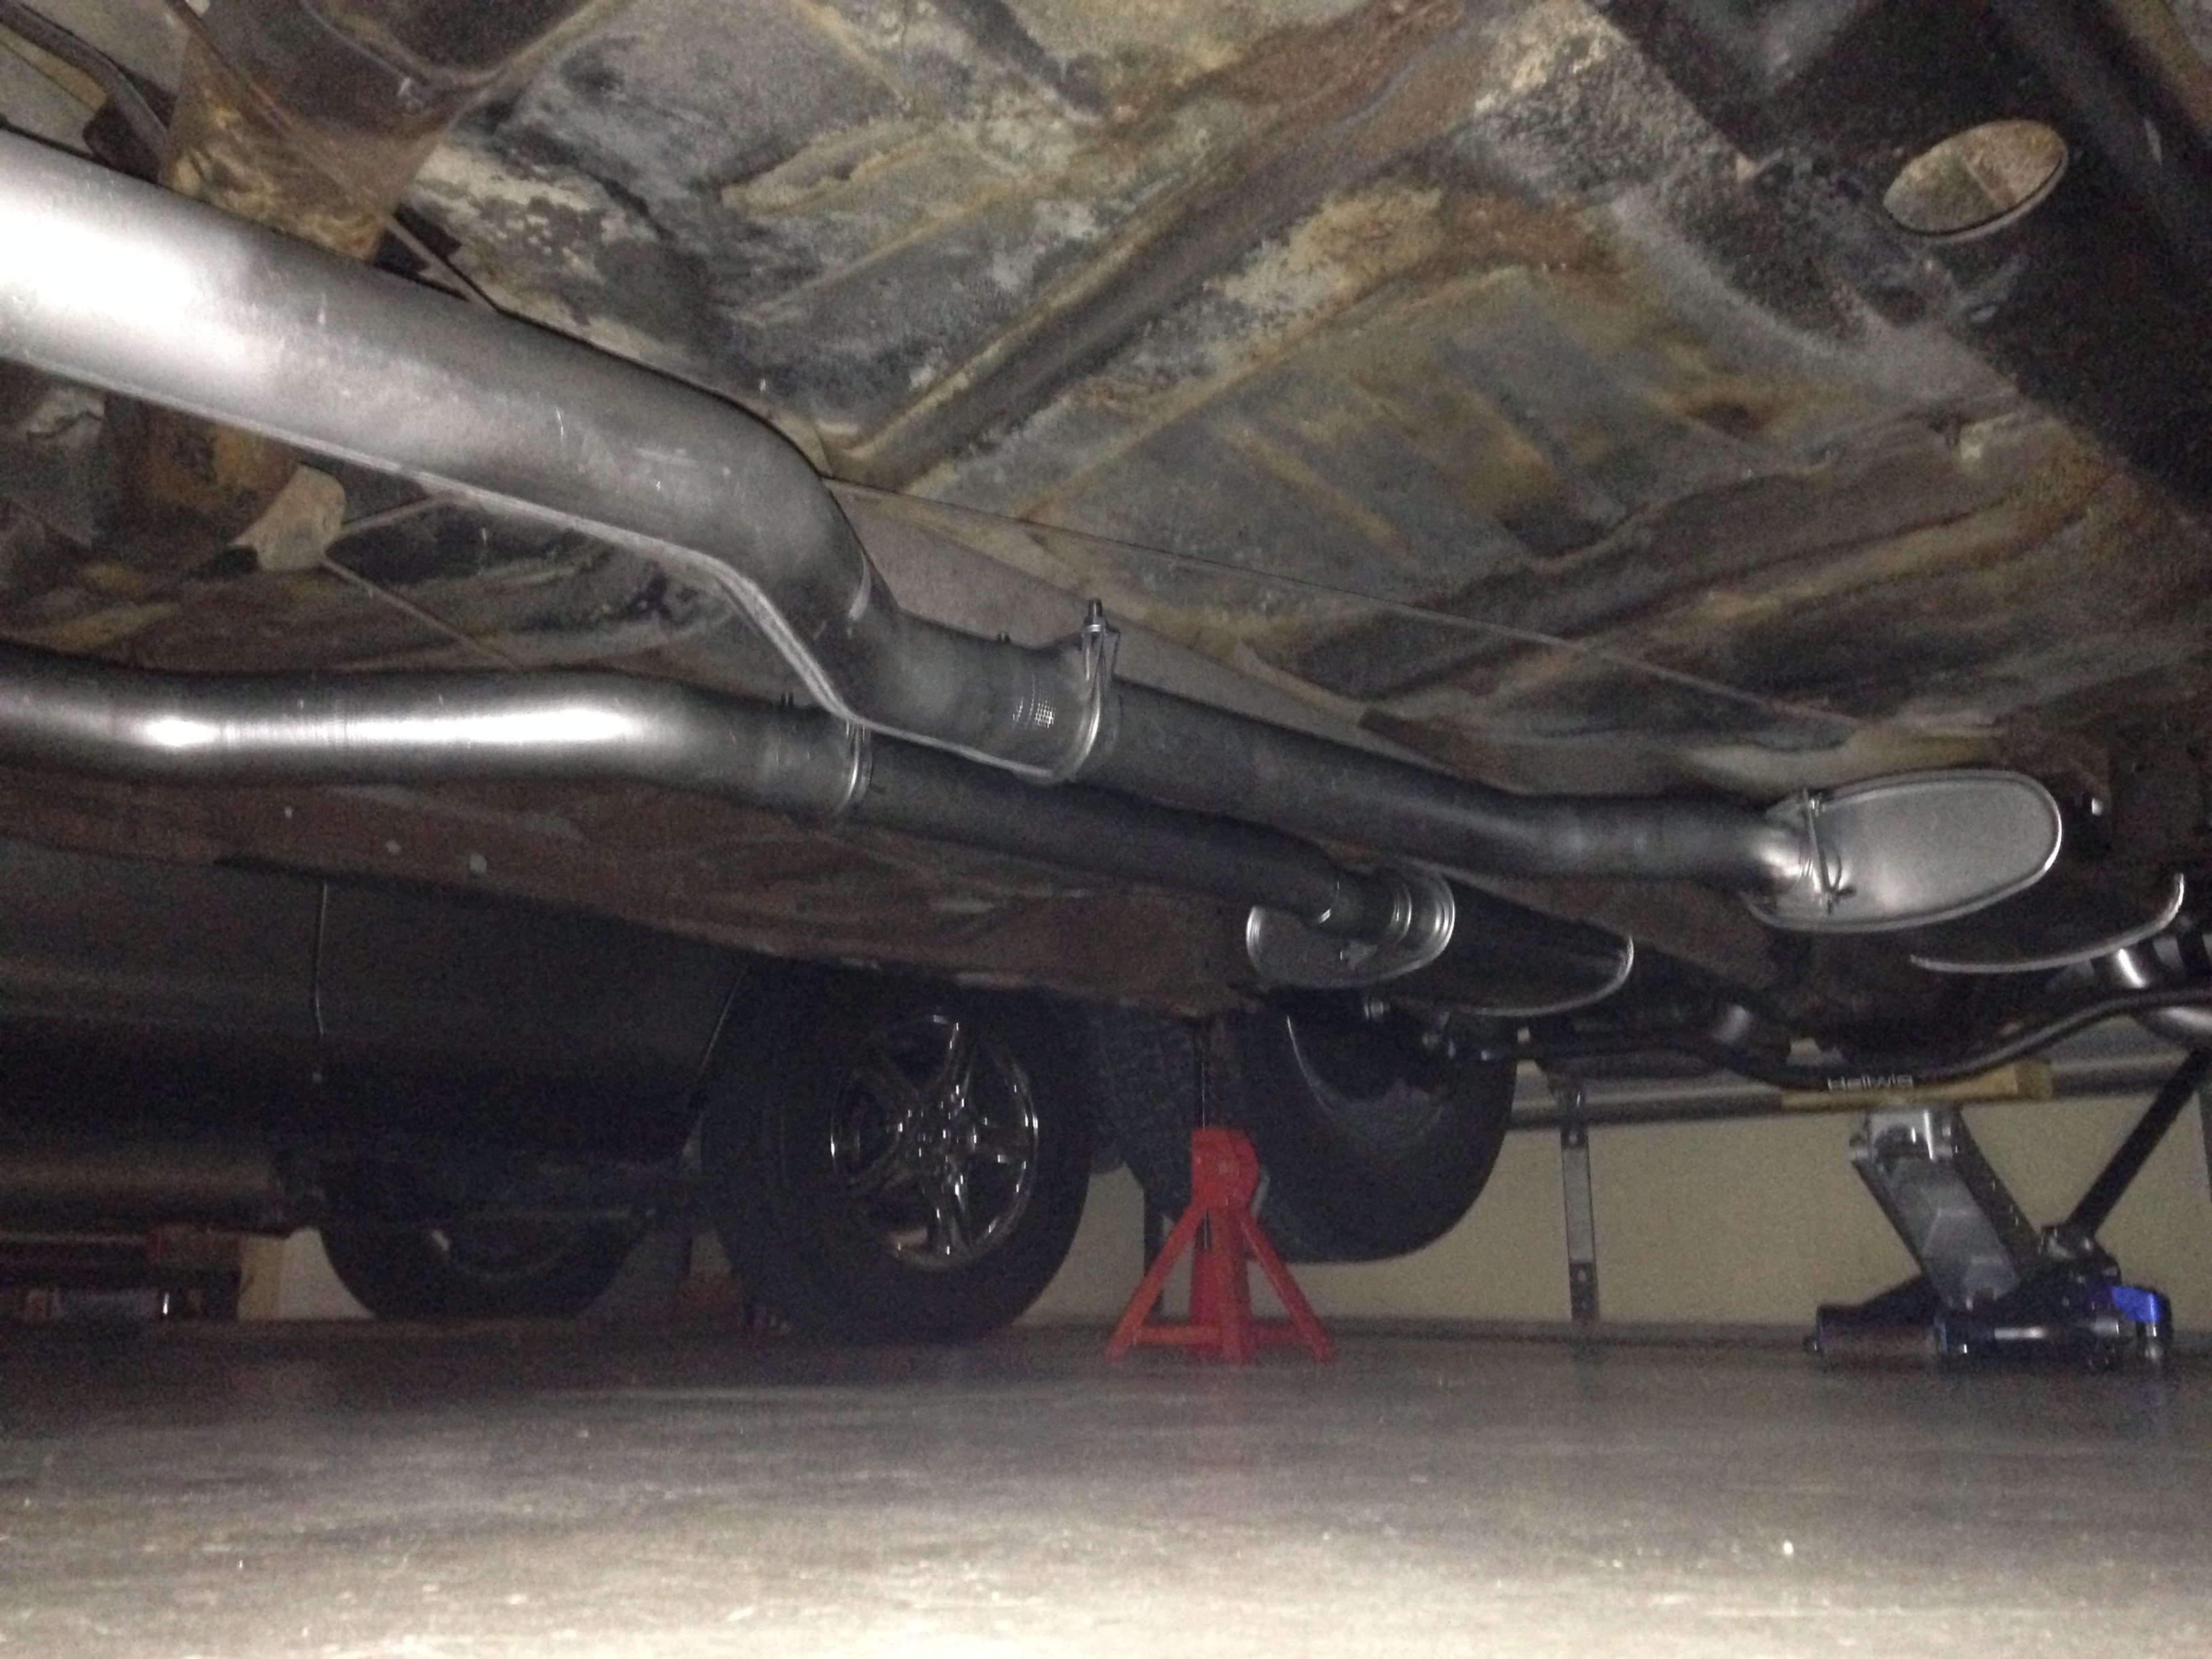
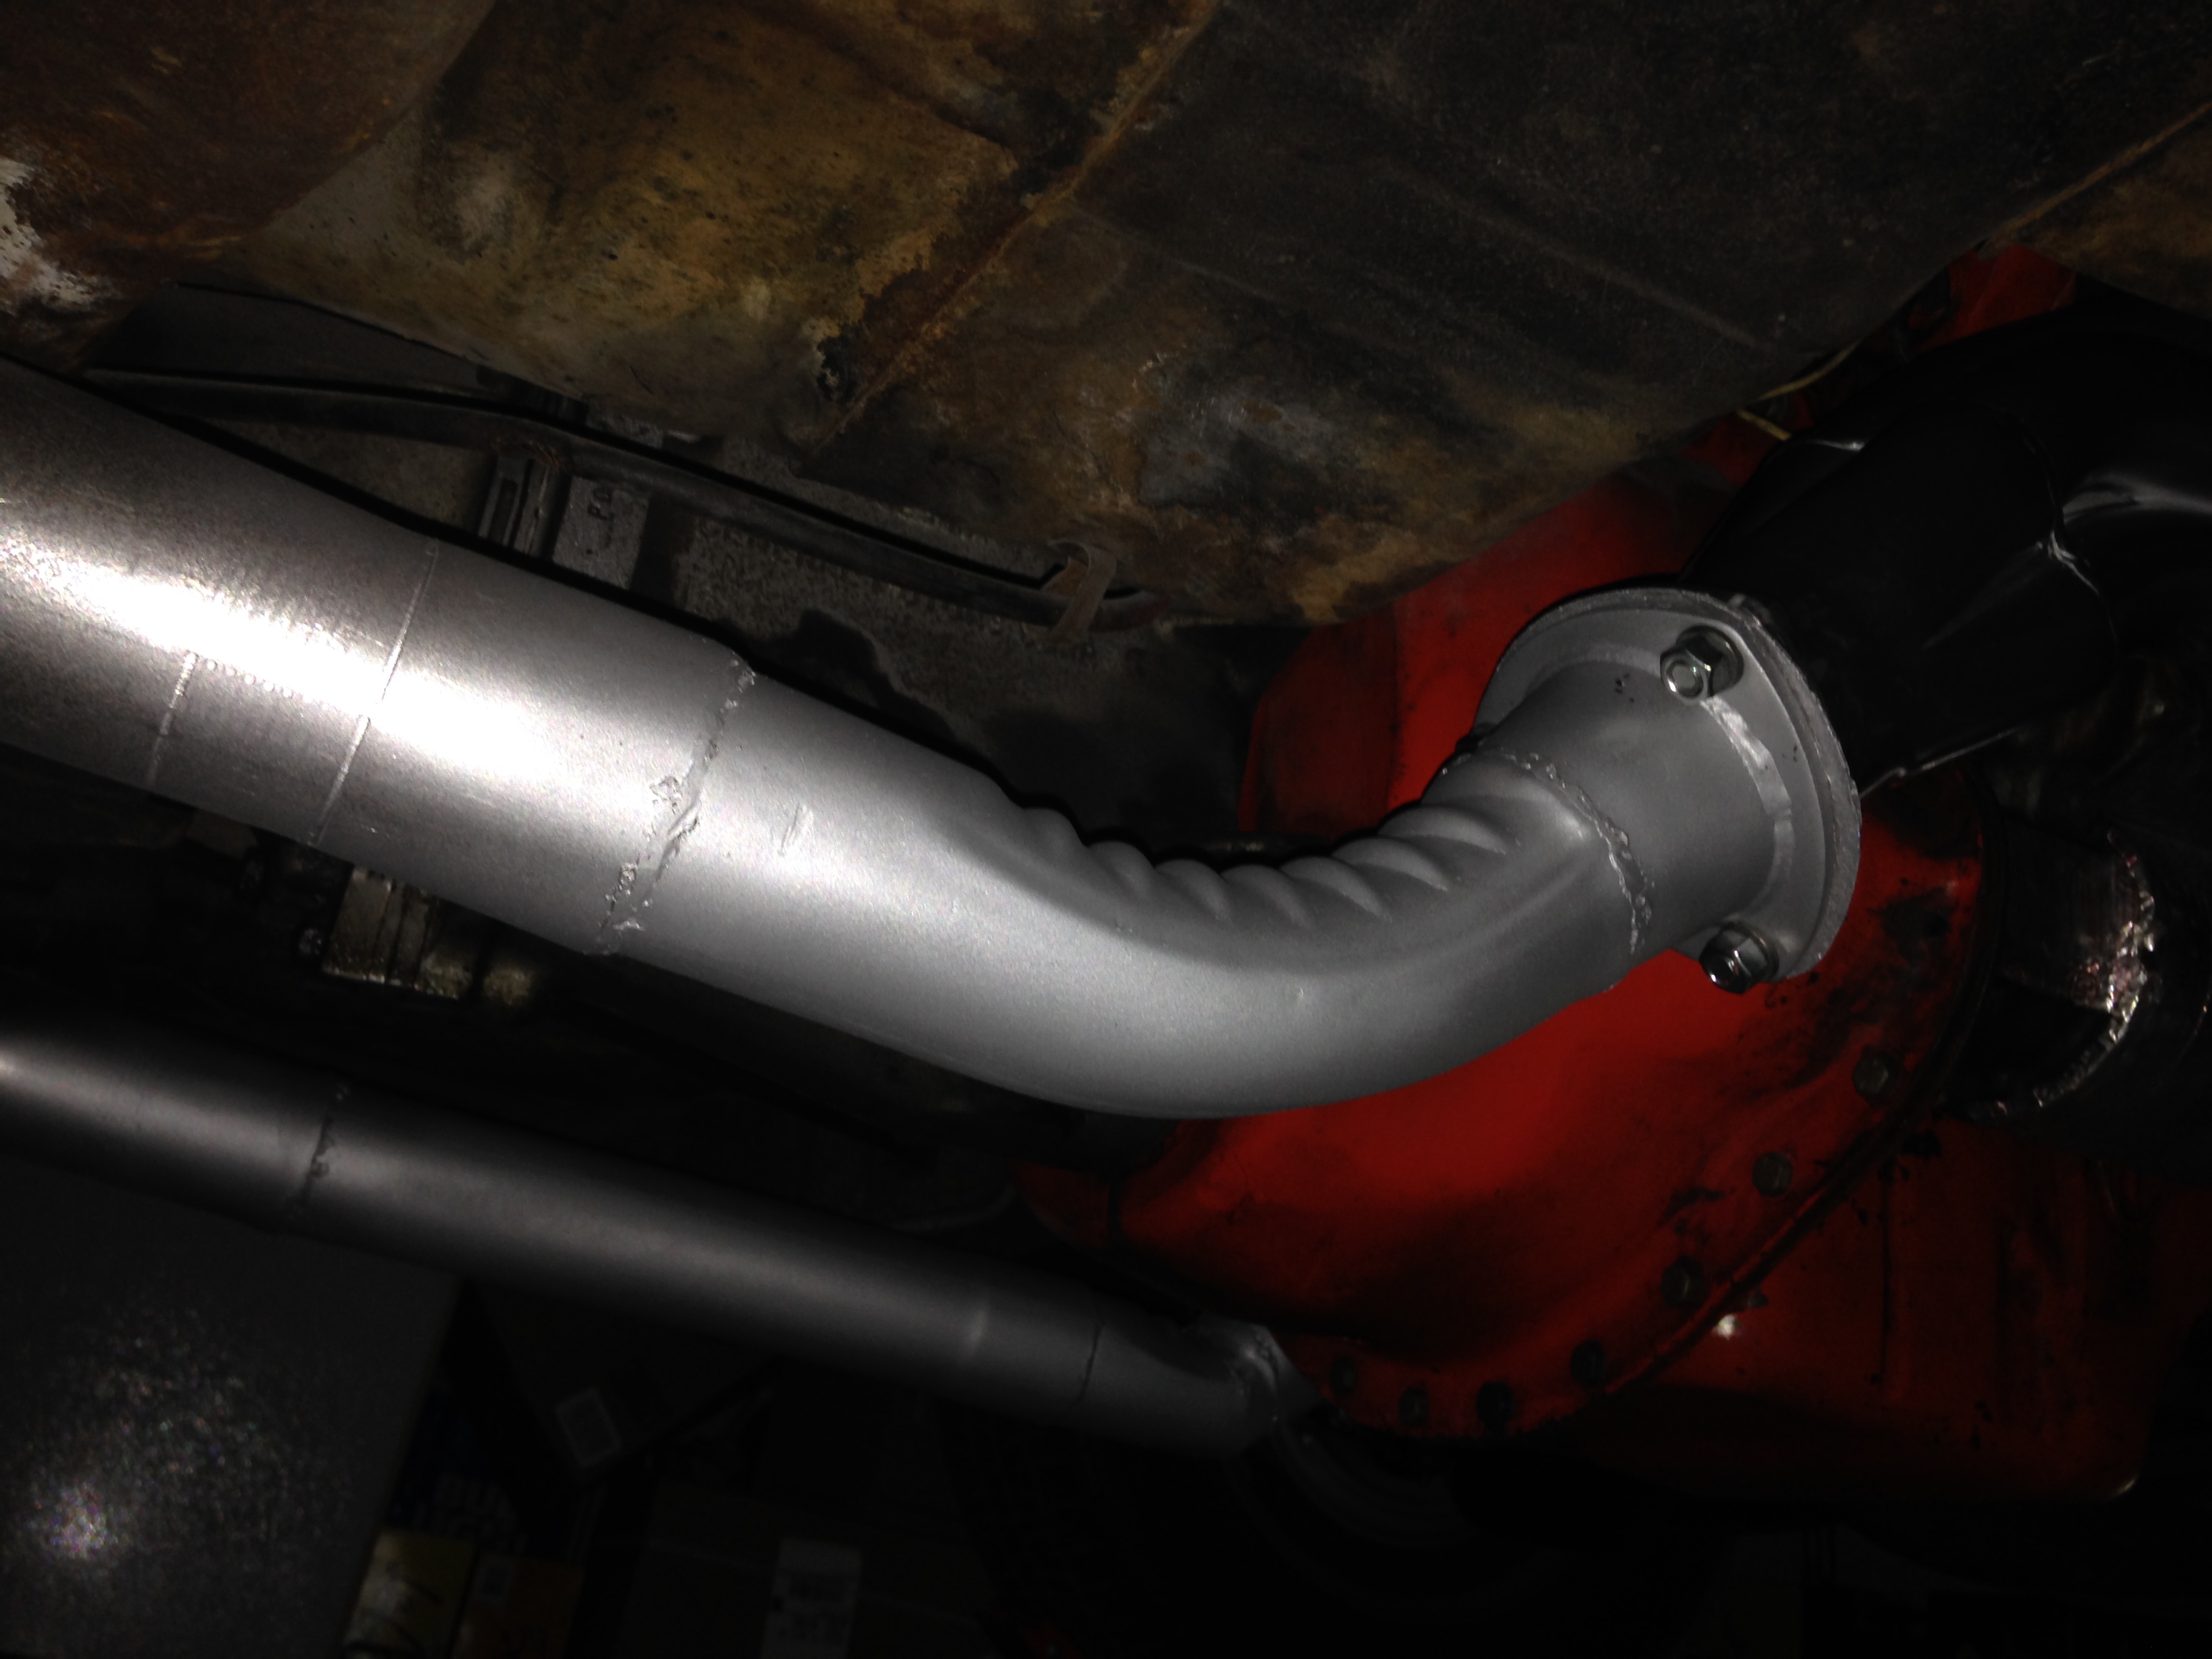
Yes, Steve, I ordered and installed the 2 1/2" Summit DIY header-back kit for the first gen Monte and have been mostly pleased with it. I do find the turbo mufflers to be a bit loud but you may love it if that's your thing. It is a more mellow/throaty sound, not sharp or crackly (which I can't stand). Unfortunately, I did not have a lift available to me then (I do now) so I did it on my back on the garage floor, which I do not recommend BTW.
Installation would have been a breeze if I could have connected to full-length, straight back headers but the only ceramic coated headers I could find to fit my big block 4-speed (the Z-bar interferes with #7 tube) were the Patriot shortys with 45 degree collectors. I probably spent twice as much time fitting/fabricating the adapters as the rest of the installation.
All of the sections have ample length to adjust the fit as you like. The hangers are robust and sufficient for a sturdy installation. I'll included a few pics and one video (so you can hear the turbo mufflers) below but let me know if you have any specific questions. Summit's DIY kits are real price performers if you are not looking for anything exotic. Good luck.
PS. The photos seem to always post in reverse order on this site so starting at the bottom will make more sense. Also, you'll probably first need to download the video to play it.


-
6
-
-
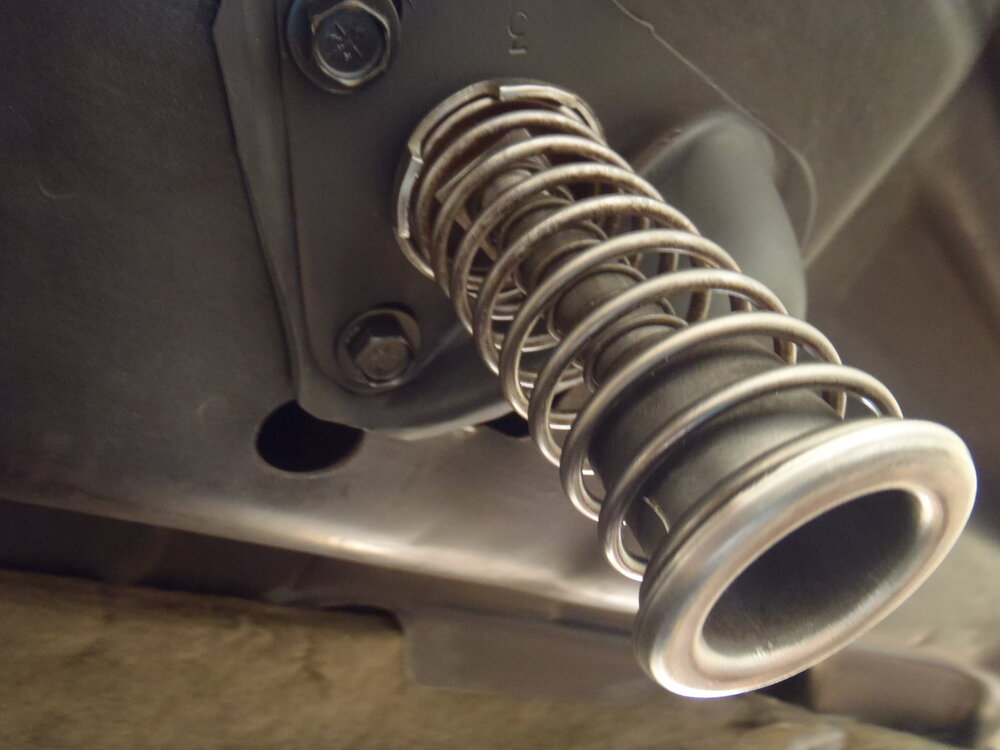
My helper spring came out of a large assortment of compression spring I've collected over the years so I don't know its specs or part number. Mine does not look as robust as the Mennards spring but it works all the same. The one you ordered should do the trick.
-
3
-
-
Just got a call from my daughter and granddaughter who safely rode out the storm about six miles inland with some property damage. They made it over to our neighborhood this morning.
Neither our house nor garage was flooded and the canal at the back of our property had receded back within the seawalls. What a relief! Of course, the pool screening was gone and part of the screen cage was in the pool but only a few roof tiles had blown off. Several trees and tropical plants were down but the tallest palms were miraculously intact!
My Monte and wife's Lexus were unscathed ... so much to be thankful for!! Now if the army of power company repairmen can get power restored soon, evacuated folks can return so cleanup/restoration work can begin in earnest. It is so much worse about 30 miles south in Ft Myers and on down to Naples. Those areas were inundated by a 12' storm surge so there was massive destruction and many suspected (unconfirmed) fatalities. Very sad ...
-
5
-
-
Ian was basically a direct hit on our costal neighborhood, making landfall between Cape Coral and and Punta Gorda. It was just as strong but much larger and slower moving than Charley that directly hit Punta Gorda in 2004.
We are still at our summer home in Crosslake, MN so did not have to evacuate. Our boat was securely lashed high on its life and all the hurricane shutters were put up before we left in late April. Unfortunately, that does nothing to stop flooding from a huge storm surge or prevent high winds from peeling the roof off. I hope neither of those damages occurred but I won't know until my daughter can get over there to inspect things in the next day or two.
Since my house is only 9' above sea level (and the garage floor is almost 2 feet lower), I know my Monte would not have escaped a storm surge in the 12 to 18 foot range initially projected. Even a modest storm surge with so much surface rain may have created a flooding incident. Earlier, when I had an opportunity to have our cars moved to higher ground, Ian's expected target was Tampa Bay and our storm surge was projected to be much lower so I took the risk. Anxious to find out what actually happened to our property and vehicles ...
-
Nicely done, Greg! Wondering if you could share more of details of your gathering like the venue, duration, activities, invitation process, etc. Maybe your "gathering" could be replicated in other locations (like Florida).
-
2
-
-
AED 750 (Holley with custom valve bodies)
-
1
-
-
12 hours ago, MC-71 said:
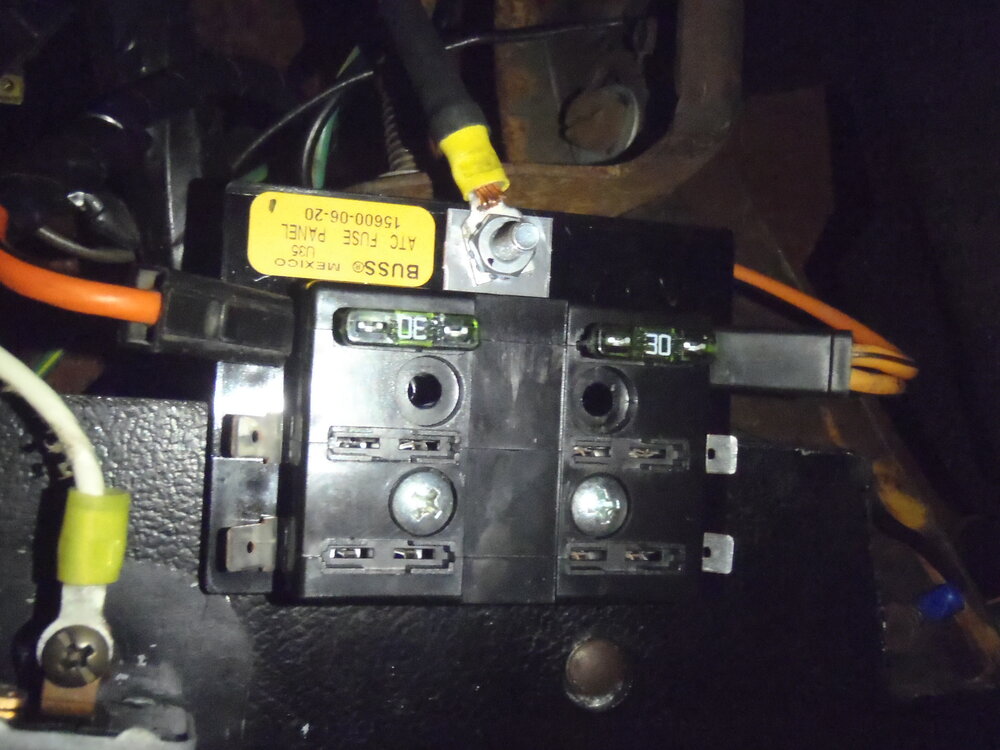
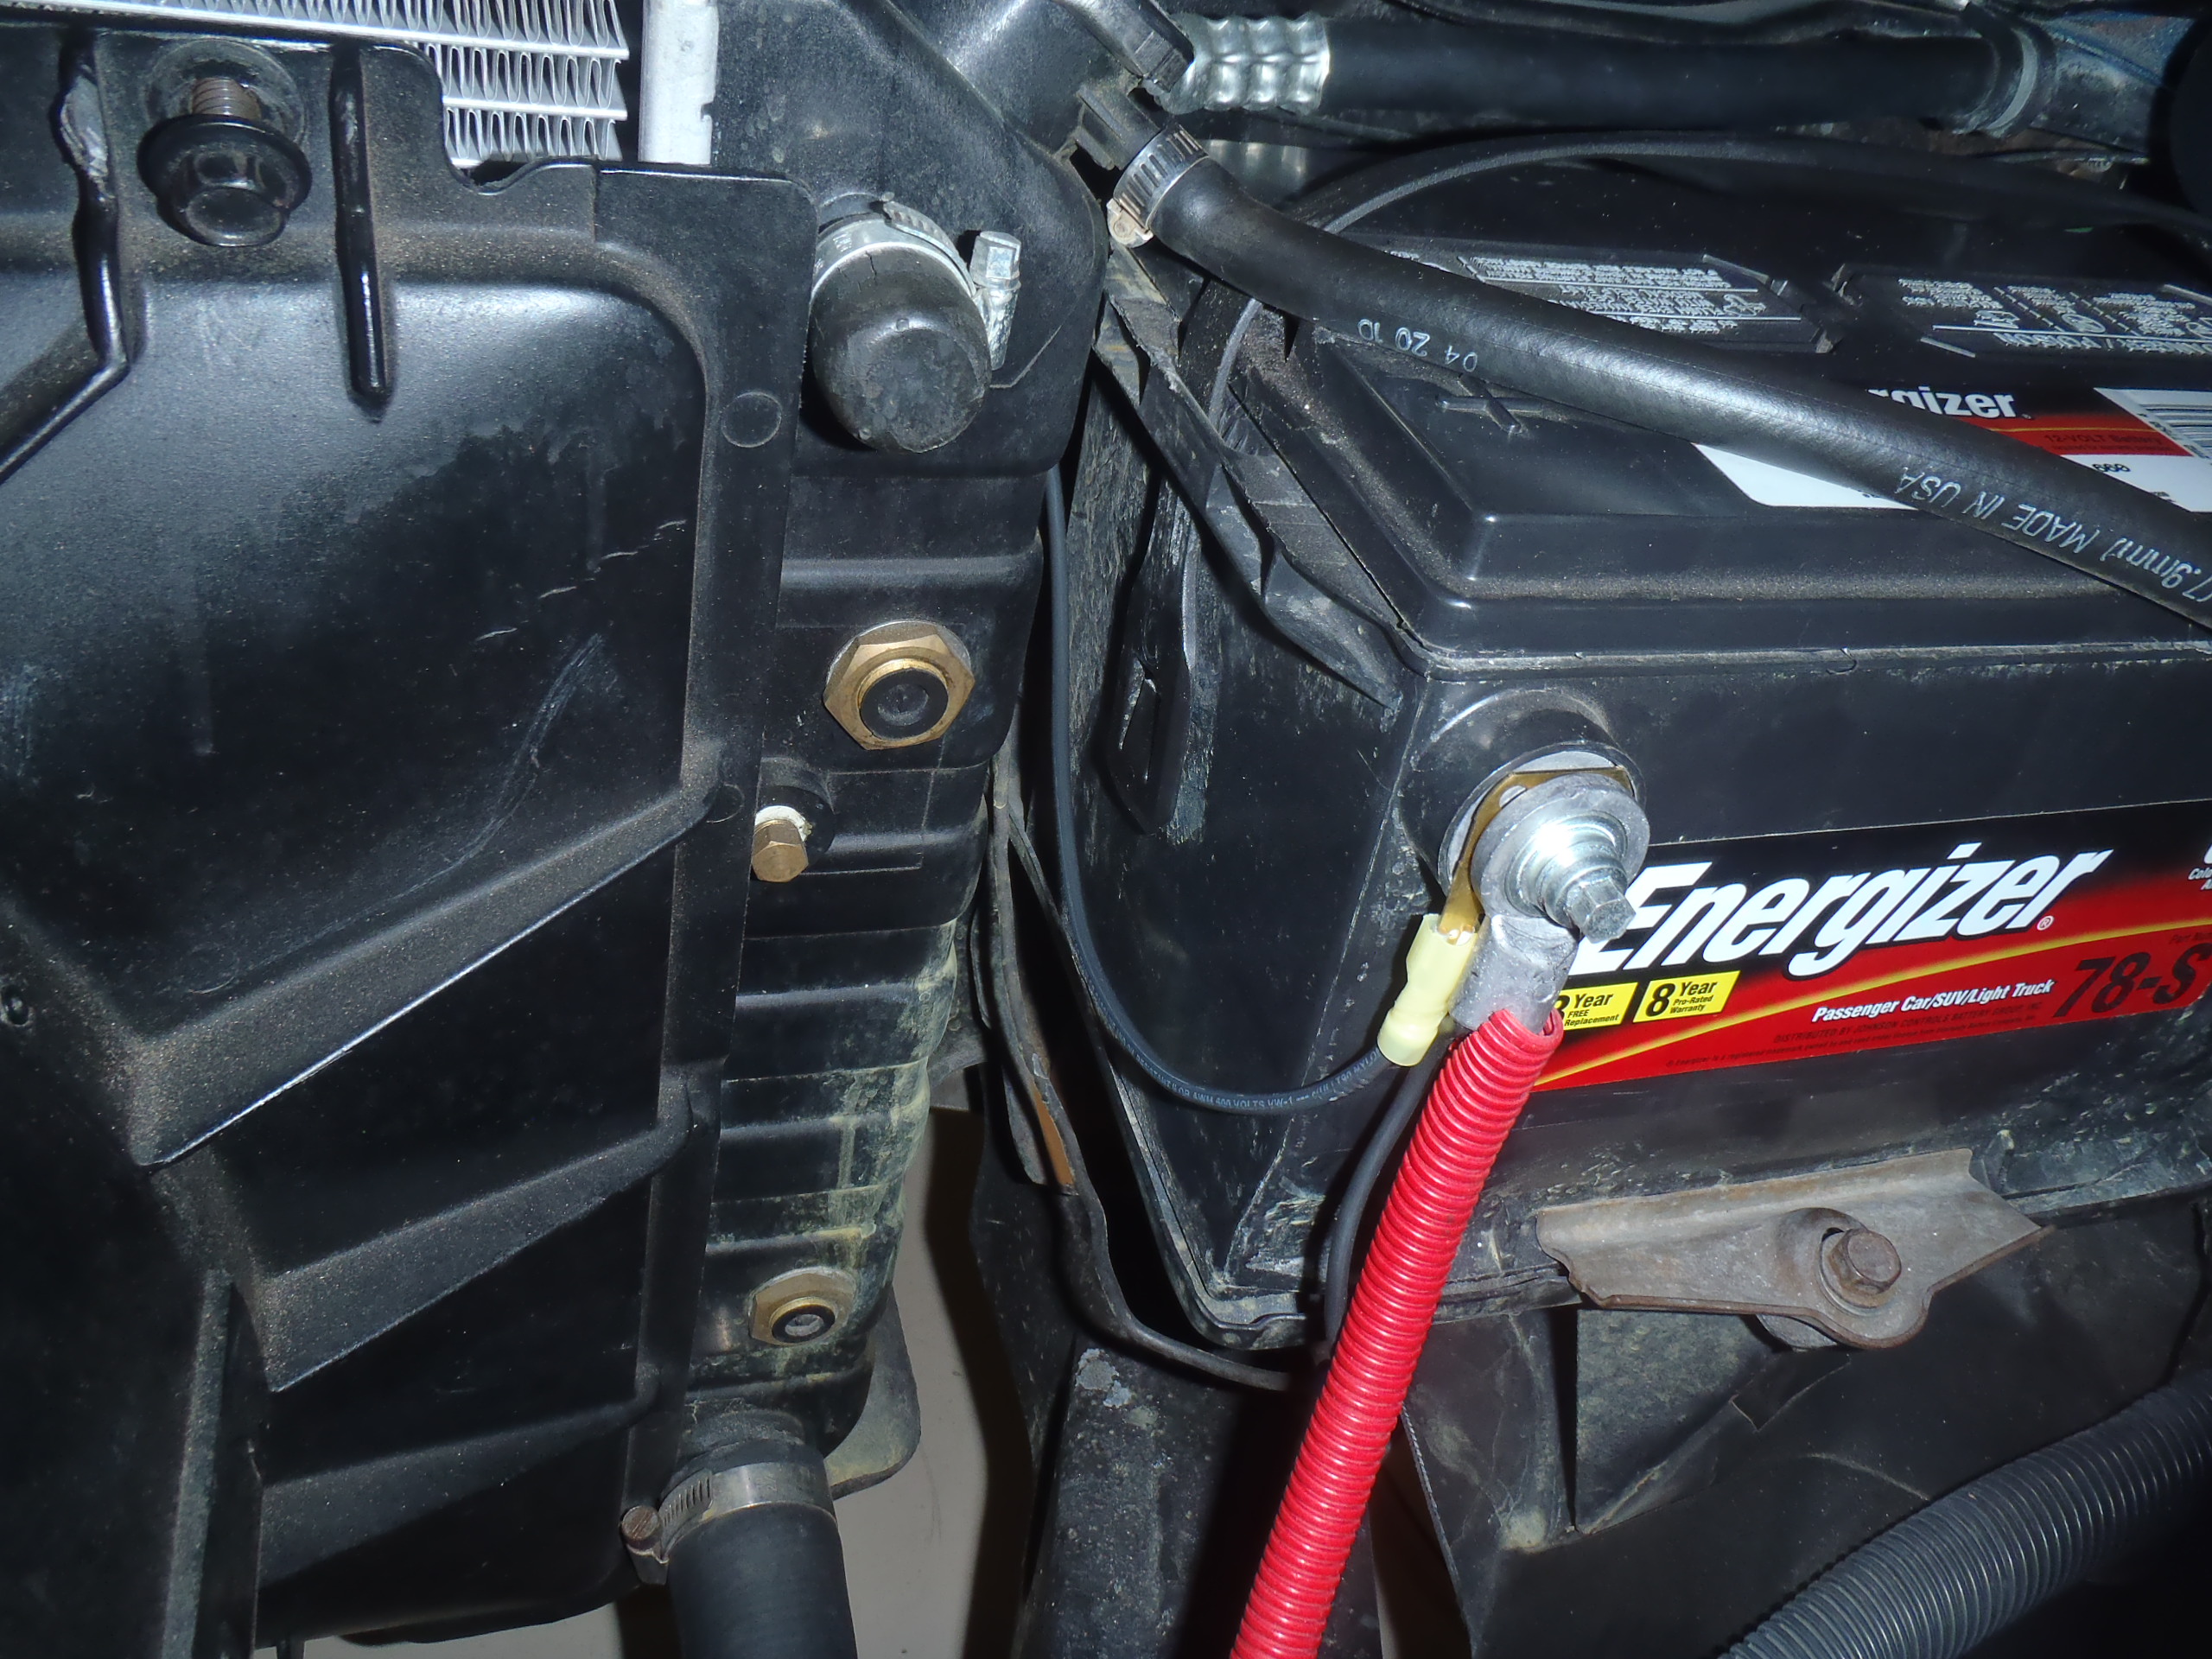
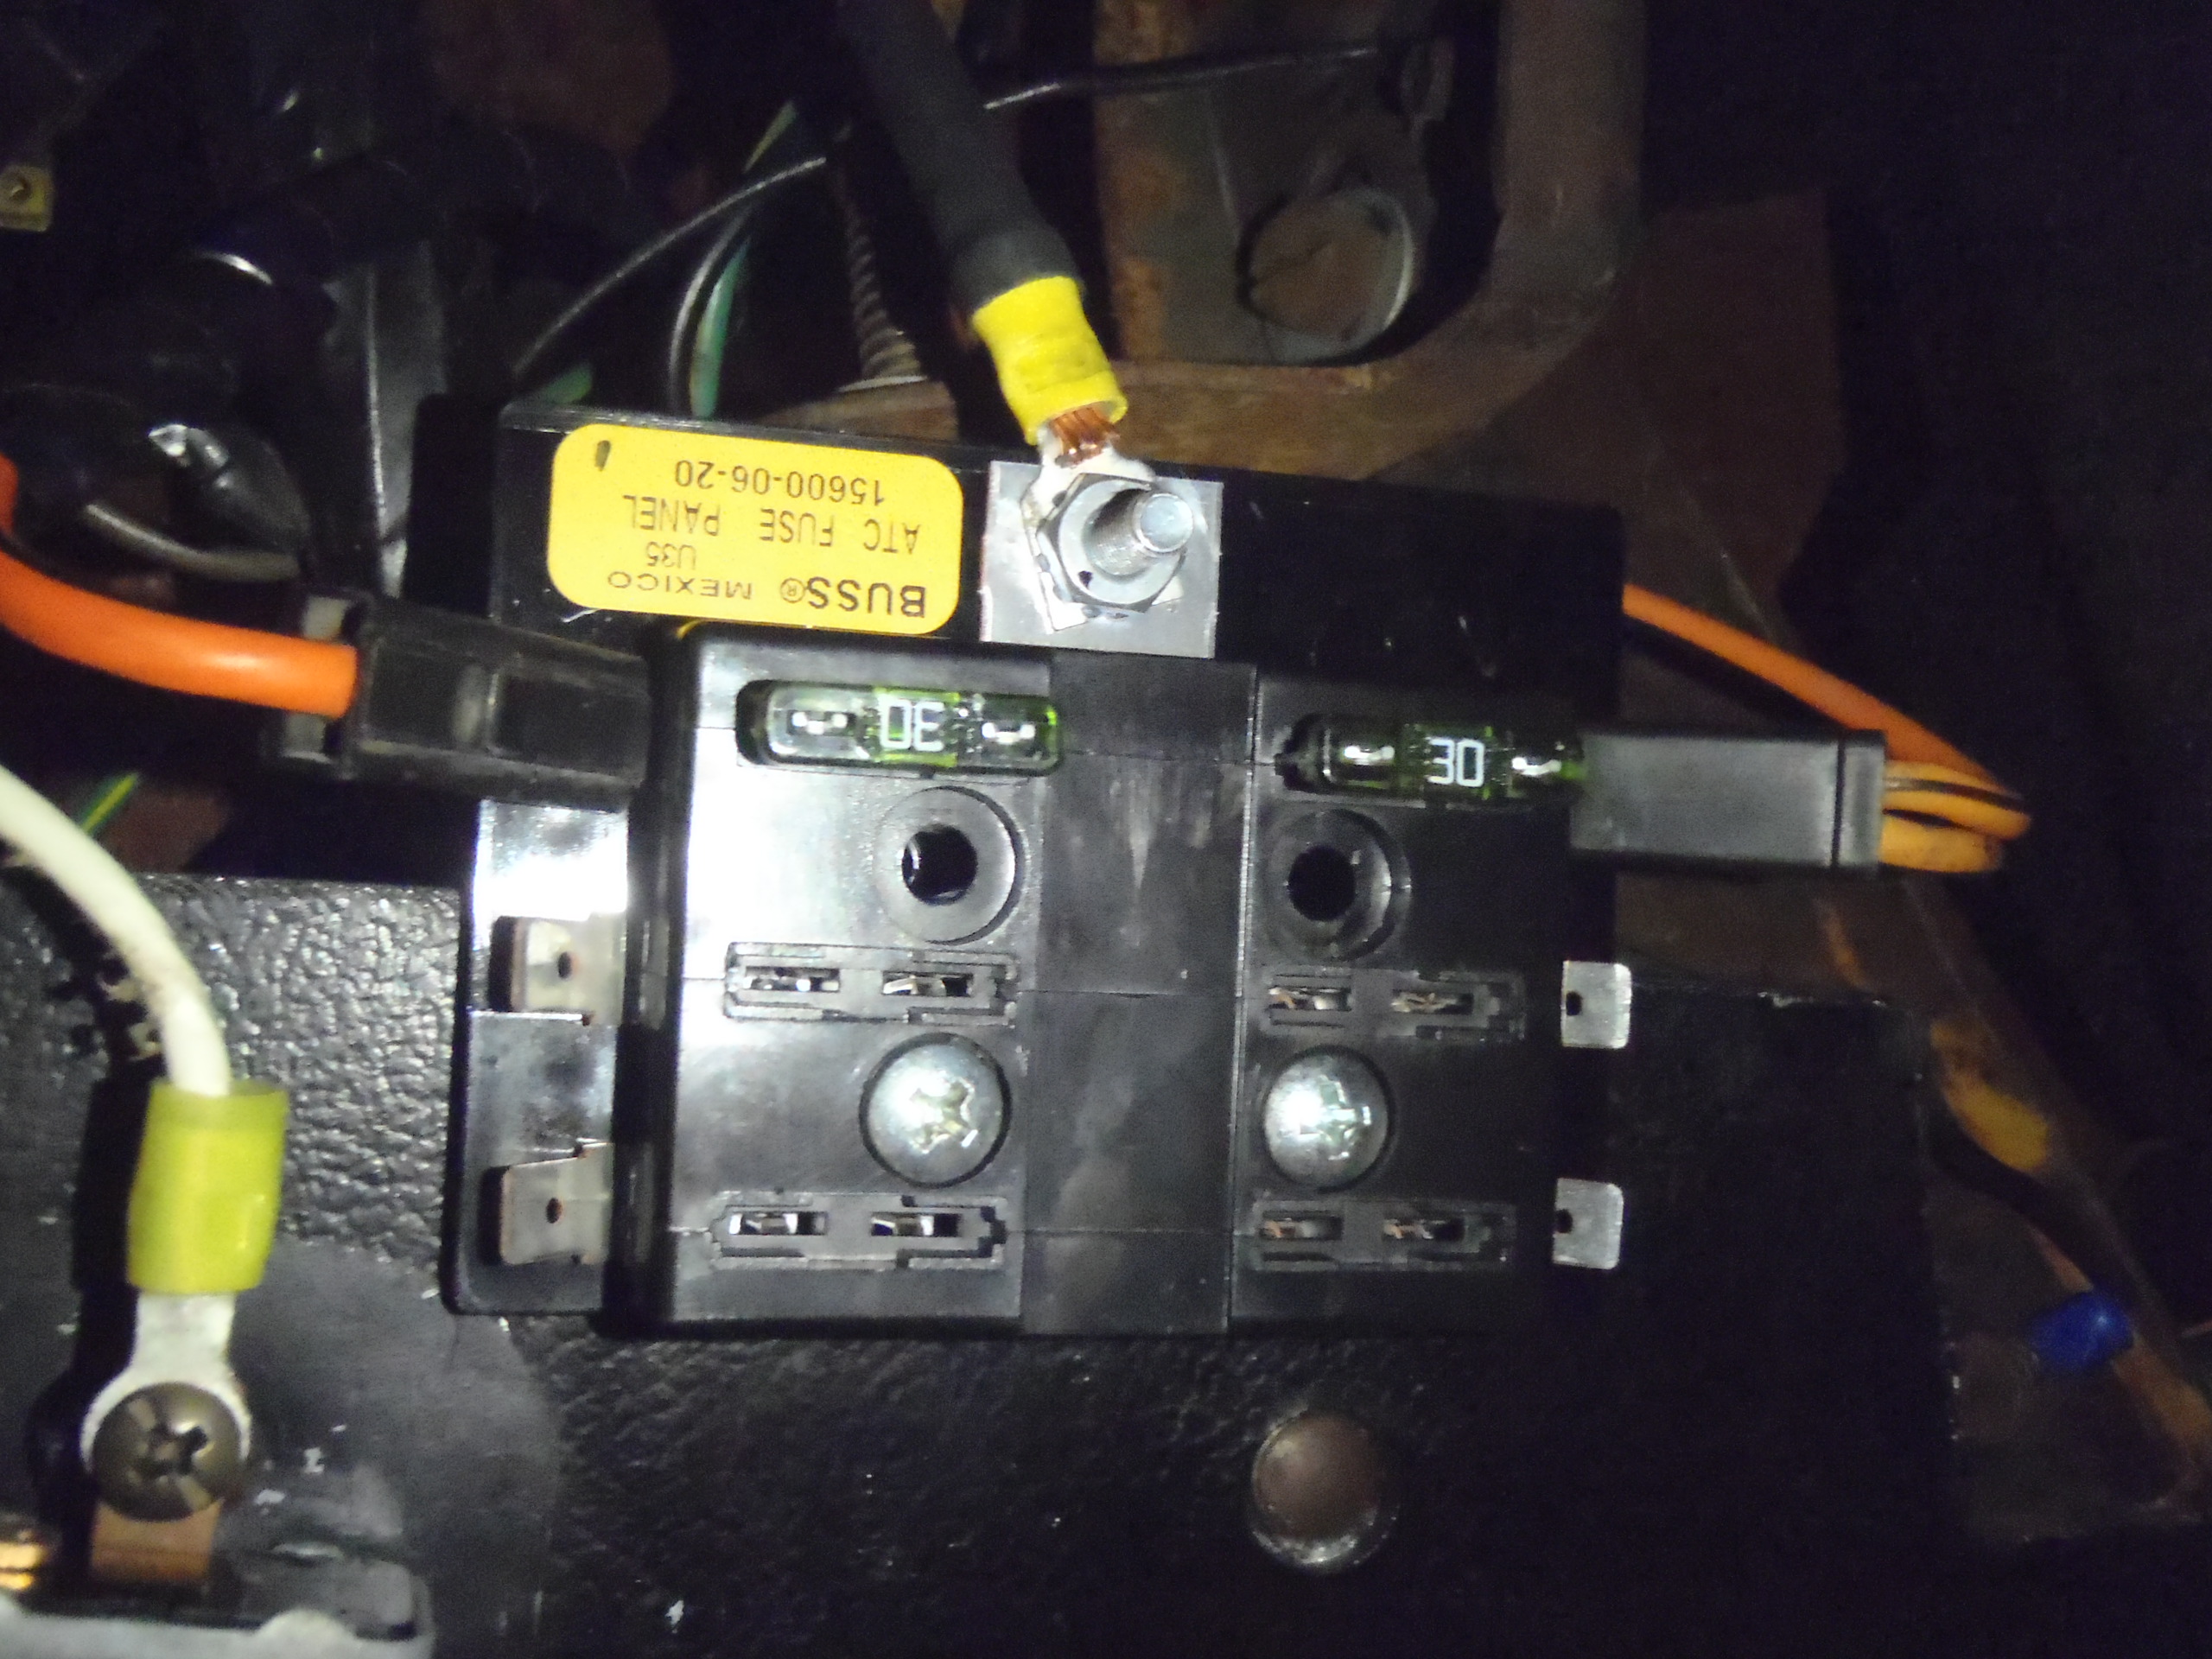
Thanks Dennis for all that information. I’m going to post pictures to what I bought. My question is do I need to come off my battery? My Monte is highly optioned and have 2 -30 amp fuses on my fire wall. One is for AC and the other is for my power options, PW PDL and Power Seat. Can I tap off or the AC one to the new added fuse block. Let me know what you think.
Carl, your original post said you wanted 3 battery terminals and 3 accessory terminals but I don't know what kind of loads you plan to run off of them. I assume you will want to have each additional terminal properly fused for whatever you are powering through it.
Tapping off of either of your current 30 A fused ports sounds like daisy chaining to me. That could possibly work but I would wonder about combined load on the original port if several of your additional devices were drawing power simultaneously. I guess you could try it and later wire it direct to your battery if you start blowing 30 A fuses. What sort of additional devices do you want to power? You should only need a relay if you want the power to be accessible only when your ignition is on.
If you do run a direct line to your battery, be sure to use an adequate gauge of wire (i.e. #10 AWG for 30 A DC) to carry your highest fused terminal or highest combined amperage for simultaneous loads, which ever is greater.
-
6 hours ago, cbolt said:
Where did you get that 3 port C plate Dennis?
NAPA Part #: NW 785124 is a kit with two plates and other connectors for $9.99 at https://www.napaonline.com/en/p/NW_785124?impressionRank=21 Their name is "Battery Cable End Taps Frame Ground Tap / Side Mount Terminal Tap".
When I got mine (also at NAPA) several years ago, it was a single part in a small package but I don't see that listed at NAPA online. You can get a single plate on eBay for $5 at https://www.ebay.com/itm/221733809403?var=0&mkevt=1&mkcid=1&mkrid=711-53200-19255-0&campid=5338590836&toolid=10044&customid=d9a259c3e966123d78af3ac9272a23a6
-
1
-
-
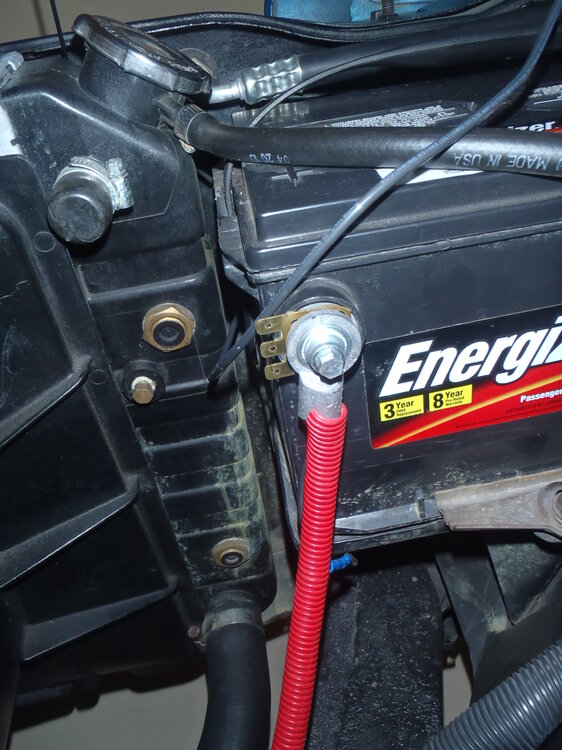
My '70 4-speed was very low optioned from the factory. When I added power windows, locks and seatback releases, I used a simple 6-port ATC fused expansion panel mounted under the dash above my left knee. I powered it from a dedicated power wire through the firewall direct to the battery connected via a 3-port "C" plate behind the positive terminal (see pics). I did not need to go through the IGN circuit because the factory power windows have their own relay, the locks need direct power to work with my keyless entry system and the seat back releases operate off of the door pin switches. It was simple and cheap but it did what I needed and works well.
Not sure why the photos always load in reverse order - guess I need to learn to think backwards!

-
1
-
-
Nice! A useful body mod that doesn't spoil the classic lines of the First Gen Monte.
-
3
-
-
Beyond Black by Surf City Garage. Not so easy to find. The last place I found it was at a NAPA Auto Parts Store in SW FL.
-
1
-
-
A 17 x 8 rim with 4.5" backspace is 0 offset (mounting surface is centered on the rim width). To keep the wheel/tire combo centered within the available space on first gen Montes, a +6mm offset is needed on the front and a +12mm offset is needed on the rear. Since your 0 offset rims will push the wheel/tire combo outboard 1/4" (6mm) and 1/2" (12mm) from the center of available space front and rear, respectively, you can encounter outboard clearance issues with wider tires.
You will be fine with 255/55-17 on the rear and 235/55-17 on the front. Going to a 275/55-17 on the rear (with those 0 offset rims) will leave you with only about 1/8" clearance with the wheel well lip. Some may risk that but I personally would not.
-
1
-
-
3 hours ago, MajorPain99 said:
What about 15x7 4.25" on all four corners?
Those rims would be essentially the same as stock rallys which are 15x7 with 4.30" backspace (+8 mm offset). What tires are you planning to run front and rear or all around?
I ran 245/60-15s on stock rallys all around without clearance issues anywhere. I have also run 255/60-15s on the front on 15x7 rallys with 4.5" backspace (+12 mm offset) but a 4.25 backspace (+6mm offset) will also work well.
Where you will run into trouble with that 4.25" backspace is on the rear if you try to use a really wide tire (like a 275/60) You will run into unsafe clearance problems with the lip of your wheel well opening unless you plan to trim it enough. I wouldn't suggest putting a wider tire than a 255 on a 7" wide rim anyway but it's been done. Good luck.
-
Welcome to the club and forums, Dave! Your beautiful '71 brings back lots of memories. I am partial to gold first gens with white vinyl tops and cream interiors as my first new car out of college was the '70 version of yours. Congratulations on a great find! Enjoy her and the club!
-
10 hours ago, Vastingray said:
Willa 275 R 15 fit in the wheel well with a 15x8 with 51/2 in of backspace ? Thanks for any help
Yes ... however, a 5 1/2" backspace on a 15 x 8 rim pushes a 275 R 15 tire inboard further than necessary, leaving plenty of clearance with the wheel well lip (untrimmed) but very little clearance (1/2" - 5/8") with the inner wheel well, frame and possibly tailpipes. Small clearances should work fine for normal driving but allow little margin of error for body shift during hard cornering, rough roads or even hard acceleration or braking.
If you have a choice regarding backspace (and you many not), I would recommend a 5" or 5 1/4" backspace (+12 or +19 mm offset, respectively) to better center the wheel/tire combo in the available space of a first gen Monte. I run that same rim/tire combo on the rear with 5" backspace (+12 mm offset) with no lip trimming or clearance issues. Good luck.


Rare 400 small block 4-speed
in General 70-72 Monte Carlo Forum
Posted
Cool find, Aaron! It was apparently one of the 839 small blocks shipped with a 4-speed in '70. Guess no one knows how many of those were the 400 ci engine.
While it was a fairly low optioned car, it was a rather nice looking (cranberry red with black vinyl top), fun/sporty configuration with black vinyl buckets/console, 400 small block, 4-speed. 3:31 rear gear and G70s with rally wheels. It apparently wasn't optimized for performance as the 300 hp 350 or 330 hp 402 would have been a better choices, as well as, posi-traction, dual exhaust and the full gauge instrument cluster. No power options but at least it had power steering (which my 402 4-speed was built without).
I can't imagine any dealer would order that configuration for inventory so someone must have had some specific objectives and/or budget restrictions. It would be a great starting point for a very fun first gen if it could be found today in reasonable condition.