NWmonte71
-
Posts
100 -
Joined
-
Last visited
-
Days Won
4
Content Type
Profiles
Articles
Forums
Gallery
Events
Everything posted by NWmonte71
-
Yeah, the car does have points on it still. I have not checked them for proper gap or dwell. Honestly, I'd like to dump the points and go to a more reliable, maintenance free setup like HEI. I want to keep the car looking stock under the hood........... so maybe the Pertronix conversion kit is the right thing for me? It still uses the OEM looking distributor and coil. Once I do get it running, what do you suggest for adjusting the idle mixture screws (all the way in and back them out 1-1/2 turns)? I appreciate all the feedback, I am very motivated to get my Monte going again.
-
Update: I finally got the car started, but it wasn't easy. I had to charge the battery and crank, crank, crank...........pump the pedal and feather it while cranking. It finally fired, but ran rough. I kept the rpm up around 1500 for a minute or so and then let it idle on its own. The idle was real low and seemed on the verge of dying. I shut off the car and decided to try restarting again. The second time, not so lucky. I ended up cranking and cranking. Nothing. The starter and fully charged battery struggle to turn it over, it's like there is some kind of big resistance on it. The good news is that the Qjet is not flooding or doing any fuel overflow. Starting this thing has gotten to be a real bear. To recap, I have installed new plugs, wires, distributor cap, coil, battery cables, and starter. You would think this thing would fire right up!
-
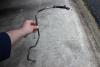
UPDATE: Well, just when I think I'm making progress and moving ahead............ more problems. So tonight I installed the plugs, connected the coil wire, and cranked it over........ nothing. The engine cranks over ok and occasionally fights to start, but no real kick off. The carburetor is no longer spraying fuel out of the vent or leaking anywhere on the manifold (which is good). After several attempts of no success, I pulled the #8 spark plug (plug was all wet with fuel, but no fuel was pouring out of the hole like what was happening before). I decided to have my wife crank over the engine while I ground out the spark plug to check for spark. While cranking, I get a very intermittent blue spark and I also noticed a fuel mist is spraying from the #8 plug hole (since I removed the plug for testing). I decided to take a step back and think about this. Is my coil weak or going out, therefore causing not enough spark to start the car? I decided to pull the coil and look at the plug wire contact. Wow! The inside was very crusty looking with green corrosion: Bingo!? Maybe? The coil looks really old and appears to be an original Delco Remy. I'm really hoping this is the culprit on why the car is not easily starting. It is really killing me to have this nice Monte Carlo sitting in the garage and I have only owned it a few months.
-
UPDATE: Finally some good news! I went out and bought a Reman stock starter from NAPA. The starter came with a 10 year replacement warranty and included a test sheet in the box showing the results after it was re-manufactured. I decided to bench test it first before installing, all good. I installed the starter and tried the key, the engine turns over almost effortlessly with the plugs removed. I'm glad I got the starter fixed. Now for the carburetor............. I cranked it over for 5 seconds, paused for 2 seconds and cranked for another 5. No more fountain of fuel blasting out of the vent tube or fuel running down the intake from the base gasket. I opened the primary butterfly and looked inside and could see a little fuel wetting on the venturi's and a very slight fuel smell. I think it's safe to say that my float is acting correct now and I can re-install my spark plugs/wires/coil wire. Looking forward to driving the 71 again!
-
UPDATE: I removed all the spark plugs and pulled the coil wire from the coil to crank over the engine. When I went to turn over the engine with the key........NOTHING! No clicks from the starter. I do get a click from the carburetor solenoid. The lights on the dash, "dummy" lights do illuminate as normal. During my original carburetor flooding experience, I did notice my starter was struggling to start and at times it would just quit. I decided to pull the starter and bench test it. I hooked up jumper cables to a good known 12V battery and jumped the switch post. Almost immediately the solenoid started hissing/sizzling and small amounts of smoke started to puff out. I deemed this starter toast, it looked old and was covered by road debris and thick oil sludge. Hopefully after I get a new starter on, I can crank the engine over to test my carburetor and see if the float problem has been solved.
-
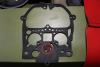
Yes, there was a spring in the fuel inlet to the carburetor. I think I might run the new paper element style filter instead of the brass one. I did get the air horn and everything torqued back up. Putting the air horn back on was a real test of patience and detail. I had to juggle my fingers with a few pieces to get it to evenly sit down flat. I really hope I have better results with the carburetor once I'm ready to start it.
-
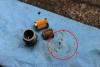
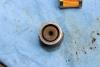
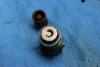
I got my carburetor all cleaned up in the fuel bowl area, seat, and inlet orifice. I took the steel fuel line off and confirmed that someone in the past had cut the tube and reattached it with a rubber fuel line section. Glad I got the new fuel line ordered from OPG. One question I do have, the fuel filter I found inside the inlet was a compressed brass pellet looking filter. Inside the filter was various flakes of rust and small debris (circled in picture). Napa Auto Parts gave me a paper element replacement........which one is correct? Which one is more superior than the other? Can I just flush the brass filter and stick it back in? The fitment is also slightly different between the two filters when installed in the inlet housing. Just want to make sure I'm using the correct parts and installing them properly.
-
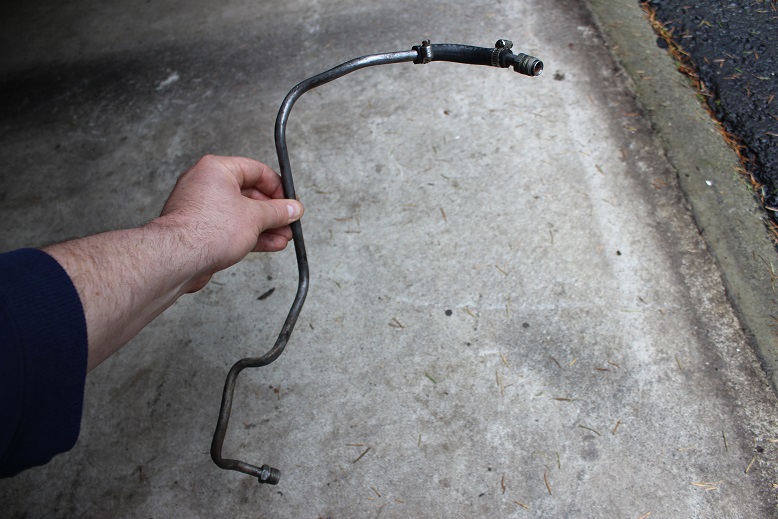
I read several reviews on people buying replacement metal fuel lines from Inline, Classic, and others. Almost all of the reviews were bad, people complained about being wrong length and incorrect bends. Some folks even went as far as saying, "Don't bother with any aftermarket company, your better off making your own with a flaring tool & bender". I do have these tools, but decided to give OPG (Original Parts Group) a try. They specifically sell the 350cid/270 hp model, pump to carb steel line made by Fine Lines. This company is advertising "Made in the USA"". I ordered one and will see how good the fitment/quality is.
-
Overdrive, Thanks so much for the detailed insight on troubleshooting! I am planning to simply clean the fuel bowl, use some carb cleaner and really clean the carburetor thoroughly with the air horn and float removed. I am thinking the rubber fuel line elbow installed on the steel fuel line (from fuel pump to carb is not stock). I assume the fuel line from the pump to the carb was continuous steel all the way up to the carb inlet. If so, who makes a factory replacement steel line for a 1971 350cid with 4brl? I plan to change the oil after I figure out this flooding problem. The oil has not been changed for at least a decade. The car sat in a heated warehouse untouched for 10 years. I will definitely pull the plugs and crank it over with coil power disconnected to verify my flooding is gone. Burning up a "survivor" Monte is the last thing I want to do. Thanks again to everyone who has been chiming in and helping! I'll keep you all updated.
-
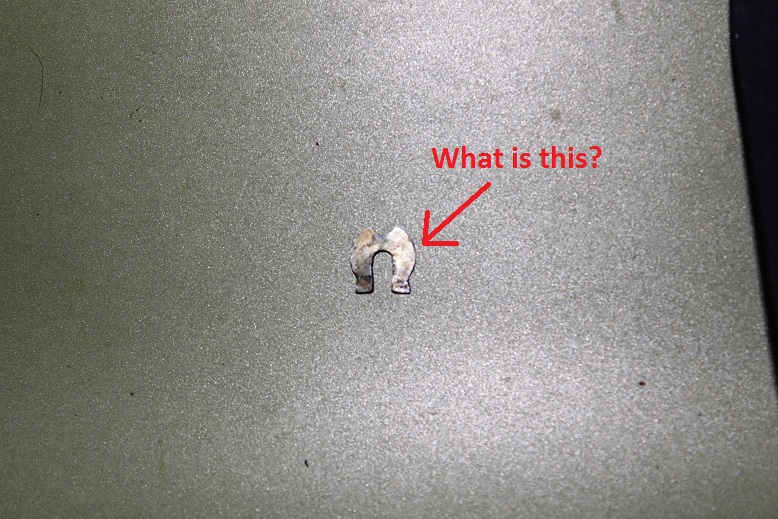
I ended up buying a quadrajet rebuild kit for $23.00 and a new float. Not exactly sure how to test a saturated float, just figured I'd buy a new one and start fresh.The rebuild kit came with an exploded view diagram. Thinking the diagram should show the placement of the little clip.
-
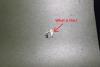
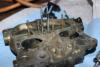
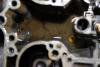
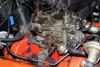
UPDATE: I got the numbers off the carburetor. They read: 17054929 I decided to pull off the air horn and see what the float/needle/seat/bowl looks like. The air horn was a little tricky with the external linkages and such, but I carefully and patiently pulled it off. Right off the bat I noticed the center part of the air horn gasket was saturated with fuel and was almost ripped apart. This part of the gasket is near the float arms, (possibly hanging the float up from going back to being fully seated?) There was just a little bit of fuel in the bottom of bowl. I manually raised the float gently by hand, seemed to move very freely. I removed the float and dried it out, no wet fuel spots were seen after drying (How do I tell the float is heavy and saturated?). I looked at the needle and seat, no debris or obvious obstructions were seen. I checked the bottom of the fuel bowl, the fuel was very cloudy and I could clearly see some kind of small sediment and algae- looking stuff floating on the bottom. I imagine this is considered very dirty and would be potential for carb needle/seat malfunctions? One item I did find that was considered unaccounted for was a small metal clip sitting on top of one of the secondary butterflies. Oh man! I was lucky it did not migrate further into the intake. I have no idea was the little clip is or where it came from. It must have fallen out when I removed the top air horn? I enclosed some pictures of what I mean.
-
Just to answer a few questions............ the fuel pump is the normal AC Delco mechanical unit bolted on the lower corner of the engine block. I also have the car up on jack stands (front only) to troubleshoot and the engine is slanted back a ways (fuel drain back to cylinder #8 reasoning). I did locate the carburetor number on the side of the body. I just need to write it down for reference. Once I pull the top air horn off to inspect inside, what measurements should I be looking for as far as float settings?
-
Thanks for the feedback. I do have a Haynes manual specifically for Rochester carburetors and how to rebuild/adjust them. I read the Q-Jet section of the book thoroughly and noticed when ever a specific adjustment is required, the books says: "Refer to your specific rebuild kit for adjustment values". I have no numbers to check the float level, wondering if anyone has them handy? The carburetor was rebuilt just before I bought the car. The previous owner explained that the car had been sitting in his heated warehouse for several years and decided to have the carb rebuilt professionally before selling it. The car started, idled, and drove fantastic for me the 2 times I drove it. It would seem likely some little piece of crud is hanging up the float.
-
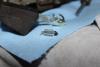
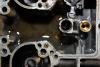
Ok folks, here is an update: Things are still just as bad as before. I got the battery hooked up and started to crank the engine. As soon as I started cranking, fuel came gushing out of the vent tube on the air horn (highlighted with green circle). I decided to lightly tap the float area on the air horn and try it again. The engine cranked very slow and seemed like it had a lot of resistance. I stopped and noticed fuel was weeping out of the base plate and getting the intake wet with fuel. To be perfectly clear, I had cranked the engine twice for only 5 seconds of crank duration. All that fuel got my attention and I stopped at that point. I decided to pull the #8 spark plug again.........once again fuel poured out of the cylinder! I really need help with this issue, I am worried about washing down my cylinders, hydro-locking the rotating assembly, and worst of all creating a potential fire! What do you suppose is the root cause? Stuck float I am assuming? I have owned this beautiful 71 Monte for 2 months and have only driven it twice........ both times it ran super smooth with no issues. Now I have a flooding pig that I cannot drive, let alone start. I attached photos of the carburetor and circled the areas where fuel is leaking out. How does the air horn come apart and how do I check for a stuck float? Is there an opening I can poke to dislodge the stuck float before taking things apart?
-
Sam, Thanks for replying back with a few suggestions on causes. More and more the float seems likely. The car ran outstanding prior to this issue (idle, acceleration, power, etc). Once I get some of my tune-up items put on, I will check for flooding.
-
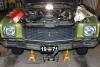
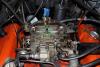
My Monte Carlo is equipped with a stock 350cid with original 4 barrel Quadra-Jet. The Q-Jet has a solenoid on the side with wiring harness. I am not exactly sure what all this is...... cold choke mechanism? automatic idle adjustment for A/C? Anyway, the most important thing to discuss is my most recent event. I just picked up this clean car about 3 months ago. Before starting, I pump the gas pedal once all the way to the floor (choke/high idle). Then I start the car and it revs at high idle until it warms up.......just like it should. Last week I did the same starting procedure and the car died after it ran for a few seconds. The more I tried to crank it over, the harder it was for the starter to turn the engine over, (similiar to being vapor locked or hydro-locked). Finally, the starter would "click" and no longer turn the engine over. Note: during this attempted starting time, I would only crank for about 5-6 seconds with about 15 seconds of rest time. Frustrated, I stopped trying to crank and could smell strong gas fumes under the hood. I ended up walking away from the car to let it settle, thinking I flooded it. The next day, I decided to pull the spark plugs and check the overall condition of them. When I pulled cylinder #8 plug, to my surprise about 1 cup of fuel came pouring out! How the heck did so much fuel get into the cylinder? and only #8? I figured that perhaps the Q-jet put excessive fuel into the engine from the attempted start the day before? I am not very savvy on carburetors and the Q-jet seems very complex on adjustments and the fact they made a million different models. I am a "set it and forget it" kinda person who really doesn't like chasing after tedious tuning to make the car run correctly. The previous owner had the carburetor professionally rebuilt just before I bought the car a few months ago. I see talk online about well plugs being sealed by epoxy, air horns that are commonly warped, etc, etc. The car ran awesome prior to this hick-up....... any suggestions. Hoping its just a little bit of crud that got into the needle/seat.
-
Pertronix Ignitor Distributor Conversion........Anyone done one?
NWmonte71 replied to NWmonte71's topic in Electrical Tech
I have all the original equipment setup on my stock 350cid (Q-jet). I noticed there is a large soleniod with a wiring harness connecting to it on the side of the carburetor. Is this where you guys are robbing the 12V power wire from? If so, disabling this soleniod will cause the carburetor to do what? -
Pertronix Ignitor Distributor Conversion........Anyone done one?
NWmonte71 replied to NWmonte71's topic in Electrical Tech
Thanks for the feedback guys! I was hoping other members have used this system before. It seems like a pretty good way to retain the stock look, while gaining modern performance. I was wondering.......How does the ballast wire/block come into play with this system? Do you need a dedicated 12V wire ran from the fuse block or do you use an existing wire? I realize the directions will explain all that, just want to prepare myself and plan ahead. -
I am curious if anyone on the board has eliminated their original points distributor internals and swapped over to an electronic Pertronix Ignitor conversion kit? The kit seems like a great way to eliminate points adjustment and achieve a trouble-free/maintenance-free setup. Just wanted some feedback on installation and performance if anyone has done it.
-
1971 Hood Ornament Assembly......... How Does It Go Together?
NWmonte71 replied to NWmonte71's topic in Restorers - Archive
Thank you for posting the picture! It helps make sense of how the medallion attaches. I guess now my only question is where can you find the little spring? -
I assume you have to drop the tank to get to the sending unit? No access hole on the bottom of the trunk pan?
-
I recently purchased an all original 71 with stock 15x7 rally wheels. I do really like the old school look of the rally wheels, but also like the look of a more modern wheel. I'd like to have the ability to swap wheels for different occasions and events. The modern wheels I really like are the grey colored Boss Motorsports model# 338 wheels. I would like to get them in 18". My whole dilemma is that I don't want to modify the car in any way to make the wheels fit (rolling fender lips, trimming the inner fender edges, swapping to a narrower rear end, etc). I want a wheel backspacing that gets the maximum wheel depth, but won't interfere with clearance. I have seen a few 1st generation monte carlos running these wheels and wondering how they are setting them up for sizing. I am interested in seeing someone post up pictures of this wheel set up.
-
I recently purchased an all original 1971 Monty. The car is missing only a couple of things....... one of them, the "Chevrolet" medallion hood ornament. The base of the hood ornament is all intact and looks great, just the upper round medallion is missing. I assume this piece attaches to the base with a spring? I hate to remove the base piece and go out and buy a whole complete new emblem. I see a few people on Ebay selling the medallion piece alone, but no attachment hardware (spring?). Can anyone tell me how it attaches or possibly post up a picture showing it? Thanks
-
I just purchased a 71 Monte Carlo and the gas gauge needle is stuck past "F". The needle does not move with key on or off, it seems to be stuck in that one position. I was wondering if anyone else has experienced a similar situation with their gauge. I am wondering what side of the circuit I should start at first for troubleshooting.........sending unit near the tank or back of the gauge? Any troubleshooting tips would be greatly appreciated.