LS5
-
Posts
721 -
Joined
-
Last visited
-
Days Won
30
Content Type
Profiles
Articles
Forums
Gallery
Events
Everything posted by LS5
-
just found I have trunk release option . please help
LS5 replied to 72jrfan88's topic in General 70-72 Monte Carlo Forum
Hey Steve, yes that is definately not a Dealer install button nor a Factory button. Thats a "I want a power trunk option so I am adding it to the best of my ability with this brown looking button" The Dealer and Factory buttons will be identical as they are one in the same, the location on yours is incorrect as the location of Erics is correct and it was an option and would show up on your build sheet. If it was dealer installed then it wont show up on your build sheet but it would be in the right place and have the correct button. Darren -
just found I have trunk release option . please help
LS5 replied to 72jrfan88's topic in General 70-72 Monte Carlo Forum
Hi Eric, yours in your monte now is held in with a large Collar nut by the looks of it. So that should just unthread and slide out through the factory hole and pop off the two wires. The yellow button just pushes through the hole from inside the glove box once the wires are popped back on, it will almost snap into place as the housing with have 4 butterfly wings that will fold in as you push the button and housing through the hole and then the wings pop open once pushed in tight and thats it. No speed nut or collar nut. Send me a PM with the full Name and address Eric and I will fire it off to you Free of charge Pal, Just pay for Mail. Yes Bruce, mine was also Oshawa and the 4th week of April and with the GM strike. lots of weird stuff between our cars in 71, yours, Larry"s, Mine and Liam's. almost all a week apart yet differences. Darren -
just found I have trunk release option . please help
LS5 replied to 72jrfan88's topic in General 70-72 Monte Carlo Forum
that is really neat Bruce, I think when we have discussed in recent that Our 71's were only built a week apart. maybe you had a left over 70 button strange.... Darren -
Basically, an electric temperature gauge is a voltmeter. The scale on the gauge face is reading temperature but the instrument itself is reading voltage. The gauge itself is comprised of a bimetallic (two different metals fastened together) "hairpin" assembly. This assembly is attached to the needle. The gauge requires an electric circuit and a sending unit in order to read temperature. The sending unit is a temperature-sensitive material that is part of a variable resistance, water-sealed unit that sits in the coolant stream in the engine. As the engine warms up the resistance in the sending unit is lowered gradually until the system reaches maximum heat. The sending unit is the "ground" portion of the circuit. In the completed circuit the battery voltage passes from one side of the gauge, through the bimetallic spring and onward to the sending unit, which is grounded to the engine. When the engine is cold the resistance is high, so little current passes through the gauge. This small current doesn't heat up the bimetallic spring, so the gauge reads a low temperature. As the engine warms and the sending unit's resistance lowers more current passes through the gauge and the needle reads higher and higher because the bimetallic spring expands further The White 402 4spd I drove last time to the Western meet doug when she was up here 40 degrees outside she ran 230 all the time sometimes even up to 235. now the 454 in the 71ss always runs a 210 no matter what temperature is outside and has yet to overheat. Darren
-
just found I have trunk release option . please help
LS5 replied to 72jrfan88's topic in General 70-72 Monte Carlo Forum
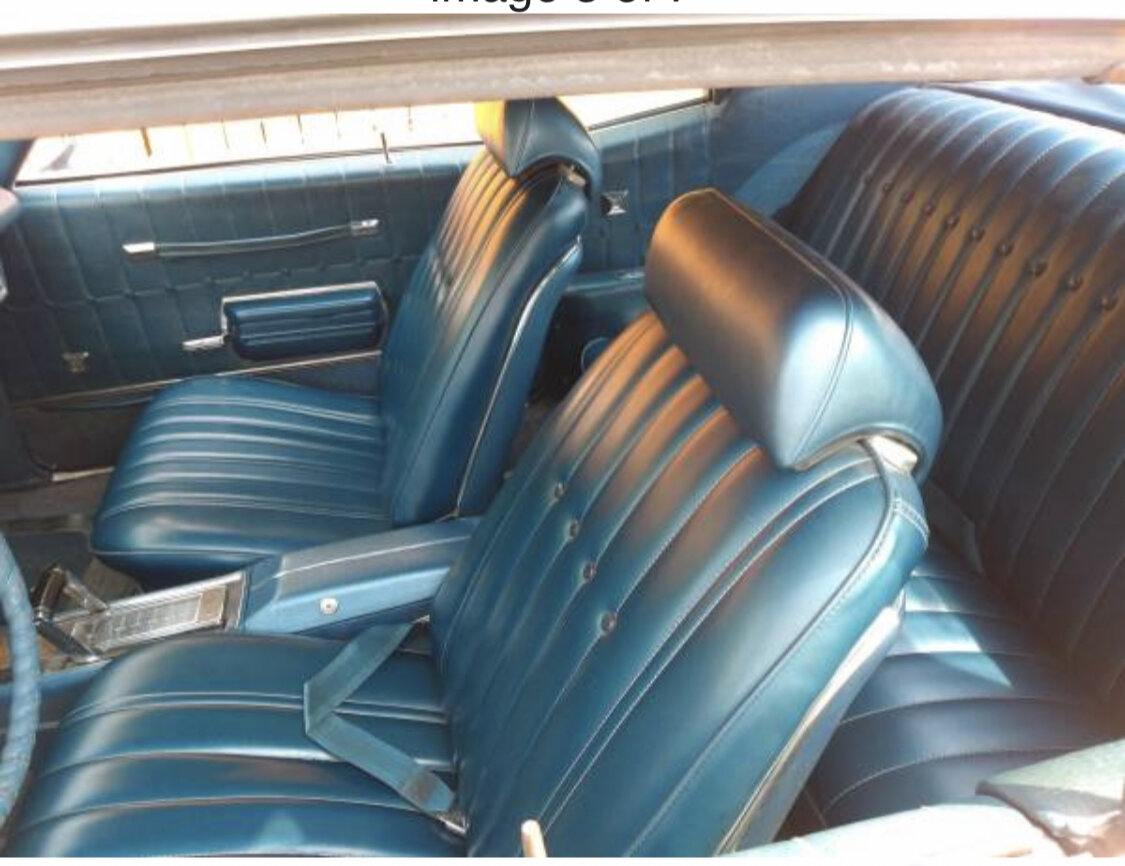
Hi Eric, 1970 was Dark Green and 71/72 was Yellow as you guessed. If you want I have a Spare Yellow Button Power Trunk release ? The button is yellow with the circular housing that says Trunk on it across the curved top and again on the curved bottom, with the standard two prongs on the rear. My 71SS has the Power Trunk Option and it's button is Yellow in the glovebox in the exact same place Darren -
Hey Mark, All the speed nuts are on the underhood side. there are 2 bolts around the fan blower housing. here are a couple of pictures so you can see the ac delete plate which uses the same holes to mount the plate as well as one that is just the housing so you can see where the bolts / speed nuts would be. Darren
-
Well there is 7 Studs that will have speed nuts that need removing and then the single bolt you removed on the top right side as you mentioned is only 1 of two that need to be removed. The other is in the opposite corner of the blower motor housing part. Basically feel all around that ac housing and or use a light and mirror on an angle to see the other 5 you are still missing. The outside is held with Dum Gum. the inside with have the firewall padding and 46 plus years and heat and dust and hardened condensation holding it to the inside wall. with a little up and down wiggle for a bit it should with its own weight start to fall inwards. Darren
-
What did you do to your Monte Carlo today?
LS5 replied to Canuck's topic in General 70-72 Monte Carlo Forum
Hi Steve, here is a NOS one pictured and then mine installed as you asked... Your 70ss would have come with one from the Factory but alas as most smog equipment or these Heat Stoves, they got removed and tossed away. Darren -
What did you do to your Monte Carlo today?
LS5 replied to Canuck's topic in General 70-72 Monte Carlo Forum
Well the Snowball is finally melting smaller now.... Whew... spark plug wires installed, Heat stove installed, rad back in, ground straps hooked up and blower motor and housing reinstalled all today. She is looking more and more like a 71 again.... And to think I was only contemplating a frame off, next thing you know a massive snowball and a thousand pieces everywhere.... well in baggies maybe and a third shed in the back yard. Hahaha Darren -
In-Line Tube out of the US. I bought them for my 1970 chevelle ss and my 402 4spd car and now my 71ss monte. look identical to the originals. Darren
-
CGU was also used as a 390hp engine but was only in the Impala and Caprice and a standard Orange Block. The corvette 454 390hp engines in a CGW were painted Red in 1970. General Motors in Canada (Oshawa) did have and made those cars as well in 1970 with those two codes but were only 454 cars. Now it has been proven that when the strike was on, Oshawa ran out of 454's for the 11 Chevelles waiting to be delivered and threw in CGW and CGU 454's that were left over during the strike. Those chevelles are worth big bucks, now it was not known if any Monte's got those two engines or if they got all the 454's before they ran out none have ever shown up but we have a couple of floaters out there in chevelle and monte carlo that got M21's instead of M20's and visa versa also due to the strikes in Canada and The USA. Darren
-
Block ID 3963512 Late 1969 454 Engine Block number 3963512 All 1970 454 Corvette,Chevelle,Nova,Monte Carlo,El Camino etc 3969854 All 396 and 402 for 1970. You Can re-stamp a Block Pad or passenger forward Head Pad to read what ever you want but try to copy GM's Font and Spacing.... Good Luck.... YOU CAN NOT REPLICATE A CASTING NUMBER ITS IN THE BLOCK WHEN CASTED. Darren
-
Here you go, 1970 engine codes for 402 and 454 engines for chevelle and monte carlo not inc Corvette. 402 ↓ CGR 402-4 330-LS3 Manual-3/4 Found on Vintage Vehicle Services Report CKN 402-4 330-LS3 TH-400 CKO 402-4 375-L78 Manual-4 CKP 402-4 375-L78 (w/L89) TH-400 Aluminum Heads CKQ 402-4 375-L78 Manual-4 Heavy Duty Clutch CKR 402-4 330-LS3 Manual-3/4 CKS 402-4 330-LS3 Manual-3/4 Heavy Duty Clutch/LS3 CKT 402-4 375-L78 (w/L89) Manual-4 Aluminum Heads CKU 402-4 375-L78 (w/L89) Manual-4 Heavy Duty Clutch/Aluminum Heads CTW 402-4 350-L34 TH-400 CTX 402-4 350-L34 Manual-3/4 CTY 402-4 375-L78 TH-400 CTZ 402-4 350-L34 Manual-3/4 Heavy Duty Clutch 454 ↓ CRN * (2) 454-4 360-LS5 TH-400 ****Monte Carlo**** CRQ 454-4 360-LS5 TH-400 CRR 454-4 450-LS6 TH-400 CRS (1) 454-4 450-LS6(w/L89) TH-400 Aluminum Heads CRT 454-4 360-LS5 Manual M22 CRU 454-4 360-LS5 Manual M22 Heavy Duty Clutch CRV 454-4 450-LS6 Manual M22 CRX 454-4 450-LS6 Manual M22 Heavy Duty Clutch CRY (1) 454-4 450-LS6(w/L89) Manual M22 Aluminum Heads/Heavy Duty Clutch Darren
-
Hi Carl, my 71ss has no ac and has the longer ones that join in the middle or at the rear view mirror mount Darren.
-
If it's the rear window rubber trim that goes all the way around and the plastic corner pieces then yes 70-72 chevelle are the same inc the back glass. Darren.
-
ok lets see if i can explain this... the bottom cable marked off...............deice that cable is the shortest and goes to the first pin on the left of the heater box in my picture where the box starts and is narrow The middle cable marked Cold..........Hot that goes to the Top and furthest away pin at the end of the heater box on top as seen in your picture The Top heater cable marked Off............Air Thats the middle pin and is tucked in behind the box and mid way from top to shortest. it cant be seen in your picture but if you look at your then mine you can roughly guess where she is going to be by feel if you dont remove your box and feel from between the firewall and heater box. Darren
-
unless someone else chimes in I have that exact same set up complete in my parts shed sitting on a bench and is all hooked up still. tomorrow after work I will head out in daylight and get some pics for you as to what goes where for each one if you would like ? Darren
-
Well a bit more progress today........ well until 3:43am this morning and then back at it at 9am with a little help from Keith who came over as an extra set of eyes. Dropping body back on the Frame FINALLY and also dropping in 454 and th400... now off to get some zzzzzzzzzzzzz [/url Darren
-
Hi Phil, I had the diff on jack stands on the tube housing and a block of 2x4 to put under the carrier housing for when I rotated it and held it in place. I used a stiff paint brush and Gunwash (Varsol) to brush on everywhere and let it soak for a while and then brushed it on again using an old tarp underneath to catch the crud. After she all dried up I scuffed it all every inch in all the nooks and crannys with a green pot scrubber pad (good thing I aint married anymore). after that I removed the diff cover and changed fluid and gasket and buttoned it up with old bolts until she sealed and dried. I painted it all with 2 coats of Por 15 and then changed the diff cover bolts one at a time so the seal didnt pop with new bolts. Even pulled all the brakes apart and wire wheeled the insides with a dremel and painted in there and used Por 15 high heat exhaust paint on the new rear drums and picked up new brake lines from In-Line Tube down in the states. Picked up Grade 8 cadium coated bolts to put back in the diff so it was all new including wheel cylinders from Napa. Actually did the whole rolling chassis that way to from front to back every single piece is new and por 15 in one of 6 different colors they offer and all new fuel and brake lines etc.... They Call That "The SnowBall Effect" you start on just the diff and the next thing you know it and the body is off the frame and in a million pieces....... hahahaha as in first picture see body in background. Darren
-
Hey Phil, I used Por 15 when I did my diff. I prefered the black though being an OEM Freak... Darren
-
6489785 for 1970 Mike...... 6489600 for 71-72 Mike... Darren
-
These are them elephant ears with the rubber tucked away on the ends. Darren

-
All done and registered Aaron Car wise... BUT had to change Vehicle info as the 71SS wont be ready in time but still bringing A Monte. Darren.
-
Hey Kris, The Center Bolt slides through the Forward Harness or Headlight Harness thats molded in a C shape. The Engine Harness slides into the C opening and the Center Bolt (3/8 head) slides through and threads into the Nut Cert inside the main wiring block. The main wiring block is then held by 2- 5/16 head screws that slide through the actual fuse block half that clips to the wiring block. the screws then screw into the Firewall. Darren
-
Easiest way to find out on that Block I just noticed is the Last of the VIN that is stamped on the engine. the 15 denotes as Canadian. GM Canada at the Oshawa Plant keeps all GM history on file. It will cost you about $75 USD but giving them that last part of the VIN they should be able to tell you what Car it was and what size that engine was for sure then you know 454 or 396/402.......... The vin will get them the details whether it was a SS car or a 402 car. Darren.