
Dynamo Dan
-
Posts
20 -
Joined
-
Last visited
Content Type
Profiles
Articles
Forums
Gallery
Events
Everything posted by Dynamo Dan
-
That's my guess as well and confirms it. It shuts off white your foot is off the pedal and originally would run a few seconds and shut off with the brake on, but when I swapped to that Corvette Master and cussed my way thru that, it went back to running with the foot in the pedal. Thanks.
-
Figured I was finished with this car but still having some issues. One I'll never install a Sniper unit again, total garbage, think it has itself sorted out cycle the key and it loses its mind. ... 2 the brake thing is ongoing. They are okay... Not spectacular. But the owner is wanting to know if we add a vacuum can of it would help the added vacuum pump not run when you have your foot on the brake at a long light. It pumps up and shuts off when you first start as expected, but one press of the brake and it will just run till you release the brake.
-
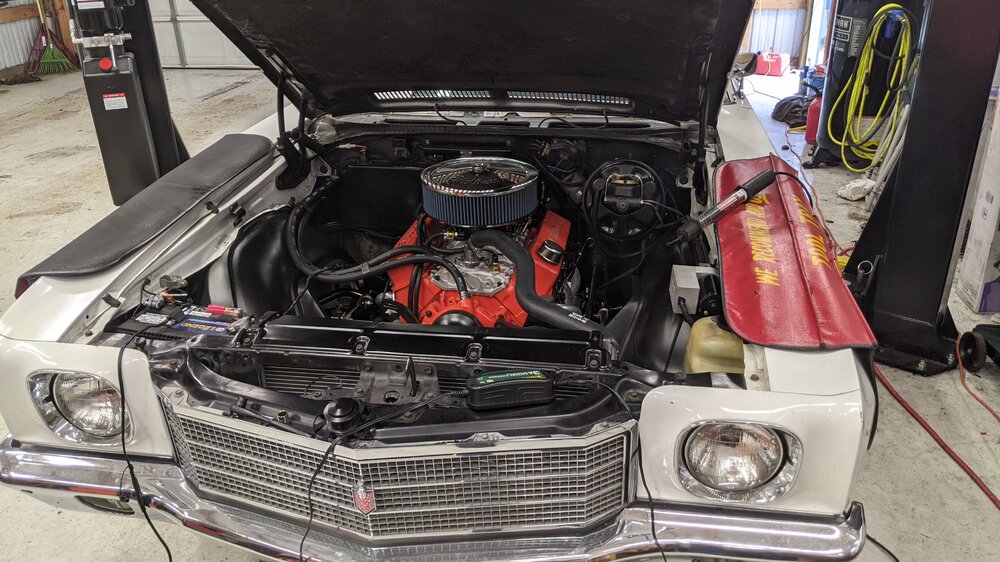
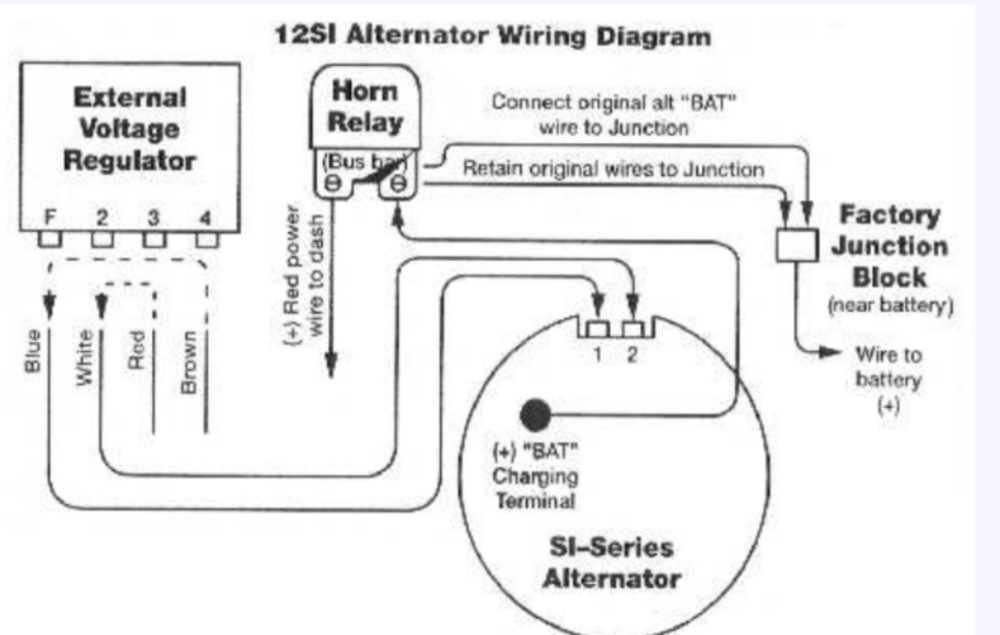
The diagram above worked perfectly. I just depinned the regulator connector and made jumpers to jump the wires and takes over them. That way down the road if someone wanted to change it back I didn't modify the wiring. Since the wires are only an exciter wire and light now minimal load is carried. But now with the big alternator in there at an idle 14.3v with both fans running. It hardly moved off if 14+ even cruising. A sneak peek of the car. Pretty much wrapped up now.
-
I got the alternator in and the regulator conversation done about the time the owner got off work. He wanted to drive it so we tested the brakes and well it will about put you thru the windshield from 50, but won't lock them up, said he will live with it. But I did mention if they go soft I'd be changing that last hose from the Hardline to the axle block. As it was a bit weak when you open the bleeders.
-
Thanks. Thankfully we do have a few good shops around here. Had a similar issue with another I helped with but it was Hydroboost that one local shop was able to sort out. I'm honestly thinking we have a restriction somewhere in the rear brake line someplace. I have a pressure gauge that screws on the bleeder I'm going to try today when I'm redoing the new alternator harness
-
Going to have him turn it over to a professional shop on the brakes. Did some more reading find the rear brake kit is a Jegs Special, no name calipers. And low and behold they say use a 1 1/4 master is recommended. But I dropped off the alternator as I had other engagements today hopped in and checked the brake pedal back to sponge and wouldn't pump up. No evidence of leaks. So I'm pretty well done trying to figure it out and stick to electric stuff and fabrication. Lol!! Thanks JFT69z for the help on both threads.
-
Thanks. That was the one I had saved previously. Easy enough to do it that way. I could also do some creative wiring since the VR is history anyway and use the terminal off the alt to trigger the light using the old harness to the VR and some splicing at the VR plug so I'd have a key trigger and the light trigger going down the original. Don't know if it's copacetic but it should in theory work. Then I'd just use 8 awg to the Battery terminal at the horn relay/ buzzer. Just wanted to see if anyone has done the swap. Figures I should of thought ahead as I rebuilt the forward harness, relayed headlights, replaced the engine harness added the electric fans, fuel injection etc and looked every thing up. Lol now I've got to cut it all apart. Lol!!
-
Yeah 100 amps thru that old 12 gauge wire would not be a fun sight to see. Don't know if I'll go to the battery post on the starter as it's closer to run to where the existing one is on the terminal behind the battery. Probably just rebuild the alternator harness totally as I technically don't need the trigger wire but the light would be nice so I'll rewire it with the 3 and figure out what to do where the regulator is.
-
Supposed to be around 100 amps. Will be up sizing the output wire to 6-8 Awg to compensate.
-
The pads are lightly dragging on the rotors when released. But could be tighter I guess without any issues. I was using a special hose clamping pliers but definitely it's a 50+ year old hose. Was only going as tight as necessary. I wonder if the hose itself has internal restrictions due to its age and with what little was being forced out with the pedal press. Definitely want to get my hands on that gauge now. Thanks again.
-
Project 2 this week on the 70 Monte I'm working on is putting in the new one wire alternator I am picking up. The oem Alt does not have enough output to run the Holley Sniper, Fans, Fuel Pump, Vacuum Pump, Stereo etc. Believe the one was less than 40 amps according to the shop. As soon as the fans kick on voltage dropped on the battery from 14.1v to 12.3v. So I took the original one to a good shop in Everett, Washington and they looked at it and went no way, not worth pumping up. OGPI Special Delco name on the outside and total junk inside. I had 2 Voltage regulators they were the same, both Declo Branded, one buzzed very loudly, the other just wouldn't charge. Open both up and it's just garbage inside of bent and misaligned contacts and poor soldering. Anyway we ordered a One Wire internally Regulated Alt from them for less than fixing this one would cost. I've looked around a bit I just need to be pointed in the right direction how to bypass the regulator. I know I'll still use the 2 wire plug on top of the Power output. But don't want to stack 2 regulators together. I was reading I cut and splice at the regulator? Thanks
-
We gained ground once I had the Freeplay figured out. He had just bottomed out the adjustment as it was on the old booster. I probably adjusted it out 1/4" to get about 20 thousandths Freeplay. As far as the booster to master I don't see any adjustments there. I did also have him hold the brake and I cracked the lines at the master after bench bleeding and got a bit more air out, and this master has plugs on the opposite side as well I verified were tight no leaks. I've been all over the car and can't see any leaks at any fittings but I do hear an odd noose when he applies the brake I think is the proportion valve adjusting, or fluid going thru the crossover since it lays on the cross member so I'm hearing it. Pistons and pucks all seem square to the rotors, fronts are 2 Piston Wildwoods backs are unbranded single piston with sizable pistons and the lousiest e brake setup ever. And I've cranked on the arms and pumped the pedal so much it's crazy. I even had to add a spacer to the ebrake cable under the floor to get enough adjustment to properly set the e brake but even then it's going down 6-7 clicks off it stop to lock the brakes. There was a note that if the e brakes were not properly set you will have little to no brakes so I went back thru even used a pry bar and pushed the pad simulating braking and having him pump the ebrake to see it it would go to the next click of adjustment. No luck. One thought and I doubt it matters is how the rear brake line has to make a small loop to go from the fitting to the flex line to the banjo fitting. As I had him push the pedal when I had the bleeder open to see what kind of pressure we had. And sadly it was minimal pressure. But the bleeder is fairly small on these. I need to see if my other buddy found his pressure gauges and maybe see what kind of rear brake pressure we have. I am pretty sure it's something now in the back as if I clamp off the flex line from the line to the axle, solid brake, and minimal movement when the booster hits. I had to head home for dinner so I gave up for the day. I will take some pictures and upload the pics tomorrow. I have to run down and pick up the new one wire alternator, and figure out how to bypass the Voltage Regulator and keep the idiot light on the dash functional. (I'm starting a new thread in that section as well later).
-
This one will pump solid with the key off/pump off. Hit the key to trigger the pump with your foot in the brake and I expect a bit if drop but not clear to the floor. It did this with the old master as well. If line size isn't the culprit I'm down to think we have a rotten booster. I'm getting pretty confused at this point as well.
-
Master is in stock location in firewall. Maybe let it sit again and try bleeding again. Never fought one like this. It's got me stumped. At least now if you hold the brake the vacuum pump cycles on them back off. Old master it would run forever if you held the brake. I did also adjust Freeplay a bit on the push rod. Forgot to mention that.
-
Figured I'd start a fresh thread in the correct category, of this ongoing hair pulling fun. 1970 Monte Carlo, 383 Stroker, Turbo 350, full disk conversion. New Booster,new vacuum pump directly connected to booster. We replaced the master with a Corvette Dual and a disk/disk Proportion Valve. Bench bled, vacuum bled, and manual bled brakes, we are 99% sure air is eliminated. Car off 2-3 pumps brakes are nice and solid. Hit the key to turn the vacuum pump on brake slowly sinks to the floor. Clamping off the rear brakes seems to improve this but it will still slowly sink. Master kit is from Southwest Performance, 1" bore. I've heard good/bad about their stuff. But it showed up fast and I'd heavy and looks good. Being that this was a rear drum car, it had the little valve on the side of the master which was in the front brakes, which I removed when I installed the prop valve in place of the distribution block on the frame rail. I redid the flares on a couple lines so they correctly hooked up with the proper fittings. Inverted flare on everything. So dumb question here. The line going from the master to the prop valve is quite large compared to the front and the line running to the rear is also a larger line. Do I need to replace this lube with smaller to increase pressure? Or would installing. 2 pound Residual value in the line help eliminate the drop and squishy pedal.. I'm no brake guy. At this point I'd be slapping the rear drums back on. Lol!!! Thanks everyone. Big help so far.
-
I figured I'd better pop in here and say hello. I jumped right into a new thread needing help and you guys didn't disappoint! I grew up helping build street rods, bikes muscle cars and even got to build a couple of my own vehicles. It's pretty fun and passes the time. A few years back I had the opportunity to help one of my local friends with a shop and he brings me in for my electrical and fabrication knowledge, I've wired a good number of cars now, done upgrades, stereo systems conversions and more. I'm a great learn as I go and not afraid to get my hands dirty. Sadly a few years back I landed on disability and now have an implant on my back for pain control so I had to give up most of my fabrication ability die to o can't be near a welder!! So the electrical keeps me busy and cars like I'm talking about a brake conversion I'm muddling thru or should I say pulling what little hair I have kit thru. Lol!! But between working on the old muscle cars and my more modern vehicle I've heavily modified. I'm busy as a bee. Thanks again I may not be a full time active member but you guys run a great ship and are super friendly. And lots of carry over stuff across the A Body cars.
-

70 Monte Carlo Rear Disk conversion Woes
Dynamo Dan replied to Dynamo Dan's topic in General 70-72 Monte Carlo Forum
I installed the new Corvette Master Cylinder (it's huge) was able to mount the new proportion valve down where the old distribution block was. I did bench bleed the new master, bled it again on the car before putting the lines back on. I used a vacuum bleeder started at rear pass side the rear diver side, front pass the front driver. Did that 2 times 2 full reservoirs of fluid without running dry as I was alone. Pumped the brakes a few times heard a pop I figured was the prop valve adjusting. Brakes are total mush can't pump them up. So I went back and sucked two more full reservoirs thru it. Got a bit of air nothing major. Pumped the brakes and they still won't pump up solid. Brake goes to the floor when the vacuum pump is turned on. No leaks and there is no button on the Prop valve. I did try stomping on the pedal to no help. Front brakes are dual piston Brembos and rears are these big single piston calipers I had to sit there and crank on the e brake lever to ratchet out the pistons. No clue the name of them. Hard part is I've got the e brake adjusted with a old socket to get the tension right and the e brake still nearly goes to the floor but I have them adjusted to where the lever just leaves the stop like the manual says. I'm to the point of telling the customer he needs someone more versed in disk conversions. Or I've still somehow got air trapped someplace. Will try an old school bleed job when I get back on a few days from some personal business. Maybe the vacuum is missing some or sucking too hard. Thanks guys. -
70 Monte Carlo Rear Disk conversion Woes
Dynamo Dan replied to Dynamo Dan's topic in General 70-72 Monte Carlo Forum
****Looks like my friend found a conversion with the new prop valve included under the master. Will still need to build new lines and couple everything. Not a big fan of using couplings on brake lines but it will work. -
70 Monte Carlo Rear Disk conversion Woes
Dynamo Dan replied to Dynamo Dan's topic in General 70-72 Monte Carlo Forum
Thanks guys. Looks like I've got some new lines to build to replace both the separated prop valve and distribution block into one unit. I'll inform my friend of the news. Been digging thru the internet for a few days. Glad I joined up here and got a straight answer. Thanks again.. -DD -
Helping a friend out with his 1970 Monte Carlo. Dropped a 383 Stoker in, Mild cam, Holley Sniper setup. Replaced all the brakes, new calipers, rear disk conversion. Put a new booster and master (stock) as well as a decent vacuum pump. (cam was only allowing for 8" of vacuum at idle. So now we know our mistake, we should of used a Corvette of similar master cylinder in place of the stock disk/drum setup. This also has the proportion valve on the side of the Master hooked to the front brake line only. Then it goes down to the distribution block with the brake light fail switch (no button there). Anyway with car off a few limos brakes are nice and hard, hit the key lump comes on, pedal drops to the floor. So we know the issue. Not enough pressure is going to the back brakes as it has huge pistons in them, to balance the brakes enough to bias in the fronts. So Brakes are not my area of expertise. I'm a fabrication, and electrical guy. What do I need to replace. I know the master to a equal reservoir style, but what diameter bore?, Do we ditch the single prop valve, and replace with a later prop valve designed for 4 wheel disk and refab all the brake lines to the block, and due to the arrangement maybe have to redo the front lines? Any assistance in helping me out is greatly appreciated here. I know enough from a prior job I assisted on to avoid CPP Crap. Thanks,


