B-Man
-
Posts
117 -
Joined
-
Last visited
Content Type
Profiles
Articles
Forums
Gallery
Events
Everything posted by B-Man
-

1972 MC 350/Auto - Power Windows & Door Lock Conversion
B-Man replied to B-Man's topic in Electrical Tech
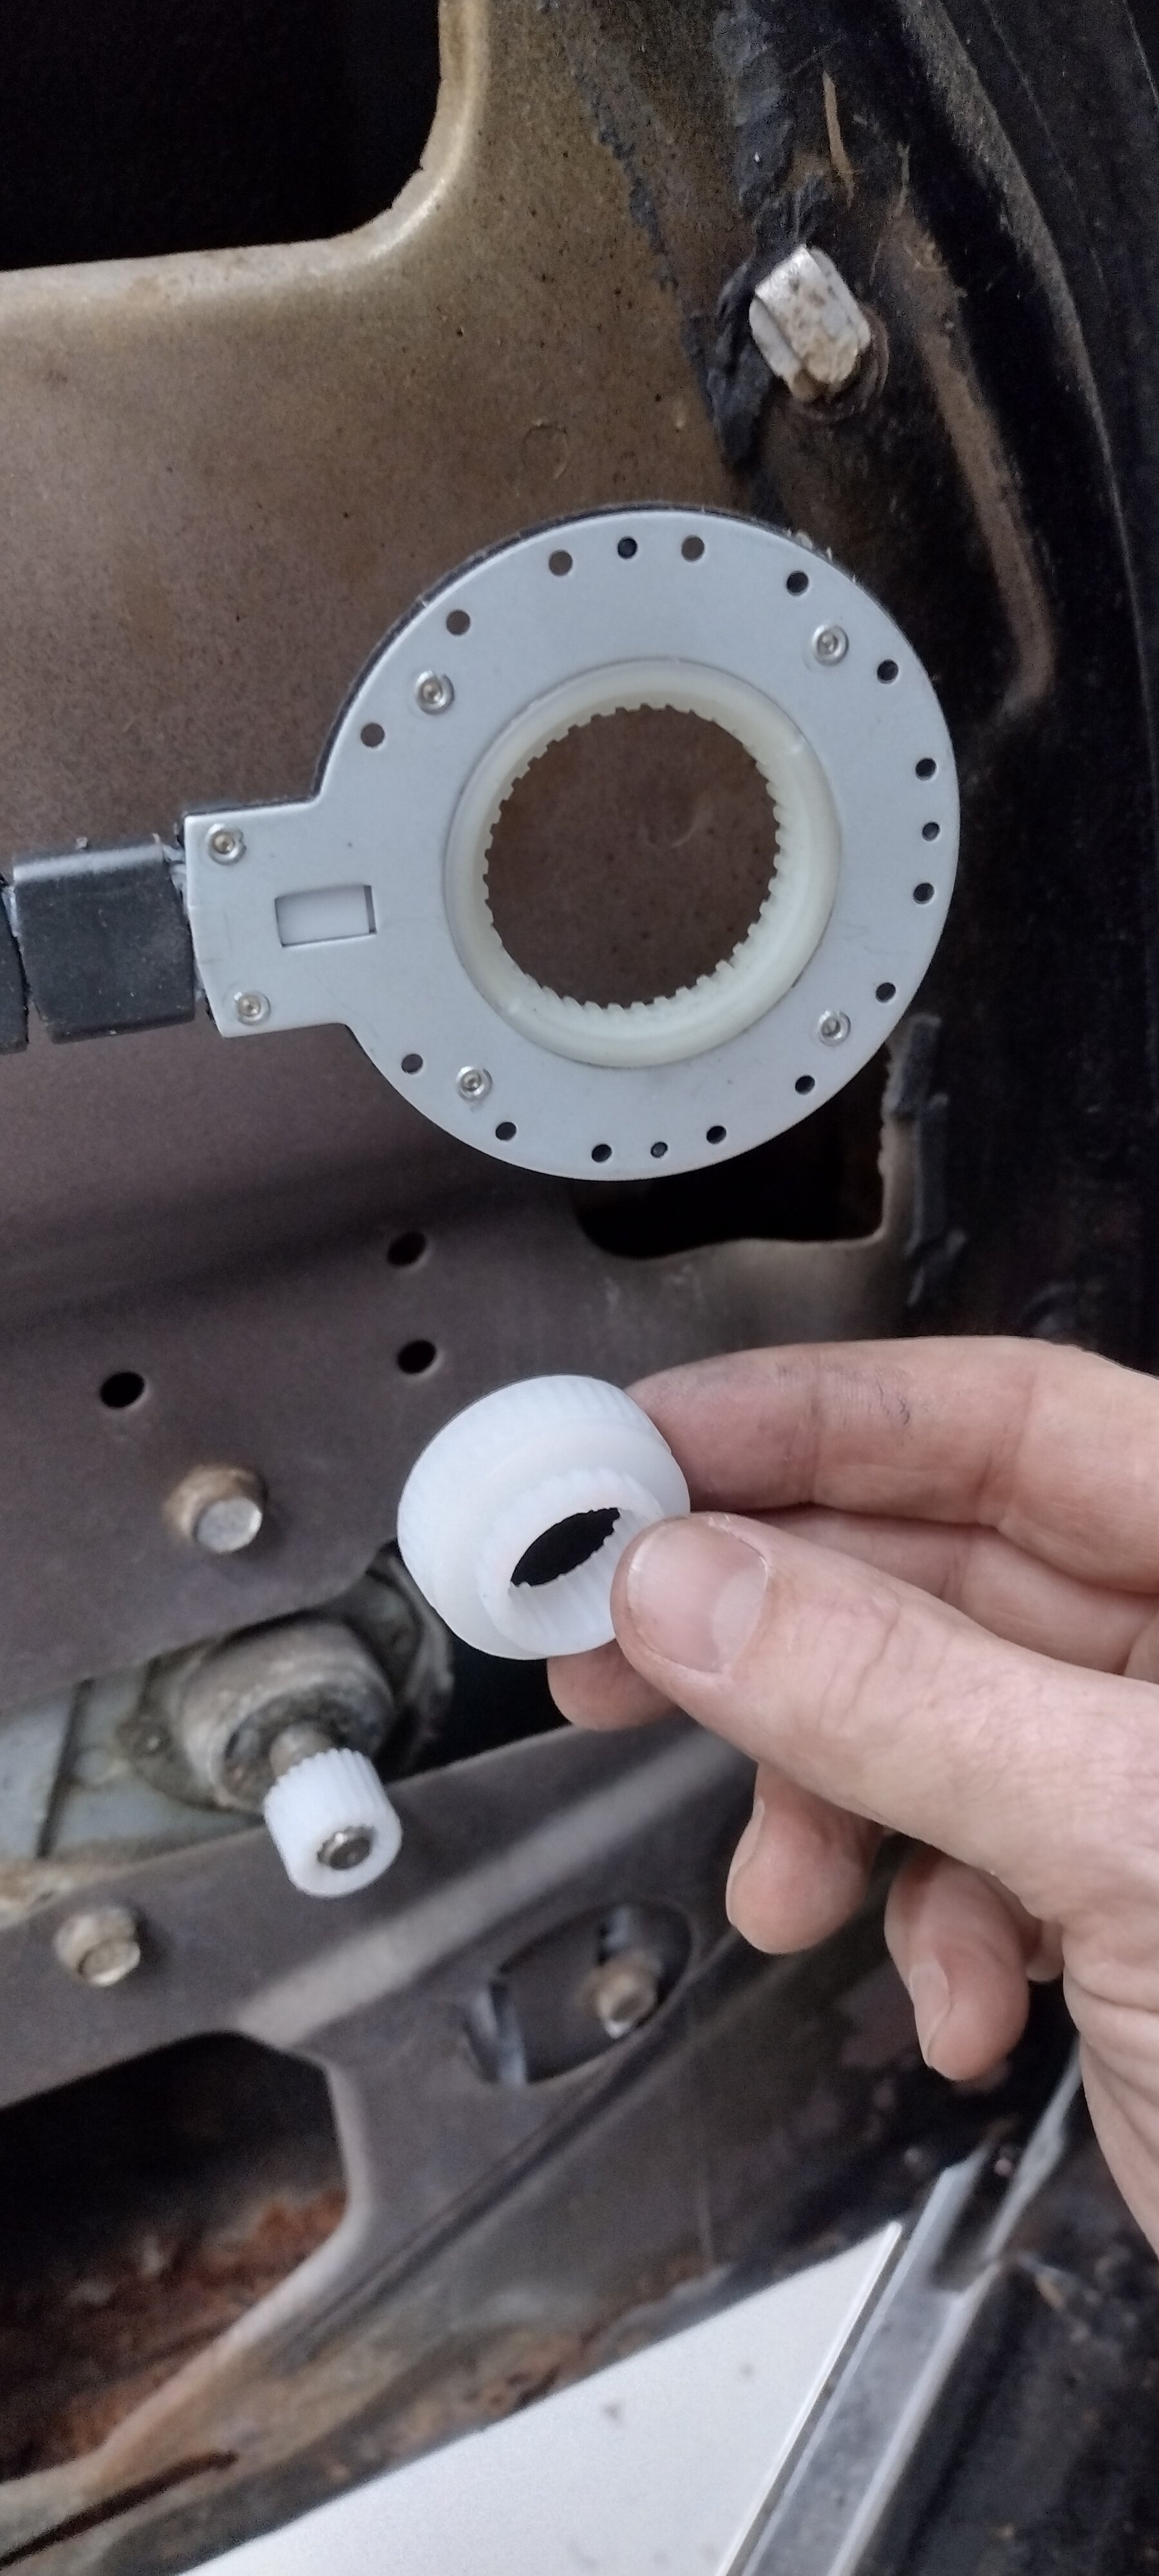
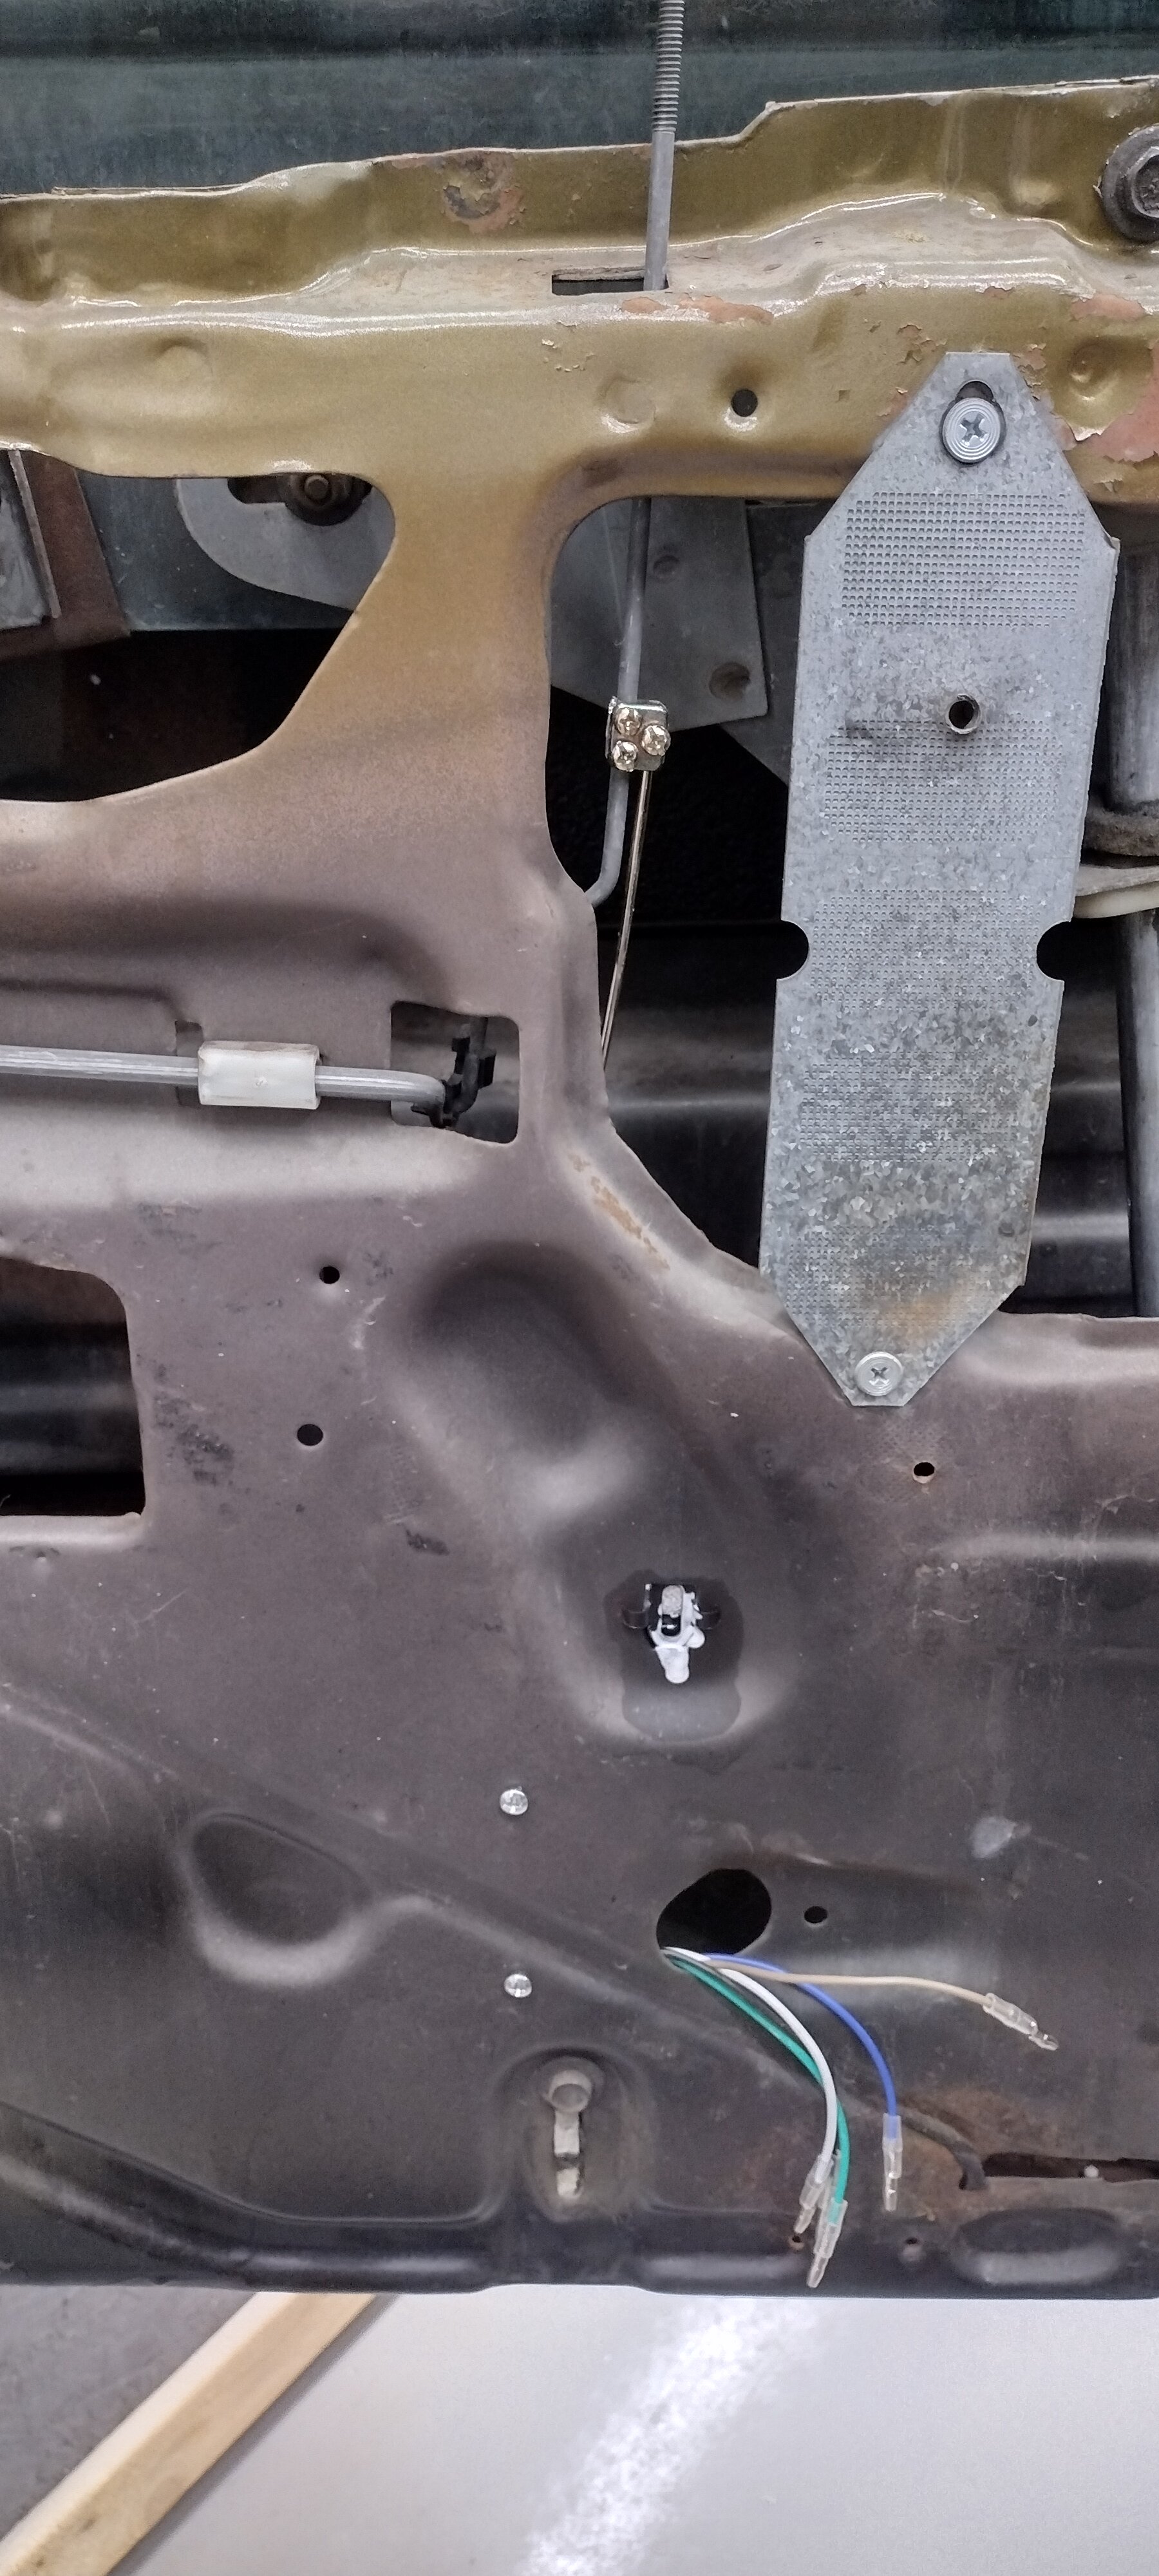
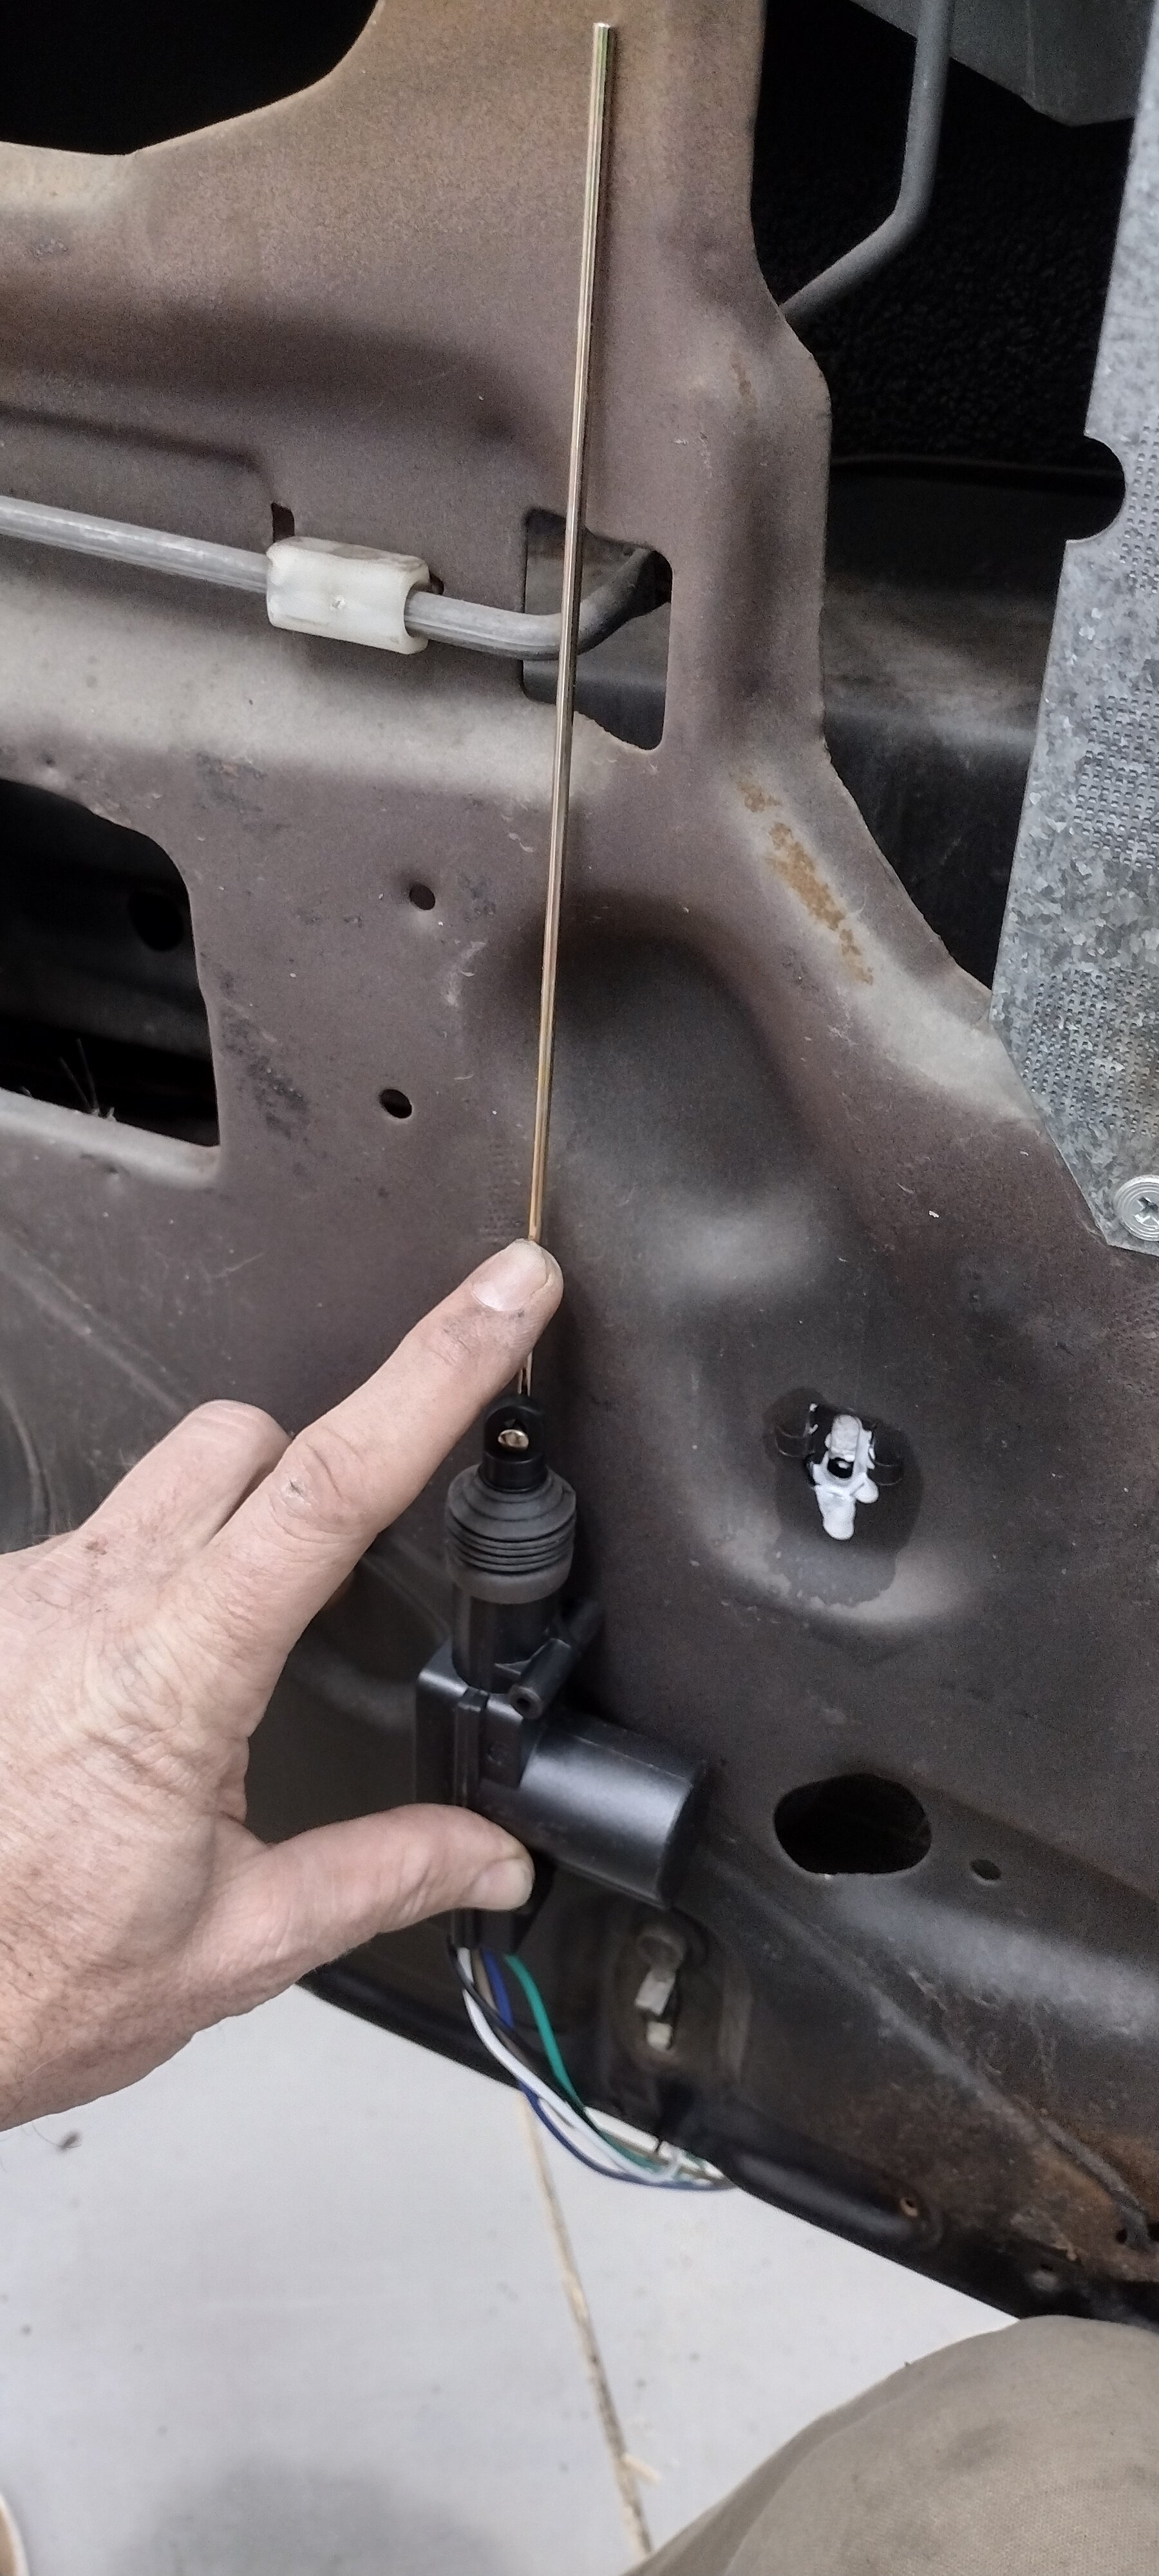
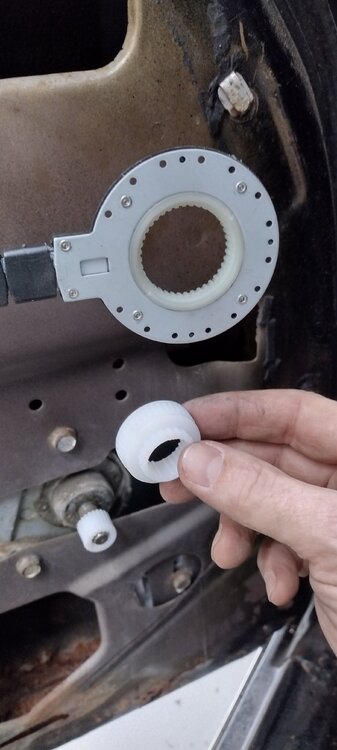
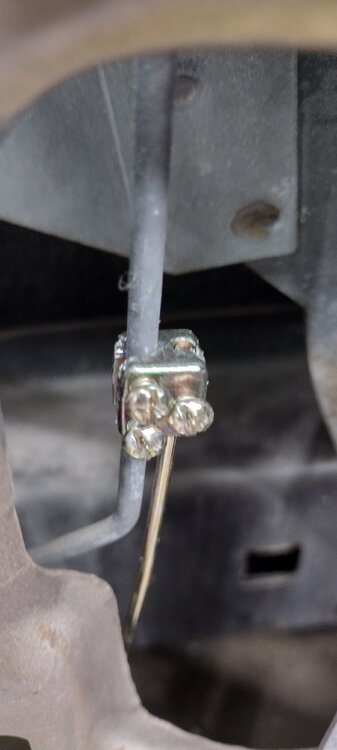
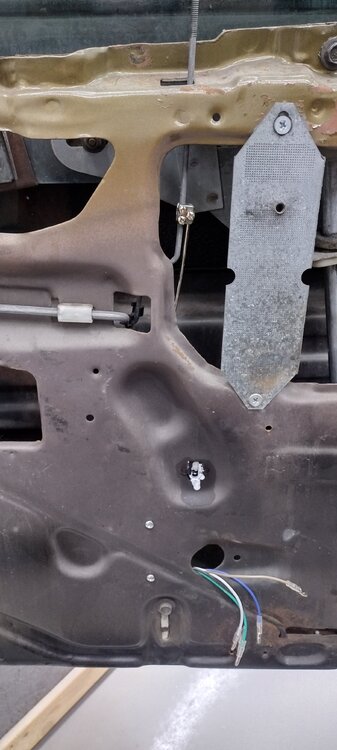
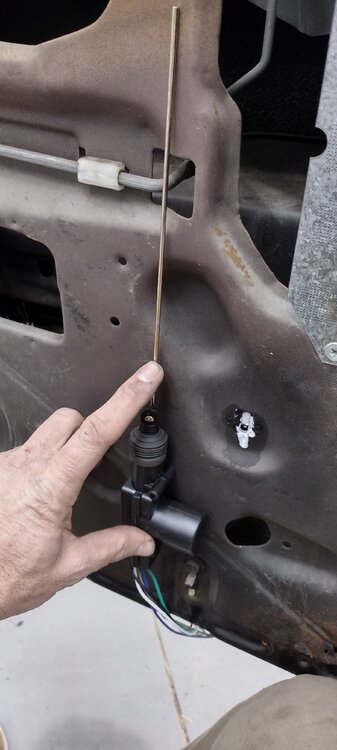
I got started on the power locks and windows today. I started with the Drivers door of course. It only took a few minutes to get the door lock actuator installed and operationally tested. The power window took a couple of hours initially because I had never installed one before, and it's definitely 'different'!! For both it's a matter of finding a spot that allows the window to clear as it goes up and down. You can see in the photos below where I mounted them. For the power window regulator I did have to remove some metal (still have some edge cleanup to do) to seat it in far enough for the door panel to be happy as well as the window. All in all, easy job so far. The hard part will be running the wiring through the door jam in a flexible conduit and getting that all cleaned up. I will run all accessories to a small separate fuse box powered direct from the battery.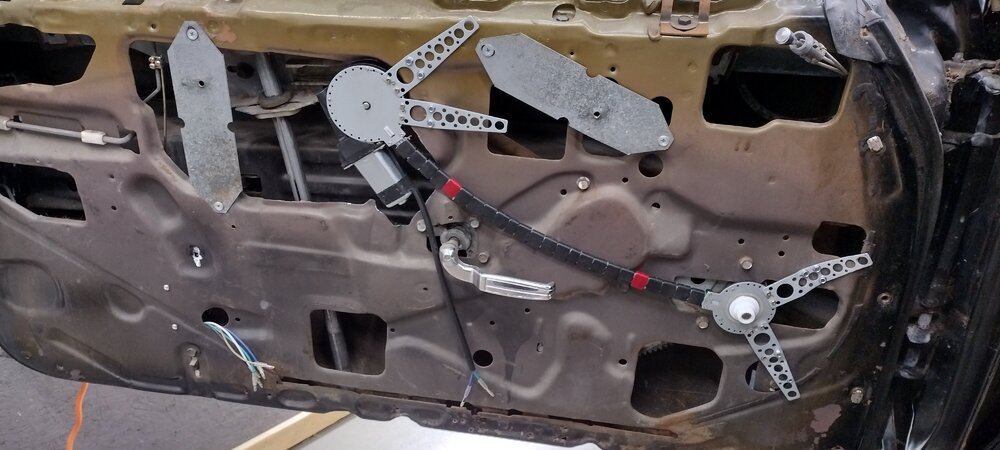


-
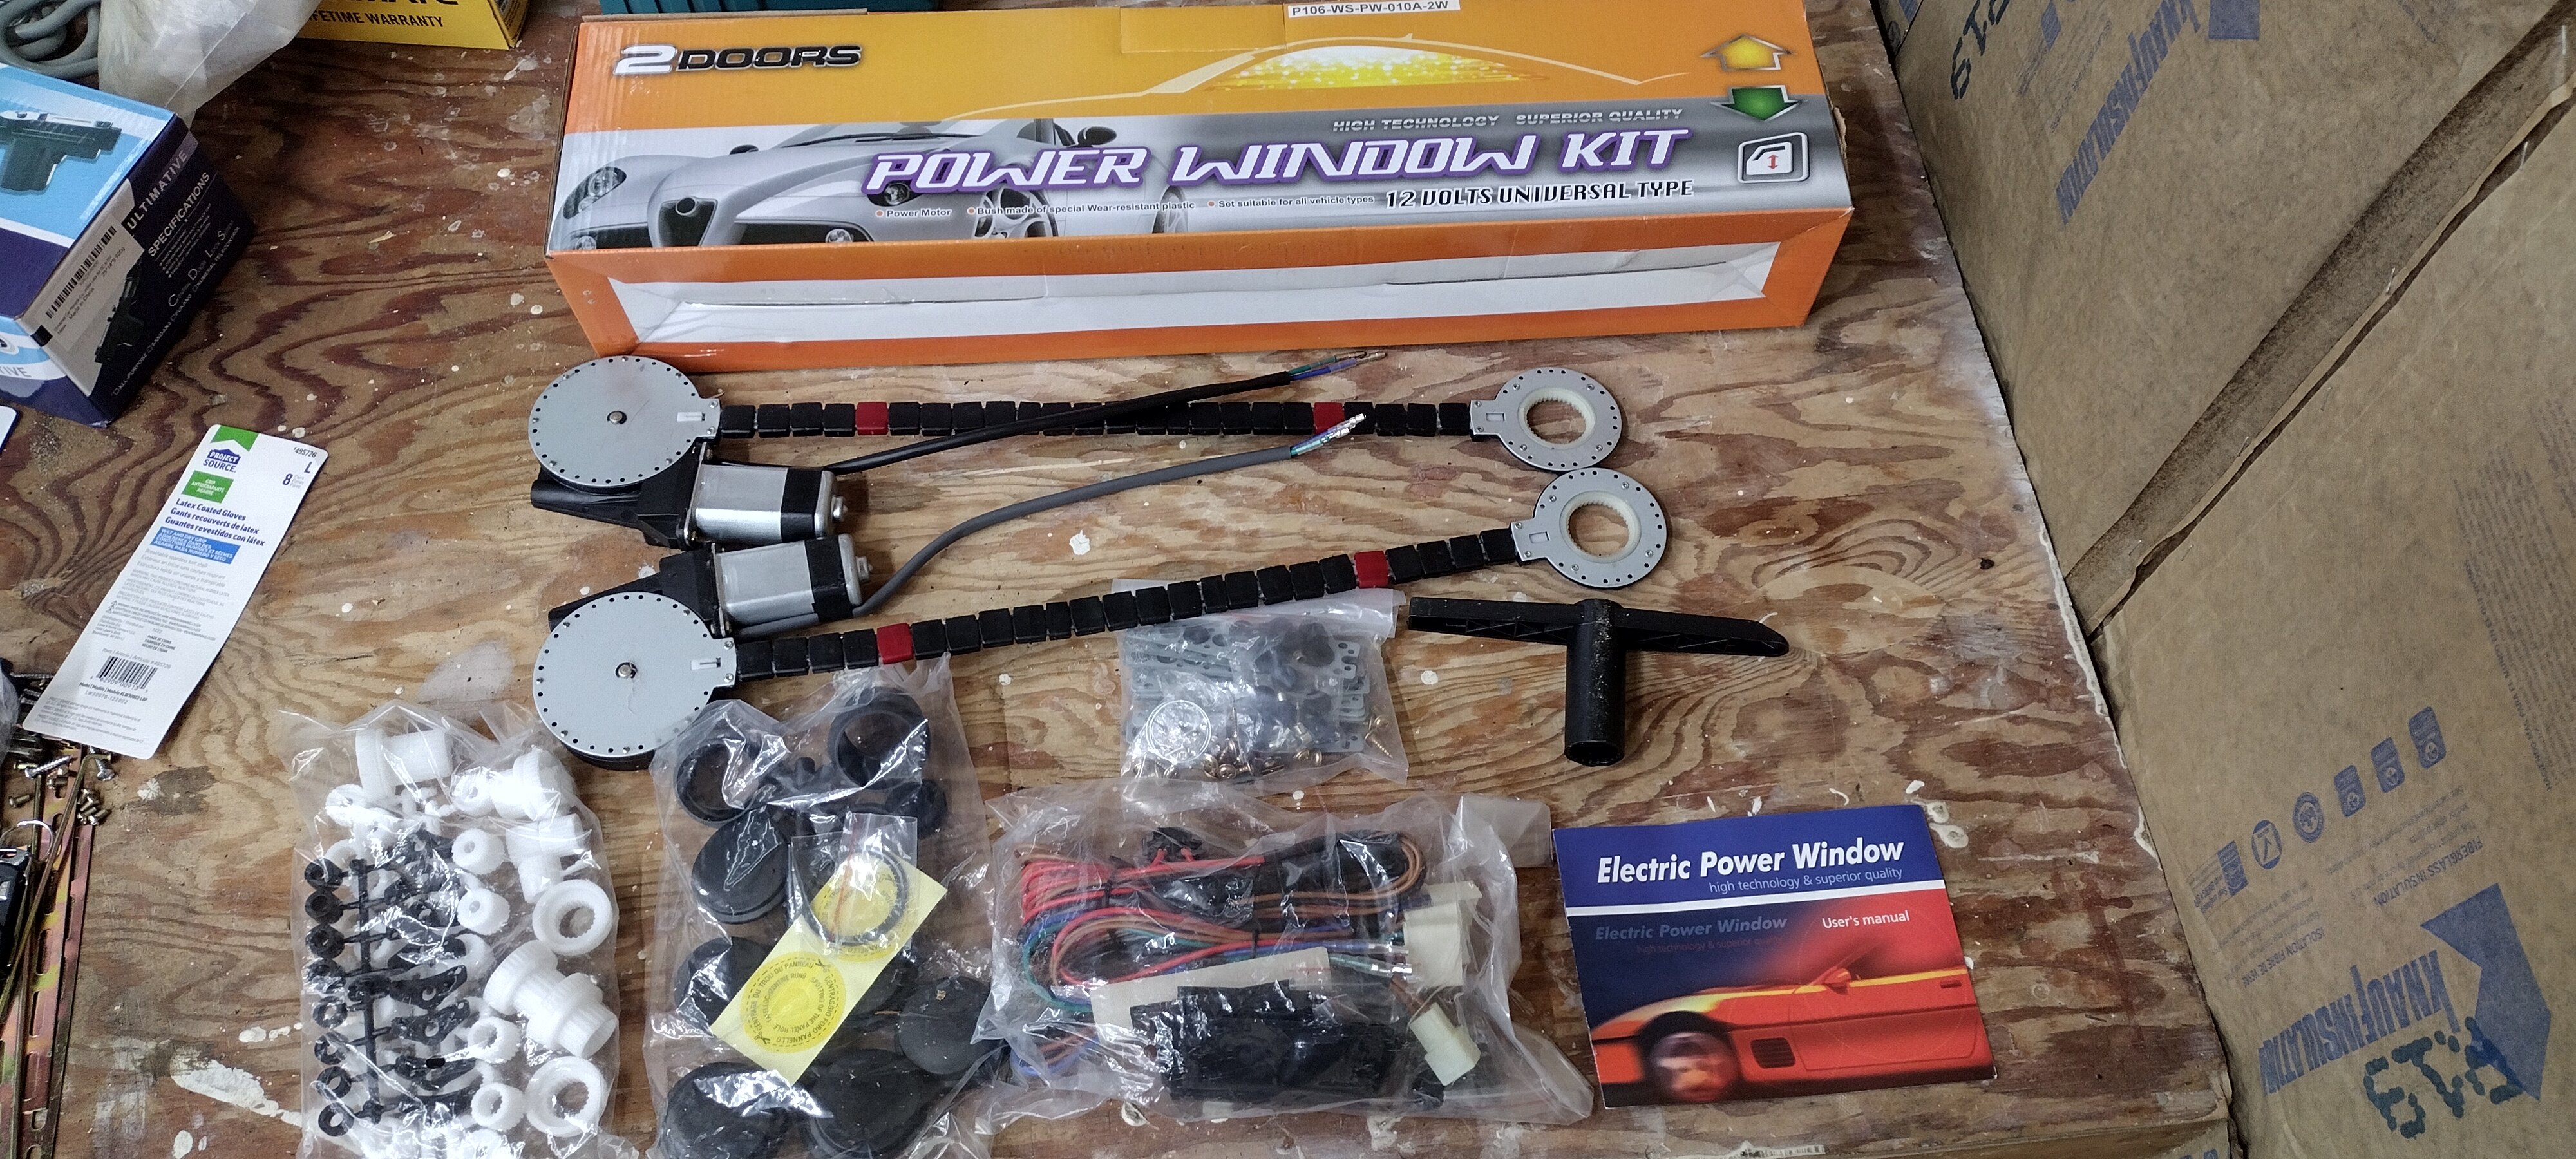
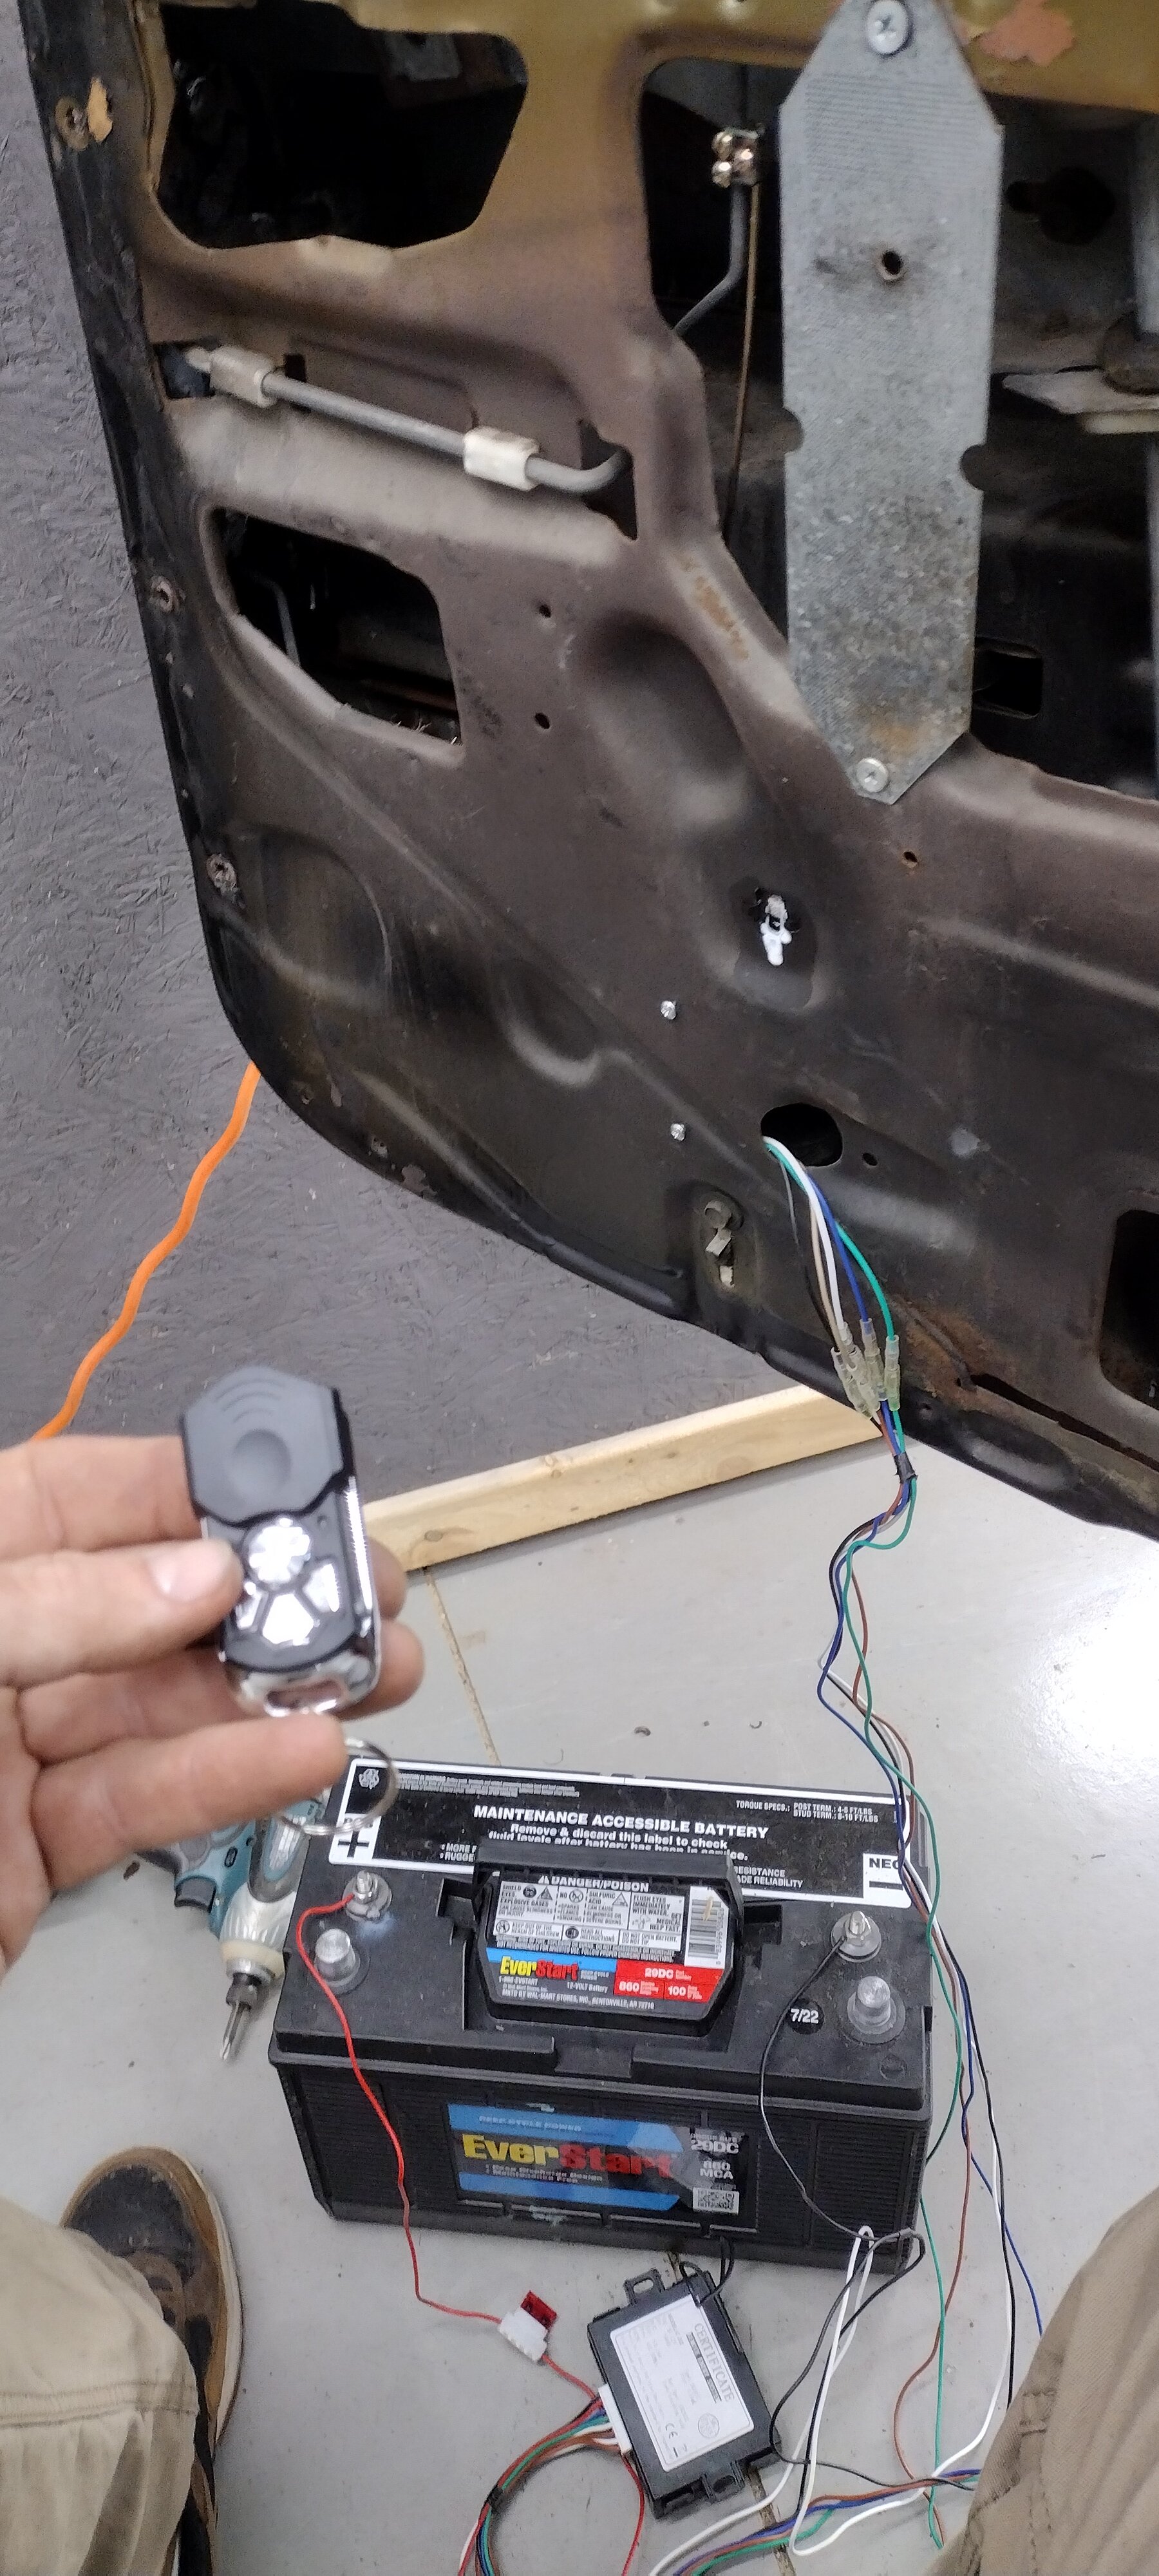
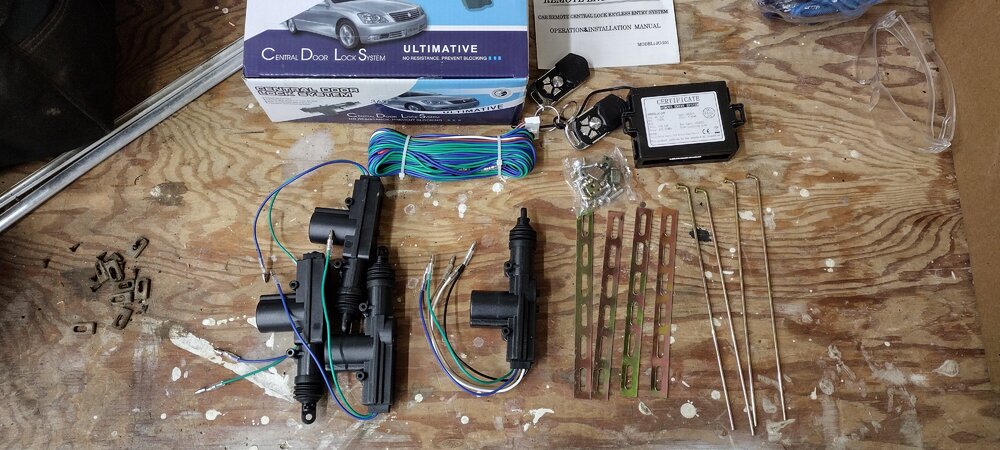
And for my next trick, I just purchased a couple of fun electrical project items off of Amazon. A kit for converting the door locks over to keyless entry, and another kit for converting the manual windows over to powered. The keyless entry I've done before on previous cars. But even though they too were classics, they had power windows. So this will be my first foray into that craziness. Here are links to what I picked up, coming in on Saturday: Universal Car Remote Control Conversion Universal Door Lock Actuator with 2 Keyless Entry-Universal Fits for 2,3,4 Doors Vehicles/Car Power Central Lock Kit DC 9-15V https://a.co/d/2Lu79NJ JDMSPEED New Universal Electric Power Window Lift Regulator Conversion Kit with Switches Wiring and Hardware for 2 Door Pickup SUV Truck Van Car https://a.co/d/3TPjU9y
-
For the front suspension rebuild I'm going with an inexpensive stock replacement for now. As mentioned in previous posts on this thread, at some point I may go 'full bore' on the suspension upgrade to do some track-racing. So keeping the car on all four while not breaking the bank, for now, is the immediate goal. I found the kit linked below on the OPG web site for $193. The price for the same kit on Summit is $240. This will be a fun afternoon project, with a buddy, for sure. I've still got the borrowed spring-compressors, along with a generous pickle fork and some sledge hammers!! https://www.opgi.com/chassis-suspension/steering-components/standard-front-end-rebuild-kits5/rebuild-kit-front-end-1971-72-a-body-oval-rk1008.html Note: This same kit is offered with oval or round lower rear control arm bushings. I called OPG and one of the tech's there informed me that some Monte Carlos came with an oval bushing there, and some came with a round one. Sort of a who-made-it and where-was-it-made thing. My MC has the oval bushing, confirmed this morning before I left the house. The more you know!
-
1972 MC 350/Auto - Roof, Sail Panel and Trunk Repair / Replace
B-Man replied to B-Man's topic in Auto Body Repair
It looks like the POR-15 crew actually sells a kit for restoring trunks and floor boards with what they call "Power Mesh" reinforcing fabric. I like POR-15 in general, though a bit pricey. Some of the Rustoleum products would probably work just as well for a roof application (vs trunk or floorboard) at a 10th of the cost. So I may use some of the components of the POR-15 kit (metal prep, rust preventer, etc). But I would use traditional BID or UNI fiberglass from a local supplier that I have used for years. https://por15.com/collections/all/products/floor-pan-trunk-restoration-kit @willie, I will definitely post some pics as I go along. At the moment my challenge is to get rid of the goo left over from the thick, butyl rubber roofing tape that someone put over the rust holes many years ago. It's incredibly gooey and sticky. Goof Off, etc are all in play here! -
1972 MC 350/Auto - Roof, Sail Panel and Trunk Repair / Replace
B-Man replied to B-Man's topic in Auto Body Repair
A nice, driver-quality restoration is what I'm going for here. I've had so many cars that I put way too much time and money into, more out of interest and excitement than need. I'm now on a path of just really enjoying these old cars and preserving them a bit for the next guys/girls. Anyway, yeah ... fiberglass with some metal backing (not rust, haha) is the plan. The plane I built is a Cozy MK IV. It's all fiberglass over foam core, with a few pieces of wood for the longerons. It was ALL structural. Pretty cool skill set. And I still have all of the tools -
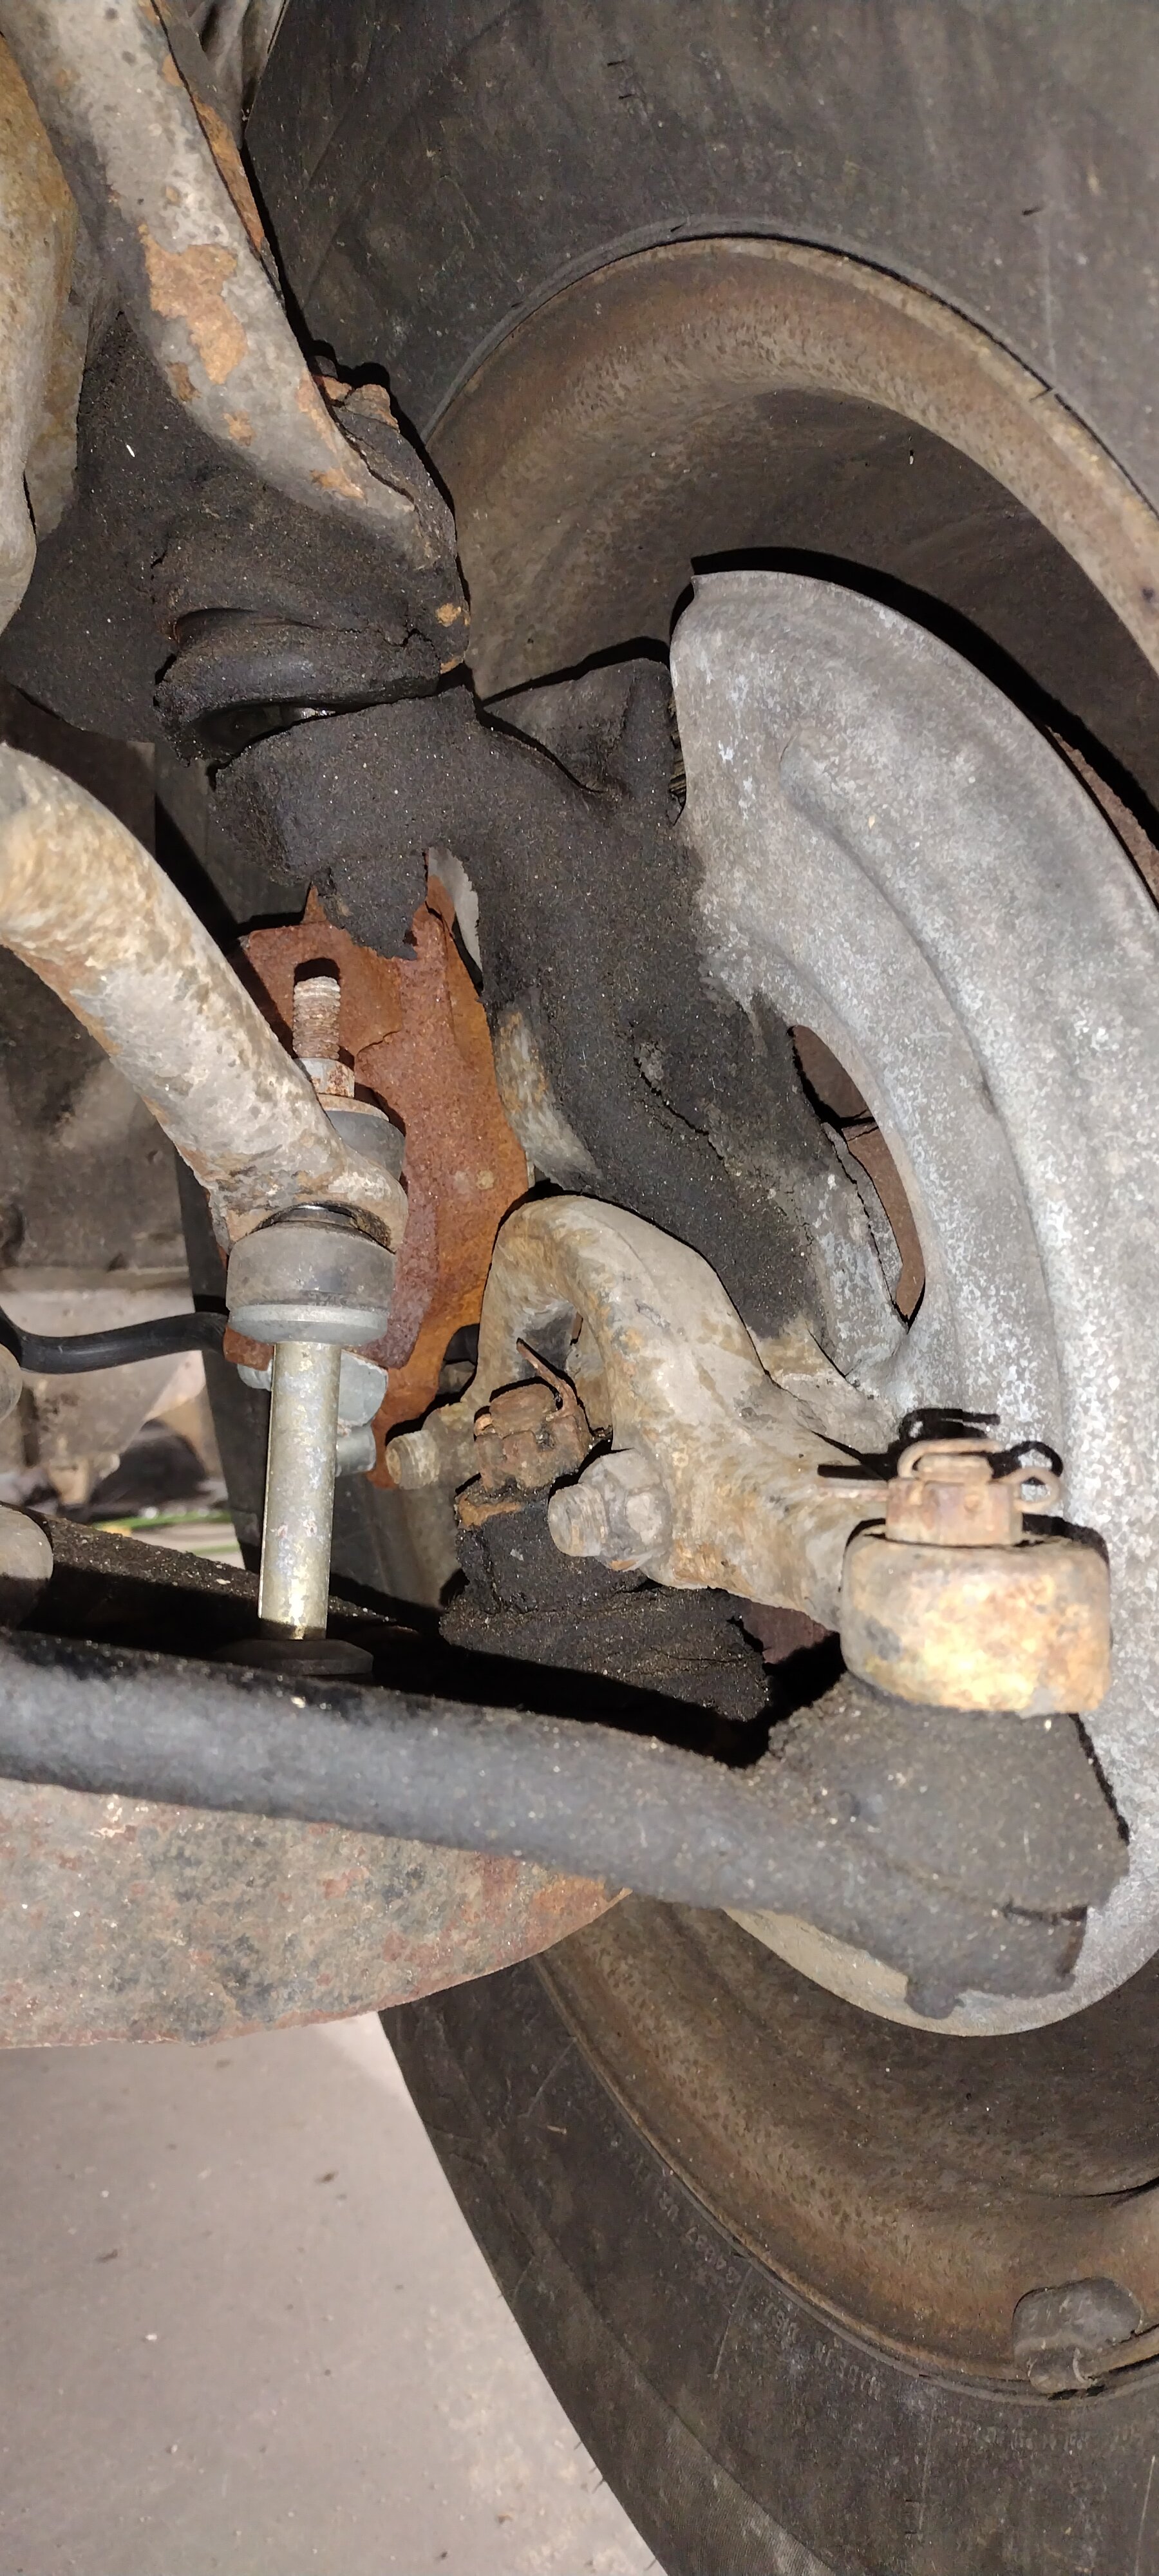
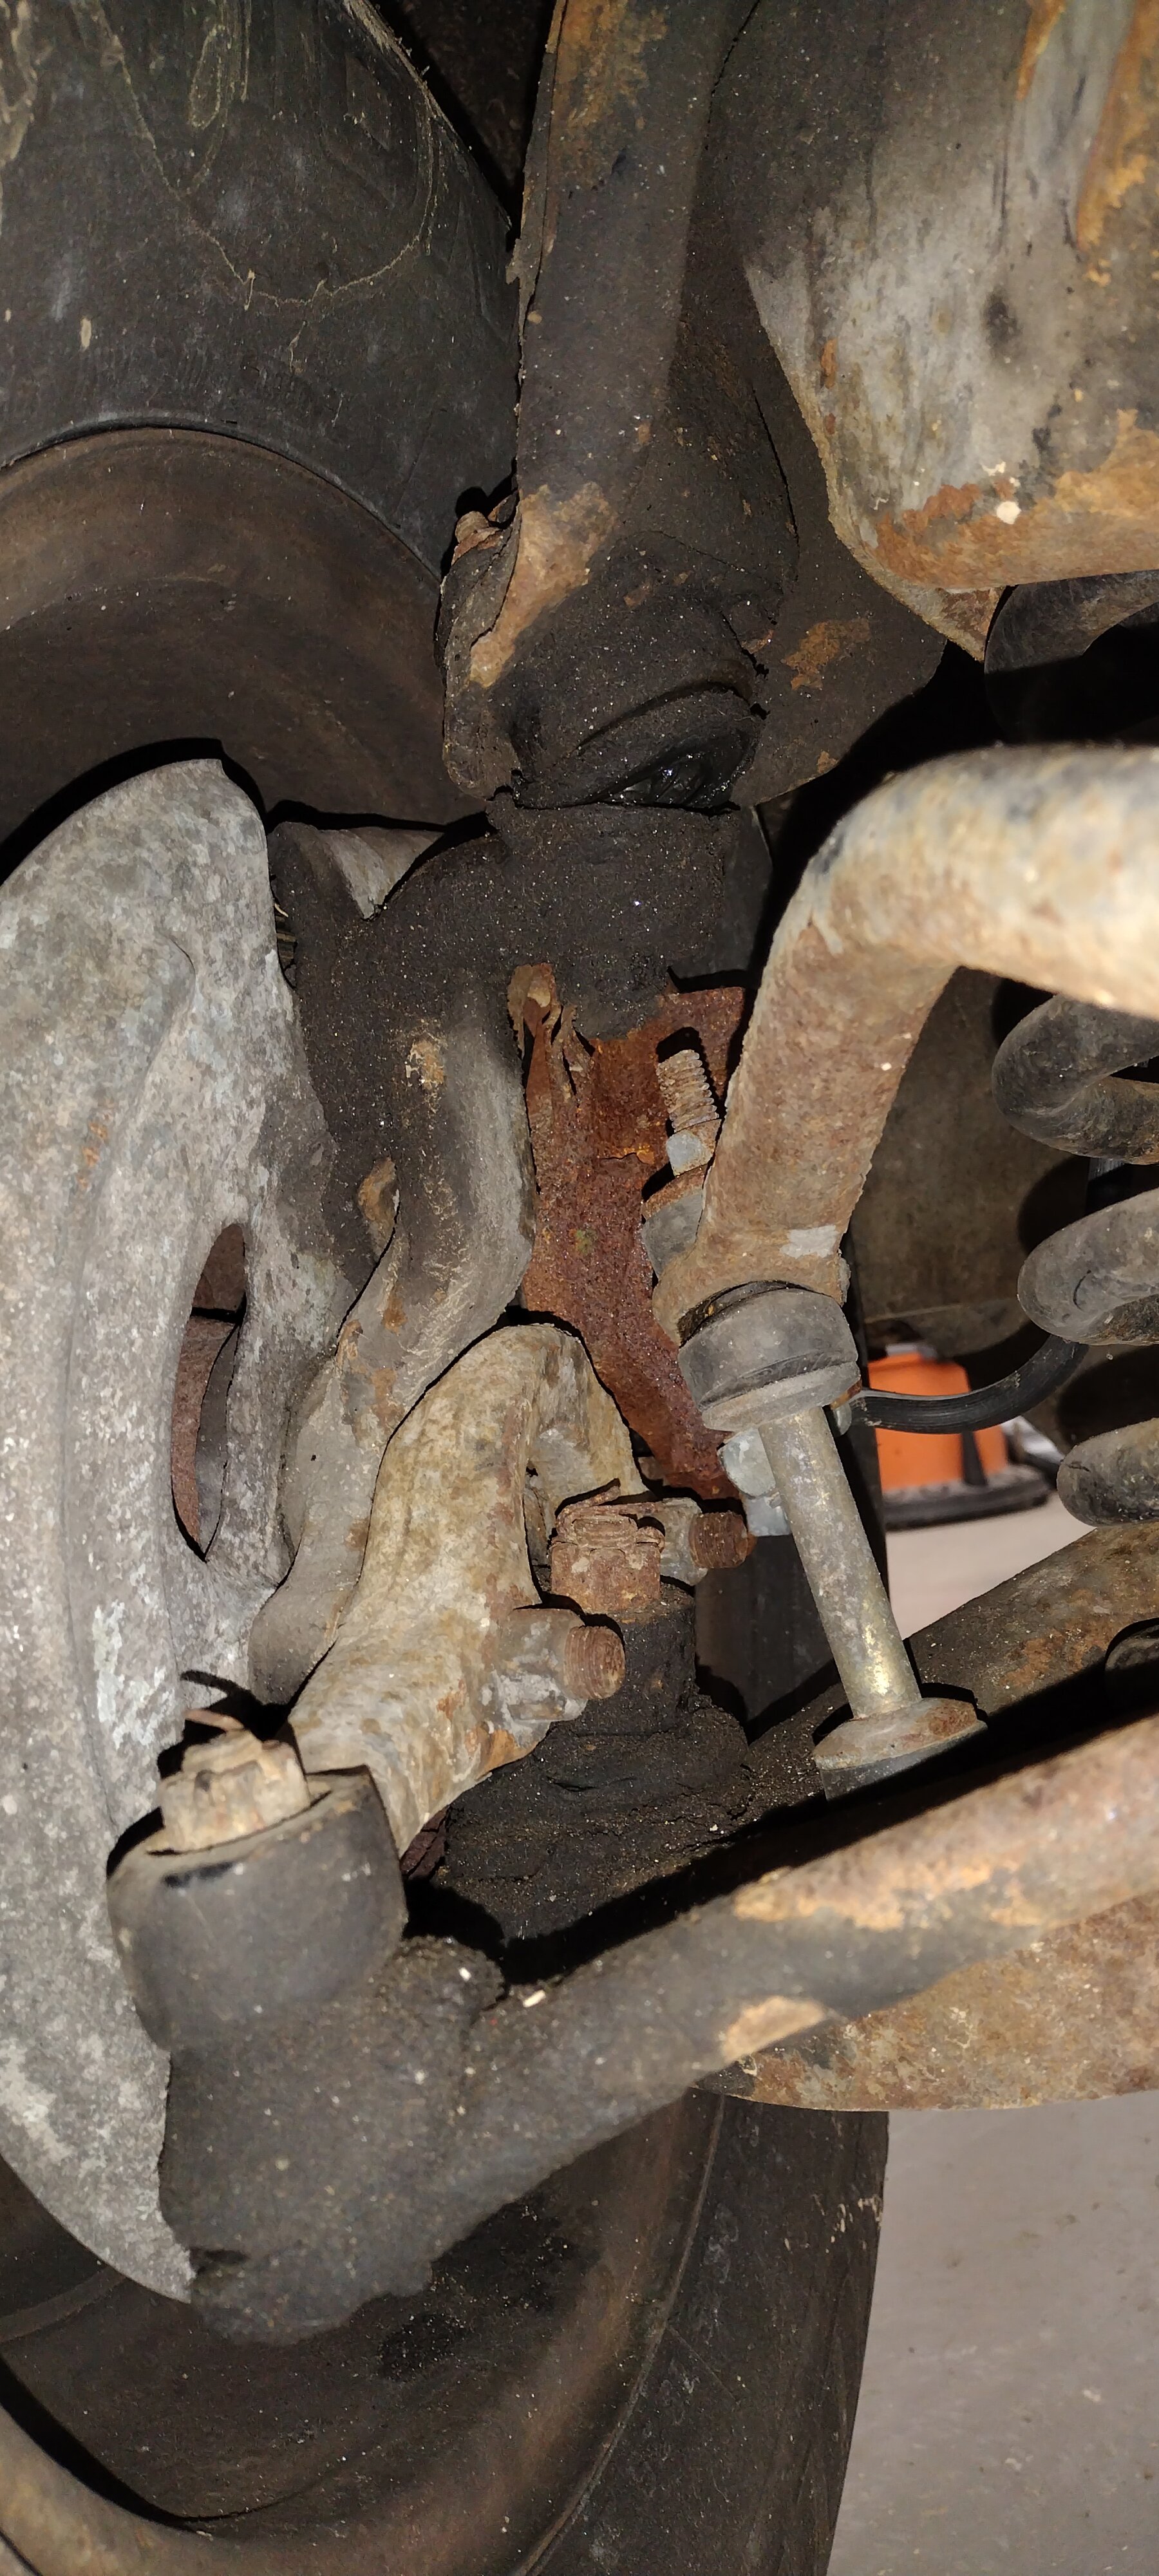
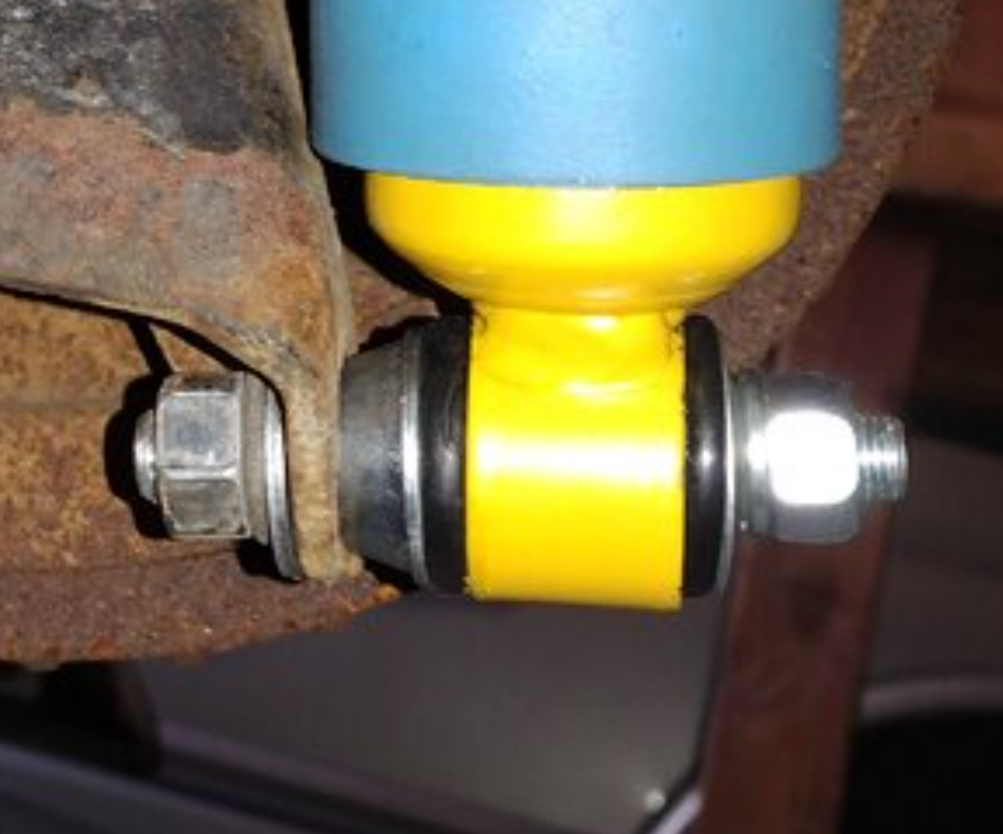
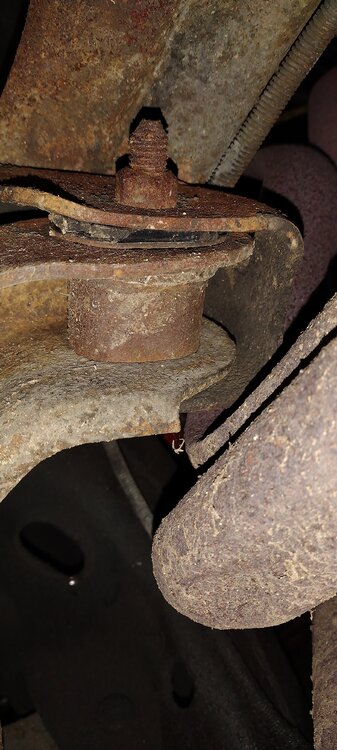
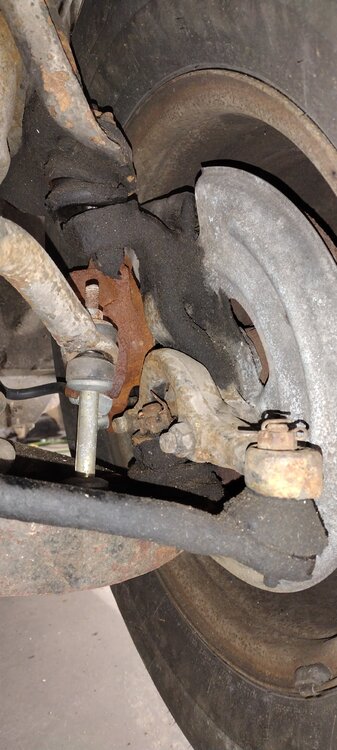
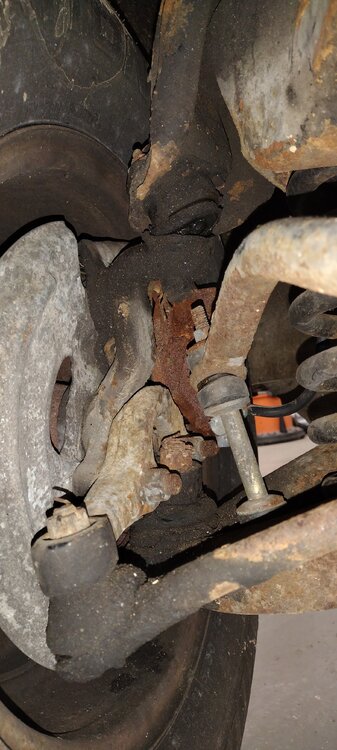
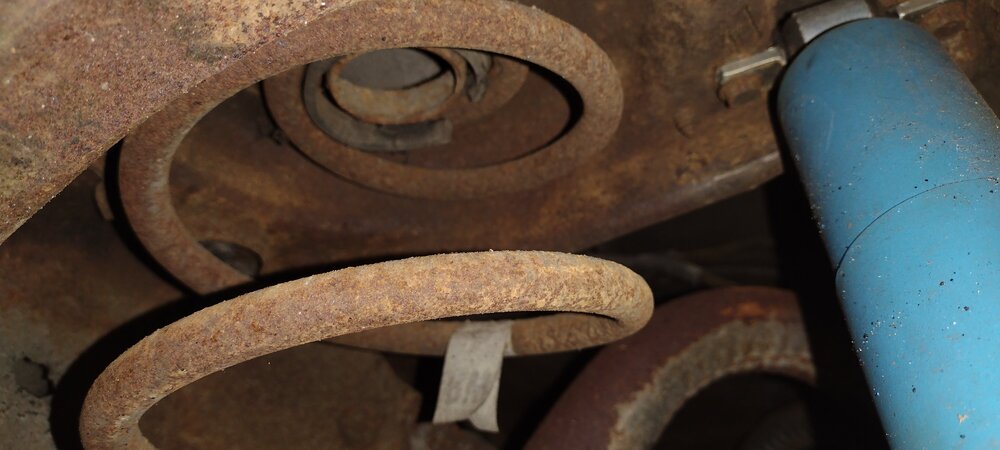
Update ... new rear coil springs and isolators installed. Much easier with the borrowed set of spring compressors, for sure. I was really tempted to drop it down and see the stance but I've got more work to do while the jack stands are giving a gravity assist. Onto the front end - SWEET MERCIFUL CRAP!!!!!!!!!! I had no idea the front end was in as bad a shape as it is. I mean, check out that passenger side upper ball joint. Geez! I guess I'm in the market for a front end rebuild kit. Onward and upward!
-
1972 MC 350/Auto - Roof, Sail Panel and Trunk Repair / Replace
B-Man replied to B-Man's topic in Auto Body Repair
Yeah, I'm not sure I'm up for all that work. I'm going to play around with some fiberglass in a few spots and see how it starts to go. Again, I have way more experience with fiberglass over metal! For the piece between the rear window and trunk, I will definitely replace that with metal. For $60, why not. I have a good buddy local who can weld that in for me. In fact, he is horrified at the idea of me fiberglass repairing, but at least that means I won't be Knocking on his garage door! Stay tuned folks!! -
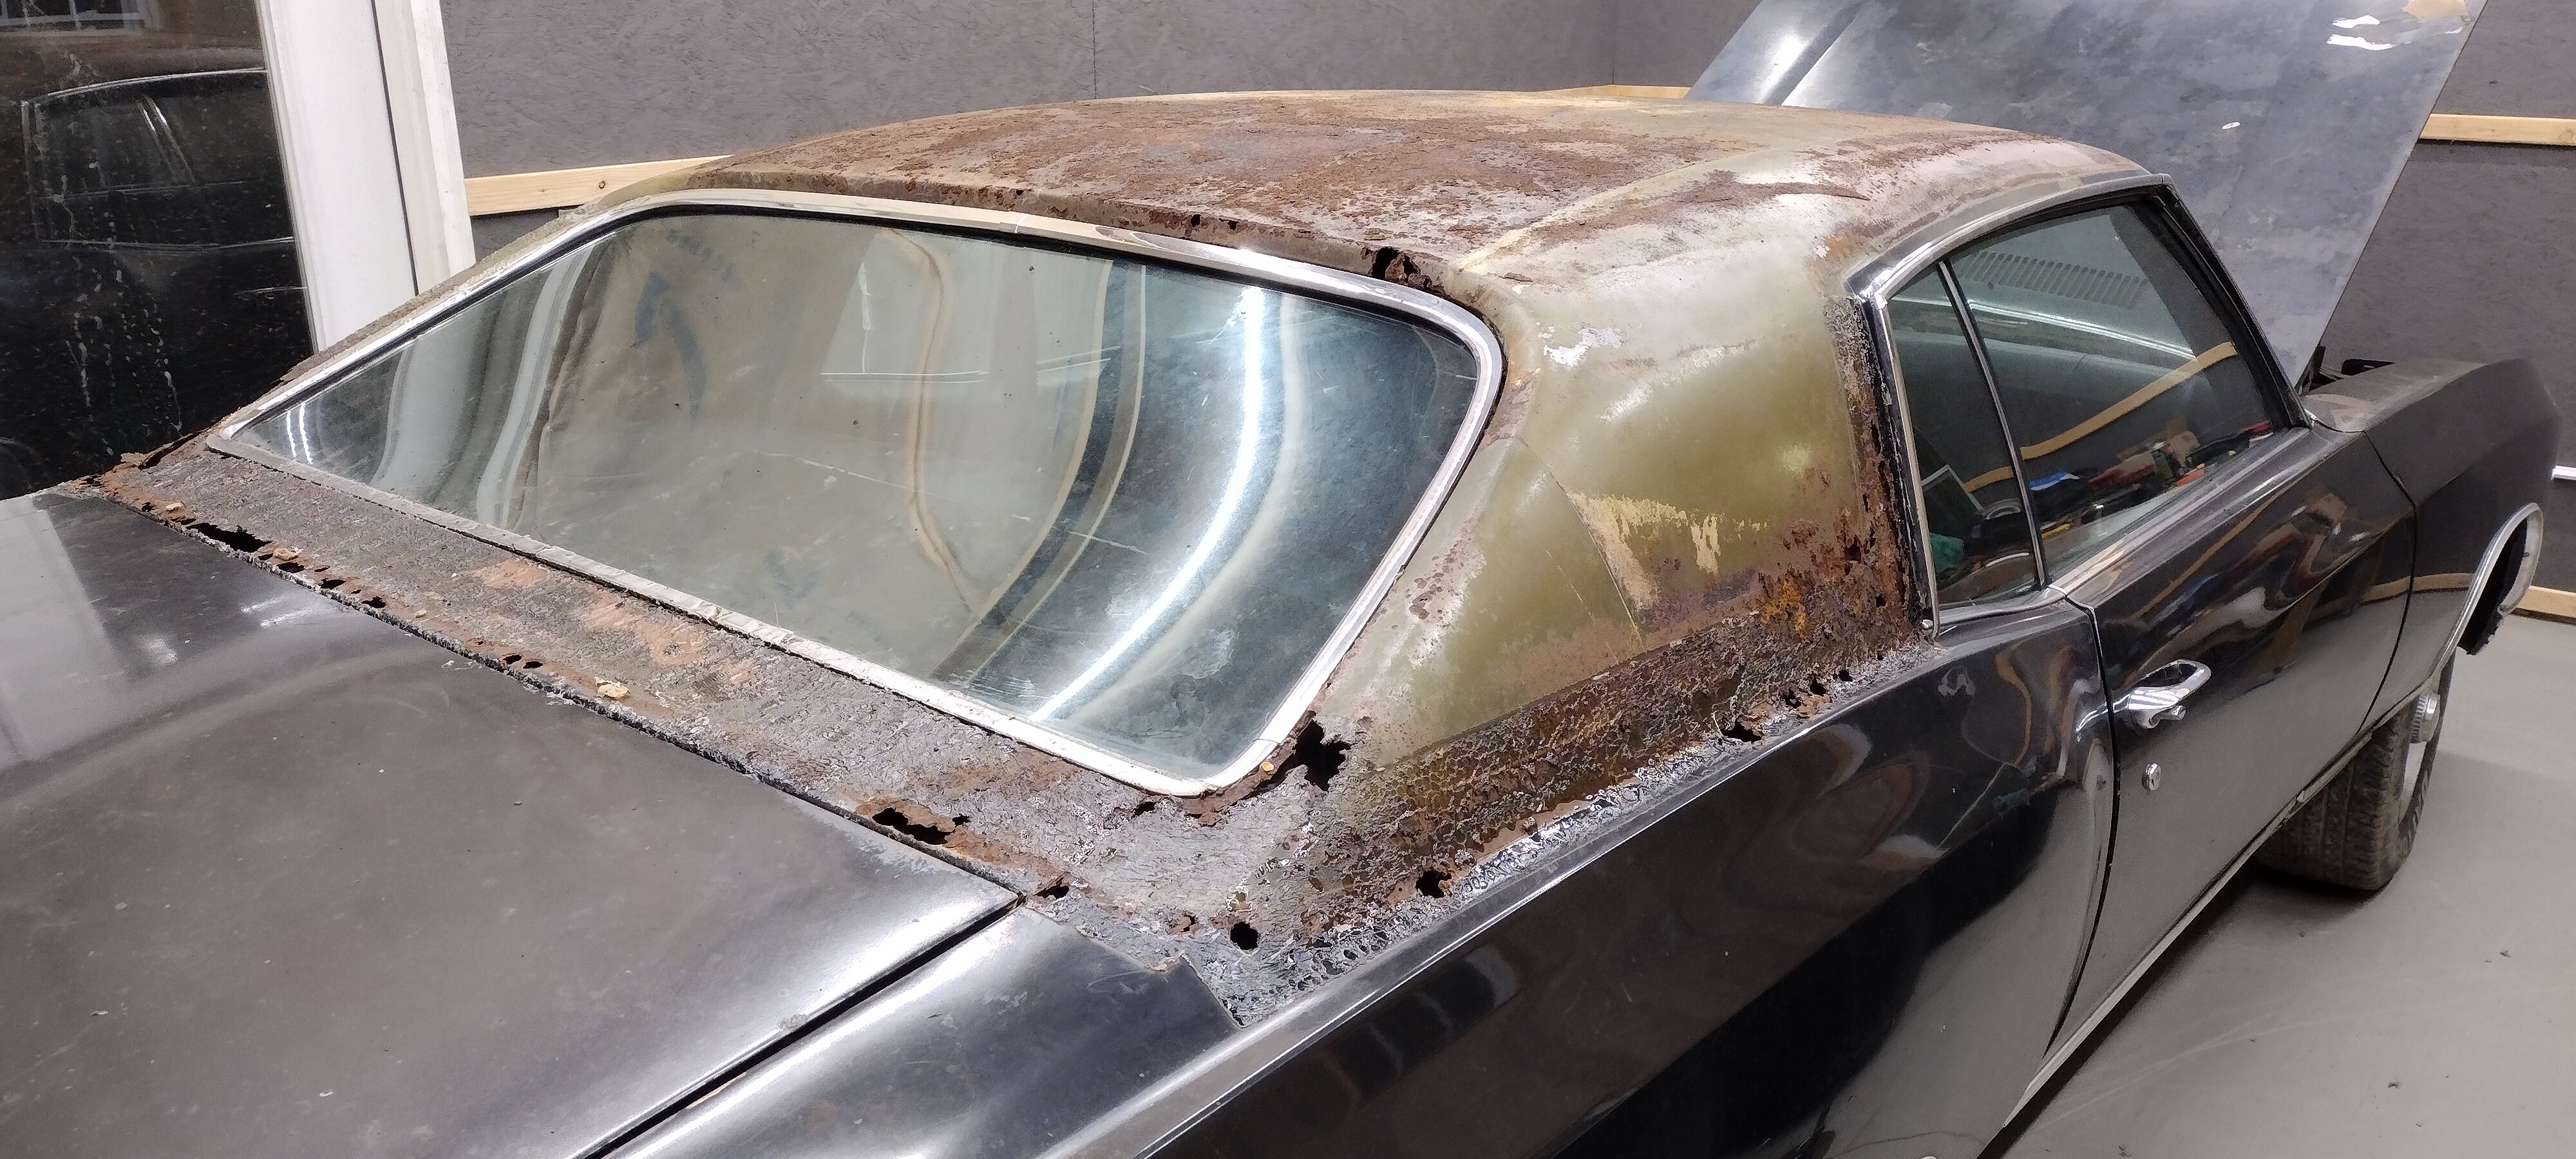
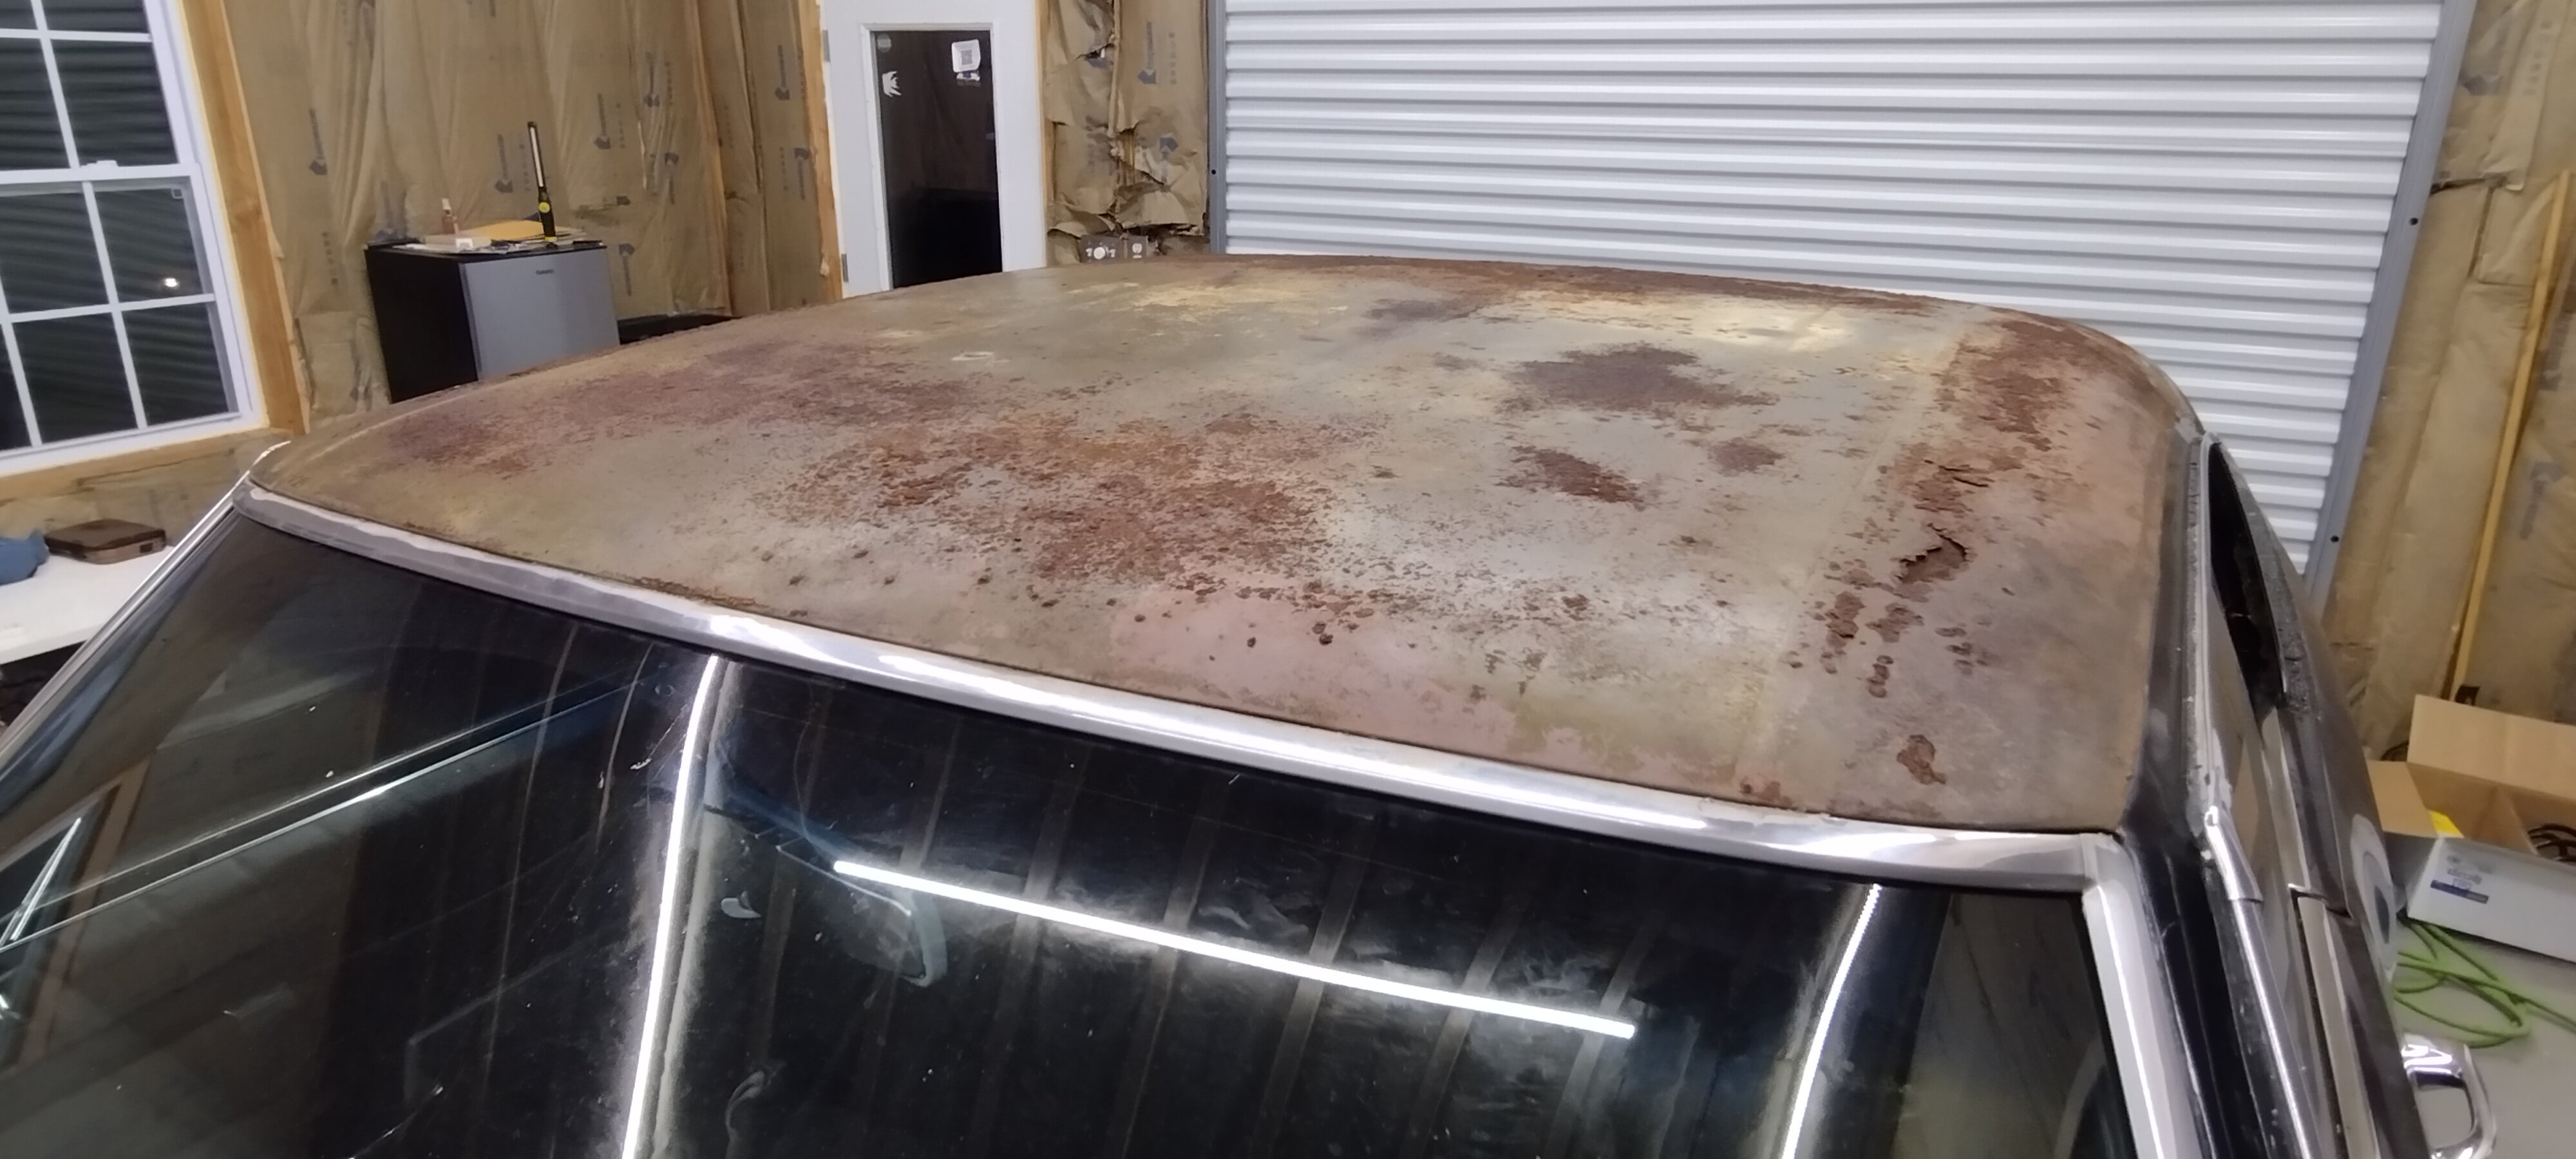
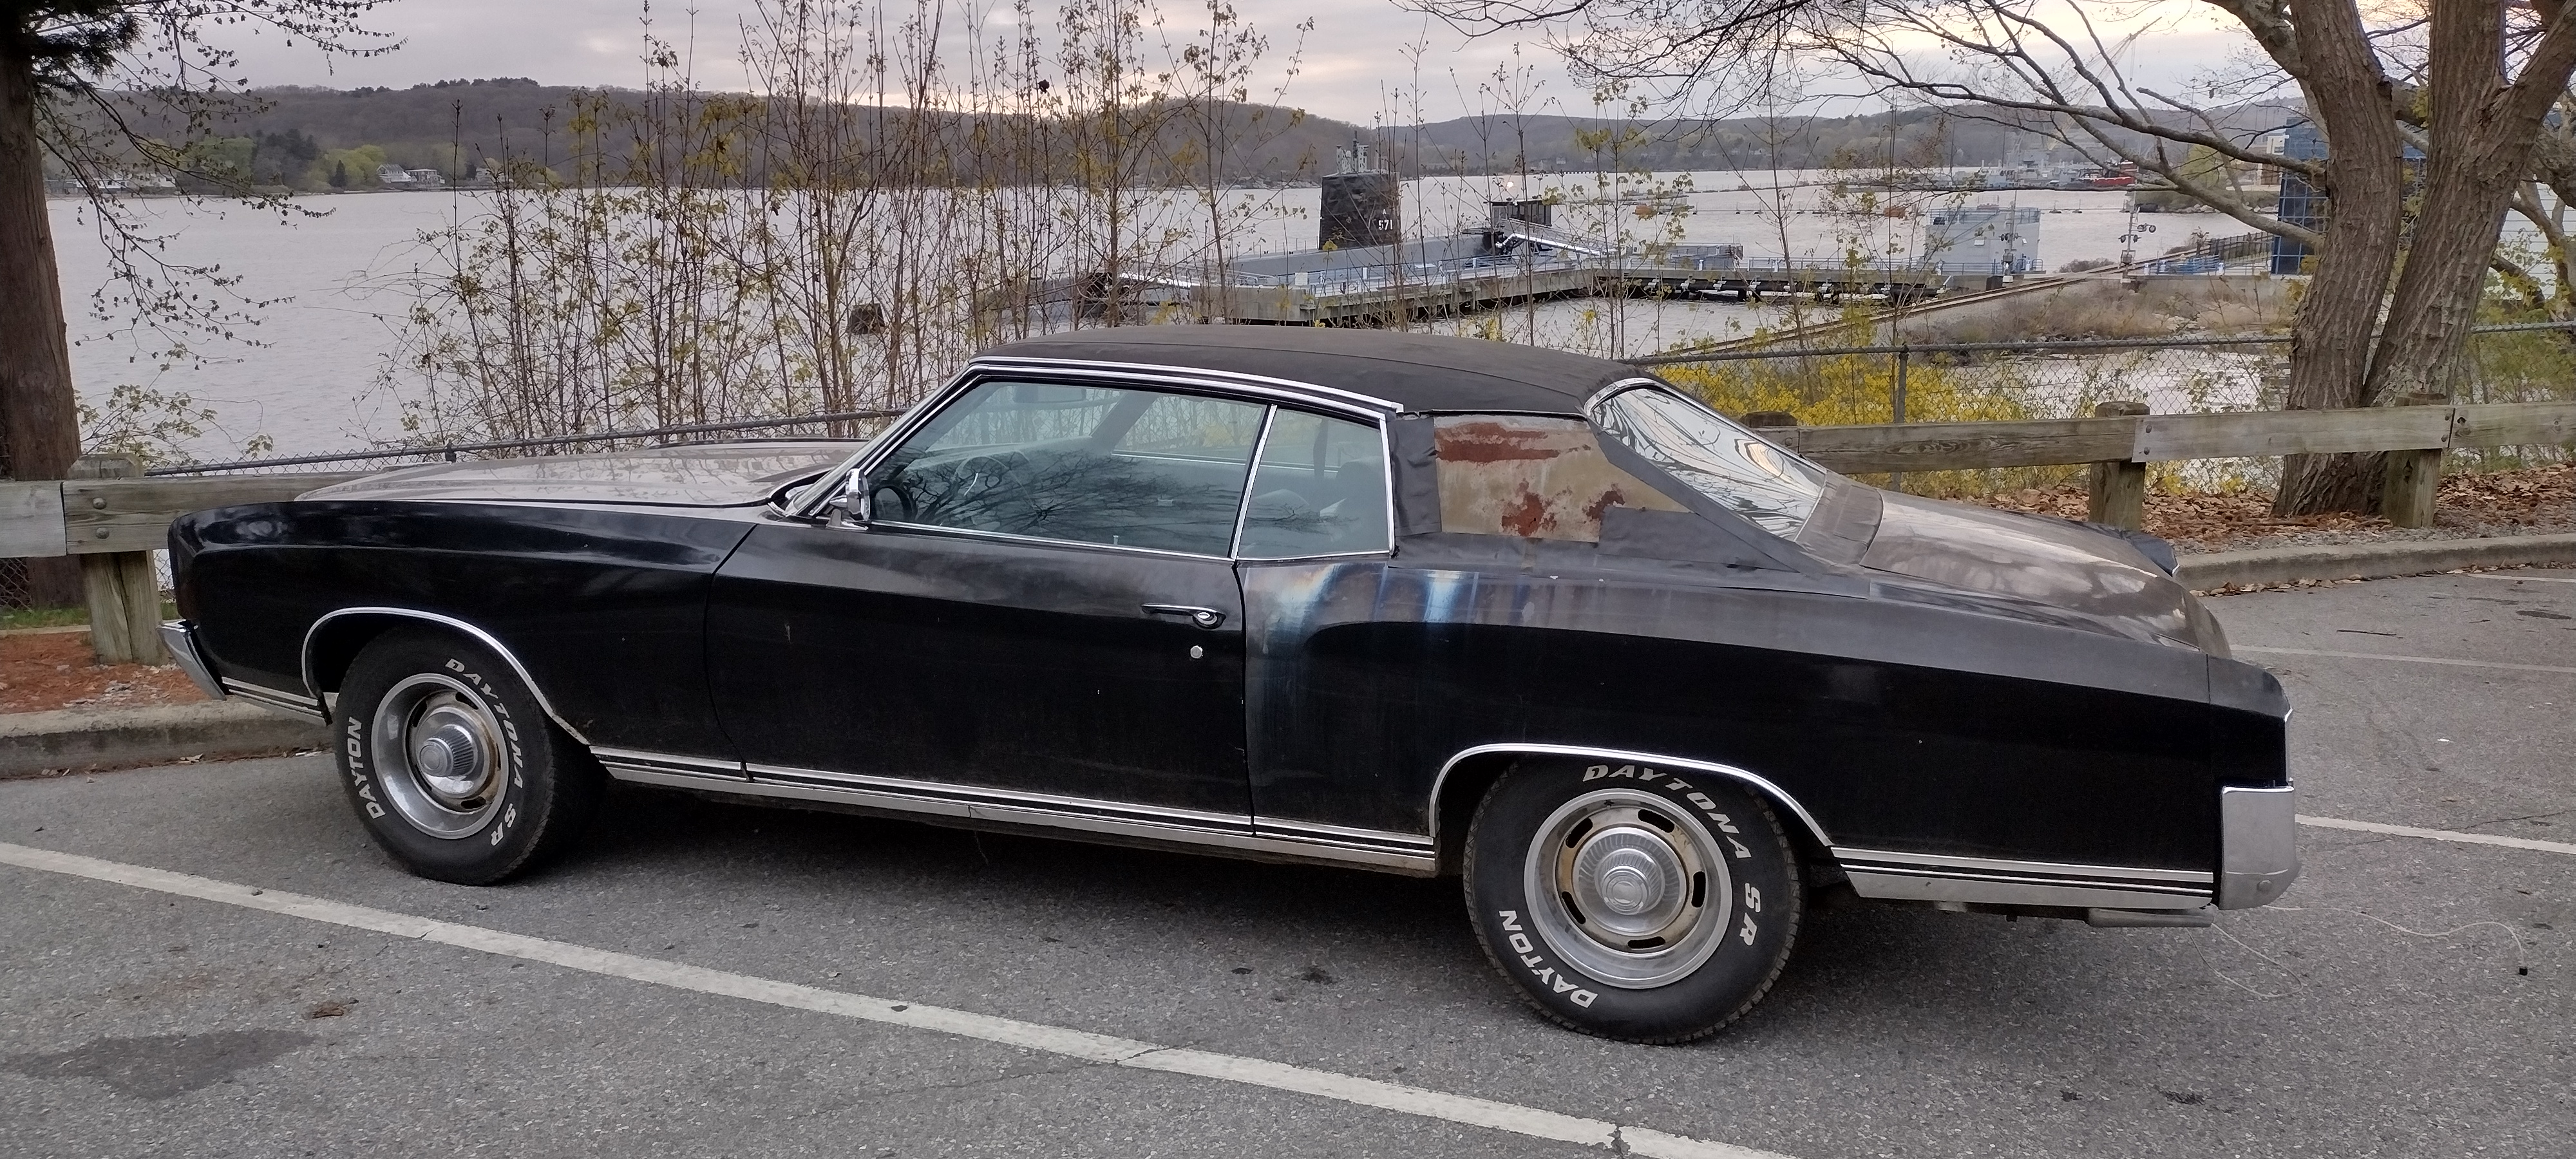
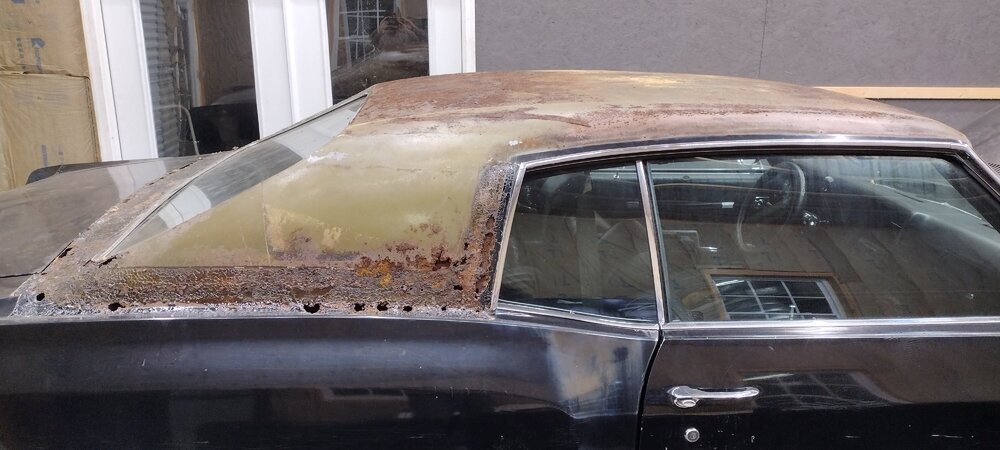
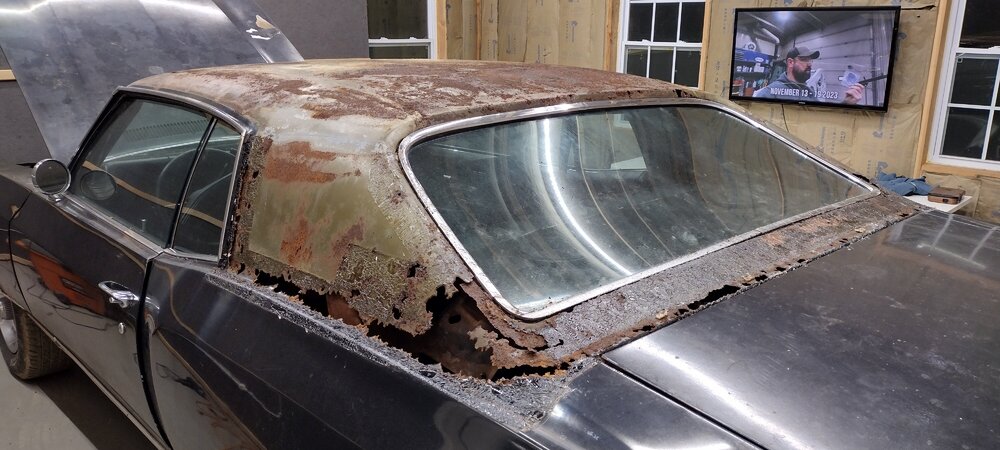
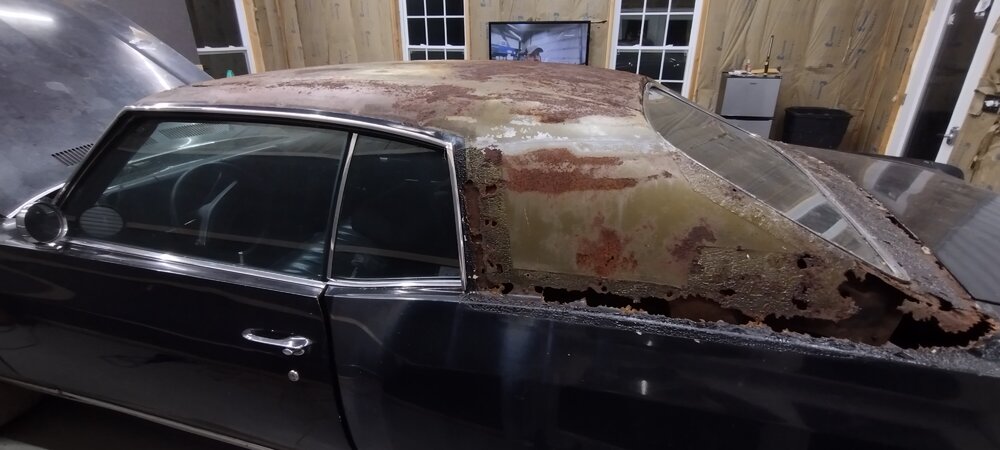
So as the title suggests, I'm starting down the path that many have paved before me. The vinyl top has just absolutely wrecked a good portion of the roof, both of the sail panels and continued down into the trunk. Ugh!!! I really don't feel like finding a donor roof and welding it in. But obviously that's the common path. I don't know, maybe. The path of least resistance for me is to cut out as much rust as I can, treat the rest, prime it and then lay fiberglass over it with a microsphere finish. I built a 4-seat airplane (real one) out of foam and fiberglass, so I have the experience and know how. I don't know. We shall see. But starting here!


-
@cny first gen 71 and @MC1of80, thanks guys. I guess I was almost there and didn't consider jacking up one side to lower the other ... hmm, makes sense though. I will give it a shot tonight, though my coworker showed up with the spring compressors too. Updates coming!
-
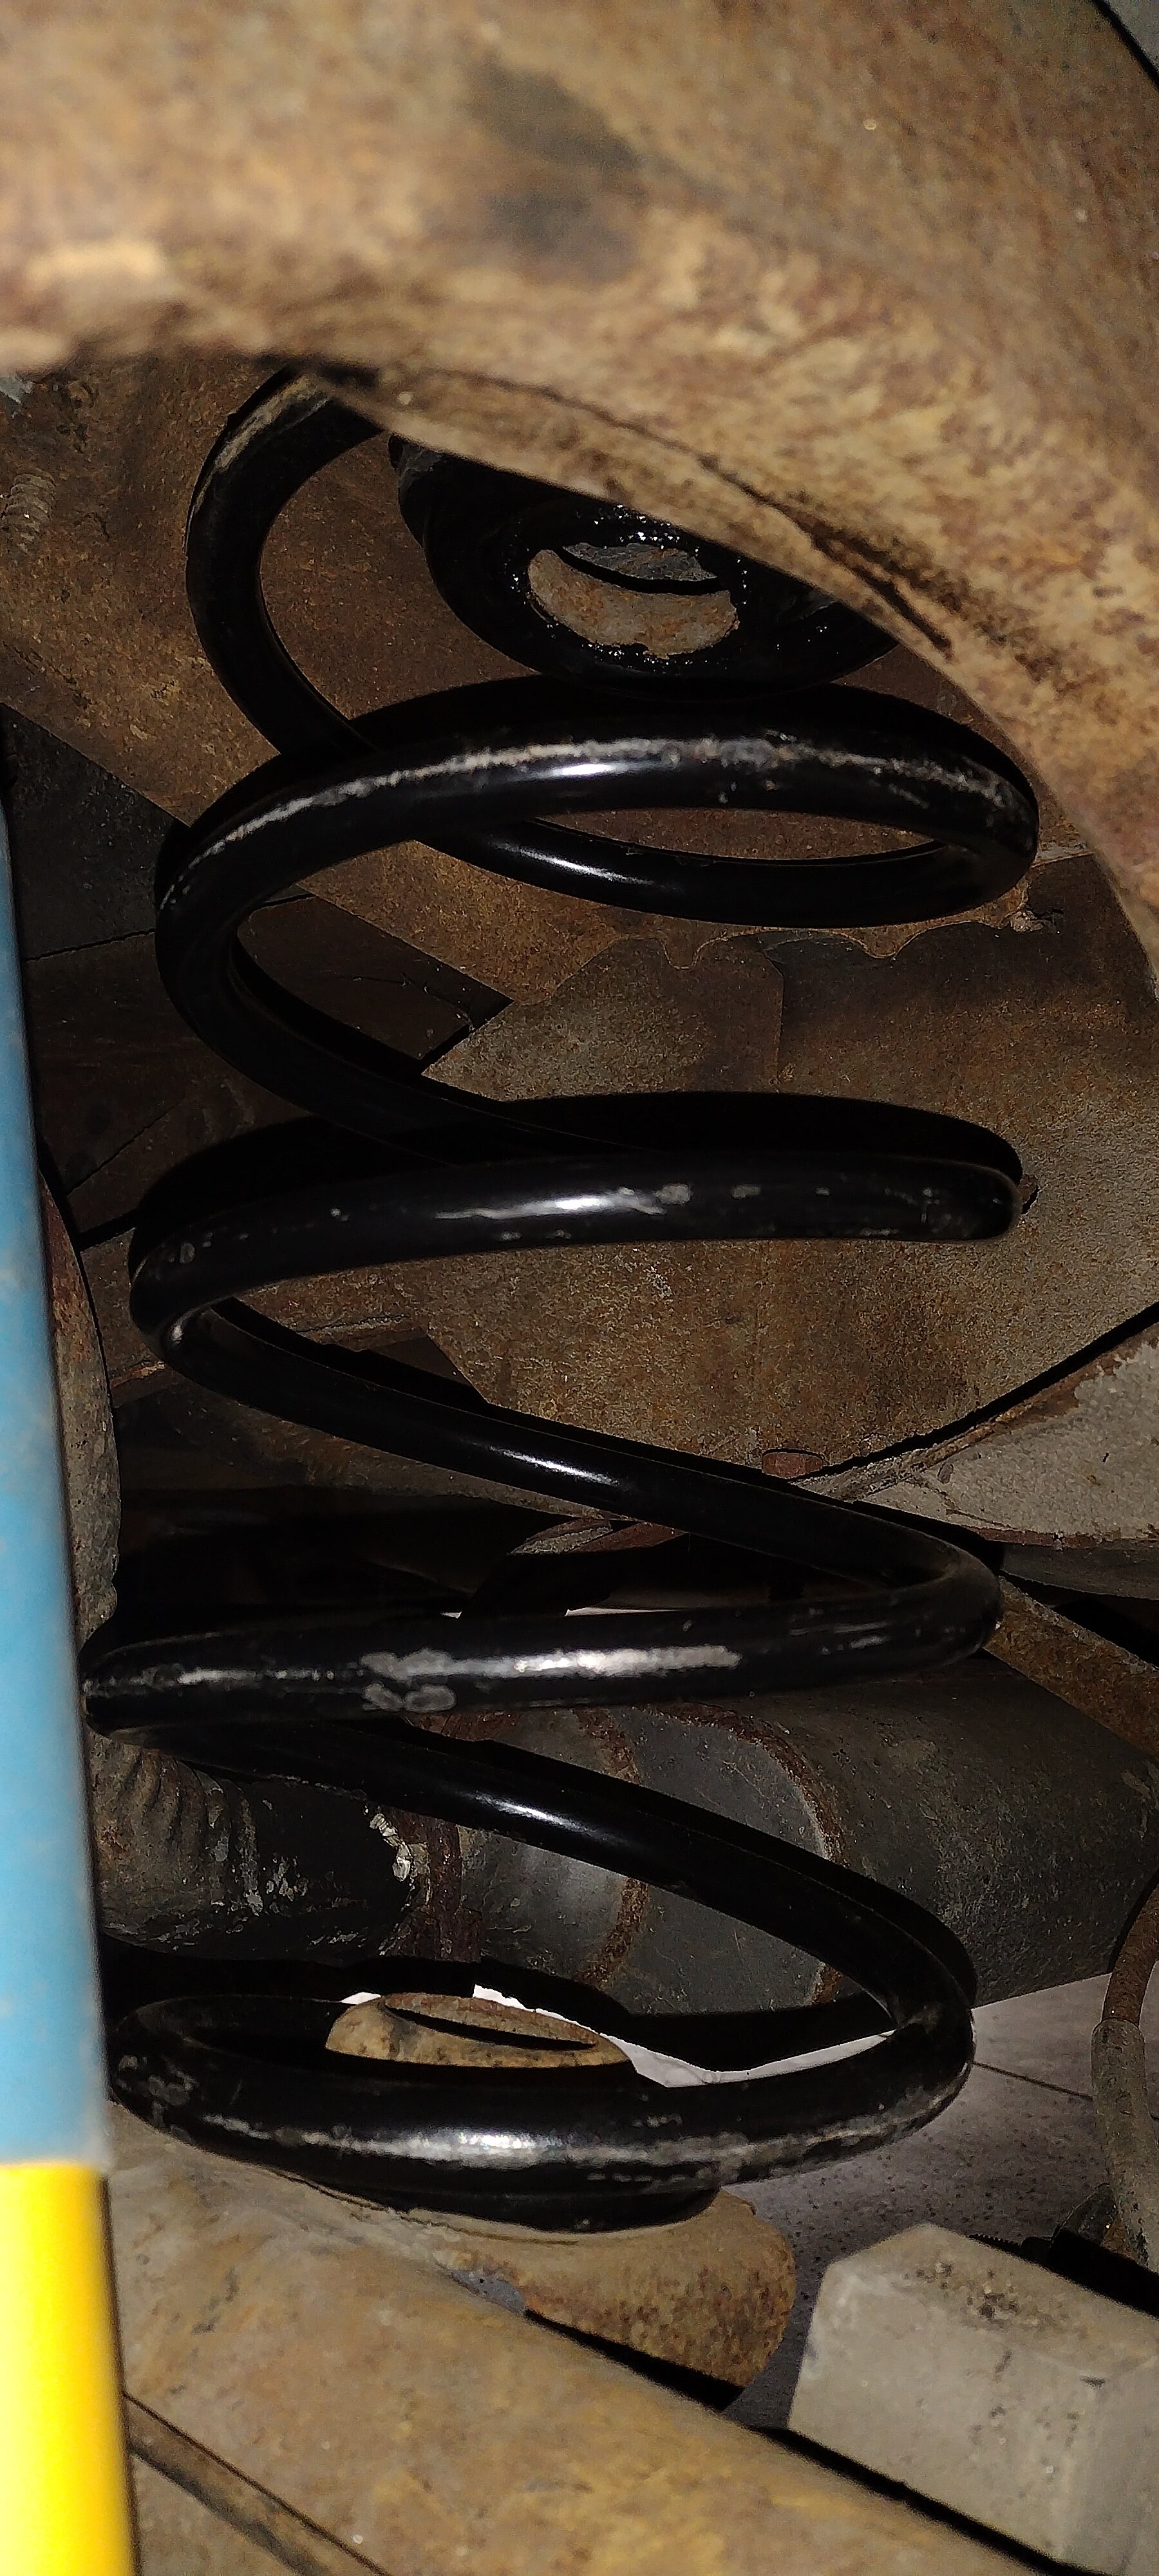
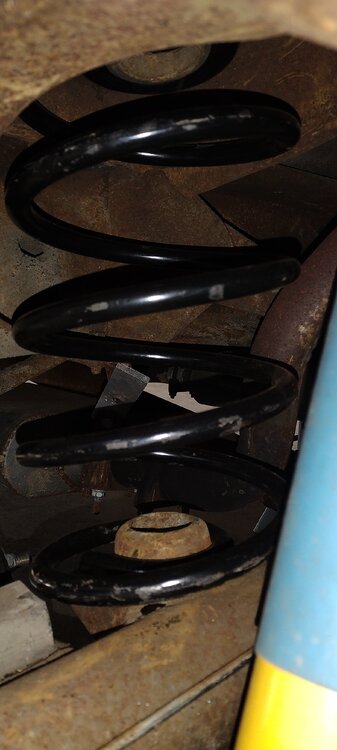
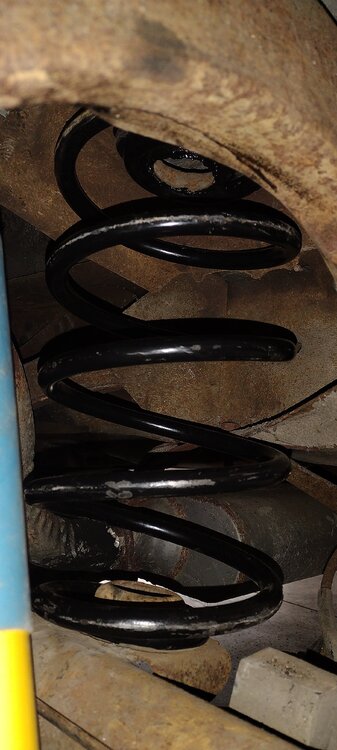
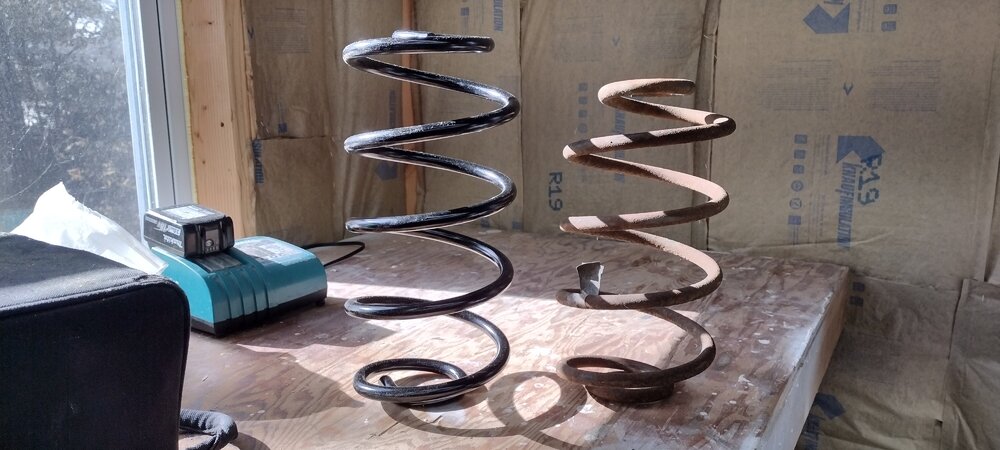
Jumping back into the suspension work now that winter has set in and I have my new 3-may garage fully functional!! Today I pulled the rear coil springs out. They look original but the rubber isolators up top are indecent shape. I wonder if they were replaced at some point ... hmm. Anyway, here is a picture of new spring compared to one of the old ones. An obvious height difference. And I'm sure the spring rate is quite different as well I was able to get the old springs out by dropping the rear end down and releasing the lower shock bolts. I then used a pry bar to pop them out since they weren't under much compression To get the new ones in I will have to borrow some spring compressors from a coworker tomorrow. They should go in pretty easy though. Then I will have to fight the suspension again to get the lower shock bolts back in. Next up after the springs - new tires ... finally!!


-
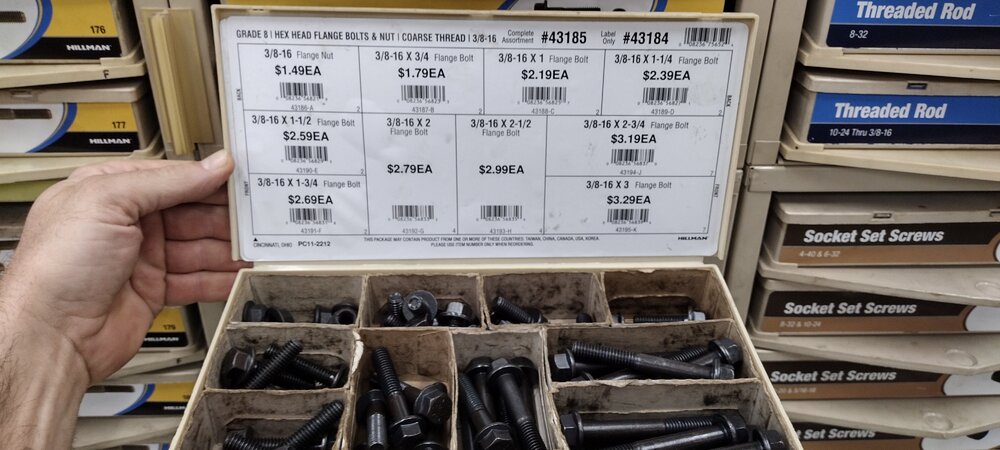
@jft69z, yeah just nuts and bolts. Grade 8 and flanged. Access is a little tricky but not horrible. I'm sure future Brendan will be cursing at past Brendan at some point :). If I ever do a full suspension kit I will chase down the proper clip nuts, or J-nuts as you call them Bummer on the Sunday rain. But enjoy your week then!!
-
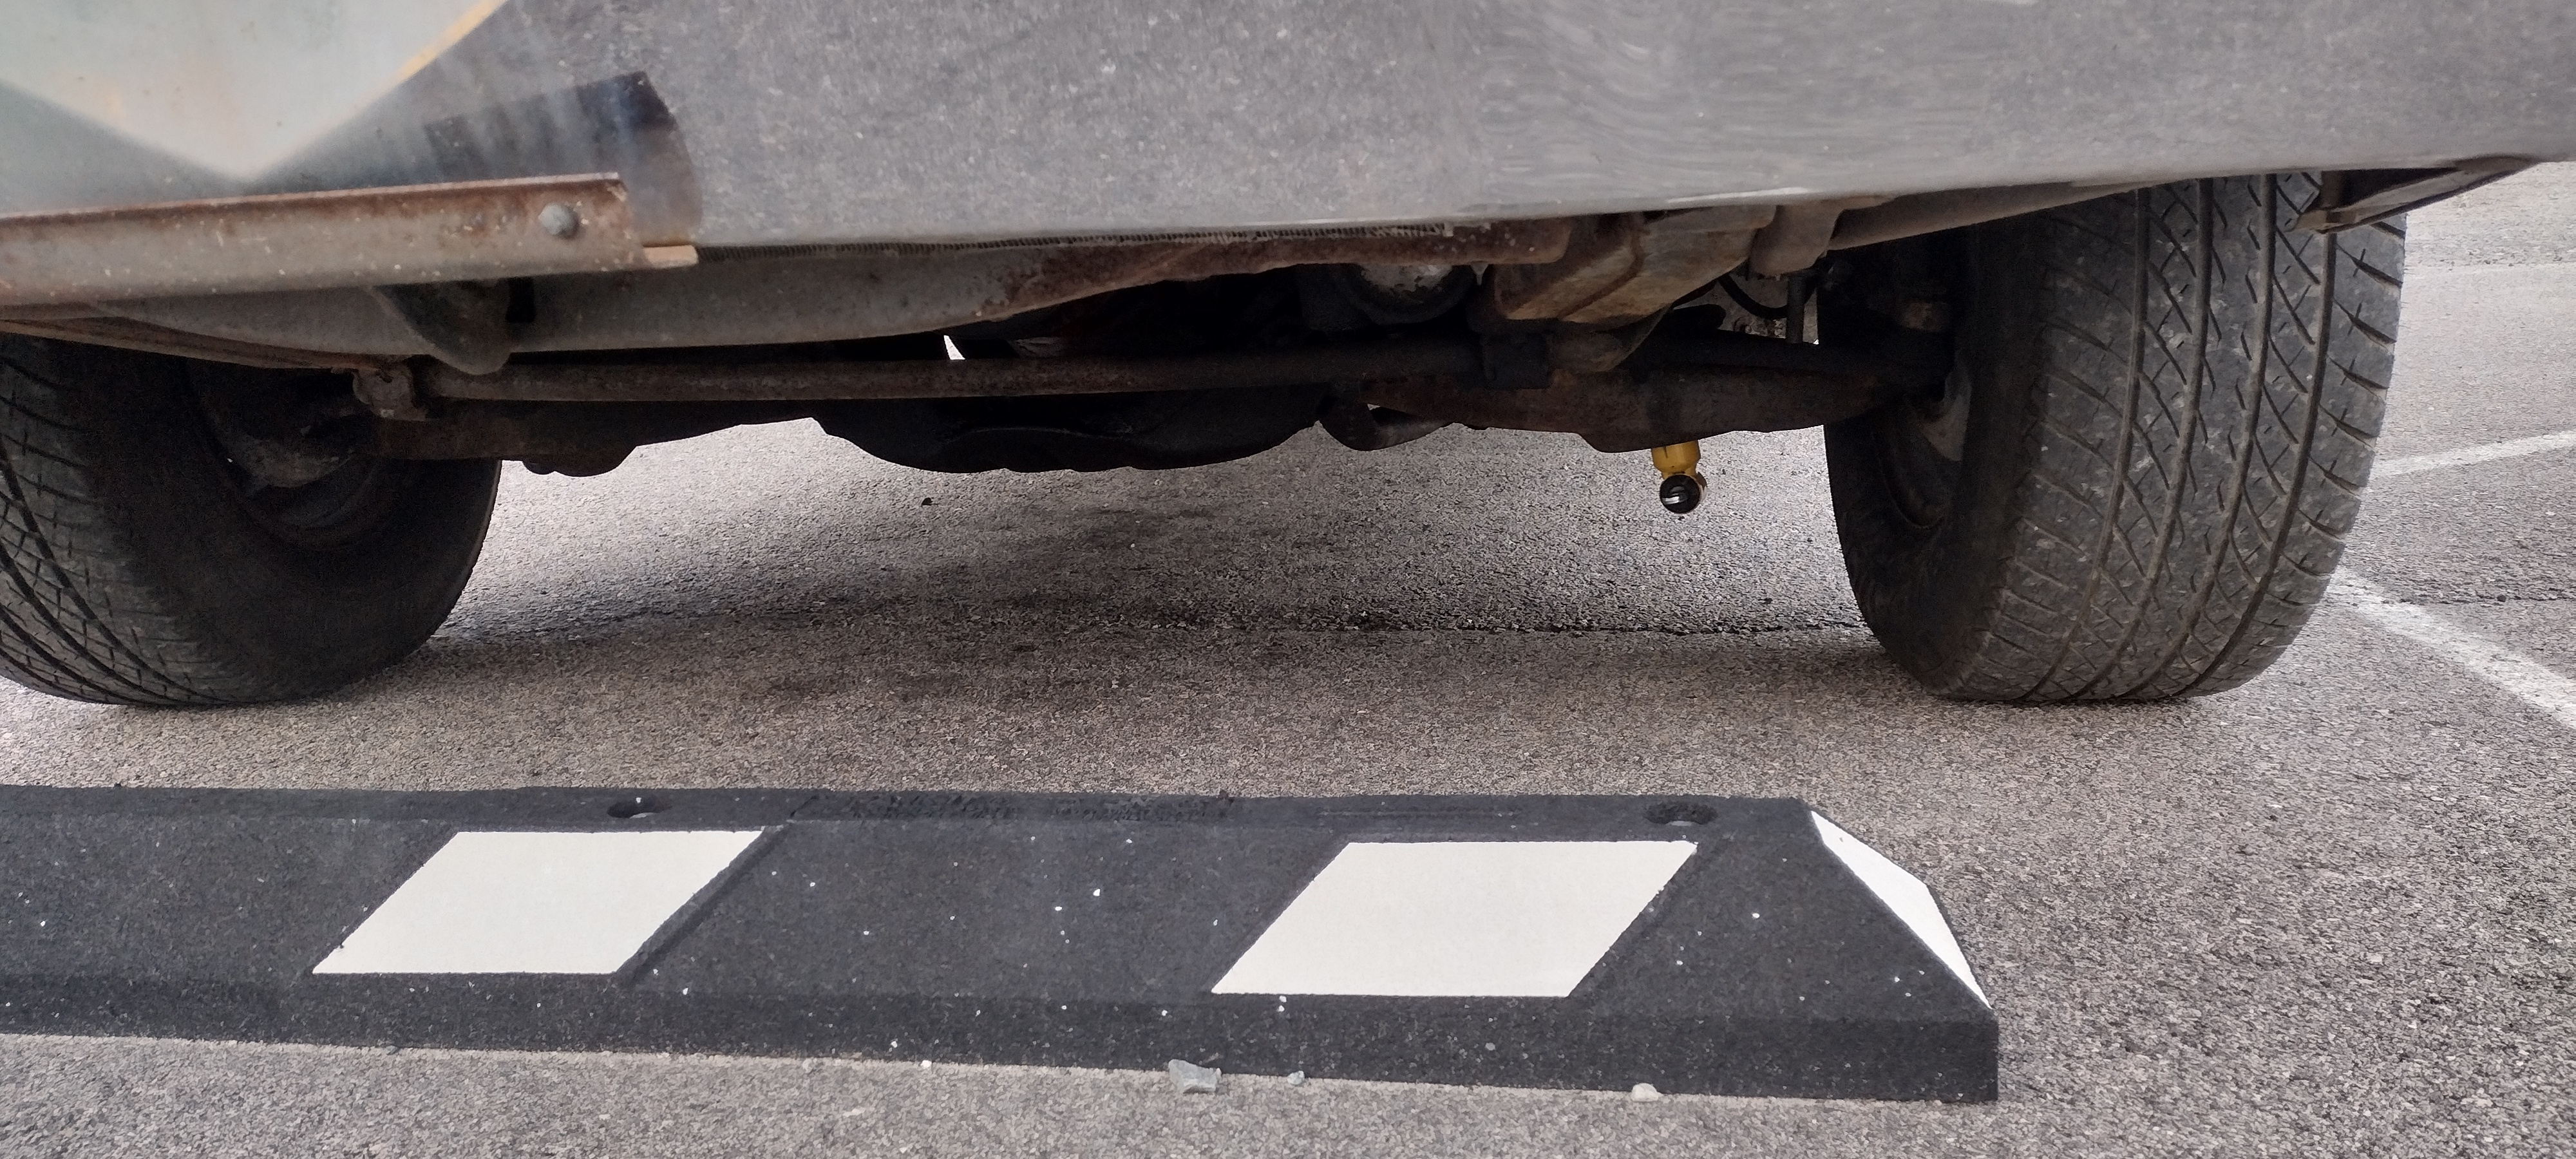
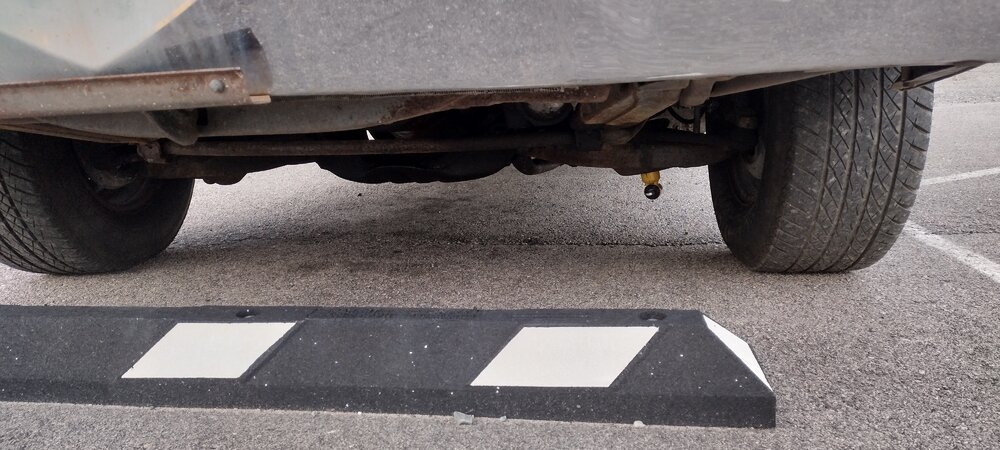
@jft69z, aha ... yeah, in the air and on the ground - I get it. I just looked and my assembly is straight on the ground, while the pic I posted was on jack stands. Whatever though, as long as it works! I got the Grade 8 flanged nuts / bolts in and replaced the clip nuts and 'body bolts' that someone else had put in. I'm not sure how I convinced myself that was ok to repeat. Probably all the rear shock nonsense I ran into So all is right with the world, and I'm headed out for a drive to the parts store for some other projects I have today. It's a beautiful day for a drive up here in Connecticut!!
-
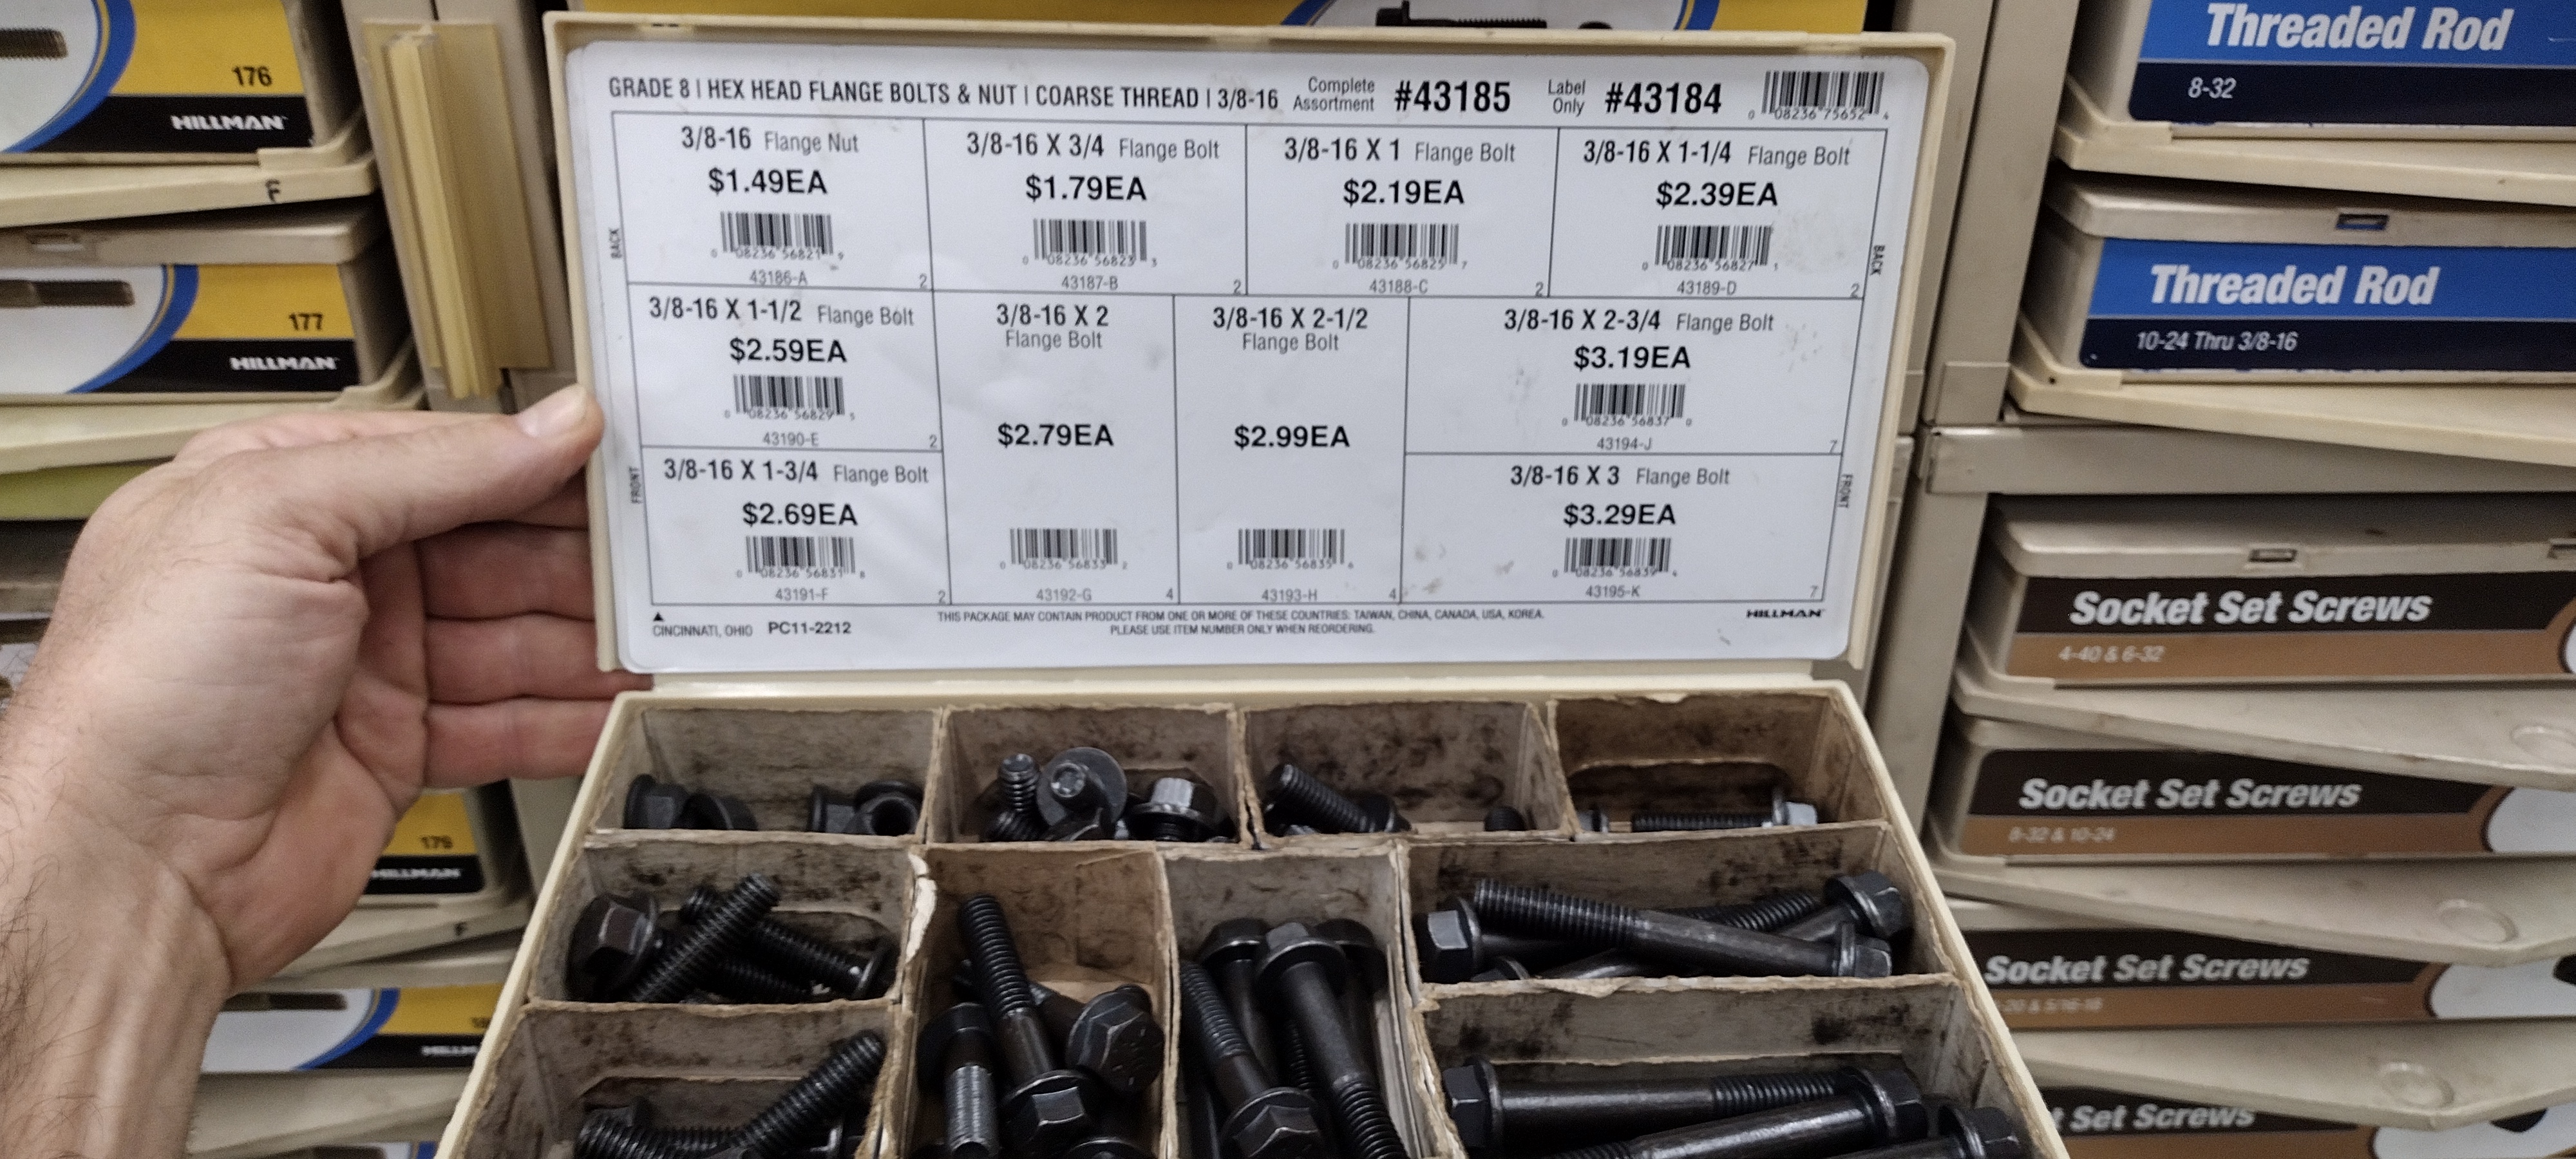
And relative to the issue I'm having with those clip nuts on the front shocks, I picked up some Grade 8, flanged nut and bolt sets to throw in there this afternoon. I guessed at the length and went with 1 1/4 long bolts - we shall see. Fortunately we have a small Ace Hardware store with one of those awesome aisles of every bolt and screw you could ever want!
-
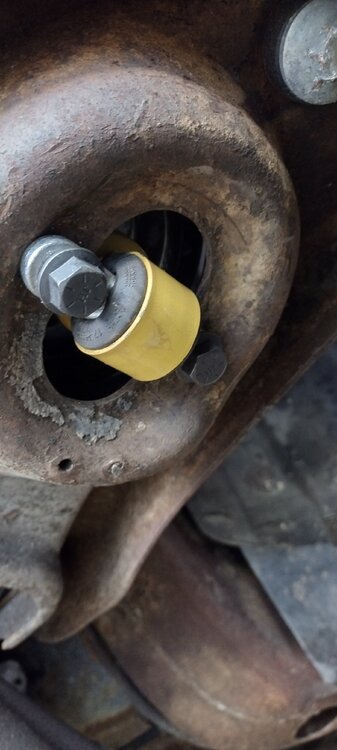
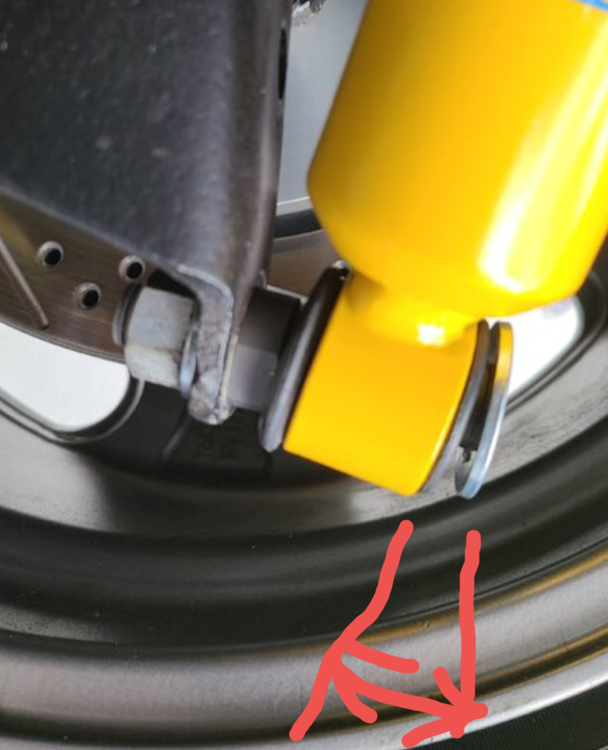
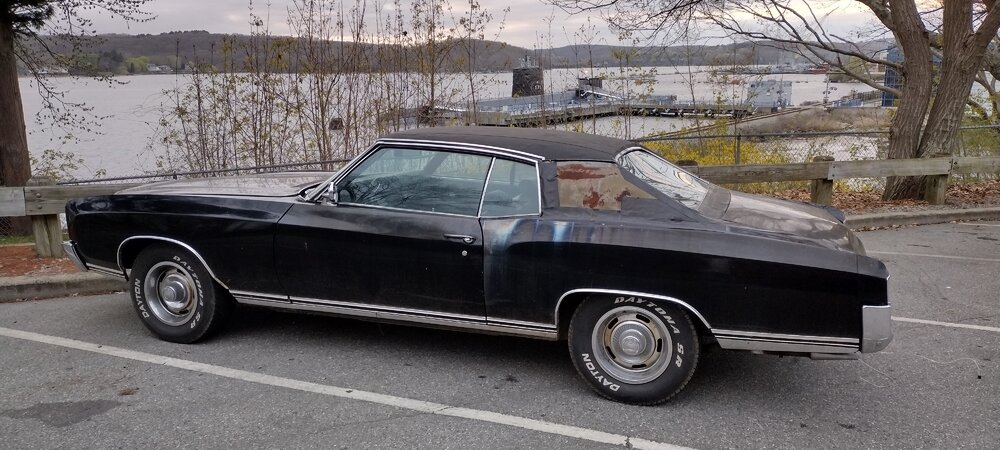
@jft69z, dang your MC looks SO CLEAN underneath!!!! Impressive. It looks like you ended up with an installation issue with the Bilsteins too. Similar to what I ran into. On your MC the angle on the bolt / stud going through the bushing seems off to me. It will probably be fine, depending on your driving habits I suppose. That would drive me nuts though. Going back through my pics and yours it's hard to tell what's going on. Seems the geometry is just slightly different maybe. I introduced the Dorman assembly and the bolt / stud going through the bushing (it's a 2-piexe bushing mind you) is much straighter than yours. But the yellow cylinder is stood off from the bracket the same amount. EDIT by Joe T: This is with my car in the air, wheels hanging free.

-
@jft69z, awesome! Yeah, so far so great with the Bilsteins. Between them, the boxed in lower rear control arms and the rear sway bar, my MC is handling incredibly well. Remember, if you ordered BIlstein P/N 24-009294 for the rear shocks you will have to buy the set of Dorman bolt / bushing / stud assemblies that I mention earlier in this post. But perhaps you ordered a different part number that comes with proper hardware. Do you have the boxed rear lower control arms and sway bar?
-
@jft69z, yeah exactly. If I had good, local source for the correct / better clip nuts I would do that. But I'm going for some GR8 bolts, washers and lock-nuts!! I just wanted to share my experience so that others dont follow :). Mounting these dang Bilstein shocks has been a real pain the butt for sure!
-
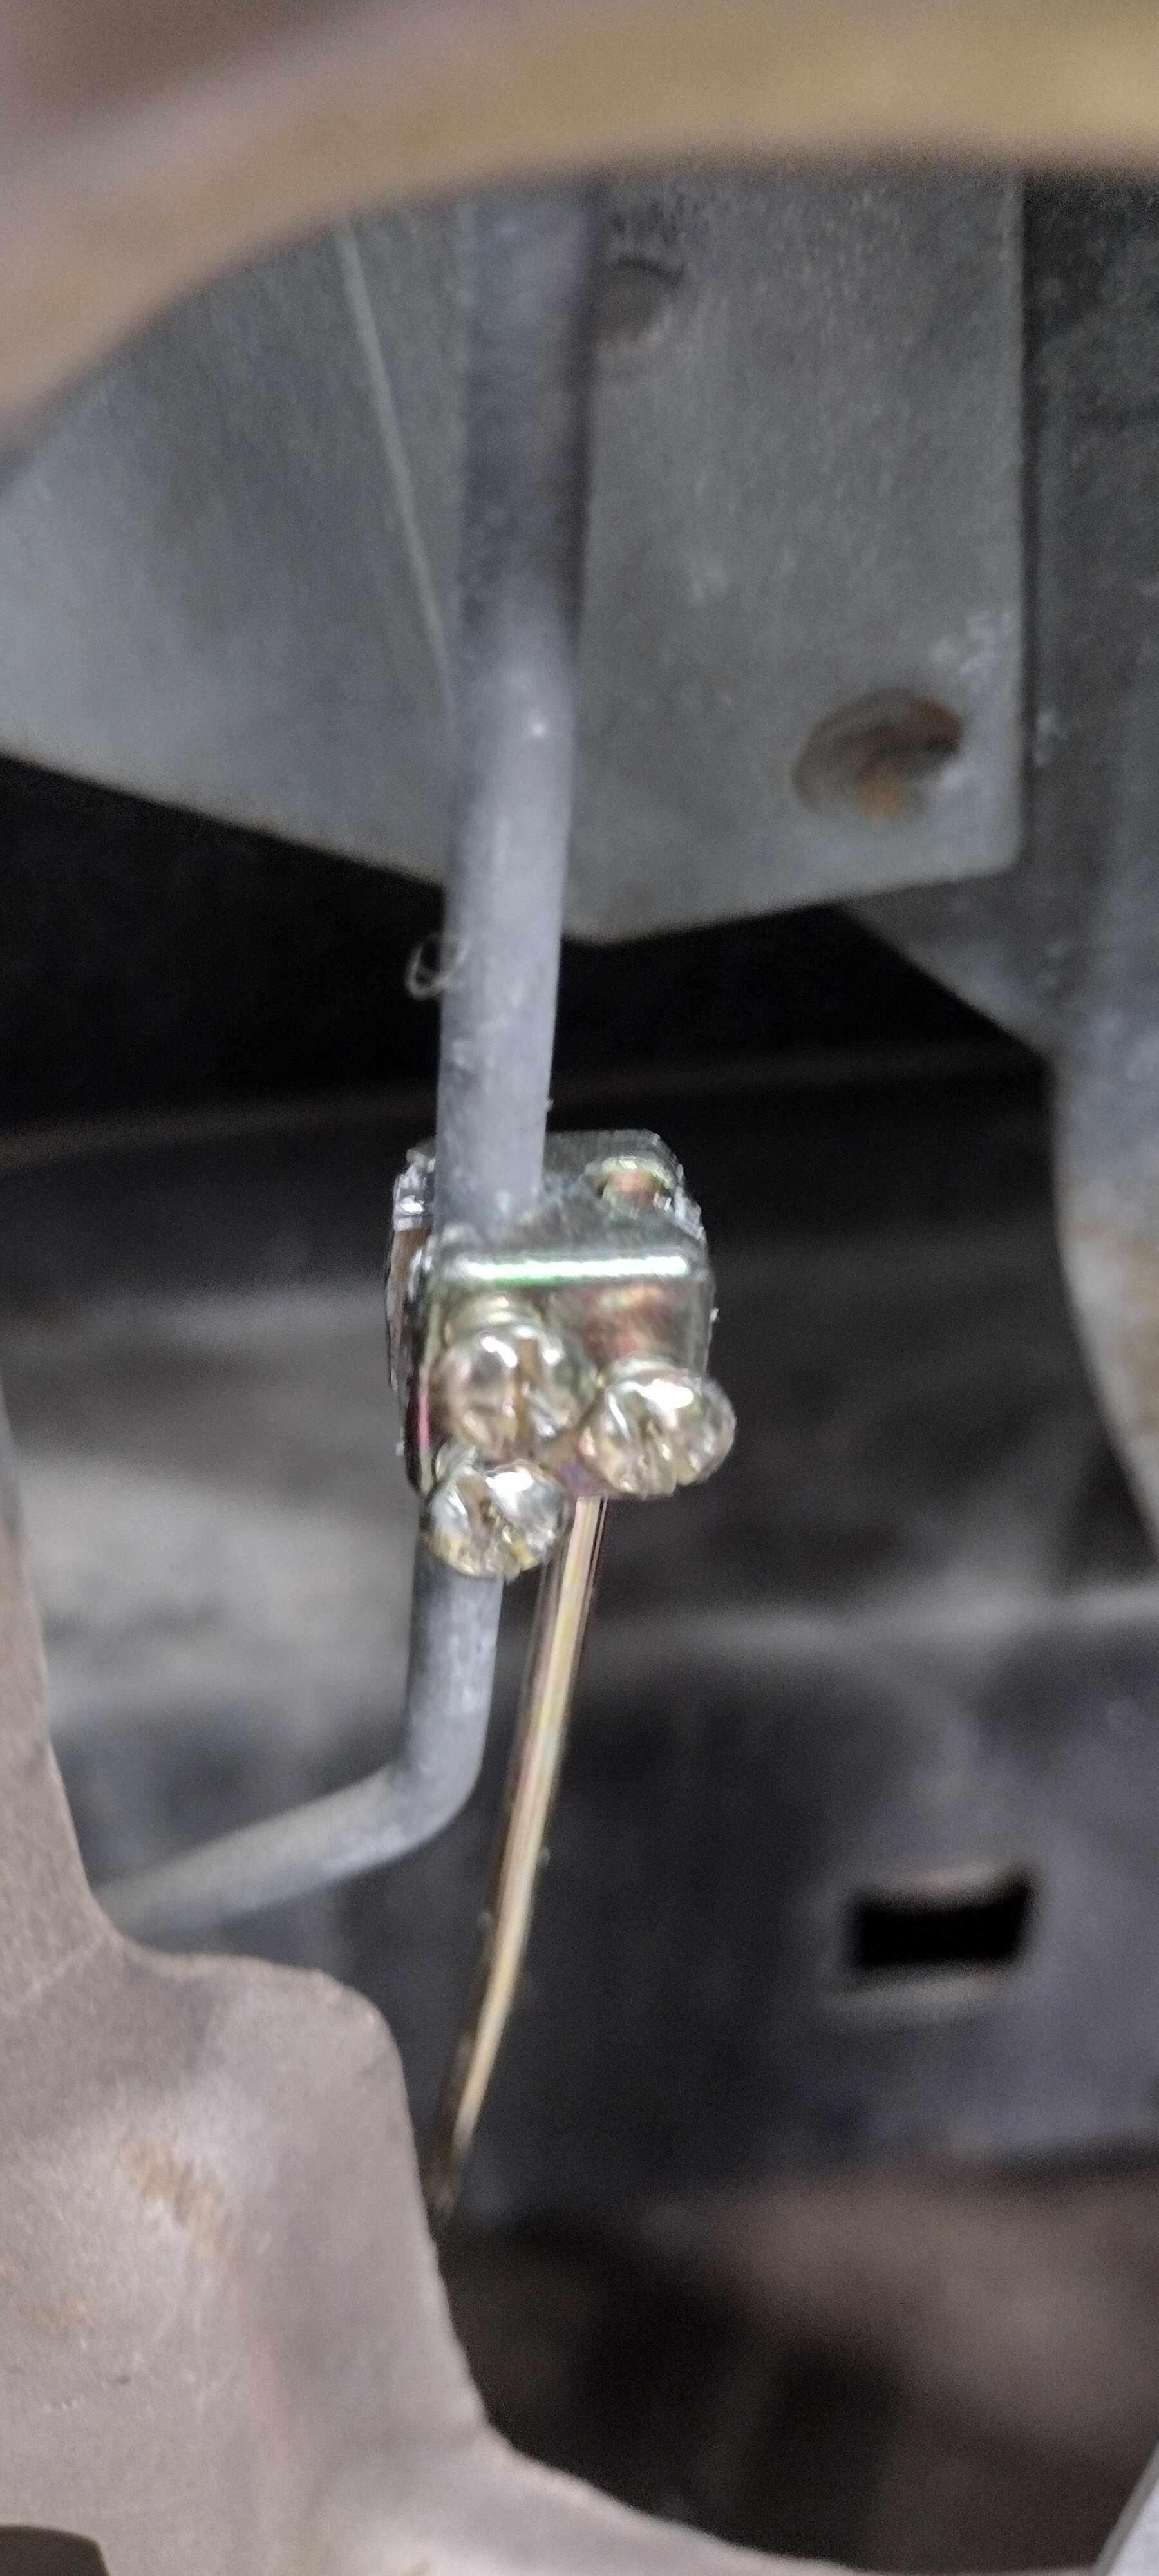
@cny first gen 71 and @MC1of80, the bolts likely did not fail. I believe the 'clip nuts' failed (a package from Advanced Auto down the street from me; see link below). My guess is that the load of the shock just pulled the bolts right down and through the threads of the clip nuts. The clip nuts that were in there when I went to replace the shocks disintegrated as I pulled the bolts out due to corrosion. As I mentioned above, I plan to through-bolt with washers and lock nuts going forward. Screw the clip nuts!! Maybe I was just replacing somebody else's bad idea. The clip nuts were probably not stock. https://shop.advanceautoparts.com/p/dorman-clip-nut-wide-panel-3-8-16-in.-45422/22147595-P?searchTerm=3%2F8+clip+nut
-
Update: the clip nuts purchased at Advanced Auto looked questionable, and they are!! Looks like both of the 3/8-16 bolts pulled right out. Perhaps due to heavy loading in hard turns (well, I never ... :). I built my own airplane, believe it or not. A Cozy MK IV. And I worked in aerospace for a few years out of college. In aerospace the bolt spec's are either inboard, downward or aft - where the bolts point when installed. In this application the bolts point upward, which goes against the aerospace install theory. The result probably would have been the same since the nut plates are the likely failure point though. I'm going to throw some new bolts in, along with some washers and maybe lock nuts. If I can, I will put the bolts through the springs and point them downward. We shall see
-
@TheBMan, I just sent you a PM. As I mentioned in my message, I was just shopping for a 1406 on Summit, Ebay, FB Marketplace, etc. I'd MUCH rather deal with a Forum Member though!
-
@SPLATT71MC, you probably got the 2.5 then. Hmm, I will keep this in mind for sure. I still want to research the Jeep OEM options too. Thank you though!
-
@SPLATT71MC QUIT SPENDING MY MONEY!!!!!! Haha Man, this looks awesome. Thank you for posting the link QUESTION: What steering ratio (number) did you buy? It says that 3 turns is stock and that they offer a 2.5 It also says they offer more ports for an after market steering ram of some sort. Did you do that?
-
Haha, yeah. As much as I bitched about it at the time, I'm through it and am ok now. The bottom bushings will be MUCH easier to get out and back in this time around
-
@SPLATT71MCand @cny first gen 71 ... ok, you guys just spent more of my money! I ordered the following from Summit MOG-5379 - Moog Chassis Parts 5379 - Moog Replacement Coil Springs and MOG-K6203-2 Moog Chassis Parts K6203-2 - Moog Coil Spring Insulators I'm still going for good, cheap replacement parts until I go full send on the whole suspension. Hopefully I can get these in without any issues. Something to look forward to this weekend!!! Thanks for all the help from this forum
-
You know, spring spacers might be all I need for the near term. Again, I plan on a full suspension upgrade / rebuild at some point. I will grab some spacers and see if that gets me what I want for now - a combination of ride quality and ride height. Cheating the ride height with spacers may degrade the ride quality a bit. But it might not either
-
Yeah, I'm definitely tiptoeing down that path. I saw some info on a late model Jeep steering box. I will post source and part number once I figure that out. Now that I've got a few miles with the new shocks in I've noticed that the rear is a little saggy - had air shocks previously. As I stated earlier in this thread, the front springs look to have been replaced at some point but the rear springs are original. I'm probably going down the path of replacing the rear springs shortly, which nega the question of other 'might as well' upgrades. Never stops!!