B-Man
-
Posts
117 -
Joined
-
Last visited
Content Type
Profiles
Articles
Forums
Gallery
Events
Everything posted by B-Man
-

1972 MC 350/Auto - Roof, Sail Panel and Trunk Repair / Replace
B-Man replied to B-Man's topic in Auto Body Repair
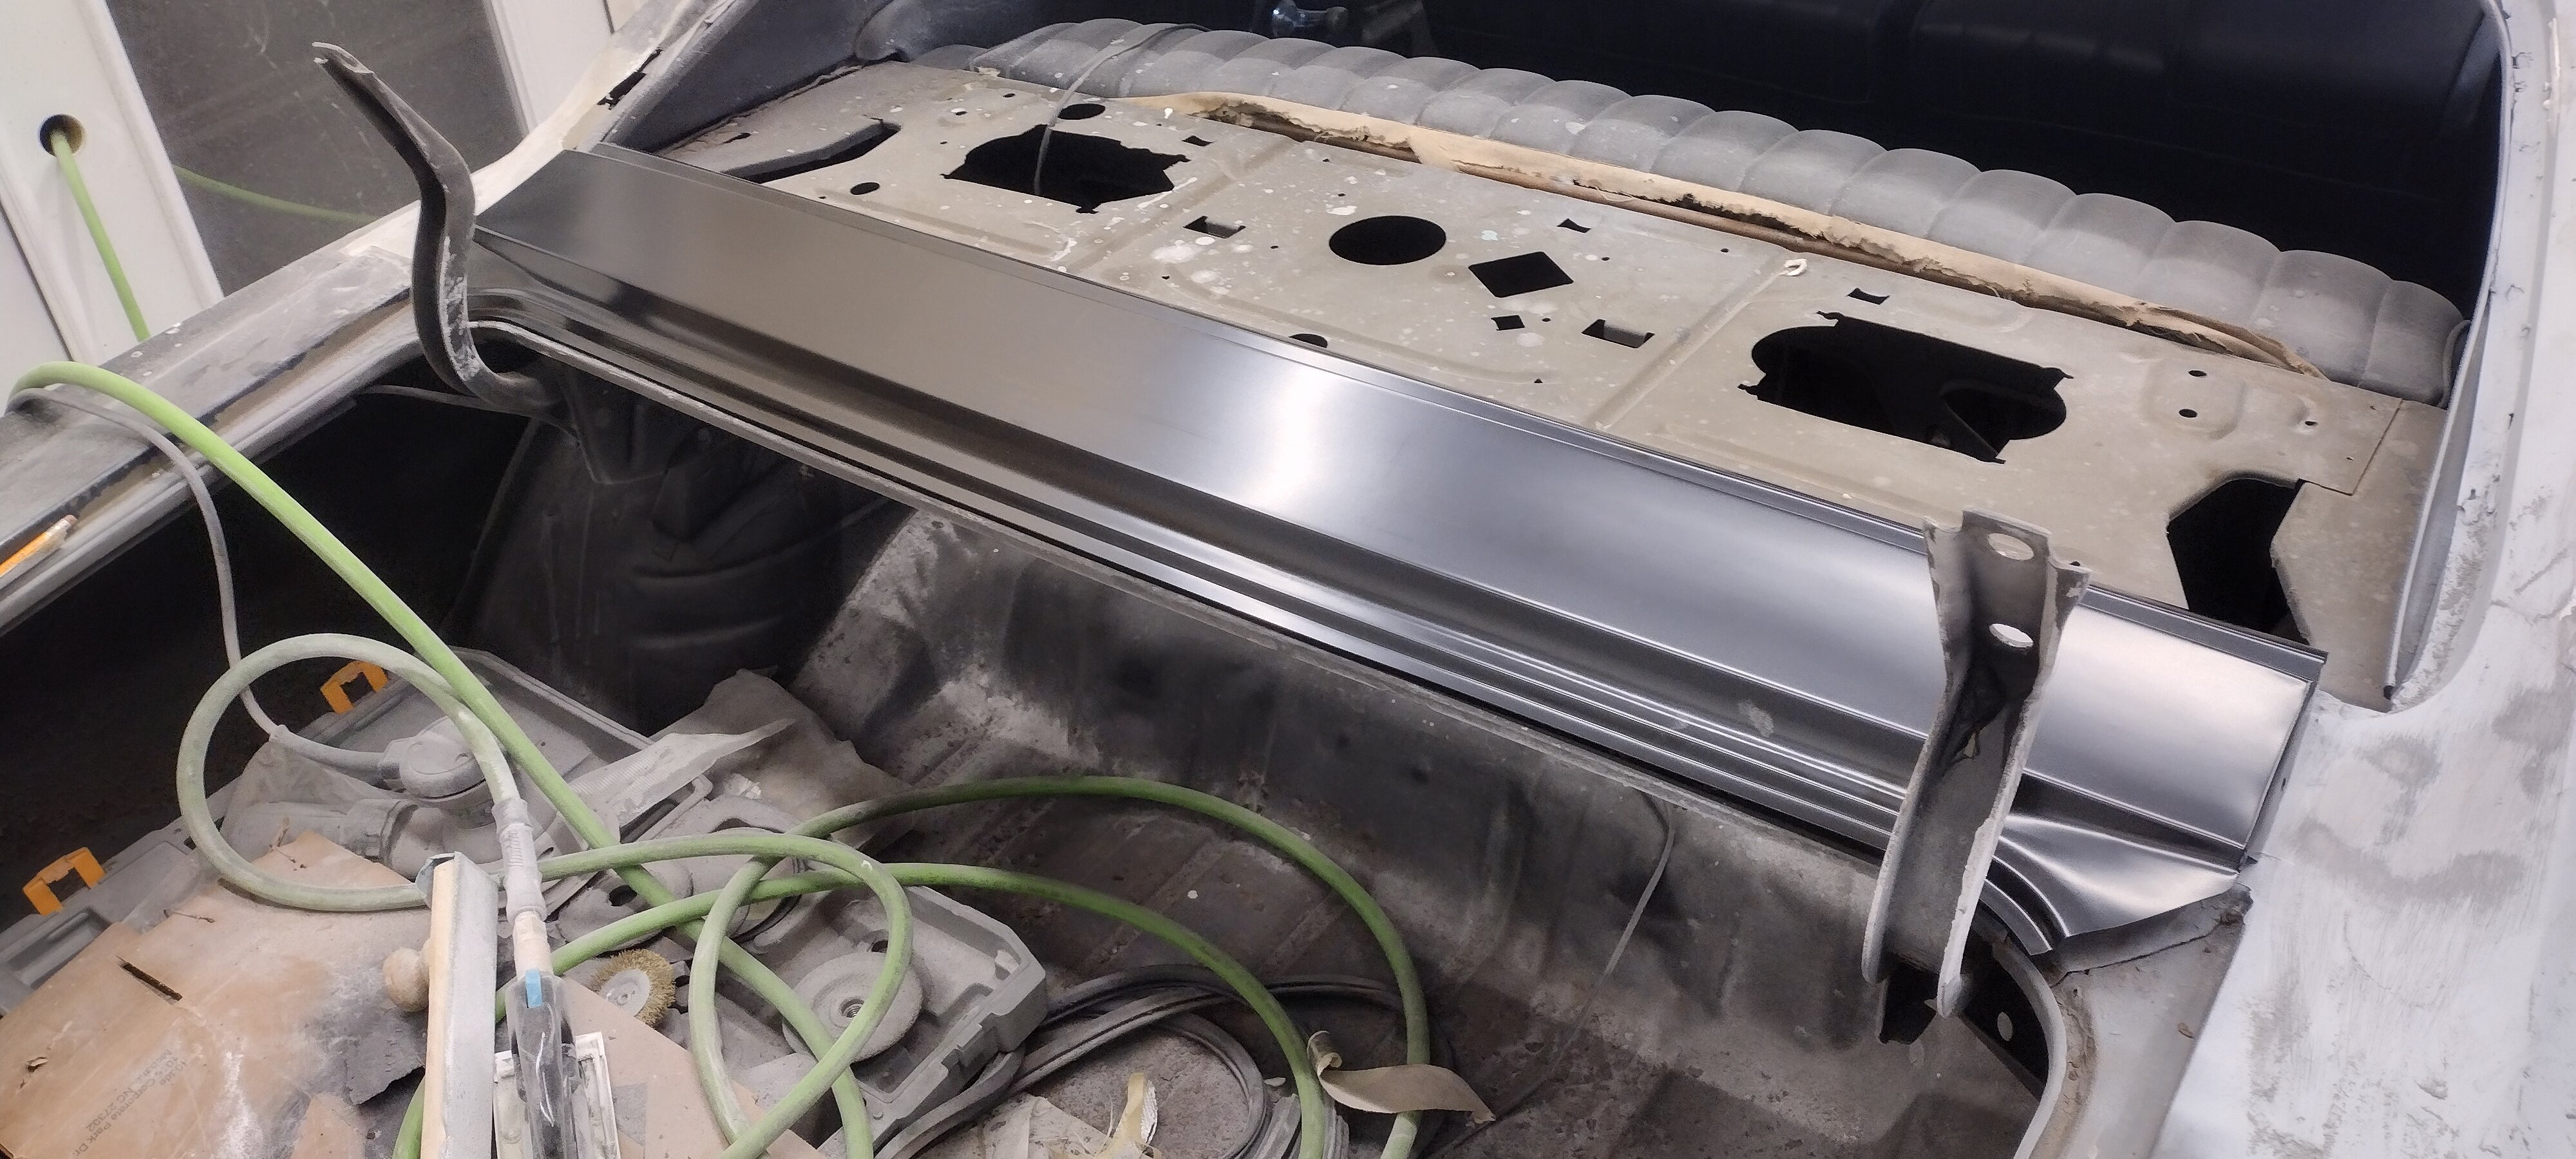
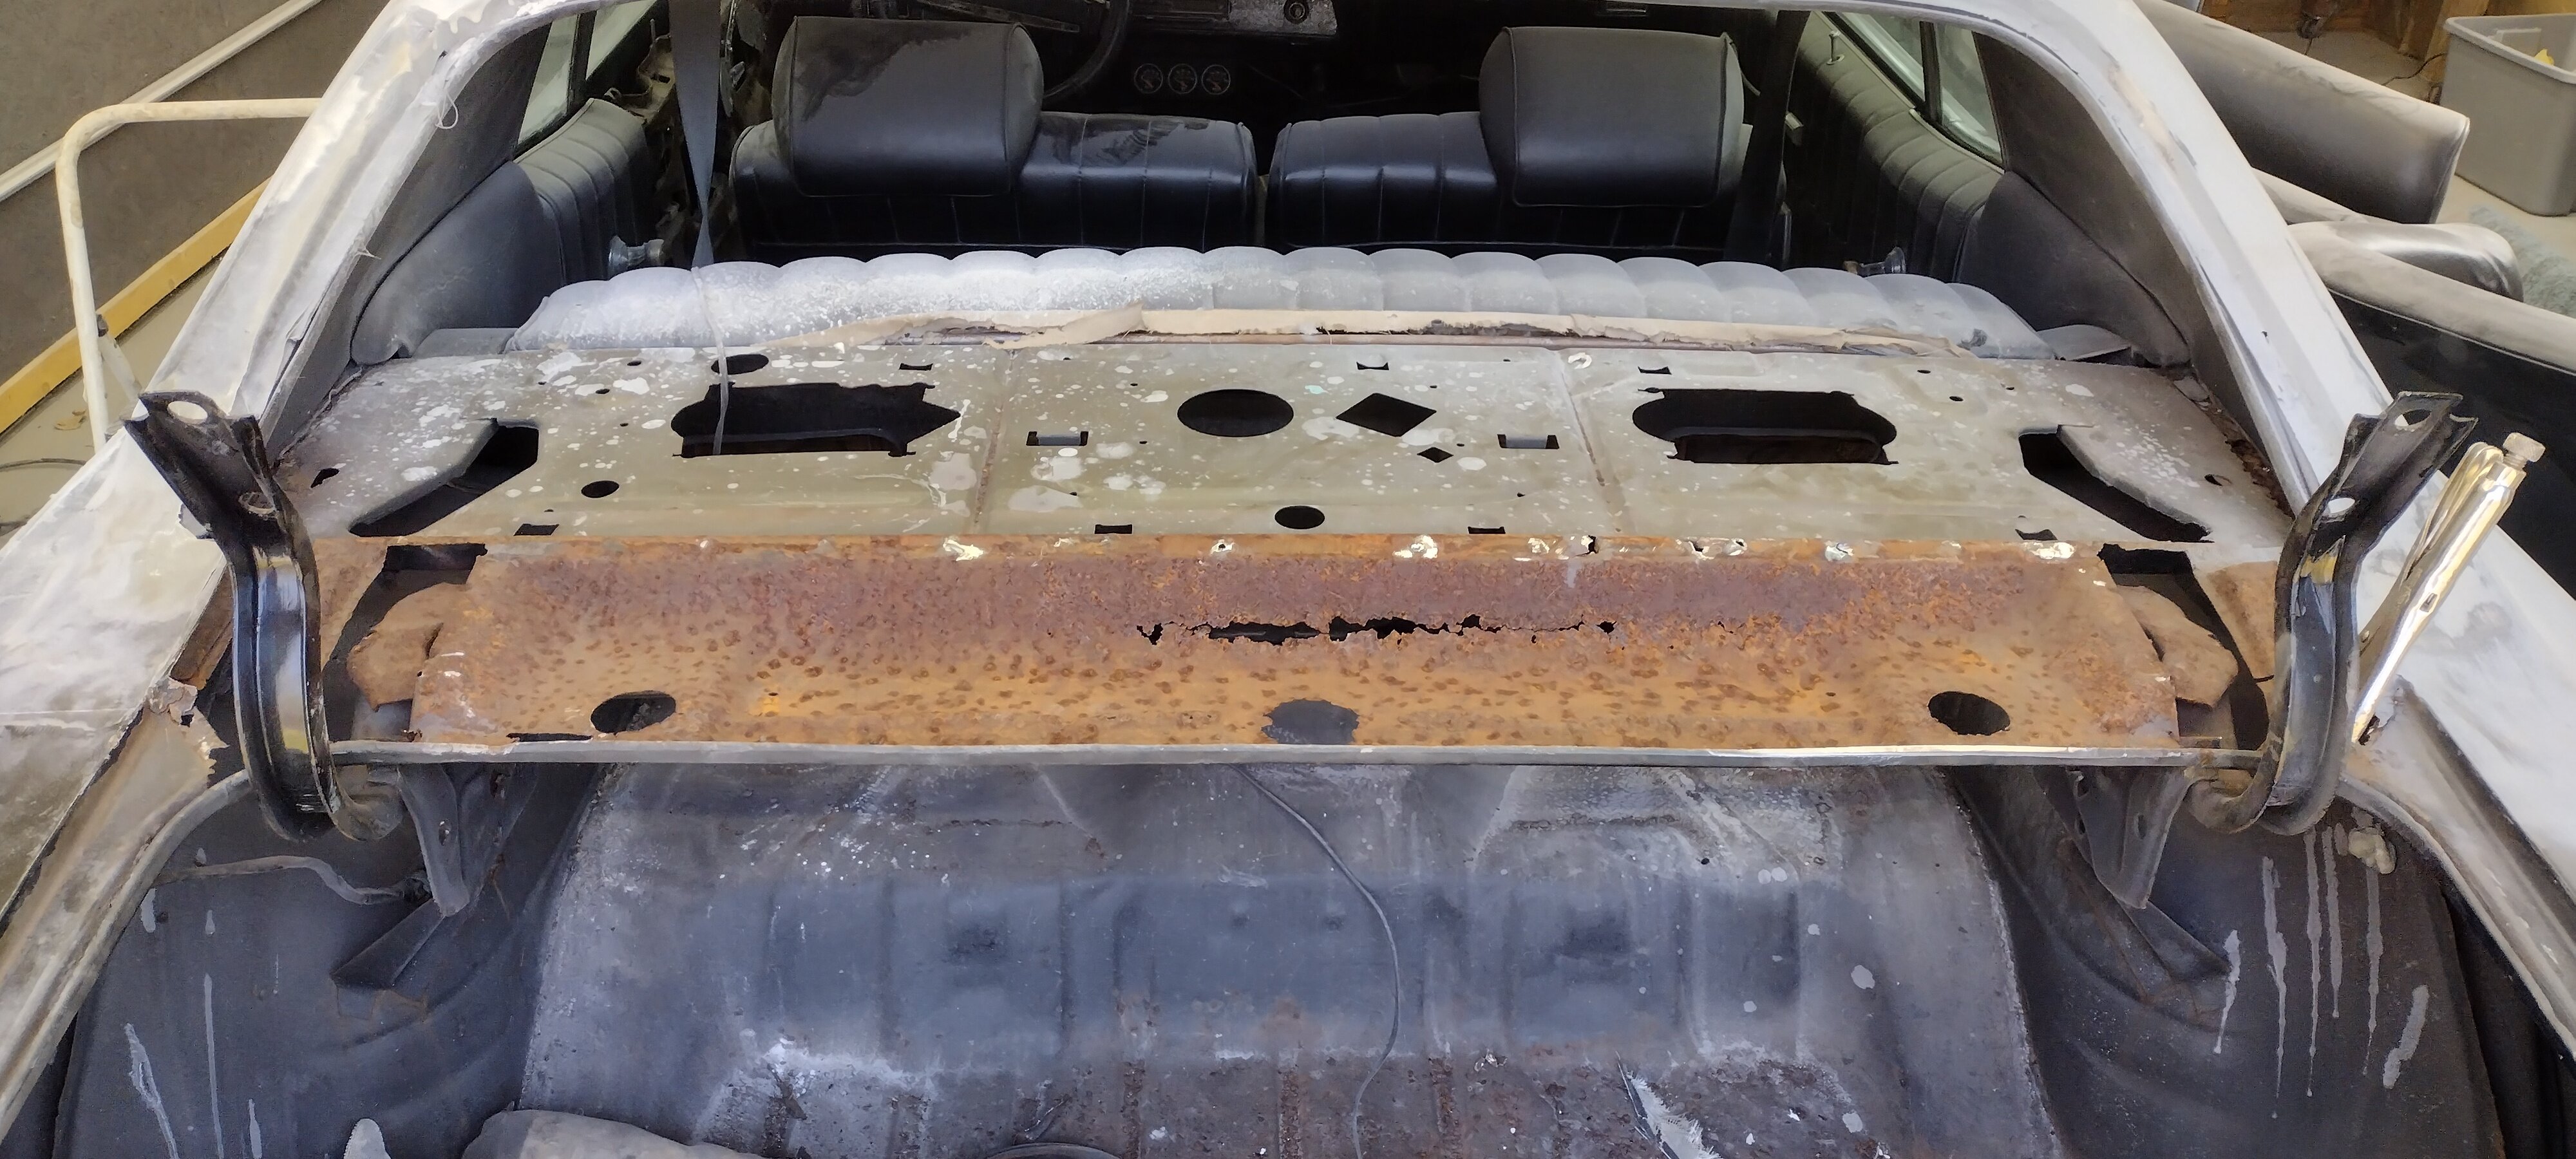
Yep, agreed. I'm going to leave any bonding surfaces free of fiberglass. It's just that structure that I'm going to reinforce. I will cut away any glass on the bonding seams as needed once its all cured up -
1972 MC 350/Auto - Roof, Sail Panel and Trunk Repair / Replace
B-Man replied to B-Man's topic in Auto Body Repair
@Steve G and @cny first gen 71 I've purchased a 200ml cartridge of 3M Panel Bond (see link below). And I'm going to borrow a 200 ml cartridge gun from my work, so I dont have to buy it (see link below). The cartridge comes with the mixing tips (swirls the 2 parts as you squeeze the cartridge with the gun, then throw away the tip after use) but I will grab more as needed Once I treat the rusty metal under the window to trunk panel with a rust reformer I'm probably going to throw a layer or two of glass over it as well to reinforce it. It's pretty thin. Then I will just bond the new panel place and use the panel bond as sort of a seam sealer too. Should be fun! And I should have this knocked out over the weekend. I still have to deal with that giant hole on the driver side at the base of the rear window and sail panel. Even though it looks somewhat finished in the above photos, there's no structure there. So I'm going to have to tear back into the area and rethink it. More panel bond, haha!! 3M Panel Bonding Adhesive, 08115, OEM Recommended, Two-Part Epoxy, 200 ml/6.75 fl oz Cartridge, Black https://a.co/d/9yNLFaL Innovations 200 ml (1:1 and 2:1) 26:1 High Thrust Dual Component Cartridge Gun https://a.co/d/05rt8ur -
1972 MC 350/Auto - Roof, Sail Panel and Trunk Repair / Replace
B-Man replied to B-Man's topic in Auto Body Repair
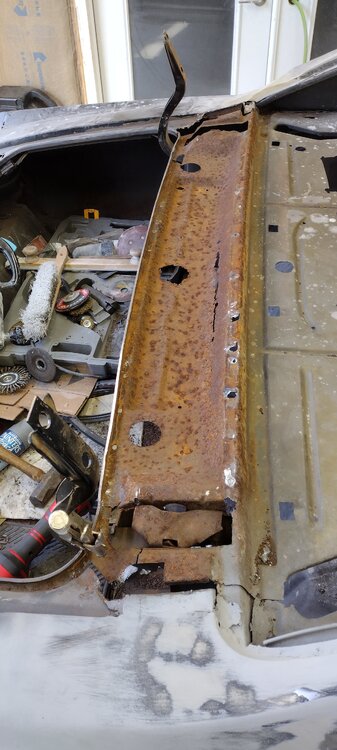
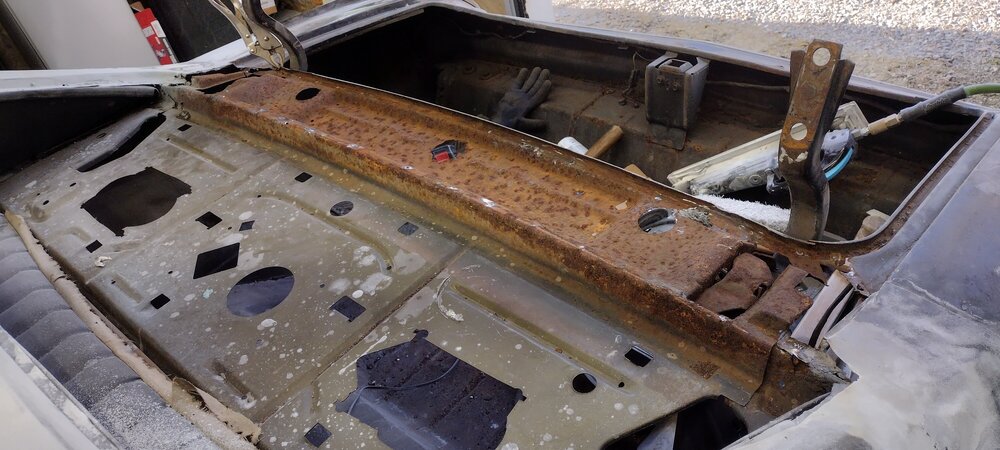
Well this was a horrible task. I guess I have some work to do before I start installing this new panel. Ugh!

-
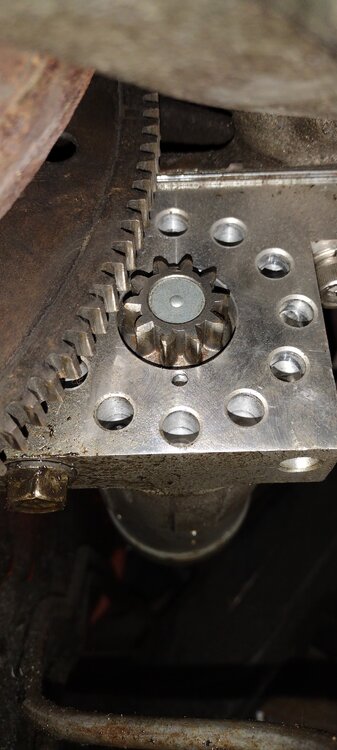
@jft69zand @Scott S.,yeah I'm sort of leaning towards "is what it is" for this ProComp "mini, high torque" starter. I will have to look back but I had put a similar style starter (not sure the brand / model) on my '68 Lincoln Continental with a 462ci engine. I had 'heat soak' issues and the higher torque helped solve that. But I don't recall it having the "shim me, please" sound. Anyway, I just put my MC down on all 4 for the first time all winter. Runs great! And the starter is what it is. I will report back if I ever get a final solution here. But I will just ignore it for now
-
A few minutes later update - all of the shims have been removed. Still has that 'needs to be shimmed' sound, but maybe not as bad(?). I might just run with it for now. Or might start the half-shim thing tomorrow. We shall see
-
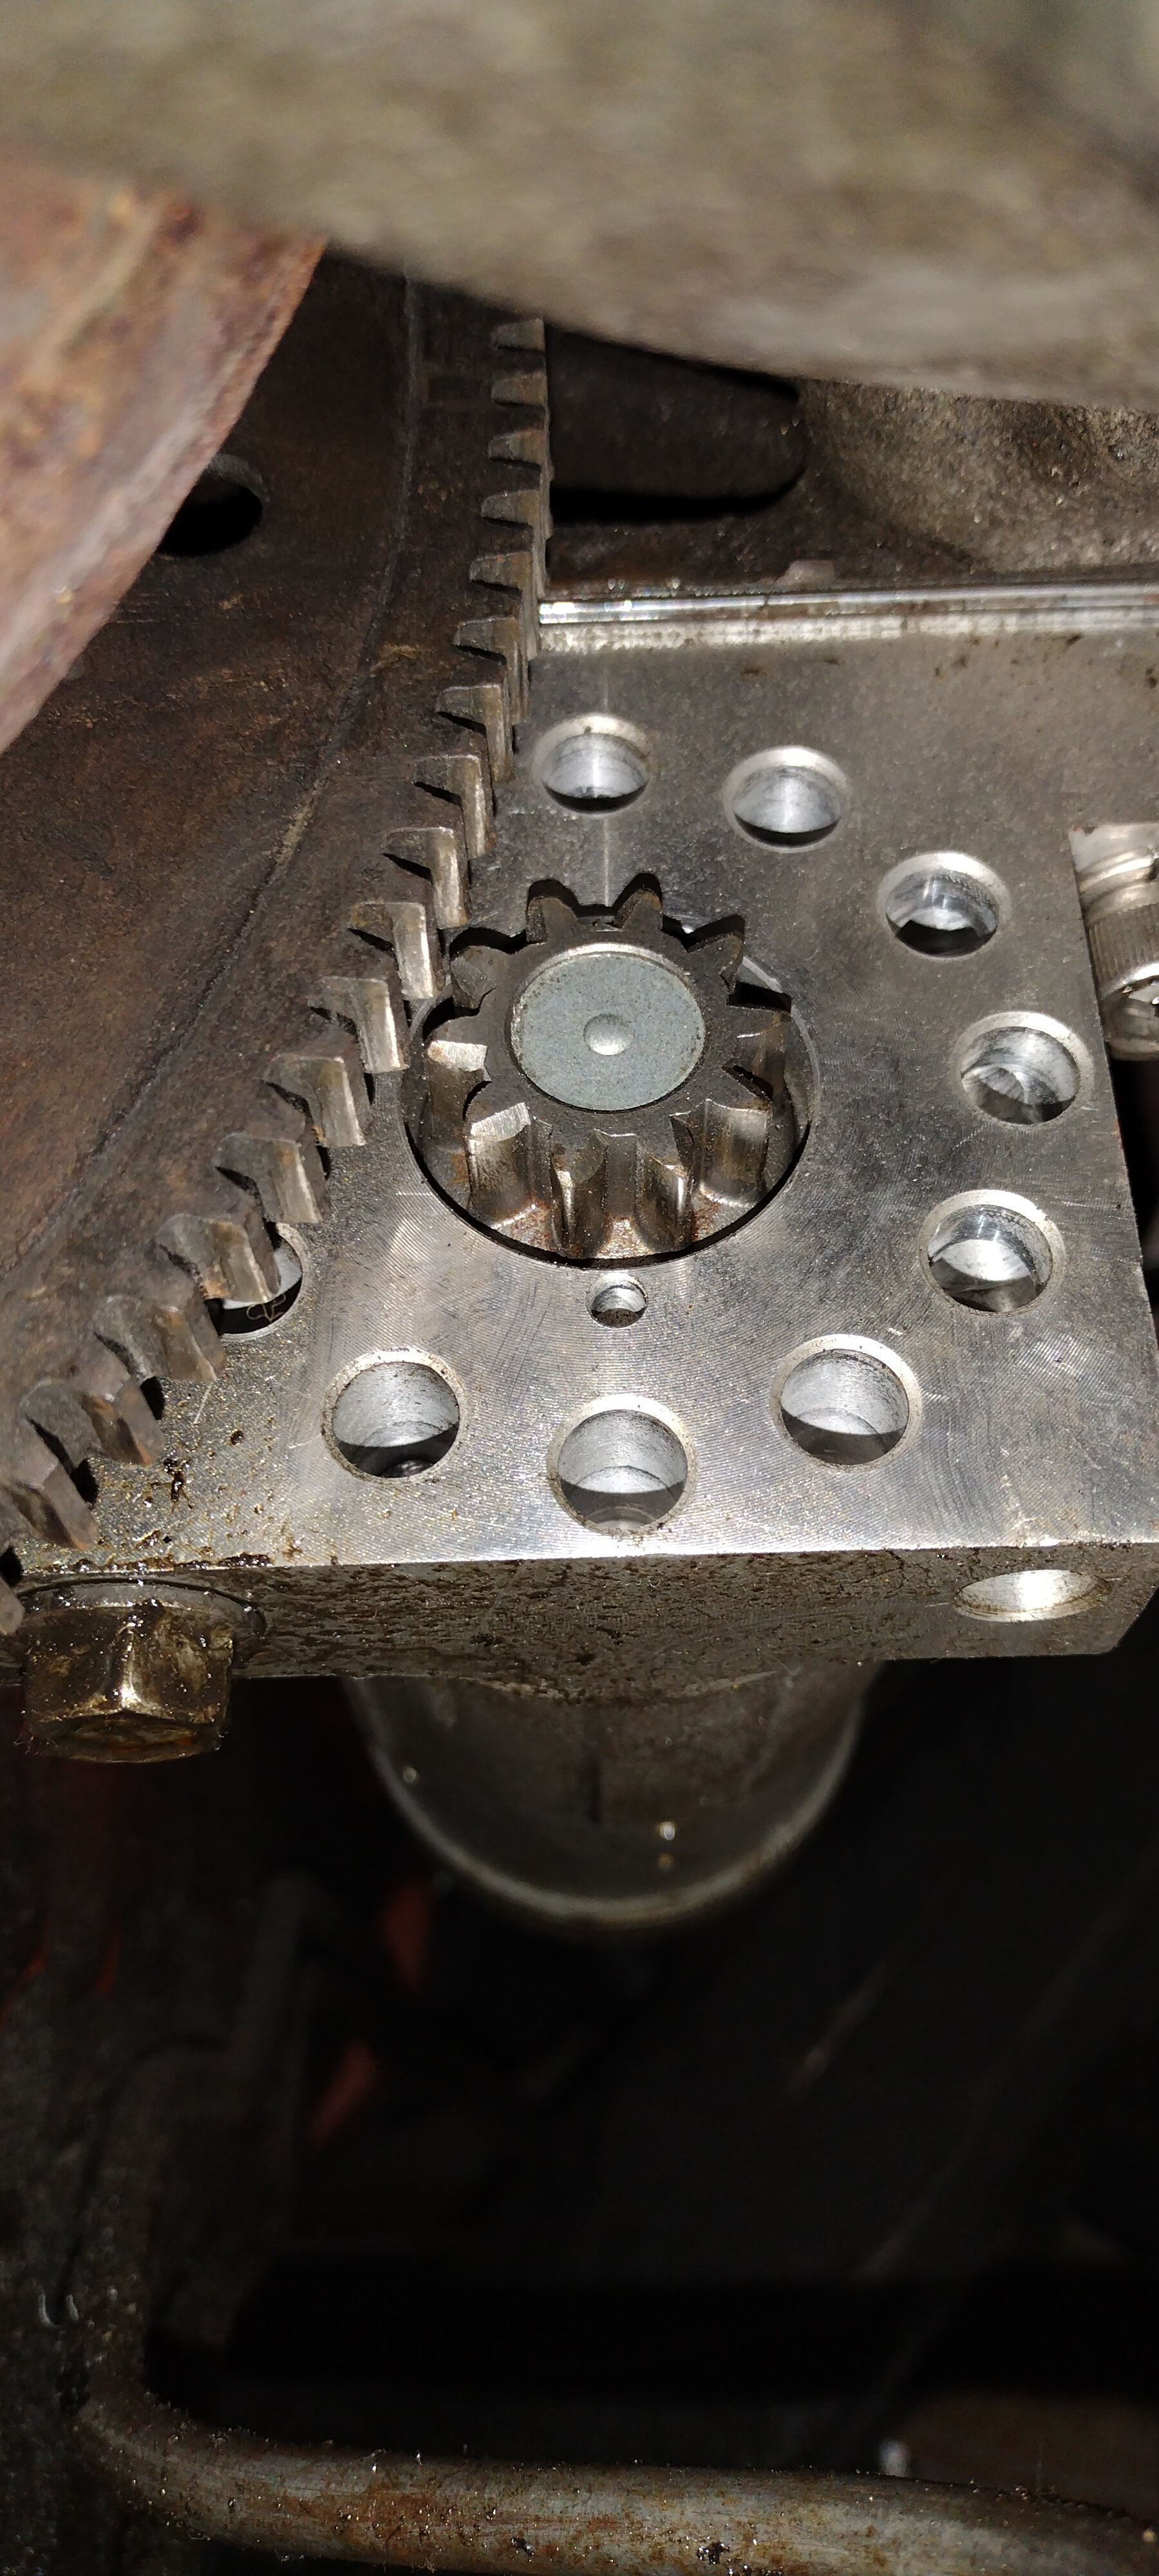
Well, as suspected there is not really a good way to measure the clearance with this particular starter model. There doesn't seem to be a way to manually pop the pinion gear out and mesh it with the flywheel ring gear. Any more thoughts here guys, before I start randomly trying the less, half-shim approach?
-
@Scott S., completely relevant and worth mentioning on this thread for posterity. But as you stated, likely not the issue given that there hasn't been a drivetrain swap. There is in fact a slight diameter difference within the lineage of Chevy flywheels across the years, but again I don't think that's what I'm dealing with here. Appreciate the input though
-
"You can't just throw shims at it randomly like you're doing." > Well, I can and I did, I just shouldn't, haha! Thanks for those references. And you're right, I should go ahead and measure and be more quantitative about the shimming process. I'm not sure if I can recall ever measuring the tooth clearance on any of my cars over the years, and there have been LOTS. I've always just shimmed until it sounded right - always worked for me in the past. And I've never done the half-shim thing, but the need to do so sometimes is obvious of course. And again, you're right The challenge (and resulting laziness) with measuring is of course the headers. And also because it's pretty messy under there. I've yet to degrease and hose it down from the previous owners usage and disasters over the years. Excuses, excuses ... again, you're right. I will get under there later tonight or this weekend and take some measurements. I might even try and take some video with sound and post it here just everyone can learn from my laziness and impatience Thanks again @jft69z
-
1972 MC 350/Auto - Roof, Sail Panel and Trunk Repair / Replace
B-Man replied to B-Man's topic in Auto Body Repair
Good to know, thanks! -
1972 MC 350/Auto - Roof, Sail Panel and Trunk Repair / Replace
B-Man replied to B-Man's topic in Auto Body Repair
Yeah, wow! That looks great! I'm definitely not getting rid of the vinyl top trim. Something to think about as I'm getting closer to finishing the work for the season. All of the little studs that hold the trim retainers on are long gone due to all of the rust. I would have to figure out where it's supposed to lay and then install some small screws with proper heads to hold the retainers in. But yeah, awesome idea and photo reference - thanks for posting that!!! -
@DragCat, ok thanks for the input. I cant imagine that the starter / ring-gear engagement, or the starter itself, is supposed to sound like that. It's that high-pitched, metal scraping sound that to me indicates a need for more or less shims. I guess I will keep playing around with it. And will keep ear plugs in each time I start it, ugh!!!
-
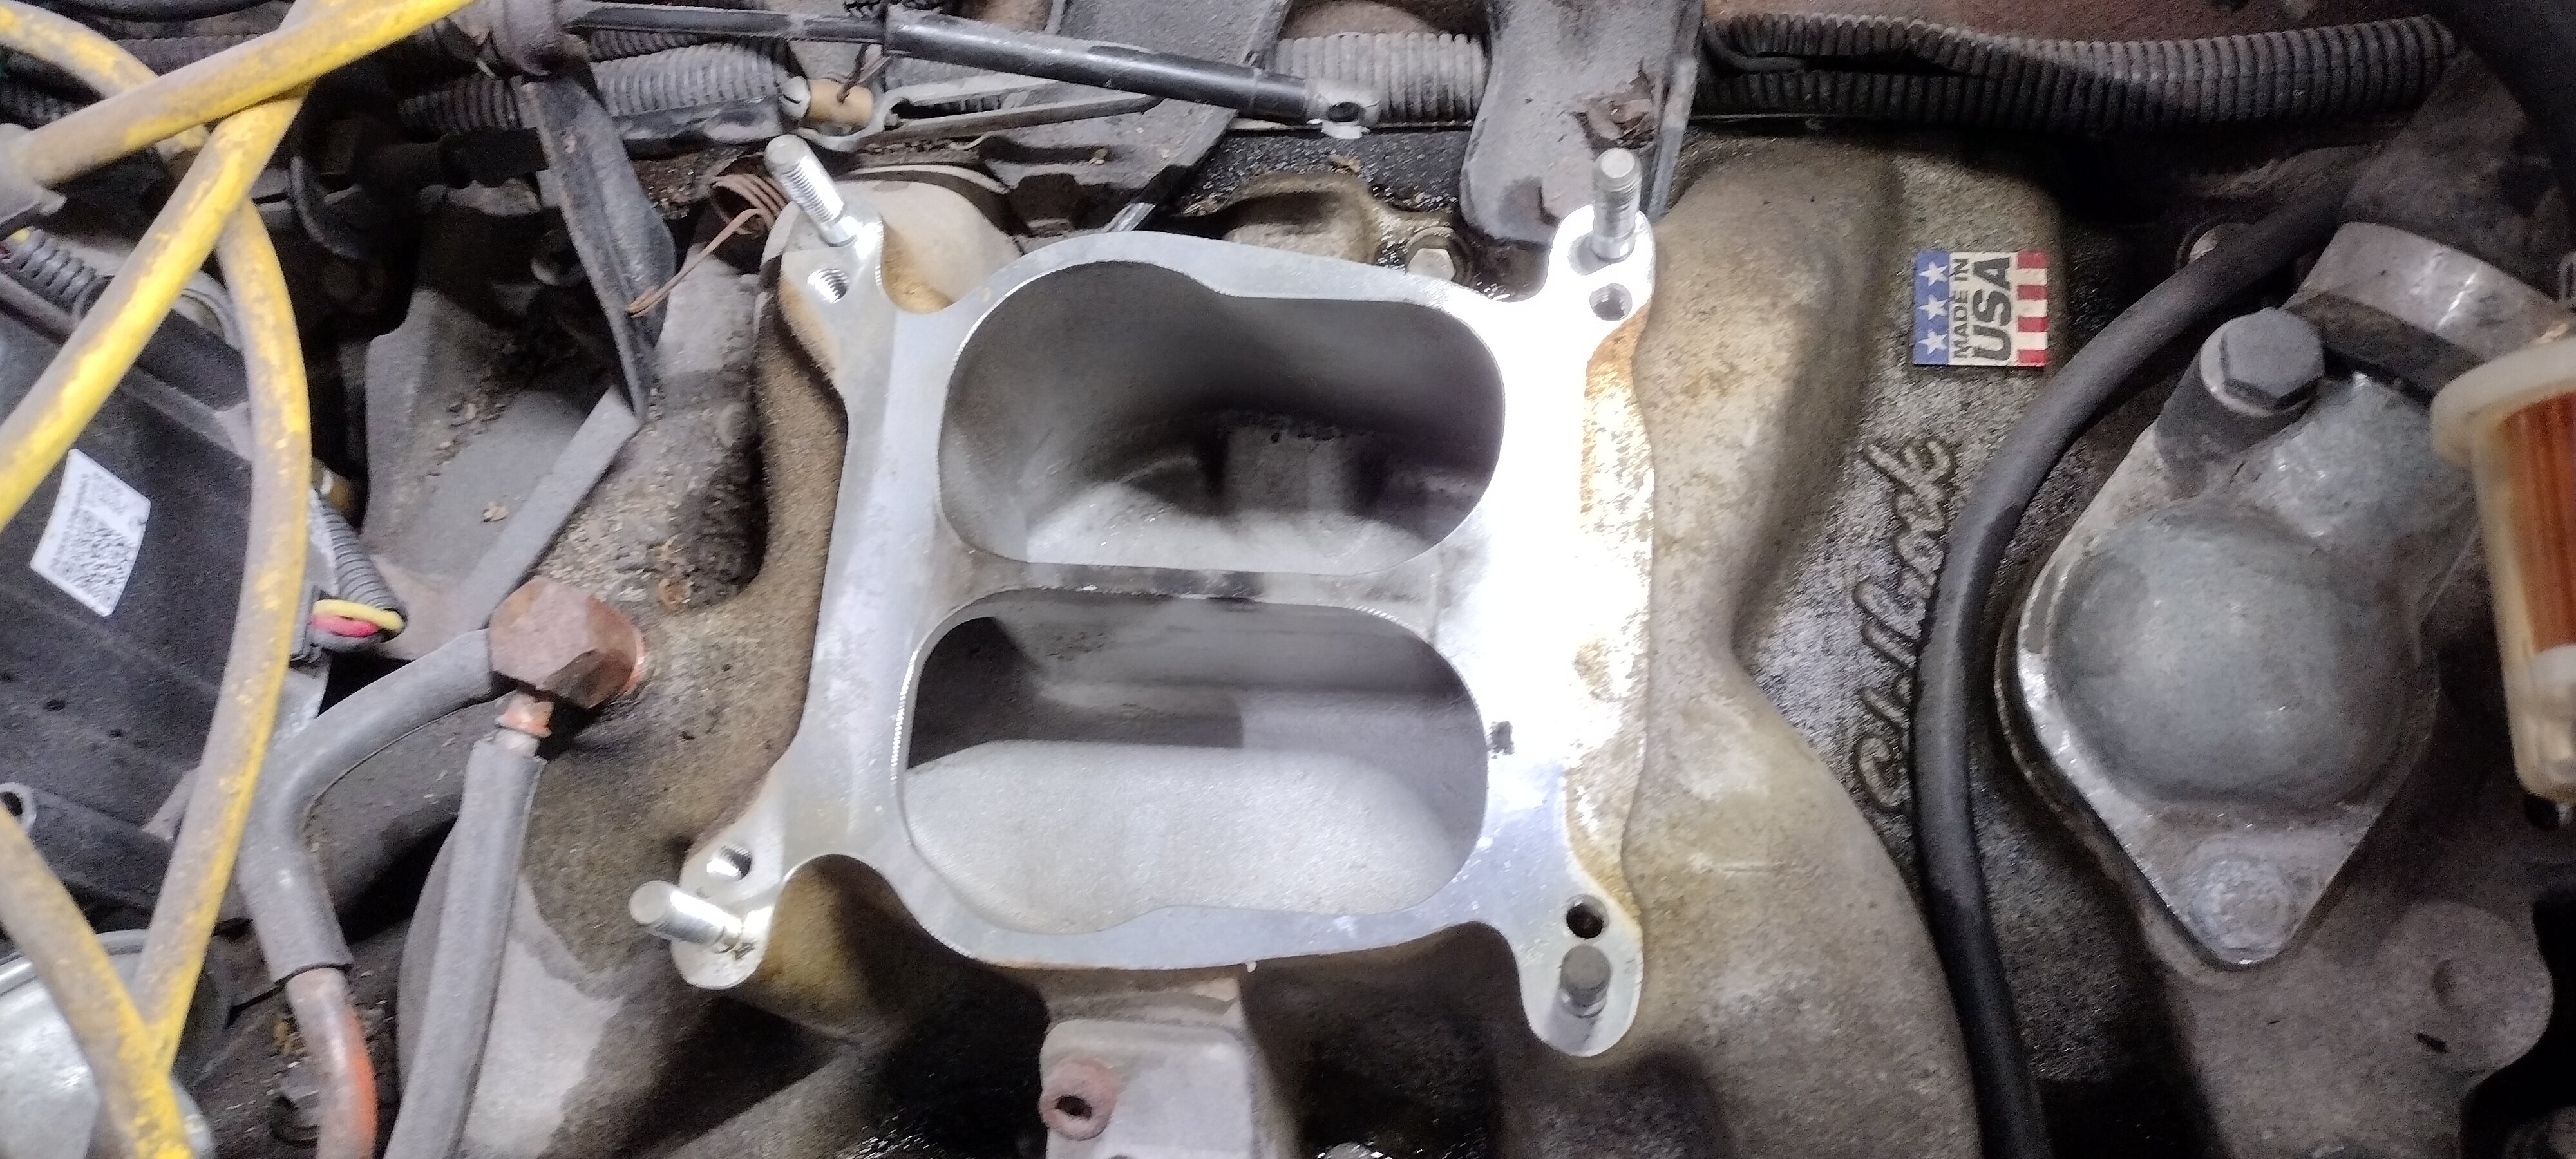
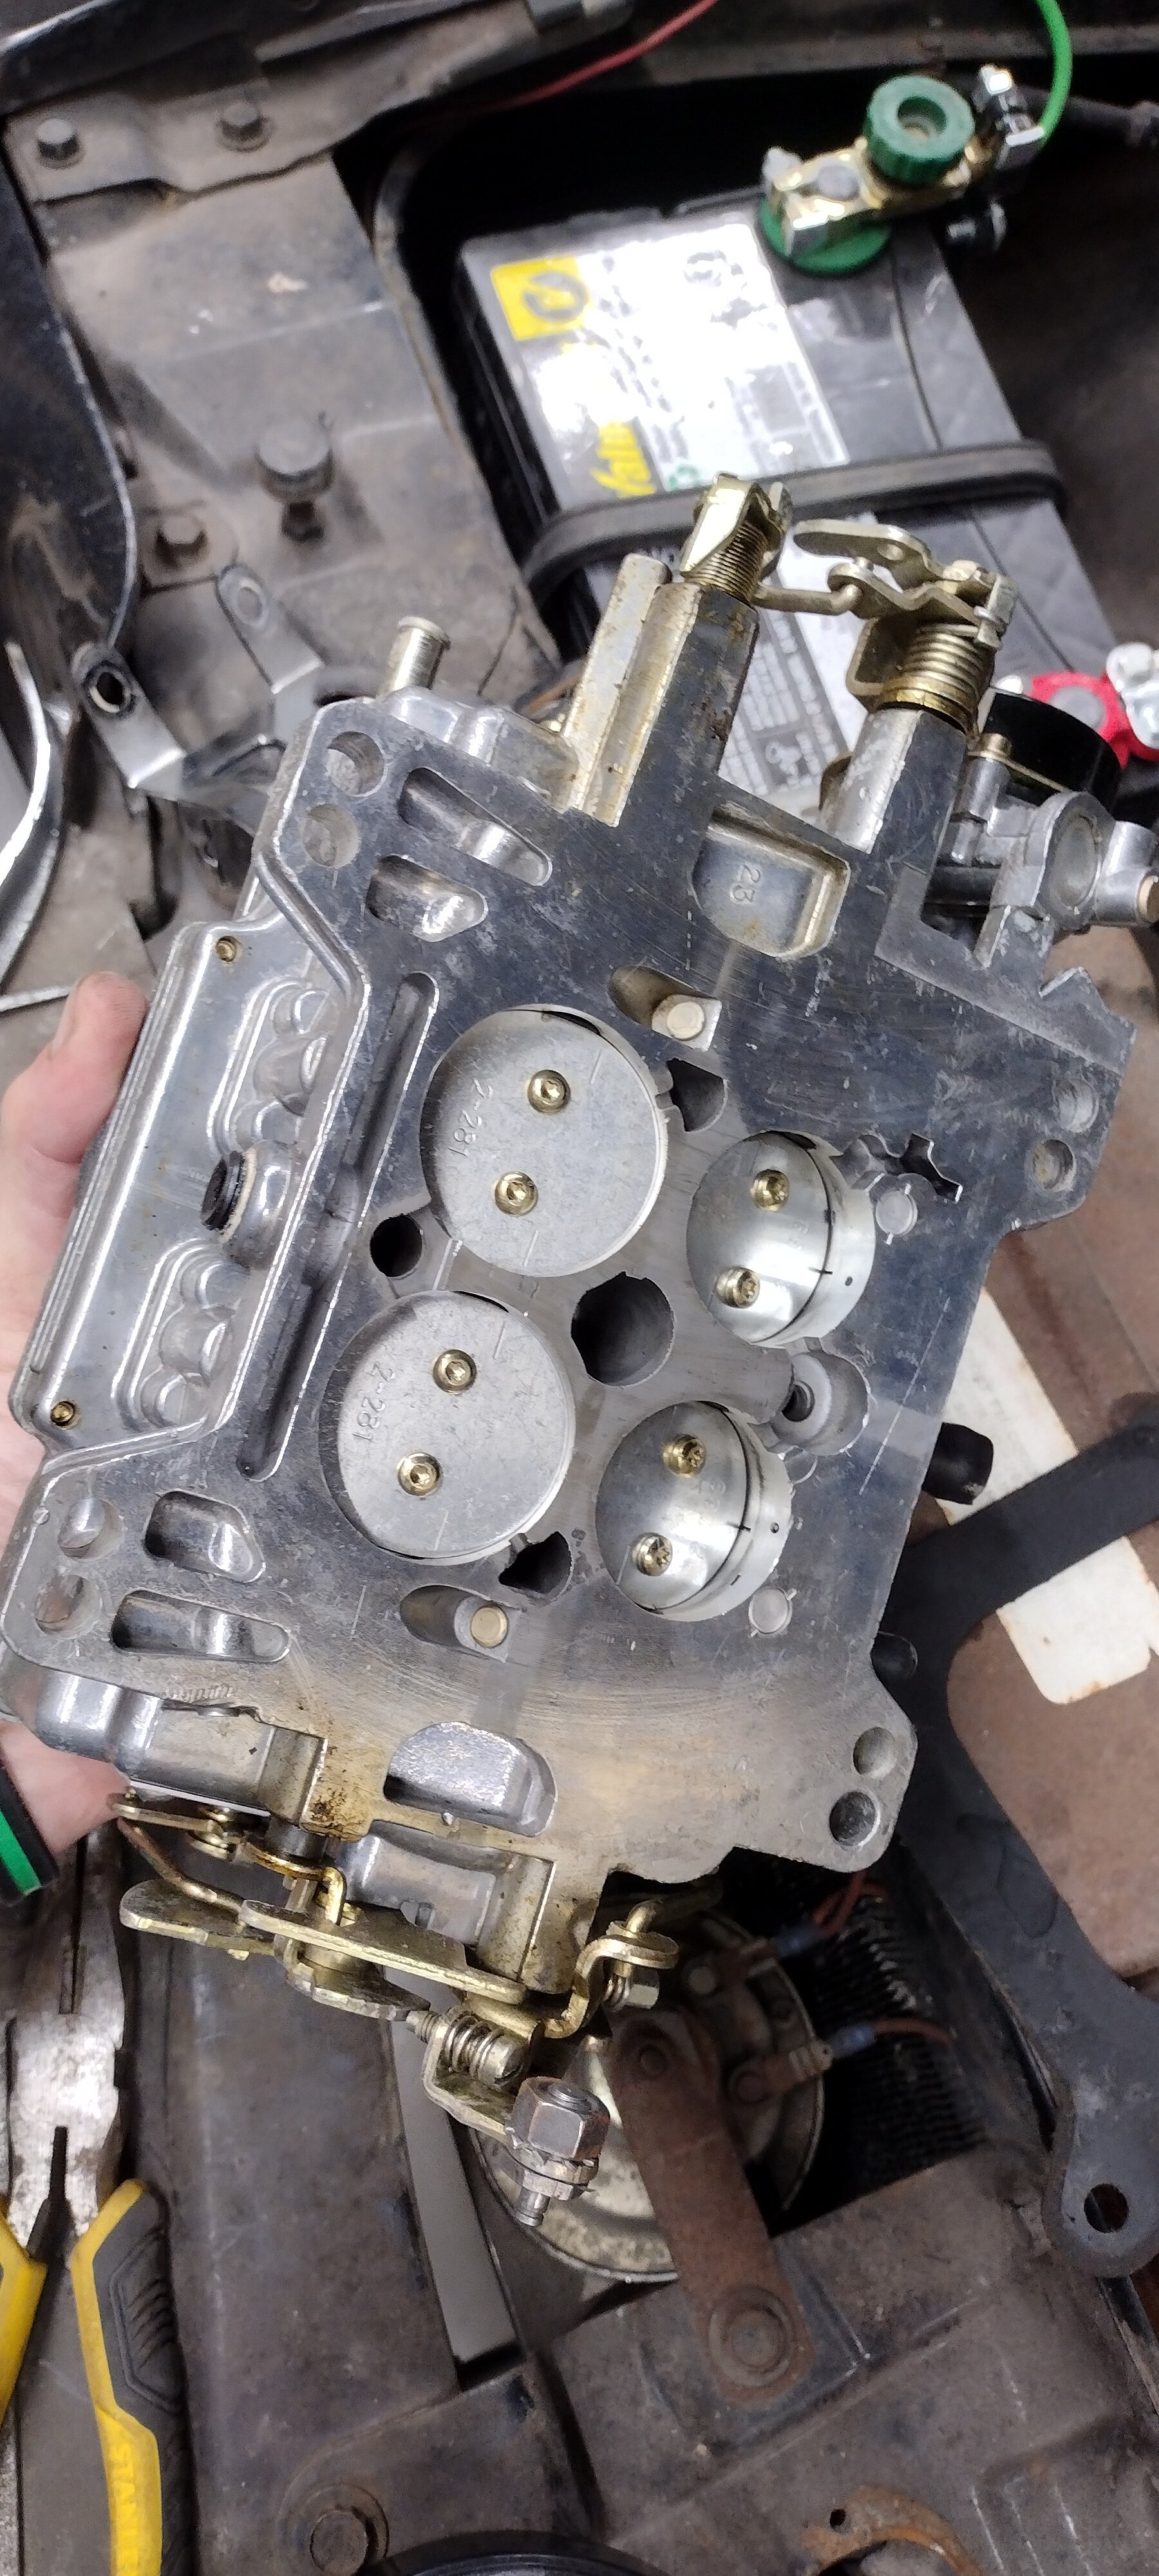
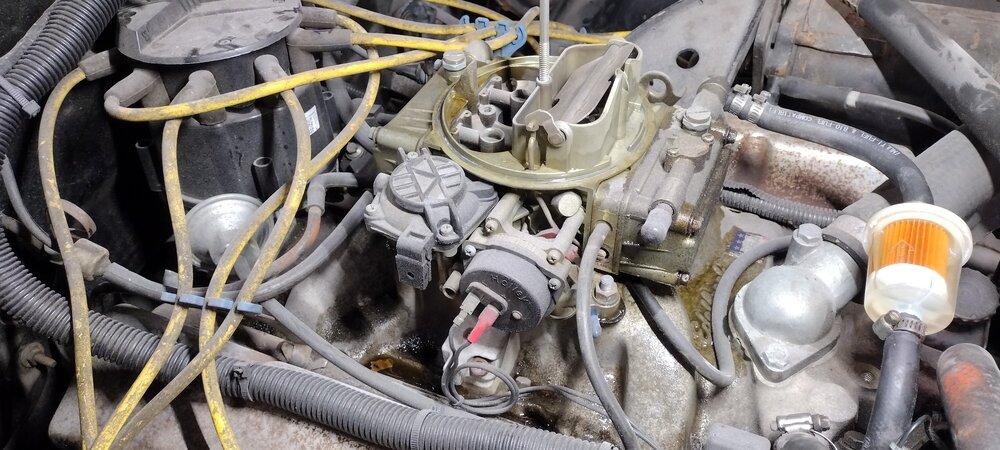
Update ... I installed the Edelbrock 1406 with the Edelbrock gasket I bought off Amazon. No issues there. I still have some work ahead of me getting the throttle and kick down cables squared away but nothing too egregious. But I started it up last night and the engine was running and idling perfectly!!!! Fresh plugs, fresh fuel filter, fresh oil/filter (with zinc) and non-Holley carb were exactly what that engine was looking for Oh, and the needles were removed, inspected (fine) and reinstalled, then 1 1/2 turns out each. I haven't rechecked vacuum and timing yet, but will shortly. I did happen to watch some Edelbrock 1406 videos on YouTube while in my man cave. And I'm glad I did. There are some very particular things to look for on any carb relative to initial setup. So it's worth the time watching some videos. As a result of one video I noticed that they bypass slots on the primaries were exposed when the throttle plates were closed (see excerpt of the above photo, below). In the video the guy talked about this being a problem with too much fuel when idling - all the carb needs exposed are the idle passages. So I backed off the idle screw all the way and got it to where those bypass slots are just barely starting to peak out from under the throttle plates. And again, the engine ran really smooth and the idle was perfect.

-
Last year the nose cone on my starter housing cracked, which lead me to replace it and also fix a tremendous amount of wiring (not me, previous guy(s); see below link if you're interested). I've never gotten past the screeching sound that the new starter and ring gear make, and have always meant to address it earlier rather than later. But here I am! I bought the Procomp Electronics High-Torque Mini Starter PCE393.1032 from Summit Racing (link below). I installed it with no shims, 2 thin shims, and then last night all the shims I've got. But still I get that same screech. The only thing I can think of is maybe there is a tooth-count mismatch. But I dont have a good way to get better clarity on that. Any thoughts? Any other thoughts on what I might try, or whether this is just the wrong starter for the job? Summit Starter Link - https://www.summitracing.com/parts/sdm-pce3931032 My 'General Wiring' thread where I first mentioned that I was replacing the starter, for reference only
-
@TheBMan , that's cool that you contacted Mobil and got some good info and suggestions back from them! Admittedly, I just bought the O'Reilly brand 10W30, plus an off-the-shelf zinc additive. I suppose one can put more thought into their purchase like you have "I use the 5W-40 European Car Formula. I also use a Wix 51060 oil filter which has the anti-drainback valve" Something to keep in mind for next time. And also a good topic for a Sunday morning YouTube rabbit hole I suppose! Thanks for your input here
-
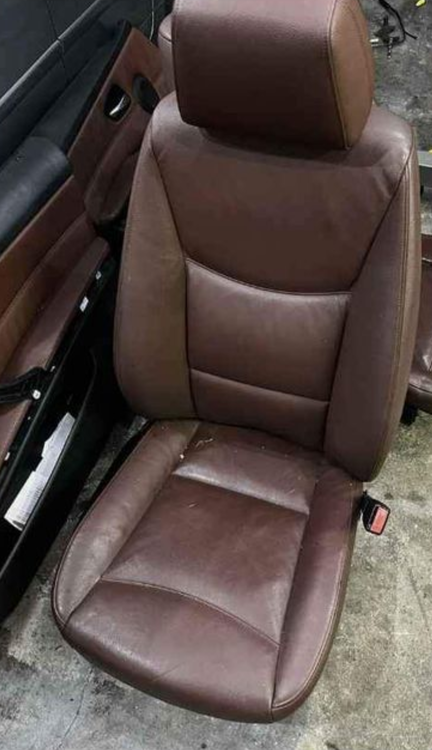
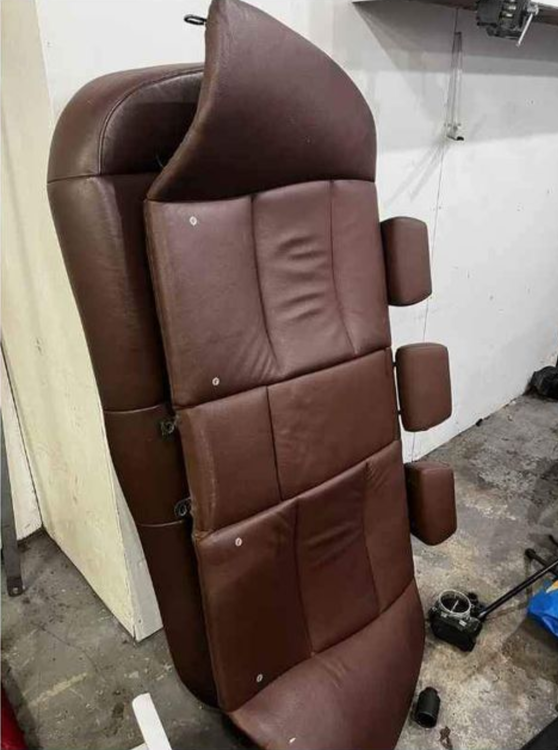
@John Burns, exactly. Quite that challenge. And I dont think it will make the list of 'completed items' for this season given all of the other projects I've got going on with this car (see other threads). But I probably wont be able to help myself, and at some point will strip the interior (carpet and seats) to try and get the front seats in. The current bench seat is pretty beat up and uncomfortable, to the point of not wanting to drive the car sometimes. Again, I will start a separate thread when the time comes
-
Check the shift linkage. Could be as simple as a bolt or rivet fell out
-
@willie, agreed. This will be a challenge for sure. I have essentially zero experience redoing seats or sewing / glueing fabric. And to the merit of @John Burns intent of this thread, it's a non-black interior ... sort of ... it will be a black / saddle-brown hybrid, which I generally like in modern cars (I don't have any modern cars, haha)
-
I just bought a complete interior out of a BMW E90 sedan off of FB Marketplace, cheap!! It's their version of the saddle brown color. I'm going to see if the front seats work out (swap for the black bench with a giant driver side tear). And I plan to pull the fabric off of the rear E90 seat to see if I can somehow blend it in with the rear bench seat. The door panels are likely throwaway but who knows! I will start a dedicated thread for this effort. Should be hilarious!
-
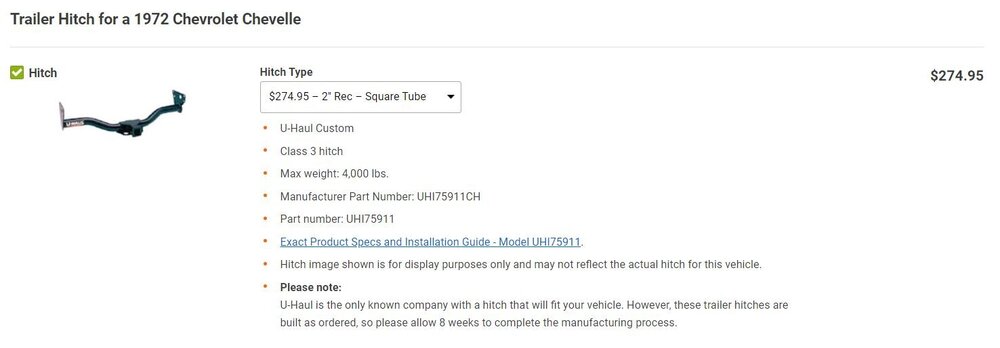
@Dtret, holy cow, that is awesome, hilarious and maybe just a tad bit horrifying (in a good way) all in one!! You're right, it's still welded to the frame. Hard to tell what's frame and what's hitch, hah! Honestly, I will pass but someone should definitely make use of that. Looks like it will hold a heck of a load! And no, I don't have any Carlisle plans at the moment. Never been. I know I know, shame on me. One day!
-
1972 MC 350/Auto - Roof, Sail Panel and Trunk Repair / Replace
B-Man replied to B-Man's topic in Auto Body Repair
@Steve G and @cny first gen 71 I'm just going to bond it in, but will see to just use the resin and fiberglass that I've been using, and am familiar with. I will check out the 'Panel Bond' stuff though. I'm not planning on putting a vinyl top back on. Not sure what I'm going to do actually, but presumably paint it. The glass / micro work has come our VERY nice, and worthy of a good paint job for sure. Certainly good enough to vinyl over. And I do have all of the vinyl top trim still ... hmm, have to get the creative juices going here! -
@Dtret, I doubt the shipping cost from Ohio to Connecticut would make it worth it. But maybe another member near you could use it. Is it a version that goes all the way across and between the sub-frame?
-
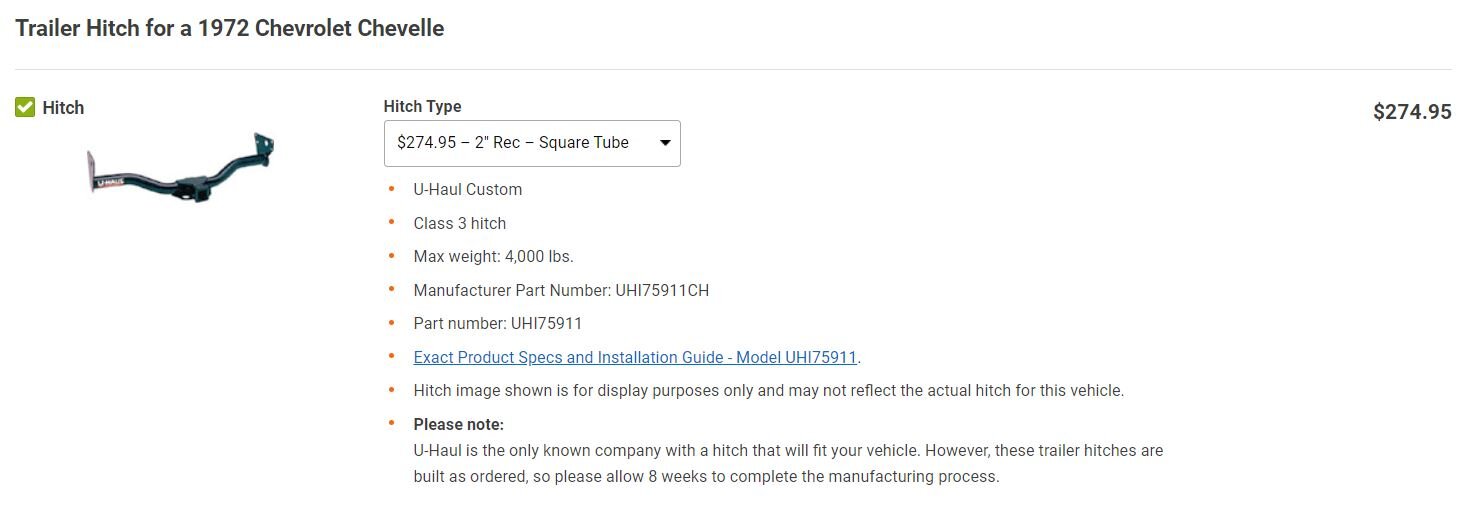
1968-72_Chevelle_Trailer_Hitch-UHaul.pdf I'm resurrecting this thread a bit since it's something I want / need to do in the near future. The UHaul-manufactured hitch (see below and attached) is viable and interesting, as @cbolt has shown us. The UHaul site (use Chevelle, not Monte Carlo) lists the Class 3 Hitch assembly for $274.95, and 4,000lb-rated. I think I would trust @EVC's approach if I did something similar myself (mechanical engineer with CAD / FEA and a machine / welding shop available to me), but I'm not sure it's worth my time given that I could buy my way out of the problem for $300!! I would only be towing a small trailer or camper. Put it on the list of things to do! he Class 2 Hitch
-
I ordered up an Edelbrock 3899 gasket off Amazon. Arriving Friday. Should be back in action this weekend The Holley is now a door stop - perfect! Edelbrock 3899 Square-Bore Carburetor Replacement Base Gasket https://a.co/d/b1JcUe1
-
First start after a long winter, fresh oil, and new plugs, then the Holley decides to start puking fuel EVERYWHERE! Man, let no good deed go unpunished. Almost had to build another new garage. I do have 2 fire extinguishers nearby, but man that was a lot of fuel. I've got an Edelbrock 1406 ready and waiting to go on anyway. I bought it from another awesome forum member here last year, along with an intake (already have the same one installed but bought that anyway). I've got to chase down a fresh gasket and then deal with the linkage but should be a quick swap. I already have the Holley off and the Edelbrock ready to go.


-
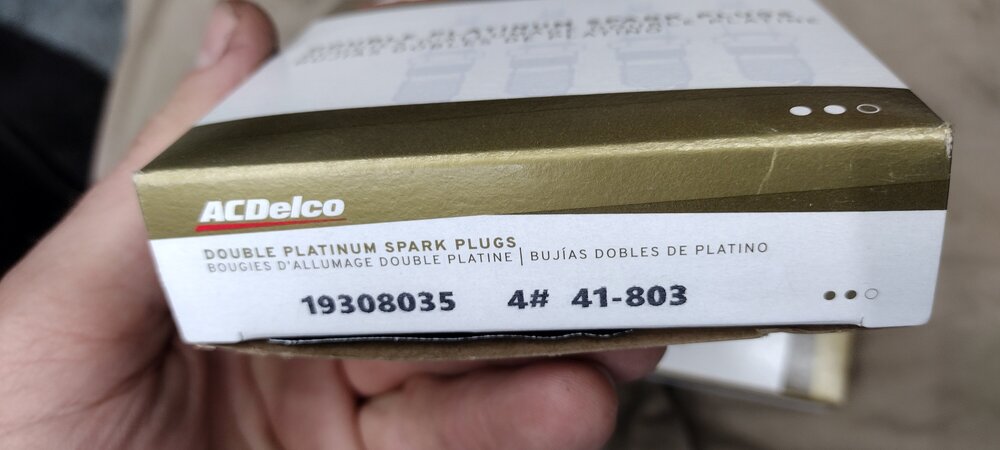
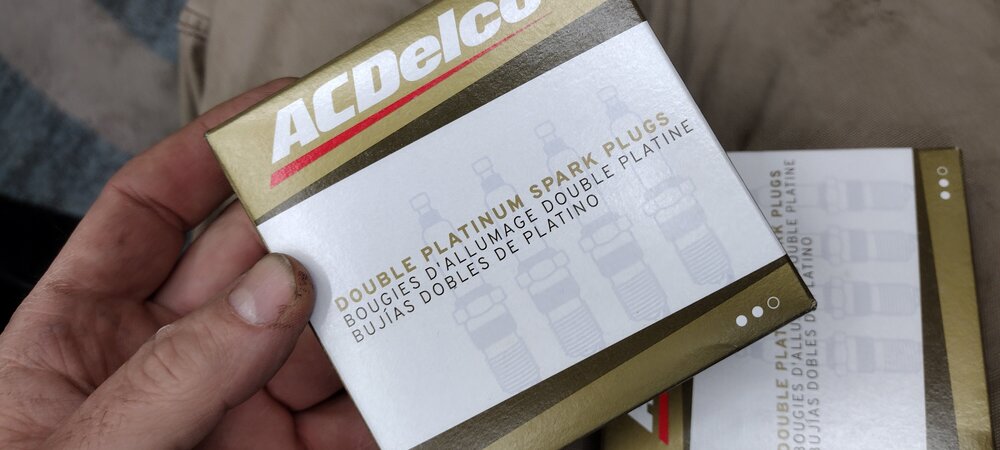
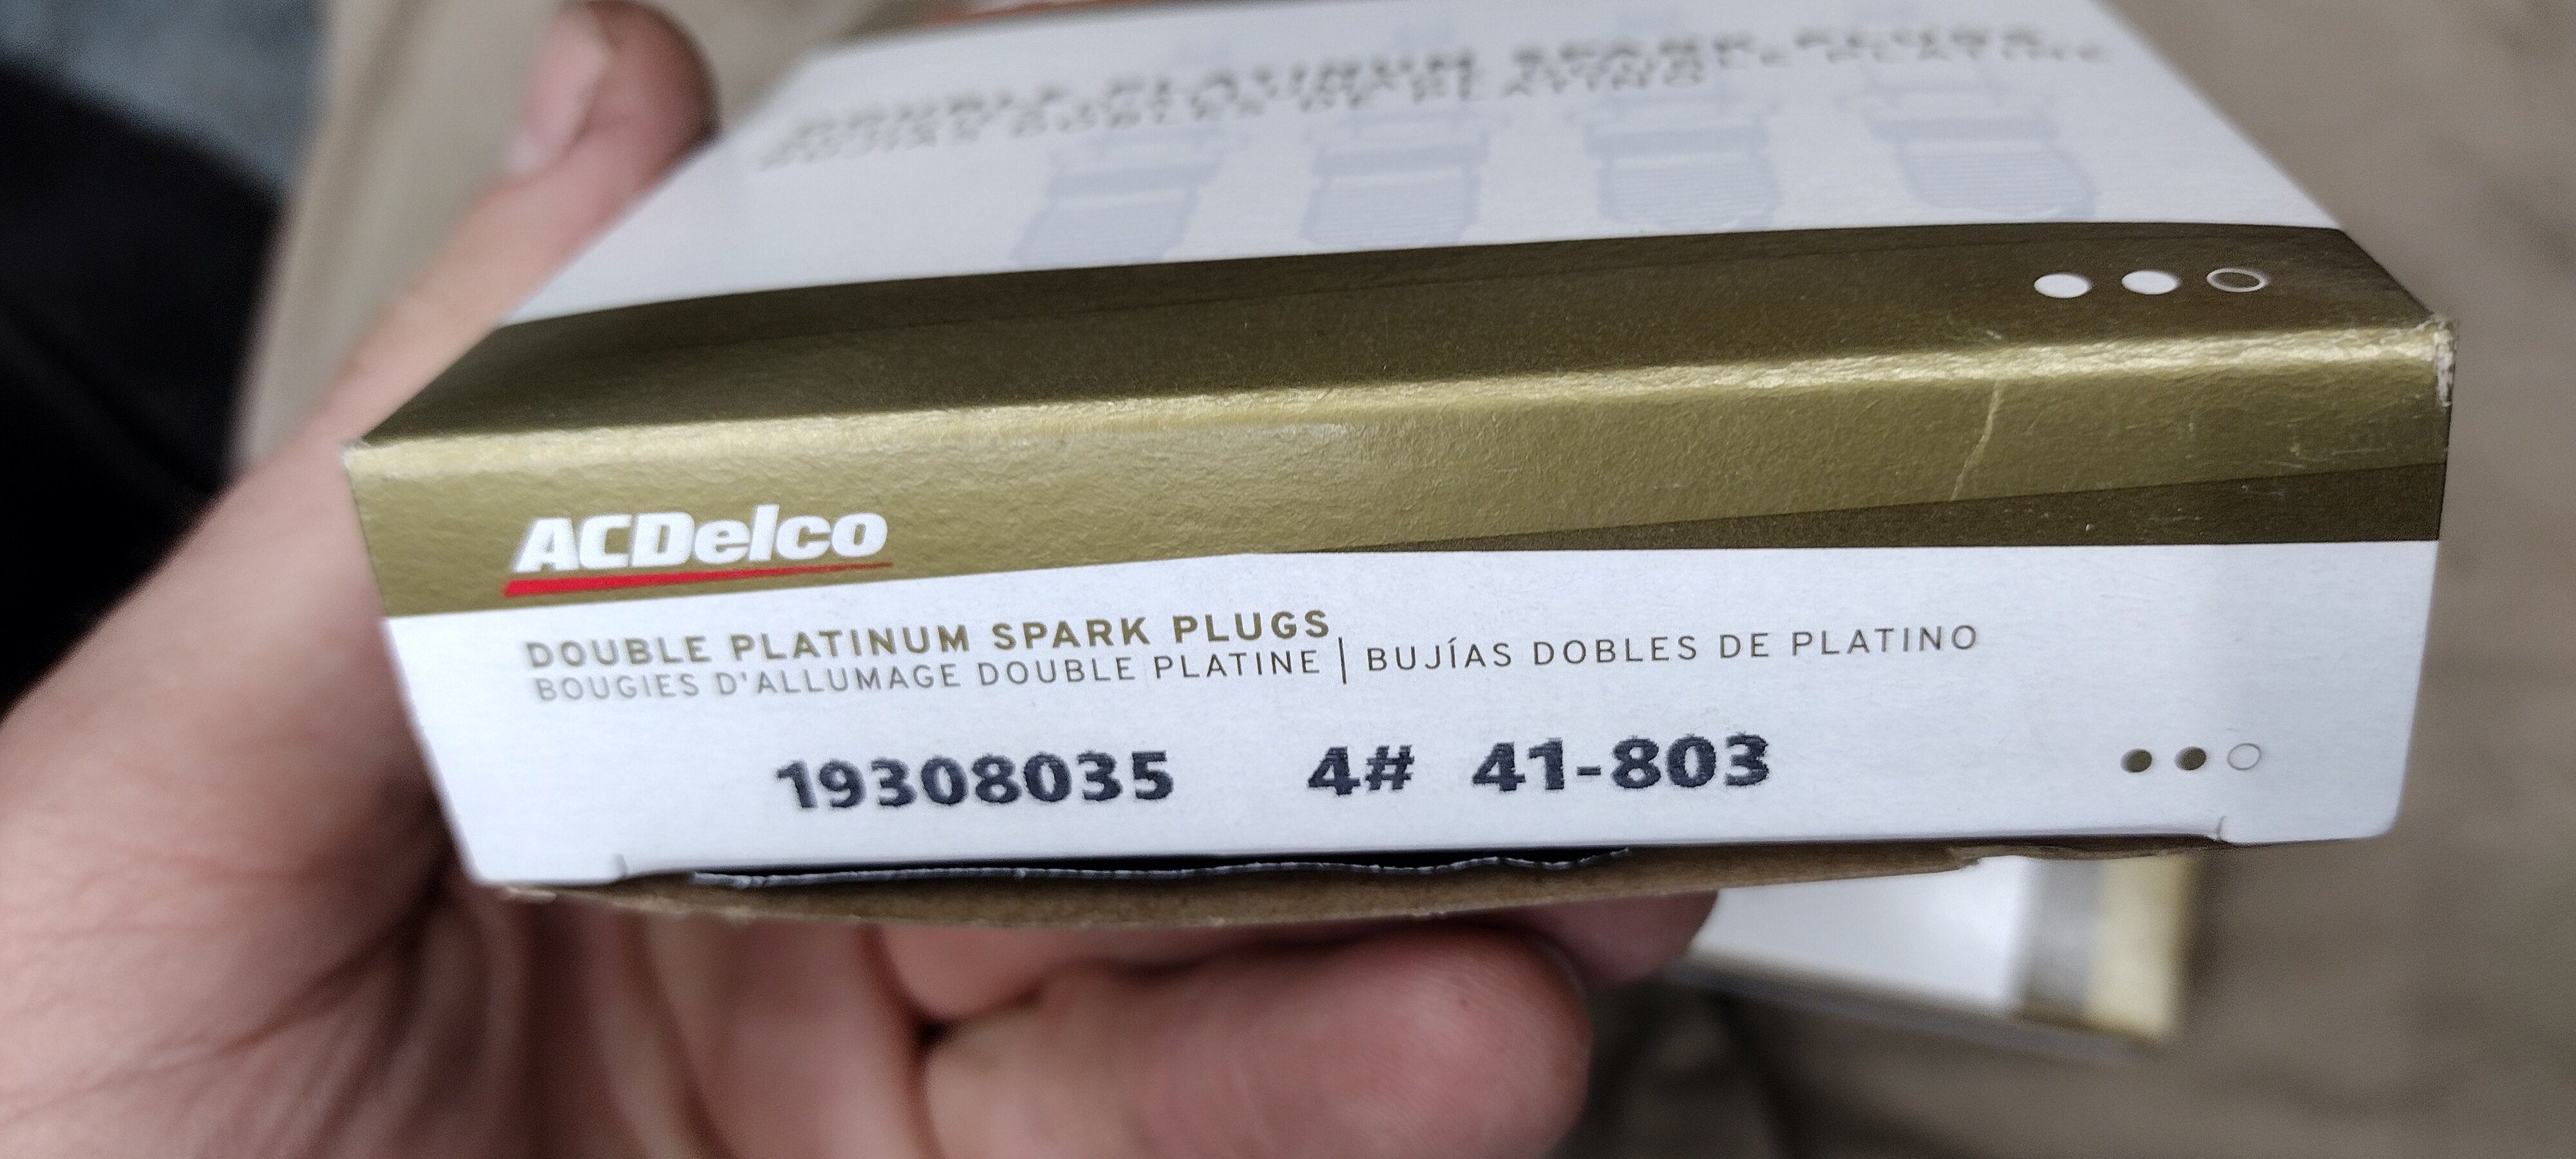
@cny first gen 71, correction here. I got the AC Delco Double Platinum 19308035 41-803 They are definitely a bit spendy. And I have no idea if I will realize the quality. But it sure has been a while since this engine has had some new spark plugs. So I don't mind the $40 delta from the el-cheapos On the oil I ALMOST made a seriously dumb move! I left the oil plug out last night to let the engine drain fully. I ALMOST dumped the oil in without putting the plug back in. I had the funnel in and was starting to poor before something in the back of my mind set off an alarm. Sheesh! Went with 10W30