Lawrence71
-
Posts
33 -
Joined
-
Last visited
Content Type
Profiles
Articles
Forums
Gallery
Events
Everything posted by Lawrence71
-
Occasional starting issues
Lawrence71 replied to Lawrence71's topic in General 70-72 Monte Carlo Forum
This is certainly what it /seems/ like, behavior-wise. I guess I'll visually inspect and see what I can tell on this wire. (If it's not to hard, might just proactively replace, if I can figure out what it's called.) I tested the battery using something like this: https://www.amazon.com/Performance-Tool-W2998-Portable-Analyzer/dp/B073VCB6P2 On the car itself, with the positive wire on the post and the negative on ground, it said the battery was bad and to replace, though it still picked up 12.79 V. I pulled the battery and bench-tested, and it said the battery was good, same voltage. I'd assume this means there might be some sort of load that it was picking up, could it be a short or something? It could also be a crap tool, was an O'Reilly in-store special. Tested the battery, which said good off the car, but it came with it and has seen better days so open to just replacing proactively; this is 650/800CA top-post, so not even sure it's the original one that came with. Don't mind throwing a little money at the problem to see if it goes away... 🙂 that and the battery cables. -
Hey, so I've been scratching my head over this one and could use some ideas for things to check. My '71 has occasional starting issues after running for a while. The general pattern is car starts ok, go somewhere for a while (30-60 minutes), then come back and nothing: no click, no turning over at all. Leave it overnight and the next day everything is fine, starts without issue. Battery and alternator are tested and verified good. I replaced the starter already and that didn't help. The common thread I'm seeing is that it's on pretty hot days, so not sure if something is expanding and losing contact with a ground or anything. There is a voltage drop when trying to start according to the gauge, so ignition switch seems to be working. I've tried switching into neutral in case it's NSS but in this case it still won't start. Any ideas on what to look for at this point? I'm considering replacing the battery cables just on principle. Thanks, David
-
So this has happened a couple of times, enough that I can't discount as a fluke. Occasionally (rarely, though seems like it's been happening a little more frequently, probably 5-6 times total) I will drive somewhere in my 71, leave for 20-30 minutes on an errand, then come back and it won't start immediately. This has ranged from complete nothing to a slight click (feels like a *little* more than just the solenoid, like it's just moving a tooth or two on the flywheel, but just doesn't have the strength to move it).. At this point, I've been able to start again in a minute or so after various random shifting in/out of neutral and just trying again later, however there's not a consistent pattern here. Battery/alternator both good/new, and when it starts up it starts without issue afterwards. I assume at this point it's likely NSS or starter going out, but what would be useful in diagnosing? This is inconsistent and has only happened when I've been out, so I've not had tools available for at-the-time diagnosis. Ideas? As always, thanks for your expertise and opinions.
-
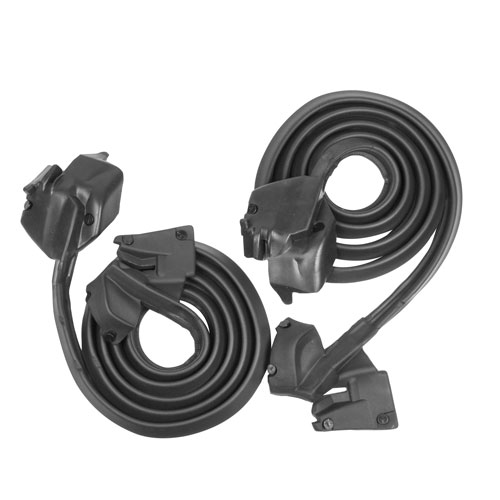
So I'm now working on replacing the Door Seals, using a kit roughly like this (including picture for clarity, since I'm not certain of the name): A couple of questions: 1) Do I need any sort of adhesive to attach these? The pieces I have have the little clips staggered throughout that match up with the holes, so don't necessarily think so. The old part had what looks to be a little adhesive on the side with the strike plate, but on the whole it appears to not use that; do I need any at all? 2) The kit I got came with the wrong size end fasteners; they are too big for the holes. I've tried searching for replacement fasteners but have not have good luck with guessing the naming to find the exact match. I did buy some stainless steel pan screws since one side the previous owner had attached using those, but would those work as expected, or should I hold out for the real deal, and in that case what is that called? 3) While I've got the inner door panel off, is there anything else I should do here with the windows, like take the time to grease the mechanism? I have new window felts on order, so I will probably wait to finish the install until those are here, just looking for easy things to do that will improve things without a ton of additional future work. Thanks, David
-
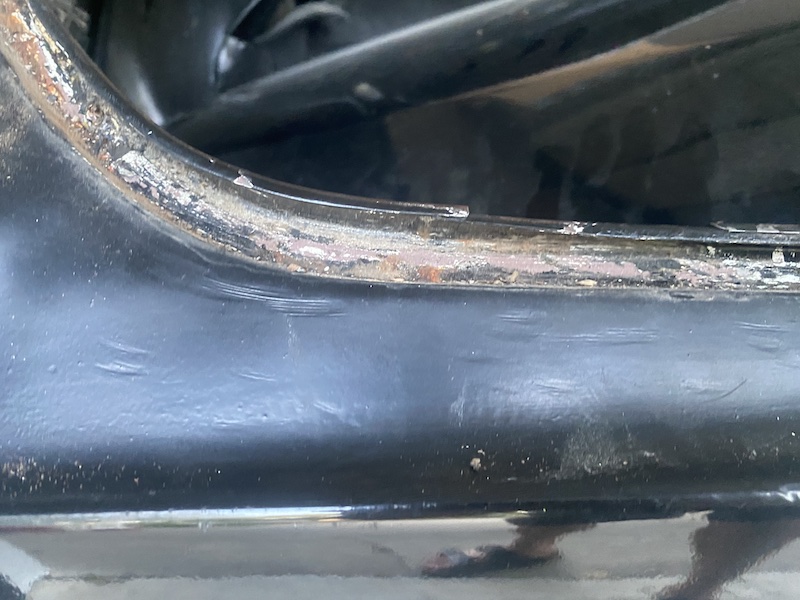
Weatherstripping channel rust
Lawrence71 replied to Lawrence71's topic in General 70-72 Monte Carlo Forum
Yup, used a plastic trim tool to remove most of it. Going to hit it with some goo gone and brush out the channel. (Maybe start with nylon so no more scratches than necessary but going to avoid anything not in the channel, will just see what is effective there.) Got the above mentioned kit which includes a couple things to pretreat, but the POR15 looks like it goes on the bare metal afterward. -
Weatherstripping channel rust
Lawrence71 replied to Lawrence71's topic in General 70-72 Monte Carlo Forum
Hi Mike. That does sounds sensible; looks like something like this would do the job: https://shop.advanceautoparts.com/p/por-15-stop-rust-kit-gloss-black-40909/11839912-p Thanks for the tips -
Weatherstripping channel rust
Lawrence71 replied to Lawrence71's topic in General 70-72 Monte Carlo Forum
Here are some pictures of the rust area and the bare metal (as examples). This is before vacuuming any crap up, so probably looks worse than reality.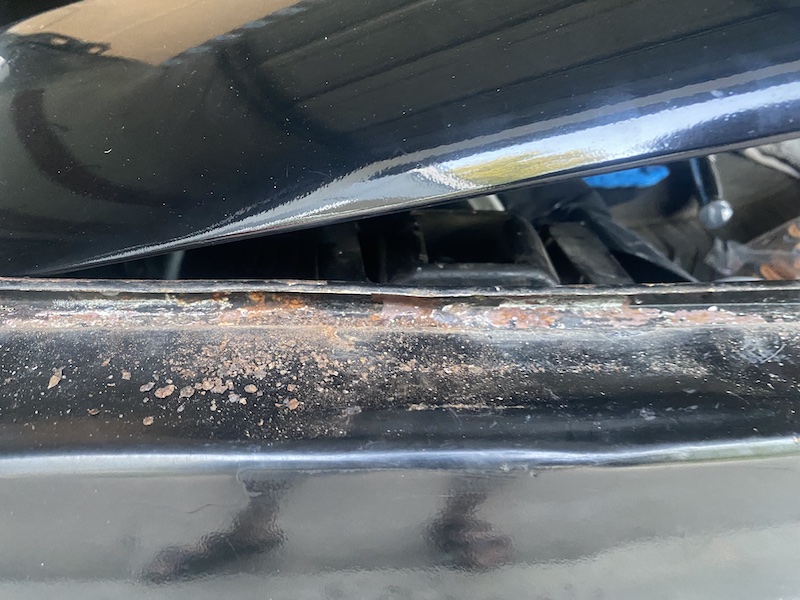
-
So I have a trunk leak that I isolated to ancient weatherstripping. Got the parts, pulled it out, and there is some varied rust/bare metal in the channel. Not bad to the point of being rusted through, just seems to be a little surface rust but not sure what next best steps are. Can I just use a brush to scrape out any loose bits? Should it be painted before I get the adhesive in there, etc? Wasn’t planning on any sort of major paint work on the car at this point so was hoping to just be able to slap some black touch up paint in the channel, let it dry, then get the new strip in. Does that make sense? David
-
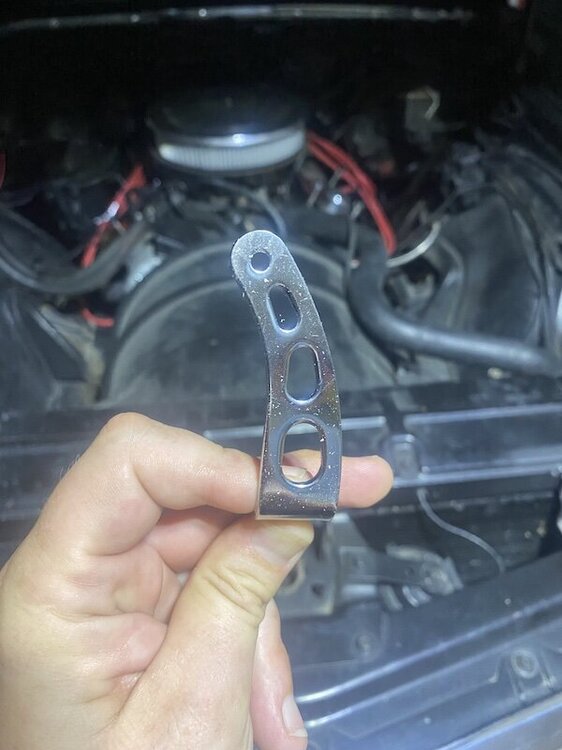
Throttle Return Spring Bracket
Lawrence71 replied to Lawrence71's topic in General 70-72 Monte Carlo Forum
I ended up doing a little more research and doing the loc-tite. Attached fine but looks like I need springs with more give. -
Throttle Return Spring Bracket
Lawrence71 replied to Lawrence71's topic in General 70-72 Monte Carlo Forum
I also have blue Loc-Tite. -
Throttle Return Spring Bracket
Lawrence71 replied to Lawrence71's topic in General 70-72 Monte Carlo Forum
Is copper-based antiseize good here? I have some left over from new plugs. -
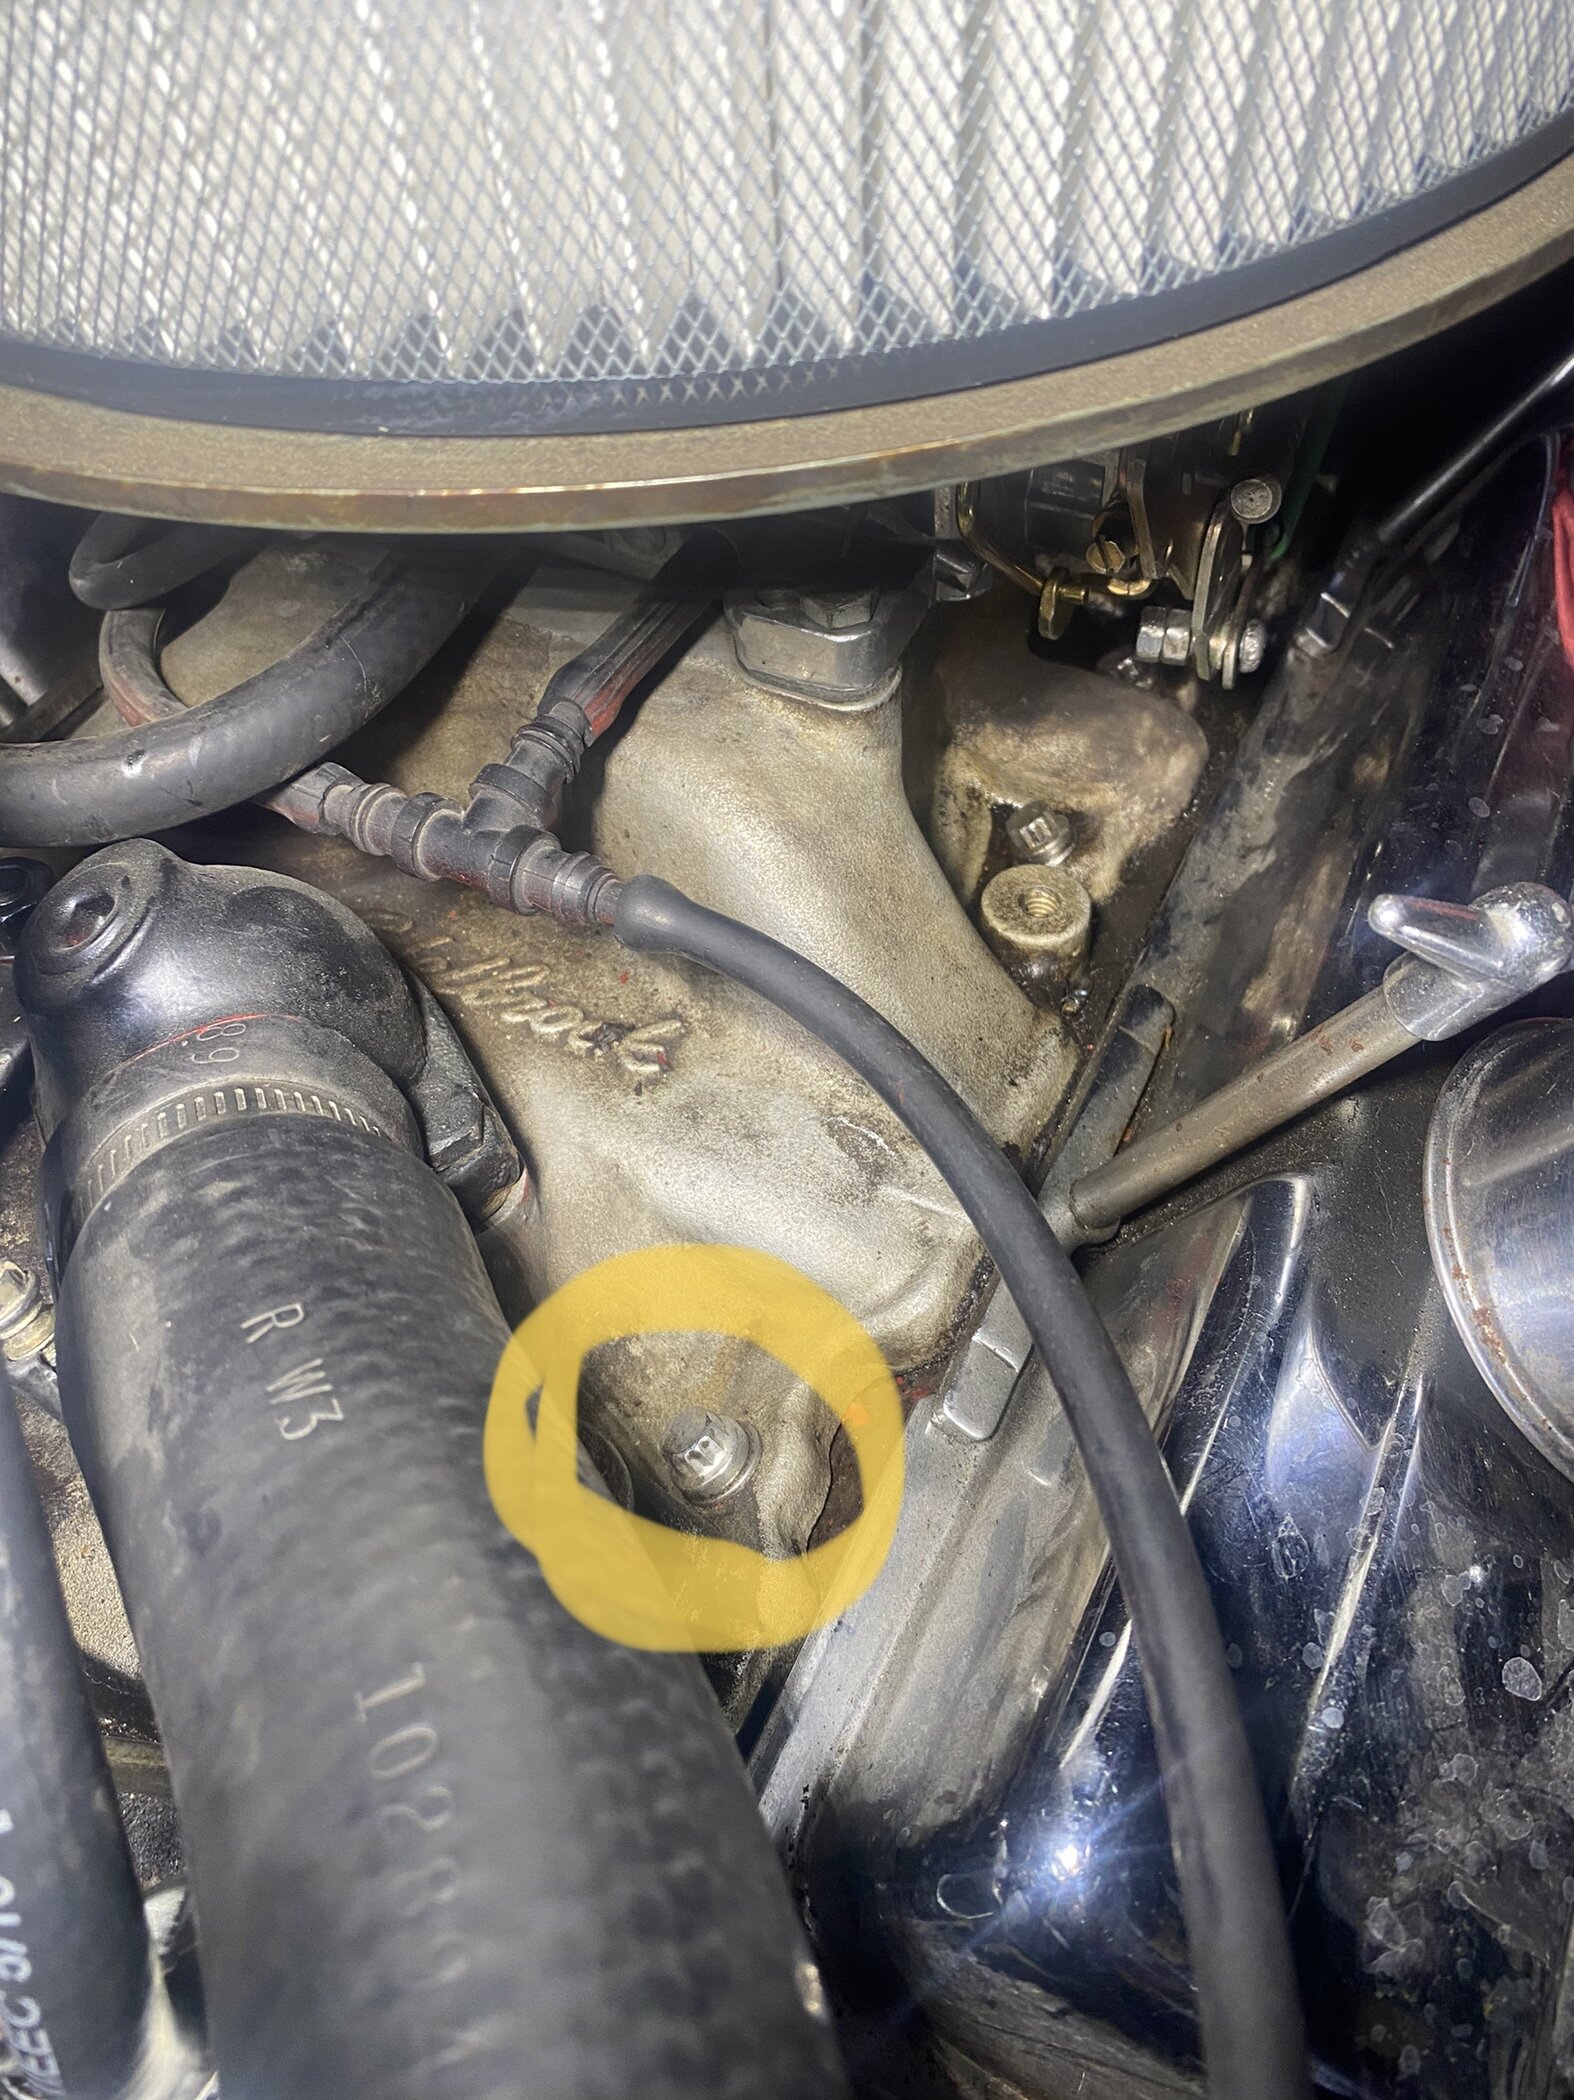
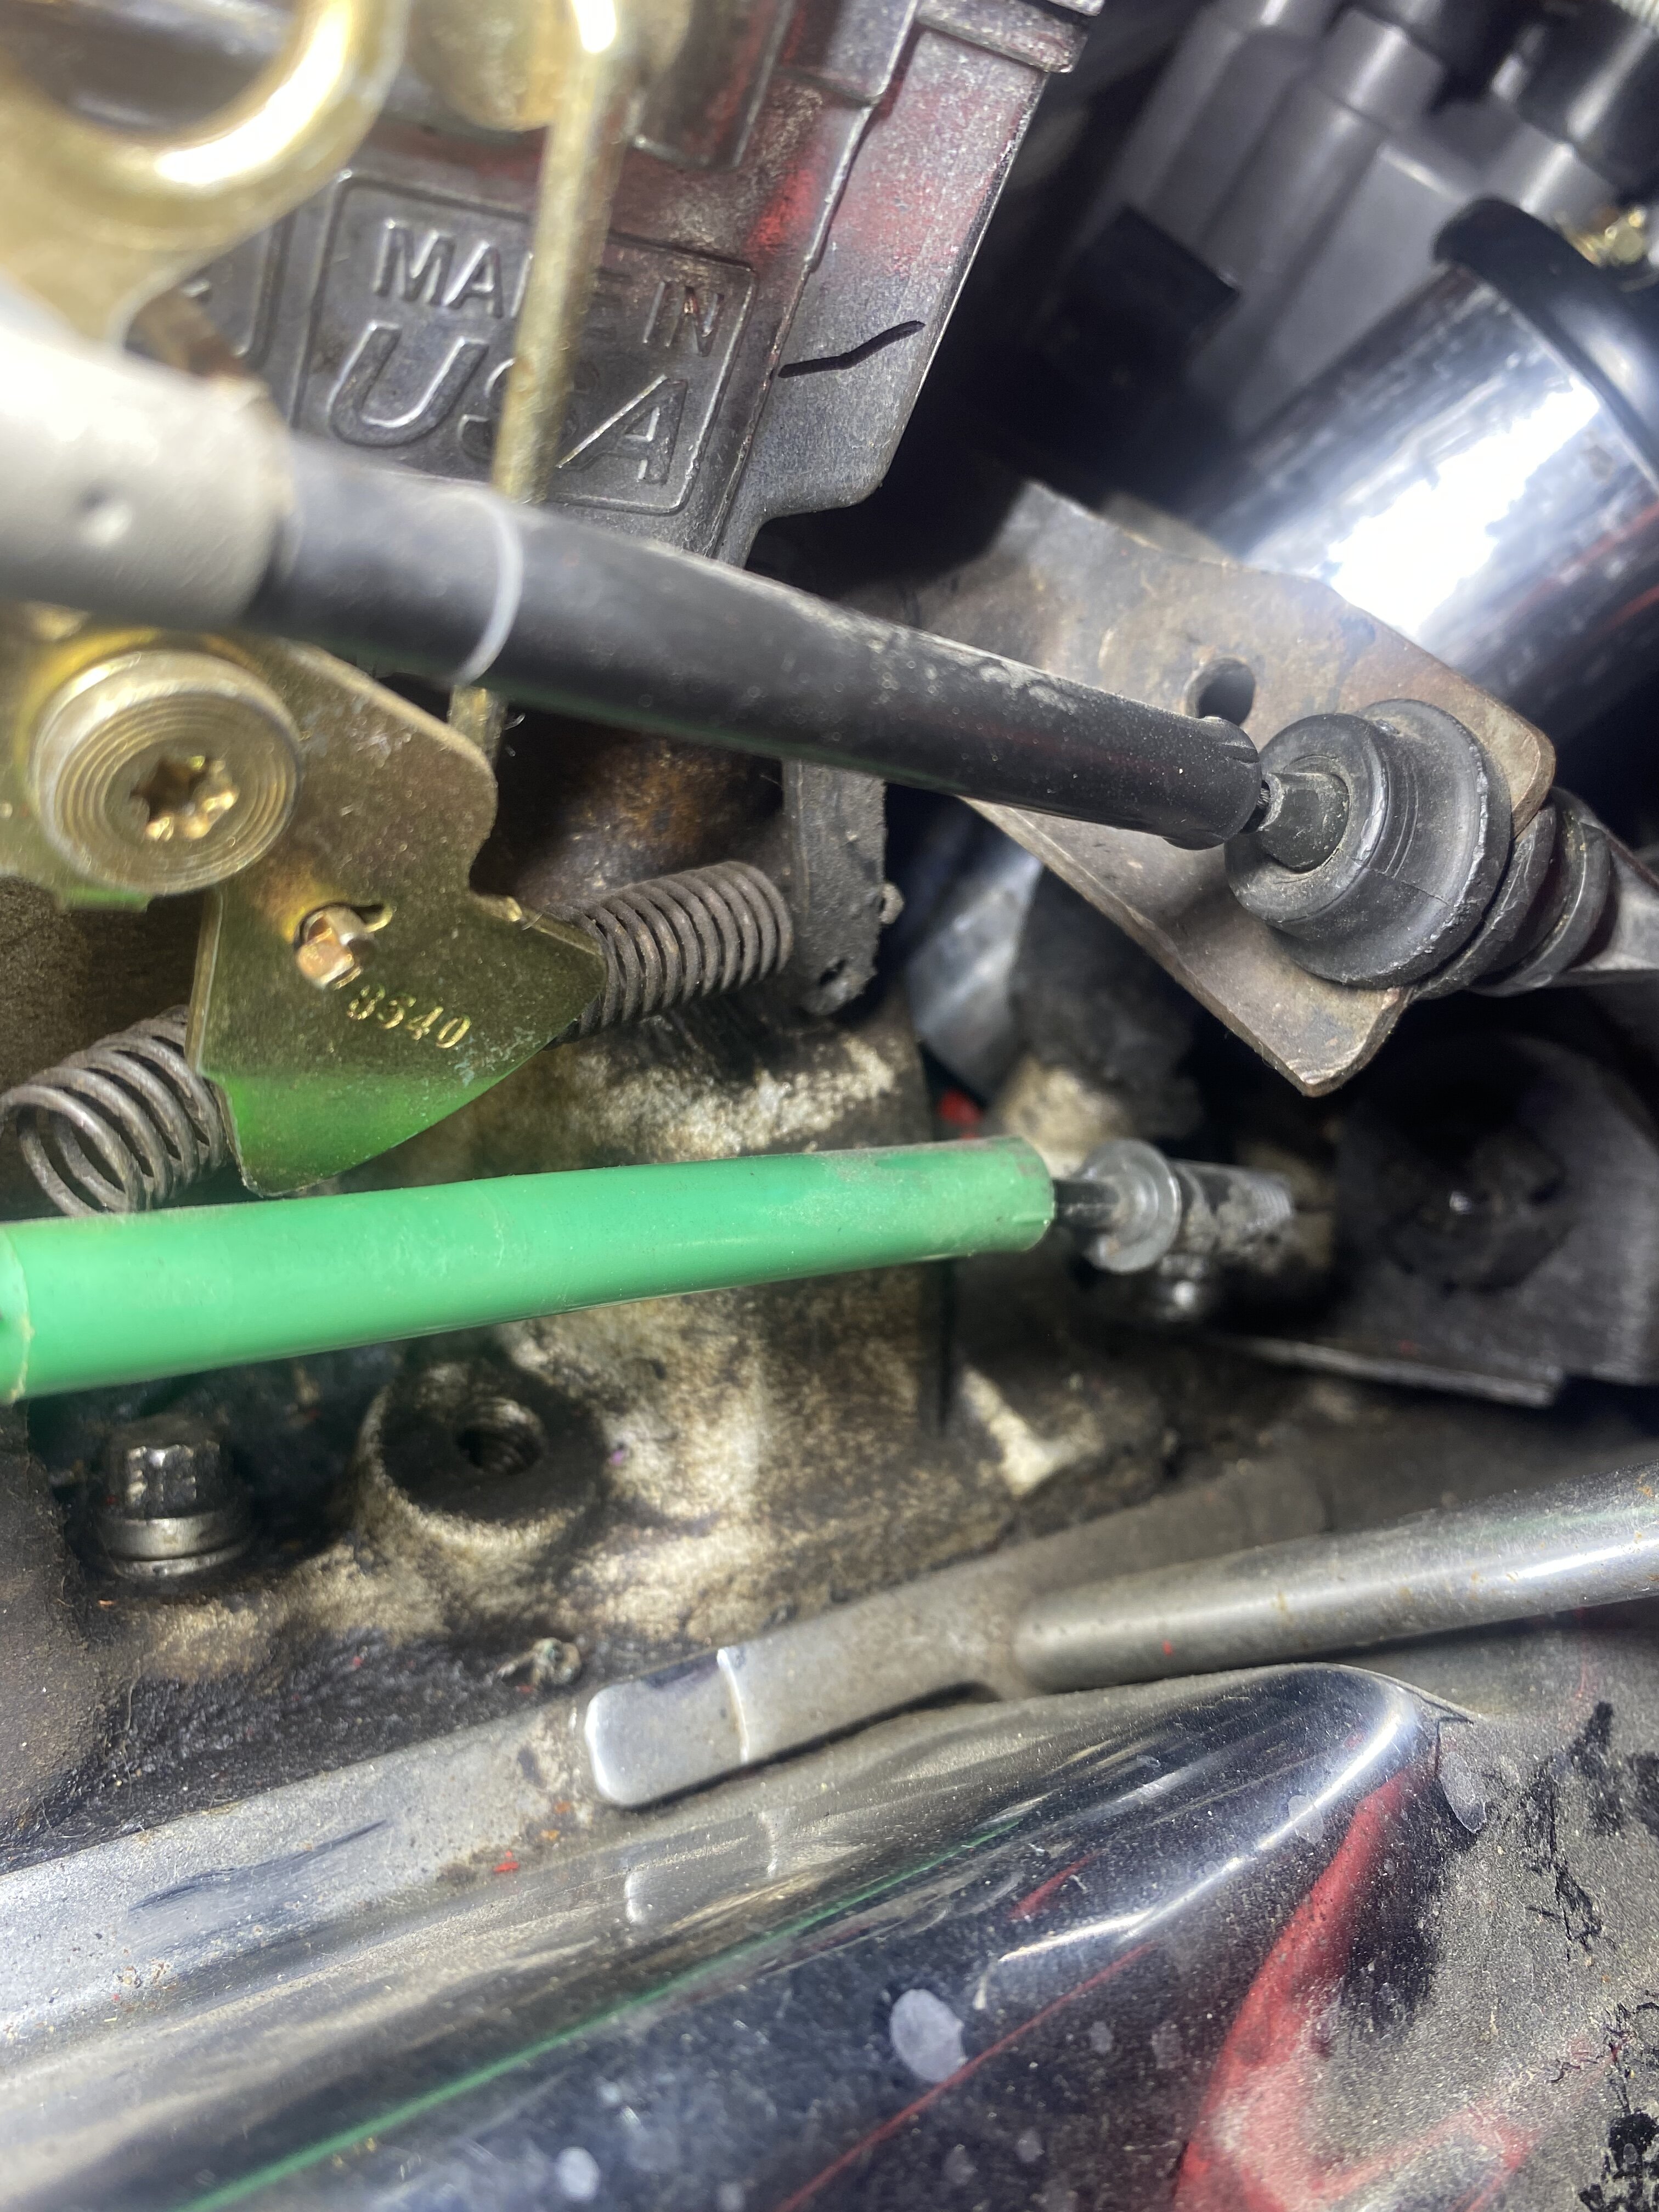
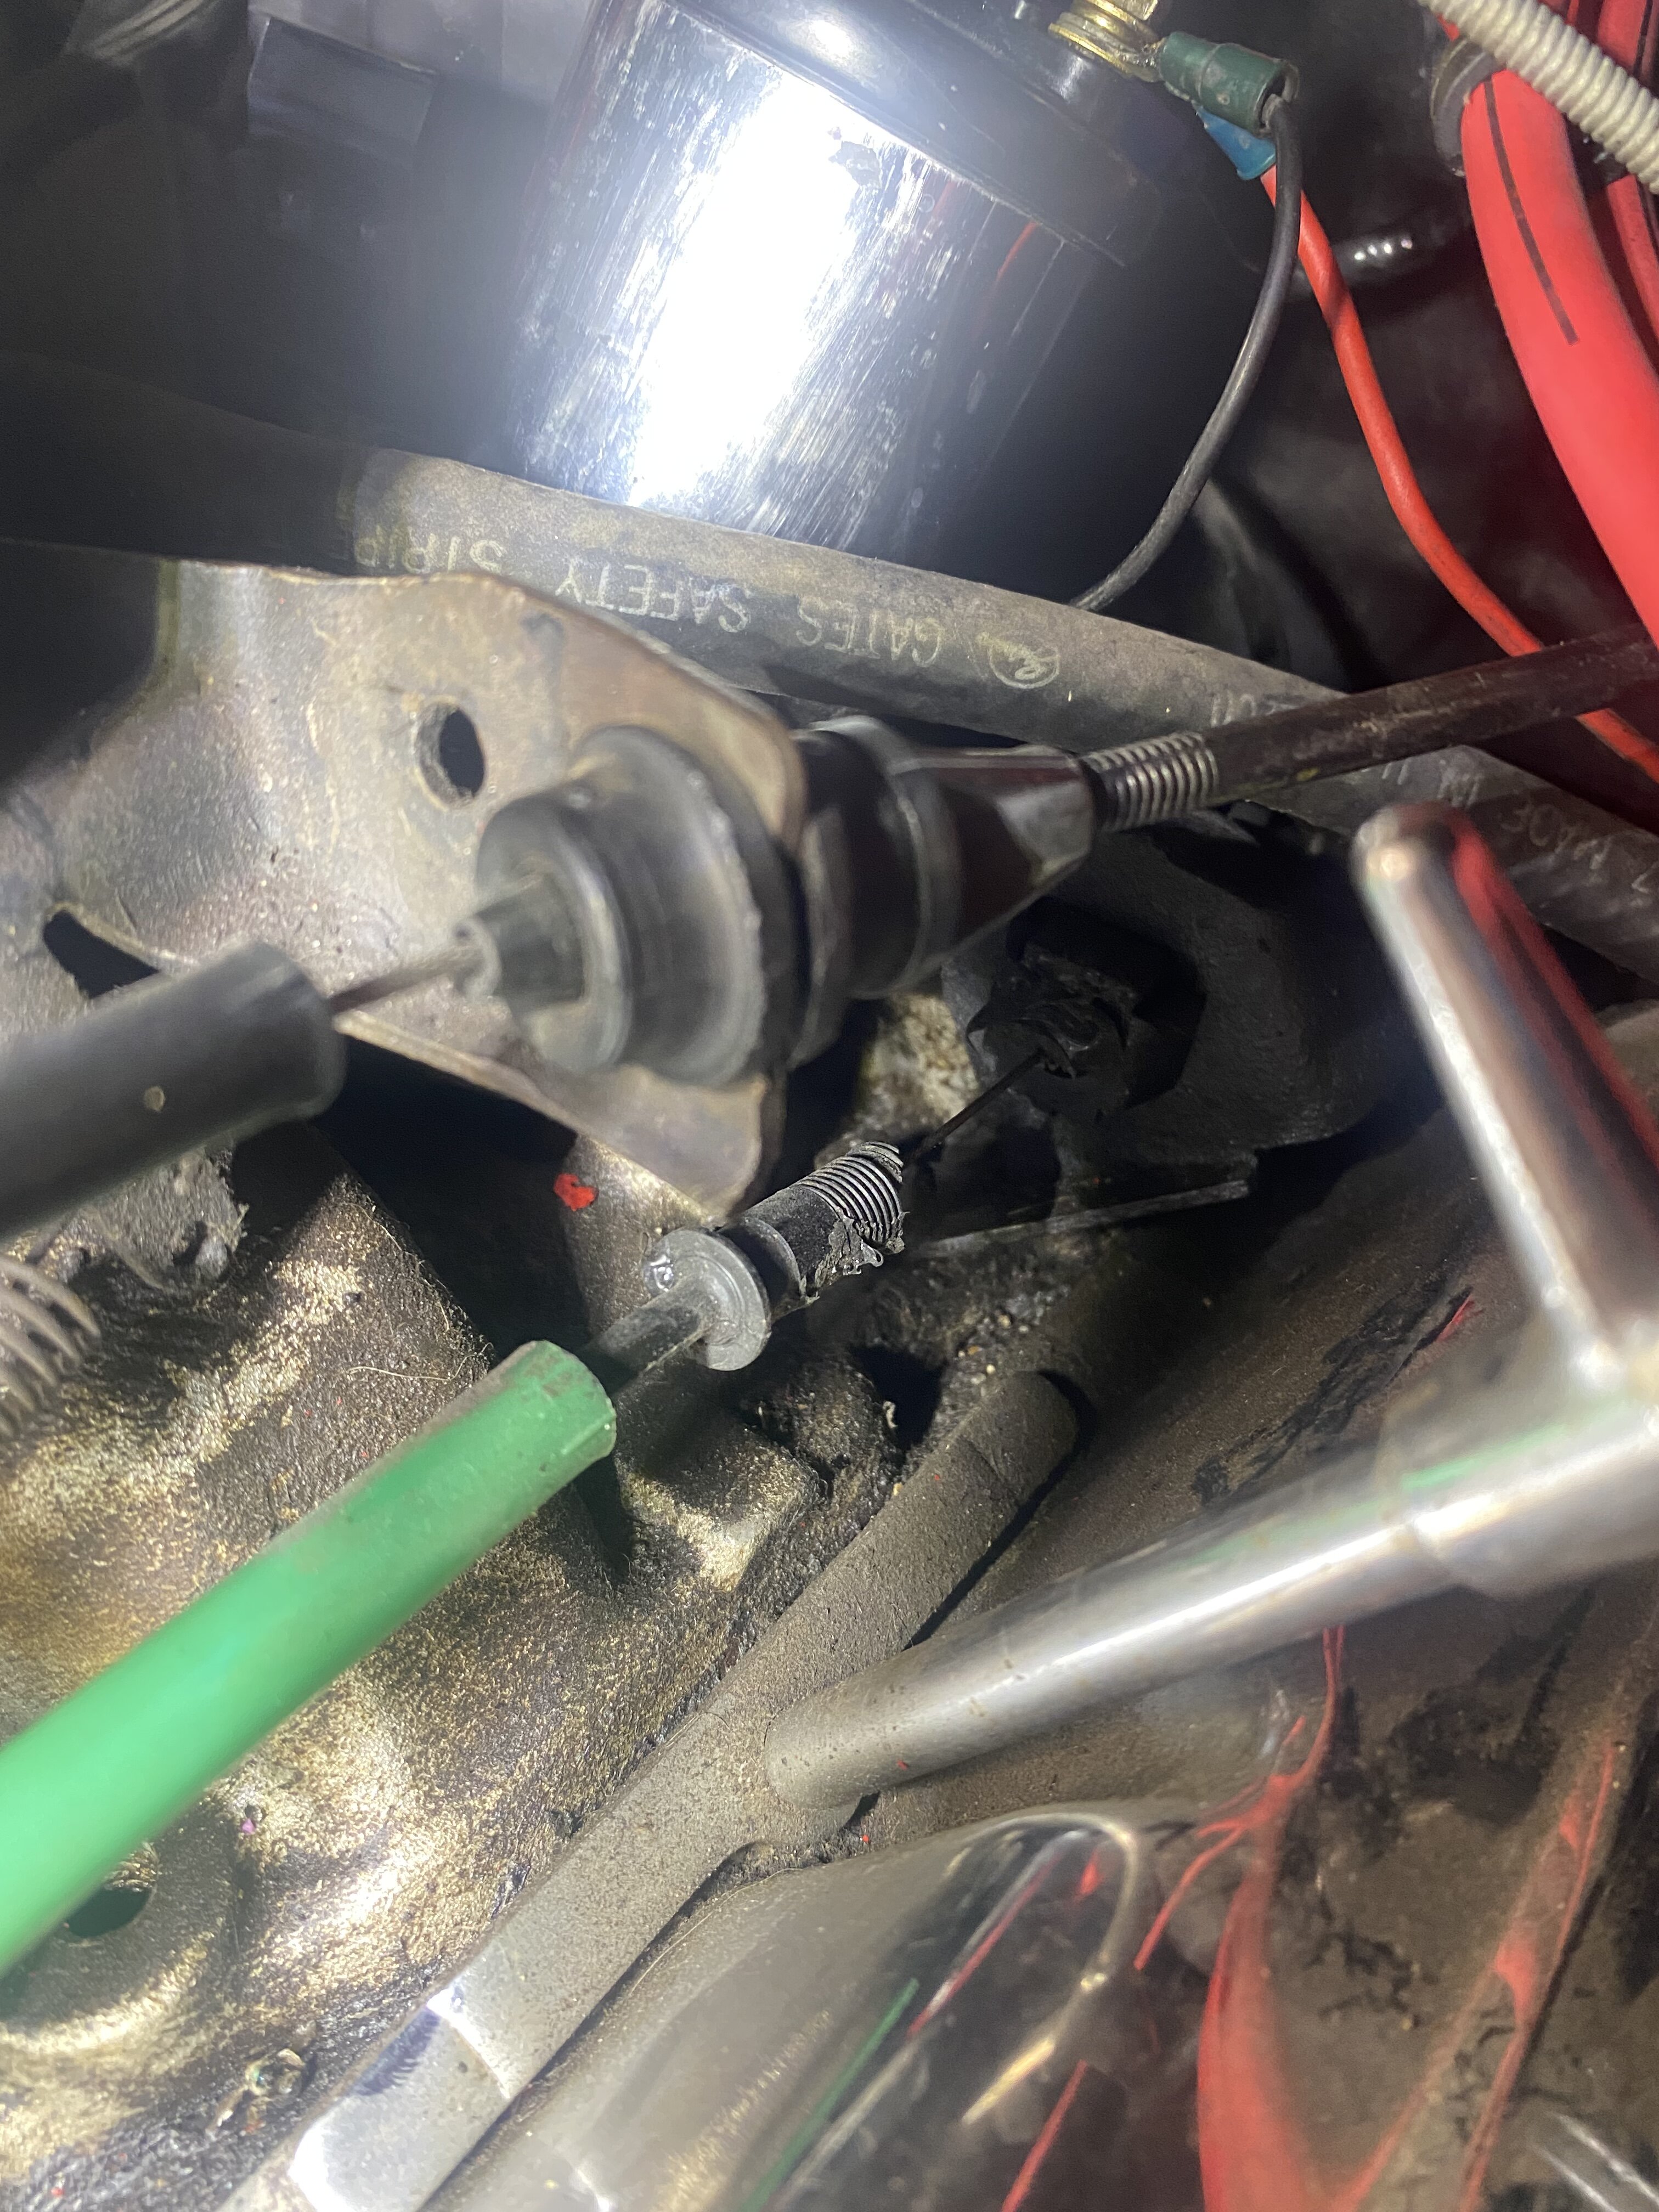
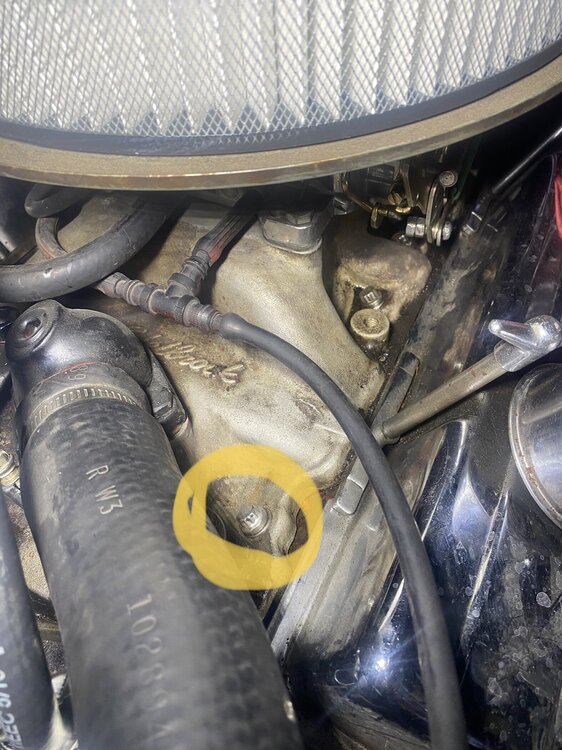
So I'm adding in the Throttle Return Spring Bracket, and based on a few images of what I've seen of others' setups it looks like I'm installing this part: on this bolt: So my questions for those who have done it: 1) Is this the right location for this? I assume it goes with the crescent side facing the front so you have several options of "distance", but is that backwards? 2) What are those bolts called? Are they intake manifold bolts? I'm wanting to make sure I don't break them getting them off, and making sure the torque is appropriate when putting them back on, so some knowledge here would help in research. (I also have exhaust header gaskets to replace, which I believe are notorious for breaking, just would prefer to break as close to 0 bolts in the engine as possible... 😄) Any pblaster or anything required for getting that one out, or should be good to just go carefully? Was going to tap gently with a rubber mallet on a rachet, but this will be the first engine bolt I've attacked, so happy for pointers/advice. Thanks! David
-
Just following up; thanks for all the help, things are working great. Also adjusted carb idle mixtures, idle speed, etc, so that's a new thing learned as well. Final initial advance ended up around 18; seemed a little higher than expected, but based on the engine sound and everything, that was the right value for me. David
-
So you turn back to 0 degrees while it’s at still at 3000? Just hold the throttle somehow?
-
tested with the vacuum advance off but just used a rag to block, no plug. (Bought some, can’t find ‘em. 😂) Haven’t replaced fuel filter yet. I *think* there might be two, one closer to the fuel tank and one is in the carb fuel line with a return. I have a replacement for that one but just visually bought one that looked similar so there may be specs I’m not aware of. So the timing tab only goes to 10ish; how do you measure beyond that? I think my timing gun may have a tare option, just tare and sum them if trying to get to 14?
-
So I did a slight twist of ~ 5-10 degrees (on the distributor) and the engine will run consistently enough for me to test with the timing light, will report back with any developments.
-
It ran fine for about 9 months; the idle started getting a lot lower towards the end of that cycle. The reason for the new distributor was twofold: 1) some play in the shaft of the original 2) desire to switch away from points
-
Ok, and as I understand it I want 30 degrees. Is that literally turning it 30 degrees counterclockwise (assuming 0 for TDC)? I just need it to stay a reasonable rpm so I can get out and use the gun.
-
Hi, thanks for the response. Redid the spark plugs, wires and coil already (basically a whole ignition rebuild). New distributor (traded out points for electric). Oil change/filter. New alternator. New air cleaner filter. Ignition converted to 12V. Very possible the timing of the distributor is off, set to match TDC and as a new guy don’t know if I should move clockwise or counter to speed it up. The vehicle had been running decent before, low rpm ish but not like this, so likely something I did, most likely the timing if I had to guess.
-
So another day, another problem ... 🙂 Got my distributor/voltage issues sorted out, and the previous owner (from hereon referred to as "blockhead") had had a broken kickdown cable, which is on the list. In the short term, blockhead's fix had been to have the throttle return spring attached to the kickdown cable, and the attachment to the carb itself isn't a nice pice, but a couple'a nuts attached to a bolt. I suspect previous stuck throttle issues could be related to the kickdown slide piece catching on the threads of the bolt being used. Regardless, trying to sort through the mess and get things working. Engine will start, but without any throttle applied it lopes and runs at a level of almost dying (doesn't *quite* get there, but still is very close). I am ultimately trying to set the timing on new distributor but seems like without a steady idle this is a fool's errand. So dumb question time: - what should I be looking at for getting a "normal" idle? is this adjusting some of the carb screws? - could fuel flow have anything to do with this, since I need to hold (slightly) on the accelerator to get things running normal? I did buy a new fuel filter for the pre-carb line (some sort of one with a return, no idea if it's "right", but looks the same as what I'd be replacing). - any other general tips? Had originally wondered if this was related to the timing on the engine being off, but now I'm not sure. Thanks, David
-
Converting to 12V ignition
Lawrence71 replied to Lawrence71's topic in General 70-72 Monte Carlo Forum
Actually, turns out this one was user error. I'd not reattached the negative battery cable when testing the voltage, so it was showing the full 12V since I was completing the ground with the multimeter. Looks like after reattaching and retesting, I'm getting 12V on run and 0V on off, so looks good now. -
Converting to 12V ignition
Lawrence71 replied to Lawrence71's topic in General 70-72 Monte Carlo Forum
So I assume this is it: Would I just replace what is there with the new wire, or do I need to squeeze it in with the existing connections? (Looks like someone has done some other wiring changes here to go to some other instruments, but for now just focusing on this part. I did try a relay kit to get 12V from the battery with the ballast wire as the feeder, but before I turned things on after getting everything adjusted it was reading 12V at the coil without the key on, so something isn't quite right with that setup, so might go back to this approach. I did notice that the ballast wire included two wires though, ended up just twisting them together since it looked like that had been how the original end had been attached, but now I am wondering if one of them is constant voltage and the other was only hot when run, so might end up detaching the wire and checking voltage for each independently. The relay kit did include a diode to prevent voltage backflow in some cases, which could also be what is at play (though from the docs it seems less than clear where this is supposed to go); at this point though I'm inclined to go with the original advice and just run the wire through the firewall as originally suggested. See, I get there eventually! 🙂 Anyway, checking out the options from where I currently stand. Thanks as always for good info. Best, David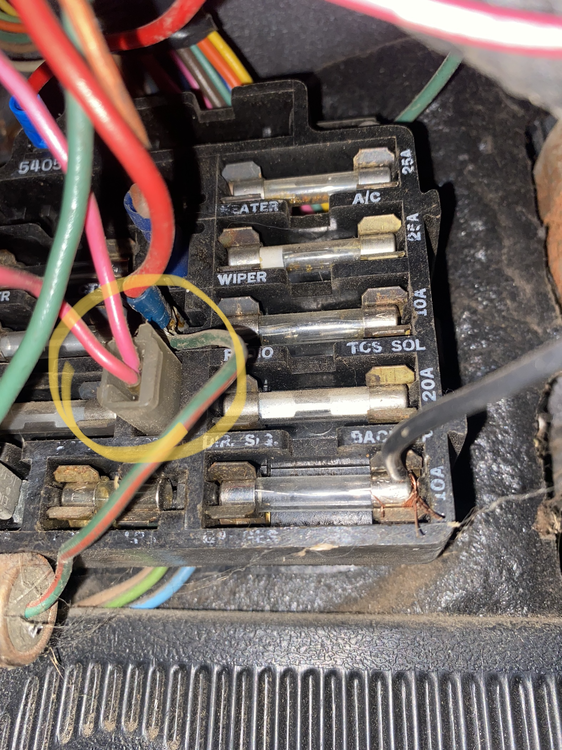
-
but won’t come out of gear
Lawrence71 replied to Lawrence71's topic in General 70-72 Monte Carlo Forum
Dumb question: since this is an aftermarket carb will what the parts stores have in their computer even be relevant? -
but won’t come out of gear
Lawrence71 replied to Lawrence71's topic in General 70-72 Monte Carlo Forum
Lucky for me I get to blame the last guy who owned it. Unlucky for me I get to clean up his messes. (Lucky for me this time I’m not the last guy.) Will see about adding the proper springs in the proper places. Is there some variety pack of springs and what kind of tension should you feel when it’s in the pulled back state? -
but won’t come out of gear
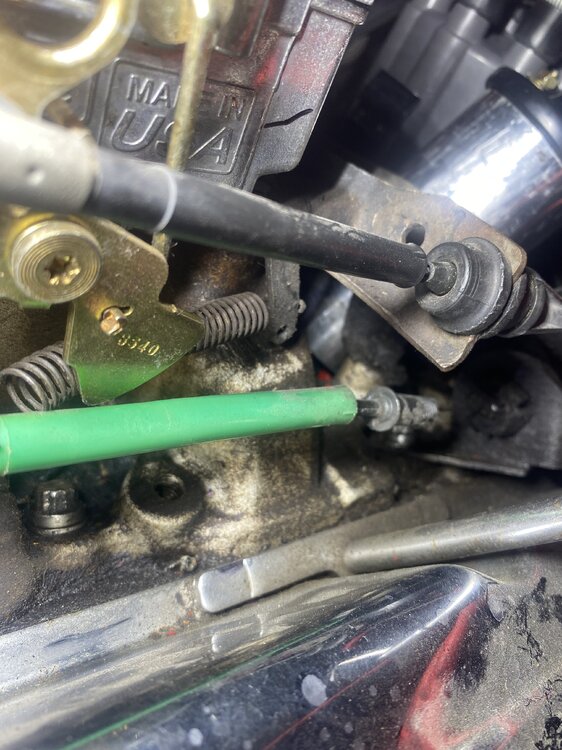
Lawrence71 replied to Lawrence71's topic in General 70-72 Monte Carlo Forum
Here is a wide view of things as they stand the top piece appears to be the throttle cable and the second green linkage is what the spring is attached to I am not sure what that is however. (There is a manual choke on the other side and that also feels to be a little stuck, though I wasn’t messing with the carb directly.) One thing I notice is that the spring seems to get caught on some piece of the linkage when it is pulled all the way in. I assume there should be some better clearance there? Could be that was what happened if the spring actually got stuck I suppose. Also it appears that the this cable plastic piece has broken somewhat: Well, whatever that mystery cable is. In any case that being broken is probably bad. Any help in identifying that part? Thanks, David