


Toppless72
-
Posts
195 -
Joined
-
Last visited
Content Type
Profiles
Articles
Forums
Gallery
Events
Everything posted by Toppless72
-
The on the four speaker systems, the harness was installed by Fisher Body, not the assembly plants, the rear speaker wires run from a plug just above the glove box. They drop down by the right kick panel then along the right side of the floor beside the seat. If you remove the carpet trim in the right door and lift up the carpet you should be able to see a depression in the floor that is covered with tape. The speaker wires is under that tape. If you look in the trunk you should see the wires coming up from behind the rear seat on the right side.
-
Sam, You may be correct on the 1970. I don't have a drawing of it in front of me. On a 1972 there are two light blue wires coming from the "CS" pin in the bulkhead connector to the lamps up front. When the directional signals are activated the side marker goes out completely and the turn signal circuit grounds through the parking lamp circuit. This is due the fact there is only one filament in the 194 type push in bulb used in the side markers. This arrangement separates the turn signal from the side marker. The socket for the front turn lamp has two separate feeds. One from circuit 13 (light blue - directional signal) and one from circuit 14 (purple - front parking lamps). The turn signal/parking lamp socket grounds with the left headlamp ground. If the left headlamp is working then the issue is back to the socket, its ground, or an open circuit. Can you confirm on a 1970 if there are two feed wires for the front lamps for me? One side marker and one turn signal…. I'd just like to know for future reference.
-
If the left hand dash lamp is working then the turn signal switch is good and the problem is between the dash lamp and the front lamp socket. Remove the lens and bulb. Using a test light, ground the test lead clip to a good ground. Turn on the left hand directional signal. Probe the two contact pins in the socket. If you get a flashing test light you have a bad ground on the socket body. If there is no flash on either contact, probe the light blue wire coming to the socket. If you get a flashing test lamp, repair or replace the socket. If there is no flash, probe the "CS" pin in the bulkhead connector. If there is a flashing test lamp you have an open circuit between the bulkhead connector and the lamp socket. If you do not have a flashing test lamp, you have an open circuit between the dash lamp and the bulkhead connector. Let us know what you find.
-
Here it is. This is from the 1972 GM issued Service Manual page 1A-60. Look at the lower left of the drawing. In the same manual, Pages 1A-53~54 outline the tests and troubleshooting methiods for both the Super heat switch and the thermal limiter.
-
Welcome to the site and I’m sure you’ll find a lot of help here if things come up. The connector you’re referring to is where you connect a thermal limiter. Some people refer to it as a fuse. It’s available at most auto parts stores for a few bucks. You’ll just plug it to the connector and let it lay on the inner fender. The black wire going to the back of the compressor is hooked to the super heat cutout switch. It protects the compressor in high heat situations.
-
Joerg, First, the horn relay/system was not designed to stay energized for long periods of time. It’s a momentary system that is designed to see on - off - on - off use. If you hold the wire to a chassis ground too long it will create a high resistance and start getting hot. This is most likely where the smoke came from. If the relay is clicking it tells me the ground circuit is making contact to the relay. If you do not get the horn to sound you need to check the wire from the relay to the horn. It’s a 14 gauge dark green wire (circuit 29) connected to the relay. Using a test lamp connect the wire to the lamp and to ground and have a helper touch the horn ground wire (circuit 28) to the steering column to ground it for an instant. If it lights the horn is bad or not grounded well. If it doesn’t, check if you have power at the relay when the horn ground wire is touched to the steering column. To test your horn touch the connector on the horn with a jumper wire directly from the battery's positive side. Let us know how you come out.
-
When I'm going 65 MPH according to the GPS, the speedo reads 58 MPH. I go by the GPS
-
You will need a lock plate compression tool to get the lock plate retaining ring off. It attaches to the steering shaft and presses down on the lock plate allowing access to remove the ring.
-
OK, The 3 wire Harness: Yellow = 12 volt switched power + Radio power Light gray = Dial illumination powered with dash lamp circuit Black = Radio Ground 7 Wire harness: Purple = Right front speaker positive Circuit 924 Tan (Light Brn.) = Left front speaker positive Circuit 923 Brown (Dk. Brn.) = Right rear speaker positive Circuit 978 Blue = Left rear speaker positive Circuit 922 3 Black w/ white tracer = Speaker ground - one to both rears together and one to each front speaker Circuit 977 If you are hooking up an AM only, radio using these wire harnesses use the yellow/gray/black for power, illumination, and ground. For speakers you will only be able to power one speaker. Pick where you want the sound to come from and use those wires to power it. AM radios only support one 8 ohm speaker. The third harness doesn't go to the radio. It is for the heater resistor located in the top of the underdash blower plenum.
-
Steve, I saw that in some of the advertisements too and it made me wonder where they found that information. While there are many parts listed specifically for the Auto Temperature Control feature such as; actuator, Amplifier Assembly, Aspirator assembly, bearing packing and many others, they do not list a difference in the ambient temperature switch. I’d just like to know where those sellers found that information.
-
Murphy, There really isn't a filter in that system. Leaves and such that collect above in the space at the top of the cowl can, over time; get drawn in with the inlet air. A clean out is the only way to get it all out of there. You'd have to remove the right inner wheel well and all the associated brackets and equipment. Then remove the passenger half of the outer evaporator box/cover. This is no small project as it involves opening the A/C system to dismantle everything. Your method of using a shop vac and just working at it as best you can is the next best option you have. In doing this, take care not to damage the fins on the evaporator coils with the shop vac. It will reduce the amount of air that passes over and through them thus reducing your cool air inside. If you have any other questions just ask. As I tell all my friends, "I can help you fix it or help you break it. We'll have to see which one it is". JC
-
Murph, I also noticed the Ebay sellers were using a transposed number in their advertisements. They're just not reading the boxes correctly I believe. The other device shown in your picture is the blower resister. In short, what it does, is provide the resistance needed to reduce the fan blower speed for the lower settings on the dash switch. Each setting routes the power through one of the resistor coils causing the fan to run at a reduced speed. On a 4 speed switch, like the ones used in an A/C car, the high position on the switch is the only one that runs direct to the fan motor. It’s mounted in the evaporator box so air flows across it to prevent it from over heating. The other part numbers you asked about are not in my parts book. My book only covers Chevrolet part numbers from 1960 to 1975. These parts may be from a different car line IE: Buick or Oldsmobile etc. or from later years after 1975. As far as I know, for the ambient switch there were two basic designs. One had a low temperature of 37 degrees and a high of 53 degrees. The other design has a low of 29 degrees and a high of 44 degrees. The latter one was used only in the huge Impala/Caprice station wagons of the early to late 1970’s. Other part number differences are most likely to be related to mounting configuration or materials used in construction of the unit.
-
Murphy, If you wish to test yours before you spend your cash, do this: 1. Take it out by removing the two screws. 2. Test to see if the switch is closed with a continuity tester. You should have a complete circuit. 3. Put it in the freezer for about 10 minutes. 4. Remove it from the freezer and run the same continuity test. It should show an open circuit. 5. Wait a few minutes and listen for the switch to click. 6. Run the continuity test again you should have a closed circuit again. If these tests all pass the switch is good.
-
I have two part numbers for that part. The first one covers 1971~1975 "ALL Passenger" P/N 7934224. The next one is P/N 3917359. Either one will work. You can find them in junk yards for a buck or two. If you have to have a new one be prepared to pay for it. They go for about $100.00 plus on Ebay. IE: link
-
I believe the part you’re asking about is the ambient temperature switch. It functions when the control is set to bi-level. It prevents the compressor from operating when the air temperature is below 37 degrees F. This protects the evaporator from freezing up and stopping the air flow and thus burning up the fan motor. It's connected to the thermal fuse at the "B" pin.
-
Joe, GM's part numbers are: Group 9.744 Warning lamps = 8901486 Gauges = 8901487 This is from the Chevrolet parts catalog
-
Yes Rob, Many things changed on seat belts for '72. 1.Seat belt warning system. 2.Forward momentum restraints for driver and front right passenger (not middle). 3.Retractors for two outside rear passengers. 4.One latch for 3 point shoulder harness driver and right front passenger. I’m not sure if that last one was new for ’72. It could have been on earlier models also. We have some very knowledgeable folks on here that may be able to clairify it for me.
-
I hope someone else chimes in on this but, I believe the 72' rear seat upper back rest are different. There is a small arch on the bottom at both ends to accommodate the retractable seat belts. Without this arch the seat belt is squeezed too tight and will not retract back on its own. You can use the ’72 in the older cars and the older seats fit in a ’72 but the seat belt gets stuck and doesn’t work properly.
-
-
-
-
-
-
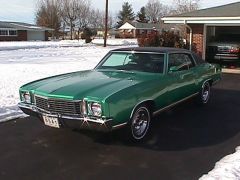
What did you do to your Monte Carlo today?
Toppless72 replied to Paul Bell's topic in General 70-72 Monte Carlo Forum
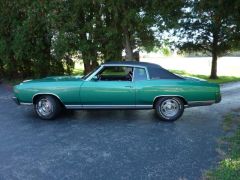
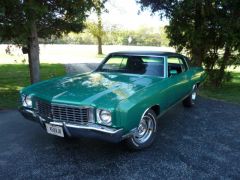
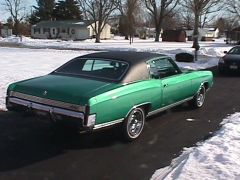
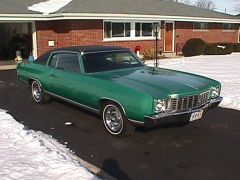
While cleaning out a mouse house, that was built behind my rear seat over the winter, I found another partial build sheet for my car. I have one that's perfect but this one is only about 40% complete. Anyway, It was fun finding it. -
Doug, You won't be replacing the manual locks; you're just adding the power locks to the system. There is an arm coming off the latch assembly that the rod from the lock solenoid will attach to. In these pictures you should be able to see that the power door lock rod just attaches to the latch arm. (Lower left) This is from the Fisher Body Service Manual for 1972. Pages 6-45 and 6-16 respectively.