Murphy
-
Posts
754 -
Joined
-
Last visited
-
Days Won
4
Content Type
Profiles
Articles
Forums
Gallery
Events
Everything posted by Murphy
-
Go with a VOLTS gauge, eliminate the problems with high amps in your dash. When I converted from indicators lights to gauges, the wiring issues were cut in half by converting to a volt gauge. Call Gary "the tachman" for the conversion.
-
My 71 chassis manual shows the spring hooks into the frame but doesn't specify SB or BB.
-
PC7 is great for repairing plastic surfaces, 2 part epoxy that works like clay.
-
Drew, I've restored a few wheels but your is toast. I can repair cracks & splits and repaint but when the warping of the plastic is that bad...it's a waste of time.
-
My Haynes manual "Montecarlo 70 thru 85" , the electrical diagrams for 70 & 71 only show indicator lights wiring but for 72 it has and options page for gauges wiring......
-
Mike, that might be pretty tough to find. Might be better off to build or have built a console to your liking..........
-
Jared, how accurate do you think it reads? What does your gauge read at idle?
-
I did not, I had to drill 3 new holes per seat and I went thru the floor brace for strength. I also needed to add a 2" spacer to each of the front bracket feet. It was pretty straight forward. Pulled back the front carpeting to insure fitment. Buckets are certainly the way to go...........
-
Great shots Rob, thanks for including the names as it's nice to see a face with the car that we all converse with thru out the years.........
-
Of course, I changed the block sensor but the 2nd wire baffled me. I just didn't use it and all is fine...........
-
Plus changing the PCB and fuse block changes if your using a factory tach.....
-
Dan, Is the dash in picture the one now in your car? The wiring on the main pcb connector indicates an indicator light dash (idiot lights)The pink wires in number 5 position make it an idiot light style pcb. Do you have a photo of the front side of the dash?
-
Car engine temps extremely high in stop and go traffic.
Murphy replied to Rock's topic in Engine Tech
How do you eliminate any possible air pockets? remove the radiator cap & accelerate the motor a bit? -
I saw them on Summit & Jegs at one time when I was thinking about an upgrade..........
-
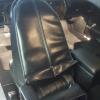
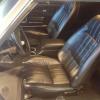
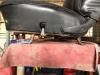
Here's a few pics of my bench to bucket conversion, I've seen several conversations about switching to buckets, so here's my penny's worth. The car was originally a cloth bench, the covers were in good shape but the springs were shot. I then converted to a bench from a 72 Cutlass S as I wanted the center arm rest. After much expense & sweat, I had the bench I thought I wanted? But with new foam and I'm over 6'2", my head was brushing the headliner and I would slide around even strapped in. I was at a car show several months ago and a guy wanted to know everything about that seat as he was rebuilding a 72 Monte back to original from being a strip car. Even tho the seat is not original to the Monte Carlo, he wanted it bad! So I sold it and made a tiny profit. About a week later I found a set of buckets from a 78 Z28 that a guy had pulled out as he was building a strip car. Ironically, the 78 & 79 Camaro had what were called zipper-backs. GM did away with the hard plastic back shell and the seat cover has a zipper that runs up the back. Also the pleats in the seat are only a 1/4" smaller than the Monte's pattern. I was sold, especially since I got the buckets w/tracks for $50. I then decided I need some type of console with cupholders and found the site called cupholdersplus.com , they make consoles for a wide range of vehicles. I purchased the unit called the 'humphugger' which is made to fit perfectly over the tunnel area. It attaches with velco and is covered with the madrid vinyl material so its a perfect match for my 71!
-
A few more pics..........
-
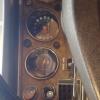
Thanks Dennis, hadn't thought about that. Maybe I should stick a note up in the dash somewhere? Quick question for everyone, how accurate are these gauges? (volts, temp, oil pressure) everything seems a bit high? Voltage in at the back of the volt gauge is 13.3 at idle but gauge shows near 15.......Temp gauge shows 200 but the engine is cold and a 180 thermostat is installed, oil pressure shows 60 but does fluctuate when rpms increase. The gauges go to zero when turned off so they appear to operate correctly?? Maybe I'm too accustom to modern vehicles that seem very accurate..........
-
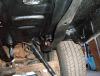
James, I used POR15 on the entire underside of my car (2coats) and love the results. I had the car up on jack stands and steel brushed and cleaned everything the best I could. I brushed it on and then got the spray can version also to get in those tough places. It can be really messy but make sure you get the cleaning solvent also to get it off your skin. Here's a couple of pics during the process............
-
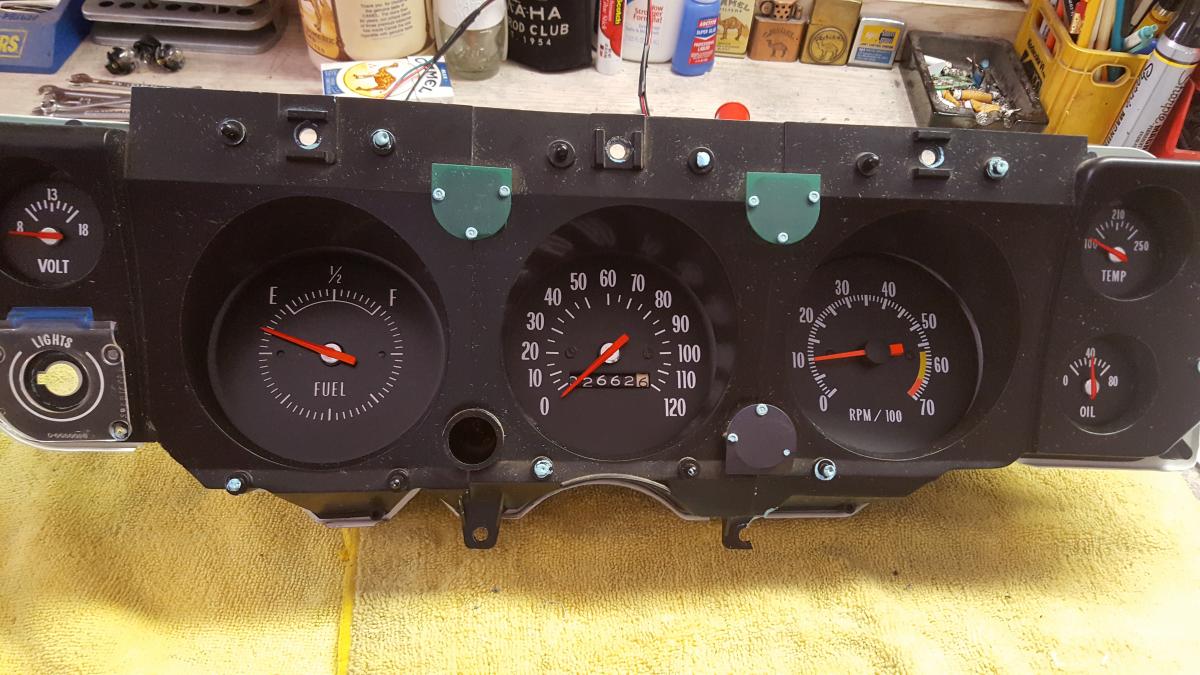
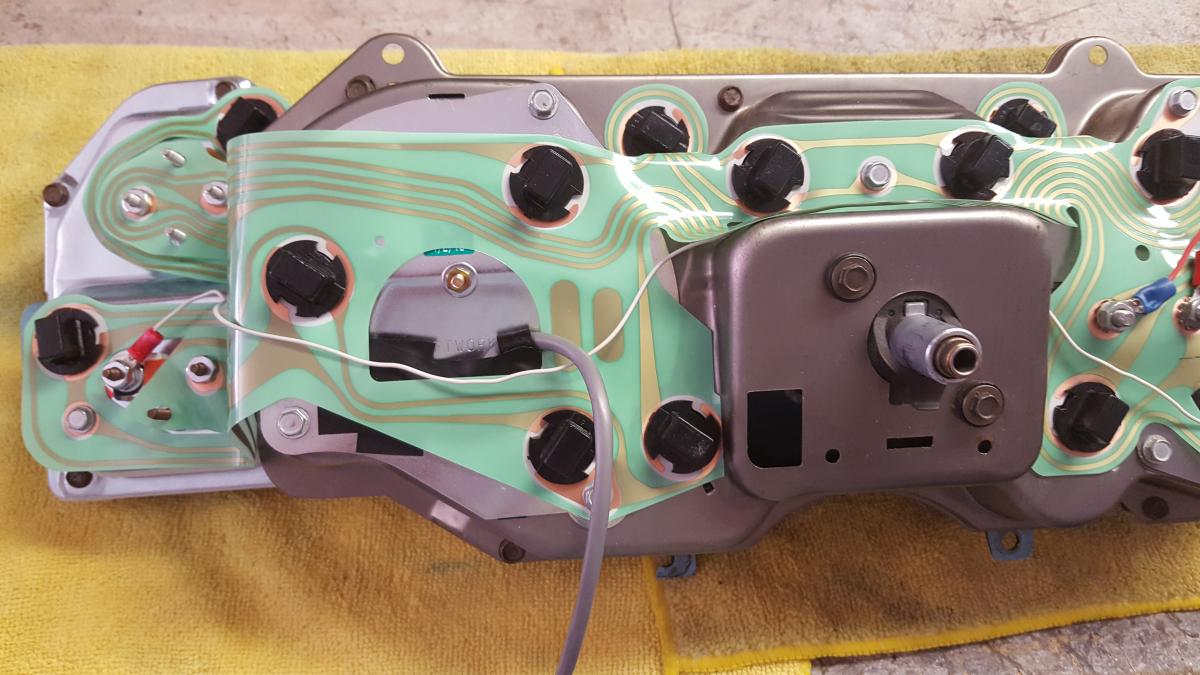
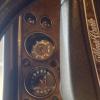
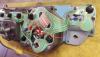
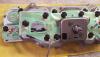
Well boys, I finally have finished my upgrade to gauges from idiot lights. As many of you know......I always put my own twist on things so I thought I would share. I need to back up an year or so, so this all makes sense. I had done a 4 speed conversion from auto/column shift car over a year ago and at that time I pulled the clock and install a Shiftworks tach in its place. So when I purchased the gauge upgrade kit from Sonnie several months ago, I talked him into leaving out the factory tach and received a fair discount. Now I didn't want the ammeter either, I wanted a volt meter, so I contacted Gary (The Tachman) as he does wonderful work in restoring/modifying gauges. He converted the ammeter to a voltmeter and I also had him convert the new small fuel gauge to an oil pressure gauge. You see, I wanted to keep the large fuel gauge in place from the factory setup. I also acquired a used speedometer (floorshift version) cause I need to get rid of the gear selector in my current speedometer. (remember I had a column shift automatic) Gary refurbished only the dial of the speedometer and then I simple removed the gear selector mechanism and replace the dial face only. Still with me? Now the fun begins, modifying the new PCB to accommodate my rearrangement of gauges. I need to thank Dennis and others for the write up on the gauge conversion cause it was extremely helpful. Sonnie's instructions were accurate but a bit criptic and difficult to read. Since I am not using a ammeter or the factory tach, I only needed to modify the main gaugepod connector pinouts and not even touch the firewall connector. Big relief. After tracing out each pinout and with the notes from Gary, it was actually quite easy. Yes, I had to pull out the soldering iron but I've been using one for 20 yrs so no biggie. I'll display the photos below for you viewing pleasure. One more item, I replaced my gauge lens also as it had lots of swirly scratches and no better time to do it. Lastly, I needed to replace my oil pressure switch. Again, Gary the Tachman came thru. He had the part number and pictures of that upgrade. It is a pressure switch from a 69 Chevelle as that was the only year GM used an electric switch in a car. This switch was common in the pickup line clear up to the late 70's so it was easy to find. I had to do a little plumbing to get the sending unit above intake as it is fairly large, as you can see in the photo.

-
I used the same foam and PUI covers, the seat was better than new. I talked with several upholstery shops and they told me the foam would gradually relax.... I added 1.5" inches to the front foot. We modified the rear feet first, to lower and move the seat further back, then we modified the front feet. It helped considerably in getting me back in the cabin. I've been told to slice off an inch of the foam of the seat bottoms but I didn't want to take the seat apart. Most upholstery shops have a foam saw that they could easily trim down the foam then reinstall the cover. Good luck!
-
Perfect, thanks Glen! guess its not as low as I thought.............
-
Hey Spoony, been there. I re-built a benchseat with new foam and covers and suddenly I'm disappointed! The seat looks great, just no fun to drive. I'm over 6'2" myself and here's what I had to do. As you can see in the photos, I cut off the rear foot, shortened it and welded it on in a new position. Then I extended the front foot by adding metal strap. But before you breakout the Saws-all, set the benchseat on a piece of cardboard and mark the locations of the feet. Once you've rewelded the rear feet inplace and straight, you can modify the fronts...........Good Luck!
-
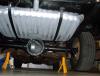
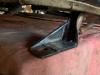
Hey Glen, when you get a minute, take a photo from the rear of the car. I want to see how far those rear coil overs are from the ground. Sure looks like they mount quite a bit lower from that photo of the lower mount............THX!
-
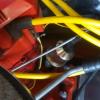
As I continue my quest to convert idiot lights to gauges, I've found another oddity? I replaced the temp sensor with the single-wire sensor that came with the kit from Sonnie. My original brass sensor has 2 wires to it, DG (dark green) as expected and a DG w/white stripe? My manual shows nothing like that in the electrical diagrams. This is a 71, SBC350 with AC. The DG goes to where it should in the firewall connector and to the dash harness connector. The DG/white goes across the firewall in a wrapped cable bundle. All looks factory & untouched, think I'll keep investigating. My car was produced in May of 71. THX!
-
Don't know what that is Larry? Must be an Indiana thing? I got it out with a small 8" pipe wrench...........easy peasy!