MGD72Monte
-
Posts
489 -
Joined
-
Last visited
Content Type
Profiles
Articles
Forums
Gallery
Events
Everything posted by MGD72Monte
-
When I redid my front end I was not planning to replace the spindles until I took them apart. On the first one I removed I noticed the lower ball joint hole was no longer round, it clearly had been hammered extremely hard at some point in the past to the point that it was oval rather than round. When I did the other side, I decided that it was not as bad but there was heavy corrosion on the exposed areas and since I was replacing one side and just about everything else, I decided to replace that one too. I would say look at the overall condition, ball joint holes, evidence of extreme hammering, the threads, the shaft for smoothness/wear, especially where the bearings sit and overall corrosion state. Good luck
-
Coil spring insulators on front?
MGD72Monte replied to Clever Idiot's topic in Brakes and Suspension Tech
DJ, no insulator on the front of my 72, backed up by assembly manual as well. If you are in a big rush and don't have time to paint the springs, give the top contact areo of the springs a quick wire brush to get the rust off, apply some corrosion control spray (Crown, Rustchek, etc...) on it and the area it contacts the frame. It will keep it quiet and will not scratch anymore than if you had new springs. Good luck. -
I'm rebuilding my chevy 10 bolt 8.2" rear end. I'm by no means a Buick Olds Pontiac read end expert, but I ran accross a thread linky that talks about the differences between the BOP and chevy rear end 10 bolts. Hopefully it can help you. Good luck.
-
If 300HP is enough for you and you want reasonable drivability and gas mileage, you might want to consider amending your plan to a low rise spread bore intake and a reasonable cam. I notice in another thread you are also looking to replace the roof. Your going all out indeed, big challenge, at least time is on your side. Good luck with your restoration.
-
I'm partial to the stock horseshoe shifter because that is what I have but what you have there would be unique for sure. Also, I have sunpro gauges for oil and temp and am quite happy with them.
-
Hi DJ, Yep, Ace is the place. My old hardware was junk and the hardware from OPG was cheap crap IMO. OEM bolts were grade 5 with special flange head, have not found these anywhere. At Ace the only flange head bolts I found were grade 8 (visible in the pic below). Likely overkill but high quality and look good and I did not see any grade 5 other than standard head bolts and I found those just chewed up the washers. The multiple extra washers were used for proper spacing to get a reasonable amount of torque on the bolts down without flatening out the lower rubber grommets too much and ensuring they did not creep out from under the washer The bushing kits don't come with nuts (except for the two for rad support bushings if I remember correctly) because theoretically you should be able to take the bolts out of the nut plates and cage nuts then simply put in the new bolts. Well with a salt car I was lucky and one of the nut plates survived, the other nut plate broke the bolt and all the cage nuts spun which required accessing the nut from the top. So in the disassembly process, if you had to cut the pax compartment floor and the trunk floor to get a tool on the nuts then you will need new nuts to replace those. If you were simply able to take the bolts out, the nuts are still in the floor held in place and you just need to put a new bolt in there from the bottom. For replacement nuts don't worry about square nuts. I don't even know where you would find any of that size, but I did not search for any. They were used in multiple locations not just the front. As I understand it they were used for two reasons. The first is ease of assembly in a factory setting as they were held in the floor by a flimsy cage which was tack welded inside the floor pan braces(see pic below) enabling the bolts to be quickly inserted from the bottom of the car. The second reason is that the wide thick surface of the big square nut distributed the clamping force across a wider area. To get the same effect I used grade C flange head lock nuts (fm Ace) with a piece (chunk) of plate steel. That's the black part you see under the nut in the second pic below. If you just try to use a washer you might find it starts to bend as the holes are fairly big. I hope that helps with your questions. Don't hesitate to PM me if I don't seem to be responding to the posts, I don't go through all of them. I just noticed this one as I was about to log off. Good luck and I can't wait to see updated pics. You are doing this resto the right way.
-
The good news is the dash is fairly easy to take apart. Once you get to the point where you have removed the main bolts that hold it in you can move the dash away from the firewall far enough to access the rear of the instrument cluster and remove the individual dials. If you perform a search, one of the guys has a good link to the removal steps if you want to take the whole thing out. I've done it twice, like I said, it's not that bad. Good luck
-
HELP...Engine Burning Very Rich... Any Ideas??
MGD72Monte replied to Waterboi's topic in Engine Tech
All good advice above, some questions that have not been asked is whether this issue occured after the engine was rebuilt or since some part of the engine was modified. Either way I would consider going to a place where they have a tuning dyno. Based on what is coming out of the tailpipe they will be able to analyze what is happening at different RPM, optimize the timing, etc... It costs about $70. In my case I discovered that the main jets in my carb which were fine for my previous set up, were way too big for my new set up and were causing symptoms similar to yours. After I changed the jets, MPG went up about 5 so it is a worthwhile investment after a rebuild. Also discovered I had a pinhole in my rusty fuel lines that was sucking in some air and messing up the mixture. Just some food for though. Good luck -
Royce, Mine has been a frame on through multi-phases over the decades. Critical body work, paint, interior, engine, electrical, front suspension and currently rear end. There have been hundreds of little projects along the way or so it seems. In retrospect a frame off would have been more efficient but like you said you need the space. The only way to avoid the snowball effect is like others have said only fix what absolutely needs fixing. That's what I've been doing with my daily driver and it's worked for the last 18 years. To avoid the going too far problem, assess all aspects of any mods you are considering. 4.10 gears might be cool but not practical for long distance cruising. Good luck
-
I'm in the process of overhauling mine myself right now, but I'm not changing the gears, and I'm not done yet so the jury is still out on the results. If you want a fairly good book, have a look at Linky to book. It will give you an idea of the process. Good luck whatever you decide.
-
Thanks a lot for your input guys. To try and rule out a faulty U-Joint, I brought the yoke to the local parts store and tried the fit of two new U-joints, one regular one and one heavy duty. The heavy duty one was the "snugger" of the two, probably because it is already greased. Even thought I was able to slide it in relatively snuggly, if I press the caps inwards, I can generate about 1mm of space, a little bit less than the current joint. Anyway, until I see the difference with another yoke, I won't be able to conclusively say either way. I will probably change it so I'm looking to get my hands on another yoke. The local junkyards are long depleated of 70s and 80s vehicles. There are a few 90s, including trucks. Where can I get compatibility info on what will fit? The junk yard says their computer system doesn't go back that far. Thanks again
-
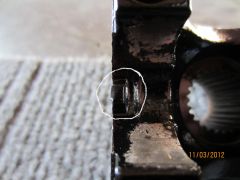
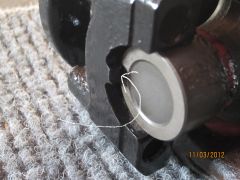
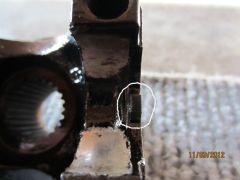
The following shows the yoke and rear universal joint from my Monte, with the tabs which retain the bearing caps circled. These are photos of each tab. Below is a shot with the two parts together with the arrow indicating the location of a gap of approx 1.5 mm or 1/16" between the tab and the bearing cap. I changed the yoke straps after I found I could move the driveshaft back and forth by hand. I also changed the universal joint. However there is still a gap. Is that normal or should the universal joint fit perfectly snug? If it should, can I take a hammer to those tabs to bend them inwards? Thanks
-
Well I finally removed both bearings from the carrier. As per above, the first one came out easy using a puller and bearing splitter. As the bearing inner race could be turned by hand it did score the shaft on that side as per the following picks. Here is another shot of it. does anyone know if the ridge shown by the arrow is normal or is that damage from the race spinning. For the other side, the puller was not strong enough, I used a cut off tool until I was close to the carrier shaft then an air chisel as suggested by Scott and eventually a crack formed. After that I was able to drive the race off with the air chisel using the bearing race inner ridge. The shaft is noticeably smoother on this side. I'm going to blend out the dents. This shot shows the bearing race I cut off. The inside has a thin black gummy layer (shown by arrows). The same was on the shaft. Might be the reason it was so hard to remove. Not sure what it is. Based on seeing the actual pics, any further thoughts. I sure hope I can re-use this carrier in spite of the scoring on the one shaft. I tried to push the bearing in by hand on that side and I can't but I'm not sure how tight it will be with a new bearing when it is fully pressed in. There is a small ridge on the top. which may make it seem tight until it bottoms out.
-
Great details Dennis, thanks for taking the time to focus on the power lock portion. I'll have to book mark this for when I have time.
-
Wow, congrats on finishing an ambitious project in a short time for someone that has never done it. I already have power windows but power locks would be a convenient option. I wonder if anyone has managed to set that up with a key fob?
-
They are kind of hidden above the frame portion which sits high and just fwd of the rear axle as others have mentioned. Originally Posted By: mnte496 Im going to do my body bushings as well did you have to jack the body up after you loosened the bushings ive never done body bushings before should have replaced them when i had the car torn apart. any tips or what to expect hopefully they come out without breaking bolts! If you want some info Have a look at the link below, it's my album documenting my experiences replacing the body mounts without a full frame off. Good luck and if you have some questions, ask away. <link to body mount replacement album>
-
Thanks, I was thinking the same thing. I won't have access to the bearing spliter until later this week. Originally Posted By: footballubet Cut into the race as far as you feel comfortable then use a chisel or air hammer with a chisel bit end and crack the race. You can then tap it off the carrier. You said the other side bearing race had spun? If it spun you better check to see how badly it has chewed the carrier surface. You don't want the inner race spinning on the carrier. If you can push the bearing on by hand that is no good. I've had them where they spun and still had a tight fit. In that case I've taken a center punch chisel and peened the whole way around the surface of the carrier then installed the bearing using the Loctite bearing adhesive on the way back together. Otherwise you'll need to replace the carrier. Did not think of using the air chisel on this, I might give that a shot. As for the other side I could spin it slowly by hand but still needed a puller to remove. I did not notice any spinning related damage but I'll have a closer look at both the carrier surface and the bearing inner race. I sure hope I don't have to trash the carrier .
-
Finally got to tackling the carrier bearings. To answer my own question above, You can pull on the carrier it is solid but if you don't feel comfortable with that you could cut the carrier with tin snips, remove the rollers and pull on the outer lip of the race. One side came out like butter using a puller and a bearing splitter. In fact the inner race was spinning on the carrier. The other side unfortunately was a no go, it is in so tight that I bent one of the bolts from my cheap puller. I had resolved to cut it off with a Dremel and started but stopped as I'm paranoid at nicking the carrier. For those that have done this, is there a technique that can minimize the possibility of damage? Will I see something obvious as I cut through the race and before I hit the carrier?
-
Hopefully that was it, look forward to your personnal confirmation.
-
There is a button on top of the switch assembly behind the dash. You need to get your hand back there, press down on it and then you can pull the shaft out from the front with your other hand. After that you will see a large washer like nut with a slot. You can use a big screw driver to undo that nut which will free the switch portion from the dash then you can remove the plug and then finally the unit can be taken out. Hopefully someone will chime in and maybe show pics which makes it easier to understand. Good luck
-
I have difficulty visualizing how such a thing could even be possible but it apparently is and it certainly sucks. I can sympathize, there is nothing worse than having to fix something brand new, but it happened to me more than once so I'm sorry to hear that. For a fix, I've never heard of welding a pan that is still installed and somebody might chime in with that experience. Regardless, I would recommend an incremental approach until you find something that works. I would go for the JB Weld first. I have had some good experiences with it under different conditions and I would be willing to bet this could be one where it will also work. Whatever you chose, good luck
-
Thanks guys, I'm not keen at taking the Dremel to this as I want to save the race to help me press on the new bearing. I'm still not sure how I can grab the back of the bearing race with the bearing spreader, from what I can tell it will simply be grabbing the race and rollers, but I'm going to head back to the auto hobby shop on Monday night to see what I can do.
-
-
-