

MCfan
-
Posts
1,294 -
Joined
-
Last visited
-
Days Won
61
Content Type
Profiles
Articles
Forums
Gallery
Events
Everything posted by MCfan
-
In answer to your surface prep question, MG, I used a wire brush to remove the accumulation of fuel-soaked dirt along the bottom inside edge of the bumper shell. Then I used very coarse steel wool to remove the light coating of surface rust on the inside. After vacuuming out the residue, I sprayed it with Browning degreaser and wiped it down with a clean shop rag. The inside surface also had a collage of black and gold overspray from previous undercarriage and body repainting projects but I just spray-painted over them. There was a little overspray on the chrome edges of the bumper, also, so I used rubbing compound to remove that since it does not leave surface scratches. I typically use slower drying paints like Rustoleum on longer projects but I really prefer faster drying paints like Krylon and Plastikote for smaller projects. Seems like all of the bright metallic paints dry very fast for some reason.
-
An initial observation of my "new girl" when I got her home in mid June was the poor fit and alignment of the rear bumper. But, since it wasn't falling off, it's realignment dropped down on my prioritized work list. Well, yesterday, I decided to tackle it early in the morning before the current horrible heat wave got going. I thought it would be a simple matter of loosening some fasteners, realigning the bumper and retightening everything. So, I loosened the ten bolts that hold the bumper to the frame and then the "can of worms" popped wide open. Nearly seventeen hours later, the rear bumper, lights and trim had all been removed, cleaned, refurbished, reinstalled and aligned. Just a typical "5-minute Monte job"! Here's a link to several project photos, a couple of which are also below: http://s912.photobucket.com/albums/ac329...ment%20project/ Rear bumper and trim before refurbishing and alignment Refurbished bumper and brackets After refurbishing lights, trim, bumper and alignment
-
I can neither confrim nor refute your assertion, Rod, but I can see your point, especially for a column shifter. So maybe I put myself at risk of "over steering" but I can tell you it is a heck of a lot easier and a lot more fun to drive my 4-speed WITH power steering than without! If what you assert is true, GM was possibly more safety conscious than I would have given them credit for (especially back then). Or maybe they were just looking for a way to punish anyone who ordered a manual transmission because they had to do different assembly procedures on an exception basis. "Now where are those darn clutch pedals and floor shifters, anyway? Oh, here they are with the manual steering boxes. Heh, heh...."
-
Power brakes may have been standard but not power steering, at least not in '70. My 4-speed Monte was built without power steering and the Build Sheet (no, it's not a fake) and the manual steering box both prove it. It's not so bad to drive a with a manual box, but it's no fun trying to parallel park or turn around, especially with a four speed, because you really need both hands on the wheel. When I did my front end rebuild last fall, I installed factory power steering taken from another '70 in a salvage yard. Since the brackets that came with the pump were from a 350, I had to order big block brackets, which are quite different. Leo bailed me out with a nice original set. I still have the manual steering box if anyone needs one. Here are a couple of before and after photos from the conversion (which is fully documented at http://s912.photobucket.com/albums/ac329/dbengtson4/Installing%20Factory%20Power%20Steering/). By the way, when you finally hook up your pump, be sure to turn your steering wheel from lock to lock four or five times to drive the air out of the fluid. It's a lot easier on the tires and frontend if you put your floor jack under the crossmember and take the weight off before cranking the steering wheel. I did not drive mine until the pump was hooked up and operating so I don't know about the wisdom of running a power steering box, quick ratio or not, without the pump. I would think it would be extremely hard to steer.
-
Whoa, John, that makes one bad Cutlass!! Do you have any pics? So when are you going to put some of those pinwheels on your Monte?
-
Great pictures, Davey! Good memories of fun times! Thanks for sharing.
-
Thanks for the feedback, Cameron. I am just beginning to focus on my Monte's ignition system and it seems like there is a lot to learn and a lot to choose from. Right now it is stock except for the Accel points elimination module and aftermarket plug wires that came on the car. It seems to work fine now but I thought there might also be an opportunity for improvement. I'll take a close look at the Pertronix offerings. BTW, I remember being blown away when the '58 Impala came out in the fall of '57. A lucky guy on our street got his hands on a black convertible with red interior, fender skirts and the continental tire kit - way cool!!!
-
Thanks for the feedback, Bruce. I enjoyed checking out Dave's small HEI website - never heard of his conversions before. Since you already have one of Dave's conversions but have never used it, do you have concerns or issues with it? Would installing it require more than a physical distributor swap (i.e. additional electronics or wiring to make it work)?
-
I stopped by the Speed Shop at Muscle Car City last week and was asking about the new "universal" HEI distributors they had on display. The very seasoned attendant asked me which engine and year it was for. When I told him it was a '70 BBC, he quitely asked, "Why do you want to put an HEI distributor on that engine? Why not just put a Pertronix kit in your stock distributor?" I told him I already had an Accel pointless kit in it but wanted to upgrade to HEI and MSD. He said unless I was racing or expecting to burn low grade gas, I probably would be wasting my money on either/both. Hmmmm Then he told me that he had heard many complaints that the "universal" HEI units were restricting oil flow (and causing consequential damage) in early big blocks down near the drive gear end of the dsitributor shaft. I had not heard of this issue before and wondered if anyone has experienced or heard of a problem like that. Aren't there earlier GM HEI units that work well with the early BBC? (I would think so.) Also, what experience have others had with Pertronix kits in their stock GM distributors? Which of their several models does anyone recommend for a street/performance modified BBC? Thanks for any feedback.
-
Well, maybe I SHOULD have anticipated a surprise or two .... I ferried my wife to the local Farmer's market today in the Monte because I wanted to see how she (the Monte, not the wife) sounded and ran with freshly adjusted valve lash. Sounded good - steady clickety click of solid lifters with no rowdy ones in the bunch. Ran fine .... once I got her moving .... But ... something happened to the formerly well-mannered idle. As soon as it came off the fast idle cam (at the end of the driveway - its' HOT here!), the idle speed dropped to 600 on the tach and the idle was more "lopey". Of course, I didn't want to show any concern to my wife and have her think I had screwed something up so I pressed on with the journey. Everything went fine but the idle was so lopey at every stoplight, the whole car was shaking slightly and I had to rev it a bit to get under way in first gear. I used the "opposing cylinder" technique to adjust the lash (i.e. when the #1 intake is fully depressed, adjust the #6 intake lash) so I should have avoided any false lash settings. Since I hadn't touched the carb or distributor during the valve lash adjustment, I wondered if I had accidently disconnected a vacuum hose but I found nothing at all amiss. Then I remembered what I had read in a website article about slightly altering cam timing and effective duration by increasing or decreasing valve lash just a few thousandths. Thinking back, at least ten of the sixteen valves had to be tightened to close to "cold" lash settings - three of them by quite a lot. According to the article (as well as common sense reasoning), tightening the valve lash setting effectively adds duration because the lifter engages the ramps on the camp lobes a bit sooner and stays on them a bit longer than a lifter with a looser lash setting. So, my theory is that by adjusting the lash on my valve train mostly tighter, the engine is behaving like it has more duration on the cam when actually nothing else changed. This would also account for a lower idle rpm at the same carb settings and the lower idle combined with the higher duration would produce a more noticable "lope" at idle. I presume that simply turning my idle screw up to 700 rpm will make this little change less noticable? I sure don't want to get back into the dieseling on shut down problem I fought for so long. Okay, all you highly respected (and rightly so) gearheads, what REALLY (or probably) happened to cause such a noticable difference in my engine's idle performance following the simple valve adjustment I described above???
-
Been working on the Monte this week trying to knock a few things off my "to do" list before I head northwest for the summer. My primary goal today was to adjust the valve lash since a couple of the solid lifters were clicking louder than the others. But as soon as I got the first valve cover off, I couldn't resist the tempatation to try some metal polish on it to see if the cast aluminum would polish up. I tried Brasso, Meguires All Metal, Never Dull and Haggerty's 100 All Metal polish. The first three cleaned and polished but didn't remove much. Haggerty's, however, showed more promise. It looks, smells and works exactly like Semichrome polish which has gotten rather expensive lately (used to polish my brass in ROTC with that). So, I got out my old 9" angle polisher and went to work. A couple hours and some detail polishing by hand later, I had a shiny valve cover instead of the aged patina I had been tolerating since I bought the Monte over a year ago. I removed the other valve cover and snapped a picture of both for comparison. Set the valve lash (cold, iron bolck and heads, Sig Erson #120421 cam) to .024" intakes and .025" exhaust. At least three were quite loose (probably the noisy ones), three were a tiny bit tight and the other ten were either right on or a bit loose. Haven't started the engine yet, but don't anticipate any surprises. Final picture is the engine with the polished valve covers re-installed. I've never seen another pair just like these. They have a Chevrolet Towanda engine plant sticker in the center "window" but no other manufacturer's name on them. I think they were installed when the engine was rebuilt in 1974 so they've probably been around awhile. Does anyone recognize them? Were they possibly an aftermarket item from the GM performance shop? Here's the original condition "before" polishing. Here's the other valve cover "after" polishing. Here's the engine after adjusting the valve lash and re-installing the polished valve covers. Shoulda done it long ago! Oh, well ... now I need to tune the Edelbrock 650 (calibration kit is on order), get a taller K&N air filter, install an HEI distributor (with "correction" cap) and replace the headers. Some of that will have to wait until next fall.
-
Congratulations on your success in spite of difficulties, Davey! Thanks for sharing your experiences and videos - it's the next best thing to being there. I love anything mechanical but can't imagine the patience it must take to flog multiple mysterious problems over a three day period. You are truly an inspiration to anyone who lifts a wrench! One of these days the door you are knocking on will open and you will be at the very top of the heap! Wishing you continued success.
-
What did you do to your Monte today?
MCfan replied to Xxyyzz's topic in General 70-72 Monte Carlo Forum
Congratulations on placing in the top ten awards at your car show, Dave! I am not surprised. You have one of the most appealing and authoratative looking Montes I've ever seen! I took my '70 to local car show, also - probably my last until I return to Florida in late fall. Although, it was poorly attended in general, there were two other FGMCC members there also: Karl with his black '72 and Ron and Jo Kisner with their forest green '70. Unfortunately, it was 90 degrees, full sun and almost no breeze - and quite humid, as usual. None of us placed as most of the awards went to the few high-dollar show cars that always show up here, but it was good to see the other entries and visit with the other owners. Here's a couple pics to "prove it happened". The show was hosted by Muscle Car City as seen in the background. Ron and Jo Kisner's forest green '70 is almost completely stock. You can almost feel the heat! Ron & Jo had shaded chairs - Karl (back to camera) and I braved the sun. -
Kenny, I think you just like to yank our chains ....
-
... or maybe your "oil light" has become an "aggressive cornering meter"?
-
Nick, since you mentioned "belts" and don't have A/C, I assume you have 2 V-belts - one that drives your water pump and alternator and another that drives your Power Steering pump. To replace them both you will need to loosen both the alternator and the power steering pump and rotate them both toward the crank pulley. Even at the unit's furtherest travel, the belt may still need to be pryed off with a flat blade screw driver, depending on its overall length. Simply loosening the bolt that clamps the unit to its adjustment track may not allow you to easily rotate either unit toward the crank pulley. You will likely also need to loosen the mounting bolt around which the unit pivots. The alternator belt should be the first to come off and will have to be worked around the fan blades and out the side of the shroud housing. The power steering belt should be in the pulley notch closer to the engine and can be pulled straight off the crank pulley once the other belt is out of the way. I checked my GM Assembly Manual for original GM part numbers that most auto parts stores can quickly cross reference in their computers for the particular brand of belts they sell. The alternator/water pump belt is GM # 3932438 and the power steering pump belt is GM # 3849258. Of course, you can always take your old belts in to the auto parts store and they can measure them for equivalent replacements, regardless of brand. Even a half inch difference in overall belt length can make a big difference in how it fits. A new belt that will just barely go on (may even require some prying) will usually tighten up and also leave some room for further adjustment later as the belt wears or stretches a bit. Installation of the new belts is just the reverse of the removal sequence. I always use a large screw driver or small pry bar move either unit far enough out to put snug tension on the belt prior to tightening the adjustment track bolt. Remember to also re-tighten the mounting bolt of each unit once you have tightened the respective bolt in the adjustment track. Hope this helps some ...
-
John, I'm planning to replace the long tube headers on my '70 402 4-speed soon. I can't identify the brand of the set that came with the car but they are circa 1974 and have been "relieved" in several areas. I've recently been advised by other club members that both Doug's and Hooker long-tube headers listed for a manual transmission will fit fine, but I don't yet have personal experience. Welcome to the club! Hope you will join up soon and share some photos of your '70 with us.
-
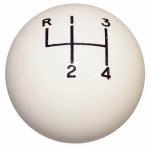
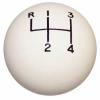
That's a good question, Boz. Obviously a period correct Muncie shifter will work, but those are getting pretty hard to find. The factory (Muncie) shifter in my '70 was replaced by a Hurst shifter when the engine was modified back in 1974, so it is rather old. As you probably know, the shifter has to be in Reverse in order to get the key out of the ignition, at least on a factory 4-speed car. That was a challenge with the Hurst shifter because the lever was hitting the left side of the opening in the console before it could be pushed forward into Reverse. I checked the mounting of the shifter frame on the transmission and did not see anything amiss. All of the bolts were tight and the linkage all lined up between the shifter and the transmission shift arms. So, when I discovered that the shifter handle was actually a two-piece unit (the joint and bolts are hidden under the rubber boot), I decided to simply place 1/2" spacers between the two pieces and use 1/2" longer bolts. That positioned the upper arm of the shift lever far enough to the right to avoid interference with the left edge of the console opening (as shown in the picture below). Although I tightened the new fine-thread bolts super tight, I certainly wouldn't suggest using spacers in a racing or power-shifting situation.
-
According to the rimsntires.com comparison tool, changing from a 255/60-15 (27" tall) to a 275/60-15 (28" tall) will increase your speed 3.5% at any given rpm. I also run a 3.31 with 275/60-15's on the rear and my engine is taching exactly 2800 at 70 mph(actual via gps). In fact, that combo of gear and tire gives you exactly .025 times (or 1/40) your rpm in mph (if your transmission's high gear is 1:1, of course). For example, 1600 rpm on the tach is 40 mph, 2000 is 50 mph, 2400 is 60 and so forth. So, you can run 75 mph at 3000 rpms (if you can afford the gas, that is).
-
I just found this eBay listing from the Parts Place for dual retangular outside mirrors (not remote control) for '70 - '72 Monte Carlos. http://cgi.ebay.com/ebaymotors/70-72-MONTE-CARLO-STOCK-RECTANGULAR-CHROME-MIRROR-SET-/270537650177?pt=Vintage_Car_Truck_Parts_Accessories&fits=Year%3A1970%7CModel%3AMonte+Carlo&hash=item3efd4cf001 Of course, I don't know the quality of these mirrors, but they are new and they look exactly like the pair I have on my '70. Unless someone already has a driver's side remote control mirror, this is a fairly low-cost way to get dual outside mirrors. Before Mark (Wallaby) taught me how to tighten up my current mirrors last fall, I was considering buying a new pair myself. The best price I could find then was $80 a pair plus shipping so this looks like a good deal to me.
-
Thanks for sharing the sad news, Rob and the pictures, Jared. I didn't have the pleasure of knowing Ronnie, but it sounds like he was the sort of person we need more of in this world. Condolences to his family. May he rest in peace.
-
Rob, I don't know what your plans are regarding rear tires, but they will also affect your car's performance (i.e. acceleration, speed, mileage) because your OVERALL drive ratio includes the gear ratios of your tranmission, the "rear end" ratio AND the size (diameter or height) of your rear tires. Here's a very useful web site if you want to see the performance results of changing any or all of these factors: http://vexer.com/automotive-tools/speed-rpm-calculator You will first have to edit the axle ratios (i.e. change 3.23 to 3.31), select "automatic transmission", edit the transmission gear ratios (i.e. 2.52 for 1st and 1.52 for 2nd in a TH350) and edit the vehicle weight (I used 3850). Then edit your tire profile or height and torque converter efficiency. Now select a forward gear (1, 2 or Drive) and move the throttle slider up to the rpm limit you plan to set (watch the digital displays not the gauge needles). It will show you the mph (for that rpm), your predicted quarter mile ET and Speed and even give you a required horsepower estimate for that set up! I had to play with it awhile to get it set up but it very helpful once you figure it out. Whether you choose a 3.31 or a 3.55, you could run a taller tire on the street for more efficient cruising and a shorter tire on the strip for beter launch and acceleration. It's a common practice, of course.
-
Kenny, I know you have a 383 stroker in your '72 but do you know what else was done to the engine? Do you know the compression ratio and the cam timing/lift? What about your intake manifold and carb? I would assume they are not stock but you never know. I think you said earlier that you have stock exhaust manifolds but maybe the prior owner just ran out of funds before he got around to getting headers. Does you engine continually burn oil (i.e. exhaust always smokes some) and does it smoke a lot when you romp on it? Maybe you've already answered all of these questions in a prior thread, but if not, it would sure help other members diagnose your plug fouling problems if we knew more about your engine.
-
Having the quickest ping should be good for something, Mike (if nothing more than waking up the server)!! Do you live next door to the server location or is it perhaps due to the increased speed of electrons at cryogenic temperatures?
-
Than what? Whatever it is, I'm not paying extra to get it and don't know why I'd want to.