

VE3HZZ
-
Posts
201 -
Joined
-
Last visited
Content Type
Profiles
Articles
Forums
Gallery
Events
Everything posted by VE3HZZ
-
Looks great Larry, that was fast..lol..musta had an EASY BUTTON EH? Parts turned out great too from powdercoat. Oh and today it rained so the ACID TEST to see if my leak in the convertible is still there.....and if so you'll likely hear me Scott
-
What did you do to your Monte today?
VE3HZZ replied to Xxyyzz's topic in General 70-72 Monte Carlo Forum
Now don't go getting her all this work she will be too busy to do mine I have seen the handy work and I think she and I need to talk as her AGENT I think we need to raise her rates some eh DAD We will do lunch and discuss it...... And watch out pretty soon YOU won't be able to afford her Scott -
Larry did you get them powdercoated locally? If so PM me the details of who as I may have a few pieces. I'd love to get a powdercoat machine myself but it's the baking process afterwards I'd have trouble with...or rather have trouble with..the MRS Scott
-
Where do they think the term Toonie came from? Someone said...Hey you guys are LOONIE TOONES so when a couple get together there Loonie's hence the $2.00 coin is a Toonie Makes cents eh??? LOL But I'll tell has ya can't buy a TOO FORE for that any more....dem waz da daze yup fur shure....
-
We have that we call it JB WELD and it works GREAT!!! That is what I'd do as well over a mig and the spatter. I have a Mig and I'd likely go this route first with the epoxy. Then if that didn't seem to fix it (and I doubt it would not) then you could clean it up and hit it with the MIG. You could use a propane torch as well to get the HEAT at the stuff your talking about if don't have a HEAT GUN..... Good luck to you in the repair. Scott
-
If it is what I think But I will wait to hear like the rest without further comment. But if it is
-
Put in an electronic flasher in where the factory turn signal relay is. It will not care what the LOAD or capacitance is in the circuit it will simply go ON and OFF at the correct intervals. The mechanical one that is factory DOES care and this is why you get a fast flash to indicate a bulb out so you know to go check them. That was the old school way of telling you a bulb is out. Now today cars have sensors for everything and they let you know a bulb it out, which one it is and how to change it (just kidding on the last part). Pretty sophisticated electronics now. But the electronic flasher should resolve your FAST FLASH situation for running these LED tail light. Regards
-
Well not sure if it makes a difference with the LED for the output? Maybe? As for price....well they were FREE we have them at work we sell for the interior of vehicles etc. There were an older version we have upgraded to newer ones. So I got my pick of them as a perk But you can use regular filament bulbs and I bet would be brighter. Scott
-
As noted there all the regular 194 style wedge bulbs found in your side marker lights look like this: And after you get them all changed (I used LED bulbs) it should look like this: Hope that helps. Good luck. Scott
-
I did manage to replace all the bulbs in the dash of my 70 with just removing the dash pad and the lower column cover. It was tight but I was able to change out all the incandecent bulbs with LED bulbs which means on half I had to turn the bulb around AGAIN after a first install. It was a PITA but I did it. I wanted power to be able to ensure they each worked hence the need to reverse a few oh and having had a couple of missing holders. So it can be done without full dash removal. I am going to do that eventually anyway but at the time I wanted to just do the bulbs. And oh yes except for maybe 1 all the REST were out!! and even ones that the filament LOOKED fine were not so quite possible fuse is fine and ALL are out!!! So yes check the fuse first but be prepared to replace ALL the bulbs and do so even if they look good. Bench TEST them and you'll likely find there NFG even if don't look so...trust me. Scott
-
Before the change over of the transmission did you check this then and it was accurate and used a GPS to verify this. Remember that even GPS is not going to give you 100% accuracy on your speed/distance calculations all the time. There is an error correction of about 5% So even though there is a different gear for the transmission to solve speedo errors first before you go and replace it need to know the rear end gear ratio, factor in the tire size and diameter that you have installed over stock to get what error correction is needed. I would also if possible check this speed with a dedicated GPS unit not just an APP on a smart phone (IMO) and check again to ensure of the amount of error. Also remember FROM factory the speedo could be off as well as there is an allowable variance and most (even today) speedo's are slightly off in the lower end meaning if your car speedo says 60 MPH it could be only 56 etc. Manufacturer's normally error on the LOW side to avoid any possible suits over someone pointing to them for why someone got a ticket etc. In newer electronic vehicles they have SPEED healers to compensate for changes to tire size etc now that in essence does the same as changing the speedo cable gear in older cable driven cars. Hope that helps. Good luck with the update I know it can be annoying figuring out how fast your going. But think of this, on the LOW side if your cruising down the road at or just slightly above the speed limit can't get pinched for speeding
-
Nothing to do with a computer or not. The old standard flasher unit is designed to be used with the filament bulbs that draw specific load and capacitance in the circuit. If you change over to LED lights the draw in the circuit is much less and in order NOT to have a FAST FLASH you would need to either A) put in a load equalizer or B install an electronic flasher that in essence doesn't care about the LOAD in the circuit and will flash at a standard constant rate. In the Monte that is what I would do install an electronic flasher in place of the old standard as it's a simple plug in same way as factory ones. These are the HD flashers used a lot when towing a trailer and causes the opposite effect of a SLOW flash due to EXTRA load in circuit. It is the same thing when you have a light out and one side flashes fast that is why you need load equalization. Scott
-
Nice MOD...this gives me idea's .....so DAMN YOU...<JK> But I have a spare set of these. One question you had to CUT the plastic covers out? I have a set of lenses and mine didn't have to be cut out? I have a complete set of the front and the rear housings including the chrome centre's a couple have some pitting but driver quality. Just wondering if your using a load equalizer so you don't get a FAST FLASH due to lower resistance or putting in an electronic flasher to compensate? Looks good however and nice ingenuity. Scott
-
I am not sure why I am posting this to check...but give it a shot. The radio face from the dash lights does come on but nothing else. SO my suggestion FIRST to check (again read back and didn't see you mention it or didn't see it so under the dash LEFT corner against the firewall beside the emergency brake is the fuse block. All glass fuses. There is one specific for the radio. Check IT and see if someone at some point hooked in some power point (blade connector) to this or somewhere else from the battery and it is LOOSE. Take that fuse out and see if it looks GOOD and use a multimeter if you have one and check that there is continuity through it (google that if your not sure the term) and confirm that it is GOOD? Radio is marked as such in white on the block. Tangs on glass fuse style can become loose especially if someone didn't remove them right (don't pry it on the glass part of you'll break it) If the radio is getting power and when you turn the switch ON even get a crackle for a moment there sees to be power. If power and no sound at all and speaker leads are known to be good and test speaker even (can connect one to test) does nothing it can be the final amplifier section of the radio which is on the other side of the finned aluminum block you see in that rear picture. Also some of these radios could have an internal fuse inside that if blown will do the same thing. I have the one out of mine sitting in the garage somewhere came with the car don't know if it works?? But I wouldn't be surprised if there was one inside the rear where power enters the radio. Common when they did switch over from tube to solid state electronics (like these are). Hope that helps and good luck let us know what else you find. Scott
-
What did you do to your Monte today?
VE3HZZ replied to Xxyyzz's topic in General 70-72 Monte Carlo Forum
Nice any rubbing issues or modifications needed so they didn't? I have 8" rallies and these: Lots of room but not sure if I'd have any with these but looks GREAT. Thanks Scott -
What did you do to your Monte today?
VE3HZZ replied to Xxyyzz's topic in General 70-72 Monte Carlo Forum
Ian they look really nice..what size tire did you end up with or are they the old ones on the new rims. Either way looks bitchin!!! Scott -
So first video sounded like the alternator as noted, but since you changed the starter with a few shims and it went away obviously that was not it. And in the first video there was stray voltage arching around in there so turn off the lights start the car and watch for it. As for the tapping noise it is likely it was there before you didn't notice it. I think it sounds like a collapsed lifter or even rocker arm clearance on valve. Have you recently done an oil change or checked to see if the fluid is low? Also you may want to run some oil treatment designed for this purpose and see if it helps before opening anything up to check. It didn't sound loud, but if it's something your noticing now that you didn't and to you it's loud maybe it's a concern to check. Or maybe it just needs a GOOD RUN to blow the cobwebs and carbon out of it? Scott
-
If you really can't solve it try some Dyna beads Truckers have been using them for years to smooth out vibrations for longer tire and suspension life. I have them in my motorcycle tires and I can tell you it smoothed out the ride. They work quite well and are not expensive and easy enough to install. You may chase your tail on this one for a while so if you've tried the basics and it's still doing this may want to try that option. Just a suggestion. Good luck Scott
-
Need To Know Jacking Instructions Decal Location
VE3HZZ replied to OhMonte's topic in Restorers - Archive
Yes Monday was due to a hangover from the weekend and Friday was due to thinking ABOUT the pending reason for the Monday hang over But that all went when they changed to a rotation shift and basically build them almost round the clock now. Not that you could identify a day or hour built by the average consumer but it was something to blame when you got a lemon....that seemed to always need repair. I think Christine was built on a Friday the 13th.....that is why it was so EVIL.... -
Need To Know Jacking Instructions Decal Location
VE3HZZ replied to OhMonte's topic in Restorers - Archive
Mine is on the opposite side to the picture in the same spot (as in opposite this one) And it's original (and some of it is still there). So I bet you would get different answers depending on model year and assembly plant. Or maybe who was on shift and putting them on if L or R handed -
Here is where mine runs to from the coil (HEI) to the IGN in the fuse box. It is the blue or green (depending on your monitor) wire in the picture. Sorry it's a but blurry I held the camera up there to take a couple of shots and didn't realize it was a bit blurry but you can get the idea from this I hope.
-
[quote=Will stock 15 x 8 Vette Rallys fit on the front? Thanks Will STOCK 15x8 fit on the front....what do you think of them on mine?
-
Thanks for posting that site will sure come in handy...GREAT resource...... Scott
-
For cleaning the wires of gunk (which is what I assume you mean) I use Spray 9 it is biodegradable and is soft on materials but cuts grime and grease very well IMO. Comes in a re-usable spray bottle.
-
What did you do to your Monte today?
VE3HZZ replied to Xxyyzz's topic in General 70-72 Monte Carlo Forum
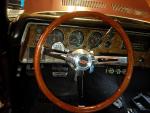
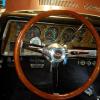
Sold my old dash pad and painted the clips and installed on the stereo pad I got for it. Took out the old dash insert after getting my hands around to that damn defogger switch bracket. Put in the new dash insert for a TEST fit and looks GREAT!!! Also figured out the ashtray adjustment issue so will remove and fix that so it goes up and down straight. :lol Also installed ONE of my new arm rest pads (just found a crack on top of the passenger side that wasn't there before. So have to take it off and replace that pad too (the new ones are thicker). I bought the KIT but when tried to put on the drivers side new plastic bottom it didn't fit flush on the top right. Everytime I tightened the bottom front it pulled it out..I think it's slightly warped. Oh well the factory one is in good shape so I just changed out the pad. Sorry no pics yet. I also finished re-organizing my tool boxes and separated mostly my metric and SAE tools and impacts. Makes life easier working on Monte if I only grab the SAE wrenches Scott