Leaderboard


Popular Content
Showing content with the highest reputation on 02/09/2019 in all areas
-
The 8’s are for a possible Holley Sniper EFI1 point
-
You’re the best Paul 🤘🏼 I should be fine when I have the dash out to see it all. I picked up 8-14 gauge wires, 2-Speaker wires, 1-RCA cable and 2- 8 gauge wires 👍🏼1 point
-
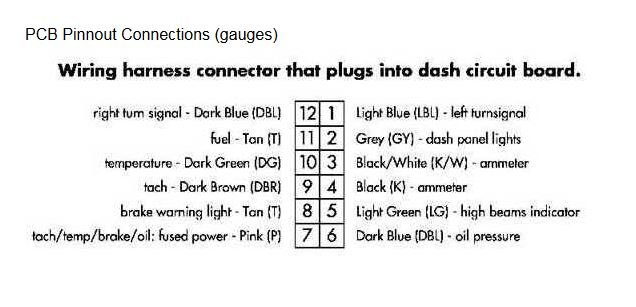
Frankie, assuming you ordered the kit for factory gauges, here are the color codes for the gauge cluster plug. This tells you what wires go where to the Dakota inputs.
 1 point
 -
Hey Frankie! I see the wiring kit you bought is complete, engine, interior and rear. It looks nice, I like that it has modern fuses. Because you’ll be using the Dakota system, you won’t be using the under hood wiring for the oil and temp gauges. The Dakota wiring for those sensors will need to go through a hole you’ll make in the firewall. Volts, tach, turn signals, high beam, brake, fuel and tach signals can be picked up in the dash. Dakota Digital has optional modules to acquire transmission selector and speedo signals, you’ll need to run the wiring to the transmission. The AAW kit looks nice but a lot of plugs are loose, un-terminated. As you’ll have a lot of crimping to do, I suggest you get the crimping tool for the Packard plugs as they’d recommend. I’m a fan of also soldering after crimping. As you have a 1972 car, did this kit include the seat belt warning light wiring? Don’t forget a few spare extra wires from the dash to the trunk!1 point
-
I second the two tone idea, if mine had a vinyl top from factory it would be a two tone now I"m not a fan of the vinyl tops. Just my 2 cents1 point
-
I had planned on placing it there 👍🏼 Bad part is: I’m a plumber 🤣. I’ll figure it out 🤘🏼1 point
-
I mounted my Dakota Digital VHX control box on top of the glove box right next to the speaker in the photo. It was somewhat tedious to install the digital display but well worth it. My son in-law is an electrical guru so he did all of the hard stuff.1 point
-
Yes, remove the dash pad to access the bulbs, but the very first thing you will want to do is remove your negative battery cable so that you do not smoke your printed circuit board while you are behind the dash. This is a VERY important thing to do. A must. Then replace the bad bulbs. There are 6 screws holding the dash pad down. Remove the screws, then lift the front of the pad up and pull the pad toward you. There are six clips holding the pad down on the windshield side of the pad. Be sure not to loose any clips. Try a new flasher.1 point