72-CLASSIC_RIDE
-
Posts
1,172 -
Joined
-
Last visited
-
Days Won
33
Content Type
Profiles
Articles
Forums
Gallery
Events
Everything posted by 72-CLASSIC_RIDE
-
Big Block full length Header - Floorboard clearance ?
72-CLASSIC_RIDE replied to snomobeelr's topic in Engine Tech
Curious that Doug's interfered. That new cross member for the Tranny may have adjusted how the Motor sits now allowing interference. Pretty sure it changed the angle a little. Doug -
Appreciate the info Kris. Do you have the VIN that I can use as an identifier on my Spreadsheet. It helps me track them and prevent duplication's. Based on the criteria on the Spreadsheet, can you provide those amenities for me as part of your Cars description? Is it a 402 CI or a 454 CI also? PM me or email me at camerondl@q.com if you prefer to limit information in reply. Doug
-
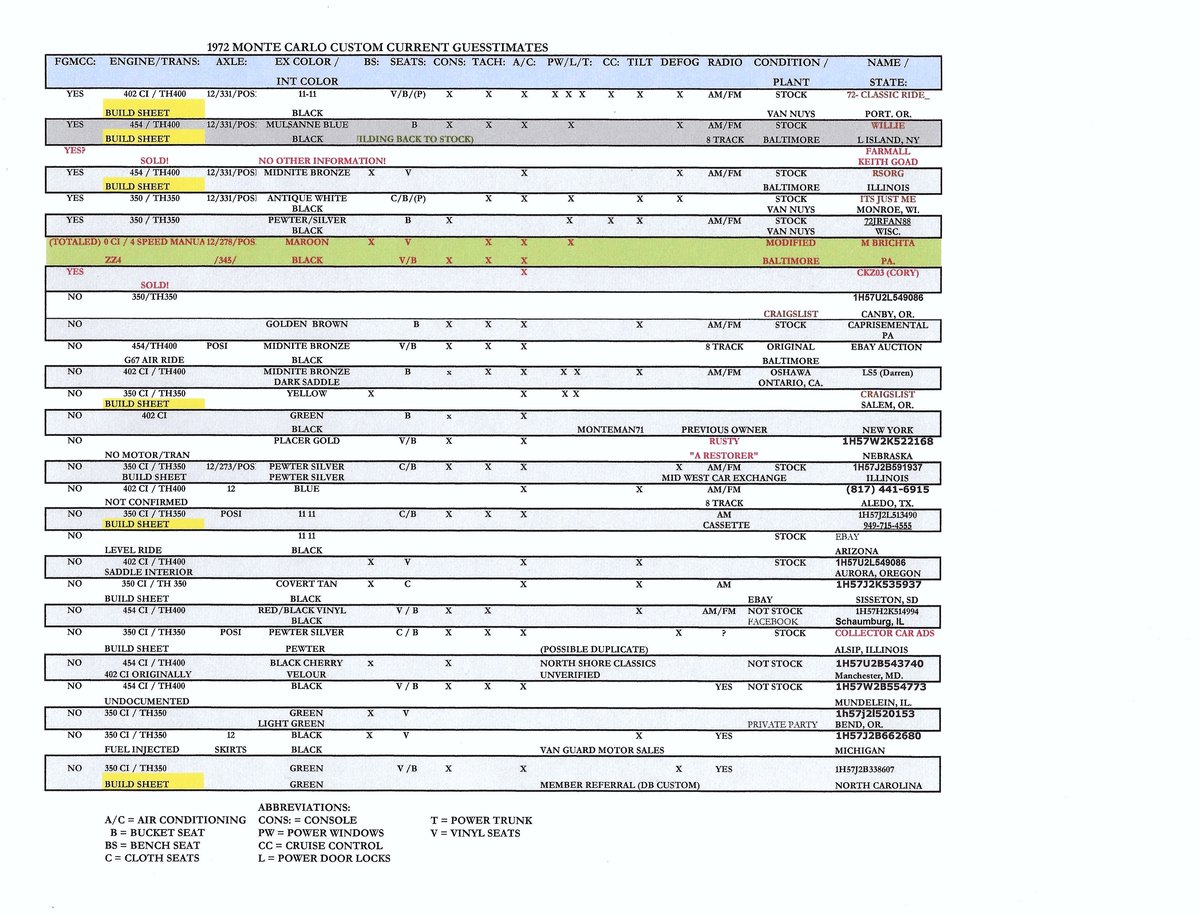
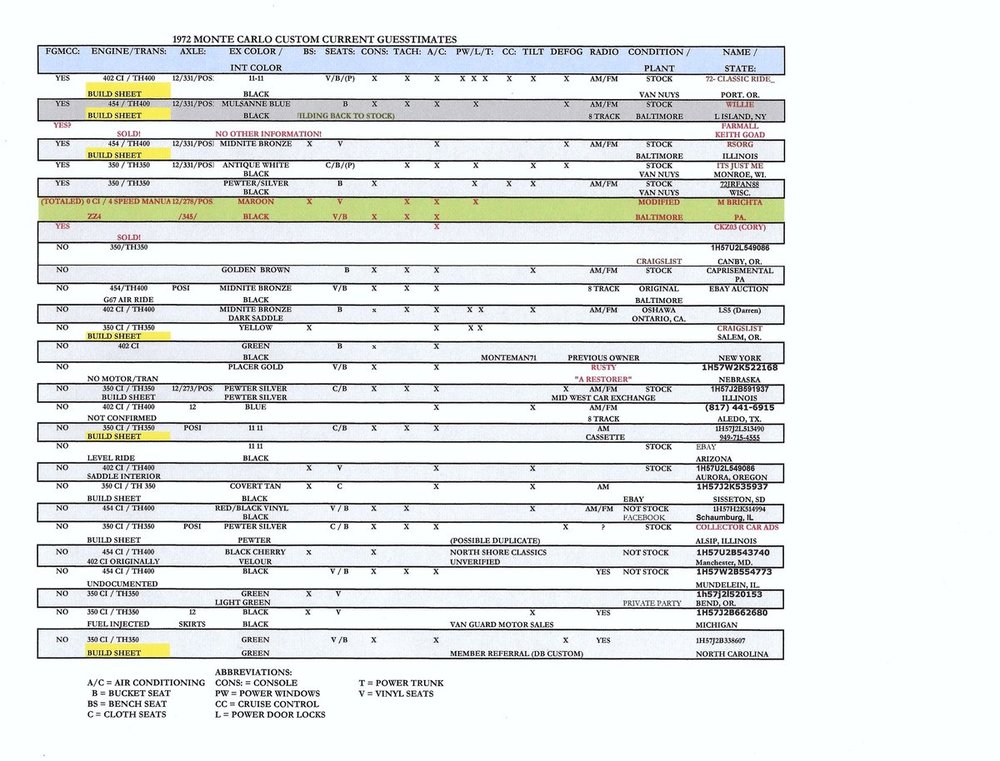
Okay guys, finally updated Spreadsheet as a Revision #6 that is the most current. I hope a little easier to follow as I had cleaned it up some with probably future changes as they arise. Anyway, here we are today with (28) identified including Mike Brichta's. Will remove from Spreadsheet once determined it has been decommissioned. Good/bad feedback & suggestions always appreciated....................... Doug
-
As they indicated, the Body was solid that could have been used to assemble. It intrigued me how they decided to shorten Car to Frame. I agree the Body was wasted, but was never intended to put back on the Street. I believe this is basically similar to what they do to the vehicles they bring in. Not sure how they dispose of them when they have had their fun. Doug
-
Hi David and appreciate your input. I have documented your info into my spreadsheet & will provide an updated Rev. 6 copy as soon as I have completed the updated format and Post on this Thread. I have 28 documented including Mike Brichta's 72 Custom & identified as Totaled vehicle. Once certain this vehicle is parted, I will remove from spreadsheet. I encourage others to offer any info you come across pertaining to this specific year and type. Getting the VIN Number is a real bonus. Thanx again David................. Doug
-
A U-Tube video showing these guys swapping a 70 Monte Body onto a Stock Car (Race Car) frame. Abouit 26 minutes long and kinda cool how they had to shorten body to mount on shorter frame. Any enjoy if you haven't seen it and hope Link opens for ya.. Brutal https://www.youtube.com/watch?v=YUefSKCjP8w Doug
-
Big Block full length Header - Floorboard clearance ?
72-CLASSIC_RIDE replied to snomobeelr's topic in Engine Tech
Hi Alan, I have Doug's Full Length Headers on my 72. I have the 60 series BF Goodrich Tires currently, replaced the 350 CI w/ a 402 CI BB without changing to BB Front Springs. Car squats more in the front now and my Headers sit somewhat lower than I like. I had scrapped Flange bottom a couple of times when I have a passenger in the car but speed bumps and the like have not caused me any problems to date driving alone. Had I replaced the front springs, pretty sure I would have no issues and also with a higher profile tire would give me at minimum another inch clearance from the ground. I can measure from the floor to the bottom of Header flange if you like tomorrow as the car is in the garage off site. Not sure I can measure from header pipe pipe to floorboard but will try. Not a lot of room under there................... Just let me know.............. Doug -
Makes things tougher when you have to mix & match! There should be (2) Lap Belts for the front seat that not only connect the Lap Belt(s) but also has a second slotted hole where you would connect the Shoulder Harness to and would decide for you which location they go. If you don't have this front seat design on any of the Lap Belts, not sure what to tell ya. In which case, I would consider they are for the rear Belts (but just my guess). All the best on sorting them out. Doug
-
Hope with all that traveling that those trees are still in good condition when they arrive. Here in Oregon, we are experiencing a Christmas Tree shortage due to the drought we had this past year in particular and the prices reflect that. Many can't afford them this year. Seems kinda funny in a State where the Douglas Fir is king, they are harder to come by. Doug
-
What did you do to your Monte Carlo today?
72-CLASSIC_RIDE replied to Canuck's topic in General 70-72 Monte Carlo Forum
Completed the majority of my projects as I had planned and am now going to take a bit of a break until I conjure up other tasks moving forward. I think the pic's pretty much explains it.......... Spent the past few Months removing wax from body, used compound to clean up mild surface scratches and oxidization from paint & renewed painting lower trim & replacing missing/broken body molding clips/screws/misc. No good pic's (no Sun) that will show difference and when conditions are right will provide them. Anyway, decided to get a car cover to keep my work somewhat fresh over the Winter months. She needs her beauty sleep...................... Doug -
Okay, found the plastic style clip going thru my Brothers spare nut/bolt/washer Pavilion. He saves everything and most often I can find it in his. Just an FYI - The Plastic Clip is a 5/16 X 5/16 snap in body in case your looking. There is a machine screw hole through it of course. Got it all back together now and the Rockers hold tightly now and the refresh of the paint made a noticeable difference. Not a machine screw as I had described it in pic, just a sheet metal stainless screw. Doug

-
Thanx! That will help me narrow it down. Doug
-
Thanx for confirming that Steve. Now I will pull that patch off and pursue a fix. Doug
-
I noticed plastic inserts were used on at least some models that would snap into place to secure screw to. Would this be a same type fastener? Unless I can find factory clip, I will likely make a modification (if needed) to hole to accommodate a replacement plastic style clip. Doug
-
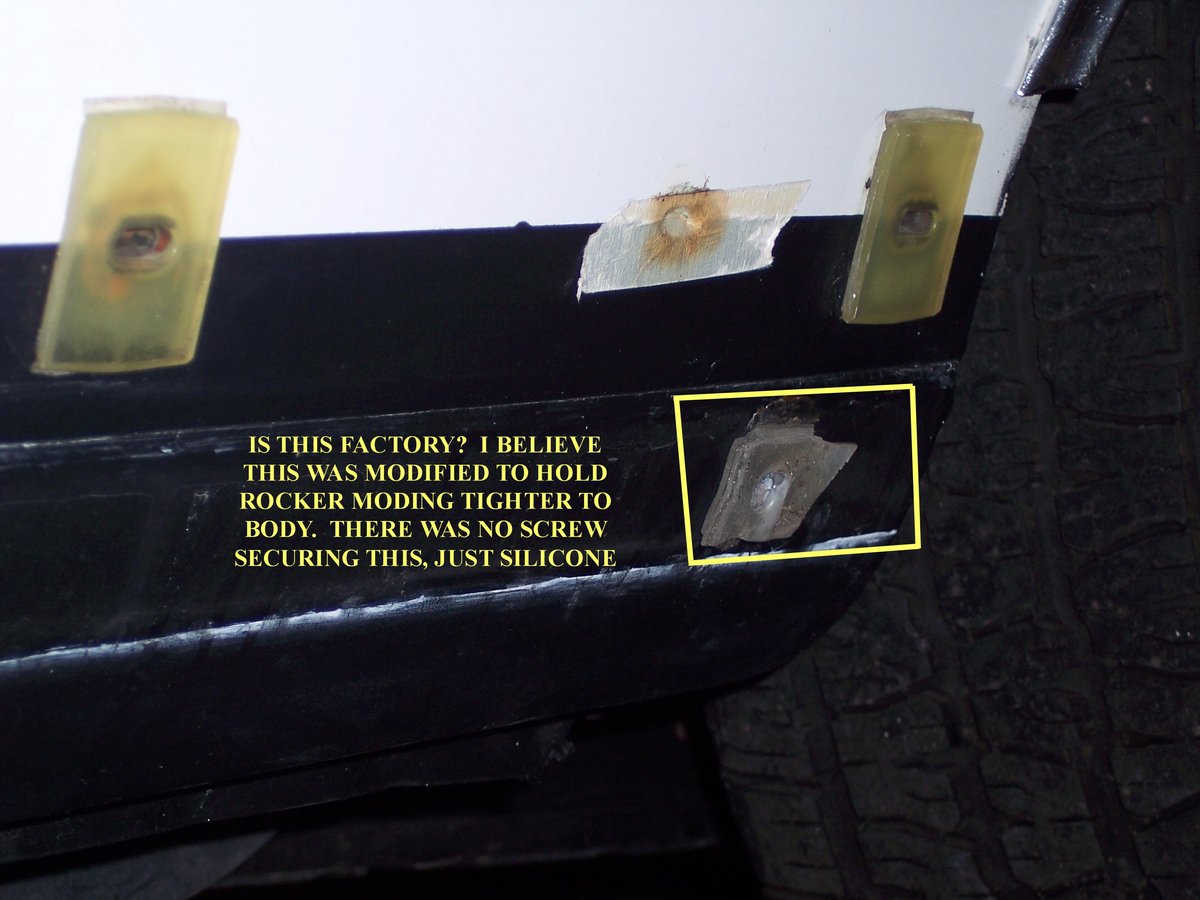
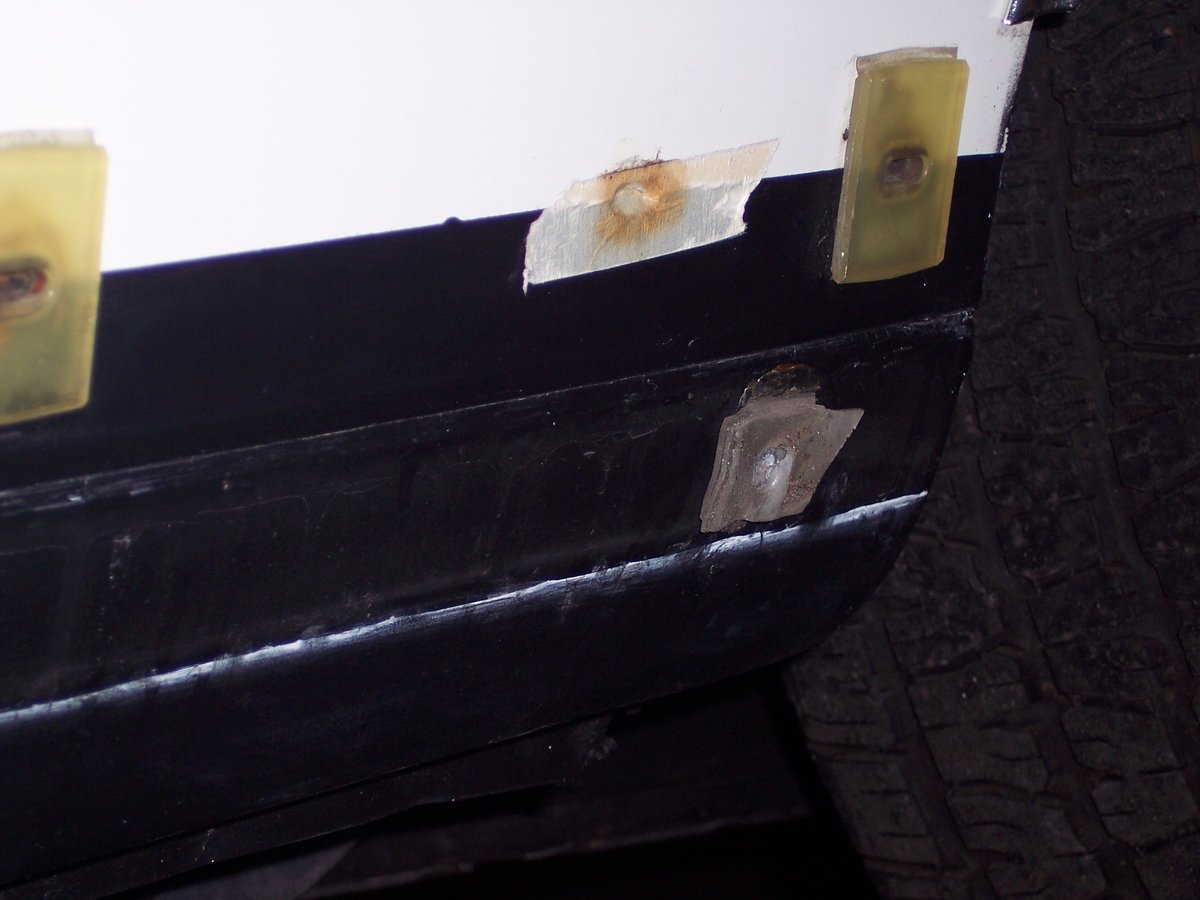
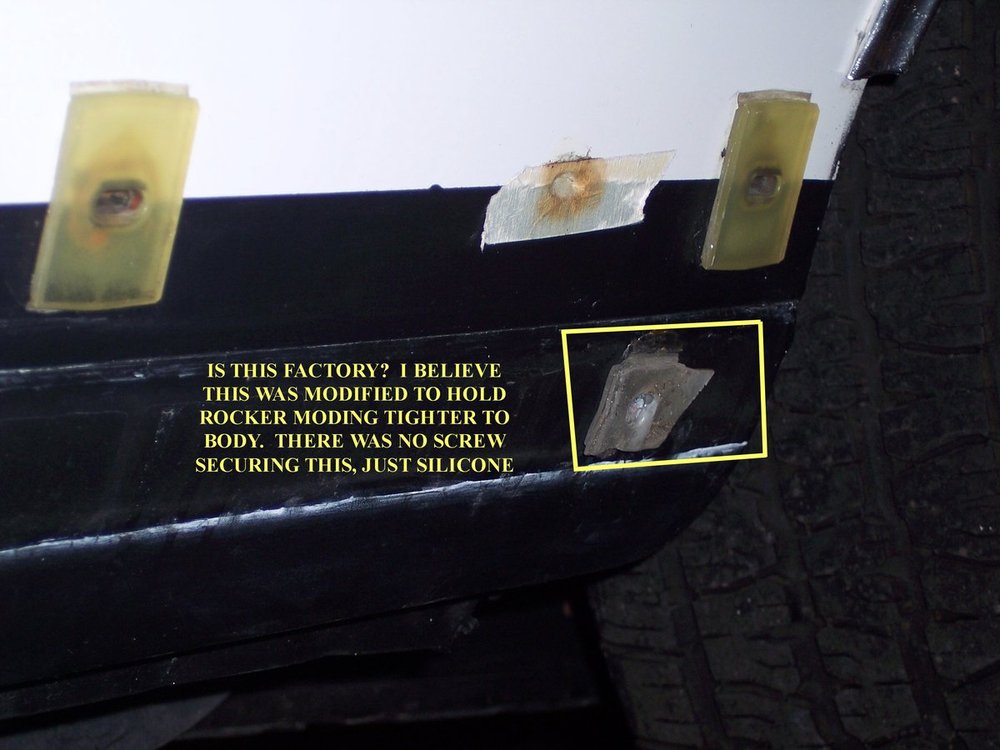
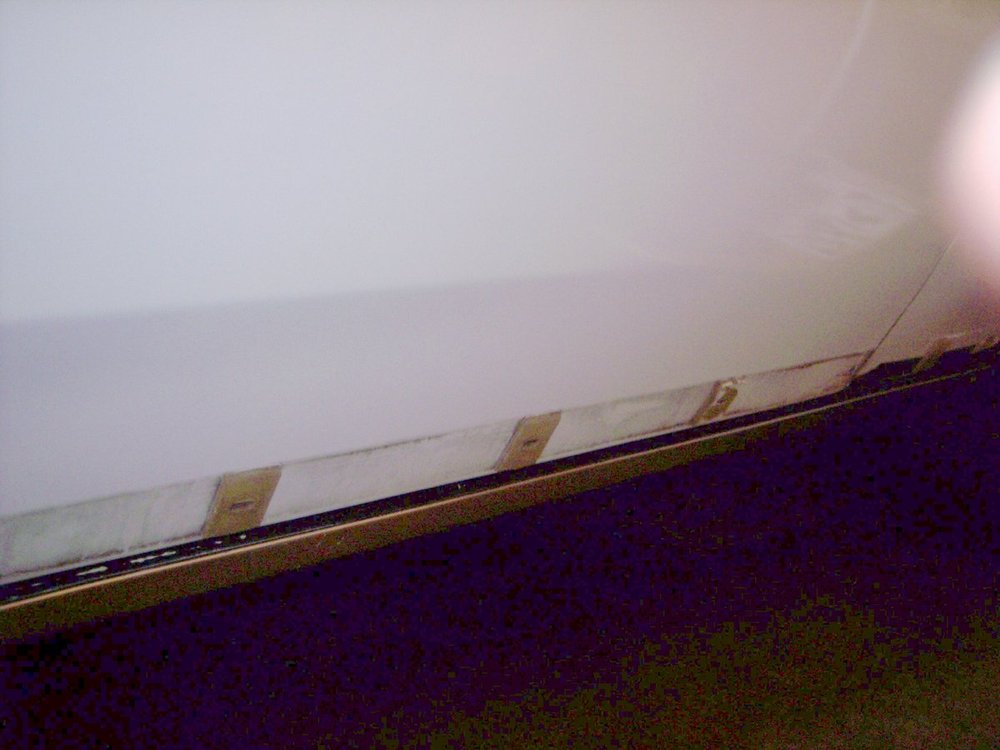
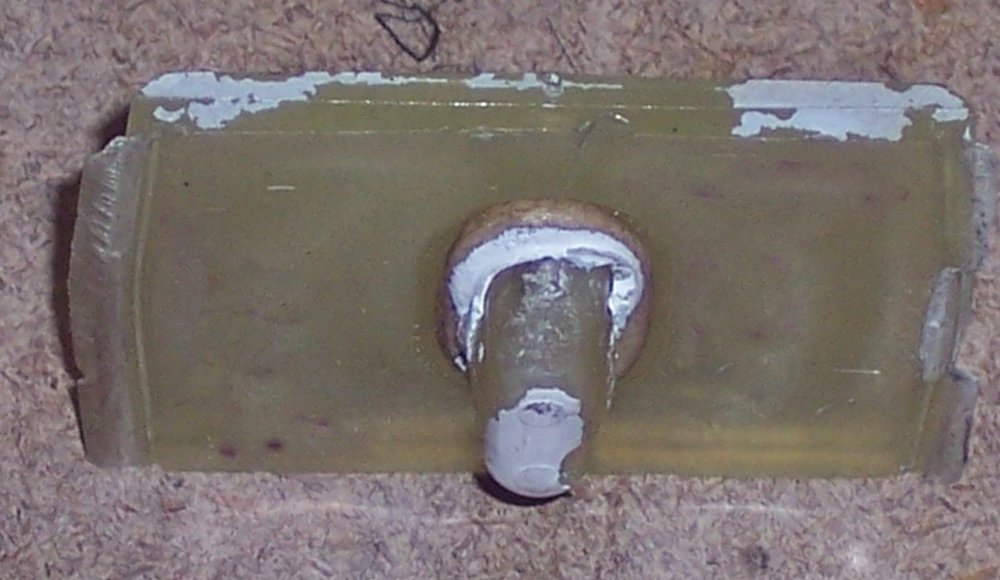
Hi all, Finally got my lower moldings back on less completing the driver Rocker Molding piece. I am having difficulty determining what exactly happens per my picture I included. The threaded nut or? is missing to fasten Rocker Molding. A patch was made it appears to hold Rocker secure where screw should have been. I assume the pad shown was put on to dampen the Molding from hitting against body panel and used some type of sealer/adhesive to hold Rocker to patch. Anyway, does anyone have a Pic or description of what should have been here. Assembly Manual shows just a screw with a nut on back side. I would prefer not to remove passenger side to have a look as by doing this I might create a larger problem. This side is secure with all the clips whereas the driver side was missing (5) clips along with the damage in pic. I see no way to replace broken/missing nut as it is hidden, so am looking at a similar repair at least for now. I don't know if there was a special clip or metal piece that would have slipped onto Rocker dampening any crush from securing screw and haven't found anything to identify installation. New plastic clips installed on driver Rocker and a couple places where clips were missing elsewhere Any help appreciated to clear up my confusion. (I thought the NOS Rockers would have had the materials to make a complete installation but only factory clips were included. Both Clip packages were already opened and may have taken pieces from Clip packages? I have NOS Rockers and Front/Rear Side Marker Trim but elected not to use them, going with original. The original while not flawless was in good enough condition to use. Refurbished lower trim (all) by repainting & polishing. I also repainted/polished and resealed my Custom/Script Sail Panel Badgeing. ps; Happy belated Thanksgiving to all. Hope your Turkey Day was GREAT............................ Doug
-
Hey Dan, thanks for the info. I did finally order the Aveco Clips and will follow your advise when installing. As far as the Rocker Molding (missing) metal clip, now that I know what I am looking at, I can devise something for that fastener. Again, thanx................... Doug
-
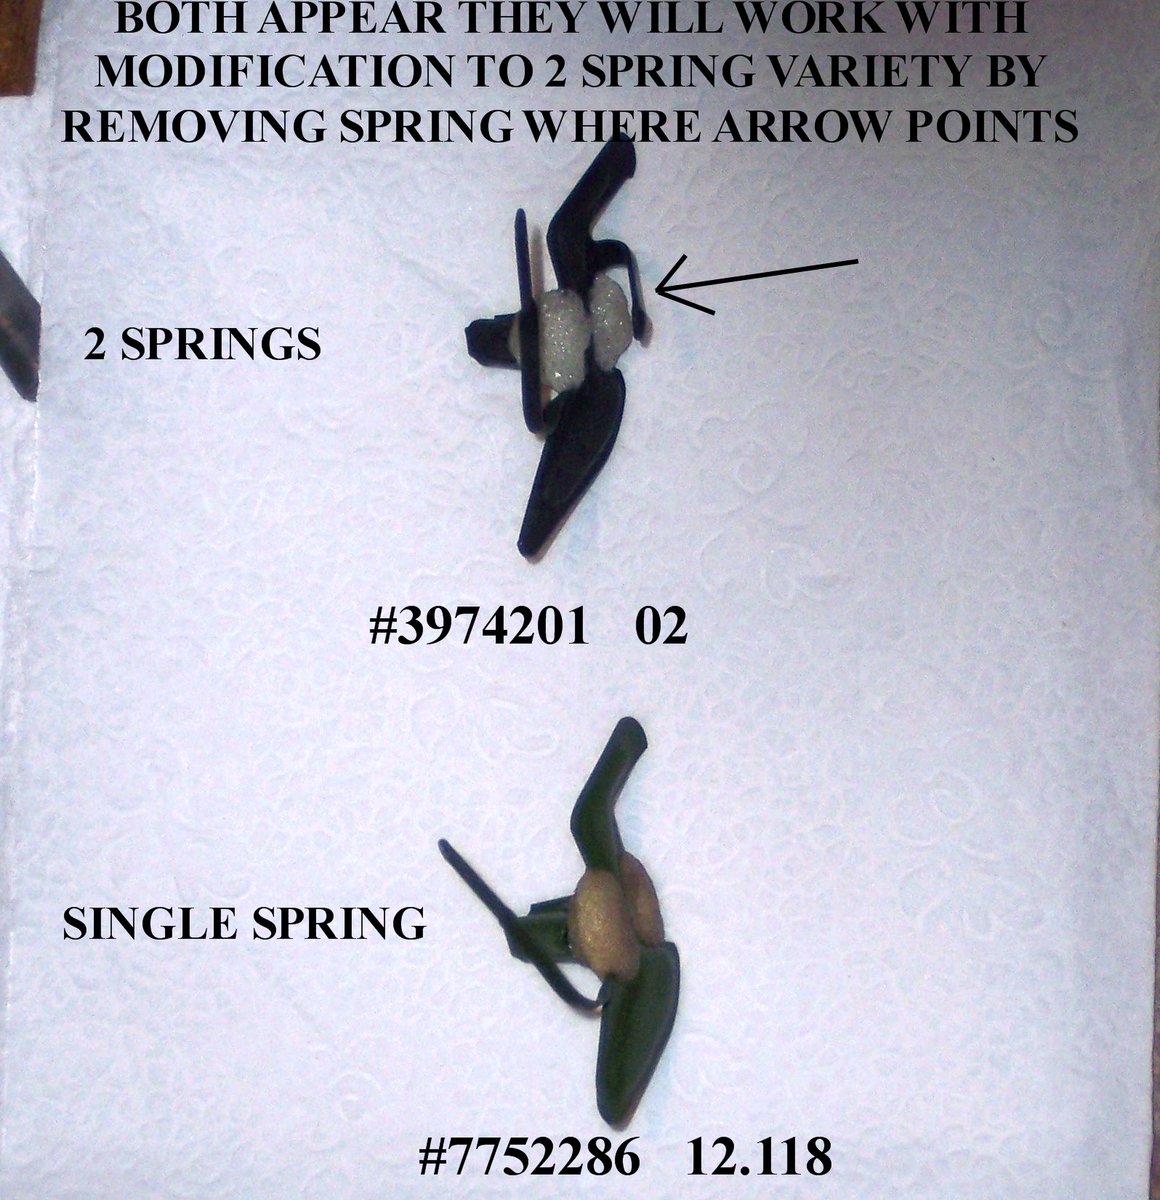
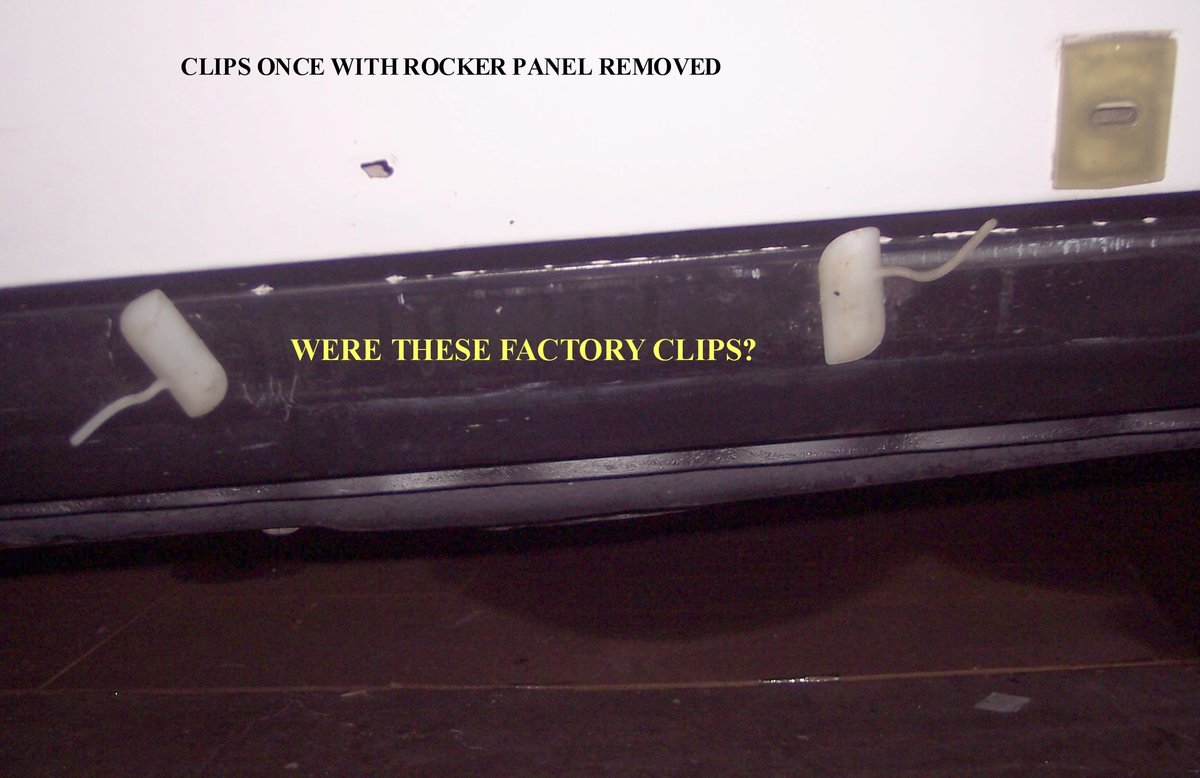
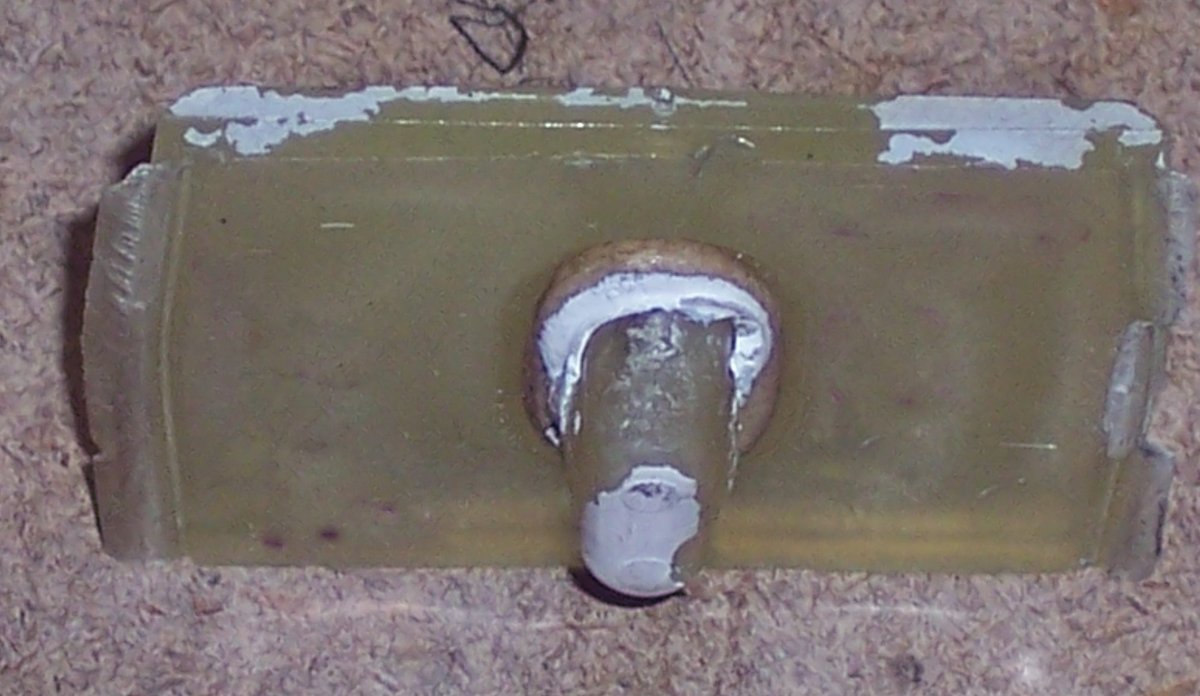
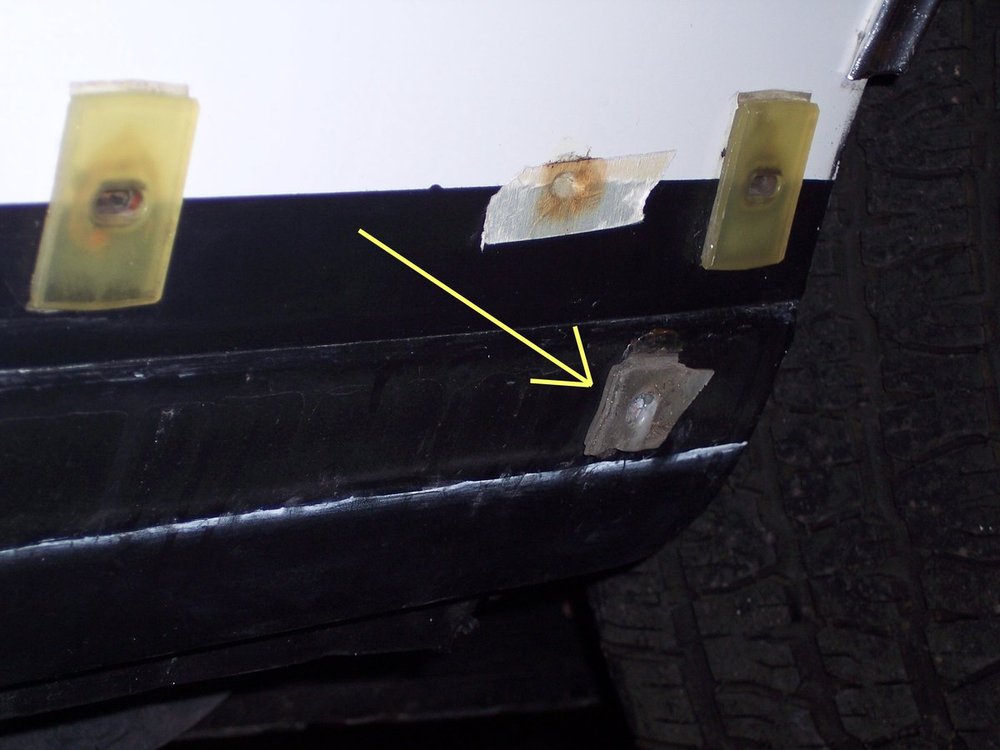
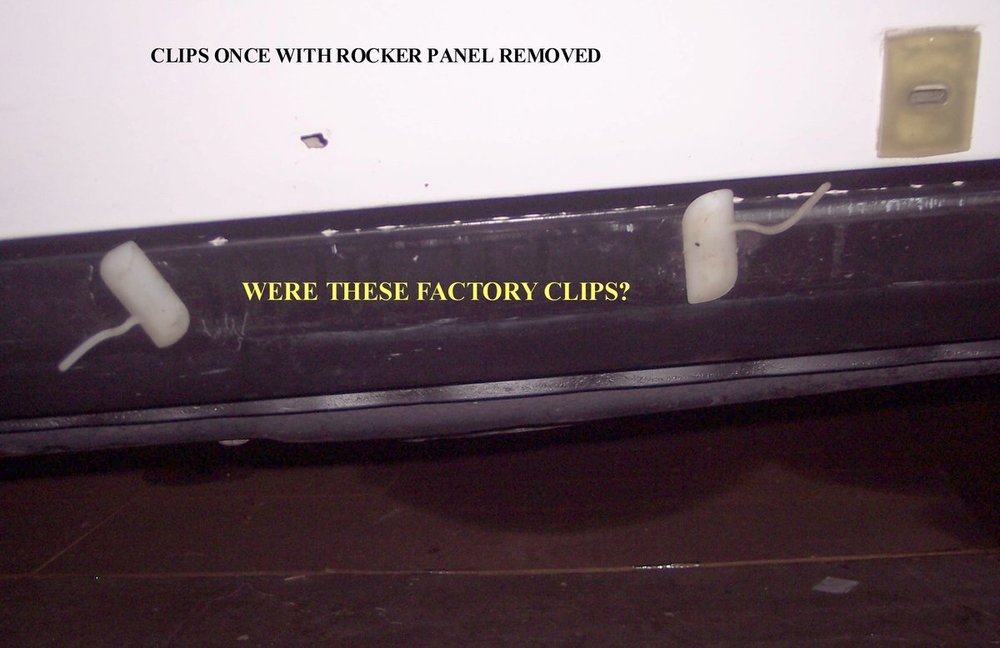
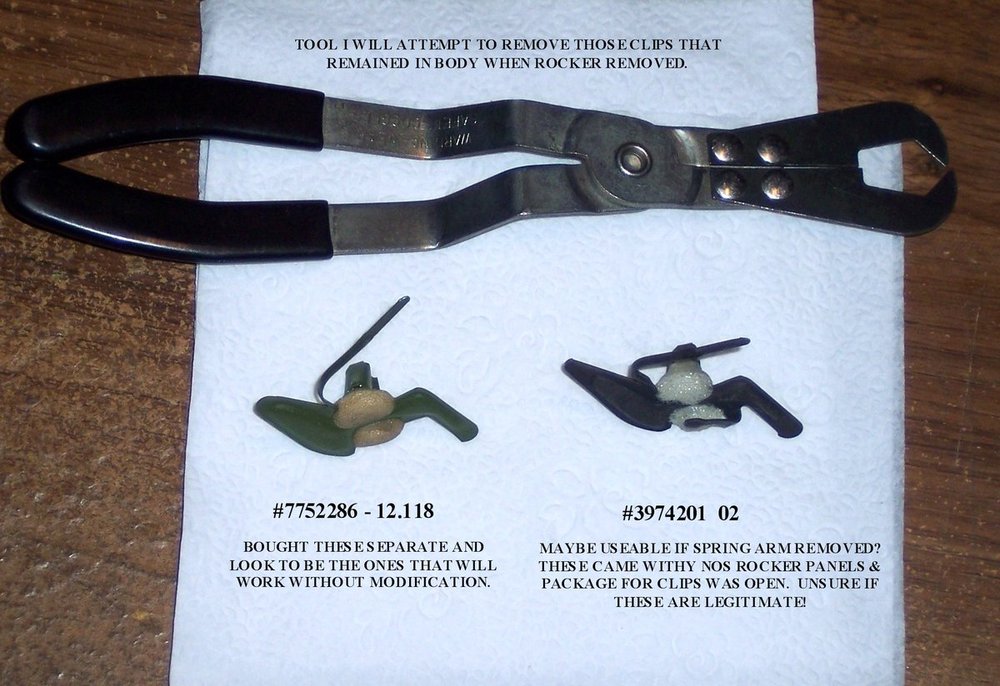
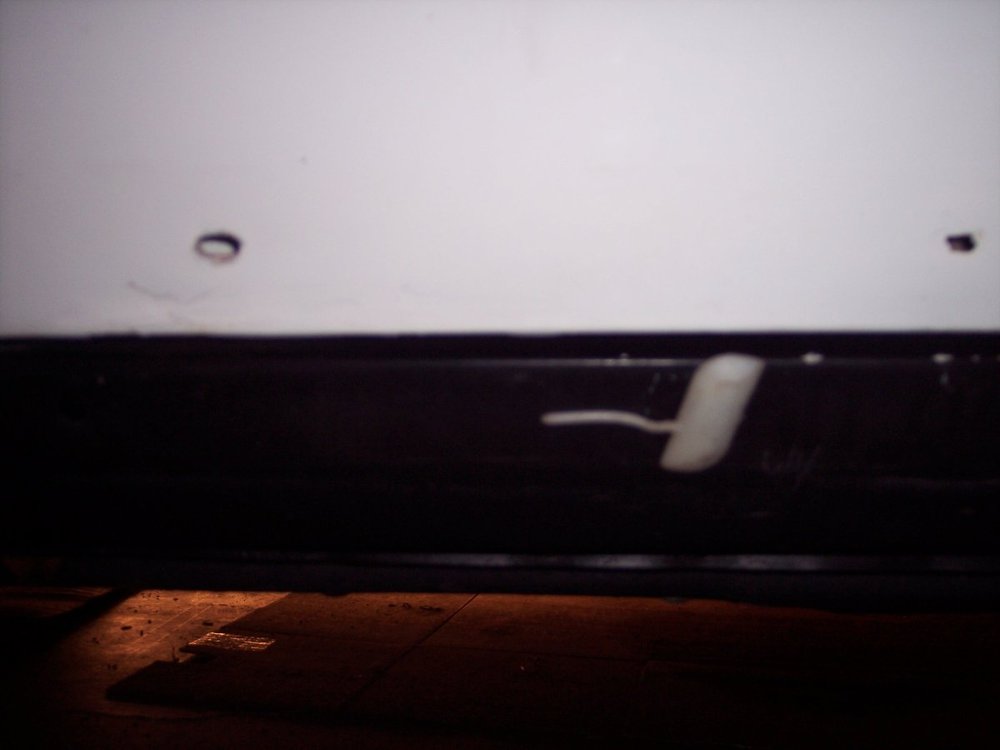
PIC #1 Been looking at various Rocker Molding Clips and have (3) possibilities. As you can see in pic, 2 separate styles shown. I have fit both and appear either will do but the front spring on the 2 spring clip likely will have to be trimmed off or compressed closer to clip at minimum for it to work properly. Any ideas? The 2 spring style came with the NOS Rocker Panels I bought several years back and were opened packages of clips when I started looking for replacements. I would prefer to not use any that were with the NOS Rockers PIC #2 The pad where screw would fasten to rear of Rocker, does this pad belong there? I think someone modified this location & slathered with Silicone to keep it up against Body. There was no screw for Rocker on this side. I did not remove Rocker from Passenger side as I did not want to risk loosing Clip(s) when removed. Looked thru Assembly Manual but short on the info I was searching for. PIC #3 These were the Clips that were originally installed when I removed Rocker Molding from Drivers side. Were these original? PIC #4 This is the 2 separate Clip Styles and the Tool I will try to remove those Rocker Clips still attached to car. Any advise appreciated. Maybe the Part Numbers might help determining use. I know there are some purchased from Aveco I believe, P/N 8400 (that look like the ones still attached and leads me to believe they are not the original Clips. This has me confused on what originally was there. Anyway, any info to enlighten me would be GREAT. Doug

-
Surprisingly the Rocker Molding came off as Mike said it would. My experience is hardly anything comes off as easily. So next question is, per pic where screw is used on rear of Rocker Molding, someone simply filled around Rocker Molding some type of sealant I suspect to keep Rocker in place. What was originally at this spot other than the missing screw? Do I need to just replace the screw or is something different that needs attention? I didn't remove passenger side as it is secure. Are these Rocker Molding Clips in pic correct? I have a new set of Rockers with the Clips that are different than these shown. They are black in color and appear to be metal? I have no plans to use them as they are for the NOS set I have stored. Again, appreciate all the advise............................. Doug

-
I'll give that a shot Mike. That worked on the rear trunk molding and a couple of the lower side moldings but haven't experienced this type of clip removal as yet. Sounds easy so I know I will probably make a job out of it! Thanx for the tip Mike. Will attempt this today. Doug
-
I ordered them from the Parts Place. I found (4) rocker molding fasteners on another Site that I picked up as well. I think this should outfit me moving forward. What type of tool had anyone used to release the fasteners from the rocker molding? I have an idea what I might use but am concerned about damage to the paint. Doug
-
Have removed lower trim, refreshed & cleaned car prior to installation. I have discovered that I am missing (2) nylon clips for lower door molding and think I found 4 bottom rocker molding clips where a couple appear to be missing (haven't removed as yet). I suspect they were likely broken during repaint in 2005 and never replaced. Looks like someone attempted using a foreign type clip on rocker but did not secure rocker at that place. Any ideas on where I might find the lower door trim nylon clips? Thanx in advance for any info, Doug
-
Check around the Distributor and any oil pressure line(s) that come out of the Block that may be positioned in that area of the puddle you saw. What about the Dip Stick Tube? I am assuming the oil is dripping down from below the Intake Manifold? Hope you find it and it's an easy fix. Doug
-
Okay Aaron & thanx. Now I have a starting point. I was pretty sure I was missing something! I restored my sail panel badges and decided to go ahead and refresh the lower moldings to keep everything looking current. I was also curious what the sheet metal looked like underneath the moldings. I believe I have now inspected every nook & cranny of the ole girl While everything has been removed, going to spend some time using scratch removal compound on the paint. Just purchased a cordless orbital buffer/polisher from Ryobi and anxious to get started on that. So I plan to keep myself entertained this Winter inside the garage. See ya all in the Spring........................ Doug
-
Have removed most of my lower body trim and will recondition it. I still have (2) pieces attached right behind lower front fender & where door meets (One on each side)...................... Cautious putting much pressure on them as not sure how to remove. I see no screws visible & assuming it is clips hidden behind holding trim in place. How do these come off? Thanx for your reply(s) Doug
-
2019 Western Meet: Penticton, BC
72-CLASSIC_RIDE replied to Canuck's topic in FGMCC Annual Western Meet
Got confirmation today and am #200! Going fast so get registered early............ Doug