monte70car Posted October 22, 2012 Share Posted October 22, 2012 A week after getting back from Fall Carlisle with another cowl induction hood we started cutting. Or first step was to build a jig for overall length of a Monte hood from the short blocks of wood to the cut edge of the hood is 8" on both sides which will be coming from the Monte nose. The center to the far block is 16" with the notches being to the turn back to the fenders to lay in. Now on the under side there will be a flat plate welded in and run out to the hood latch area on the Monte nose. Quote Link to comment Share on other sites More sharing options...
Jared Richey Posted October 22, 2012 Share Posted October 22, 2012 So is this the 2nd hood yall have tackled doing this too. If I remmeber correctly the first one came out good. Quote Link to comment Share on other sites More sharing options...
MGD72Monte Posted October 22, 2012 Share Posted October 22, 2012 Sounds like you could start producing these hoods and selling them to FGMCC members, they do look good. Quote Link to comment Share on other sites More sharing options...
monte70car Posted October 22, 2012 Author Share Posted October 22, 2012 Yes Jared this is hood number two the original one is on my car which will be at the eastern meet next year. As for producing them the jig will come in handy for what needs to be done if a third hood is built or even a fourth. The problem I'm running in is I need the Monte nose for any more to be made, since that is the only item that is needed. Any one have a spare Monte nose with about a foot of metal back on a bent hood? I did have the ideal of building the nose part but then I would have to do the whole under side Quote Link to comment Share on other sites More sharing options...
bobsmc Posted October 22, 2012 Share Posted October 22, 2012 pm sent. Quote Link to comment Share on other sites More sharing options...
Jared Richey Posted October 24, 2012 Share Posted October 24, 2012 I'm sure we could round up some junky hoods. I have one myself that is warped just laying on the ground. Long ways to VA though. Quote Link to comment Share on other sites More sharing options...
monte70car Posted October 24, 2012 Author Share Posted October 24, 2012 I got a nose coming from Bob up in Ohio should be here Thursday. Once it arrives it will be time to mate another Chevelle hood to a Monte nose. Went up to Home Depot this morning and brought two piece of sheet metal to fill the gap on the under side of the hood. Will probably have some welding done by Sunday and some more done Tuesday and Wednesday while I'm off from work. Bob thanks again for the Monte nose and I look forward to building you one down the road. And Jared if you have damaged hoods I could just tell you how much of the nose I need and we could do some producing of a hood GM never built. Quote Link to comment Share on other sites More sharing options...
71 MONTE 4 YA Posted October 25, 2012 Share Posted October 25, 2012 How much would they cost? I would love to have one eventually. Quote Link to comment Share on other sites More sharing options...
monte70car Posted October 25, 2012 Author Share Posted October 25, 2012 Rodney it depends on what all I'm doing to the hood and what parts I have to buy. This current hood has a price tag of $1,500 which covers the inner and outer door, brackets for both doors wiring harness for the kick down switch. All the hoods we would do comes with all body work done top side and bottom side with the buyer to pick up and have his paint shop put the final coat of paint on for $1,200. I would not want to ship a ready to paint hood to a buyer and them have it get damage plus the pick up will save on the price. Quote Link to comment Share on other sites More sharing options...
71 MONTE 4 YA Posted October 25, 2012 Share Posted October 25, 2012 Not a bad price at all. No I need to get my coins together so I can get one! Quote Link to comment Share on other sites More sharing options...
footballubet Posted October 26, 2012 Share Posted October 26, 2012 Rodney it depends on what all I'm doing to the hood and what parts I have to buy. This current hood has a price tag of $1,500 which covers the inner and outer door, brackets for both doors wiring harness for the kick down switch. All the hoods we would do comes with all body work done top side and bottom side with the buyer to pick up and have his paint shop put the final coat of paint on for $1,200. I would not want to ship a ready to paint hood to a buyer and them have it get damage plus the pick up will save on the price. So why a $300 difference between this hood and the next hood? Quote Link to comment Share on other sites More sharing options...
monte70car Posted October 26, 2012 Author Share Posted October 26, 2012 This hood I promise the buyer I would mock up the outer door which was not factor in the original price. After pricing everything to mock up the outer door I gave the buyer the option of the complete cowl induction kit vs just the outer door and he opted for the complete kit. I'm still mocking the outer in place but when he picks up the hood he also gets the rest of the kit. Quote Link to comment Share on other sites More sharing options...
monte70car Posted October 29, 2012 Author Share Posted October 29, 2012 So I got the nose from Bob in Thursday afternoon along with the cowl induction kit from Ausley's. Friday we drilled out the spot welds on the Monte nose the under side of the hood will be cleaned and primed had to fix one side where it got bent which was no big deal. Here is the nose laying on the Chevelle hood it hasn't been cut to the final size as of yet you see how it fits the blocks of wood for the head light extension. Most of the bracing for from the Monte nose will be cut out with only the area behind the hood latch staying in place and most of the metal down the side for a better bend . All of the cowl induction kit items Quote Link to comment Share on other sites More sharing options...
Jared Richey Posted October 29, 2012 Share Posted October 29, 2012 I see a real market for these Robert. This takes a lot of work though. I'm astonished at the undertaking to do this. Great job. Quote Link to comment Share on other sites More sharing options...
MGD72Monte Posted October 29, 2012 Share Posted October 29, 2012 Can someone tell me why there is apparently enough of a market for companies to make the fiberclass Monte hoods some of the members have but not make steel ones like this? I would think there would be more people buying this type, I must be missing something? Quote Link to comment Share on other sites More sharing options...
monte70car Posted October 29, 2012 Author Share Posted October 29, 2012 Mg a lot of it has to deal with the price. A good firber glass hood probably cost $400- $600 then you add the freight. Being a steel hood done the same way you have all the dies that needs to be made a press to form it now your talking maybe $1000 just for that. I know there is a small market for the hoods and its just the matter of finding people who want one and who don't mine the wait. Right now with the storm moving in we have closed our little shop until the storm passes so there will be no work going on today or tomorrow. If I could get people to place an order for the hood I could see doing it on the side, the jig is going speed up where the cut goes and how much gets add on and how the under side will be finish. I know on my it was test fit after test fit to make sure it was long enough the width was right. The jig there is no need for a test fit as it was built off a stock Monte hood. I know a few people I have done work for has been surpise of what comes out of the little shop I know Jared saw my Monte in 08 with old paint job not sure if he liked it as much as some of the others did. I've also been thinking of doing glass ecthing on the as I have the needed tolls for that. Quote Link to comment Share on other sites More sharing options...
Jared Richey Posted October 30, 2012 Share Posted October 30, 2012 I've not seen your car since you cut and buffed it, hope to see it one day. I really liked the color inside, and the custom ordered Dark Saddle 70 door panels. Quote Link to comment Share on other sites More sharing options...
MGD72Monte Posted October 30, 2012 Share Posted October 30, 2012 Thanks for the explanation Rob. Looks like you have found a good niche market . Still wonder why the fiber glass hood they make for the Monte is not designed to look the same as the steel one you are making. Maybe they can't make those complex shapes out of fiber glass I guess. Your design looks so much more like something the factory would have done. IMO Quote Link to comment Share on other sites More sharing options...
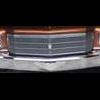
monte70car Posted October 30, 2012 Author Share Posted October 30, 2012 MG here is a picture of a fiber glass hood on theirs the cowl starts in the center and their underside doesn't have the stock look The stock under side of what I build and where our cowl starts the original cowl hood had the outer door which the fiber glass ones don't have Quote Link to comment Share on other sites More sharing options...
Leghome Posted October 30, 2012 Share Posted October 30, 2012 That is one great looking hood. Quote Link to comment Share on other sites More sharing options...
Jared Richey Posted October 31, 2012 Share Posted October 31, 2012 Glad you posted a pic of it on the car. Quote Link to comment Share on other sites More sharing options...
monte70car Posted October 31, 2012 Author Share Posted October 31, 2012 the last picture is the first one we did, we learn a few things on that and this time we are going to improve some of the areas we didn't like on my. Time the hood is done you will still have the option to put the hood spear on it and it would not look out of place. Quote Link to comment Share on other sites More sharing options...
monte70car Posted October 31, 2012 Author Share Posted October 31, 2012 With the storm gone I was finally able to get back out to the workshop. I took a wire wheel to the skin cleaned up most of the rust and the glue the factory used to hold the under side to the sheetmetal. Once it was all clean I hit the bare areas and some areas that had surface rust with a can of rust convertor which will seal the panel and stop the rust from going any further and can be use as a base for paint Quote Link to comment Share on other sites More sharing options...
monte70car Posted November 5, 2012 Author Share Posted November 5, 2012 Got the nose tack in place on the hood still have some more work to do to get the right angle and body lines but it is starting to look like my http://i274.photobucket.com/albums/jj278/monte70car/hood/project%20hood/124a.jpg Quote Link to comment Share on other sites More sharing options...
monte70car Posted November 10, 2012 Author Share Posted November 10, 2012 Well we will be finish welding the nose on by Sunday with the under side of the hood in place. Quote Link to comment Share on other sites More sharing options...

Recommended Posts
Join the conversation
You can post now and register later. If you have an account, sign in now to post with your account.