Paul Bell
-
Posts
893 -
Joined
-
Last visited
-
Days Won
43
Content Type
Profiles
Articles
Forums
Gallery
Events
Everything posted by Paul Bell
-
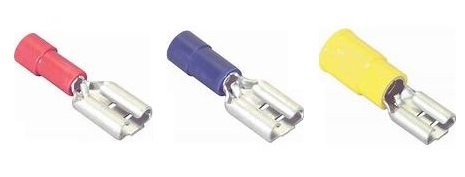
Cut off the incorrect plugs from the two wires, strip and crimp them into one 1/4" female connector and push it onto the BATT terminal in the fuse box.
-
It looks like the wrong fuse block tap plug is on those wires. The wire harness makers will NOT sell any of the three different keyed plugs unless it's in a harness of some sort. BATT means all the time power. It's the top of the three sockets in the center of the fuse block. Any 1/4" crimp terminal will work.
-
-
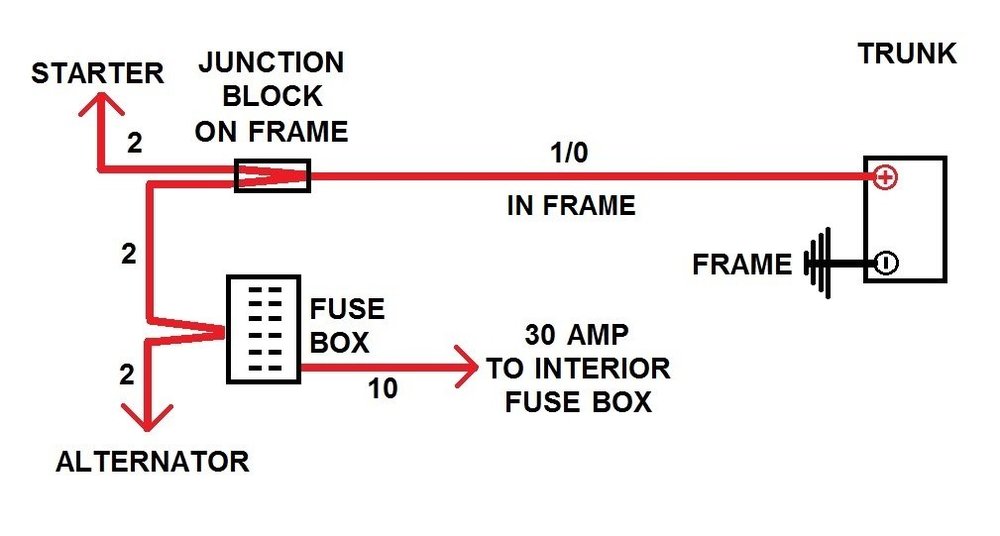
If you have an auxiliary fuse box with added loads to the vehicle, the heavier wire needs to go there AND to the battery. Getting to the battery via the starter cable is just silly. If you don't have an auxiliary fuse box or heavier loads than stock, just run it to the battery.
-
Actually, this is commonly done in the electrical field. However, when paralleling conductors, they need to be the exact same length and terminate on both ends together. A 10 gauge wire handles 30 amps so two handle 60 and so on. I would say it's NOT commonly done in cars as it's easy to replace one wire with a single heavier one.
-
Just for kicks, I'll show you guys what I did but it's far from stock. The under hood fuse box has fuses for water pump, fuel pump, vacuum pump, two fans, headlights, AC, body, relays, 2 for EFI, and ignition coils. The AC system is modified to get all power from under the hood. The alternator is a 200 amp AD244 unit.
-
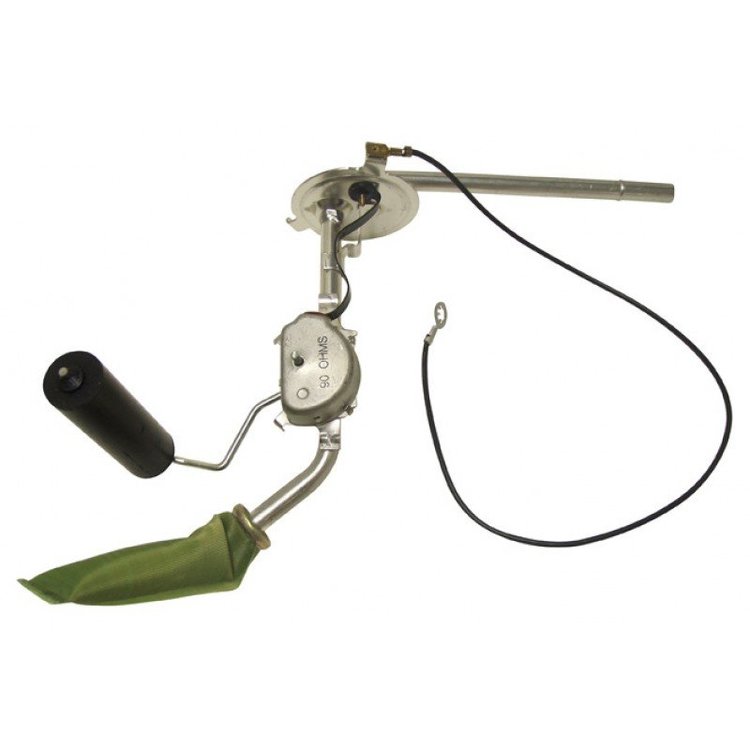
Rob is probably right. But before you drop the tank, make sure the ground wire that goes from the sending unit to the body is actually to the body, not dancing in the wind.
-
The store rebuilt ones are junk-and for a later car. It'll work but you'll need to fool with the wires. Of course, you'll need to give in your correct original as a core. You're better of sending your original to one of the rebuilder services-like I shoulda done. I ended up getting a working correct original one from Leo.
-
Yes, the thin pink wire goes to the IGN terminal. It tells the relay to close which sends power to the window switch.
-
While it's unlikely you'll ever draw that much from the alternator to the battery, going to six gauge isn't a bad idea. 4 gauge even.
-
Is the thin pink wire from the relay plugged into the IGN terminal in the fuse block? When you turn the key to on, you should hear or feel the relay click. You can pull the relay to test it. Power to where the pink wire went, ground the relay metal itself. Click?
-
Yep. Ground that hanging relay.
-
Mark, what are you connecting the main feed wire, the 12 gauge orange & black wire to? These old power windows ran notoriously slow because of the wire lengths and gauge. If I were installing power windows, I'd replace every single wire with 10 gauge. Here's the wiring schematic for this system. W - Chevelle El Camino Monte Carlo 1970-72 Power Window Circuit.pdf
-
There should be a red & white 14 gauge wire from the relay to the drivers door switch block. This is the main power feed. The relay is energized anytime the key is in the on position. This sends power from the main power source to the window switch. The relay gets it's ground (for it's coil) by being bolted in place in the door hinge cowl, it has no separate ground wire. It won't pull in if you have it just hanging in the air.
-
What did you do to your Monte Carlo today?
Paul Bell replied to Canuck's topic in General 70-72 Monte Carlo Forum
The right side of my front bumper was so high I couldn't install the two small screws at the bottom of the fender extension. I fixed all that today.
-
Sidewalk or “hurricane” bolts are normally used to hold down decking that people are gonna walk on. They have extremely flat heads with beveled edges that’s difficult for shoes to get caught on. Also, for commercial buildings, threaded anchors are placed in the concrete around entrances and sidewalk bolts are installed to keep the threads clean. The anchors allow things such as temporary banners or barriers to be bolted down without drilling new anchor points.
-
Yessir, that's correct.
-
John, what you linked to on the Camaro site are rivnuts. You drill a hole, insert the nut then tighten down hard on them until they collapse and stay in place. I used stainless sidewalk bolts poked up from the bottom. They have a very wide very flat head. https://www.ebay.com/sch/i.html?_from=R40&_nkw=sidewalk+bolts&_sacat=0&_sop=15
-
yeah.....I'm not finding anything with a smaller neodymium for car audio. You'd think they'd take advantage of the lighter weight these magnets are.
-
OH SORRY Joe, I didn't realize that. Lemme see what else is out there.
-
I used Aura speakers with tiny magnets. I got the left one to sit just right somehow and I glued the right one to the dash pad.
-
There's a TON of information over here, check out the sticky thread: https://www.chevelles.com/forums/141-lsx-engine/
-
What did you do to your Monte Carlo today?
Paul Bell replied to Canuck's topic in General 70-72 Monte Carlo Forum
I performed a more difficult task today, installing the two screws that hold the blower speed switch on the inside of the dashboard. I gotta get a mouse who’s good with a ratchet wrench. But I did discover laying a long mirror on the windshield to see into the dashboard is the next best thing to removing the windshield. I have these plastic cups all over my shop and car to hold screws and stuff. One tumbled down the left cowl duct. That mouse sure would be helpful! 🐭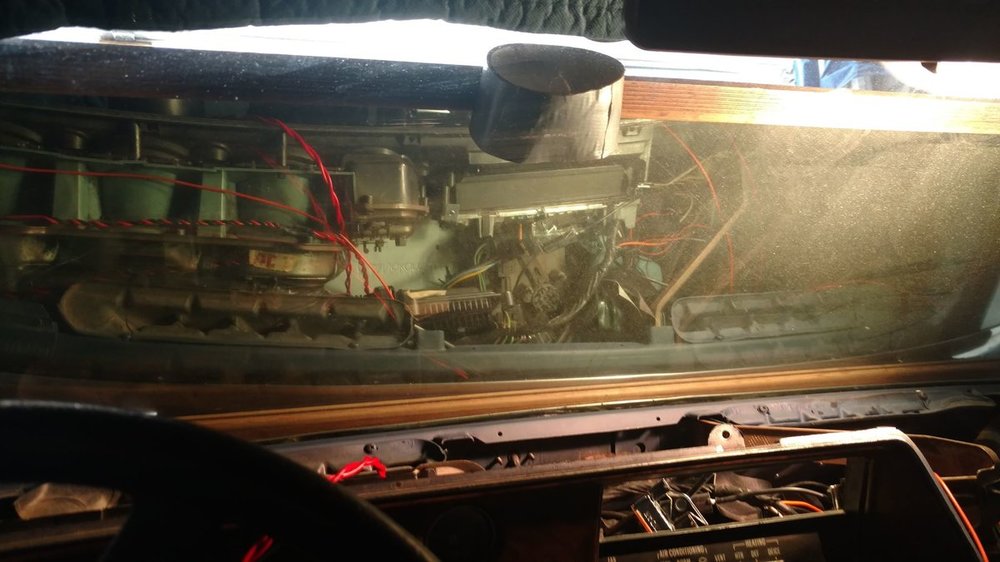

-
If you meter the tan wire to ground, if it shows open on an Ohmmeter when the brake pedal is up, grounded when it's down, it's the brake light wire. If it reads 0 to 90 Ohms and doesn't change when you press the brake pedal, it's the fuel sender wire. I used this 4 x 6 Aura two way speaker with a very small neodymium magnet: https://www.parts-express.com/aura-4600rpm-4x6-2-way-coaxial-speaker-pair--269-179 Pry off the magnet's plastic cover and this speaker will clear everything in the dash. At this size, they don't provide super sound but you'll have cruising tunes. In car audio, these small speakers (up to 6 x 9) don't need to be more than two way. Three way or more is just a waste.
-
This might help: https://www.ss396.com/pdf_catalog/tech/ssdash/1970-1972_chevelle_dash.pdf