72Ragtop
-
Posts
87 -
Joined
-
Last visited
-
Days Won
1
Content Type
Profiles
Articles
Forums
Gallery
Events
Everything posted by 72Ragtop
-
Show your aftermarket or non-monte bucket seats
72Ragtop replied to Arvizu9618's topic in Interior Tech
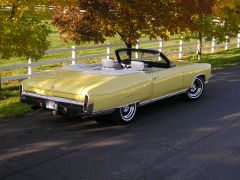
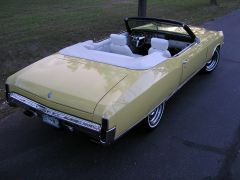
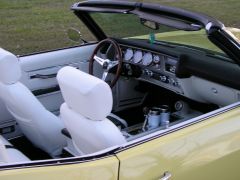
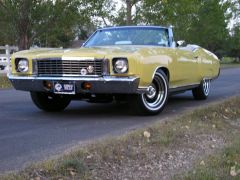
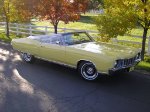
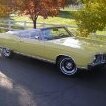
I still can't post fotos...see the 72 yellow convertible in gallery. Seats are from 93 Firebird. Good thigh support & Recline. I did minor reshaping of the headrests. They almost look "Period correct". Powered units available -
I have a methoud to mount the actual kick panel vent, in the original screw holes and make the kick panel portion removeable without having to deal with all the sealing puddy. Requires only an Exacto knife and three self-tapping screws. No modification to the grill required. I can't figure out how to post drawings on here. Also note that if you have an A.C. car, you can put akick panel vent on the Driver's side ...and do not use or need the re-circulating setting, it is very E-Z to put in a kick panel floor vent on the Passenger side.
-
Just an FYI...4 years ago, Just Dashes quoted me $1050.00 (Plus shipping!) do redo a cracked green dual-speaker dash into black.
-
What did you do to your Monte Carlo today?
72Ragtop replied to Paul Bell's topic in General 70-72 Monte Carlo Forum
Mid 60's today....Left the Magnum in the garage and drove the Monte to work! Out at noon to take "the Long way home". -
Convertible top question
72Ragtop replied to Britton Hickman's topic in General 70-72 Monte Carlo Forum
The top up does nothing for structural support. As with ALL "A-body" ragtops, keep an eye on the area around the two chrome tips on each side, above the rear window....the staples or tacks can sometimes work loose out of the tack-strip that goes past those "tips" and may start to poke at the top material. Also, over the years that 1/4 area seems to be the first to get a tear, as the top ages. Look at other A-body ragtops at car shows. -
I did the exact same thing Robert did. Really helps with visibility and as a convertible doesn't have dome lite, it really helps out. It functions with the door jam switch or with its own built-in switch. I also added "Theater-Dimming" to the entire courtesy lite system....its a nice touch. They're so much better than the original G.M. mirrors from that era, with the (single) lite and really cheap in the boneyards, too.
-
If your not using the original 3-terminal connector to the original radio, try the grey wire.
-
a "Non-Disc Brake" pad makes a great "Dead Pedal/Carpit Saver" when mounted vertically to the Right of the dimmer switch.
-
What did you do to your Monte Carlo today?
72Ragtop replied to Paul Bell's topic in General 70-72 Monte Carlo Forum
Snow is gone (!!!!!!) Roads wereclear & Dry so I drove it to work.....The top is going down on the way home this afternoon! -
What did you do to your Monte Carlo today?
72Ragtop replied to Paul Bell's topic in General 70-72 Monte Carlo Forum
I drove it to work this morning and on the way home, I'm putting the top down! -
I just got my Popular Hot Rodding rag...Year One show them on inside front cover ad. No price shown. 1)Normally plenty of room, way down by the Parking brake release, and it's out of "knee-bumping-range". Can't see it from windows and you can reach in the open window to pop the trunk....nice feature at car shows. 2) Another option, but it's more work...Get a Chevelle convertible power top switch (momentary) and a Monte/Chevelle rear defog bezel and put it at their factory location, just right of the steering column. 3) Ash tray mounting bracket. You have to open the ash tray to get at it, but it is well hidden. You'll love having it when you do get it installed!!
-
For what its worth; don't mount the switch in the Glove box...you'll hate it. Dave
-
What did you do to your Monte Carlo today?
72Ragtop replied to Paul Bell's topic in General 70-72 Monte Carlo Forum
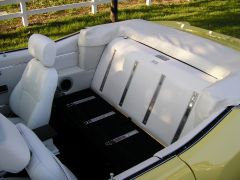
I took the "Bottom Platform" part of my "Quick-Change-Rear-Seat-to-Cargo-Platform" project to my carpit guy. Wish I could attach a foto to this. -
I remember doodling it while I was on the phone some years ago.....Center exit, under license plate.
-
I can't stand to have to have the key in the ignition and then to have to have it in the ON or ACC position to put the windows up or dowm so I always bipass that relay. (A-Body wagons had the same @#$% thing on the tailgate window and Convertibles had them on the power top). Simply remove the the two 10 or 12 gage wires (orange (or Org/Wite) and red (or Red/Wite) from the relay and plug them together using a 40Amp fuse or (Better yet)30 Amp circuit braker.
-
1970 Convertible Monte Carlo.....
72Ragtop replied to LS5's topic in General 70-72 Monte Carlo Forum
A picture of that car was up on the garage wall, as inspiration, while I completed my Monte Rag Top. -
I wouldn't go pulling out anything till you know exactly what it does. Get a foto-copy of the facktory wiring diagram and make notes of anything you find, change, remove or tap into. Lots of times, the wires themselves are OK, but individual wire strands can be partly broken at the terminal/connector...like at the two wires that connect to the Alternator, for example. Always check ground connections!! Like the black wires at the back of the headlites that screw into the radiator core support/frame. Make sure the engine block is grounded to the Frame and body! Unscrew any ground "ring-Type" terminals, clean them with a small wire brush or a finger nail file and screw them back down. If you ain't done alot of wiring, a (simple) aftermarket stereo is a good place to start (see my AM/FM/Cassette/10-Disc Changer for sale ad in the "For Sale" section). And...Those "Screw-Clamp type battery cable connectors" that most people have are for temporary use...proper 2 Gage battery cables and clean battery posts are rule number 1...good luck!
-
Wiring Montes is E-Z. Be thankful they are not "SloPars" (mopar) of the same era...like the 68 Road Chicken and 70 Challenge-less that I'm currently re-wiring for my buddies. Educating one's self is E-z, too. Step 1) Break down and spend the $30.00 on a faktory service manual*. (notice, I said facktory, not Chiltons or Clymers or Acme brand Manuals) Thumb thru it while your sitting around with the T.V. on or taking your morning dump. Copy the wiring diagrams so you can write notes and additions on them. Step 2) Go to MAD enterprises website and look at all his info....simple and so understandable that even my SloPar friends can understand (some) of it. (P.S., You'll be amazed at what their headlite relay kit will do for nite driving!!!) 3) Buy a simple test lite*. 4) spend another $25.00 on a Digital Volt Meter* (get one with the Continuity Beeper) {Even the $5.00 units at Harbor Freight work - but buy two). 5) Buy or make some test leads with aligator clips and an in-line fuze*. 6) Spend another $12.00 on a basic "12 volt/car wiring for dummies" type book*...swap meets are full of them. 7) If your not sure, put a fuze on it. 8) Anything that I put an * next to should be kept in the trunk at all times. 9) Don't be scared to pull your battery out and put it on the bench and play with some simple circuits, like a light bulb and switch (See No.7). 10) Good ground connections!!! Pretty much every metal part of your car is part of the "ground circuit". (example:On montes, the W/W switch case has to be grounded. 11) Next car show, look at the wiring on other peoples' cars with the same critical eye that you would use looking at their paint, interior, engine or girlfriend. Chances are you'll know what looks right, then ask them questions. remember, we all like to talk about our cars and their modifications. 12) Fear not!!...fuses* ain't too expensive, so if ya blow one, you know something ain't right.
-
I wish I could figure out how to post fotos.