

MCfan
-
Posts
1,291 -
Joined
-
Last visited
-
Days Won
60
Content Type
Profiles
Articles
Forums
Gallery
Events
Everything posted by MCfan
-
Of all the "high dollar" original/restored first gen Montes that have graced these pages, that is the one I would prefer above any/all the others! Unfortunately, I don't have a spare $73K laying around nor do I have a spouse who would understand ... 😃
-
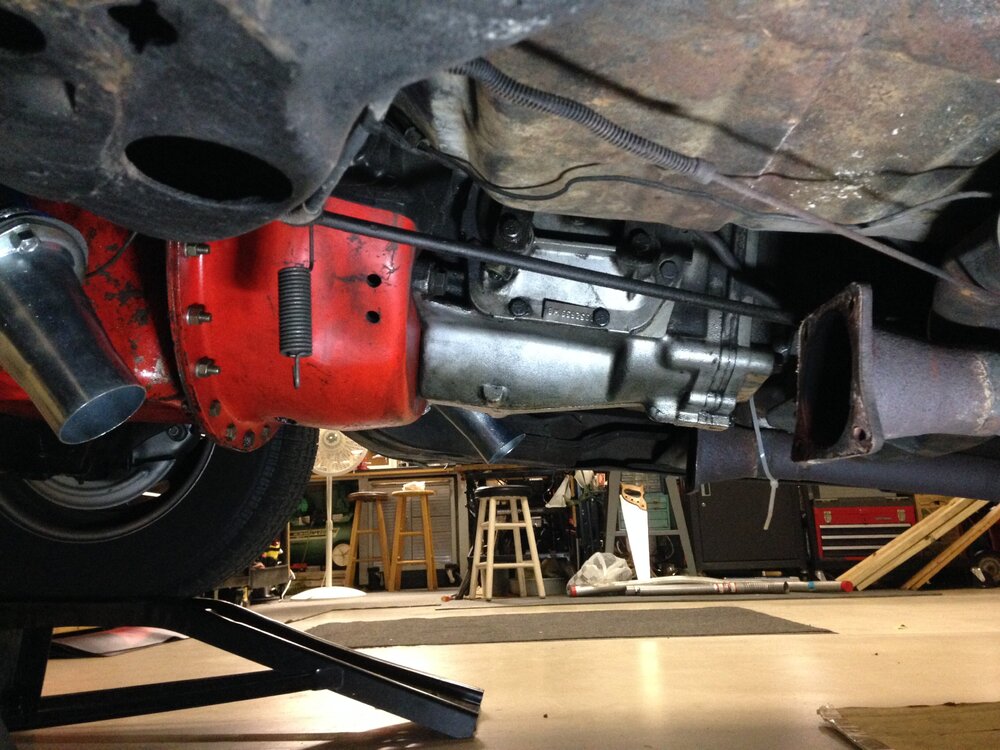
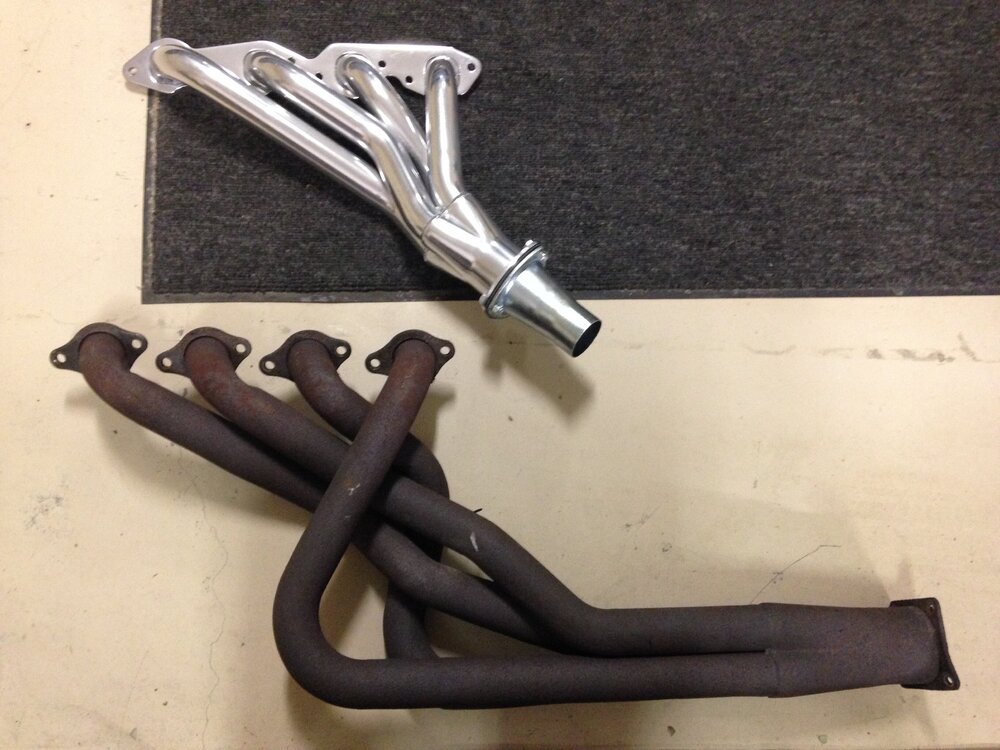
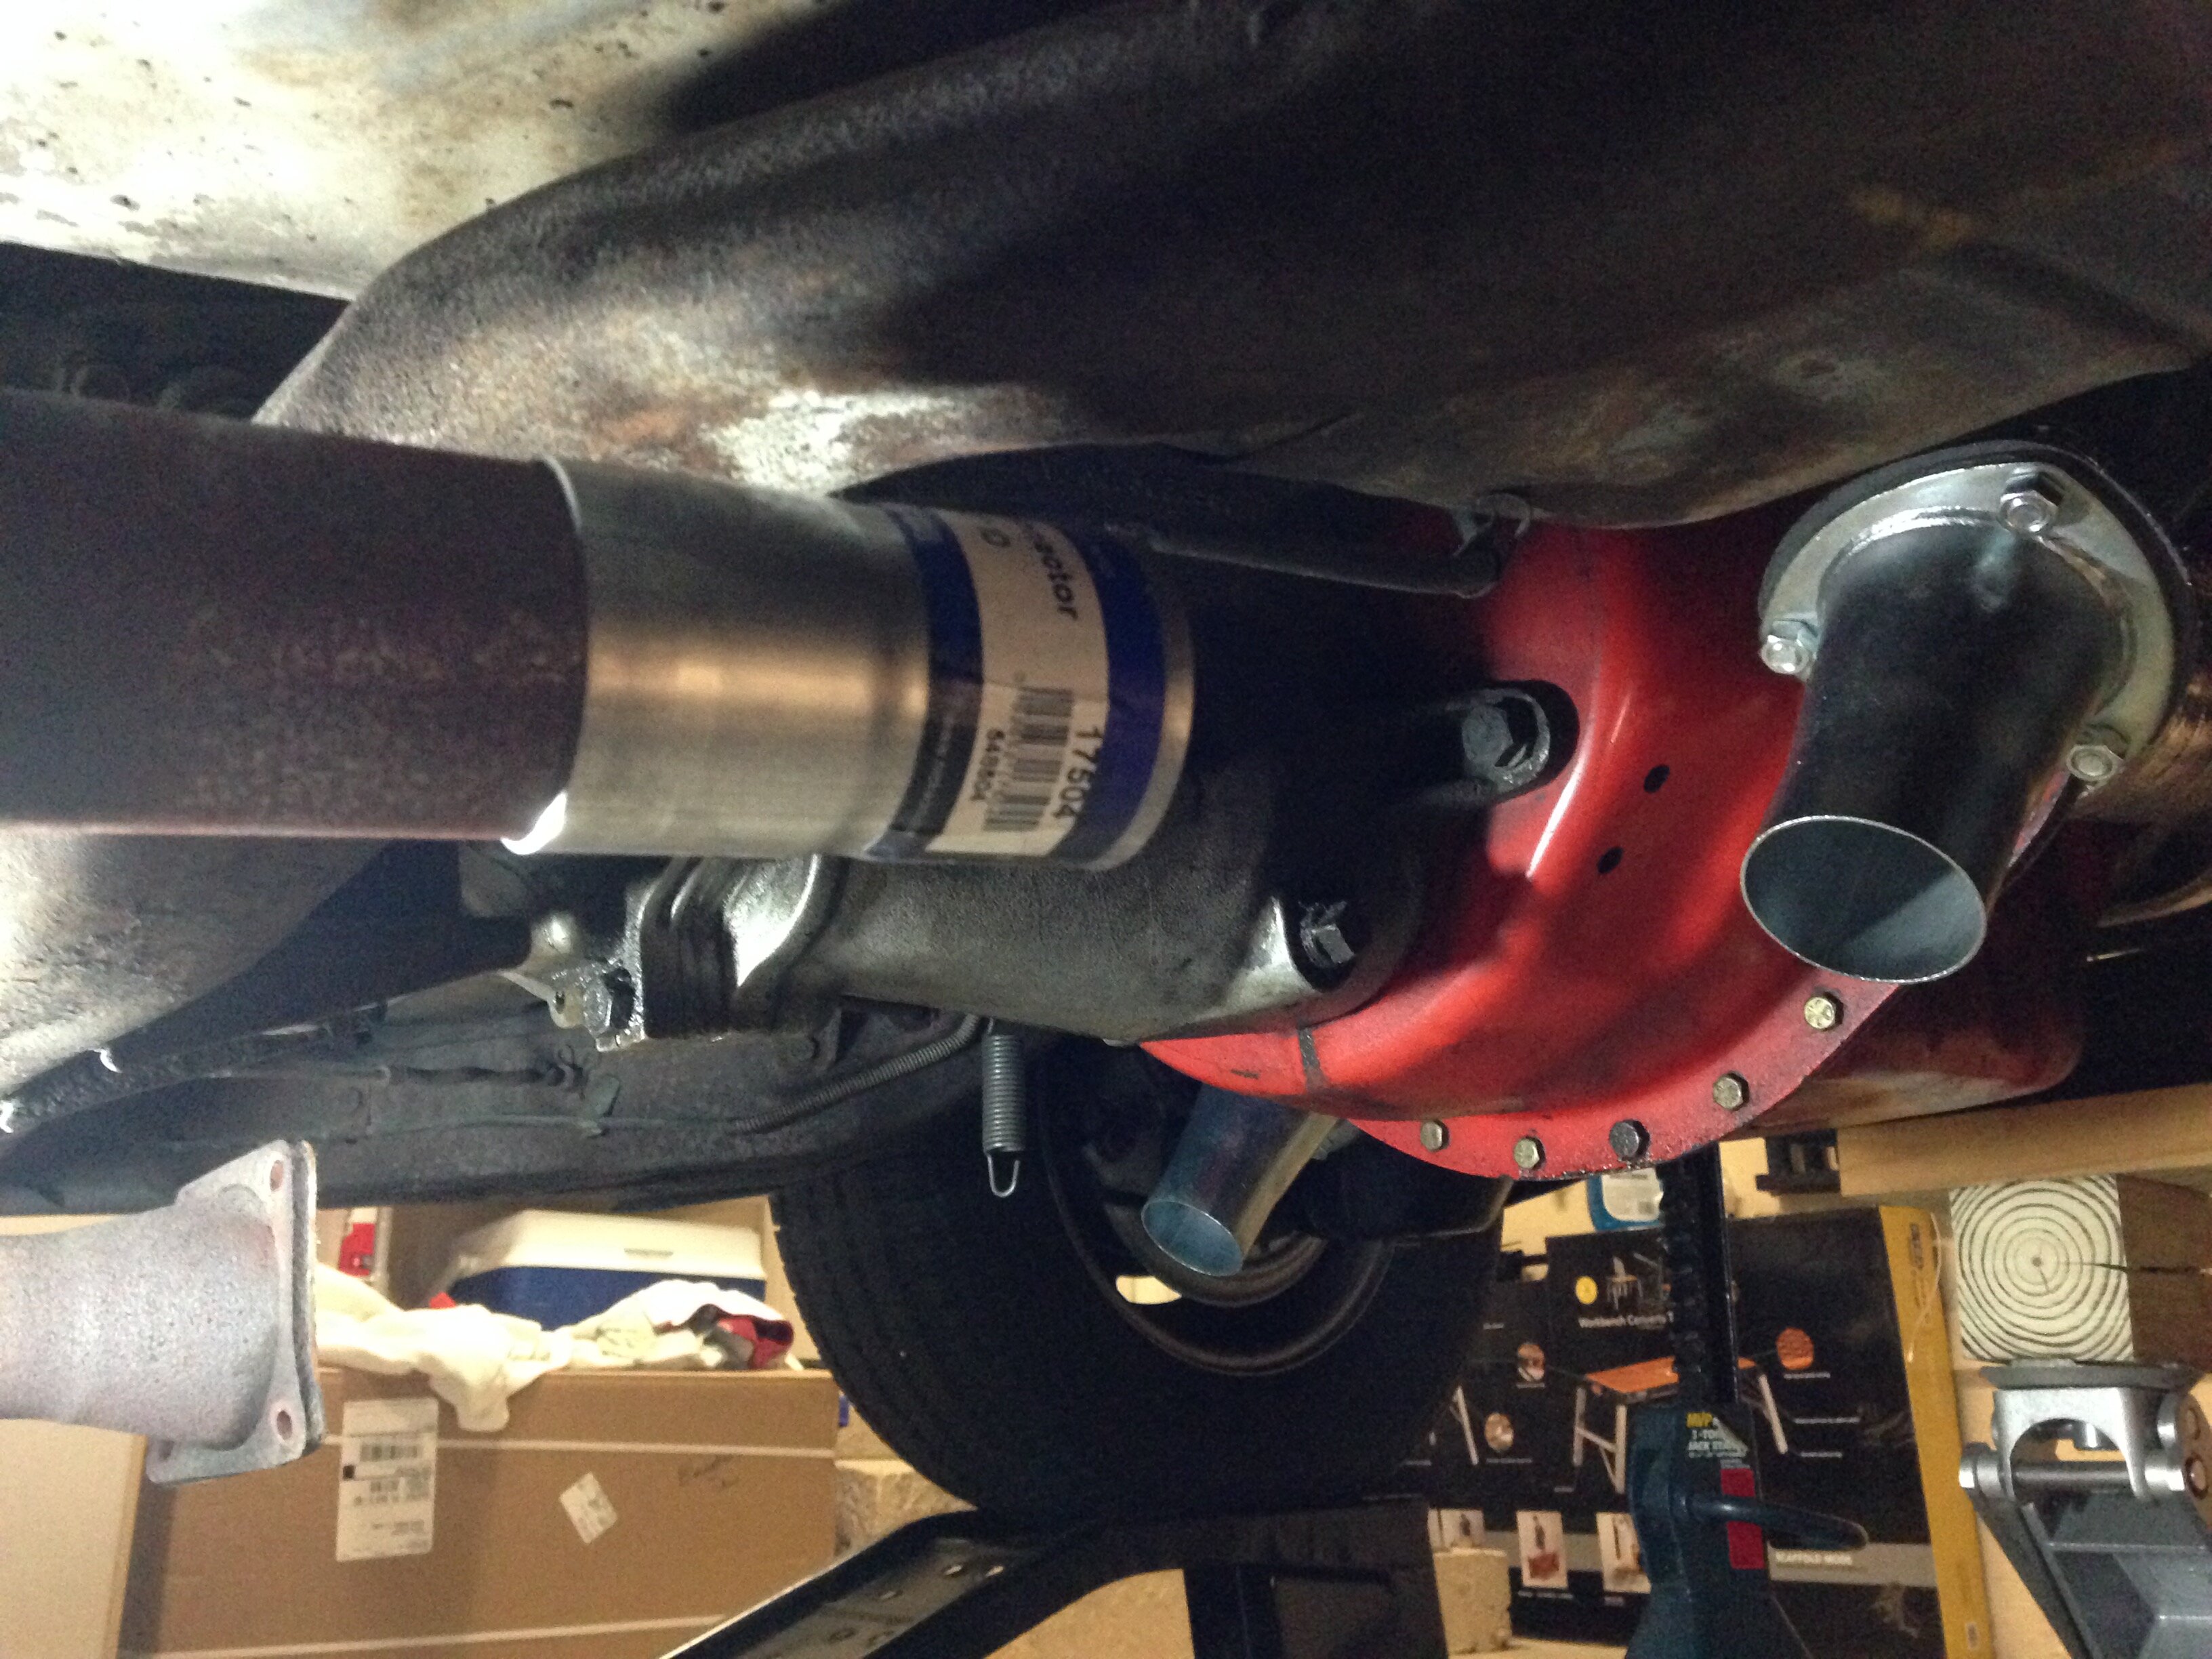
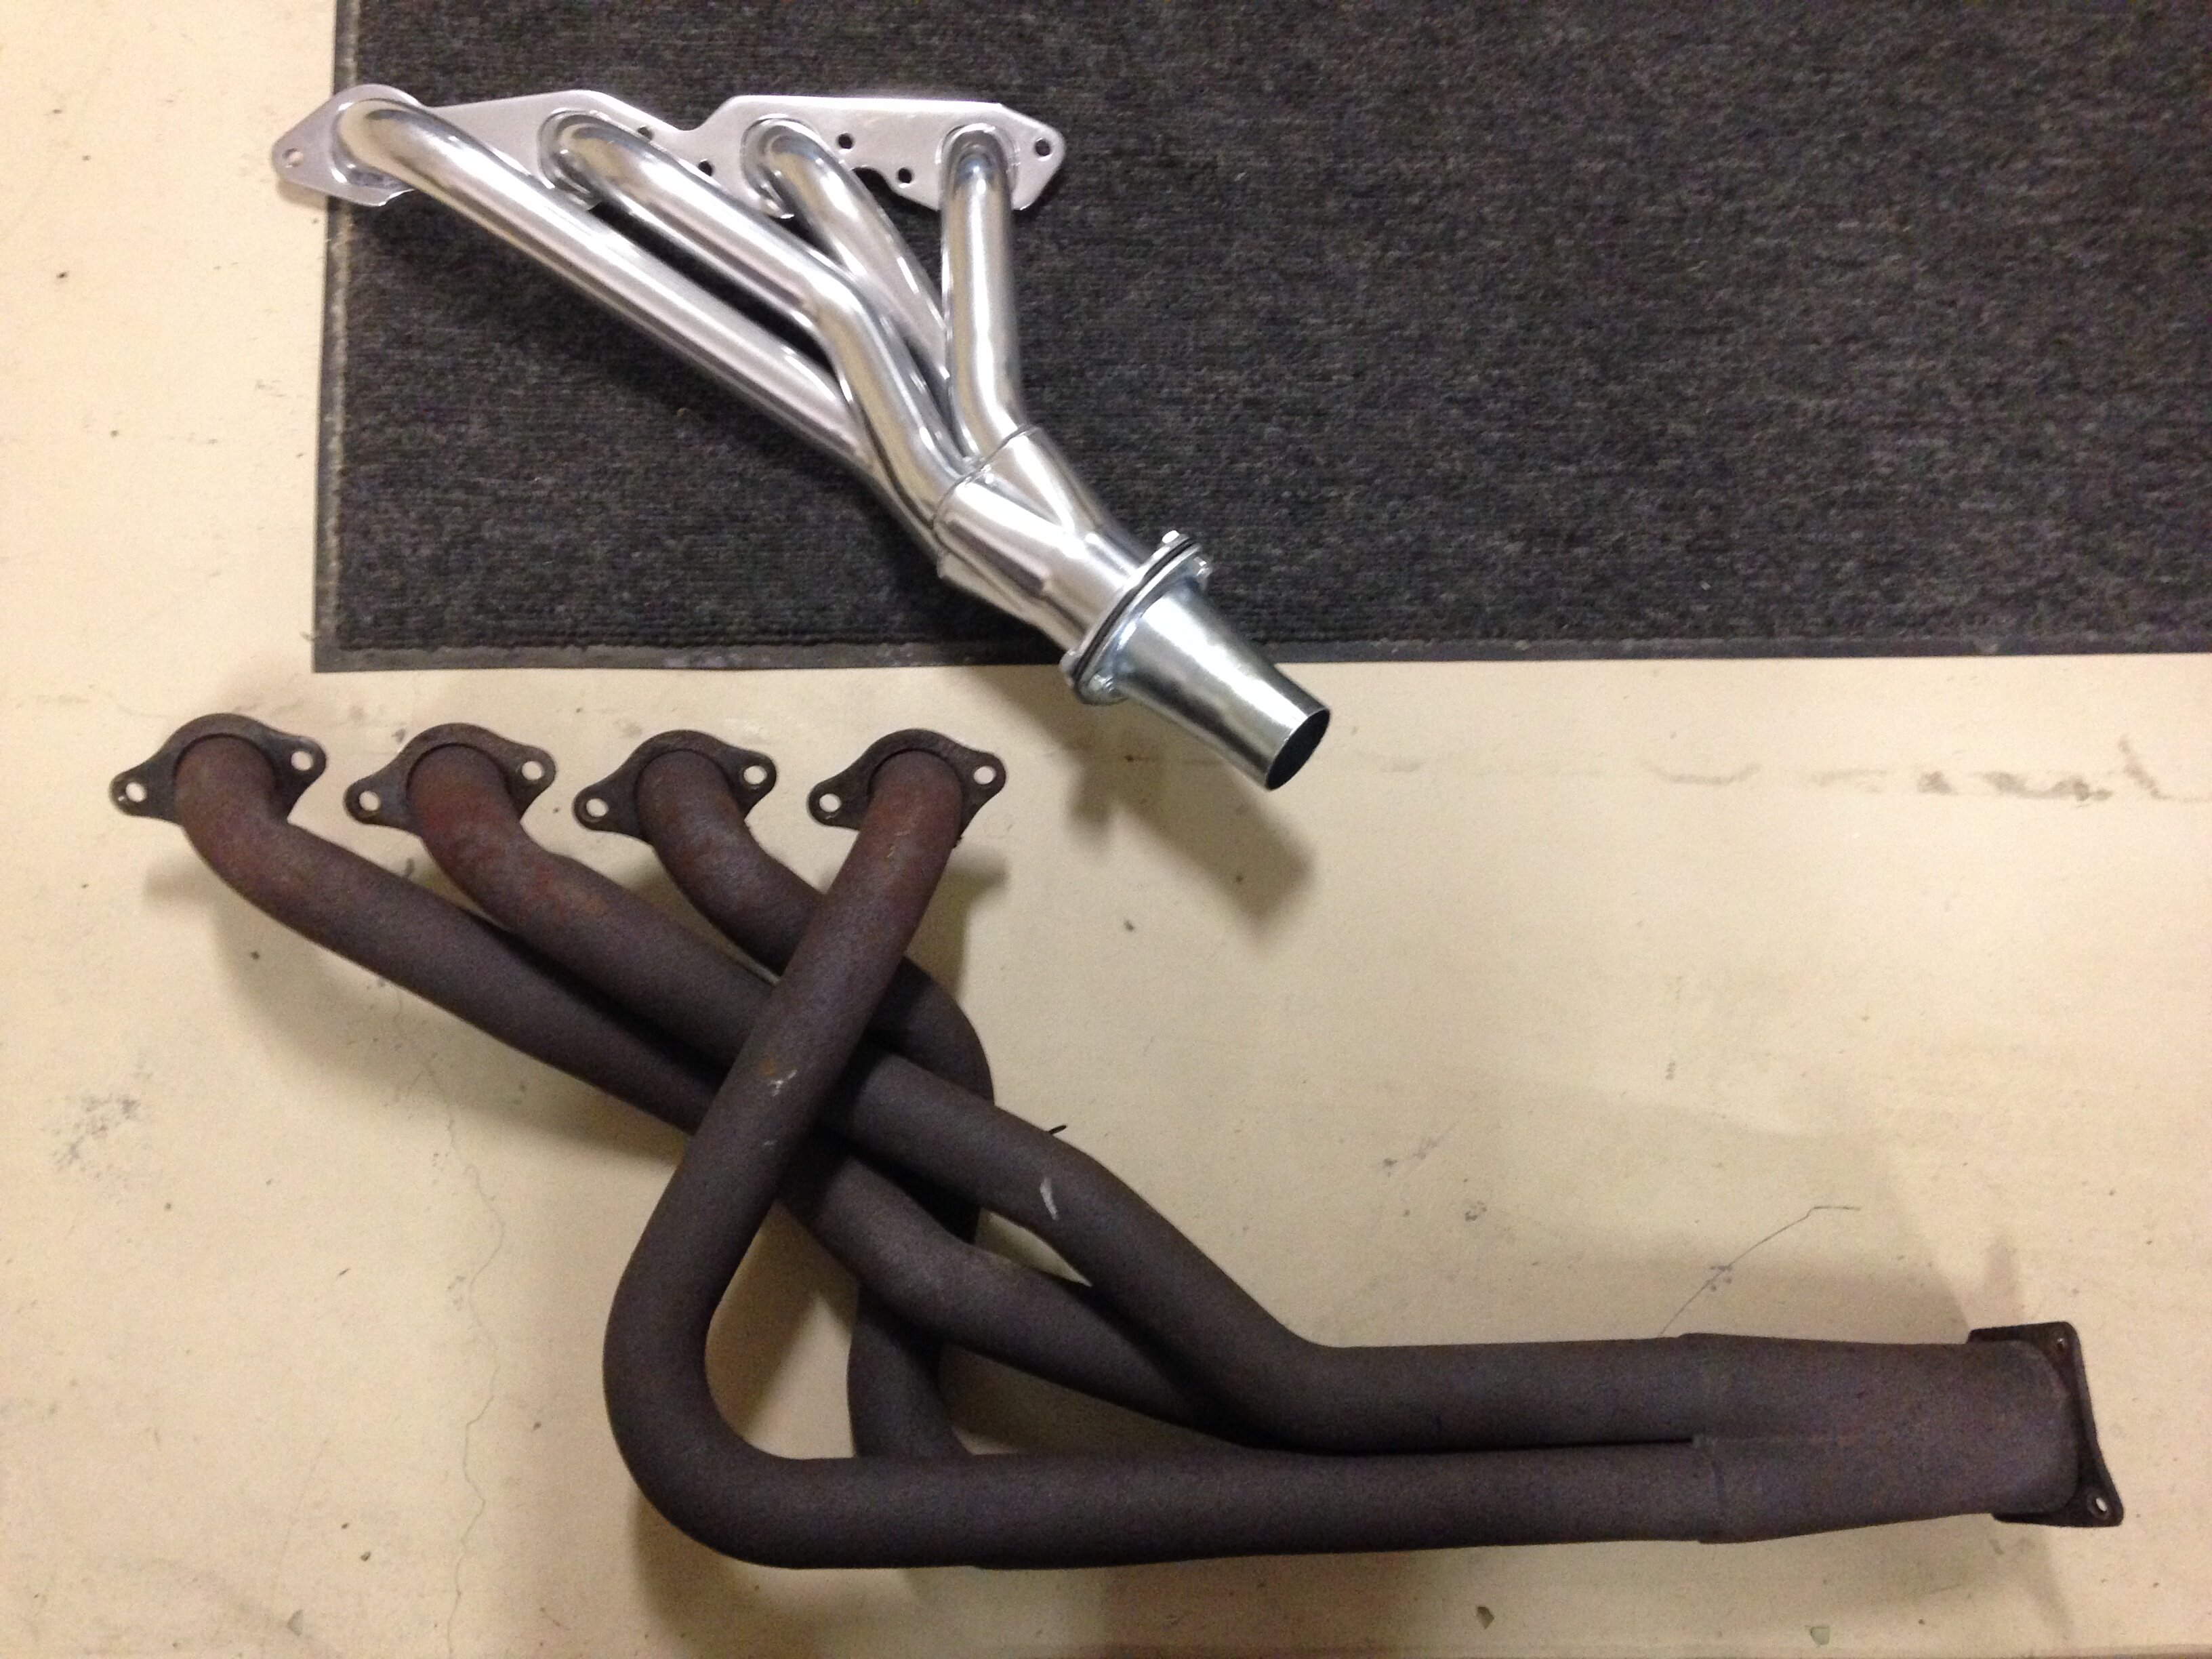
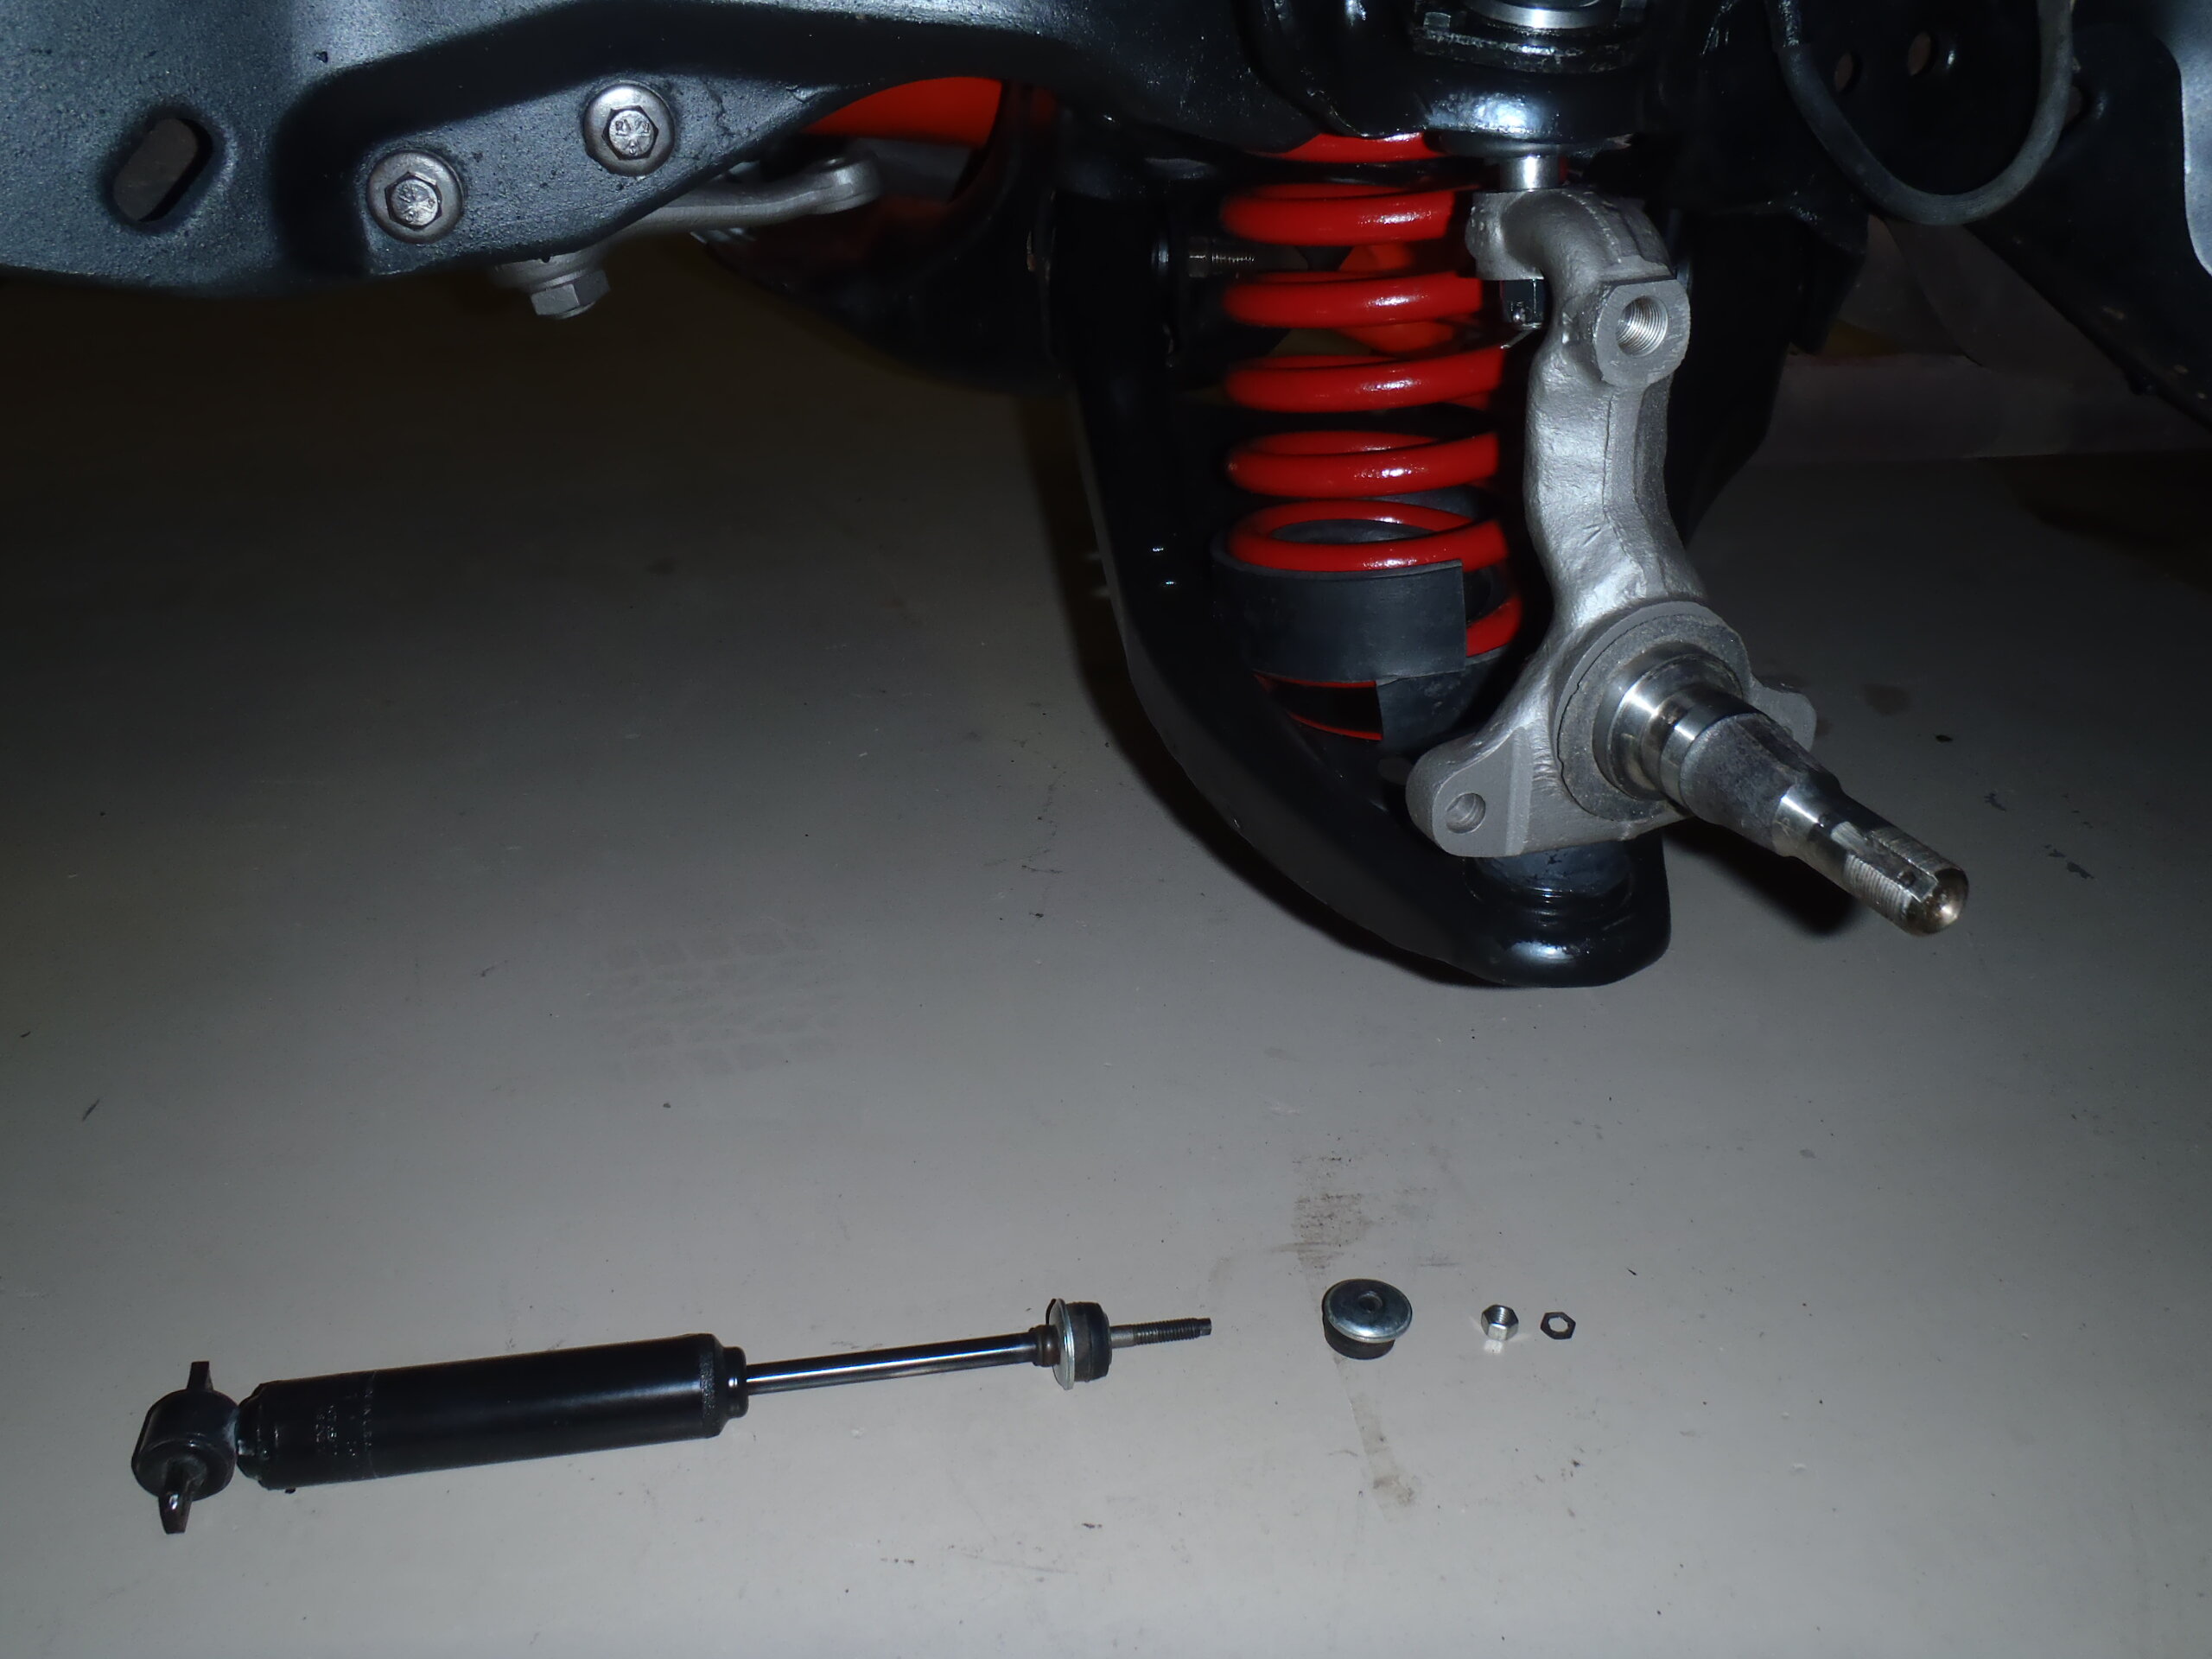
Hey, Mike, When I replaced my old rusty full-length headers (that had been severely massaged to fit years ago) I was unable to find any direct replacement for a big block first gen Monte with a manual transmission. There are numerous full-length headers for big block Montes with automatics but their #7 tube sweeps back into the space where the clutch Z bar operates. Consequently, I chose to go with the Patriot "shorty" header that comes down and exits at a 45 degree angle. I am not where I can look at my car right now but I am certain there was no interference with the new headers and the clutch arm return spring. I checked my project photos and only show that spring hanging down during the installation of the new headers (see below). Since that spring was formerly connected to a washer welded to the old full-length headers (rather than the hole in the frame), I am wondering if you might have to do something similar with your new headers? You may even have to substitute a completely different length and power of spring in order to connect it to an alternate location that will work. Good luck.

-
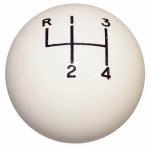
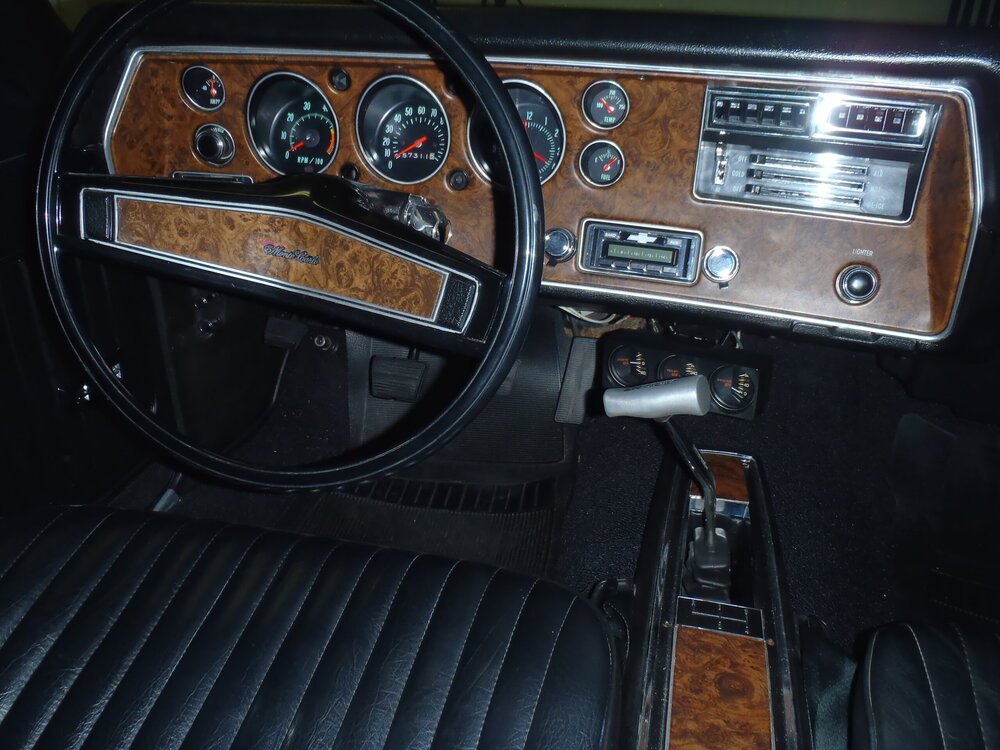
There's certainly something to be said for originality but there's probably a good reason that Muncie shifter and knob came to you in a Hurst shifter box, Dan! Mine also came to me with a Competition Plus Hurst shifter (but no Muncie in a box). Of the literally dozens of changes and upgrades I have done to that car over the past 12 years, replacing the shifter knob was the very first one done on the first day! That white Tootsie Roll lollypop quickly gave way to a fist-filling, gear-banging Hurst T-handle and there will be no return. 😁
-
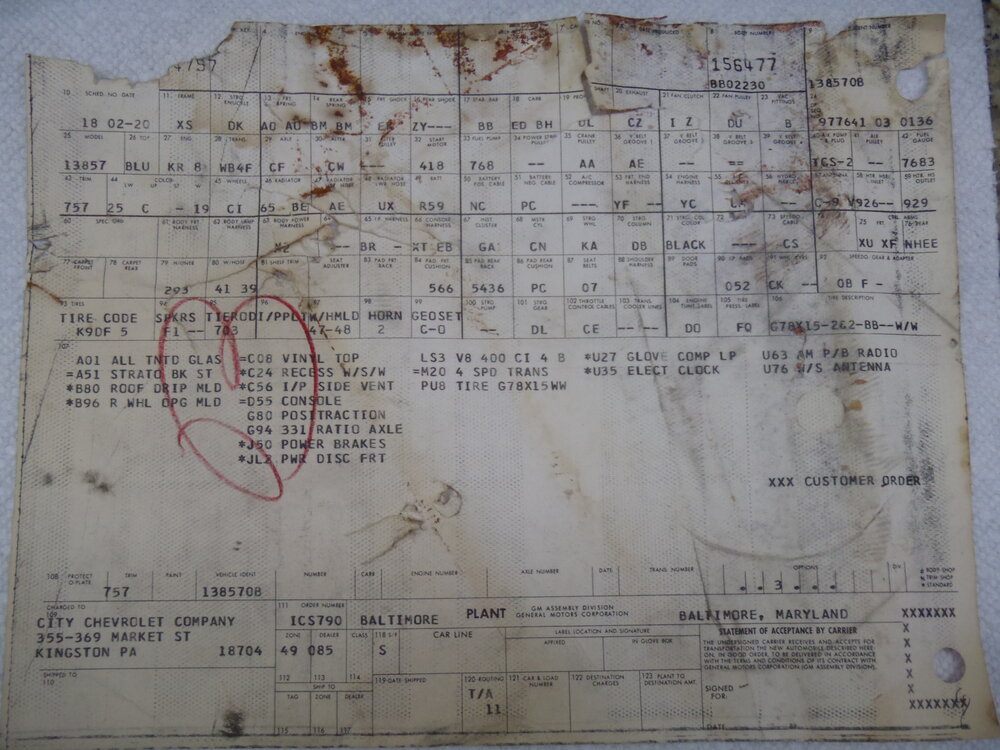
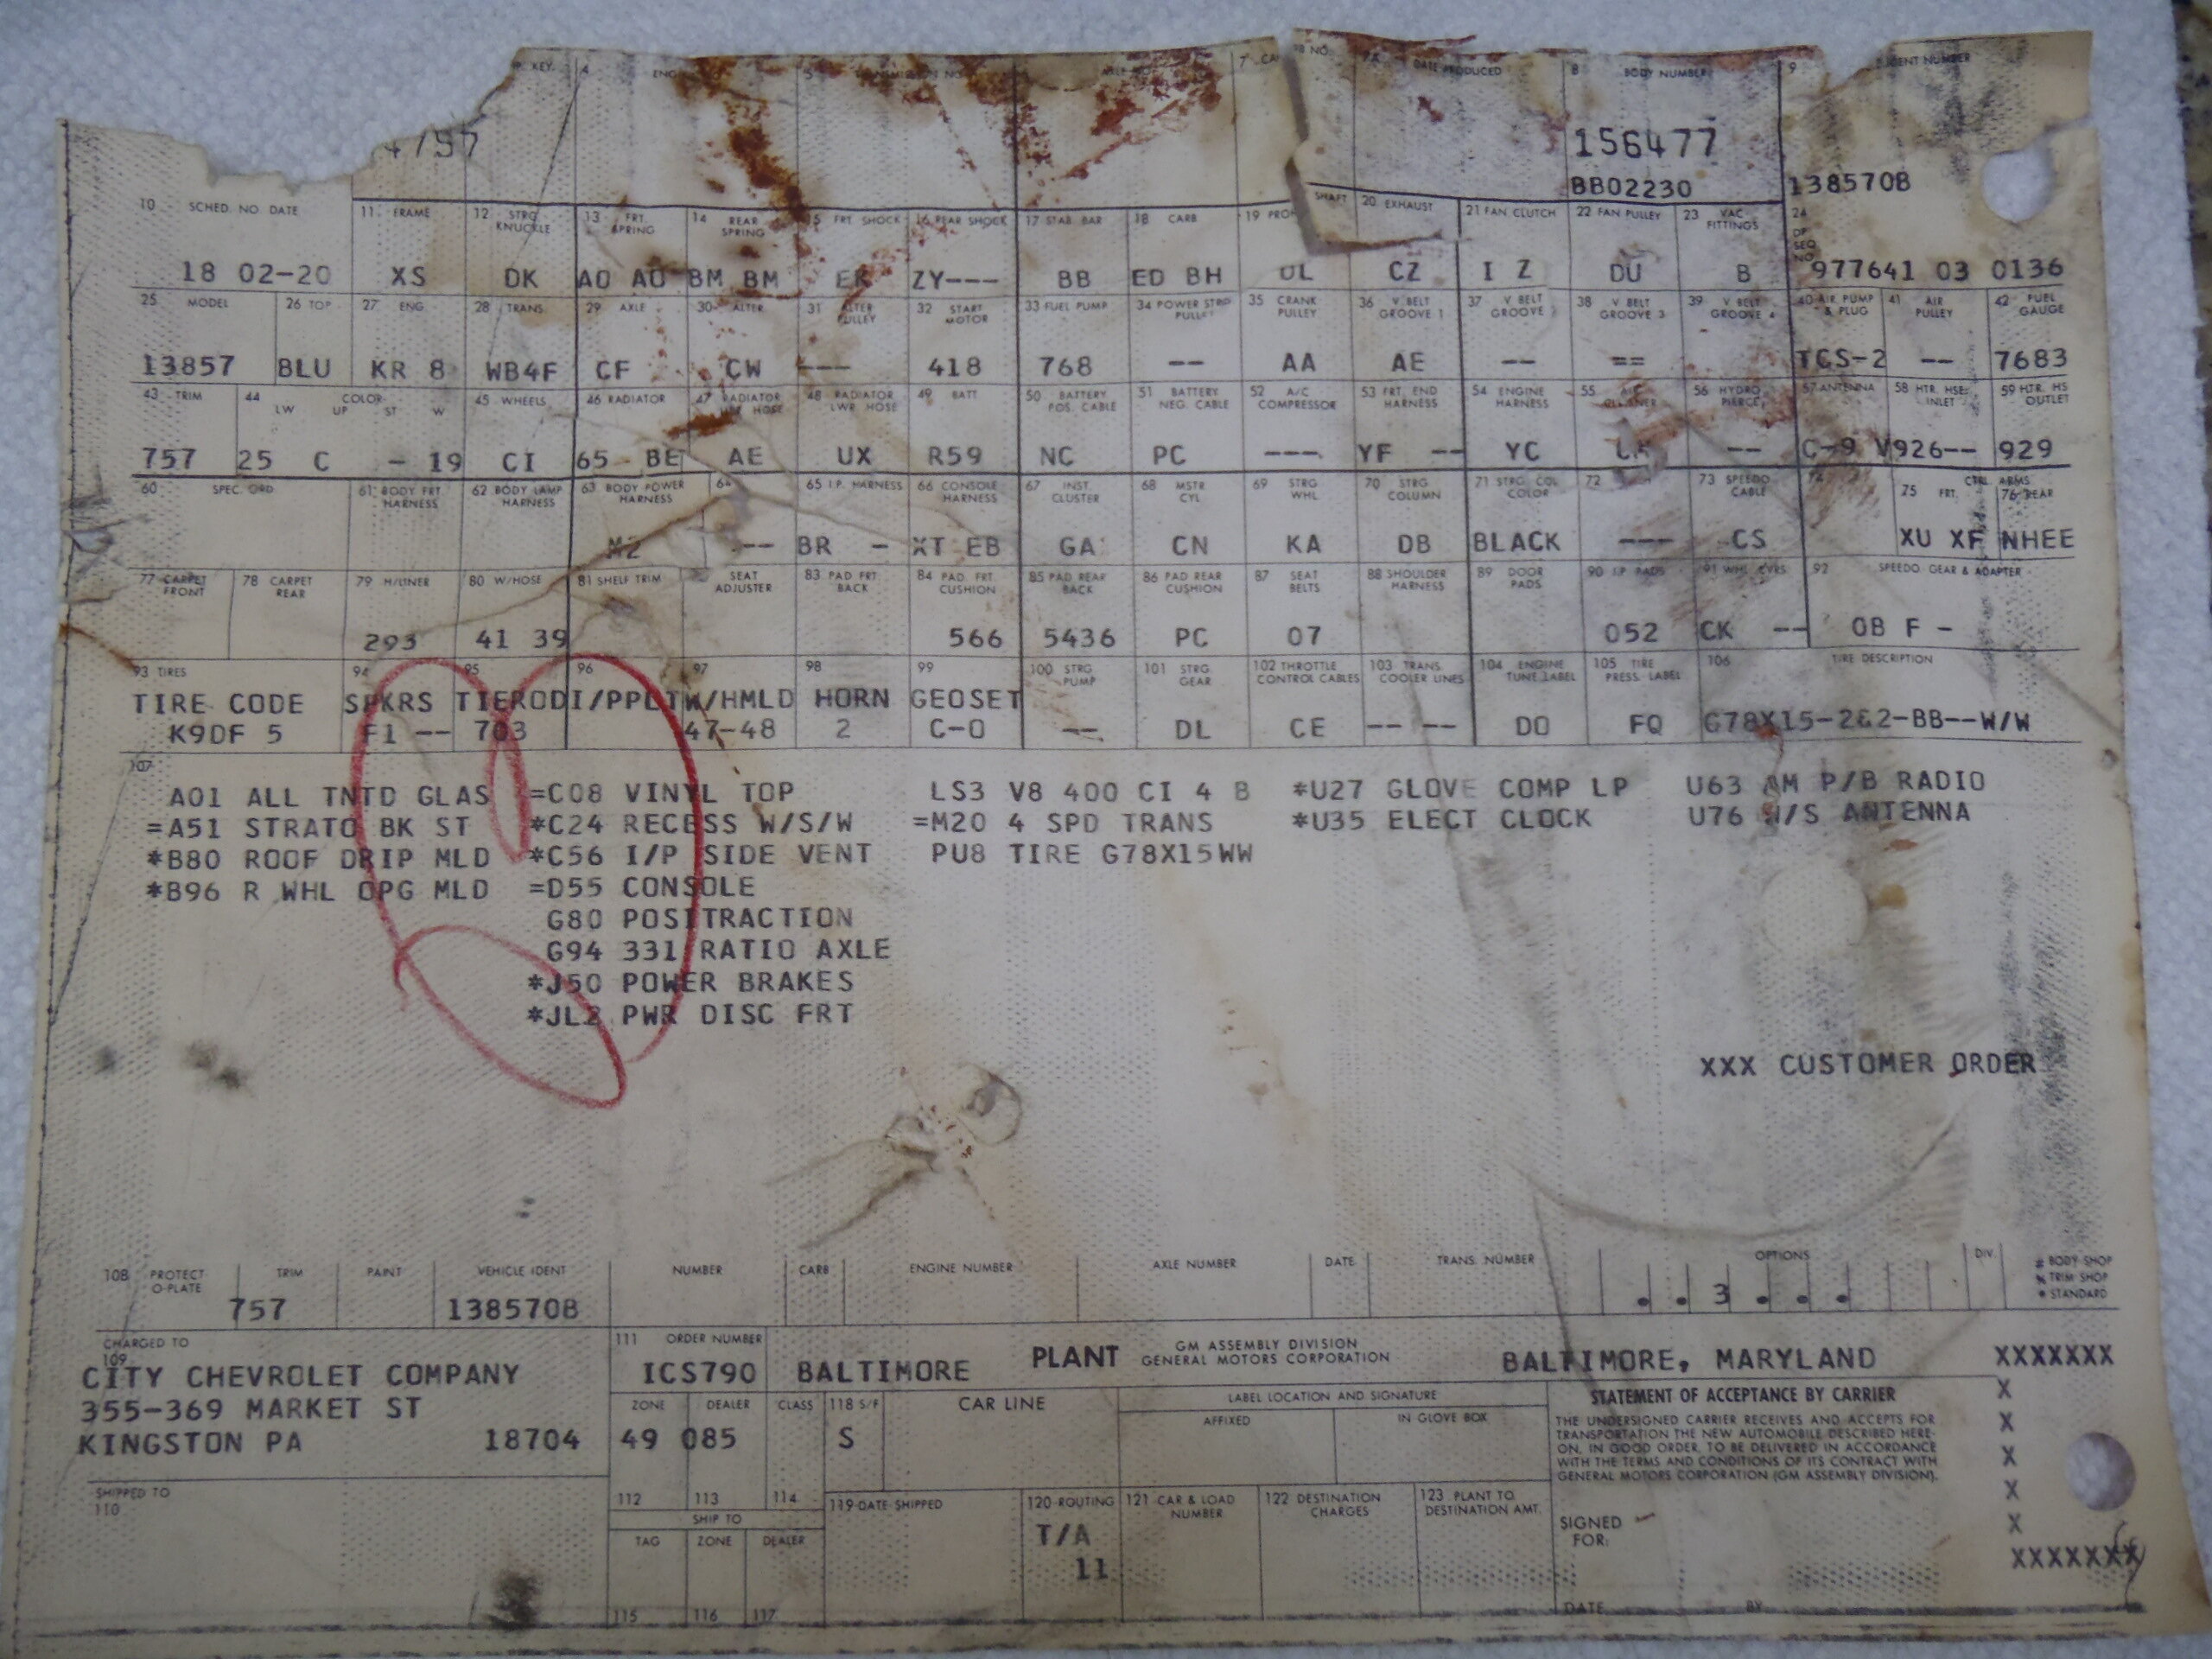
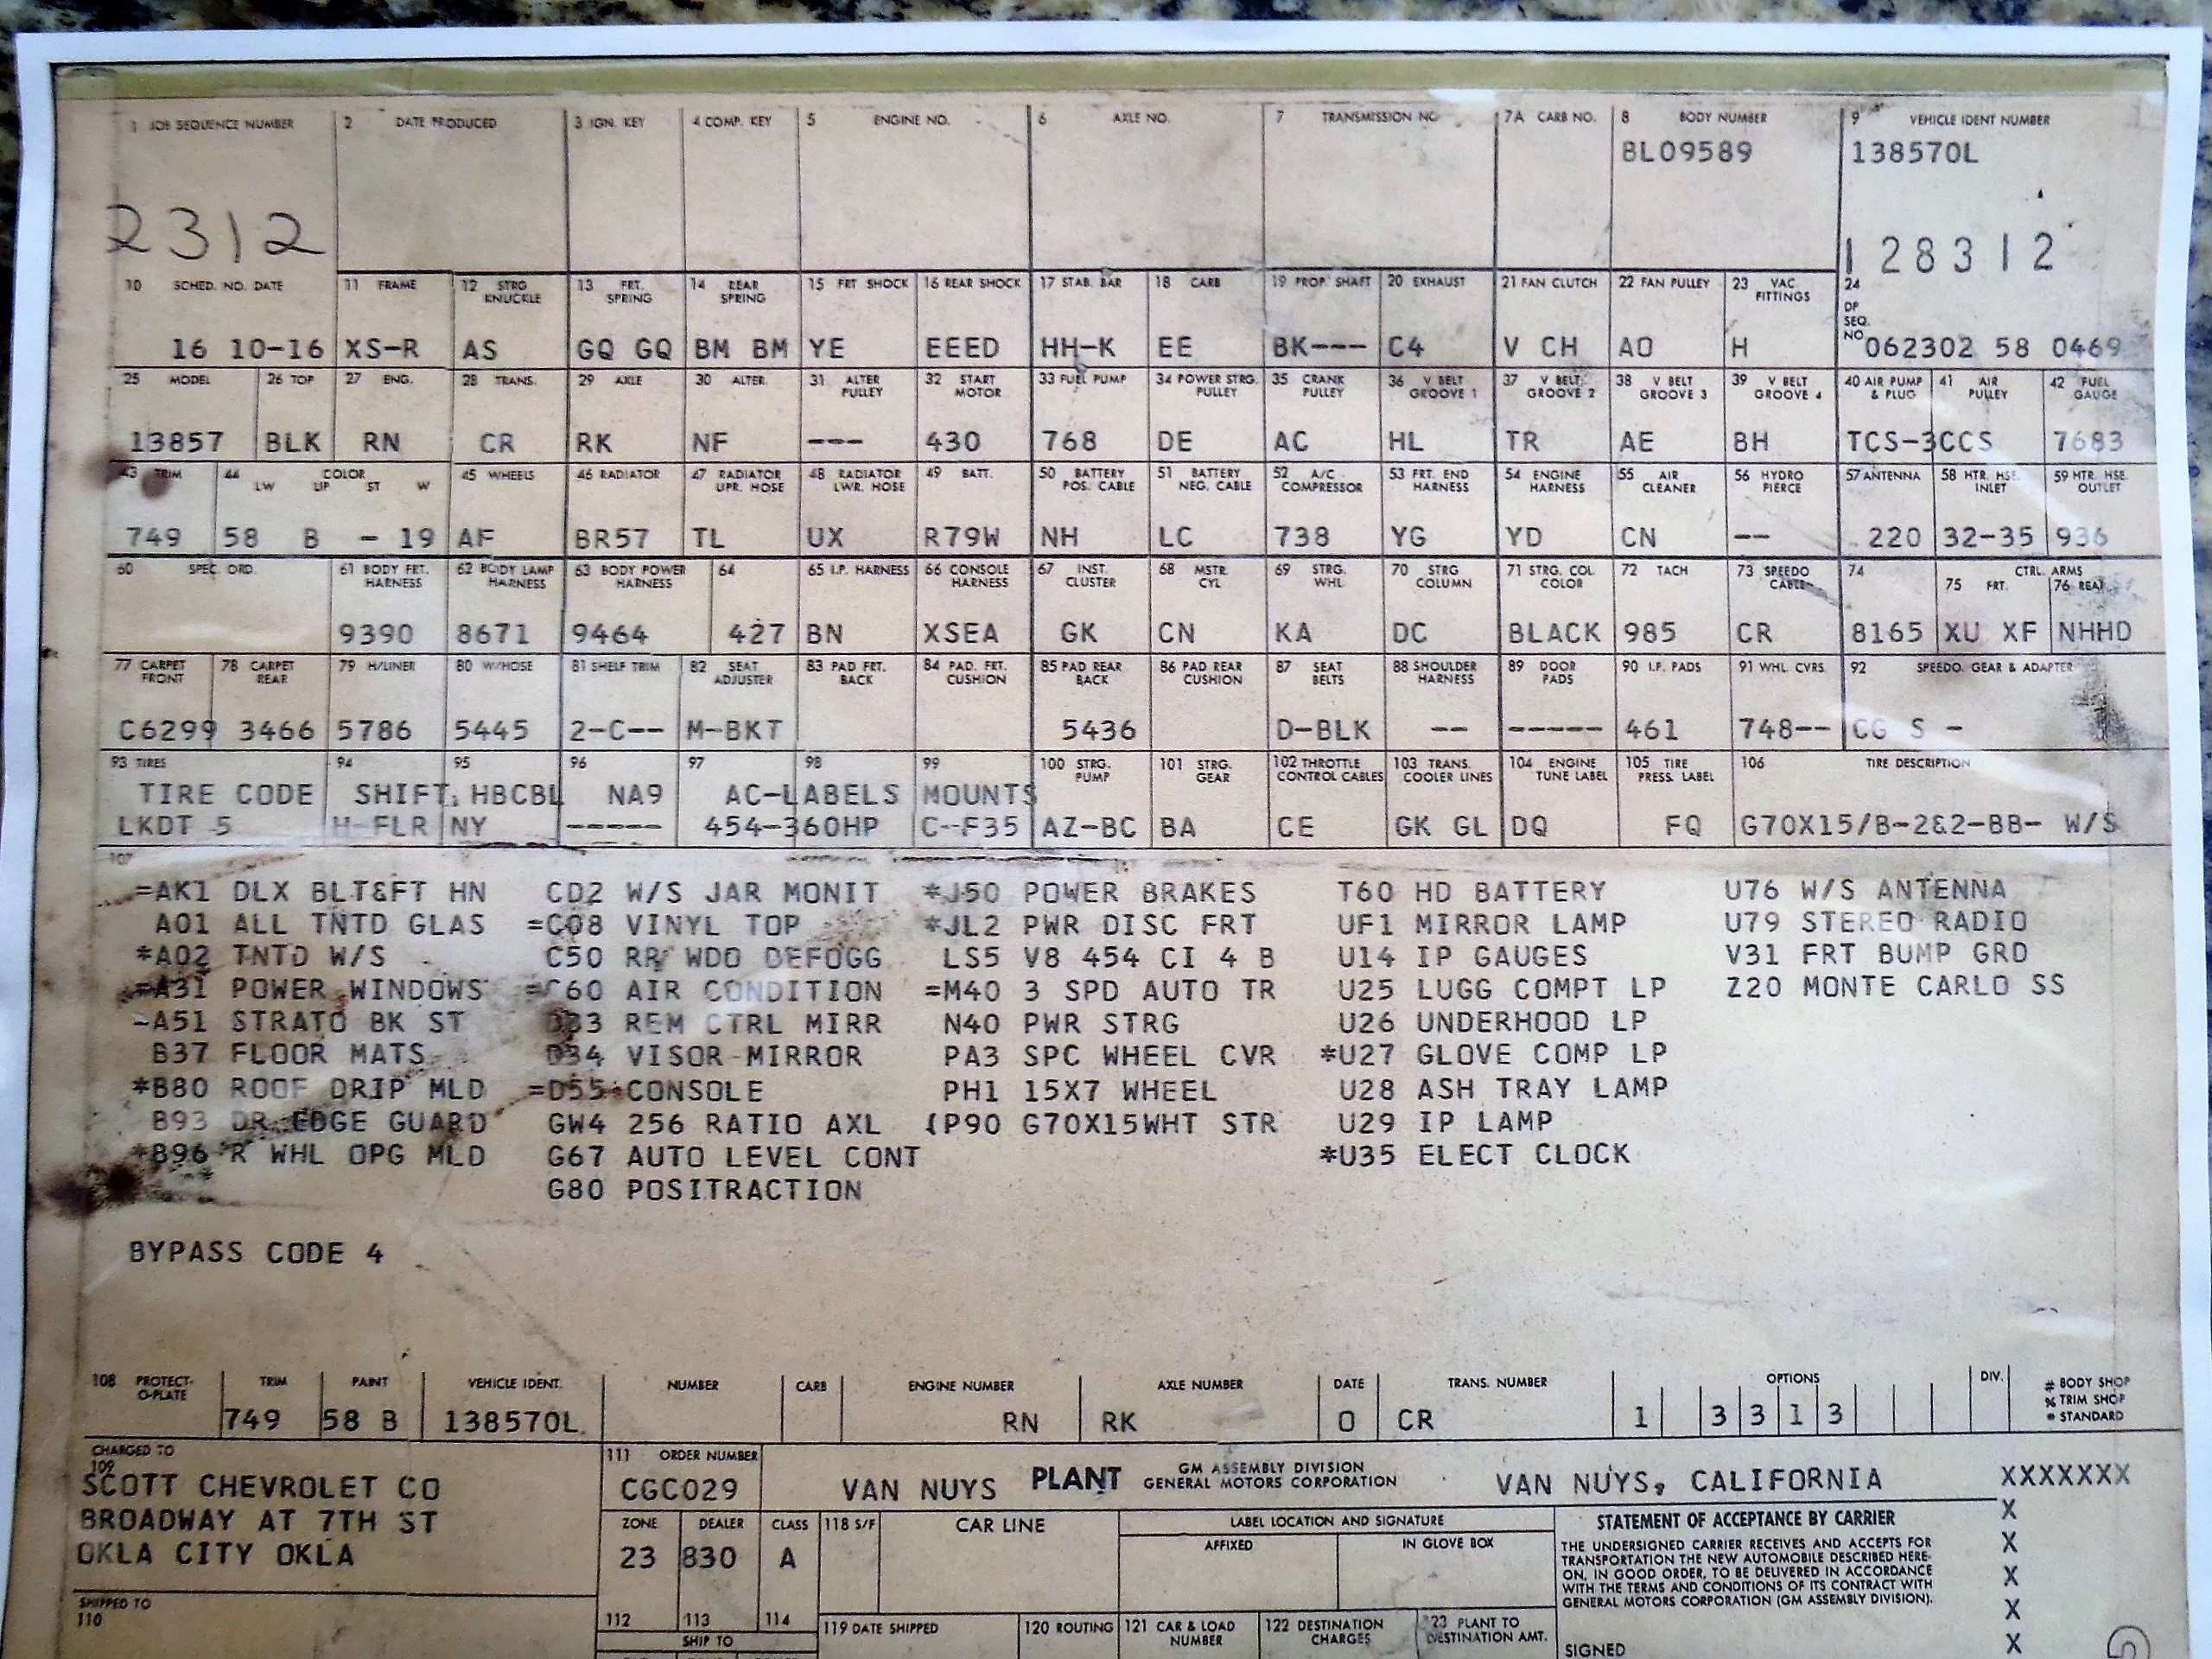
Good idea, Dan. Build Sheet attached for my '70.

-
Great to know that another survivor is now in good hands! It already looks a lot better and we know what you are capable of through your amazing SS! At least your 402 4-speed has factory A/C and power steering - mine was built with neither. Good luck with the resto and enjoy the unique pleasure of owning and driving a big block 4-speed Monte!
-
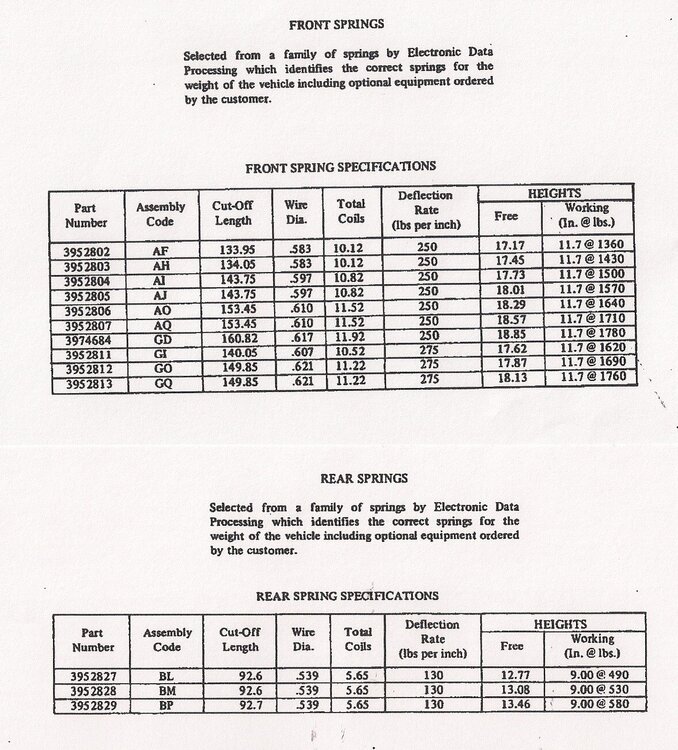
Dale, do you have a Build Sheet for your '70? If so, check box 13 for the 2-letter code identifying the spring that GM selected from 10 possible front coils when your Monte was assembled. Even if your front coils have been replaced or sagged over the years, the specs for the spring used in assembly (see spring table below) should get you back to "stock" front end height for the options originally built with your car. You are not going to find the original part numbers for replacement springs so you have to compare the original specs with specs of available replacement springs. As you look down the table of 10 possible springs below, you will see that the springs increase in preload force (pounds at working height of 11.7" in the far right column) from 1360 lbs for the "lightest" AF spring to 1760 lbs for the "heaviest" GQ spring. Your car was built with the spring that had the best preload for its total weight, including options. While small blocks obviously weigh less than the big blocks, engine choice was not the criteria for factory spring selection which was based on total weight including all options. For example, my low-optioned 402 4-speed '70 was built with the AO spring while a heavily optioned small block automatic car may have been built with a heavier spring. Because I added AC, power steering and larger front tires, I chose to install 1" spring spacers in my original AO front coils to avoid tire rubbing on tight turns. I used the split-circle 1" rubber spacers near the bottom of the coil (see photo below) to get some minor lift without stressing the spring. I would personally never use those metal plugs that twist-in between the coils because they create stress points during operation. As you may know, spacers effectively reduce the working height of a coil spring and thereby increase its preload so use them in moderation. Coil springs can take a "set" and/or weaken over the years, so if you decide to replace them (instead of using spacers) you will need to calculate the preload of the spring you select to either match or slightly exceed the preload of the original factory spring. The calculation is easy once you have the following spring specs: free height (in inches) and deflection rate (lbs/inch of compression). Simply subtract 11.7" (working height) from the spring's free height and multiple that difference by the deflection rate. For example: using the popular replacement Moog 6330 specs: (17.5" - 11.7") x 293 lbs/in = 1700 lbs of preload. Now compare that to the preloads shown in the right hand column of the table below and see where it stacks up (almost the same as the AQ spring in this example). I agree with others that you probably shouldn't select a spring with the heaviest preload unless you want the front end to sit pretty high. Preload is definitely the most critical factor in determining the static height of your Monte's front end. Good luck.

-
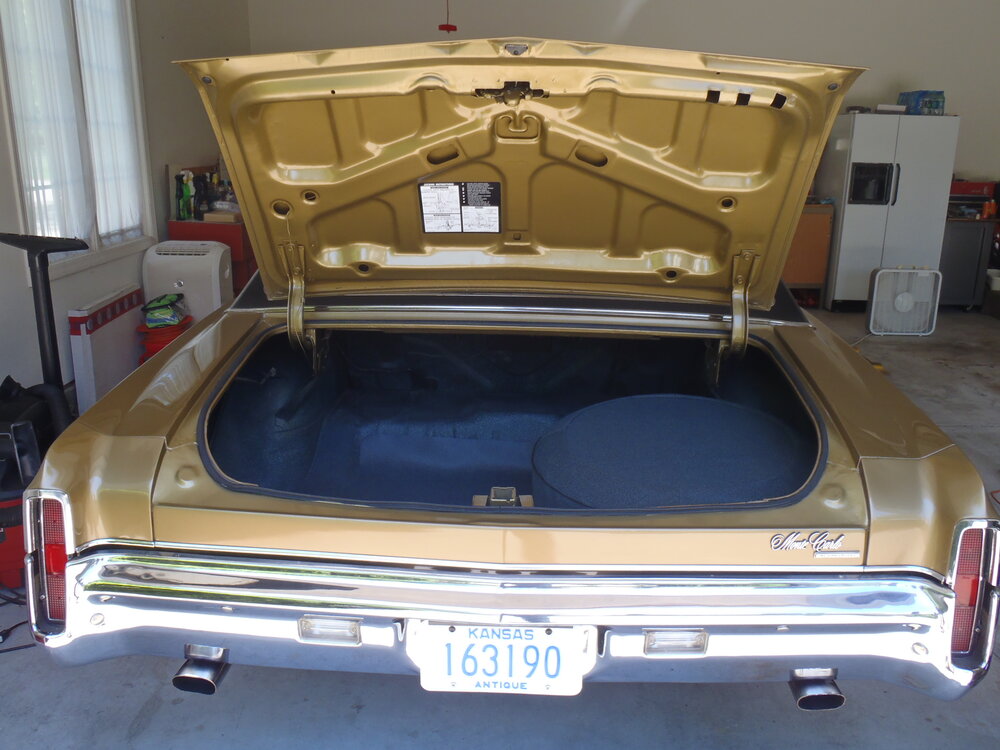
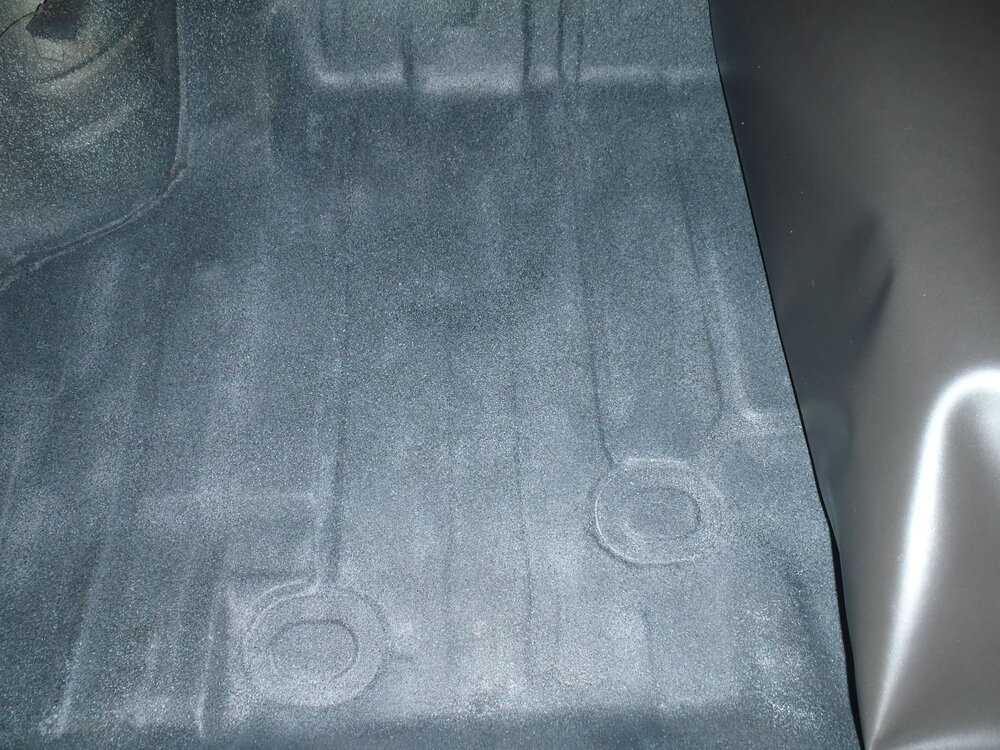
I believe the factory paint for the trunk floor on all first gen Montes is well-matched by Dupli-Color Spatter Paint DM109 Black & Aqua. I've also used the black and aqua spatter paint from Eastman.

-
Dang, an elusive and ultra rare '70 454 SS 4-speed finally emerges! 1 of 6 built no less! Better get it while it's hot! 😜
-
Looks fantastic, Aaron! Amazing what some time, attention and elbow grease can do!
-
My '70 SS had a 2.56 Posi and was a good cruiser, also. My '70 402 4 speed has a 3.31 Posi which I believe was an option for the SS that year as well. It would be a compromise between the 3.08 and 3.42. How tall are the rear tires you plan on running? You can get away with a bit higher (numerical) ratio if you are running a taller tire like a 275/60-15 that is 28" tall.
-
Beautifully done and very unusual - bet she is a real head-turner everywhere she goes! Probably moves well, too, with that 383/373 combo. Enjoy!
-
71 402 4-Speed (Anybody Remember This Car)
MCfan replied to Rob Peters's topic in Cars and Parts For Sale Leads
Sure, Rob, I remember you telling us about this car and your great disappointment that his wife did not honor her husband's wish for you to have it. The car looks very clean in the photos - a beauty for sure! Can you tell if the current owner had to put a lot of time and/or money into it to get it looking this nice? I seriously doubt it will bring anything close to $80K but I've been wrong before. There are some crazy people out there who pay crazy money for certain cars. This car is nice (even desirable), but I just don't think it is quite that "certain". 😄 -
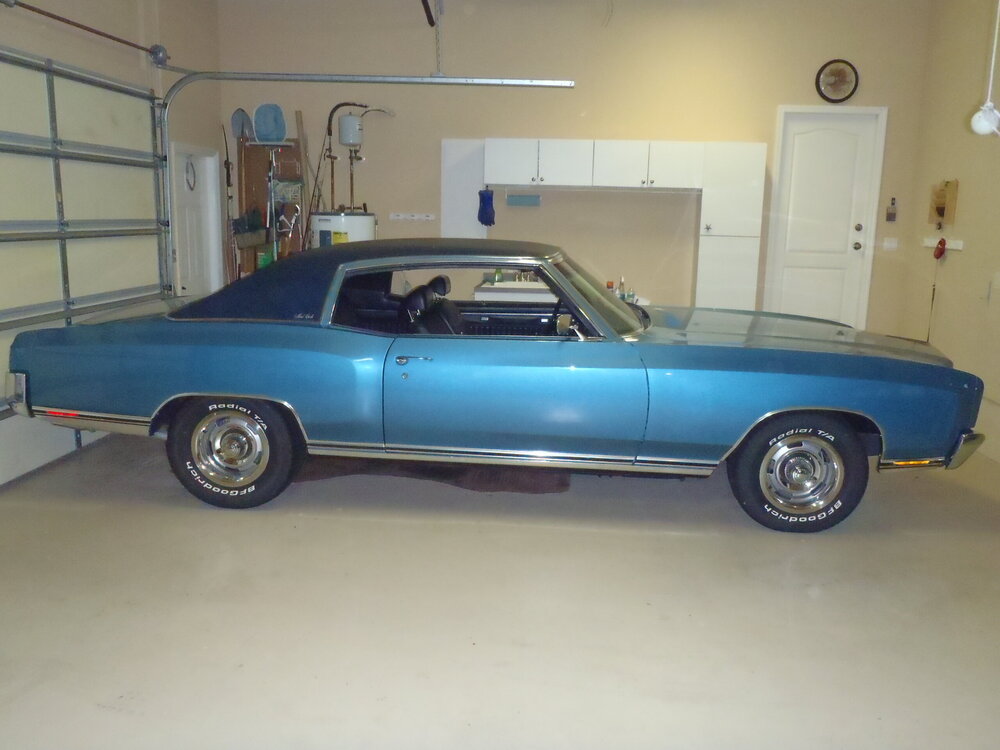
A '70 Monte Carlo was the first new car I bought in July of '70. I had just graduated from college in late January and started to work for IBM in Kansas City in early February. We were driving my wife's '67 VW fastback in college but then she went to work at a local hospital while I was out of town in training to be a computer salesman. When I returned, we needed two cars so I went down to Papas Chevrolet in Kansas City, Mo to get me a new Chevy as a second car. My dad was always a Chevy man and so was I. The Sales Manager asked me to drive his demo vehicle, an Autumn Gold 1970 Monte Carlo with a white vinyl top, a 402, TH400, Positraction, AC and several power options. I wasn't looking for a muscle car, just a nice looking and nice riding coupe to tool around my sales territory. I was super impressed with the elegant styling, smooth, quiet ride and the peppy performance which seemed even better than my dad's '66 Impala 396 with automatic. Since we had no established credit, starting salaries and some college loans to repay, I had to get a high risk, high interest rate loan but I had to have that Monte. I absolutely loved the car and did some mild performance mods to it but needed a larger car when our second daughter came along in '74. Premium gas had just hit 41 cents a gallon so I sold the Monte and bought a new '74 Buick LeSabre - big mistake! My crazy brother-in-law had owned several big block, 4-speed Chevy's in a row - a '62 Impala 409, a '66 Impala SS 396 and '69 El Camino SS 396 so I always dreamed of owning a big block, 4-speed muscle car. I had no idea that my dream would come true 40 years later with a '70 Monte Carlo but that was the best of both worlds! In 2010, I had a '70 Monte Carlo factory 402 4-speed shipped from Scranton, PA to my SW Florida winter home where it still resides. A year after that, I picked up a '70 Monte Carlo SS 454 to keep at my other seasonal home and enjoyed it for the next eight years. Both Montes certainly qualify as muscle cars, but my preference will always be the big block 4-speed!
-
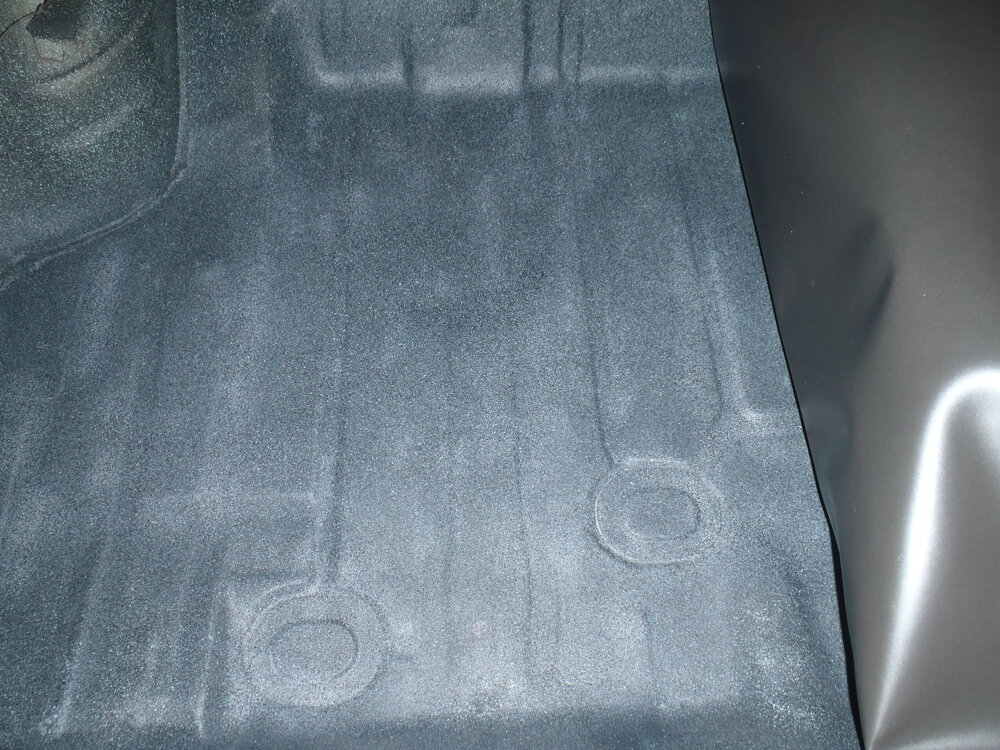
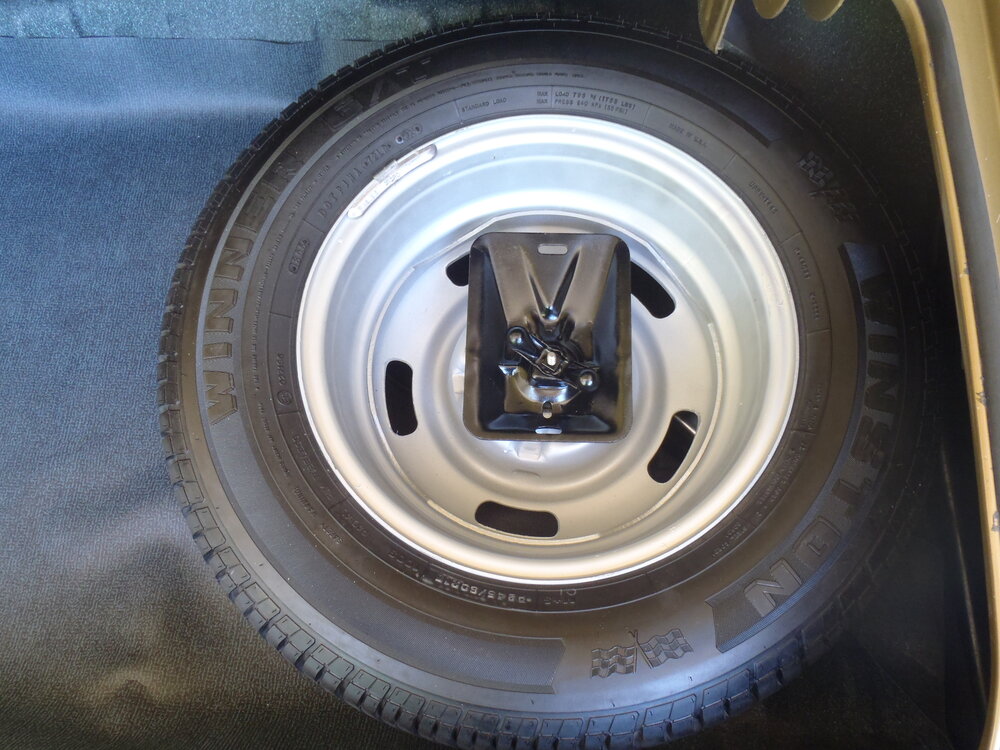
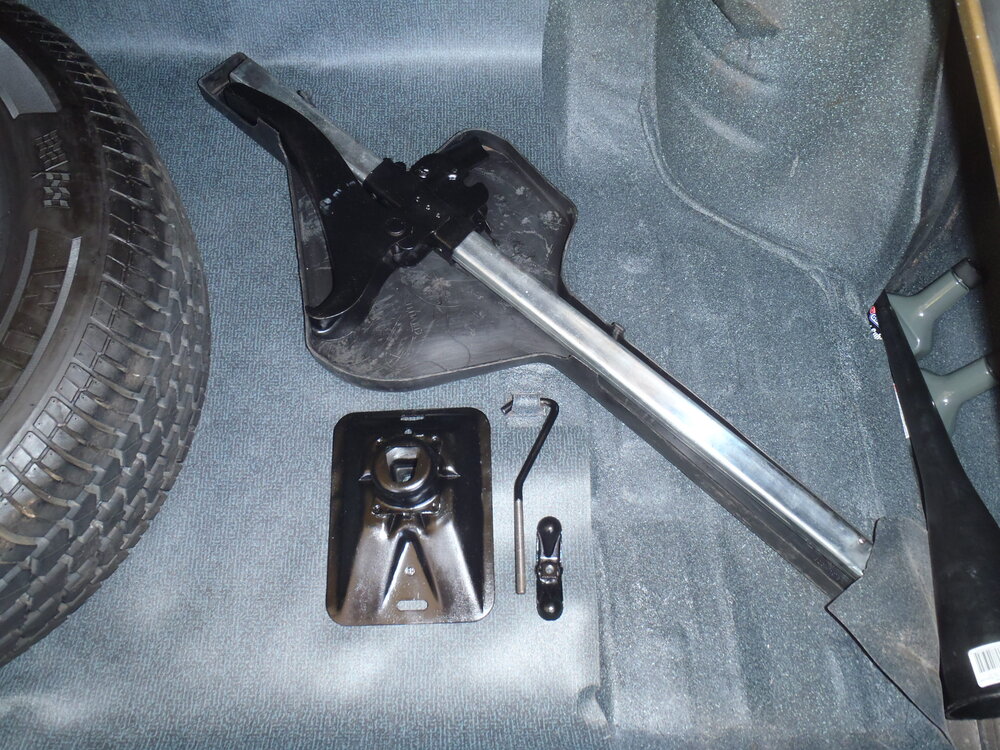
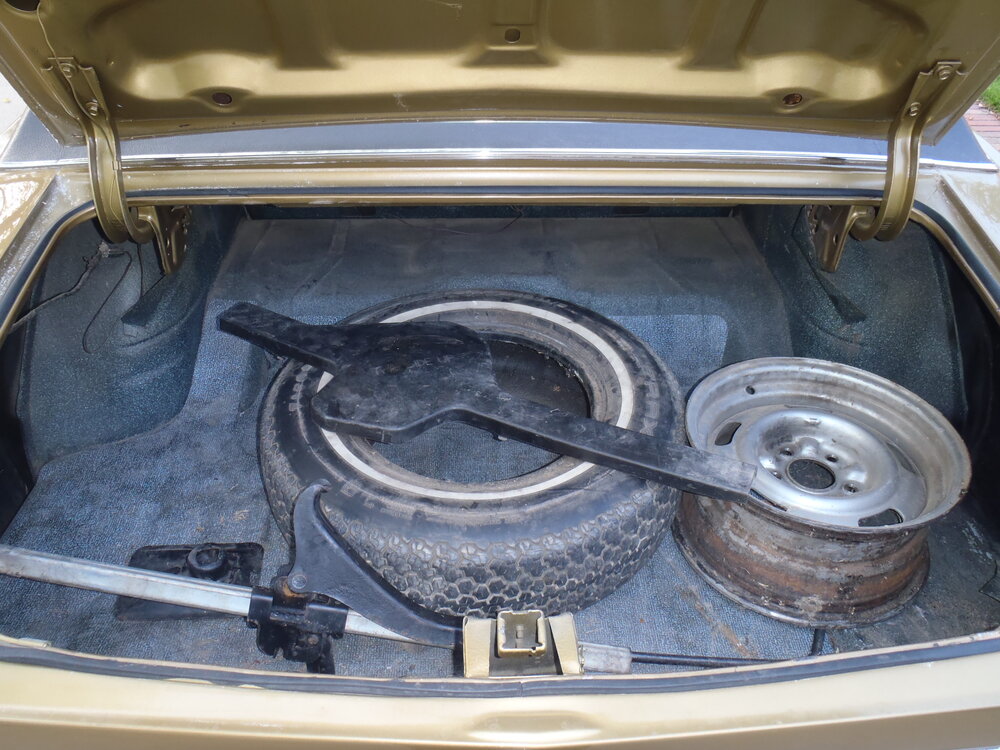
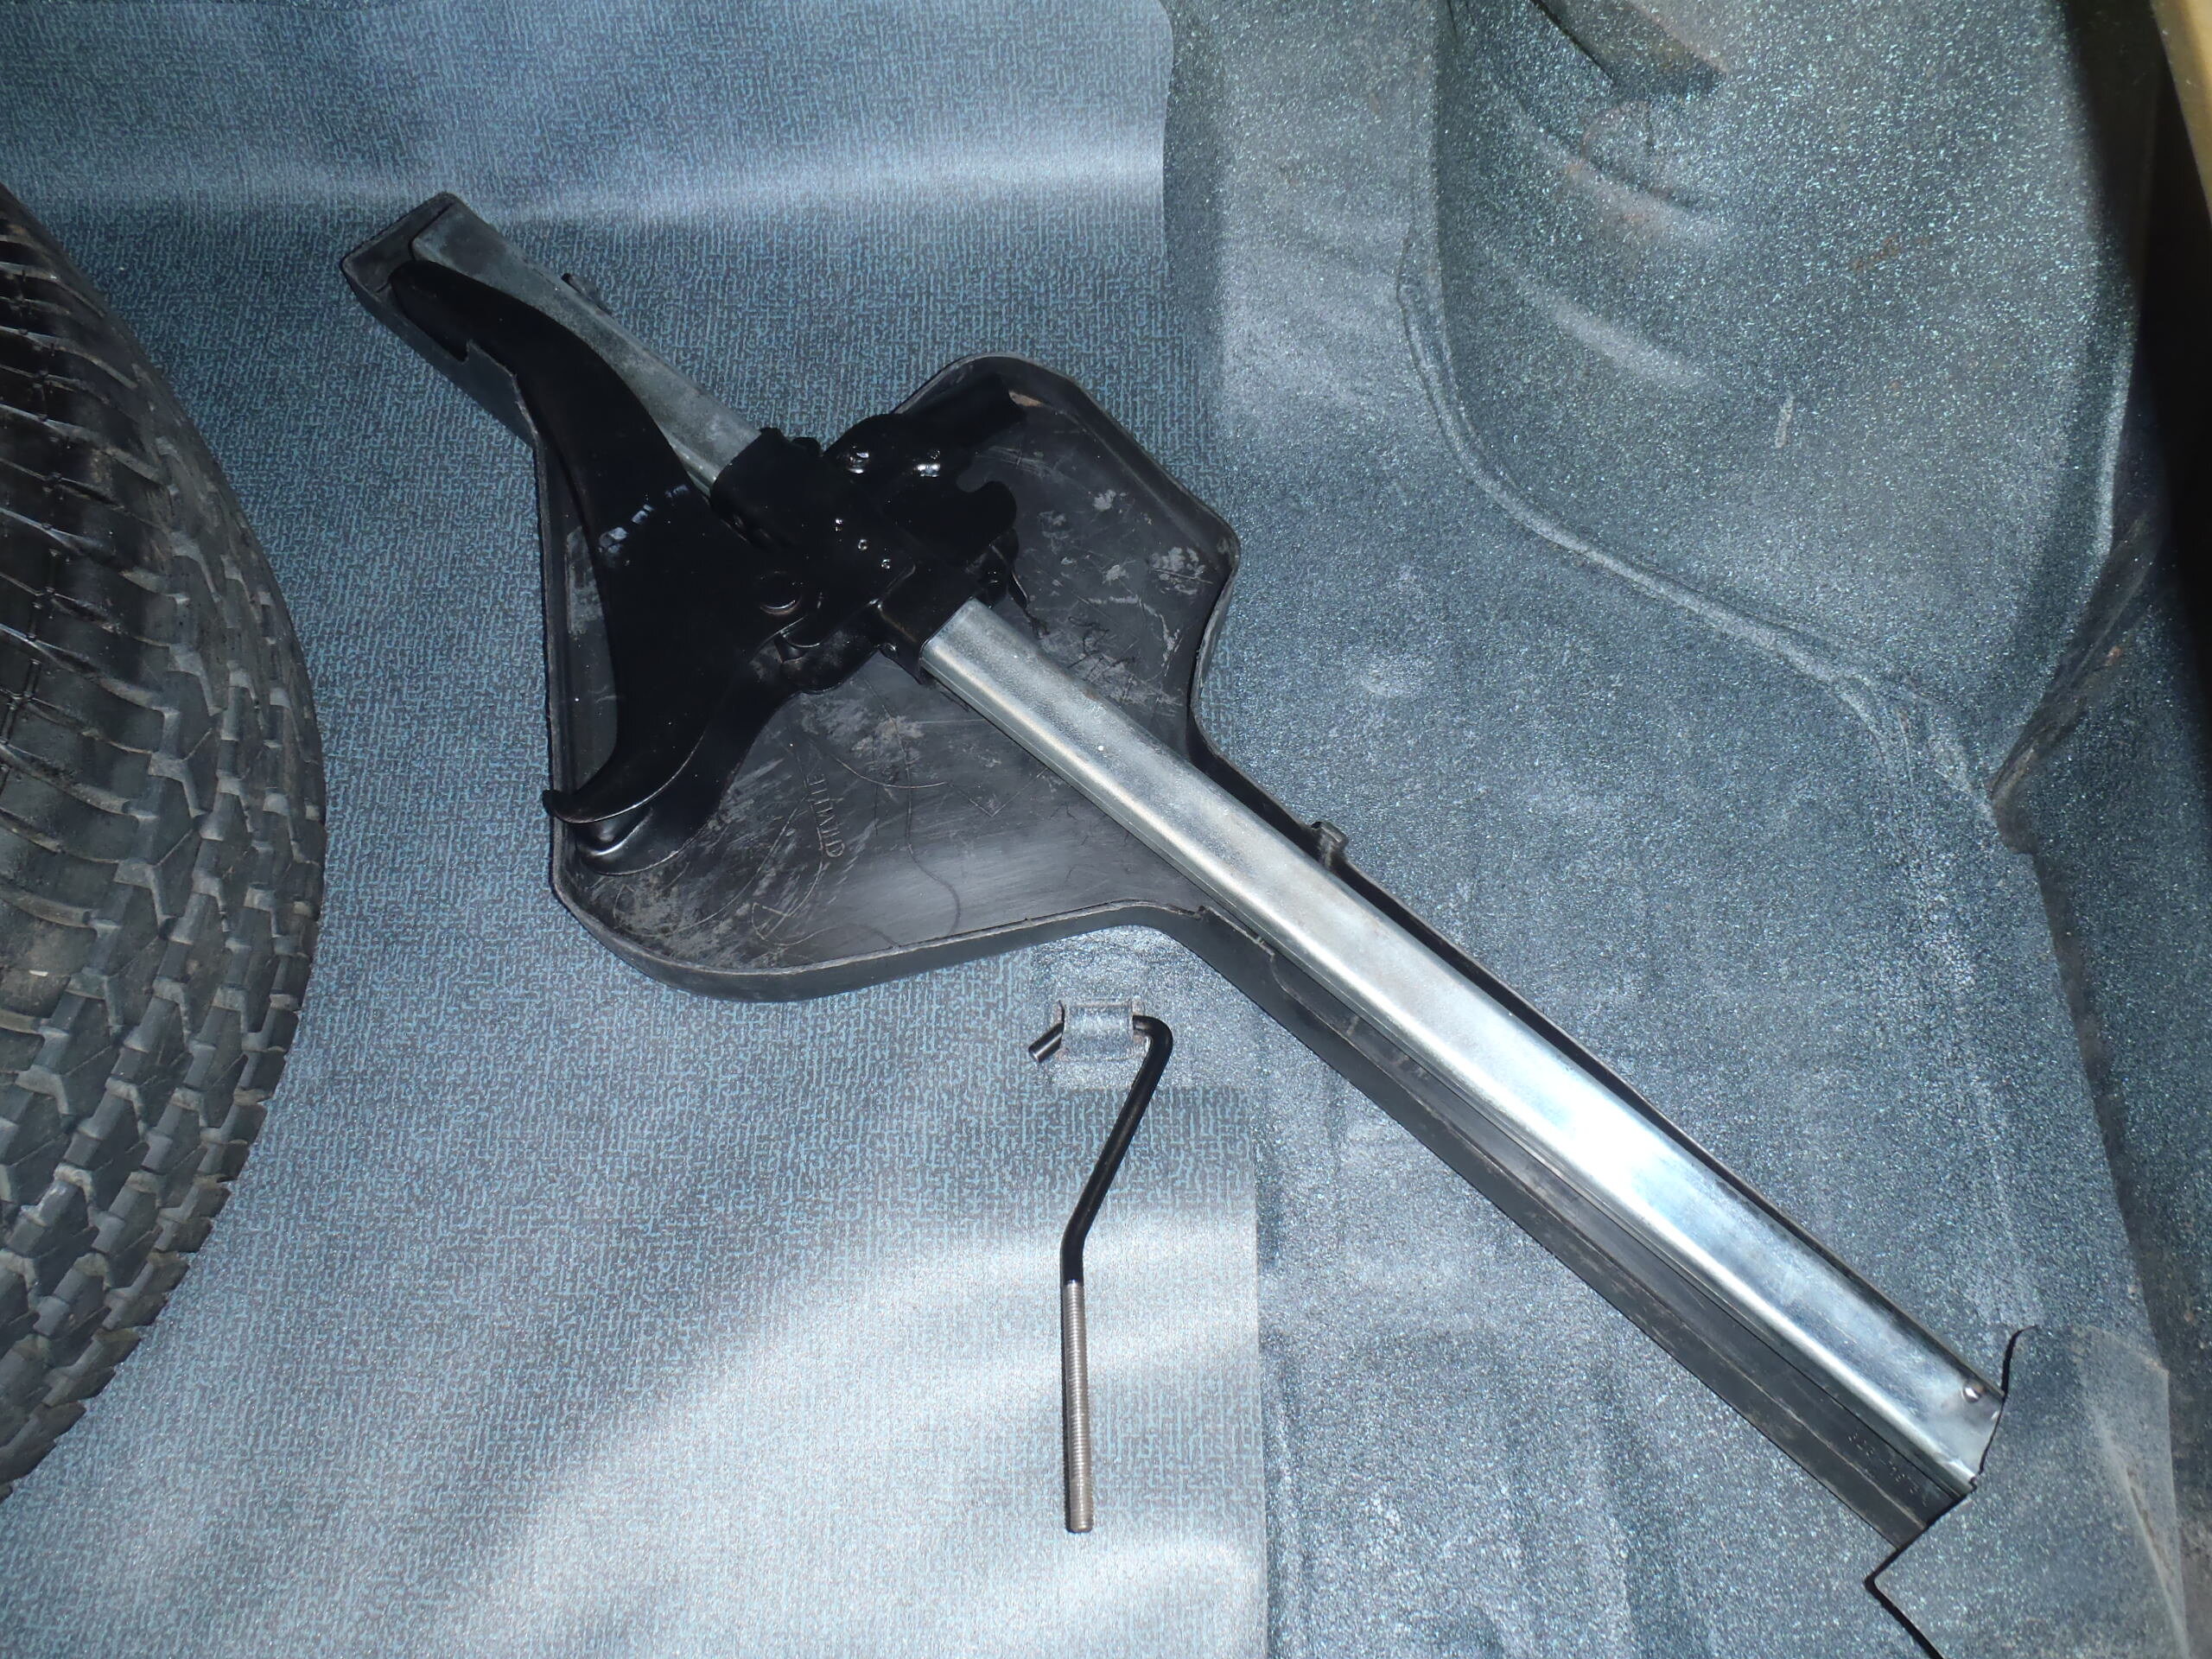
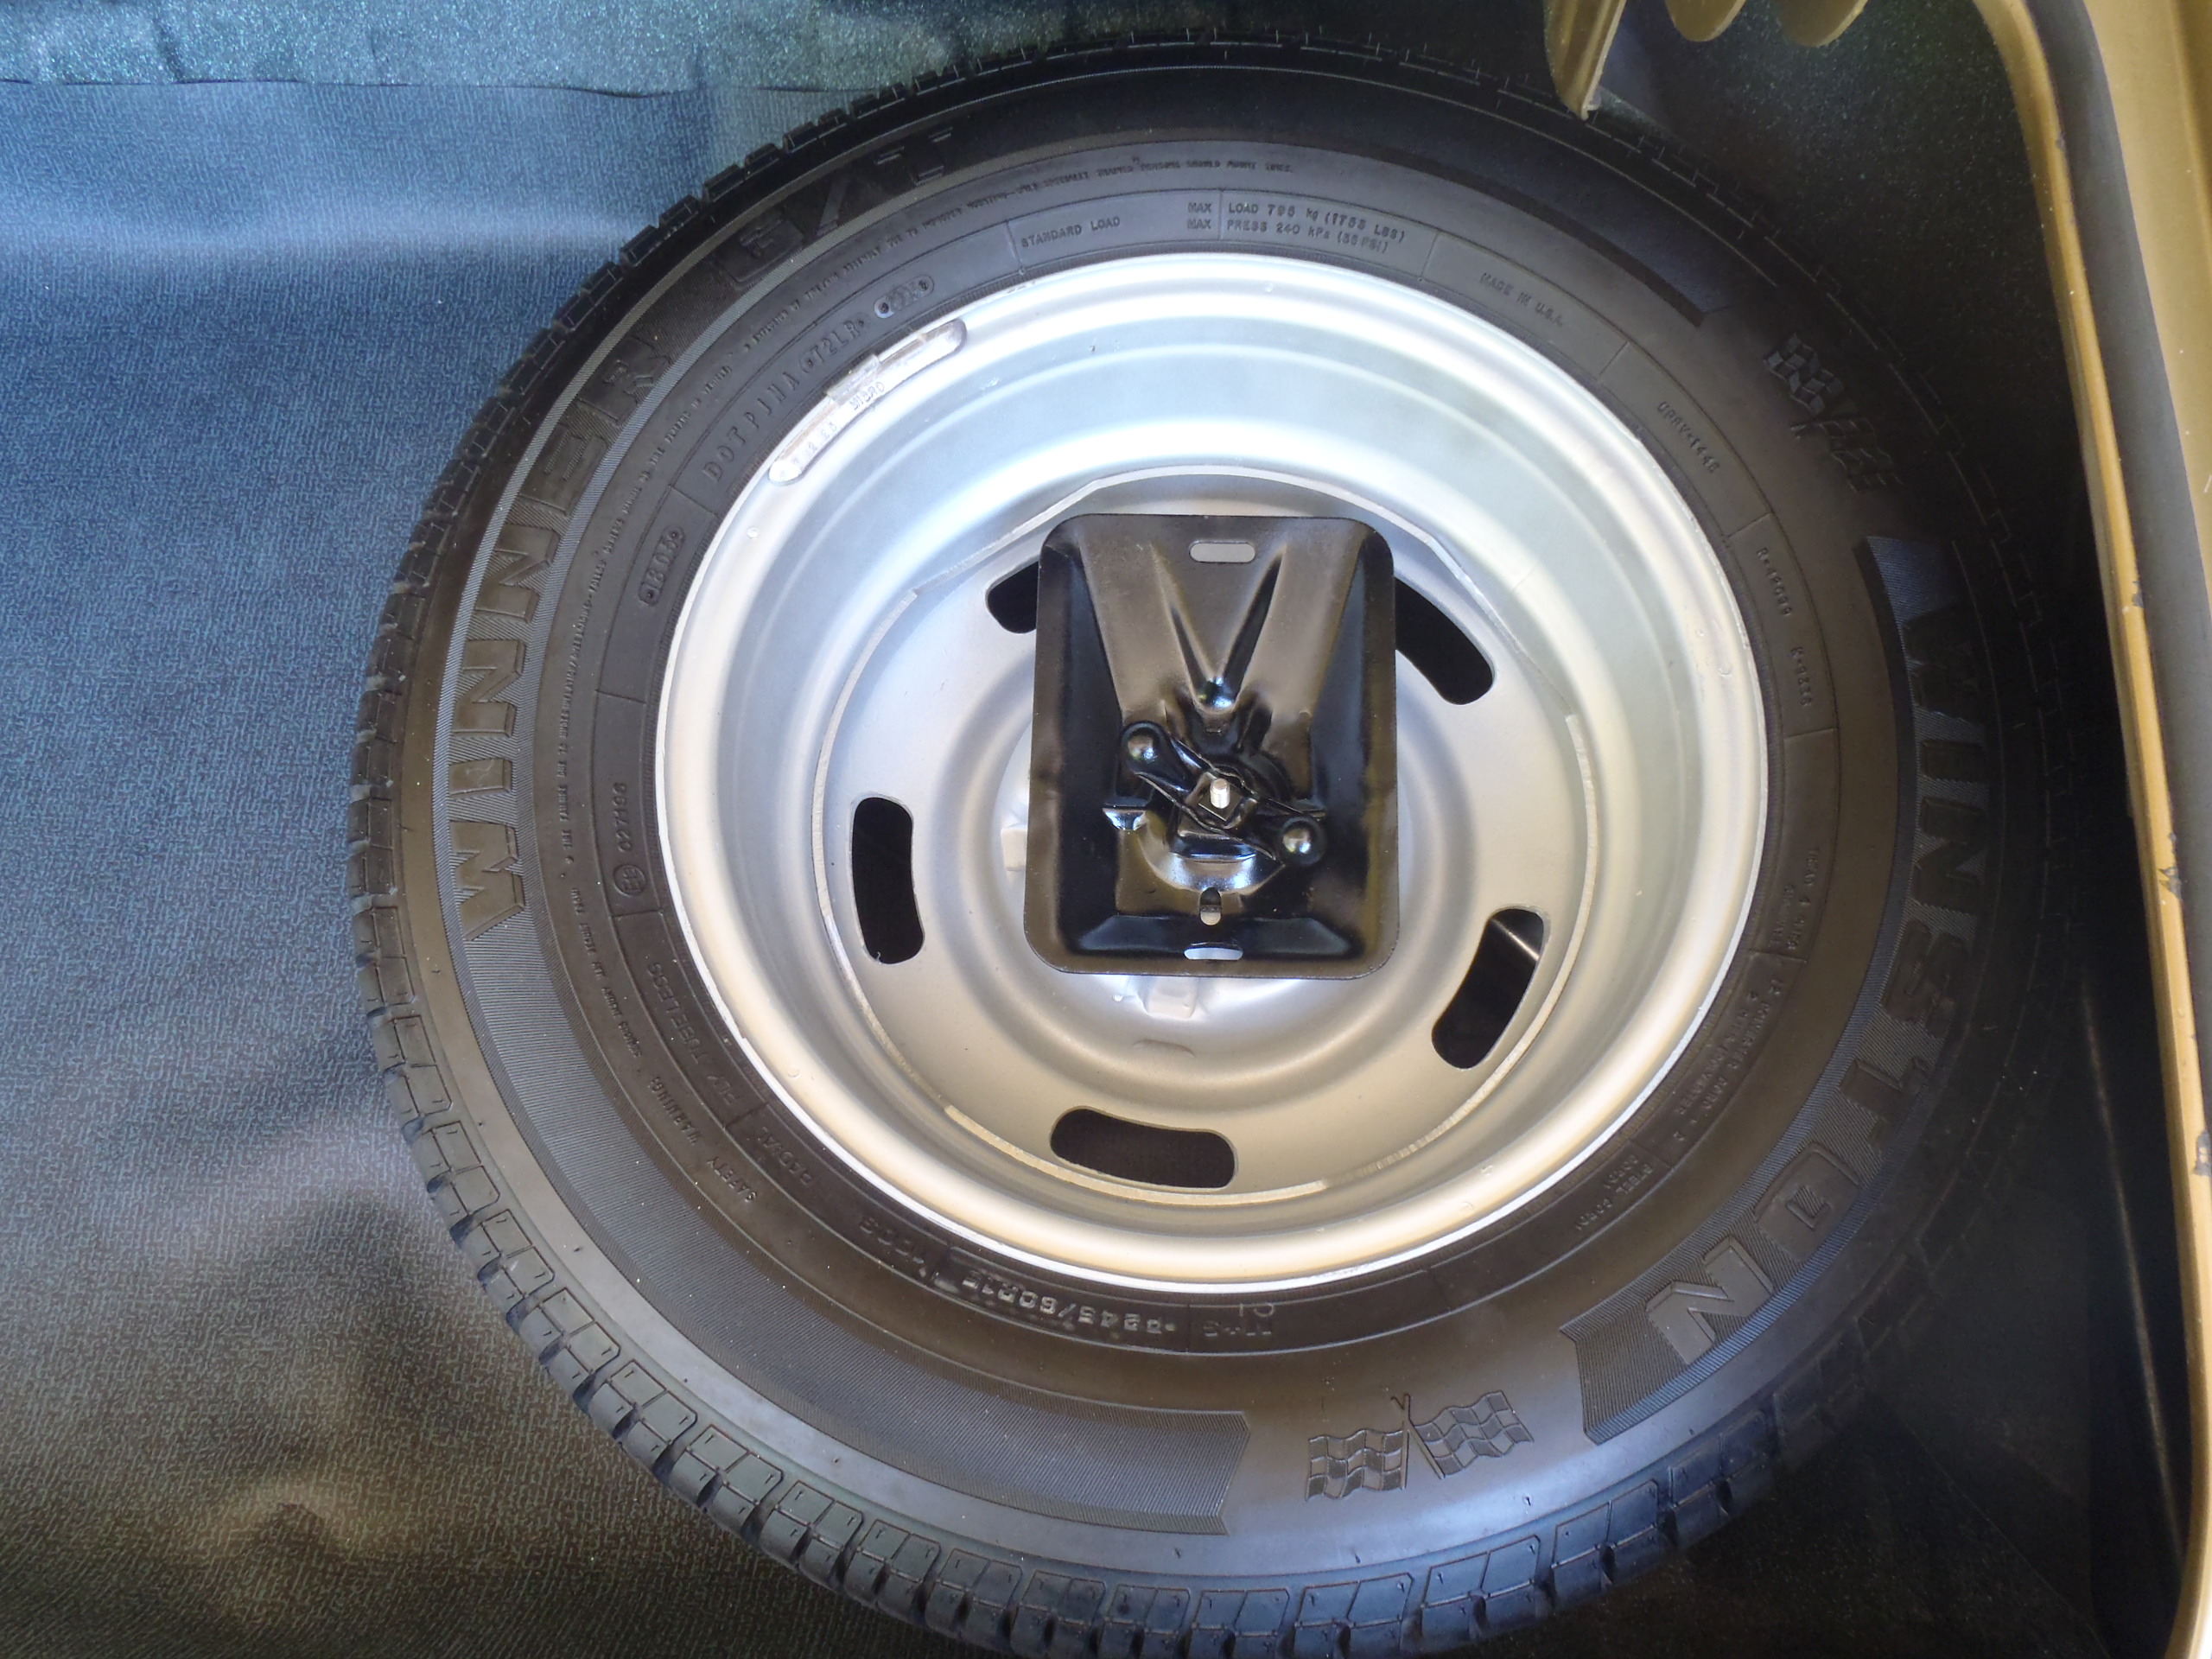
I bought a '70 SS sight unseen back in 2011. After I picked up the car, I opened the trunk and found some "opportunity for improvement". Cleaning up that mess was among the first projects I did on the car. I can never tell what order my photos below will appear (often reversed or completely scrambled) but they show the original and basic refurbishing steps. After thoroughly cleaning the floor surface, I sprayed the worn areas with aqua/black trunk spatter paint (available from Eastwood and other sources). Next, I ordered a matching floor mat and spare tire cover from the Parts Place. Meanwhile, I completely refurbished/repainted the jack and rim and located a size-correct used spare tire. Finally, putting it all together resulted in a much cleaner and more orderly trunk (even if not perfectly "stock" looking). Good luck with your project.

-
Thanks again for everyone's suggestions on things to do and check regarding my power steering issues. I had planned to investigate all suggested causes but, before I got started, I also mentioned the problem to my son-in-law who lives nearby. Several years ago, he had the same symptoms occur on his swamp buggy powered by a 305 Chevy with power steering. He solved it by flushing the power steering fluid and re-filling the system with Lucas Power Steering Fluid with Conditioners. Based on his input and several of your questions/suggestions regarding the condition of the power steering fluid in my system, I decided to investigate that as a possible cause first. Before I began the power steering fluid flush procedure (I looked at several YouTube videos), I jacked the front wheels off the ground and cranked the steering wheel lock to lock several times without the engine running as Tom suggested. There was no locking up at all so I could pretty well eliminate a mechanical failure in the steering box. I flushed the old fluid by disconnecting one end of the return hose and plugged the return inlet to the pump. Cranking the steering wheel lock to lock several times pumped the old fluid out into the catch pan. It was surprisingly dark as it had not been changed since 2013 when I installed the rebuilt pump. Continuing to crank the steering wheel while filling the reservoir with fresh Lucas fluid ultimately purged the old fluid out of the system and replaced it with fresh fluid. After reconnecting the return line, I again cranked the steering wheel lock to lock many times to purge the air bubbles and kept refilling the reservoir with fresh fluid. But when I checked the fluid level on the dip stick, I could see that there was a layer of foamy fluid on top in the reservoir and on the dip stick. Apparently the procedure I used either allowed or introduced a lot of air into the system. Finally, I decided to test drive the car. Every movement of the steering wheel cause an unusual noise from the power steering pump, although the system seemed to be working fine otherwise. I returned home and immediately jacked the wheels off the ground and tried to purge more air out of the system by operating it lock to lock many times and adding fresh fluid as needed. The pump was much quieter during the second test drive and almost totally quiet during the third test drive. The best news, of course, is that the "locking up" problem has almost totally disappeared. I am confident that the conditioners in the Lucas fluid will eventually unclog whatever the old fluid had done that was causing that problem. I plan to follow up on some of the other suggestions but for now, it seems that the original problem has been solved. If I find anything else, I'll report that later. My Monte is about to be put down for a long summer's nap as I head for our summer home in MN next Thursday. I'll miss her while I'm gone!
-
Thanks for the tips and suggestions guys! I will check them all out and read my Service and Overhaul manuals to see if I can diagnose the failure. It may take a while but I will report what I find or conclude.
-
Thanks for your reply, Steve. The fluid is a natural color and not leaking anywhere. I really appreciate your thought that the box may be binding. The box/pump/hose system came off of a salvaged '70 Monte so it is a correct factory part but used and quite old. My '70 was built without power steering (RPO N40). Being a factory 4-speed, it was a bear to parallel park or turn around, requiring both hands on the wheel to crank it around (especially with 255/60s on the front). It makes good sense that the box may be progressively failing or needing adjustment as most mechanical parts eventually do. I rebuilt the pump before I installed the system in 2013 but didn't think to inspect or rebuild the box. I see that both my '70 Chassis Service Manual and '70 Chassis Overhaul Manual have extensive chapters on the power steering box and pump so I will delve into them after I get my income taxes prepared. What has mystified me is that the binding only occurs briefly after a cold start and then works normally after that. Usually a mechanical failure is more persistent than that.
-
My factory power steering system has begun "sticking" or "locking up" but only on initial start up. Once I force the steering wheel around in either direction a bit, it suddenly frees up and works as well as it did for the past ten years since I rebuilt the pump in 2013. At first, I thought the reservoir had run low of fluid allowing introduction of air bubbles (can't remember the last time I check that fluid level). But, when I checked it, the fluid level was still on the bottom of the stick at the "cold" marking. I did add a bit more fluid and also jacked the front end up and did several "lock to lock" turns of the steering wheel to purge any air that might be in the system. Nothing changed, but the problem now seems to be getting worse, requiring longer and more force on the steering wheel to release the "sticking". Again, once it starts working, there is no more intermittent "sticking" until the next cold start. I searched the forums but have not found this particular problem addressed. It sounds like B-man may be experiencing something similar right now. Does this problem ring a bell with anyone? It almost feels like a gradual internal pump failure since there is no fluid leaking anywhere. I read about a pressure reducing valve available from Summit but the system has worked perfectly for the last ten years so I'd rather think it is some type of mechanical failure. Maybe I just need to rebuild the pump again? Any thoughts/suggestions would be appreciated. Thanks!
-
Yes, Darrell, if I were to do my current wheel/tire selections again, I would choose the 15x7 with 4.25 backspace (instead of 4.5" backspace) for mounting my 255/60 tires on the front. That would move the wheel/tire combo .25" further outboard and probably eliminate any tire contact with the frame, even on tight, compressed turns. At the time I did my original wheel/tire selections in 2010, I wasn't aware of any online tools like the Wheel Offset Calculator (if it even existed then). After using that tool many times since, I now believe that offsets of +6mm for the front and +12mm for the rear are the very best specifications for centering any wheel/tire combo within the available wheel/tire space on a first gen Monte. My primary objective was to avoid risky clearances with the wheel well lips on the rear quarter panels and front fenders. Note that it makes sense to specify different offsets for front and rear on new/custom wheels if you are using different width rims and tires on front and rear. If you want to use the same size tire and rims on all four, you have to make a compromise which is exactly what the factory did when they offered 15x7 rally wheels with 4.30" backspace (+8mm offset) for use both in front and rear interchangeably.
-
Brendan, If your rims are actually 15x7 with a measured 4.25" backspace, they should work beautifully with 255/60s both front and rear. Having a measured 4.25" backspace on a 7" wide rim gives and offset of +6 mm (versus a -6 mm offset with the same backspace on an 8" wide rim). That means your wheel/tire combo will be moved .5" further inboard (compared to an 8" rim) which increases your rear wheel well lip clearance. All of my initial calculations and examples were based on your assumption that you had an 8" wide rim (not counting the lips) so you can disregard that reply if, in fact, you have 15x7 rims with 4.25" backspace. Honestly, it sounds like you may have a set of factory Monte 15x7 rallys with the 4.30" backspace. If you do, you should be good to go. Good luck.
-
Darrell, Yes, that combo will work both front and rear. That is the exact combo I run on the front of my '70, although I did insert a 1" spacer in my front coils to eliminate minor tire rubbing on tight, compressed turns (i.e. backing out of a driveway with a dip at the street). A 15x7 with 4.5" backspace has a +12 mm offset which is only slightly more than the stock Monte rally rim at +8 mm. However, the 255/60 is a full 1.5" wider (same height) than your 215/70 so you will lose .75" of clearance both inboard and outboard. No worries on the rear. You should have just over an inch of outboard clearance with your wheel well lip and about the same clearance with the frame inboard. Your Monte will have about the same stance but with a lot more rubber on the ground! Good luck.

-
Joe, Thanks for your input. When I was considering going to 60 series tires (255 front, 275 rear) several years ago, I considered a set of four used Corvette rallys that were 15x8 with 4.25 bs but rejected them due to their -6mm offset. I don't doubt that there are other Corvette (or Corvette-style) rallys (maybe from different years) with different backspaces. The rear rims on your Camaro are even more severe with -12 mm offset so the Camaro and Monte rear wheel wells must be somewhat different dimensionally due to their different body styles. First Gen Montes like around +12 mm offset in the rear, especially with wider tires. Your front 15x7 rims with 4.25 bs (+ 6 mm offset) are almost ideal for a first gen Monte as the factory rallys are very close at +8 mm offset). I think the Wheel Offset Calculator at tiresize.com is a fantastic tool to do both visual and quantitative comparisons of wheel/tire combinations but you have to input accurate offset measurements to use it. That's why the included conversion table available on that tool is so useful. But to get the correct offset (in millimeters) you have to first select the correct rim width and backspace measurements in inches. Having actual fitment/clearance measurements of an existing wheel/tire combo with known specifications as a base to compare any other proposed combination is the ultimate decision aid and I think that is where Brenden is headed.
-
Brenden, you are absolutely correct. I wasn't sure which rally wheels you currently have/use. If they are stock first gen Monte rallys (RPO ZJ7), they are 15x7 with +0.30" (+7.65 mm) offset. However, if not stock Monte rallys, they might well be stock Corvette rallys which are usually 15x8 with 4.25" backspace (-.25" or -6 mm offset). Of course, they could also be any of the custom made rallys (I have both 15x7 and 15x8 rallys from WheelVintiques, both with custom offsets of +12mm). Note that when discussing and comparing wheel/tire combos it is imperative to only use OFFSET measurements, NOT backspace! All wheel manufacturers specify offset measurements/dimensions because offset is completely independent of wheel/rim width! Offset is measured from the centerline of the wheel, regardless of width, to the mounting surface of the wheel on the hub. If that surface is outboard of the centerline, the offset is positive (+); if inboard of the centerline, it is negative (-). Offset measurements are always expressed in millimeters (mm) to avoid confusion with backspace measurements which are always expressed in inches (in). Note also that most car enthusiasts discuss and compare wheels by referring to their BACKSPACE measurement. However, that can be dangerous as backspace for any given wheel is totally dependent on wheel/rim width. Backspace is measured from the mounting surface of the wheel to the inside rim lip/edge. Therefore, you can only compare wheels by their backspace measurement if they have the same rim width. The backspace measurement that corresponds to a zero (0) offset for any wheel always = (rim width +1)/2. For example: A 7" wide wheel with a 4" backspace has zero (0) offset (mounting surface aligns with the centerline of the wheel) while an 8" wide wheel with a 4" backspace has a -12mm offset (mounting surface is .5" inboard of the centerline) which pushes the wheel tire combo .5" further outboard. Study the table given a couple screens down in the Wheel Offset Calculator tool to see the relationship between Offset and Backspace for any Rim Width. The relationship is Offset = Backspace - (Rim Width+1)/2 You can easily measure the backspace of any rim by laying it face down, then laying a straightedge across the inside rim lip and measuring down to the mounting surface, however, you MUST also know the rim width to know its actual offset measurement (see equation above). Rim width is easy to measure on a naked rim but more difficult to determine if you have a tire mounted.
-
Brenden, Like you, I'm a Mechanical Engineer so I dig this mechanical fit stuff. 🙂 I used the Wheel Offset Calculator at tiresize.com to compare your proposed set up of 255/60-15 tires on 15x8" wheels with 4.25" backspace to your existing setup of 235/70-15 tires on the same wheels. Here's what I found: First, you can use the table several pages down in the Wheel Offset Calculator to determine the offset for your wheels which is -6mm. This is confirmed by subtracting the backspace of any 8" wide rim at zero offset which is (8+1)/2 = 4.5" from your wheel's measured backspace of 4.25". So, 4.25 " - 4.5" = -.25' which converts to -6mm offset. On the front: Since the 255/60-15 tire is 10" wide and 27" tall (versus 9.3" wide and 28" tall for the 235/70-15 tires) your inside and outside sidewall clearances will be .35" less. I think you can probably get away with that if nothing is rubbing now. On the rear: The reduction of your existing inside and outside clearances will be the same (.35"). HOWEVER, the sidewall clearance with your wheel well lip will only be around .44". I have confirmed this by comparing your proposed setup (using the Wheel Offset Calculator) to my existing rear setup where I have measured my sidewall clearance at .75". I suggest you carefully measure the sidewall clearance to your rear wheel well lip of your current setup at the narrowest point and decide if you can afford to lose another .35" of clearance there. Don't forget to allow for some body shift during cornering or hard acceleration/braking. Wider tires on the rear of any first gen Monte really need to be mounted on wheels with about +12mm offset (5" BS on an 8" wide wheel) to move the combo inboard (away from the quarter panel) where there is more room. Wheels with -6mm offset will actually move your combo outboard about .75" more than is ideal. I think your proposed combo will probably fit on the rear, also, but you'll need to decide if the small outside clearance is livable. Good luck.
-
Dennis, here are three '70 Build Sheets I have - one Van Nuys SS, one Baltimore SS and one Baltimore non SS. Hope they help in some way. Good luck.

.thumb.jpg.7ef57a936fda093c565dffa7a06106d1.jpg)


.jpg.42ff839dd755e0784eea2f351a830488.jpg)

