MCfan
-
Posts
1,294 -
Joined
-
Last visited
-
Days Won
61
Content Type
Profiles
Articles
Forums
Gallery
Events
Everything posted by MCfan
-
 Ditto. Just checked mine and it has no "notch" in the lower nose.
 -
Ditto. I believe Aaron (Canuck) just recently ordered and installed a set from the Parts Place so he can probably advise you of both the fit and the cost to get them into Canada.
-
I've never seen a groove that wide in any rotor! Usually it is just a small V groove that would turn bright when the pads were nearing end of life. Your pads are wearing almost enough to polish the sides and bottom of that wide groove also. Seems to me you are giving up a lot (1/4 to 1/3) of your disc surface area that could be used effectively for braking. Are you sure the squeaking is coming from the front?
-
Going to a 28" tall tire (i.e. 275/60-15 as Tom suggested) will change your effective gear ratio from 3.42 to 3.28 which is very close to the 3.31 many of us run in our BBC Montes. RPMs @ 70 mph with a 28" tall tire and your current 3.42 rear gear would be around 2875 - not great but possibly livable. Of course, running 28" tall tires with a 3.31 rear drops 70 mph rpms a bit further to 2785 with an effective ratio of 3.17.
-
I certainly don't know all the ways an original dash clock can fail but I found two mechanical failures and one electrical failure when I repaired mine. Although working on a dash clock is not as challenging as watch repair, it is certainly more tedious than rebuilding a carburetor, for example, so take your time, use a magnifying glass or headset and get out your smallest tools. Like many of the systems on our 50+ year old Montes, the dash clock is electro-mechanical with no electronic or solid state components. Just eliminate any shorts or breaks in the 12V wiring, reseat/adjust the moving parts and lube all bearings/contact points with a very light oil. Beware that the orange luminescent paint on the clock hands is very tender and can be scuffed off easily. Also the black face of the clock can be easily scratched or marred. I had a complete photo journal of my clock repair project available on Photobucket but they dumped me because I refused to pay their hosting subscription. I still have all of the photos, of course, and can share them with anyone. If you need any pointers on how to remove, disassemble, inspect, adjust, repair, reassemble and reinstall your dash clock, I might be able to help and send you a relevant photo or two - just let me know. If I had known how relatively easy it is to repair our dash clocks, I would have attempted repair before I ordered a new quartz replacement. I installed the repaired original in my '70 SS and it ran fine.
-
Welcome to the club and forums, Don! Great to have another '70 BBC 4-speed in the club, especially one as nice as yours!
-
What did you do to your Monte Carlo today?
MCfan replied to Canuck's topic in General 70-72 Monte Carlo Forum
Sammy, either you have an incredibly good buddy or he wants your '71 out of his warehouse (or maybe both)! 😀 Either way - you win! Great looking Monte! Enjoy fixing her up and driving her! -
What a great collection of amazing cars, including the star of the show! Your photography is also amazing - thanks for sharing! Regarding the vanity plate - maybe I just don't get it, but why ZXX instead of Z20? Are you suggesting your '70 is not a true SS or was Z20 already "taken" for your licensing area? In any case, your '70 is simply gorgeous - muscular, unmolested, understated elegance!
-
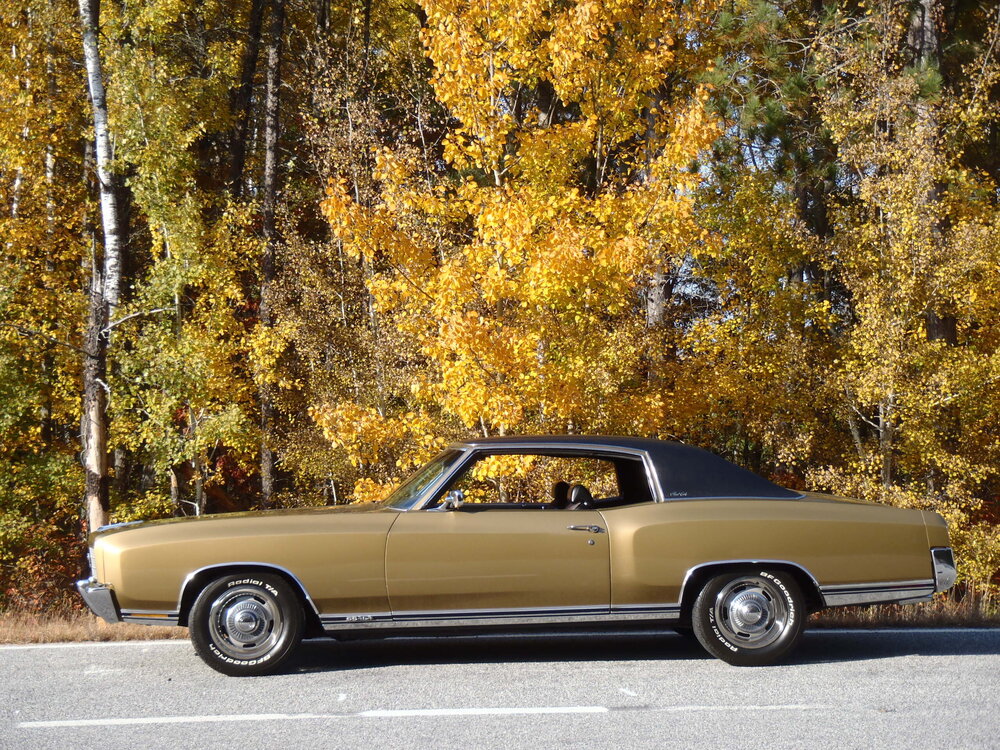
Looks gorgeous, Brew! I love Autumn Gold on a '70 Monte (only year it was offered)! I've owned two, one with a white vinyl top and one with black. It will be great to see more photos of yours with a painted top. Hope the paint job meets your expectations because quality isn't always proportional to wait time. I left my blue '70 with a painter all summer in FL but he didn't even start on it until I returned in the fall and then did a rush job. Same money - substandard results. Never again ....
-
Welcome to the club and forums, Kade! Your efforts to keep your grandpa's Monte up and updated have really paid off! I assume that is the factory paint - possibly Cream Yellow (code 56)? If so, I don't recall seeing many, if any, other member's '72s with that color combo - I like it! Please tell us more about your great looking Monte when you have time.
-
That's a gorgeous '72, Kevin! Love the blacked-out grill! Bet you keep that beauty indoors during the harsh Alaskan winters! Welcome to the club and forums. Looking forward to hearing/seeing more of your fine ride!
-
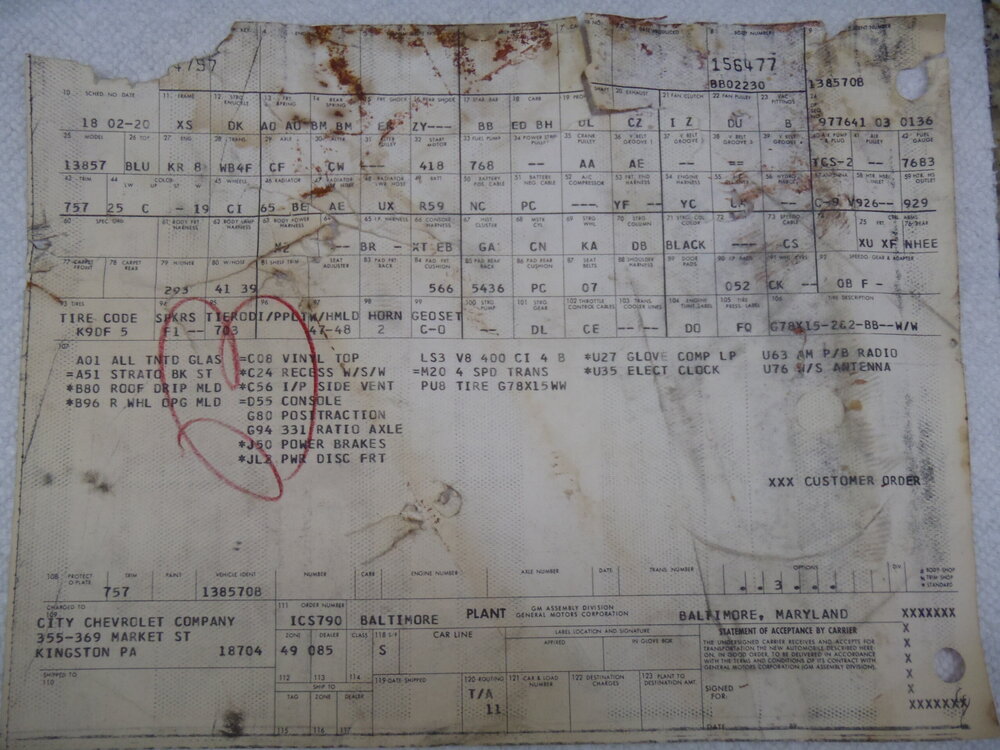
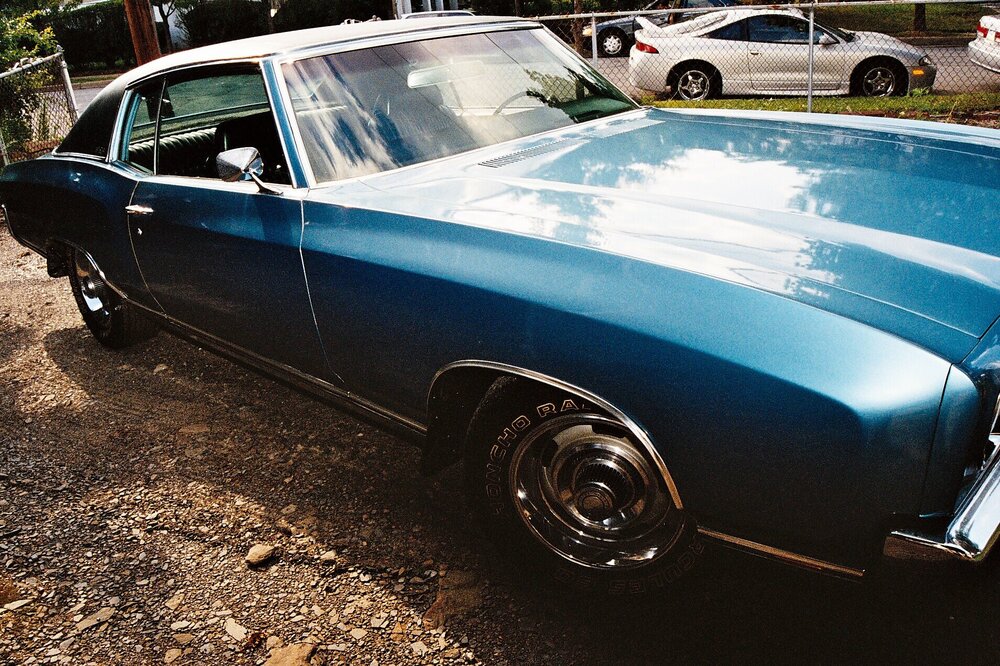
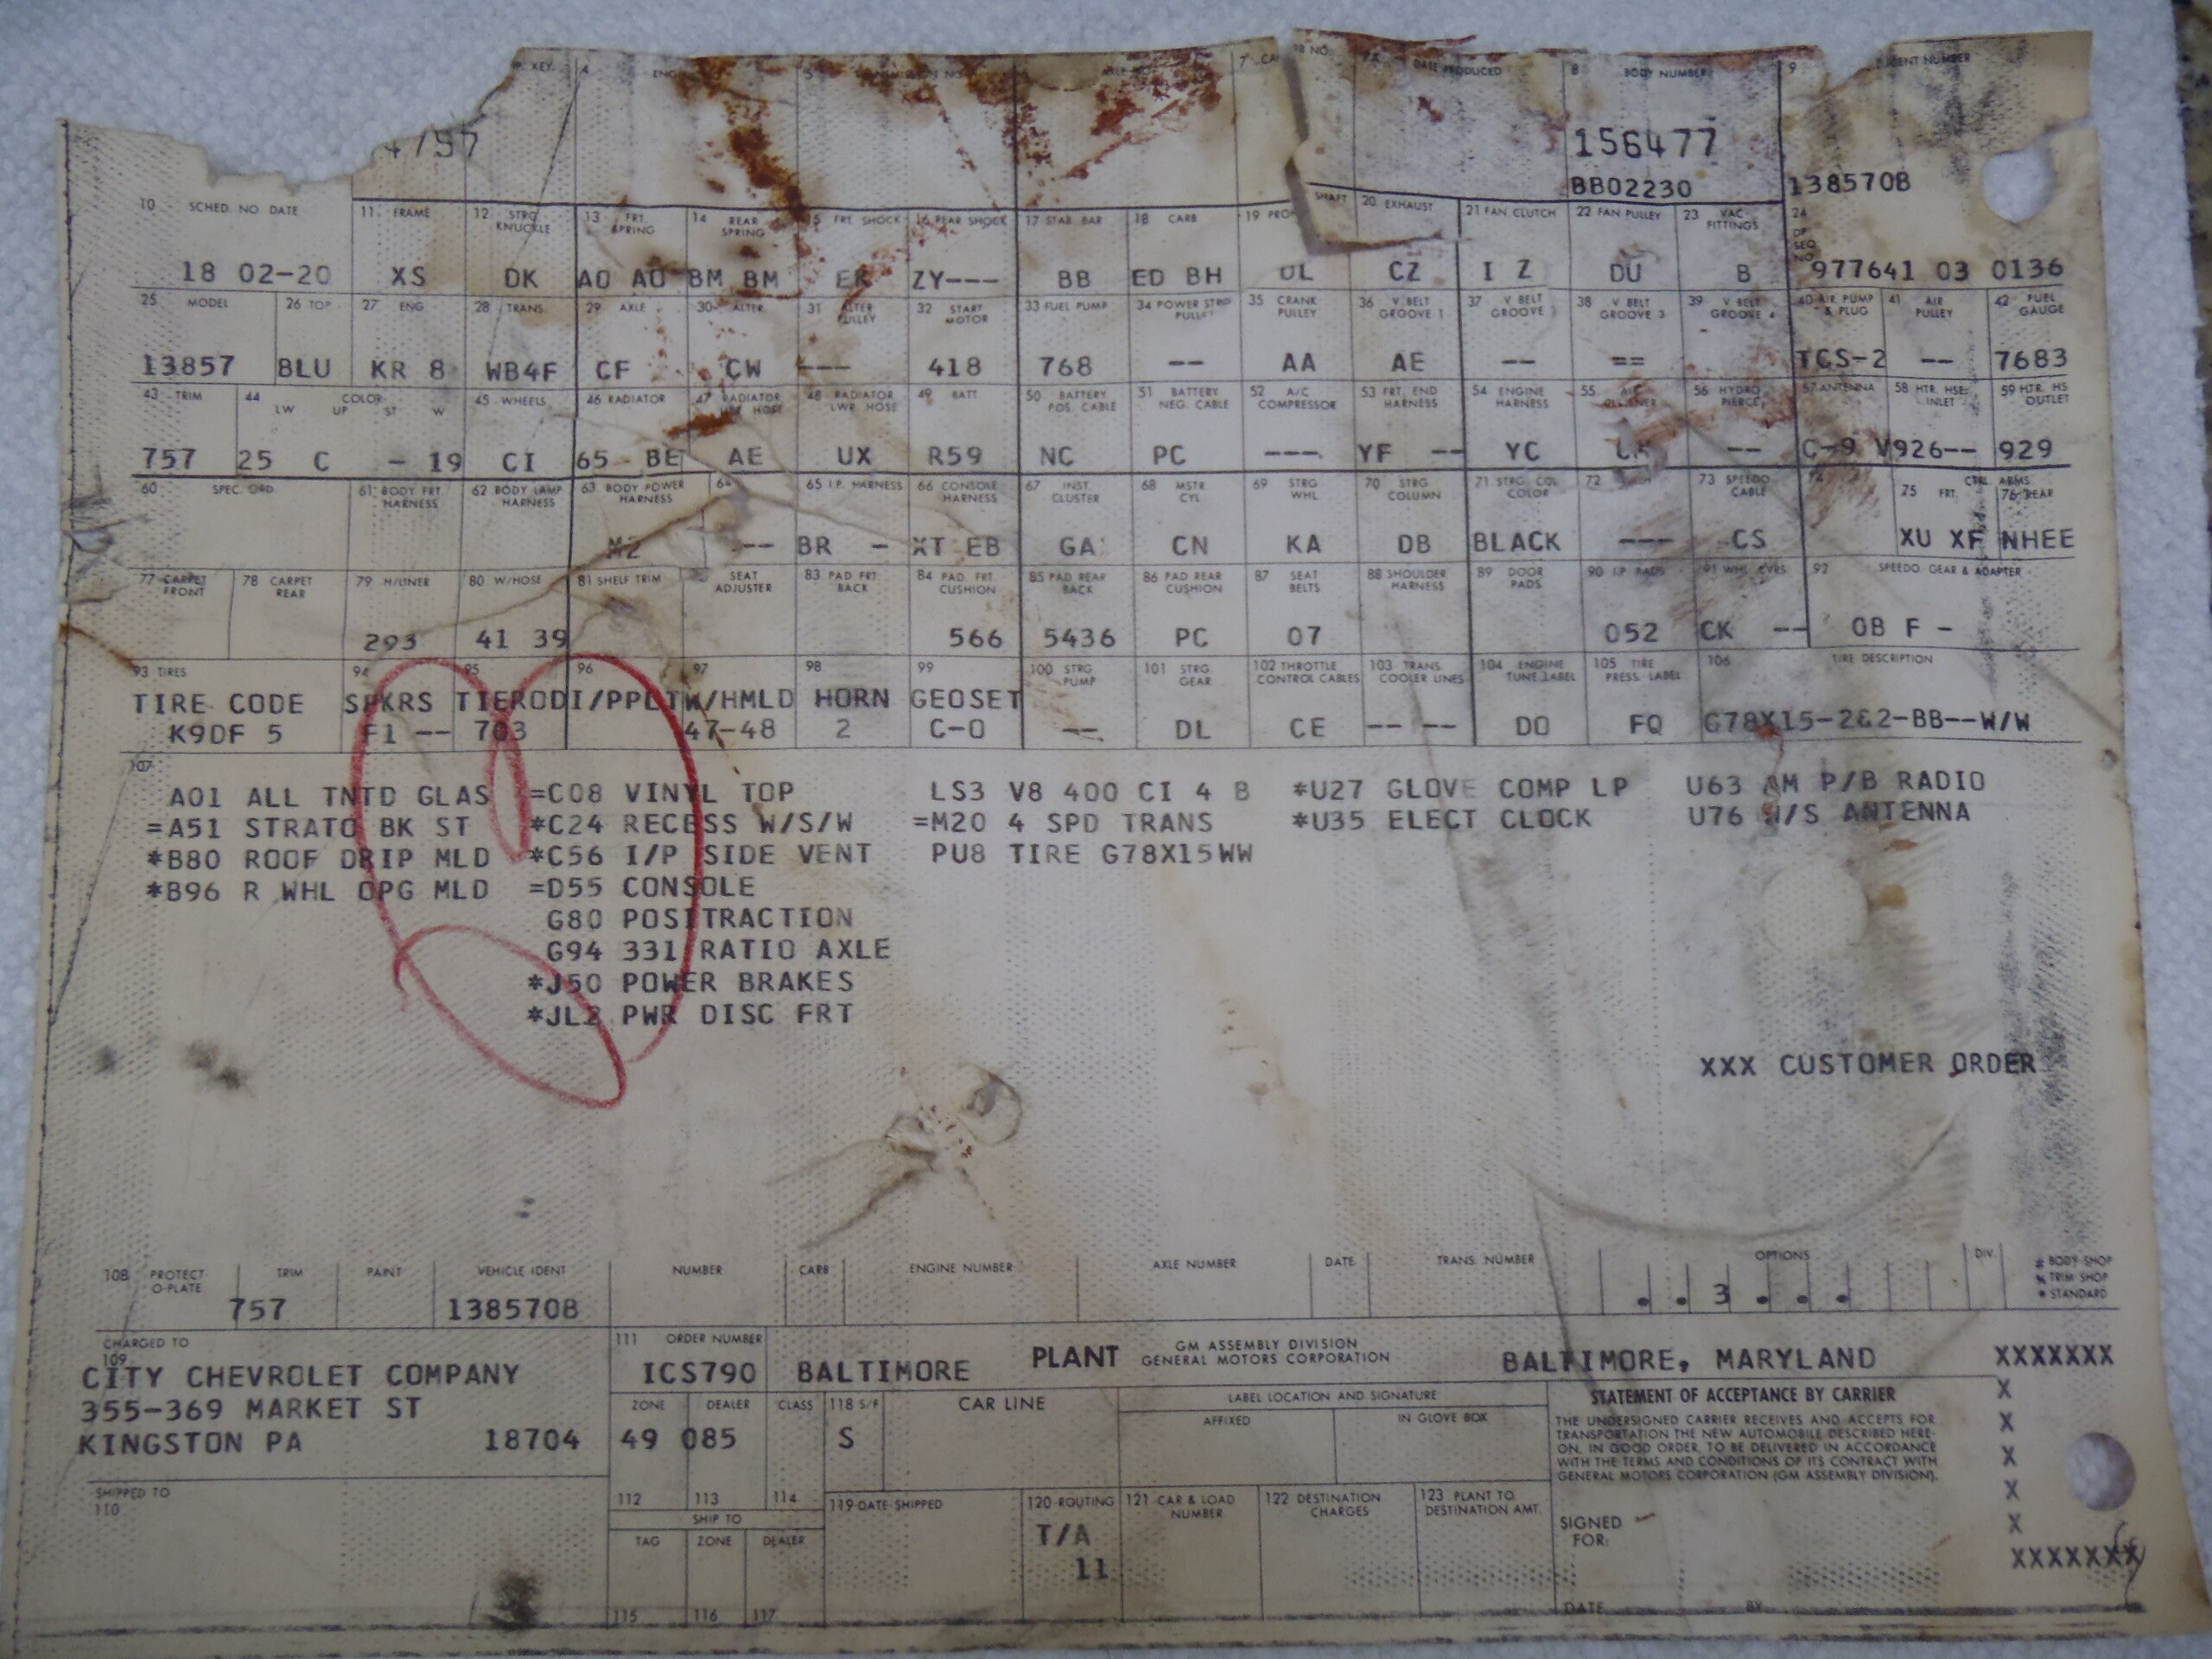
My '70 402 4-speed was a low option car without gauges, power steering, A/C or any other power options (see Build Sheet below). Fortunately, it had all the good stuff: Big Block, 4-speed, 3.31 posi, buckets, console, running/driving, 50K miles and was in reasonably good condition. It was apparently configured to drag main street and not much else. The drive train is original but the motor was heavily modified in '74 (all of the speed shop receipts came with the car). Fortunately, it had been well cared for and a high-school kid bought it in the late '80s (for $600) and stored it in his dad's garage for the next 20 years as an investment. In 2009, when that young man (now married) needed a down payment for a new home, he put his Monte on the market and I just happened to be looking for one. I bought it for $16,500 sight-unseen and had it shipped from Scranton, PA to SW Florida in early 2010. Of course it now has factory power steering, Classic Auto Air, factory power windows and door locks, power seat back releases, power trunk release, keyless entry, new paint, new carpet, new wheels/tires, stereo radio, new exhaust system, new carb, airlift, bumper guards, suspension rebuild, etc. but the basic bones were there to build on. This barn find is one of 589 built in '70 and has the same potential but is in much rougher condition to start with. Hopefully, someone will have the time, skill, patience and money to bring this one back to life.
-
Sorry, Paul, I don't know and I sold my SS a couple years ago so I can't check. Maybe Steve (cny first gen 71) can answer your question as he just bought a spring from a hardware store that worked well for him.
-
You're welcome, Steve, good to hear it worked for you, also! This is a great site for sharing fixes, tips and techniques. I've picked up quite a few from others myself.
-
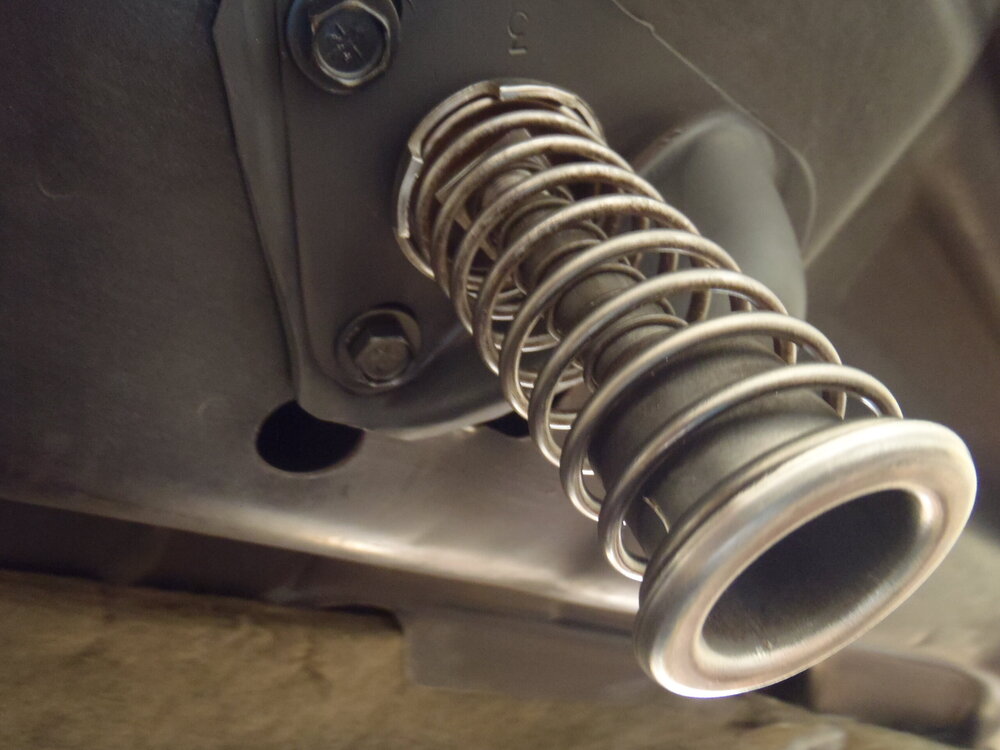
Hey, Brew, I had the same issue on my '70 SS several years ago. I knew better than to mess with the hood hinges (heard too many horror stories) so I went to my large assortment of spare coil springs and selected one that just fit over the bolt and was long enough and strong enough to become a "helper" spring. Once I added it to the assembly, the hood popped up far enough that I could get my fingers under the lip to open it. It's a simple mod and hardly noticeable once it is in place. .
-
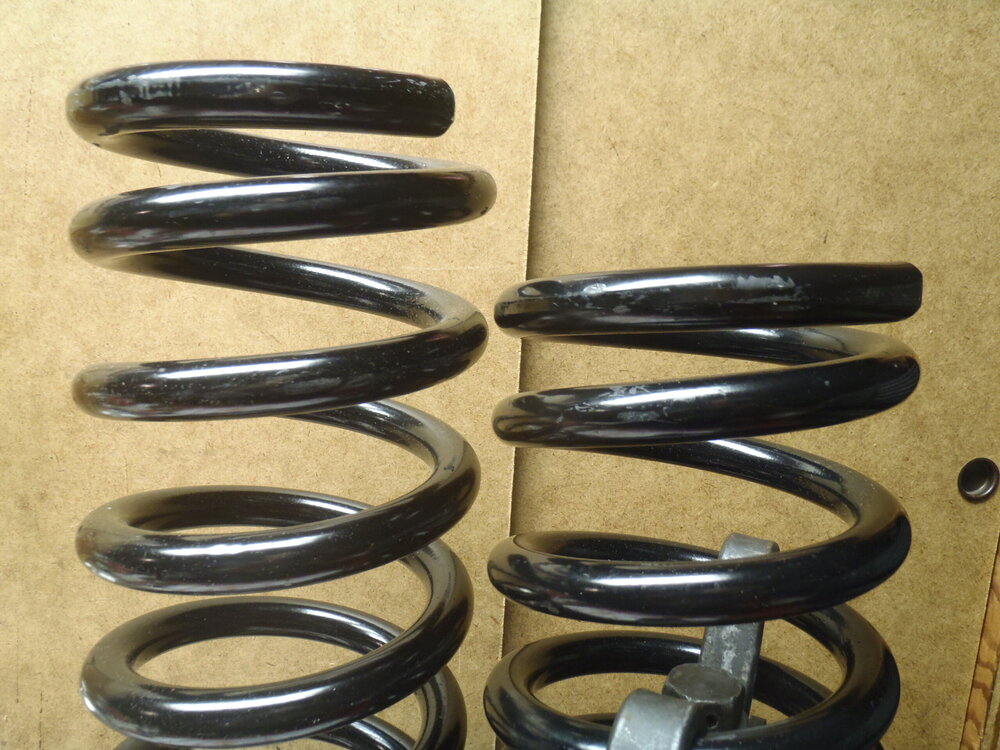
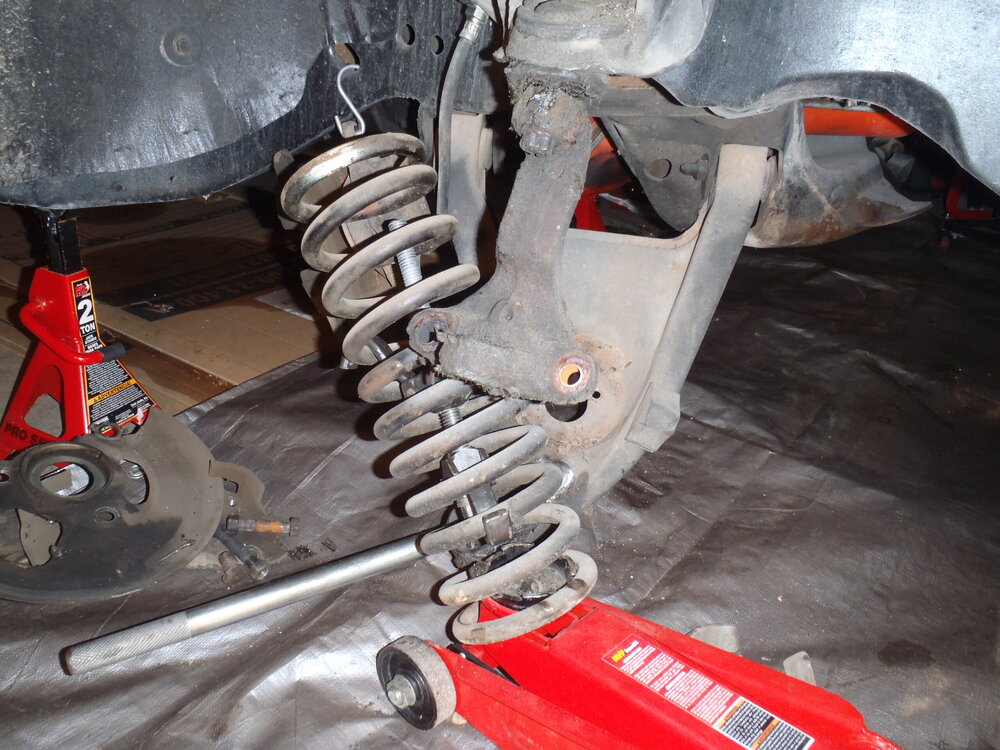
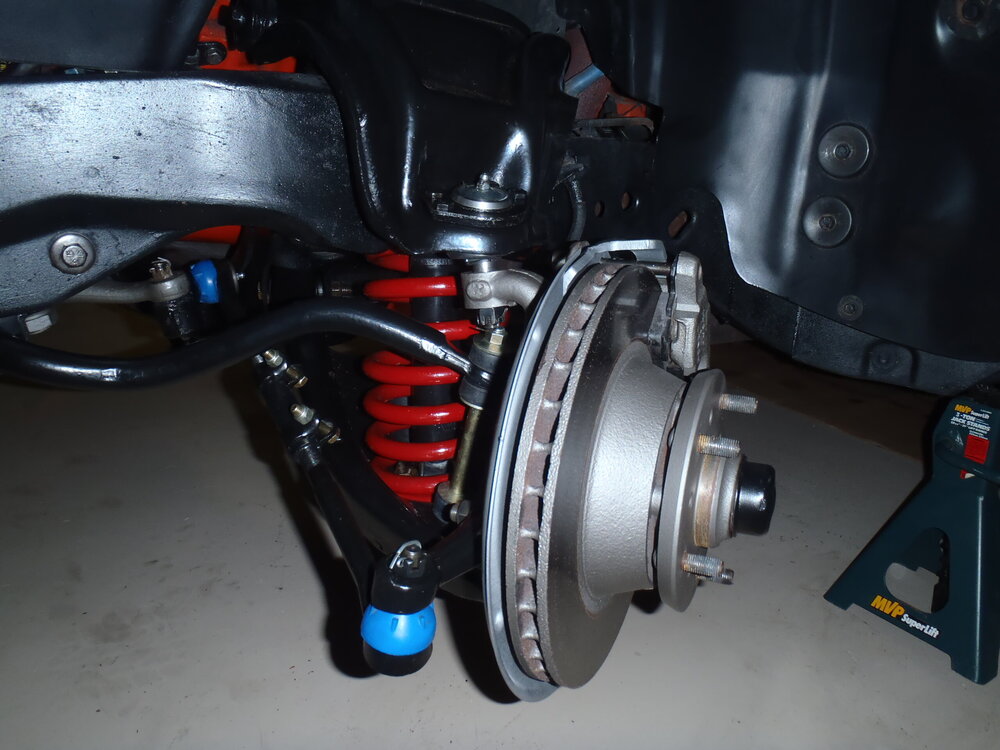
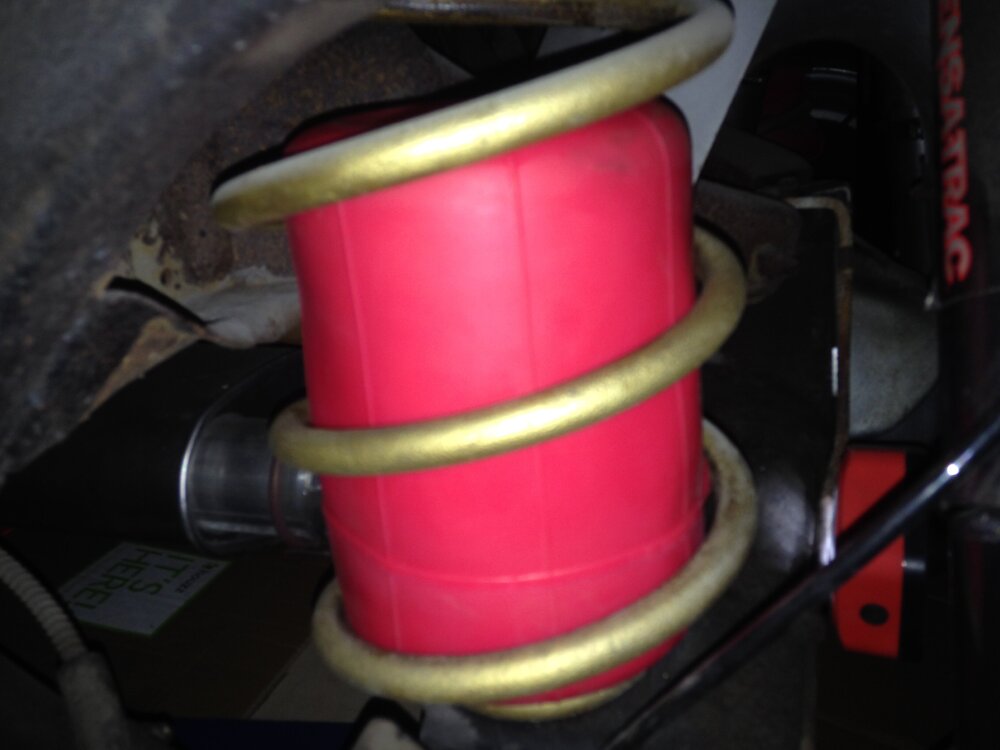
Sendo, I can appreciate your disappointment regarding the surface condition of your new Moog 6330 front coils - looks like they have seen a transcontinental shipment or two. I would be steamed, also. The pair I got were in much better condition (fortunately), yet they were a bit scratched up by the internal spring compressors before I got them installed (see photos below). Seems that black powder coating is not so durable. Of course, any spring will eventually get covered with road grime if you do much driving so I didn't worry about it. I was surprised to learn that the springs I replaced (see photo) were also Moog 6330 because that number was stamped on each spring. I had already ordered the new ones or I might have just stripped and repainted the pair I took out. I agree with Dennis, they should be fine functionally and they are easy to spray paint. I sprayed my original front coils red on my 4-speed and the original rear coils gold as neither set needed to be replaced.
-
Jim, I will definitely give it some serious thought although my Monte is more of a street toy than a highway cruiser . The Eastern and Western meets are always out of reach for me but I did attend a mini-meet in Kissimmee in 2011, I believe. We usually don't leave FL for MN until mid-April so I hope to be around then. Please don't count on me for sure, but I'll see if I can make it work somehow and let you know.
-
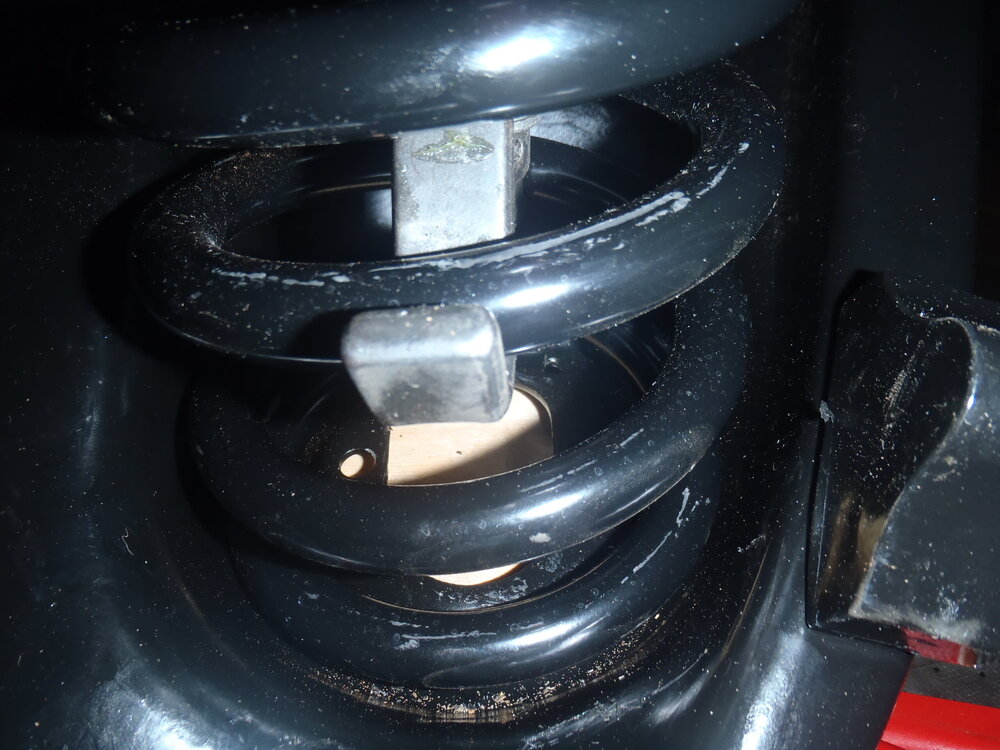
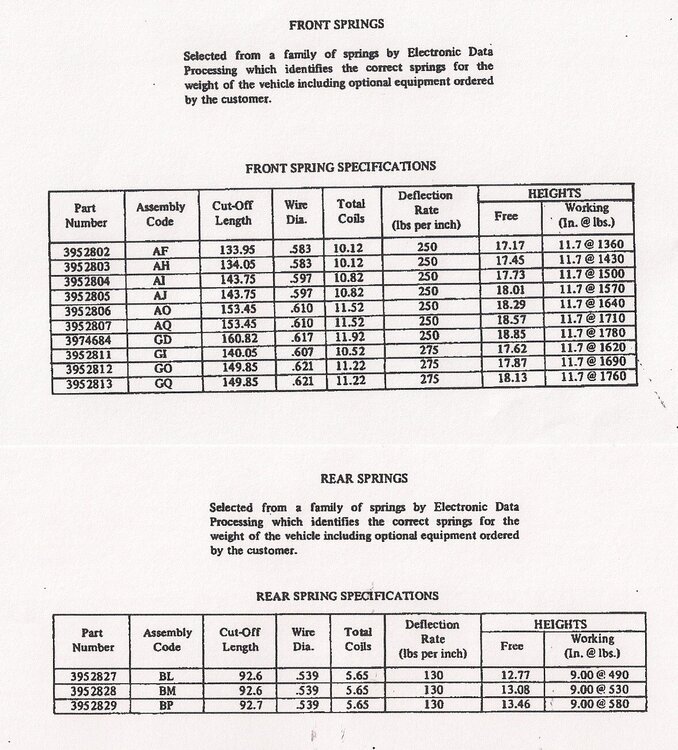
I don't know about other A bodies, but there is no spring insulator for the front spring shown in the '70 Monte Carlo Factory Assembly Manual. I have rebuilt the front suspension of two '70s and neither had any insulators. The top of the front coil must rest firmly against the bottom of the frame and be correctly positioned over the locator tab that protrudes down from the frame. The bottom of the front coil must be correctly indexed so the end of the spring is seated at/over one of the two holes in the lower A arm, leaving the other hole completely open for drainage. Both of those are shown and called out in the Assembly Manual.
-
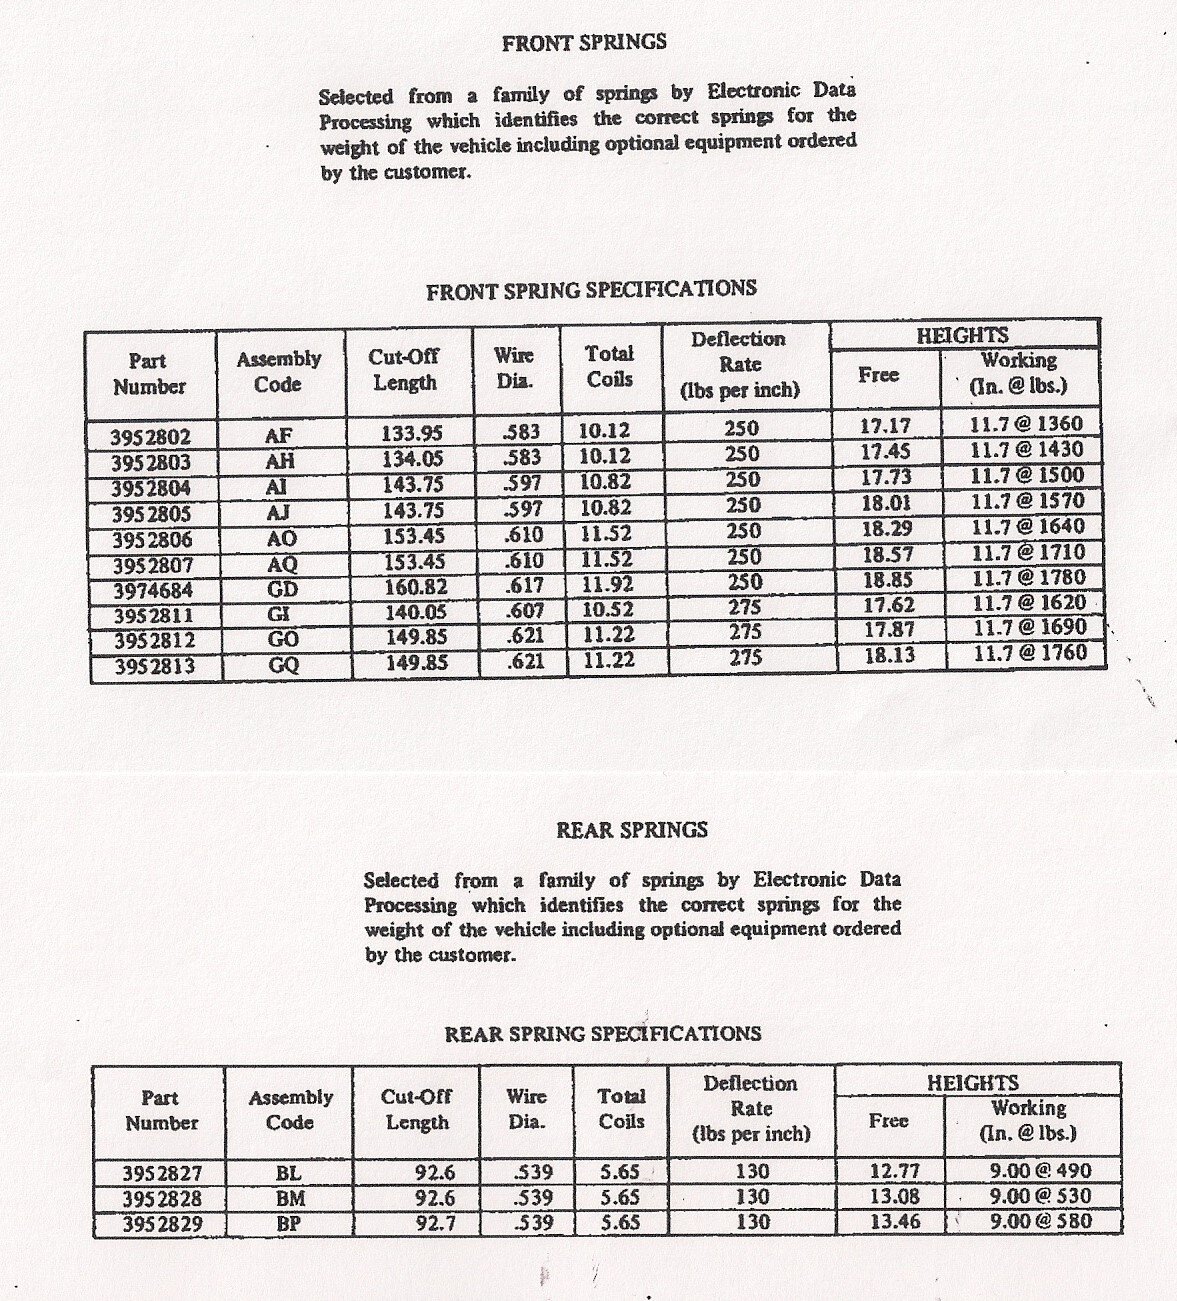
Sendo, I also went with the Moog 6330 when I refreshed the front suspension of a '70 SS I used to own. There is a good reason that is a popular replacement spring for first gen Montes and that is it has a pre-load of 1700 pounds which is very close to the two heaviest springs (out of 10 available) used in the '70 Monte Carlo assembly. The 6330 will work well for big block and/or heavily optioned first gens with stock-like front end height and ride characteristics. For front end height, the most important spring characteristic is its preload value which is simply its Free Height less the 11.7" Working Height (std for all first gens) times its Spring Rate. For the 6330 that is (17.5" - 11.7") x 293 lbs/in = 1700 lbs of preload. The preload for the heaviest stock spring (code GD) is 1780 lbs and the second heaviest (GQ) is 1760 lbs. For the '71 Monte the highest preload was for spring AK at 1830 lbs. The maximum spring rate for both years was 275 lbs/in. Now, compare the Moog 6330 to the other "Big Block" spring from Speedway Motors (in your link above) and you will see it has a preload of 2060 lbs (18" - 11.7") x 327 lbs/in = 2060 lbs). That spring will cause the front end to sit a bit higher because you will have 360 lbs of additional preload on both front wheels. It will also have a bit firmer ride because the spring rate is 34 lbs/in greater (327 - 293 = 34). Unless you want to raise the front end and/or have a firmer ride, the 6330 may be a better choice. JMO. BTW, if you have a Build Sheet for your Monte, the original factory spring code will be shown in one of the boxes (it is Box 13 on a '70 Build Sheet). You can look that code up in the chart below and know the specs for the spring originally installed in your car. Note that the preload figure for each spring is given in the far right hand column of that table. Good luck with your new spring choice.
-
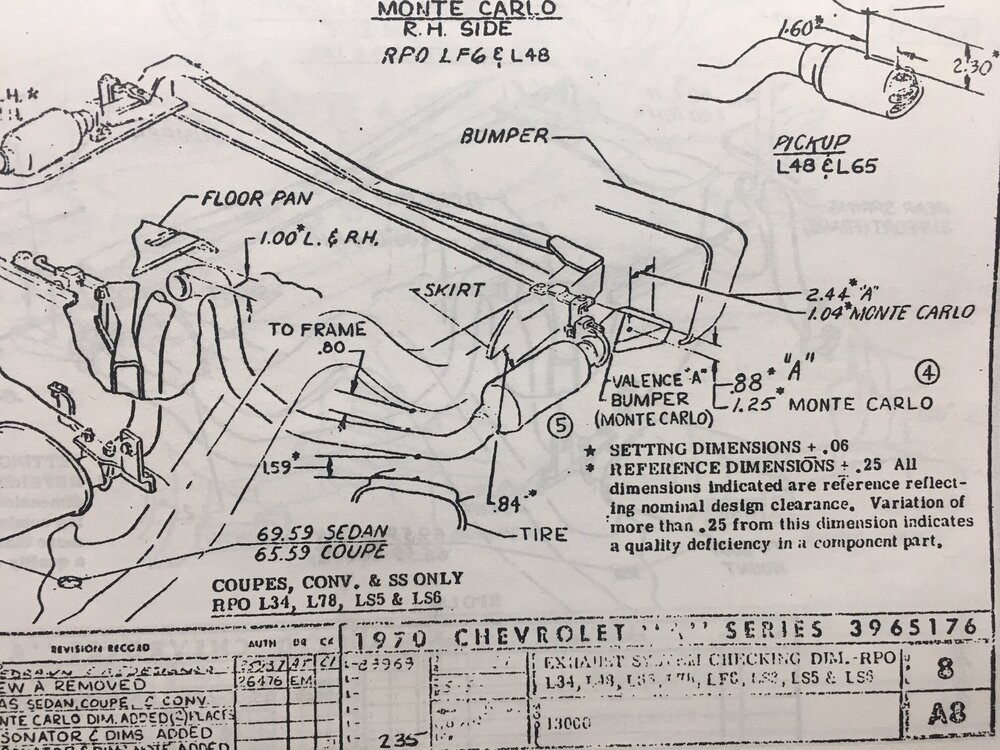
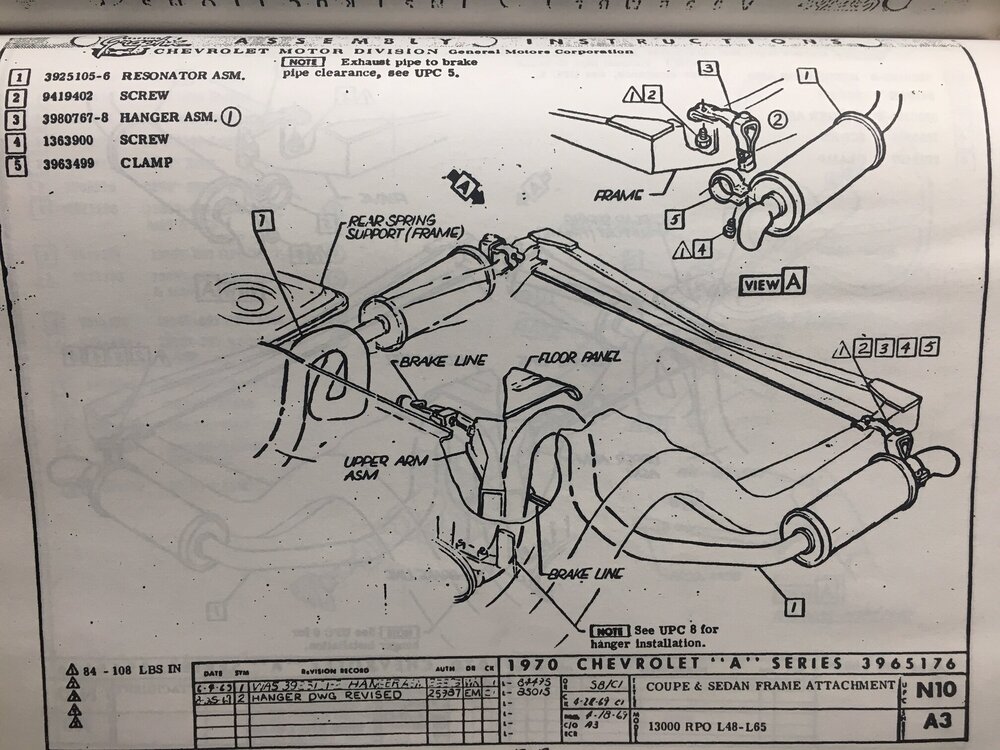
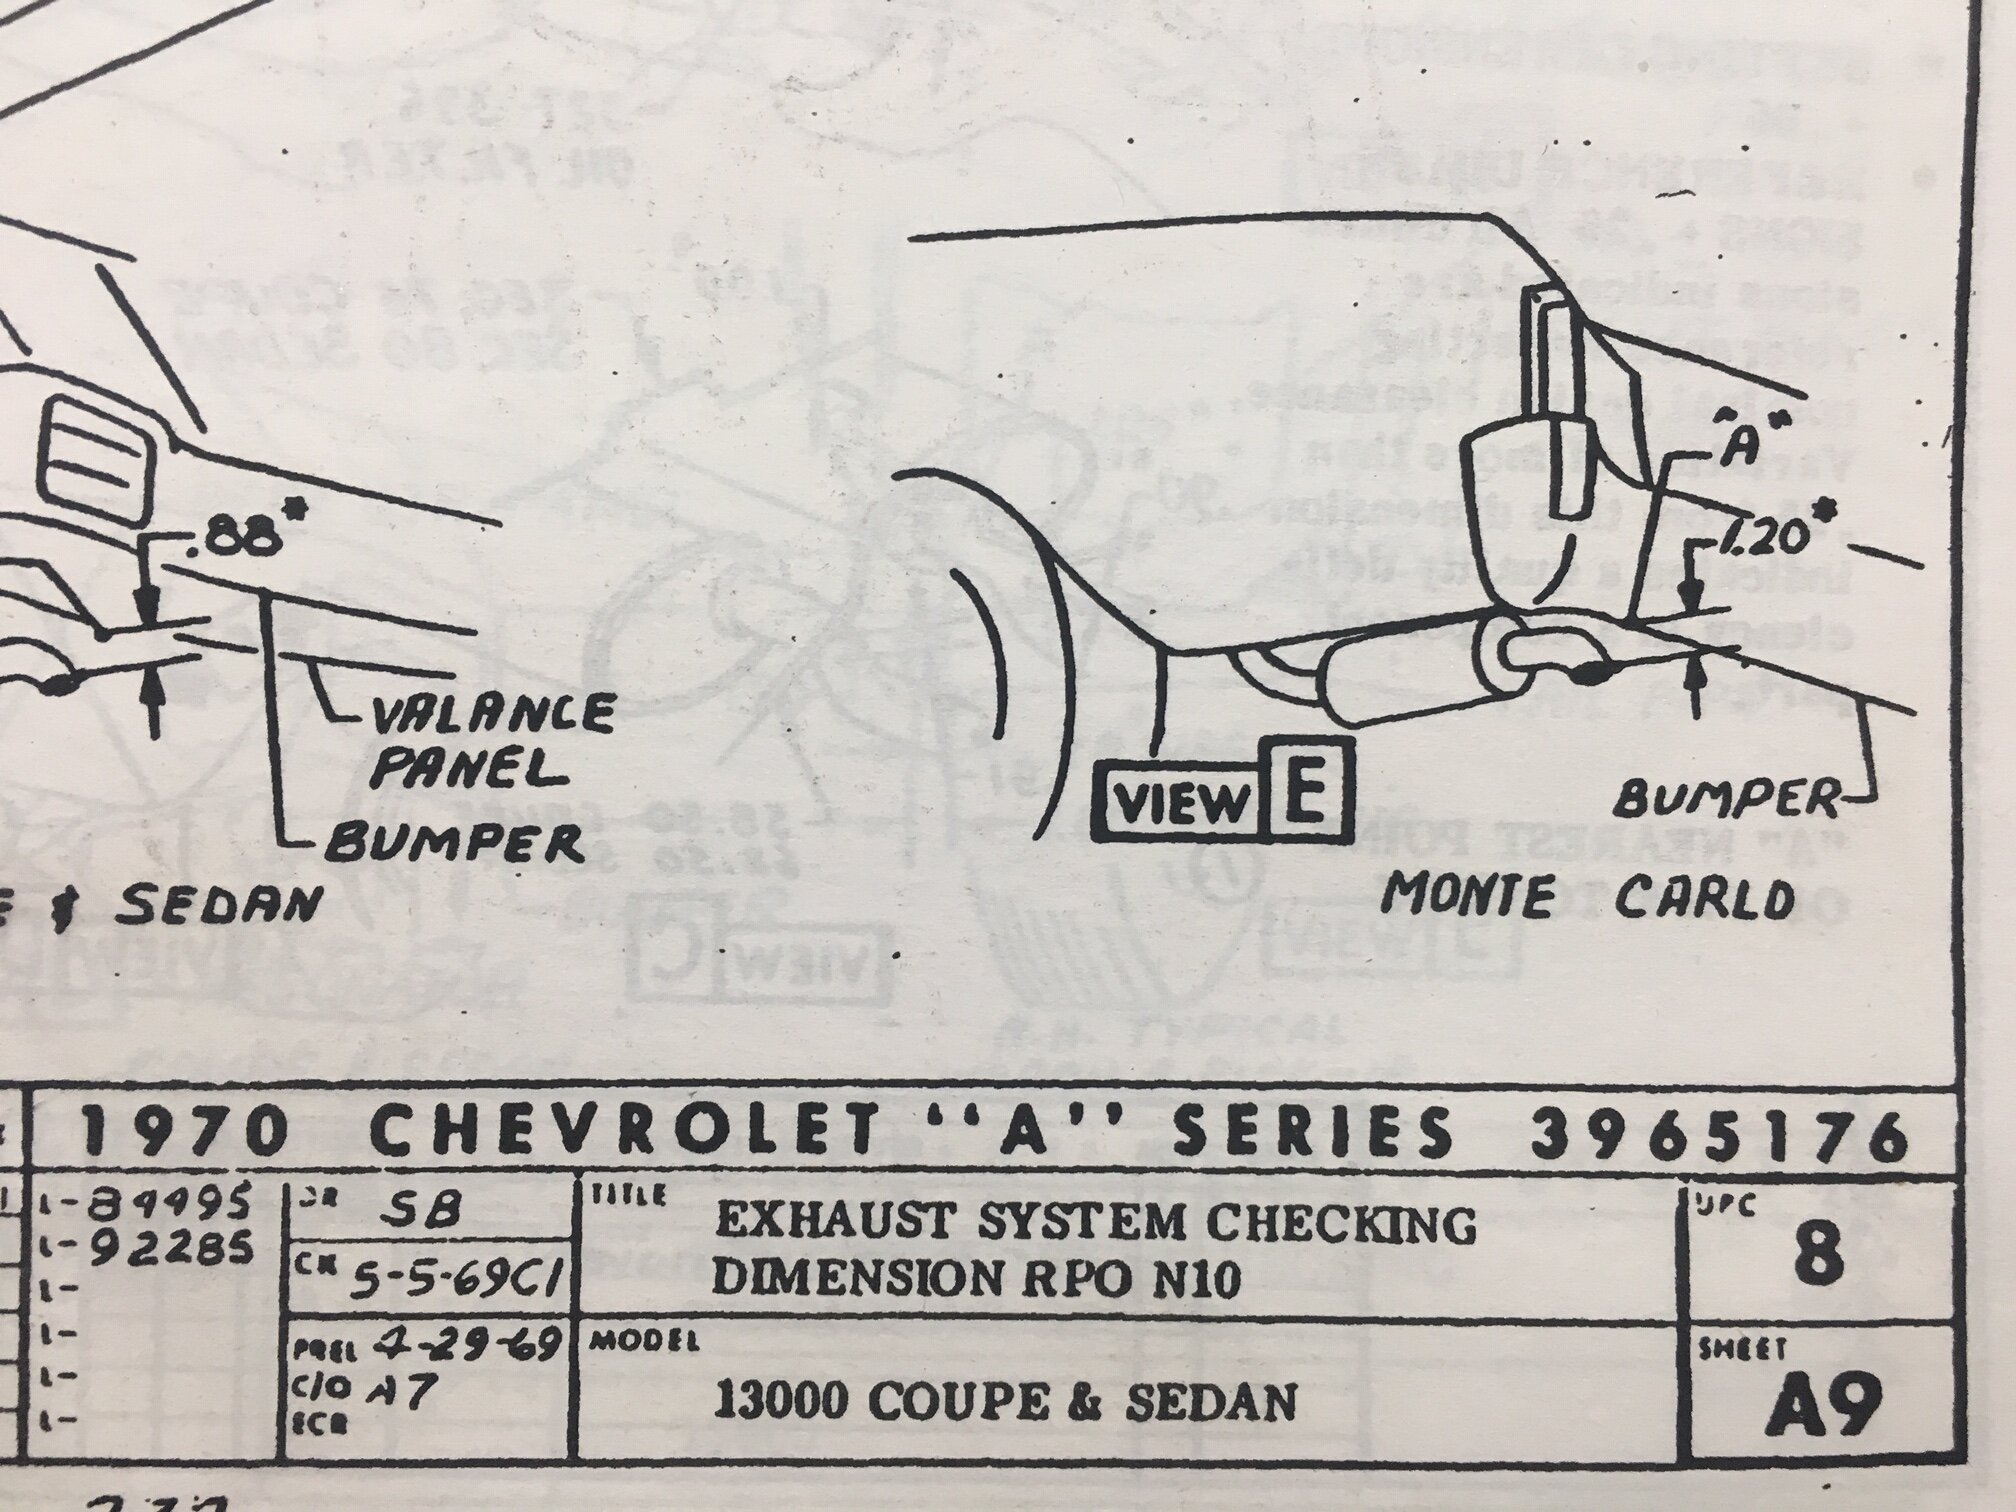
Here you go, Bryan. There are many more pages in the '70 Factory Assembly Manual regarding the exhaust system, but these three pages include the Monte Carlo so the rest is just confusing Chevelle stuff. One of these pages shows the locating dimensions for the resonator and chrome SS tip. One shows how the resonator assembly is attached and one shows the turned down tailpipe tips location relative to the bumper. Hope this is useful. Good luck.

-
I'm partial to gold also and yours is a nice shade to go with a black vinyl top. I've owned two Autumn Gold (code 58) '70s and loved them both. I bought the first one new in '70 with a white vinyl top and sandalwood interior and bought the SS forty-one years later with a black vinyl top and black interior. I don't own either one now but I still admire them. Good luck with your choice.
.thumb.jpg.394575080cbd9da1cc2859b8f5e51325.jpg)
-
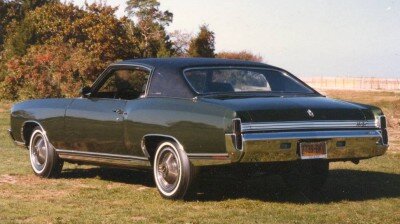
Bryan, It sounds like your '72 Monte currently has dual exhausts. If it was built with a big block engine (LS3 or LS5), it would have had dual exhaust from the factory. If it was built with a small block, it could have also had the RPO N10 dual exhaust option. In either case, the dual exhaust pipes were terminated at the back with a resonator assembly (looks like a small glass-packed muffler) P/N 3925105-6 that included a short downward curved pipe with no added tip. (See assembly line photo provided by Aaron.) If it was built with a small block engine and no RPO N10, then it was originally a single exhaust pipe with no resonator assembly and a similar downward curved tailpipe with no added tip. In addition to the photo Aaron has provided, I found one of the rear end of a '72 Custom from our site that shows the right hand exhaust pipe barely extending below the bumper. The '70 Factory Assembly Manual I have also shows all of the locational dimensions relative to the rear frame and I would expect it to be the same on the '72. If you need that information, let me know.
-
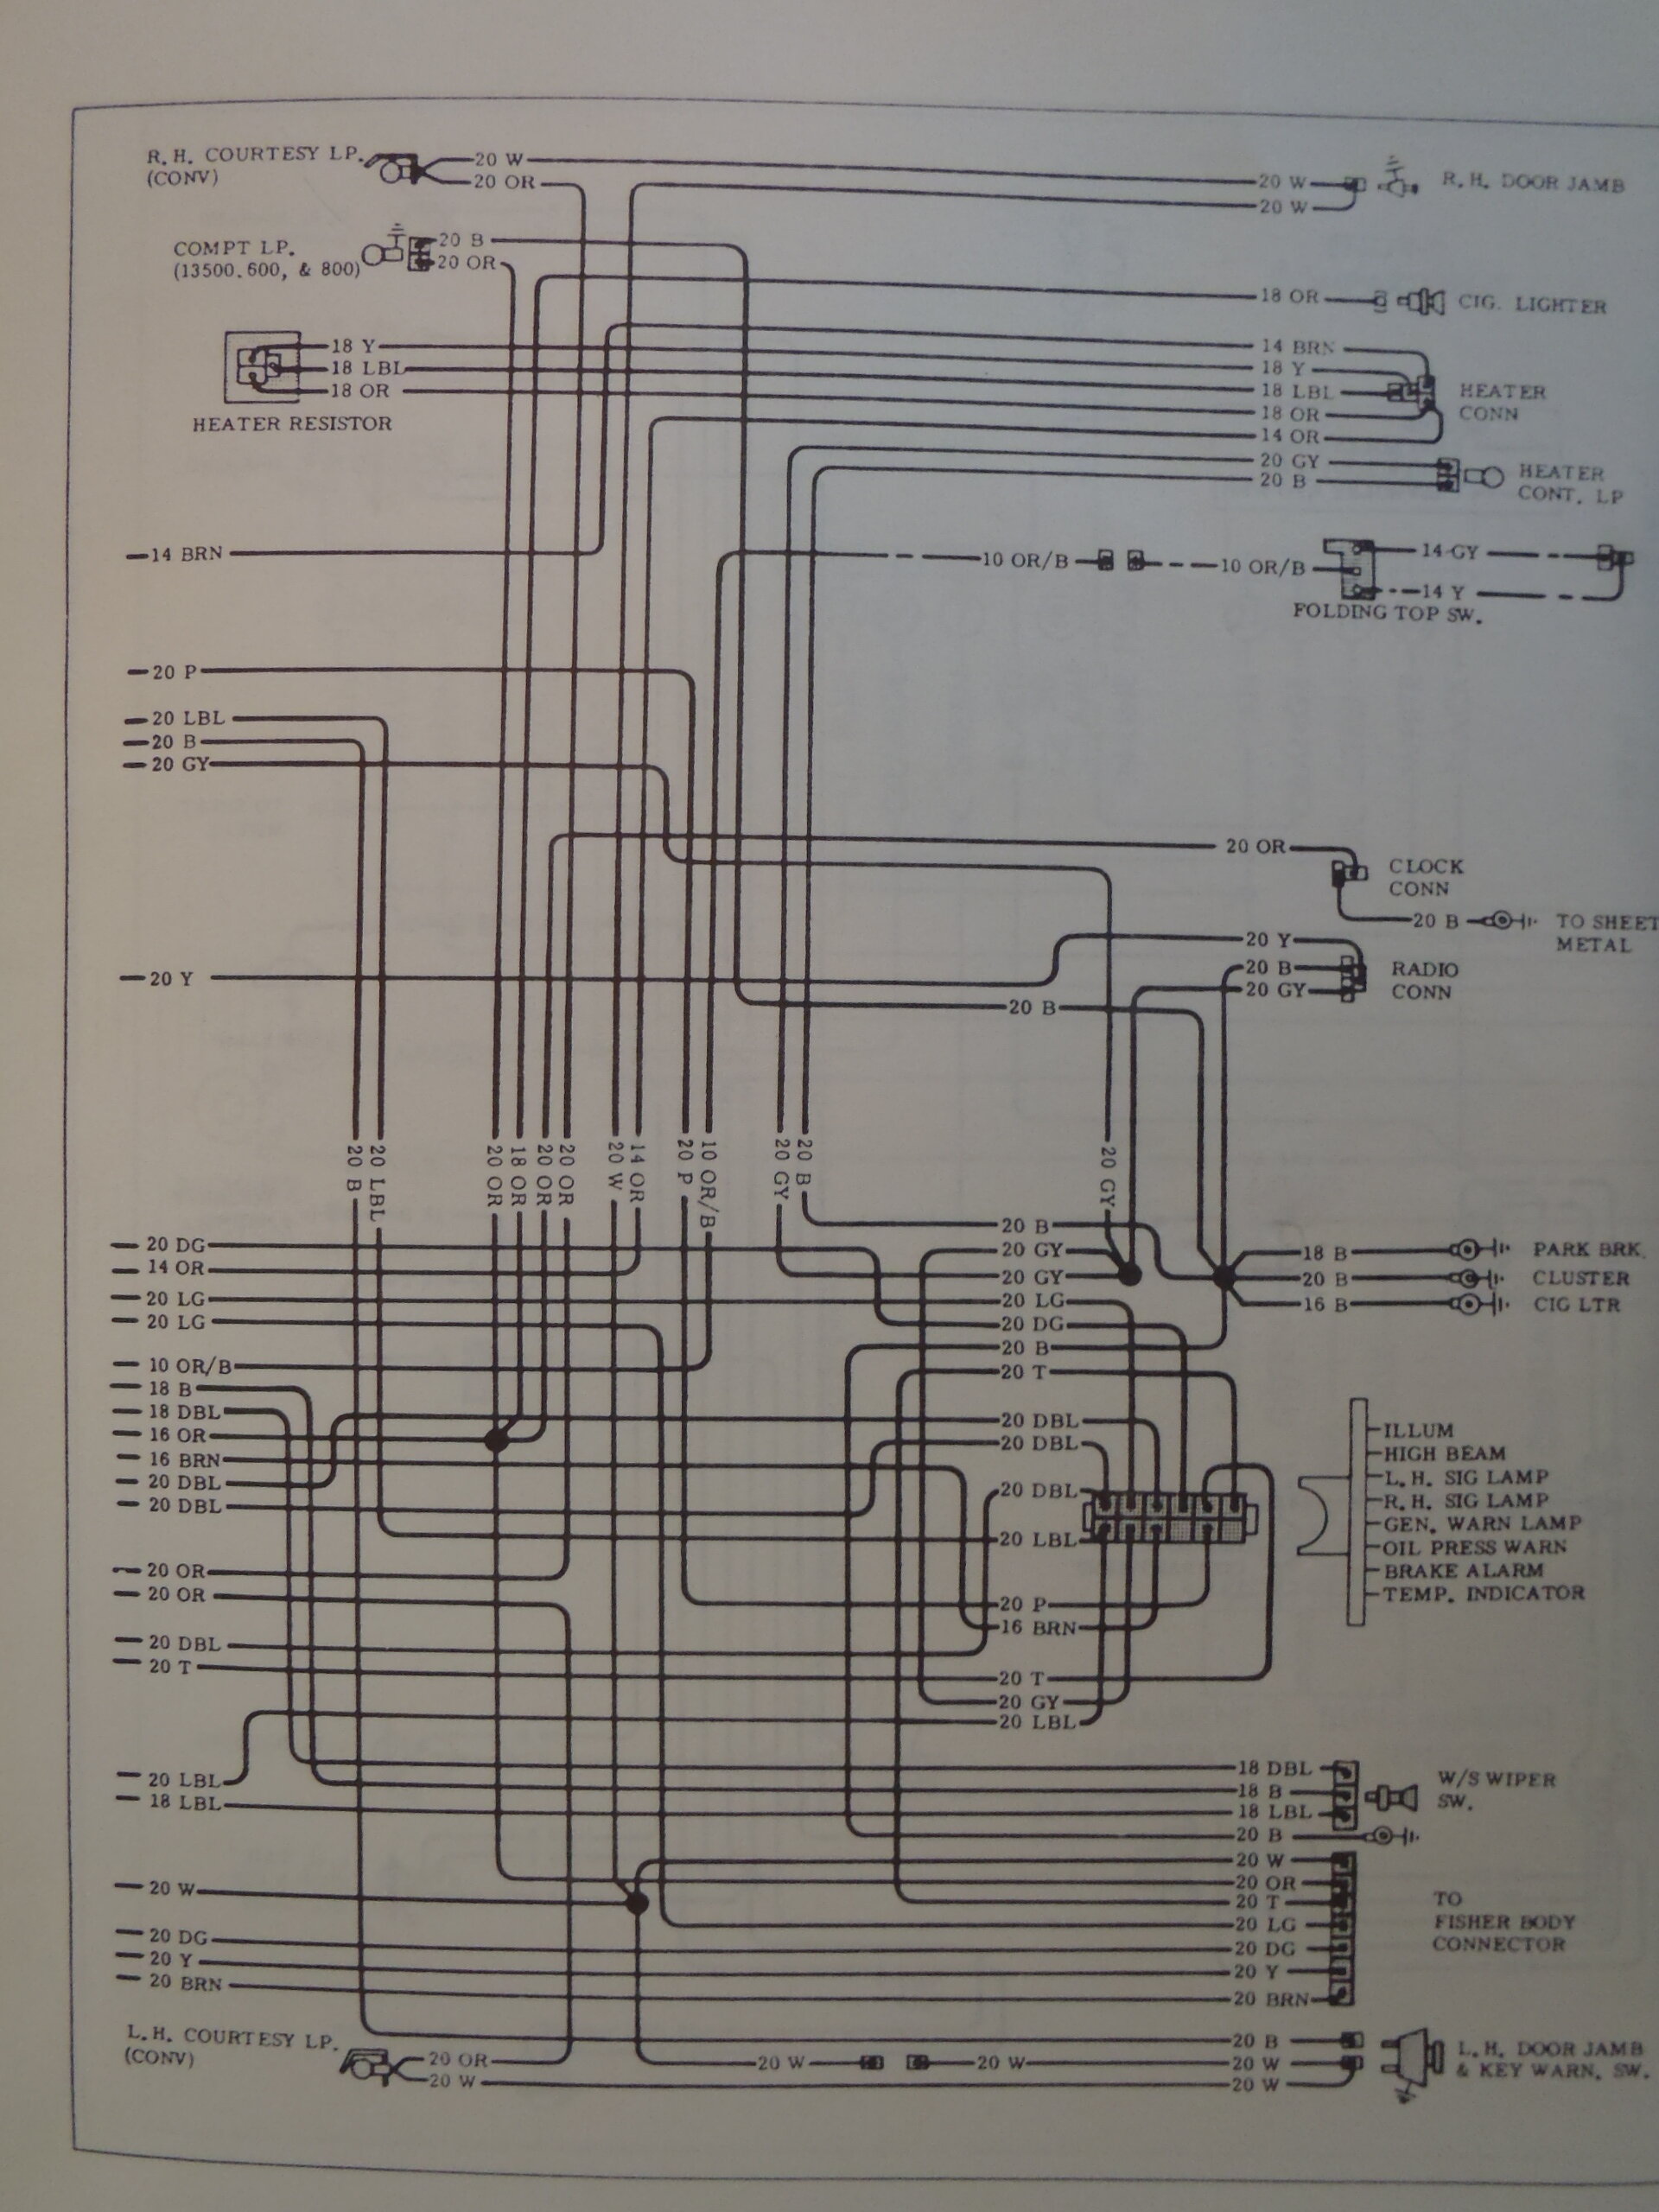
According to my '70 wiring diagram, those two wires, Light Blue (LBL) and Yellow (Y) are both 18 ga and connect the Heater Resistor to the Heater Connector (possibly on the A/C controller?). Since it is a direct two-wire connection between only two plugs, I suspect one of the following: 1. The heater resistor is faulty. (my strongest suspicion) 2. One of the wires is in the wrong position on one of the plugs which may compromise the circuit. (swapping both wires on both plugs should have no effect as they are both 18 ga) 3. The plugs are reversed (may not be possible if they are different physical shapes). I have attached a photo of the page in the Wiring Diagram that I referenced. The circuit I think you are concerned about is shown in the diagram as the third one down from the top. Since that circuit is specifically for the heater, I doubt that it matters if you also have A/C. It is still possible that this wiring diagram is not correct for your particular car/options.

-
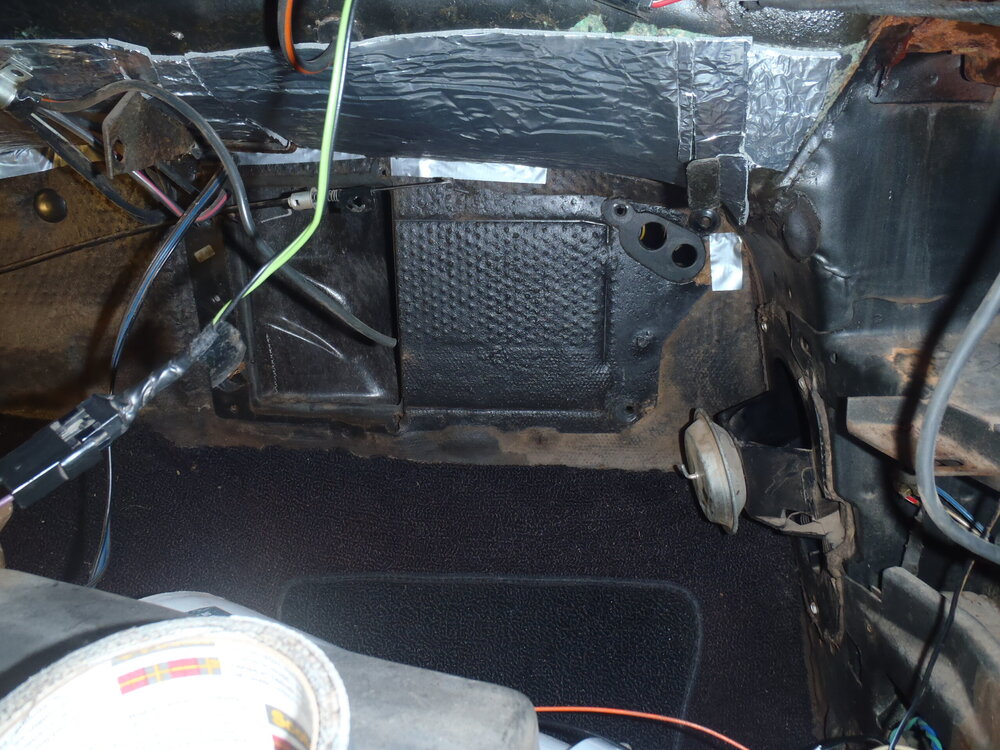
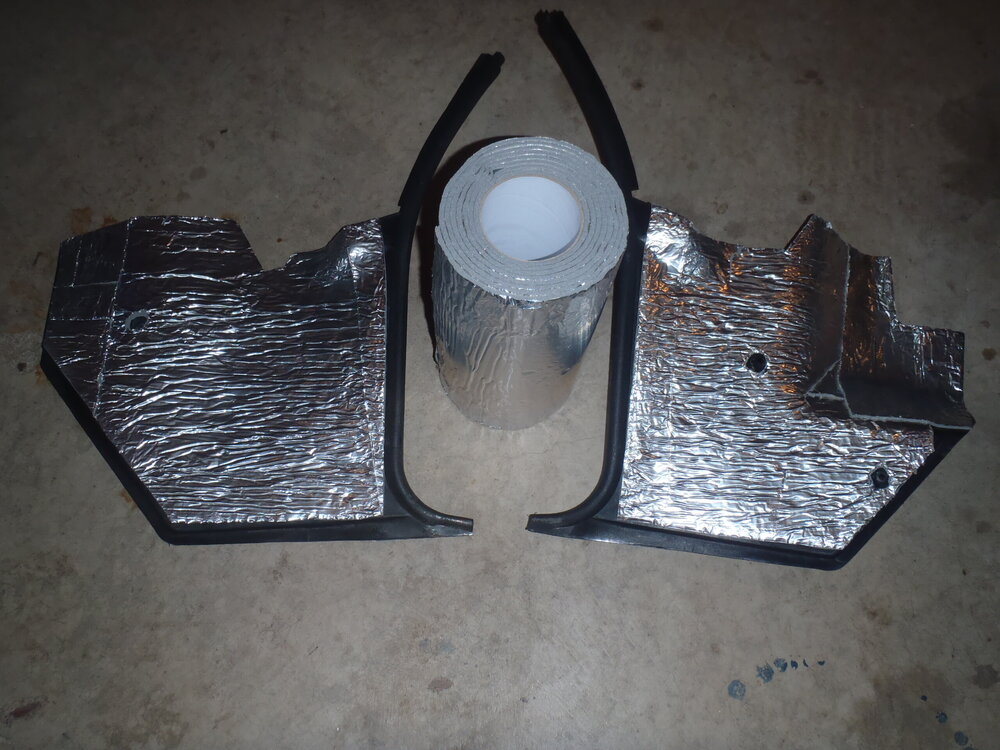
I replaced the heater core in my '70 SS with factory A/C in conjunction with a larger project that was anything but fun or easy. The heater core was actually not leaking but I replaced it preemptively while I had the rest of the system removed for cleaning. The first winter I stored the car in my garage in MN, I placed it up on six jackstands and foolishly thought that would protect it from invasion by mice - not! In just one winter season, they built nests all over in that car, including above the headliner, in the trunk, under the rear seat, inside the condenser box and inside the heater fan. The heater fan housing was so packed with mouse nests that I blew a fuse when I flipped on the AC because the fan was locked up. I did loosen the dash and pull it forward as I also converted the dash lights in the instrument cluster to LEDs, but removing the heater box was still a challenge because of all the vacuum hoses and cables associated with the A/C system. I would encourage you to take lots of pictures as you methodically remove parts of the system, especially the cables and hoses and their routing and retainers. I also removed the steel inner fender on the passenger side and completely stripped and refinished it with POR-15 on the underside and Rustoleum Semi-gloss black on the topside during this project. Looks like your inner fenders are already removed. Before re-installing the heater box and dash, I ripped off all of the frayed factory insulation against the back of the firewall and replaced it with foil-backed thermal insulation. I also lined the inside of the kick panels with that insulation before reassembly. While your car is apart is definitely the best time to do this project. Good luck!
-
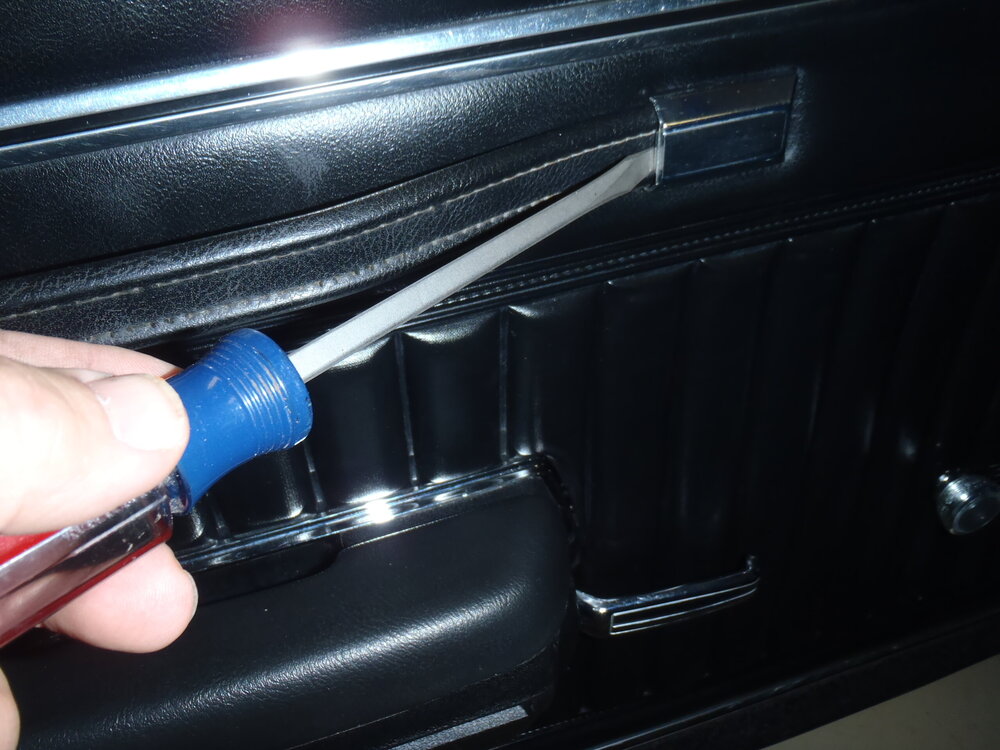
Brew, Not to be nit picky, but those end caps don't actually "slide" on to the mounting brackets. Instead, they are made to "snap" onto the mounting bracket once they are properly positioned. I don't have a photo of the back of an end cap, but the ones on my '70s had a small spring steel catch that clamped onto the outer edges and the inside end of the mounting bracket to keep them from sliding back off the end of the strap/bracket when in use. It sure looks like they should slide onto the side rails of those mounting brackets but they actually have to be positioned over the mounting bracket and snapped into place. I encountered one end cap that would slide a bit on the bracket and discovered that the end of the spring steel clamp and been broken off, likely by trying to slide it into position on the bracket. I found that it was easy to remove them by simply snapping them off the bracket with a flat blade screwdriver (as shown in the attached photo) so replacing them just reverses that process. Good luck.


.jpg.c09ee90909c6bfa58f7b191535626baf.jpg)