MCfan
-
Posts
1,294 -
Joined
-
Last visited
-
Days Won
61
Content Type
Profiles
Articles
Forums
Gallery
Events
Everything posted by MCfan
-
Welcome to the club and forums, Justin! Great to have another factory big block four-speed in the club! Is that vinyl top black or dark green? Sorry to hear about your dad's health challenges - watched my own dad go down that road years ago - it's tough.
-
Great photos of some gorgeous Montes! Thanks for sharing, Tony!
-
IMO, bumper guards look so good and so natural on a first gen Monte that they should have been standard equipment from the factory!
-
For a '70, they were listed on the Build Sheet (in the options section below the boxes) as RPO V31 and RPO V32 for front and rear bumper guards, respectively. I don't see a box for them on the '70 Build Sheet. Doubt anything was different for the '72 but I can't confirm that.
-
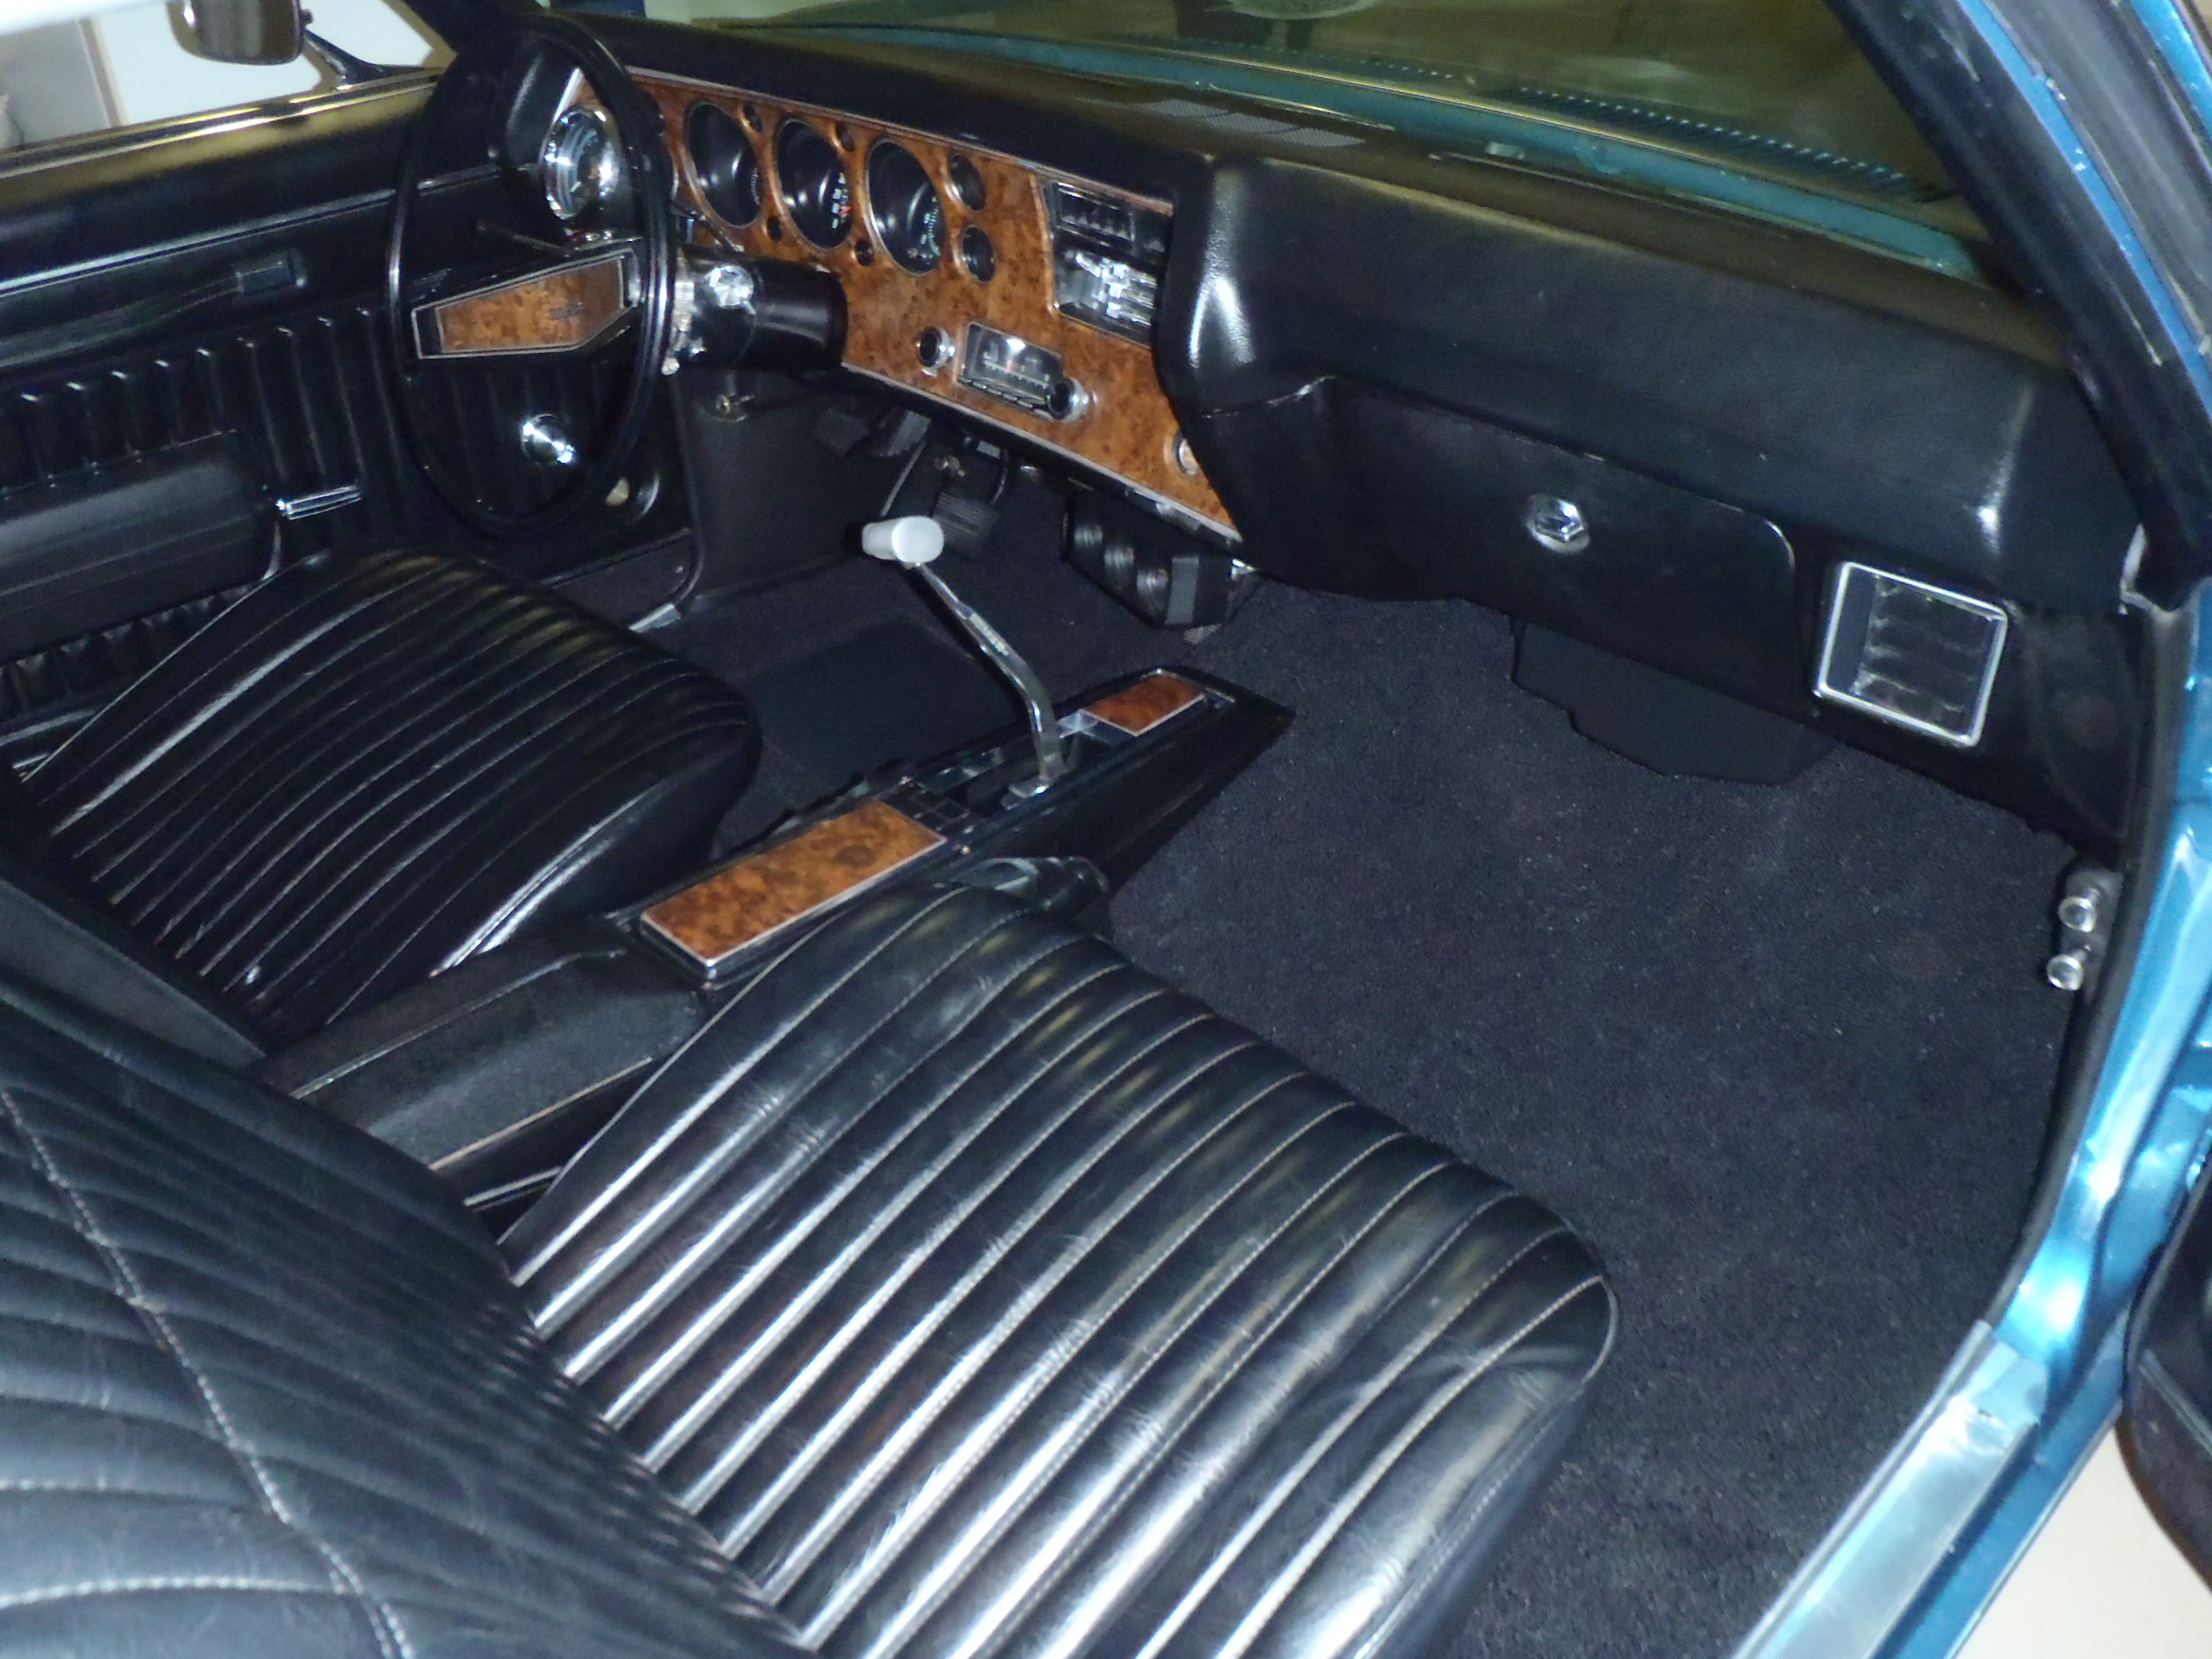
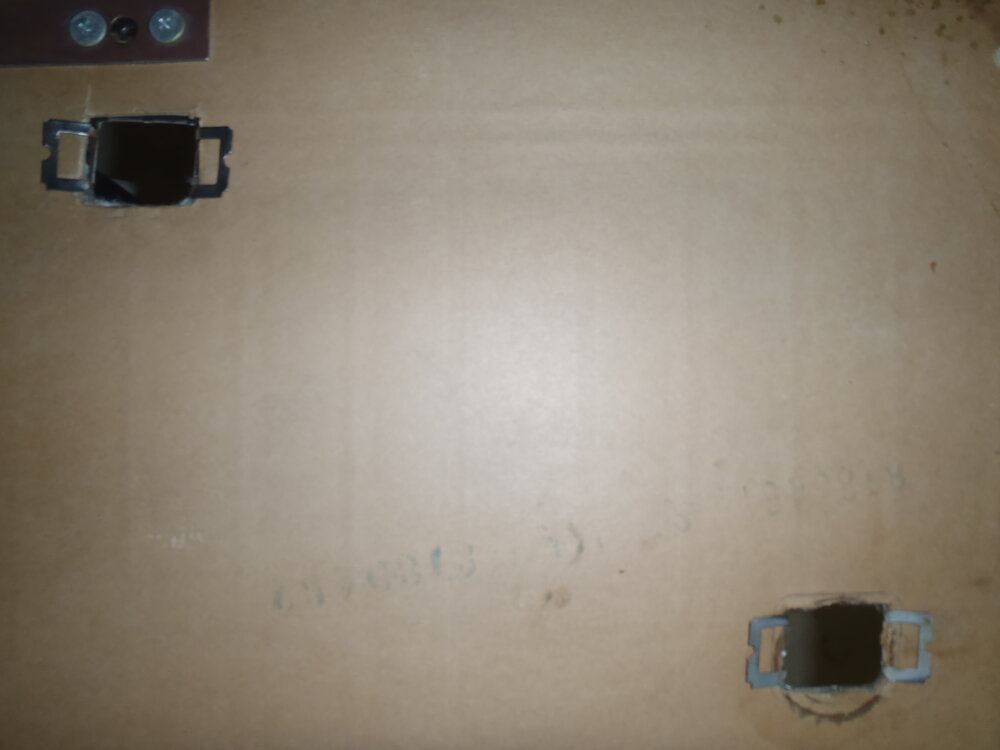
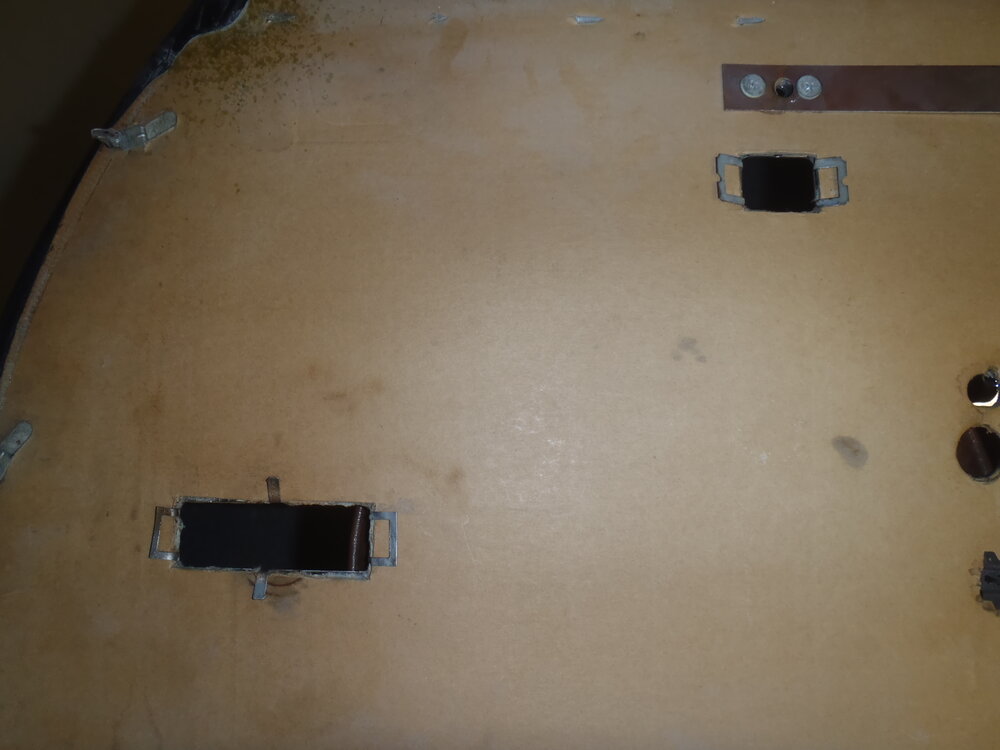
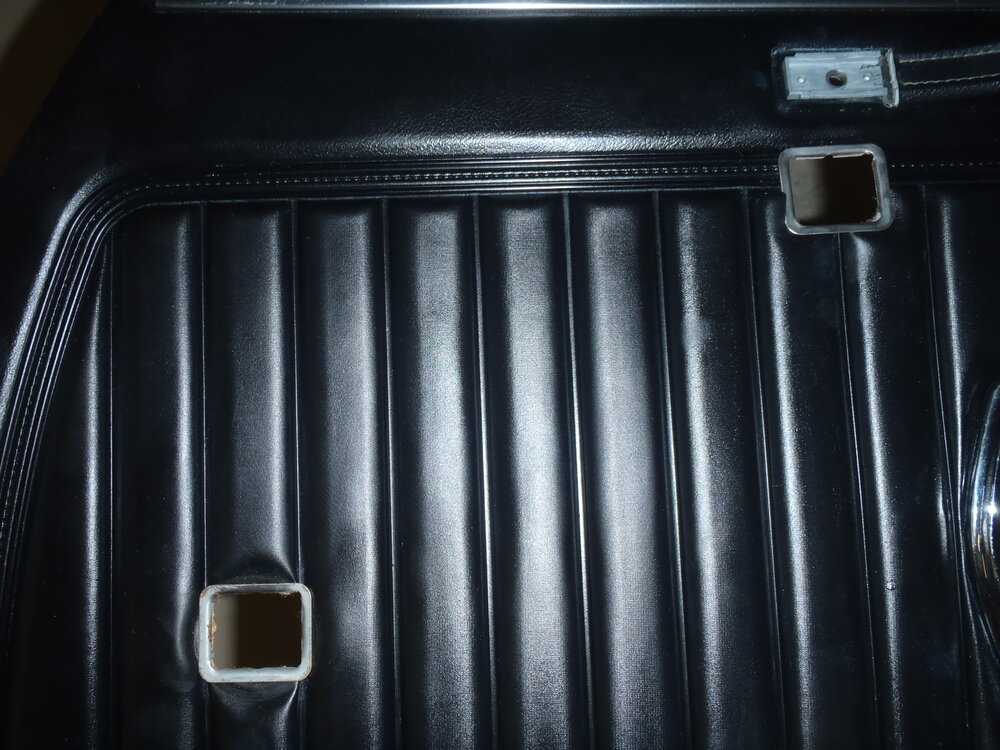
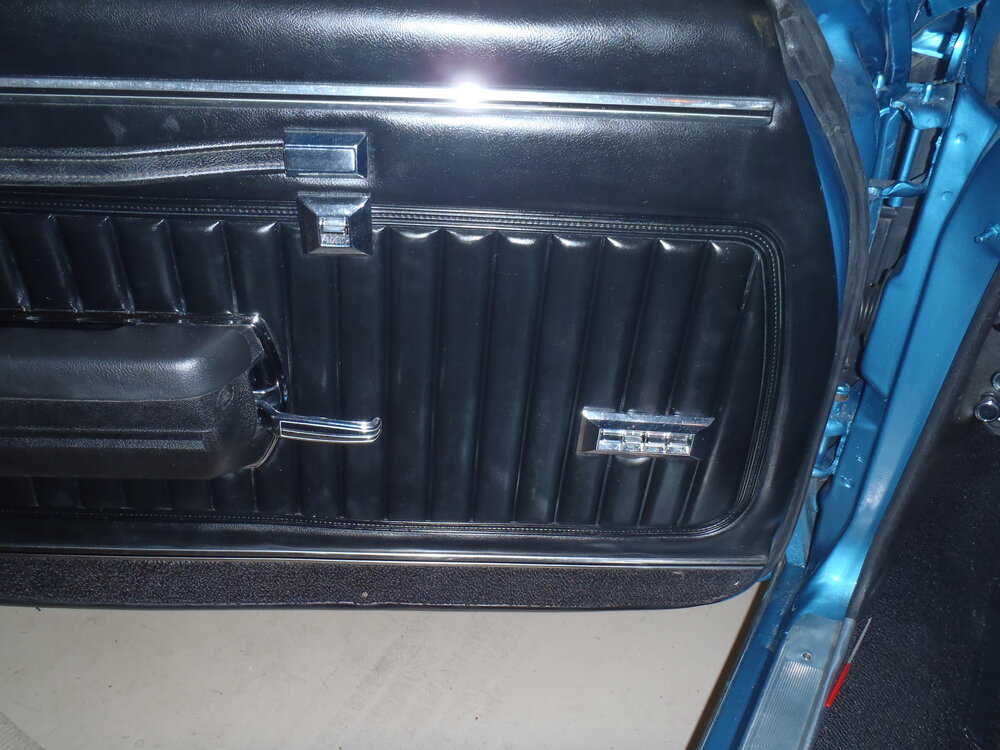
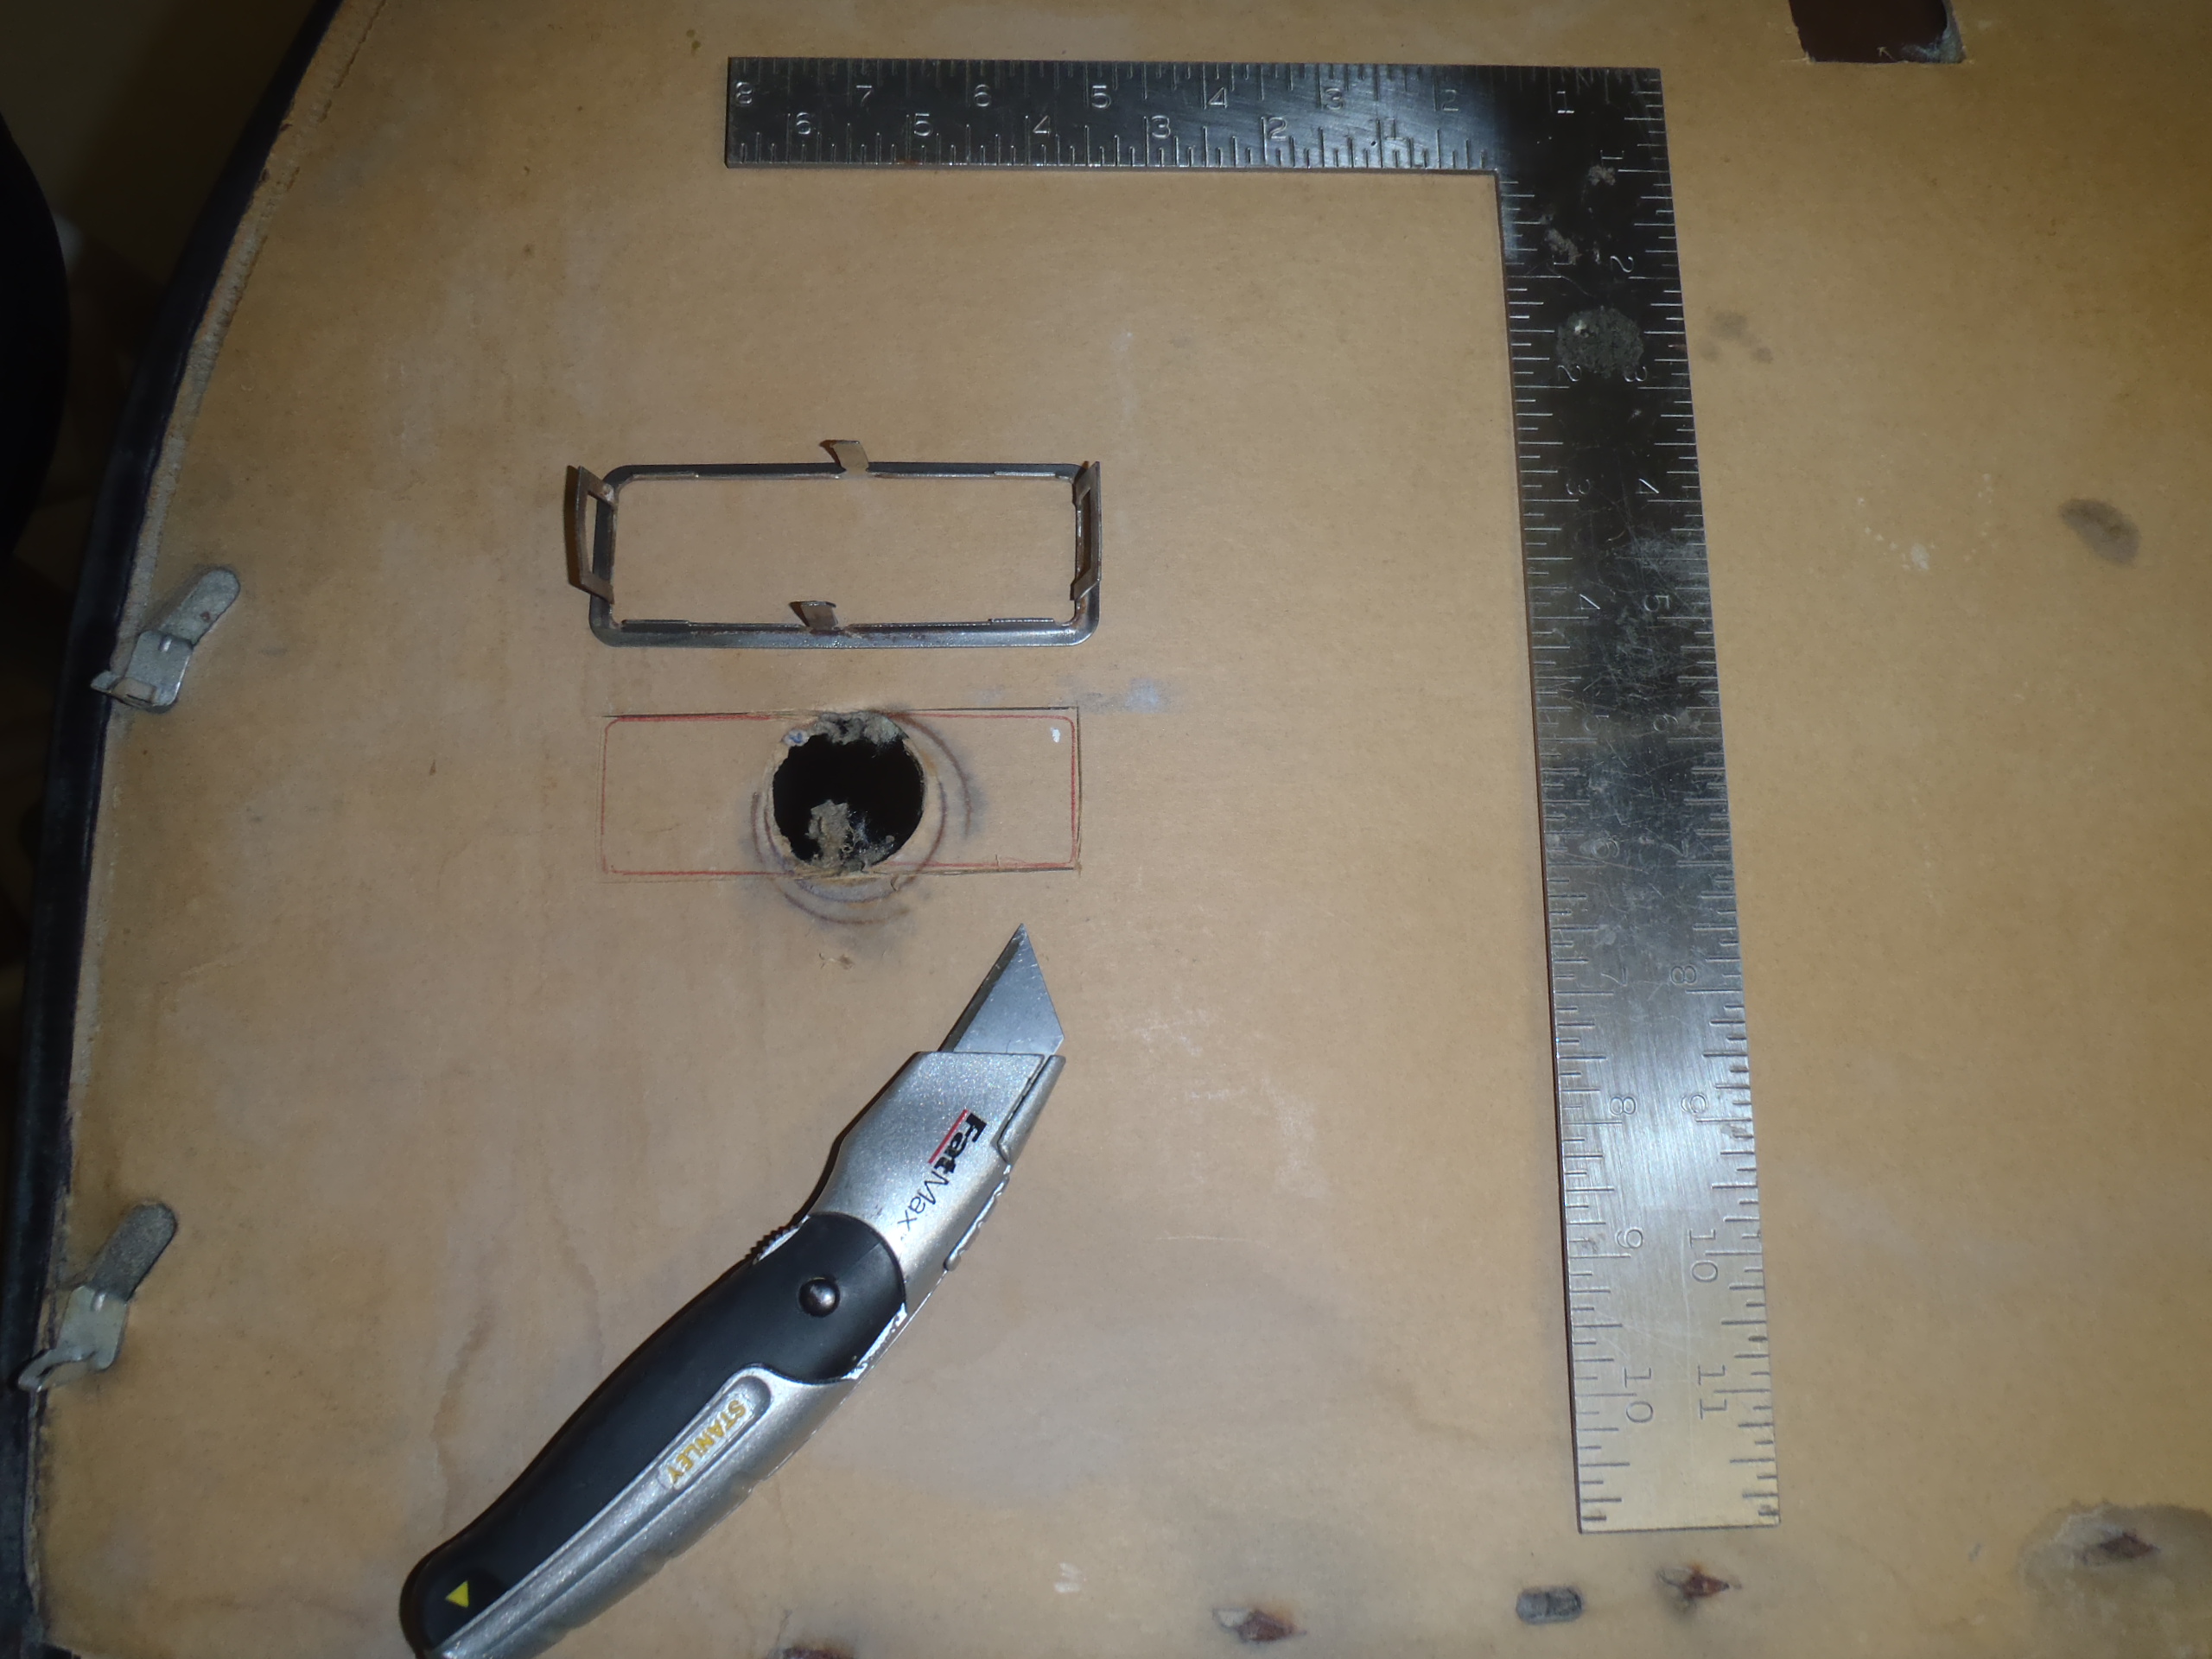
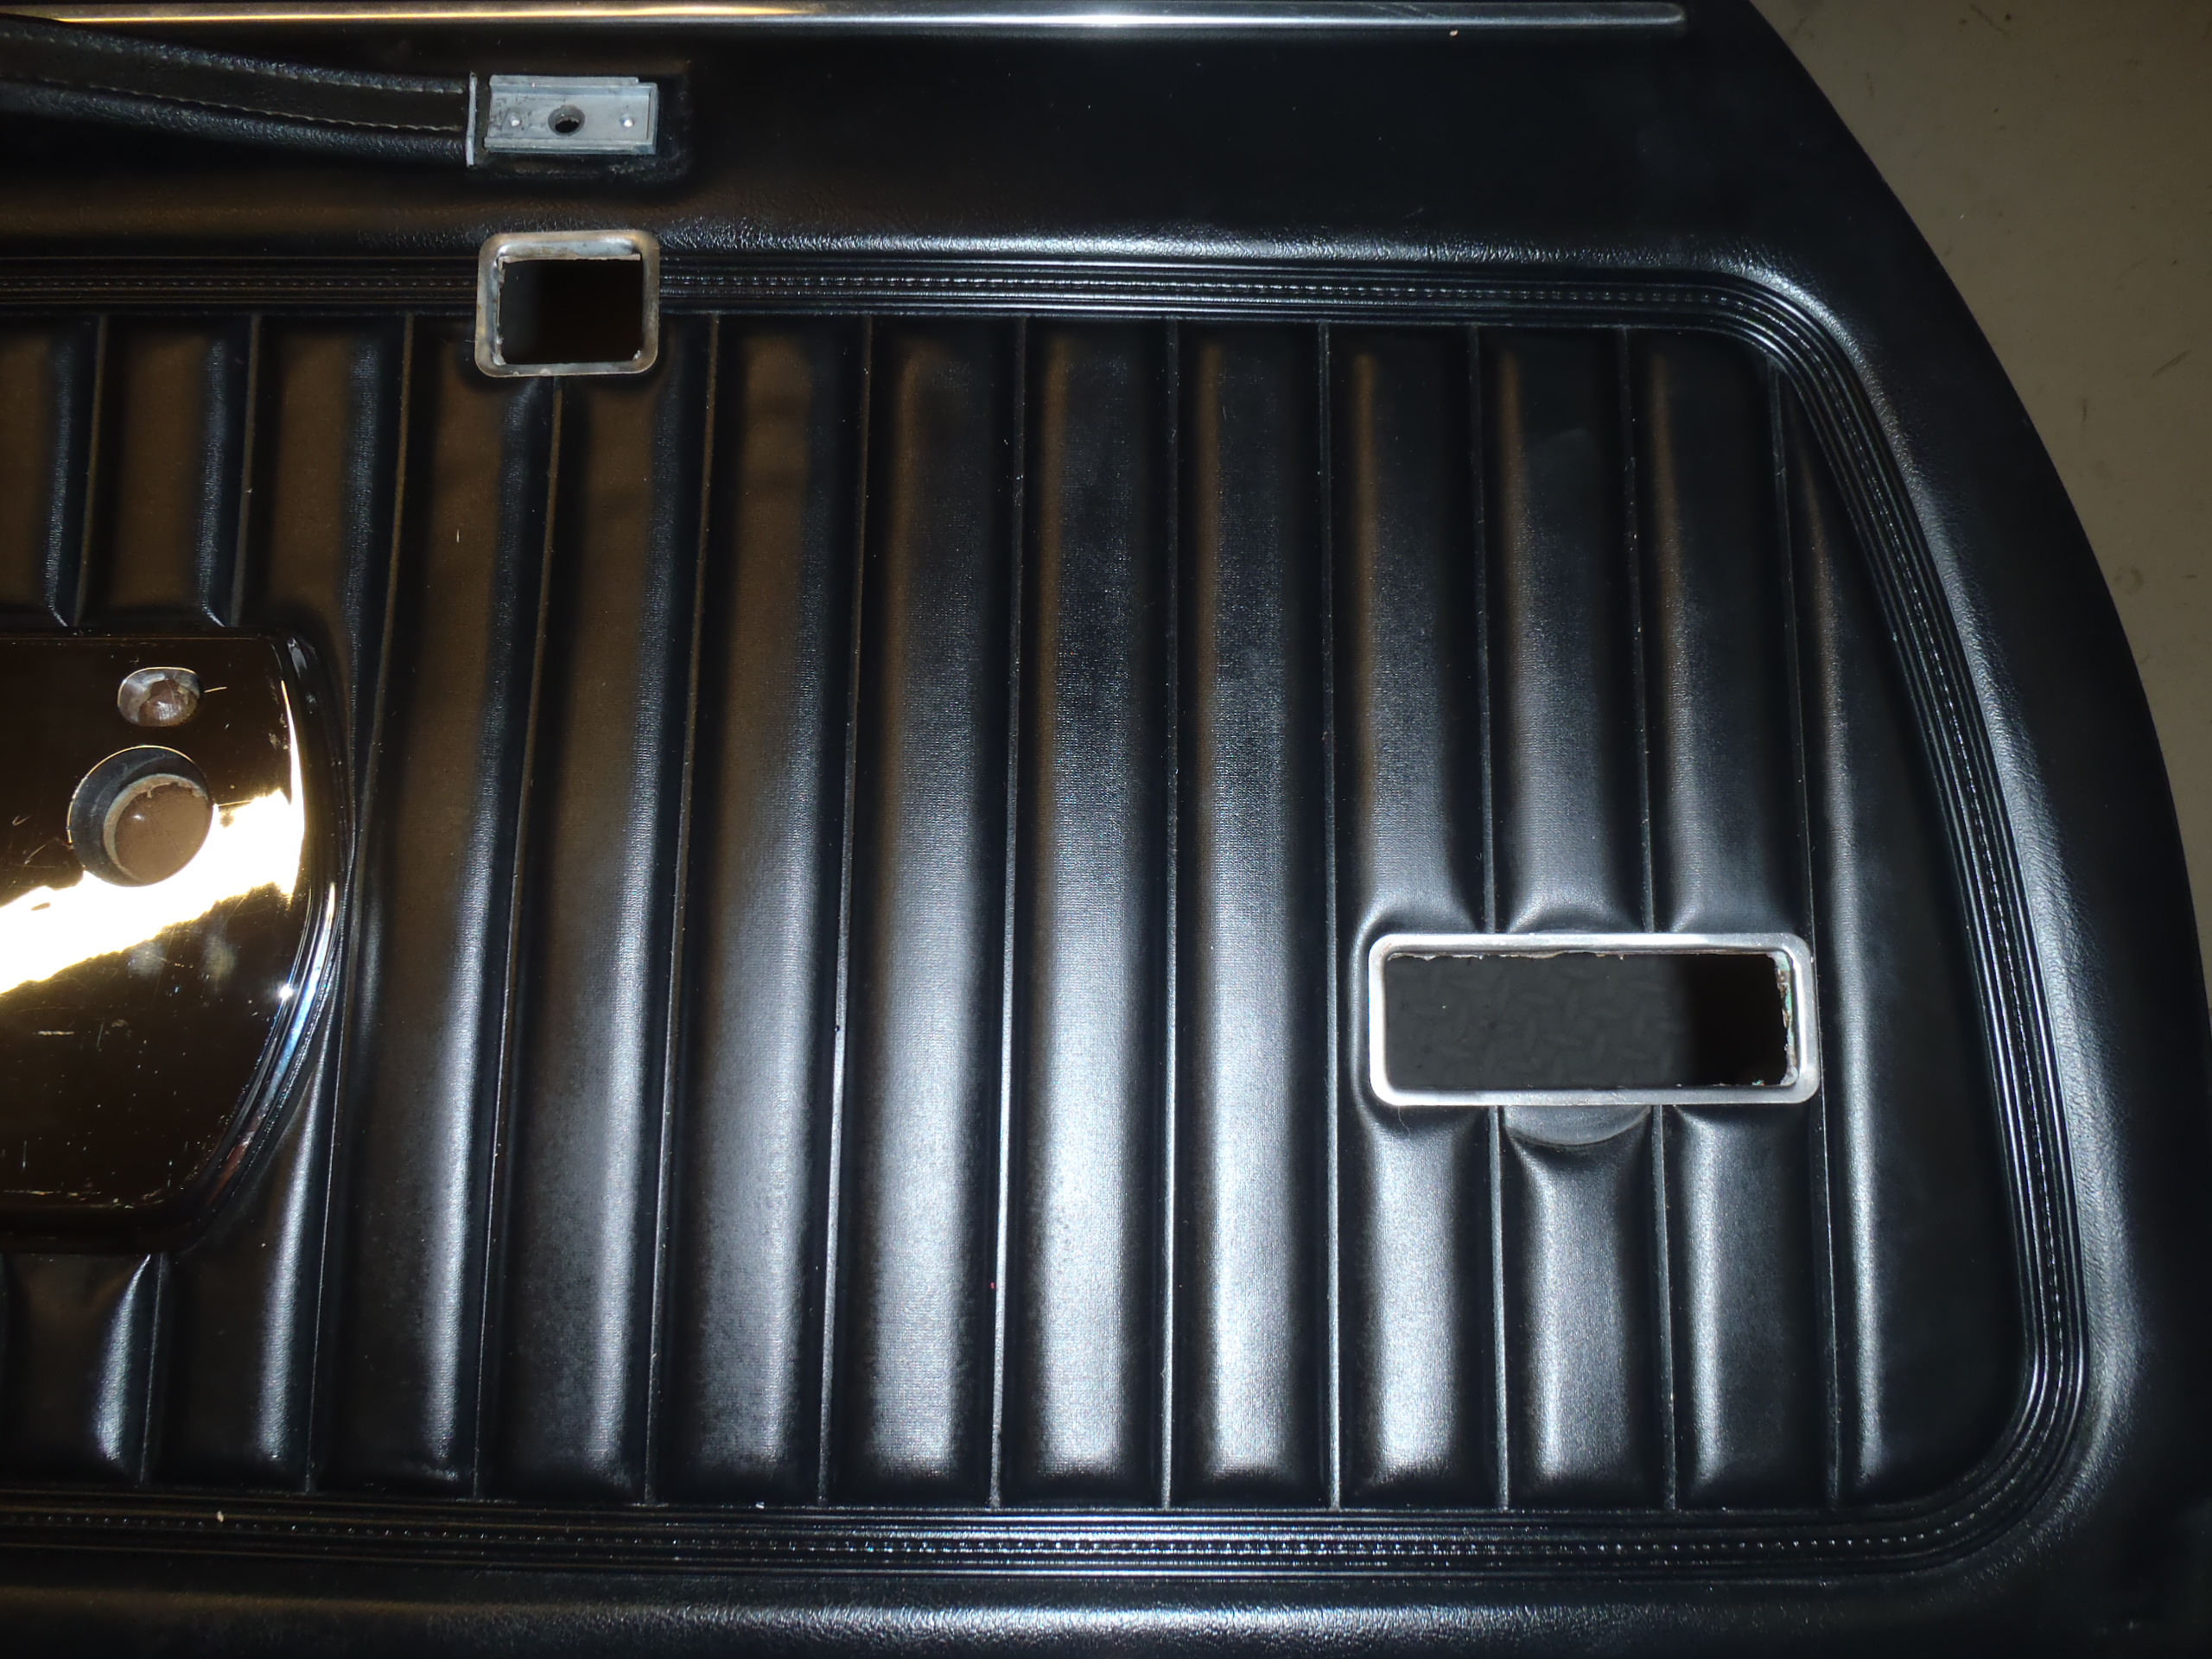
I was able to use the existing door panels by installing the switch housings at the same location of the previous hand crank opening (photos attached). I had factory power windows on my other '70 and the switches were in exactly those same locations. I also installed factory power door locks at the same time and those switch locations were actually shown with an indented outline on the backside of the door panel.


-
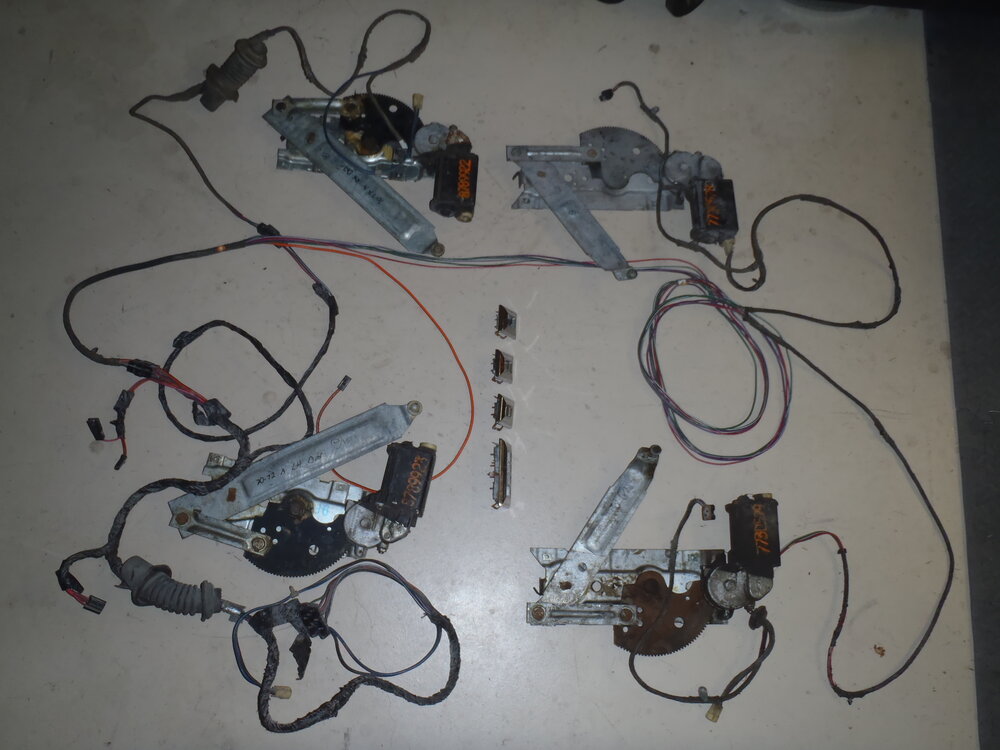
Yes, I installed a complete factory PW setup from a '72 Monte into my '70. I refurbished the regulators and all of the door switches and connectors prior to the install. I took my time and took dozens of photos of all steps in the process. If you get a factory system from salvage, be sure to get all four regulators (front, rear, left and right), all four switches, both accordion door grommets, both wiring harnesses and the PW relay (often overlooked but necessary). It's not a simple project but well worth doing, IMO. I use the power windows every time I drive my '70 in SW Florida (almost daily) during the winter months. We had such a gorgeous winter and early spring last season that I didn't run my Classic Auto Air AC once. I prefer to cruise around town with all the windows down unless my wife is along. Let me know if you decide to do it as I will be happy to share tips and photos and answer questions. Good luck!
-
Mike, I have individual photos of the 14 pages of the 1970 Wiring Diagram that can be edited for brightness and contrast. I just sent you the page containing the Power Window diagram via email (also shown below). I am not certain that it is the same diagram for the '72 but I installed a complete power window setup from a '72 into one of my '70s and everything appeared to be the same. Good luck.
.thumb.JPG.590eb1e58a7cabc9e65fb4e56a97ef38.JPG)
-
What did you do to your Monte Carlo today?
MCfan replied to Canuck's topic in General 70-72 Monte Carlo Forum
Well, Doug, since you asked, I think your front tire rubbing on the inner fender issue has everything to do with your new 8" rims having only 4" backspace and almost nothing to do with the height of your front end. Perhaps you missed the many discussions we've had recently on this forum regarding wider rims (and tires), backspace and offset. A 7" wide rim with a 4" backspace has zero (0) offset. The stock 15x7 rally rims have 4.30" backspace or +.30" (POSITIVE) offset which moves the wheel/tire combo INBOARD .30" and no rubbing will occur (even with 245/60s as I can attest from personal experience). When you switched to an 8" wide rim with only a 4" backspace you now have a -.50" (NEGATIVE) offset which moves your wheel/tire combo OUTBOARD a full .80" further than the same tire mounted on a stock 15x7 rally wheel. So, it's not surprising that you are encountering some rubbing under certain conditions. You are correct that a 4 1/2" backspace on an 8" wide rim (which is zero offset) might alleviate the issue because it will move your wheel/tire combo a full 1/2" further inboard. Note that your wheel/tire combo will still be .30" further outboard than the same tire on a stock 15x7 rally rim but you can probably get away with that. An 8" wide rim with a 4 3/4" backspace will get your wheel/tire combo back to a nearly stock location (with +.25" offset vs. +.30" offset for stock). Note also that you shouldn't get carried away with too much backspace (and too much positive offset) on the front rims when mounting wider series tires because you will then get inside tire rubbing on the frame on tight turns. There is a "sweet spot" where wider tires and rims work fine on our first gen Montes, both front and rear, but you have to pay close attention to the amount of positive wheel offset required to position your new wheel/tire combo squarely in it. Good luck. -
Congratulations, Bill! Beautiful '70 - love the Misty Green/Dark Green color combo! Thanks for representing our first gens so well.
-
Hi, Jane, Welcome to the club and forums! It's great to have another original owner, especially of a '70. I wish I had kept the new '70 Monte that was my first new car out of college. It had the same drivetrain as yours (402 with auto and column shifter). Although it is not so easy to find, our site has some interesting production numbers that should come very close to answering your question, at least the engine/transmission combo number. On the top red banner of the main page of any section, put your cursor on the far right-hand menu option "More". The dropdown box has only one option "resources" so click on that down arrow. Now move your cursor down to the "Tech Info" option and then to the right on that dropdown menu and click on the "Production Numbers" line item. The production numbers for the '70 MC are in the left-hand column. Note that the number of '70s built with the "330 hp Turbo-Jet 400 V8" (402 big block) was 7,456. Of those 589 were built with the 4-speed manual transmission. I have never heard of any big block being coupled with the manual 3-speed transmission (column shifter only) so the remaining 6,867 402's must have had automatic transmissions. Although there may be rare exceptions, all big block engines (402 and 454) that were coupled with an automatic transmission got the TH400 rather than the TH350 or Powerglide transmissions. So, also note that a total of 10,786 '70s were built with the TH 400 transmission. Since the 454 big block was only available in the Super Sport and they were only built with TH400 transmissions, you can subtract 3823 from the 10,786 TH40s to get 6.963 TH400 automatics available for all other engines. If you now subtract the 6,867 TH400s that were supposed to be coupled with the 402 big blocks, you actually have 96 TH400s left over that were apparently coupled with other engines (the 350 and 400 small blocks). Look at your build sheet to see if RPO "M40 3 speed automatic" is listed below RPO "LS3 V8 400 cu in". If so, you have a TH400 automatic transmission coupled to your 402 engine. Since there were more than enough TH400s produced to go into every 402 non-4 speed car, I would say your car is one of 6,867 1970 Montes built with your drivetrain combination. Personally, I think that is a very desirable combo (I loved mine) but I wouldn't call it "rare" as it is nearly twice the number of SS454s built with the TH400 automatic in 1970 and over ten times the number of 402s built with manual 4-speeds (589) in 1970 (I own one of those now). The most "rare" 1970 models were those built with the 3-speed manual transmission (545) but those were only coupled with the small block 350/400 engines to my knowledge. Various members of this club have searched high and low for more specific and detailed breakdowns of the '70-'72 production numbers over the years but to no avail. If someone here has found some recently, I'm sure they will chime in. Hope this helps some.
-
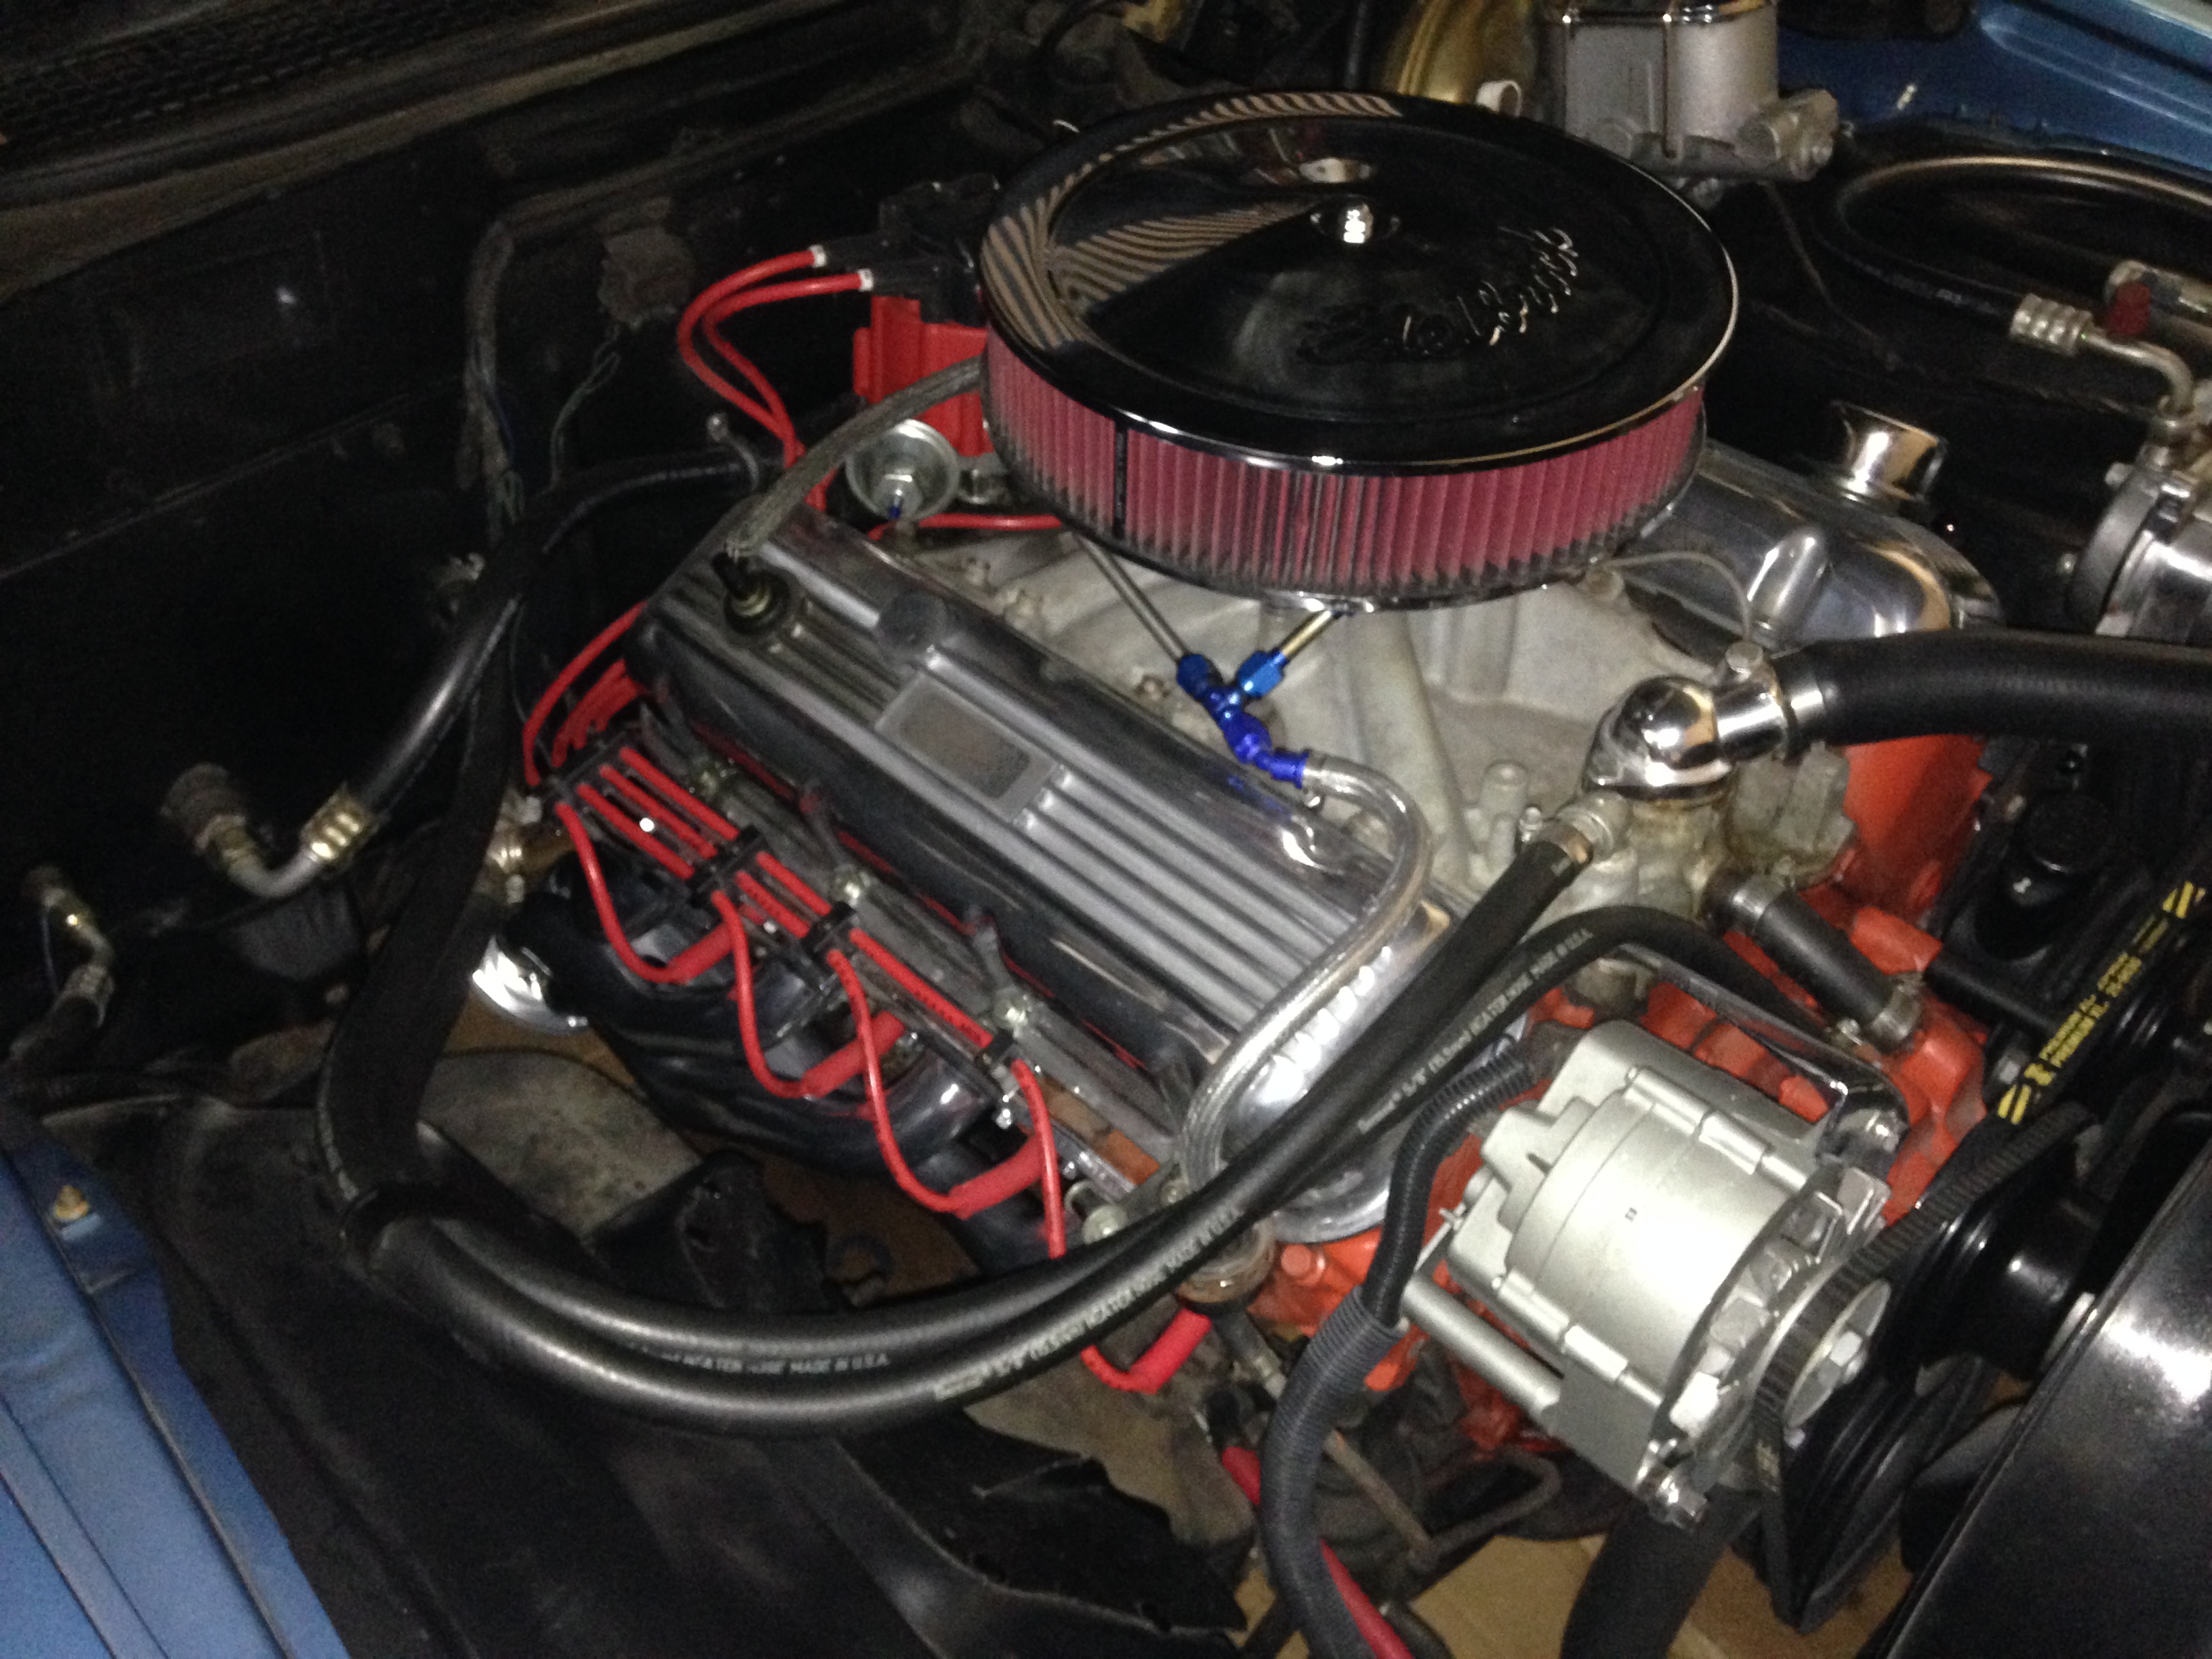
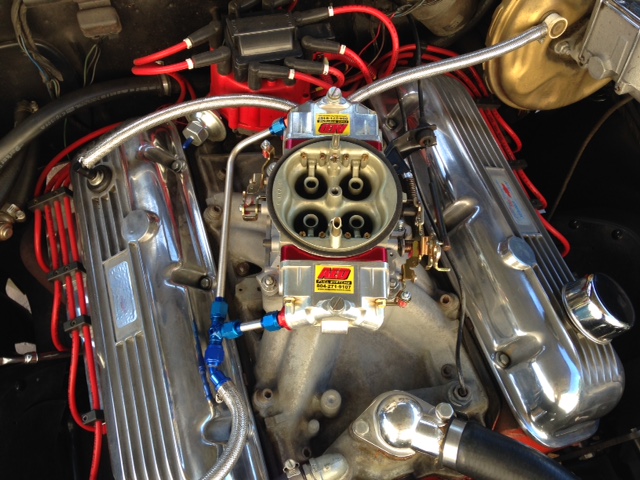
Yes, the Torker II on your 454 should fit under your hood ... barely (unless the Sniper EFI is taller than a typical Holley carb). I have a Torker II on my 402 with an AED 750 and a 3" Edelbrock drop base air cleaner. I have to use a very flat nut on the air cleaner lid stud to keep from snagging the hood blanket.

-
Sam, Based on your comments above (and in agreement with Aaron's previous suggestion), I am almost certain that your particular 8" rallies have insufficient backspace (and positive offset) to run those 60 series tires on your first gen Monte. There is PLENTY of room inside the front and rear fenders of your Monte to accommodate those tires. Many of us are running up to 255/60s on the front and 275/60s (or larger) on the rear with no rubbing issues BECAUSE we are using both 7 and 8 inch wide rims that have sufficient backspace (and positive offset) to position the wheel/tire combo safely within the wheel well. The reality is that where the web of a rim of any width mates to the front or rear wheel hub does not change relative to the wheel well frame or sheet metal so you have to move where the web of the rim is located within its width. That's what backspace and offset measurements are all about. I'm guessing that if you want to use the rims you have now, you are going to significantly limit your tire size/series selection. However, if you want to run a certain size/series of tire on a certain width of rim, you can easily determine how much backspace (and positive offset) those rims will need to give you safe clearances by using the calculators on the tiresize.com website. Just click on the Wheel Offset Calculator icon on the home page. That page has a great explanation of both backspace and offset because, while they are directly related, they are not the same measurement. Car guys talk backspace (in inches) but almost all custom wheel manufacturers talk offset (in millimeters) so it is important to know the difference and how to convert from one to the other. If you scroll to the bottom of the page in the Wheel Offset Calculator, you will see a cool table that converts backspace in inches to offset (negative, zero or positive) in millimeters for any size of rim you could possibly imagine. Here's that link: https://tiresize.com/wheel-offset-calculator/ For any width of rim, zero offset occurs when the web is exactly in the center of the wheel, however the backspace of that same rim is dependent on its exact width. Example: for an 8" wide rim with zero offset, the backspace is 4.5" (NOT 4") because backspace is measured from the outside edge of the rim lip to the web. Rim lips are almost universally 1/2" wider on each side of the tire bead width (8" in this case) so 8" bead width + 1" of lip width (both sides) is 9" divided in half (center of rim is zero offset) is 4.5". Note that an 8" rim with a 5" backspace moves the web outward (wheel/tire combo inward) by 1/2" or 12 mm of positive offset from the centerline. That is the kind of movement necessary to give adequate quarter panel clearance with larger/wider series tires on our Montes. A 7" wide rim with zero offset has a backspace of 4" (7+1)/2 = 4. To get positive offset on a 7" rim, backspace must be greater than 4". In fact, the factory 7" wide rallies used on our Montes have a backspace of 4.30" or + 8mm offset. Likewise, a 7" rim with 4.5" backspace has a +12 mm offset. I suggest you measure the backspace on your current 8" rims, look up the offset in the online table and use that with the tire size you are considering in the Wheel Offset Calculator. If nothing else, compare it directly to a stock 7" rim with 4.30" backspace and a near-stock tire size (which you know has adequate clearance). You can then try various amounts of positive offset for an 8" rim to position your desired tire further inboard for adequate outboard clearance. The table will tell you what the backspace measurement is for any offset (in 1/4" increments) so you will know what rim backspace you need for your larger/wider series tires. Good luck.
-
Both front and rear!! At least the front guards are in the correct location. The rear guards are simply disgusting! Looks like a '72 Custom masquerading as an SS headed to a demolition derby! 😝 Lose those hideous guards and it's a nice car ...
-
Tim, The answer to your third question is 13". Someone else will have to answer your first and second questions.
-
Thanks, Aaron! We help each other the most by sharing real-life experiences. Words of wisdom are great but I find pictures most helpful.
-
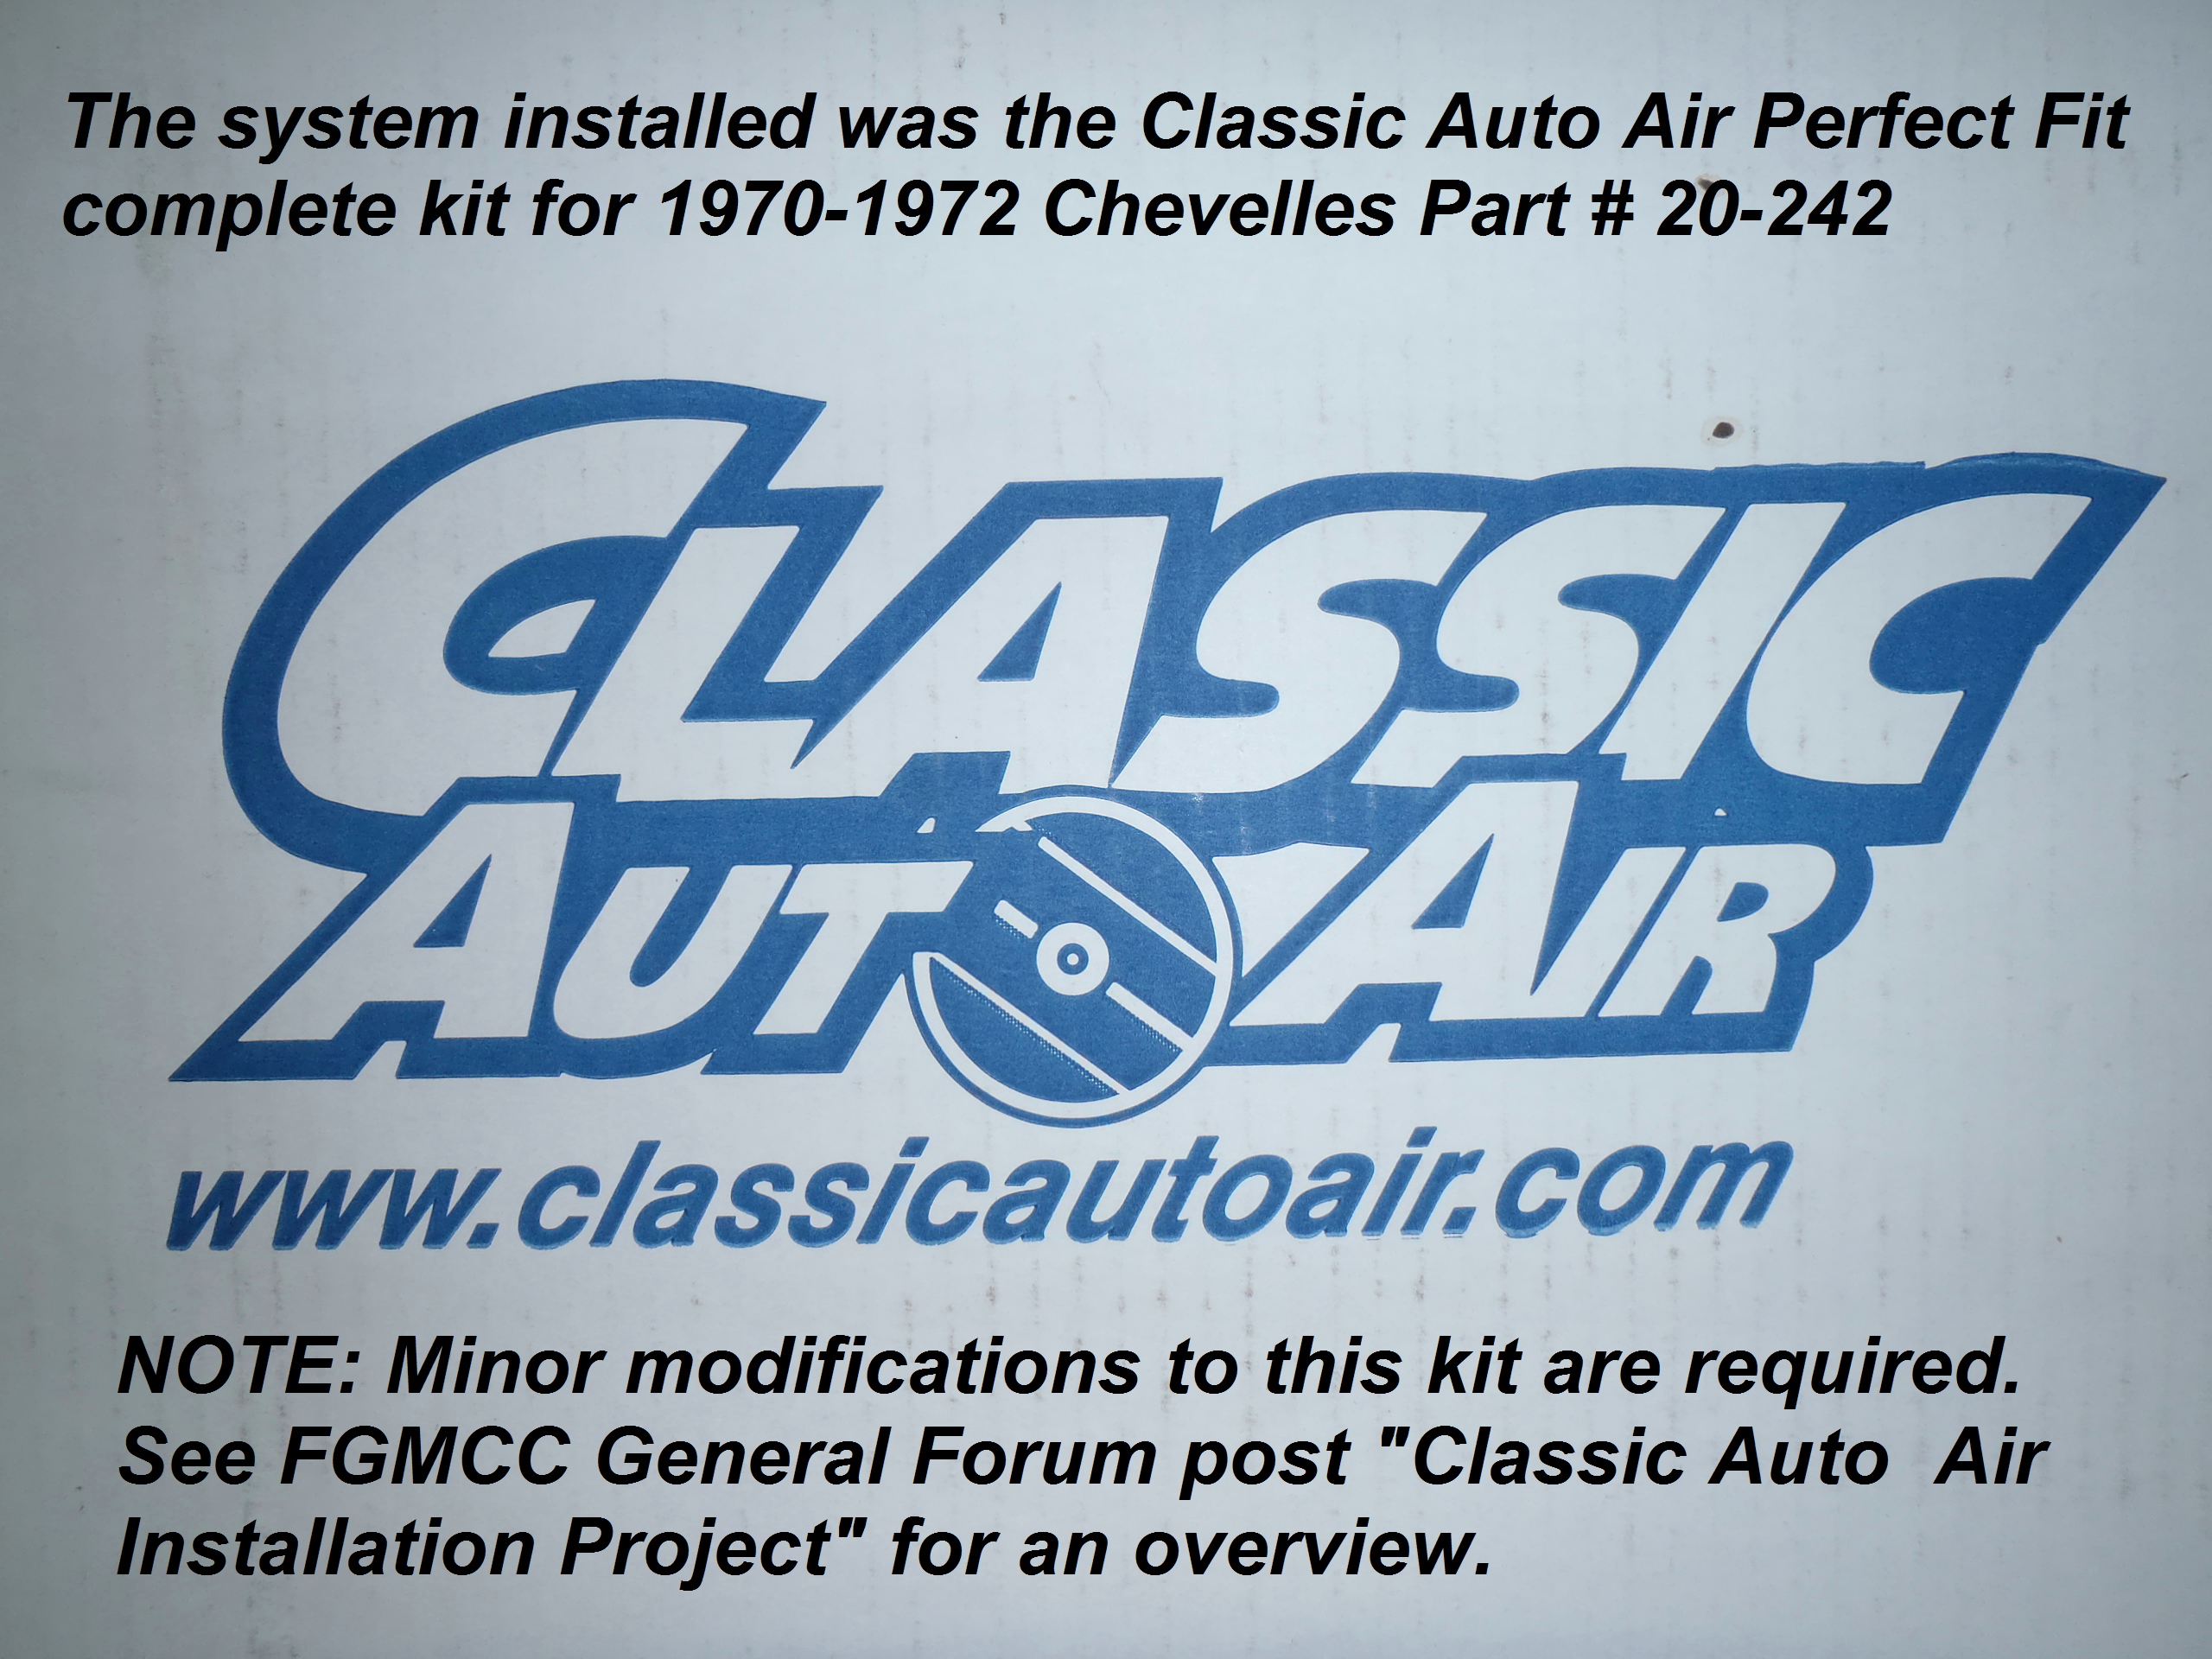
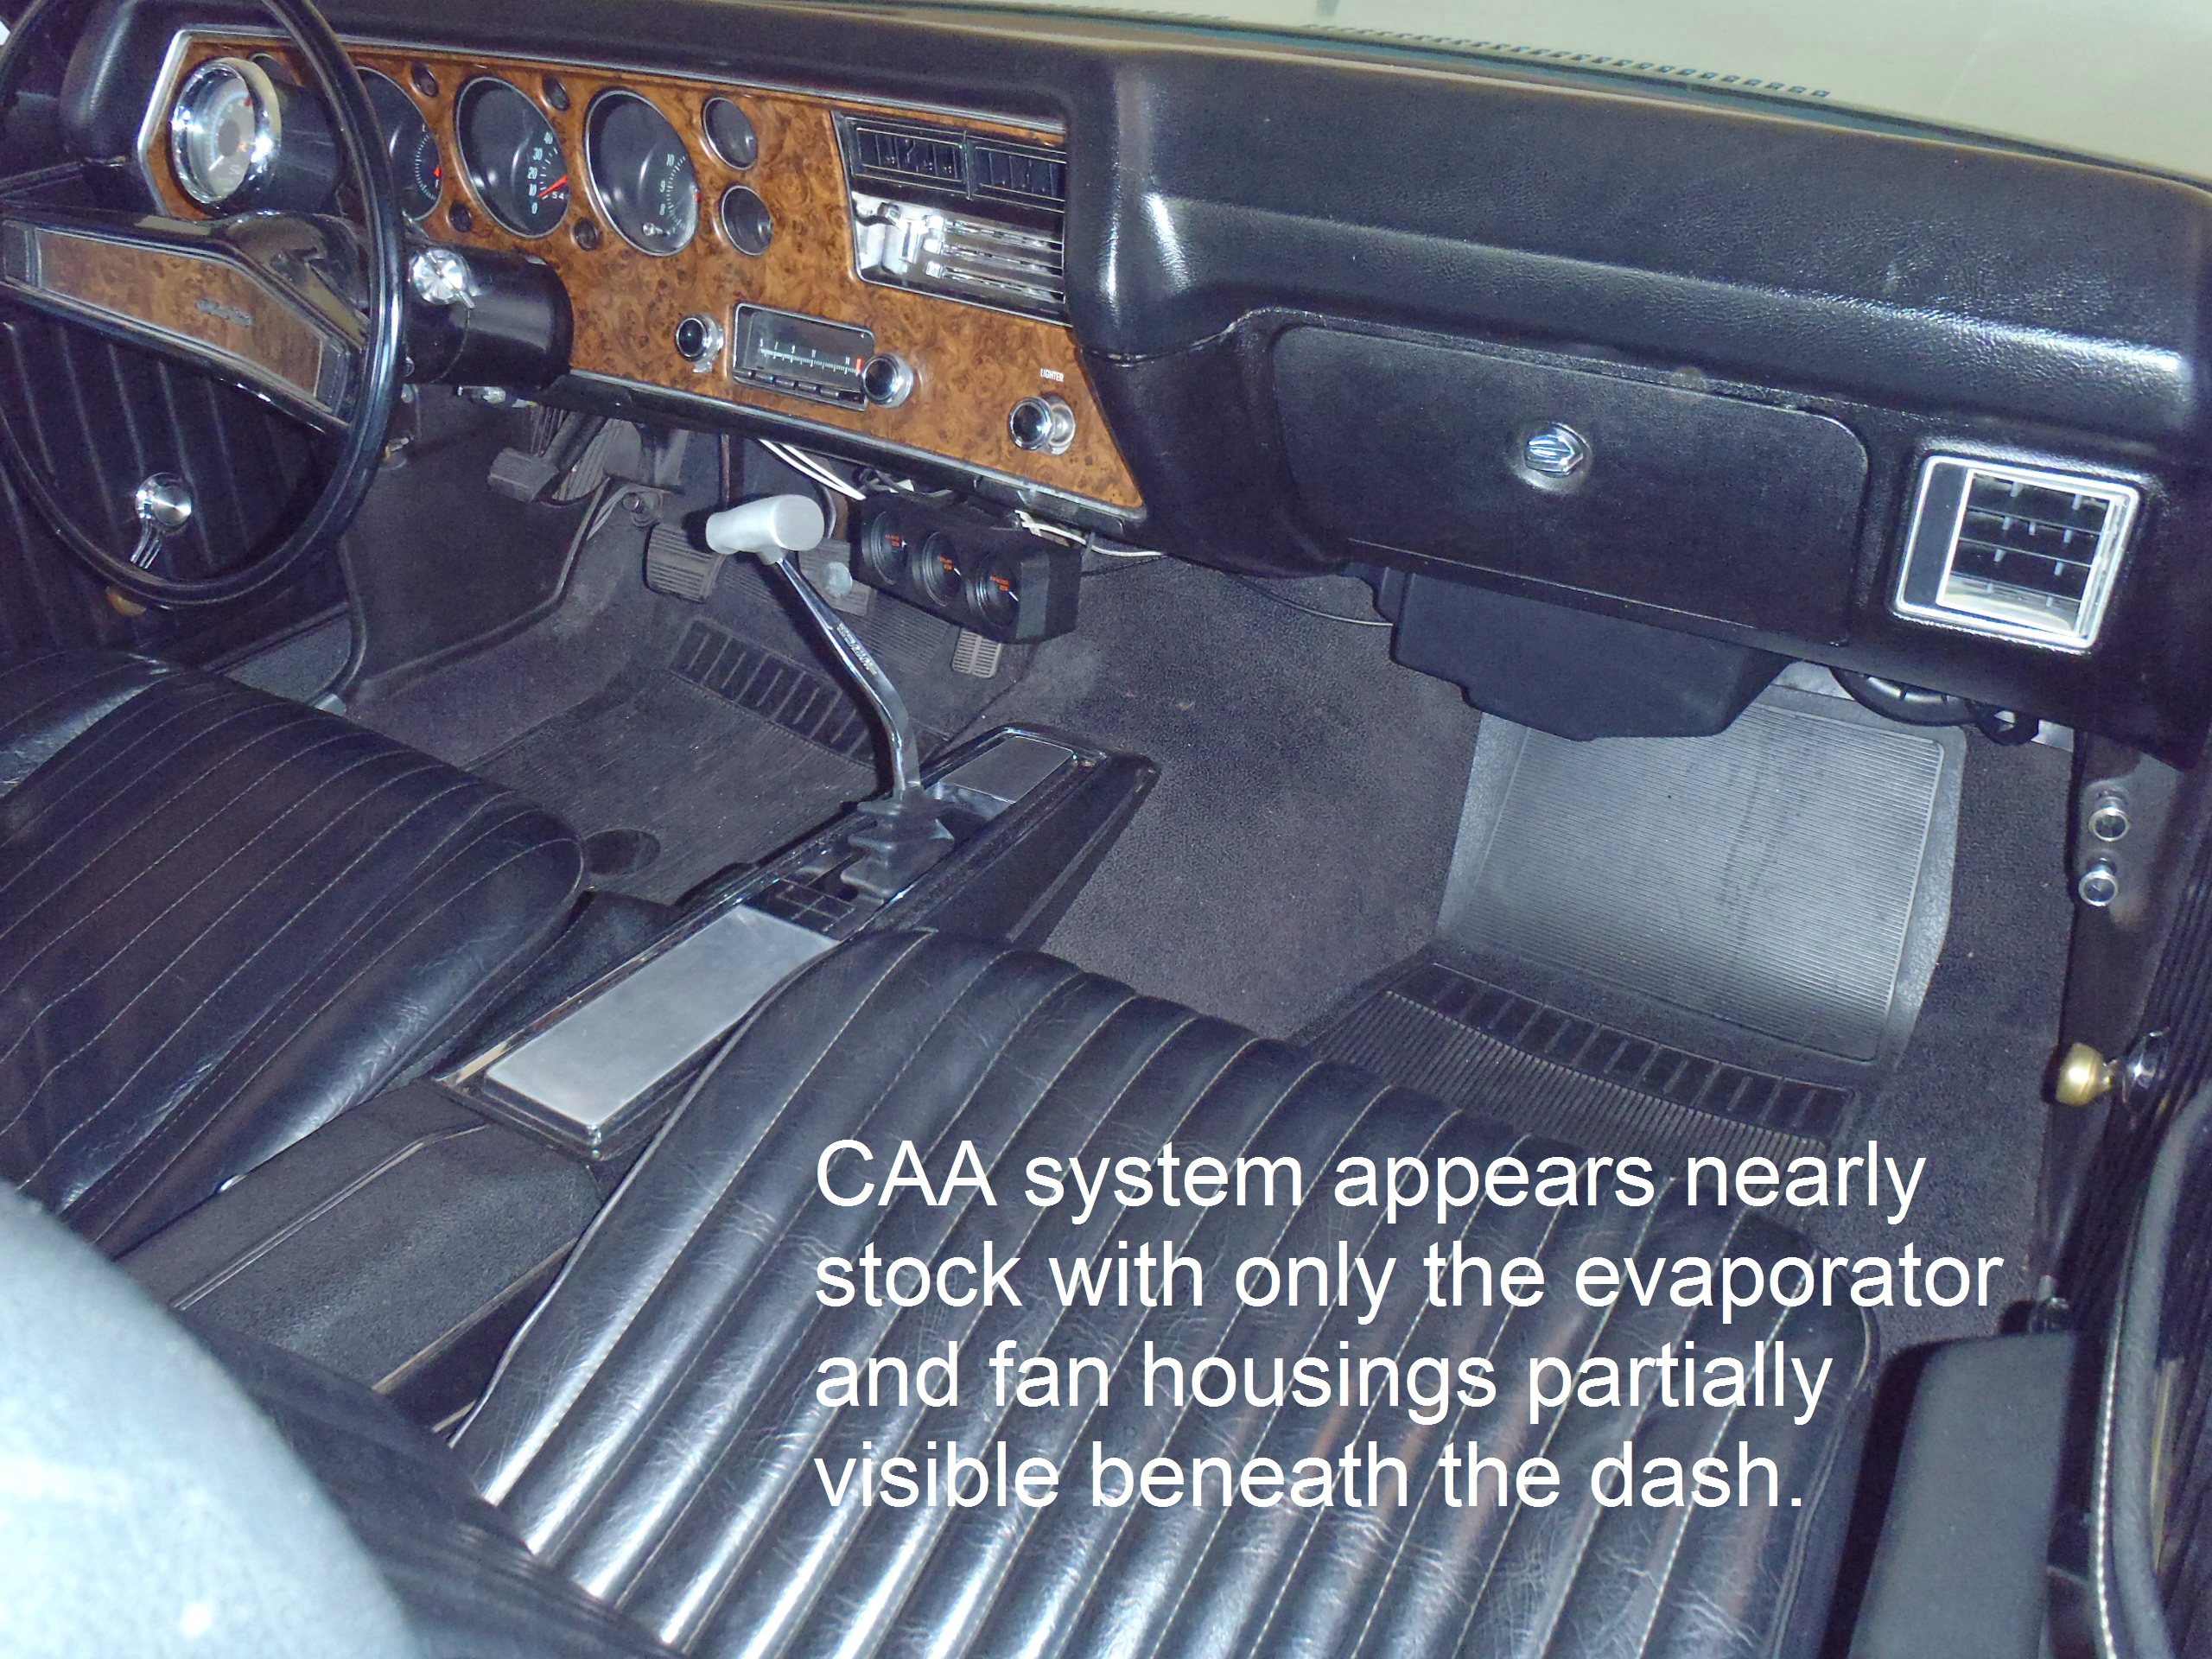
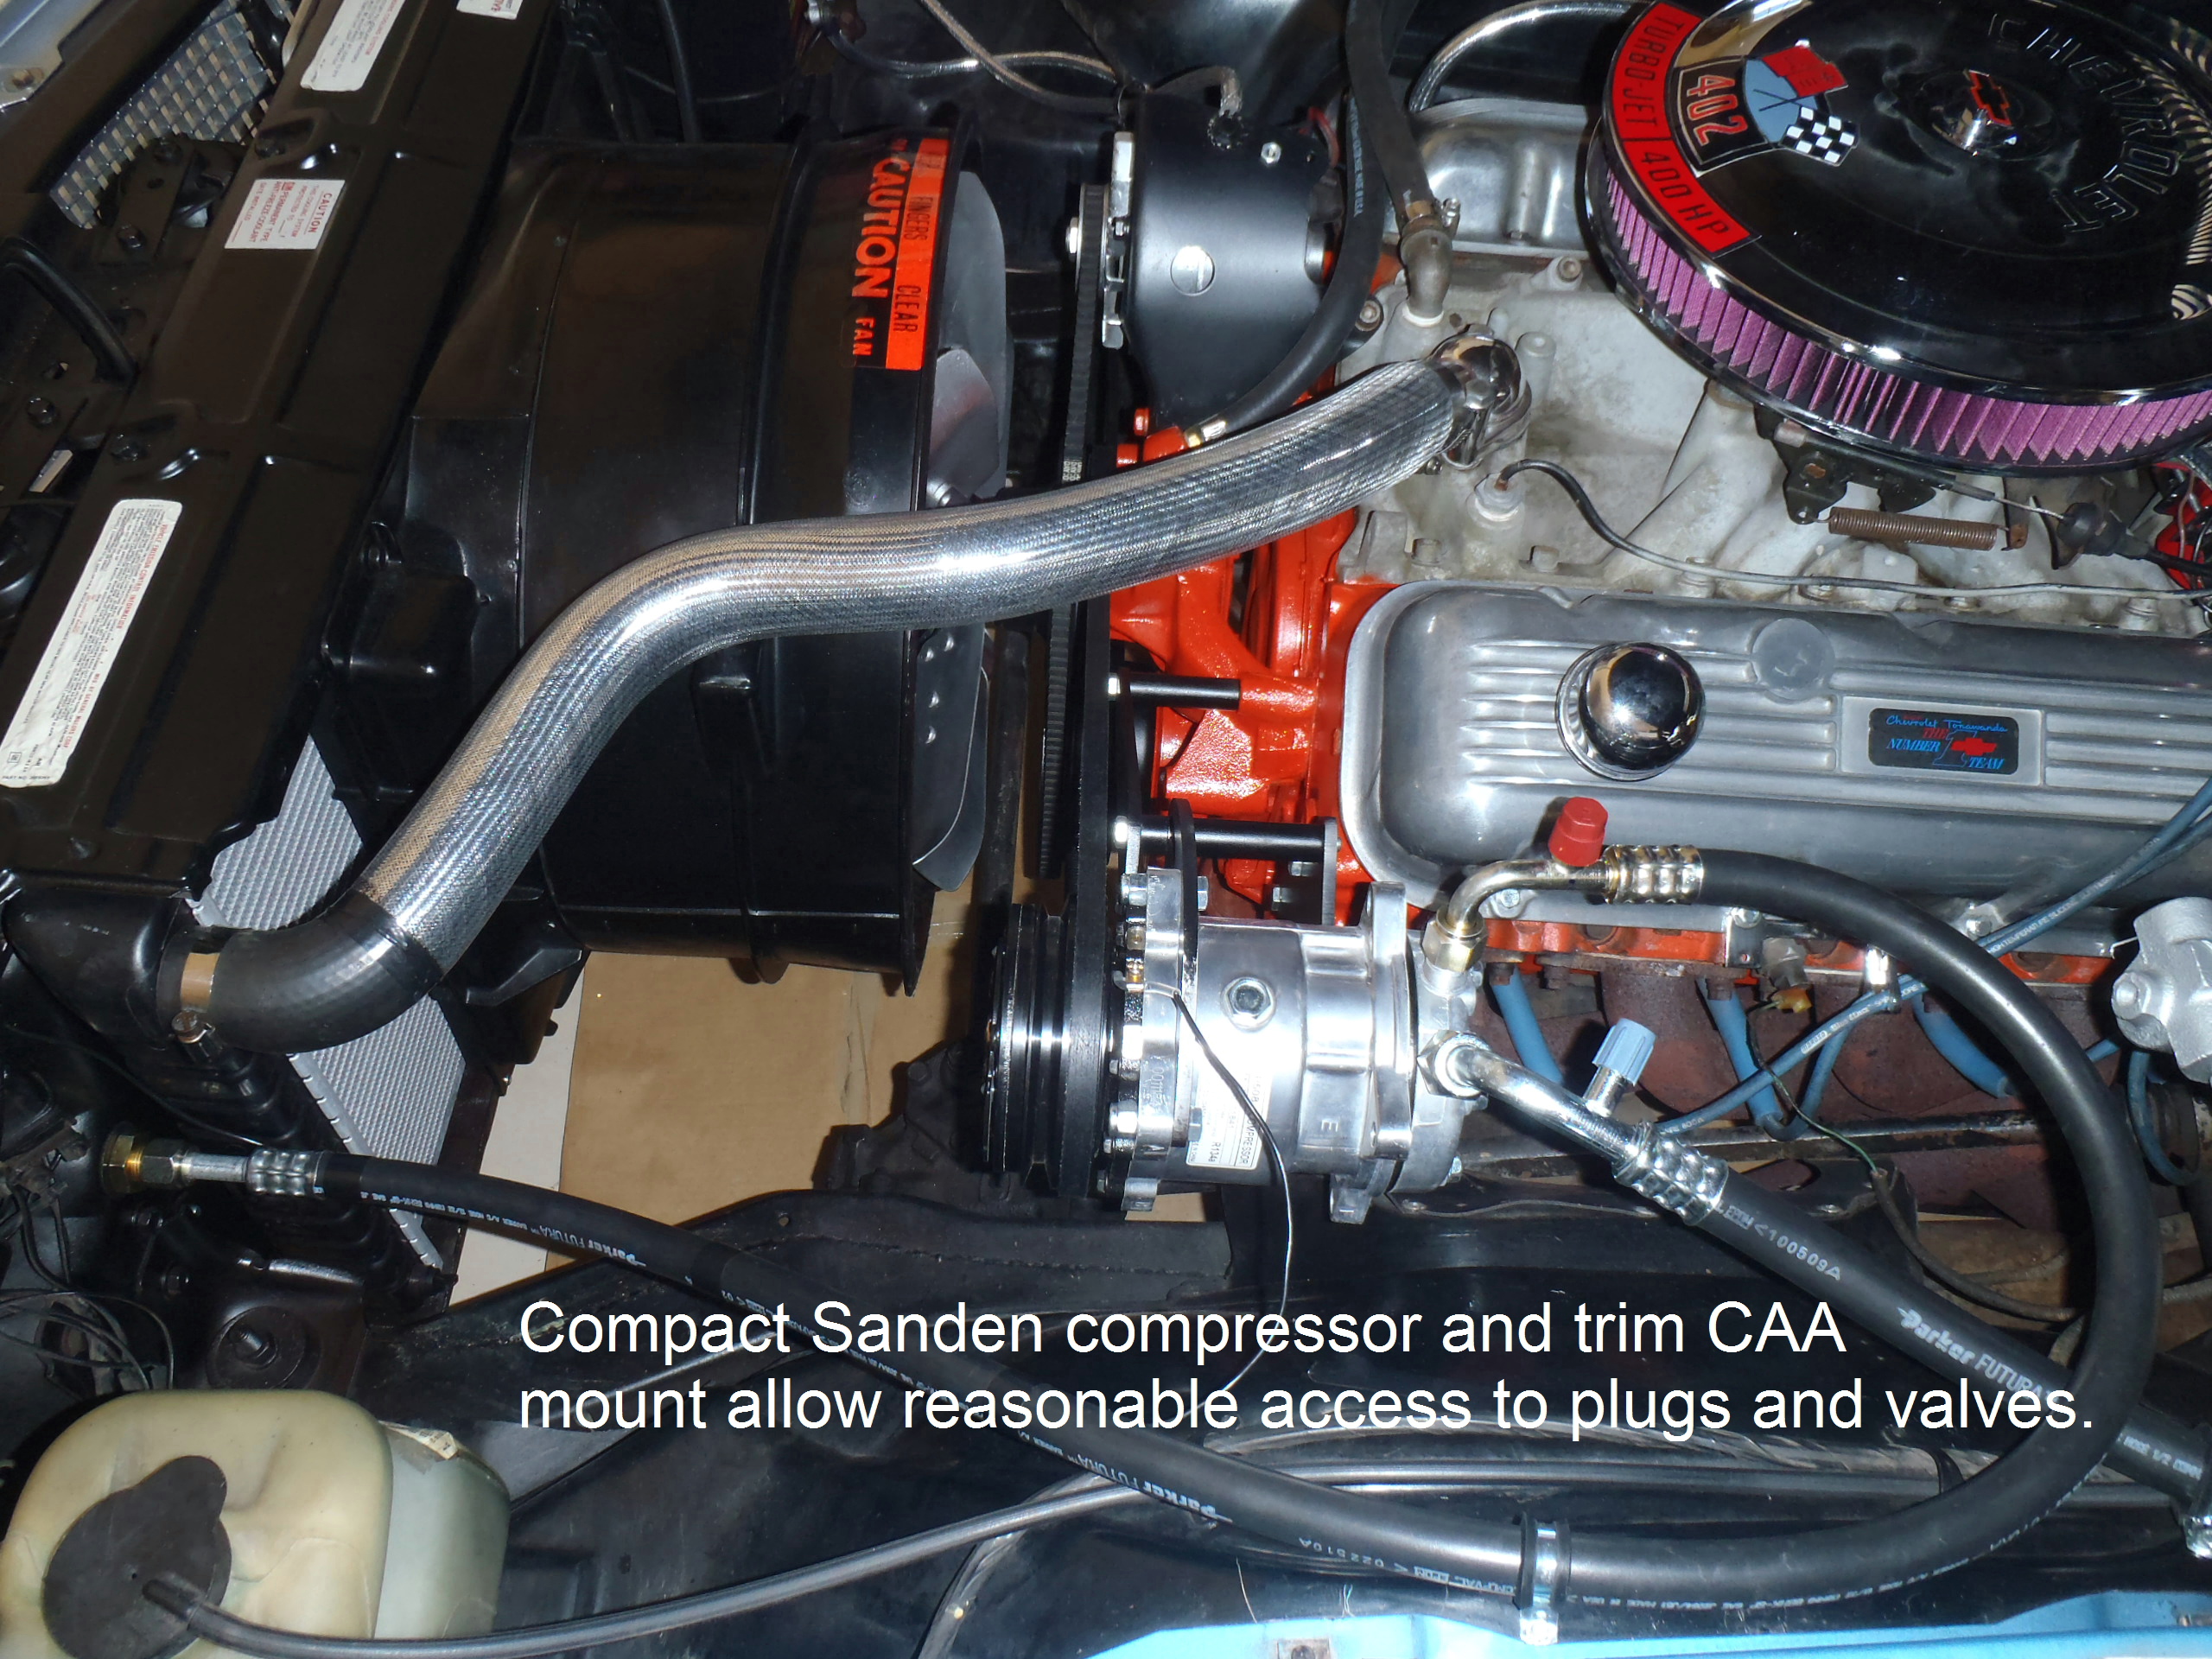
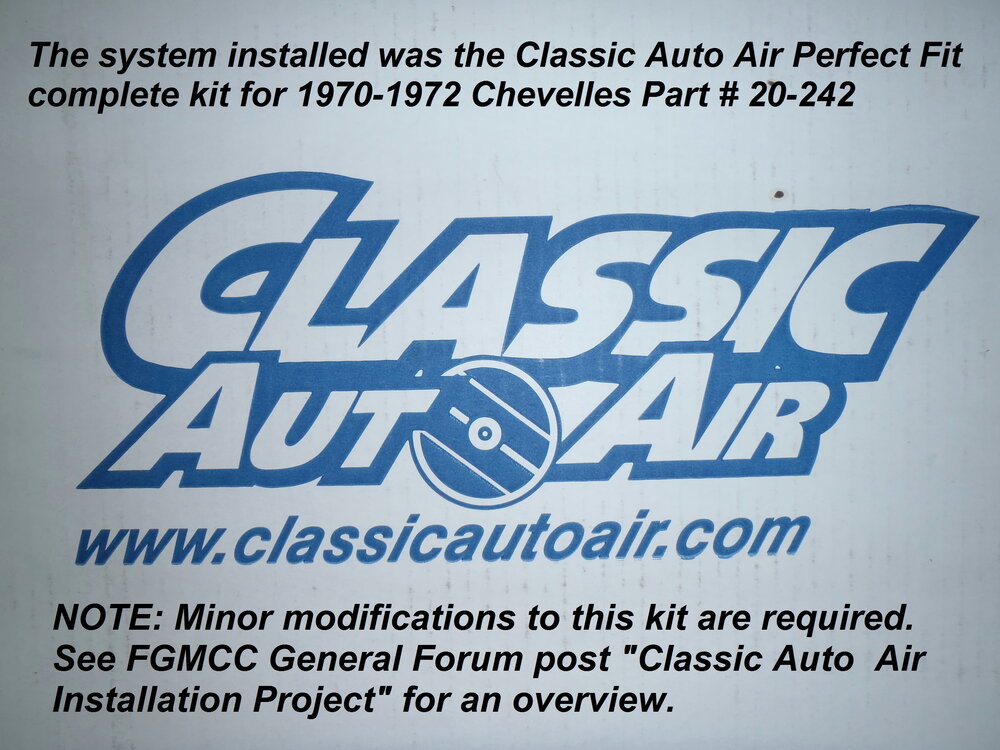
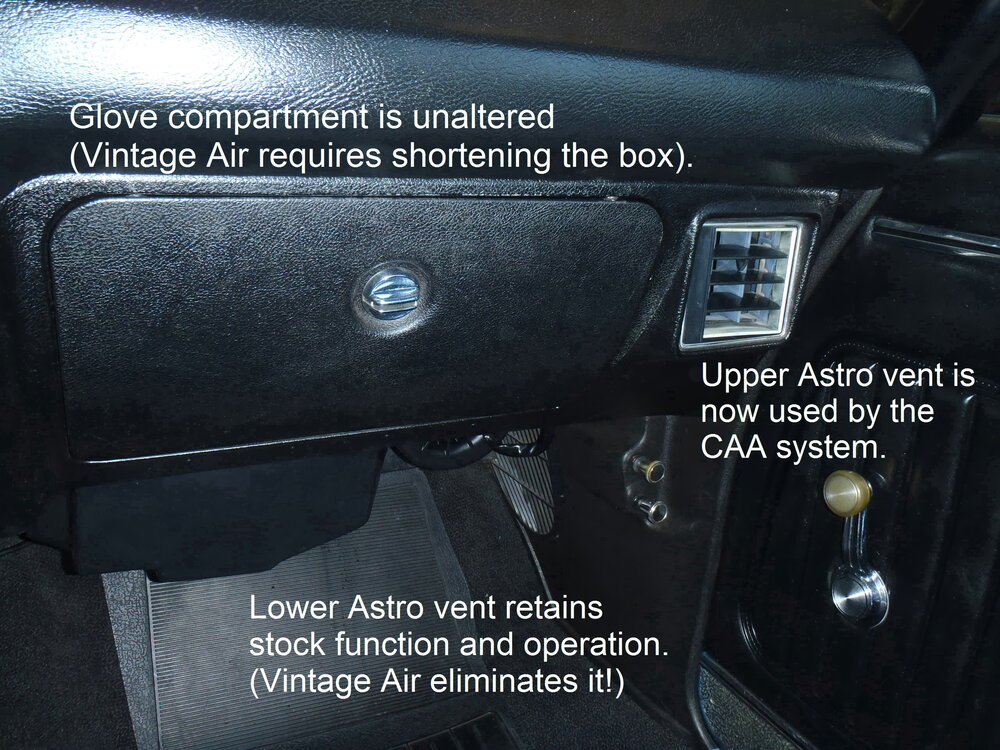
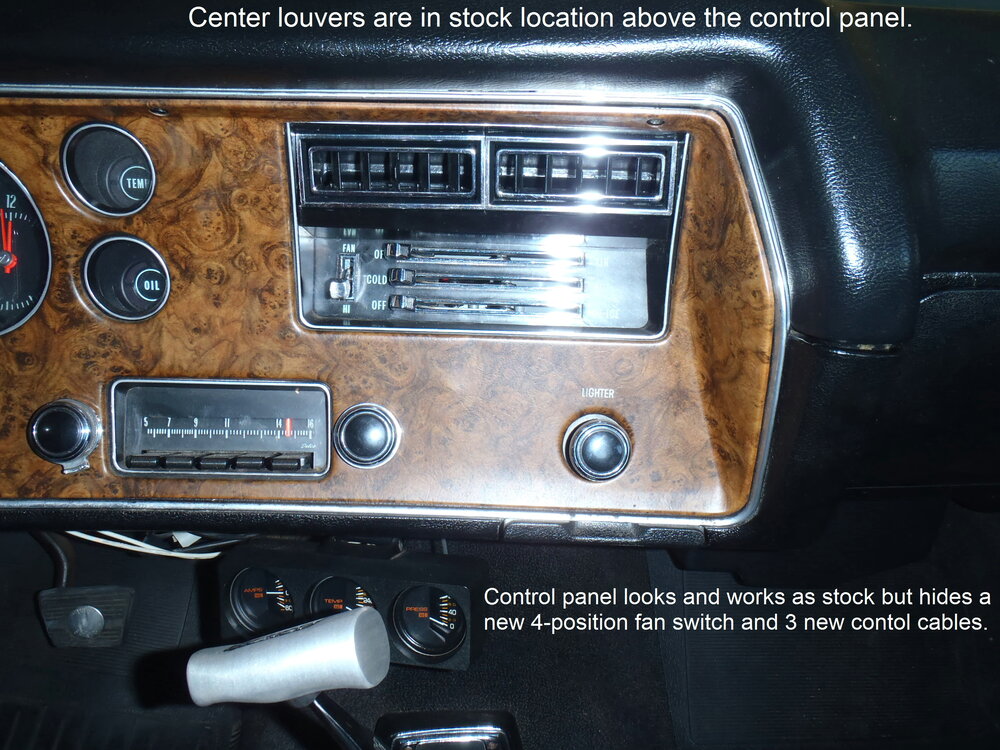
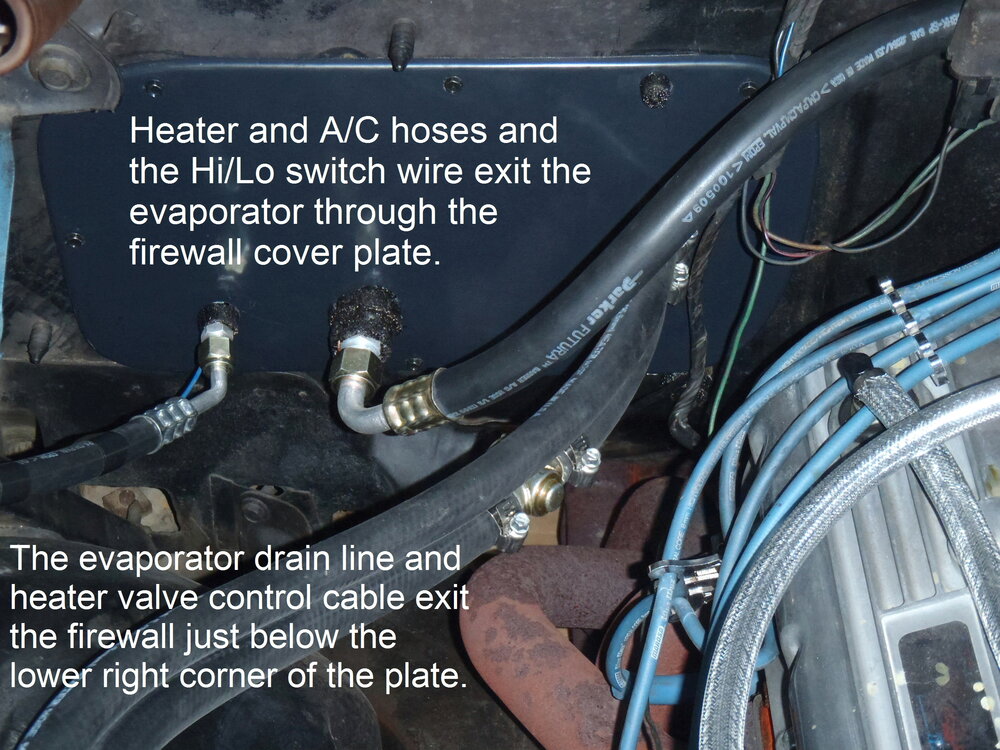
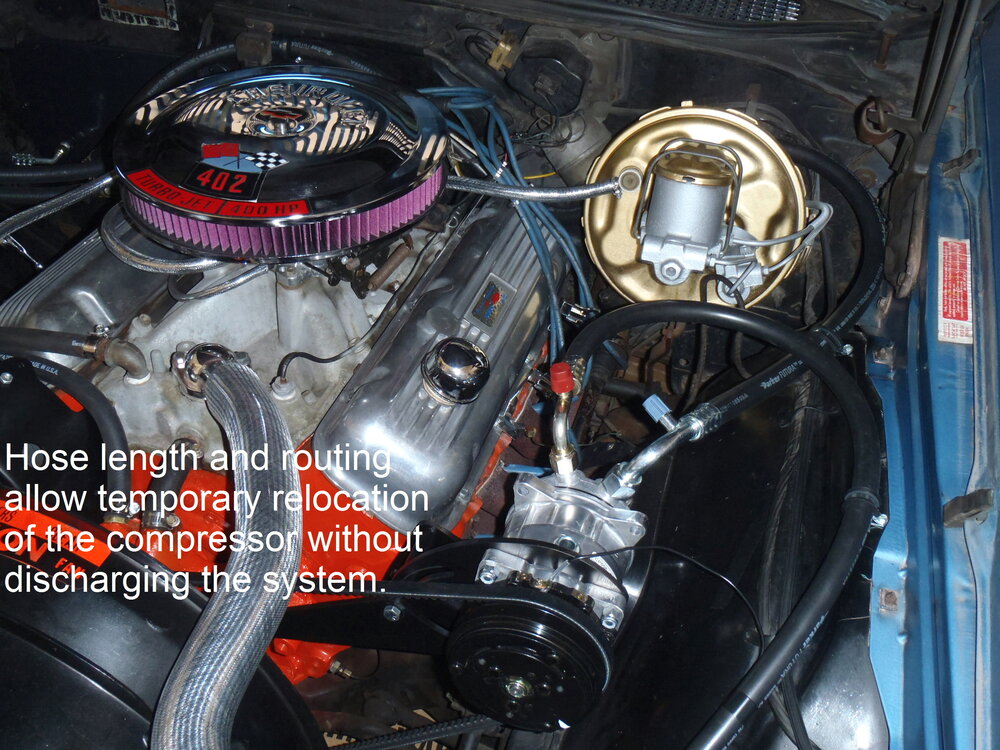
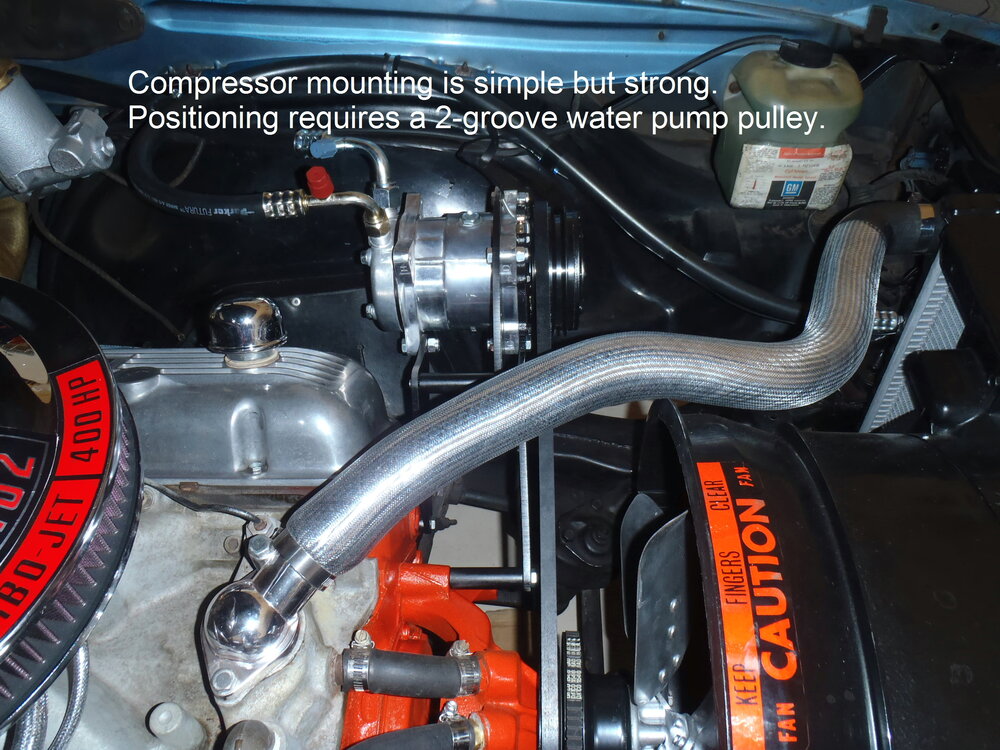
Yes, Jim, I installed Classic Auto Air in my '70 non-AC car and have been very pleased with it. At the time, nearly 10 years ago, I found the sales/support staff at Classic to be most helpful in making sure I got the right kit (a Monte takes longer supply and return hoses than a Chevelle). You can also keep your lower (kick panel vents} fully operational when other kits like Vintage air don't. The condenser was also larger and in a field serviceable unit should the coil need replacement and you don't have to cut the back end out of you glovebox to clear the evaporator unit. You can go with the fully manual controls and have a stock appearance in your dash or you can go digital, your choice. I went with the manual controls for stock appearance and function. Be sure to call them and let them know it is for a first gen Monte and they will help you configure it correctly. I could never get the guys at Vintage Air to return my calls. You can download their instructions before you buy anything and get a good idea of what is involved. Maybe there are new and better options available on the market now, but that was my choice back then and I've never regretted it. A few photos are attached - more are available if you want/need them. Good luck.


-
Bruce, if you can't find an easier way, you can do it by brute force using the Microsoft Office Suite. Just open a New file in PowerPoint and select the Title and Content page layout. It has a title bar and a content box below that which will accept eight types of content from text to graphics to picture/images and more. Ignore the Title bar and click on the lower left icon "pictures" of the Content box, then select the photo you want to reverse from your file system. That will insert the photo onto your blank page. Click anywhere on the page to leave Insert mode and then click on the photo again to select it. Now click on the Arrange function on your task bar and select Rotate from the drop down menu. Finally click on "Flip horizontally" and the negative text image will become readable. Like I said, only if you can't find an easier way ... 😄
-
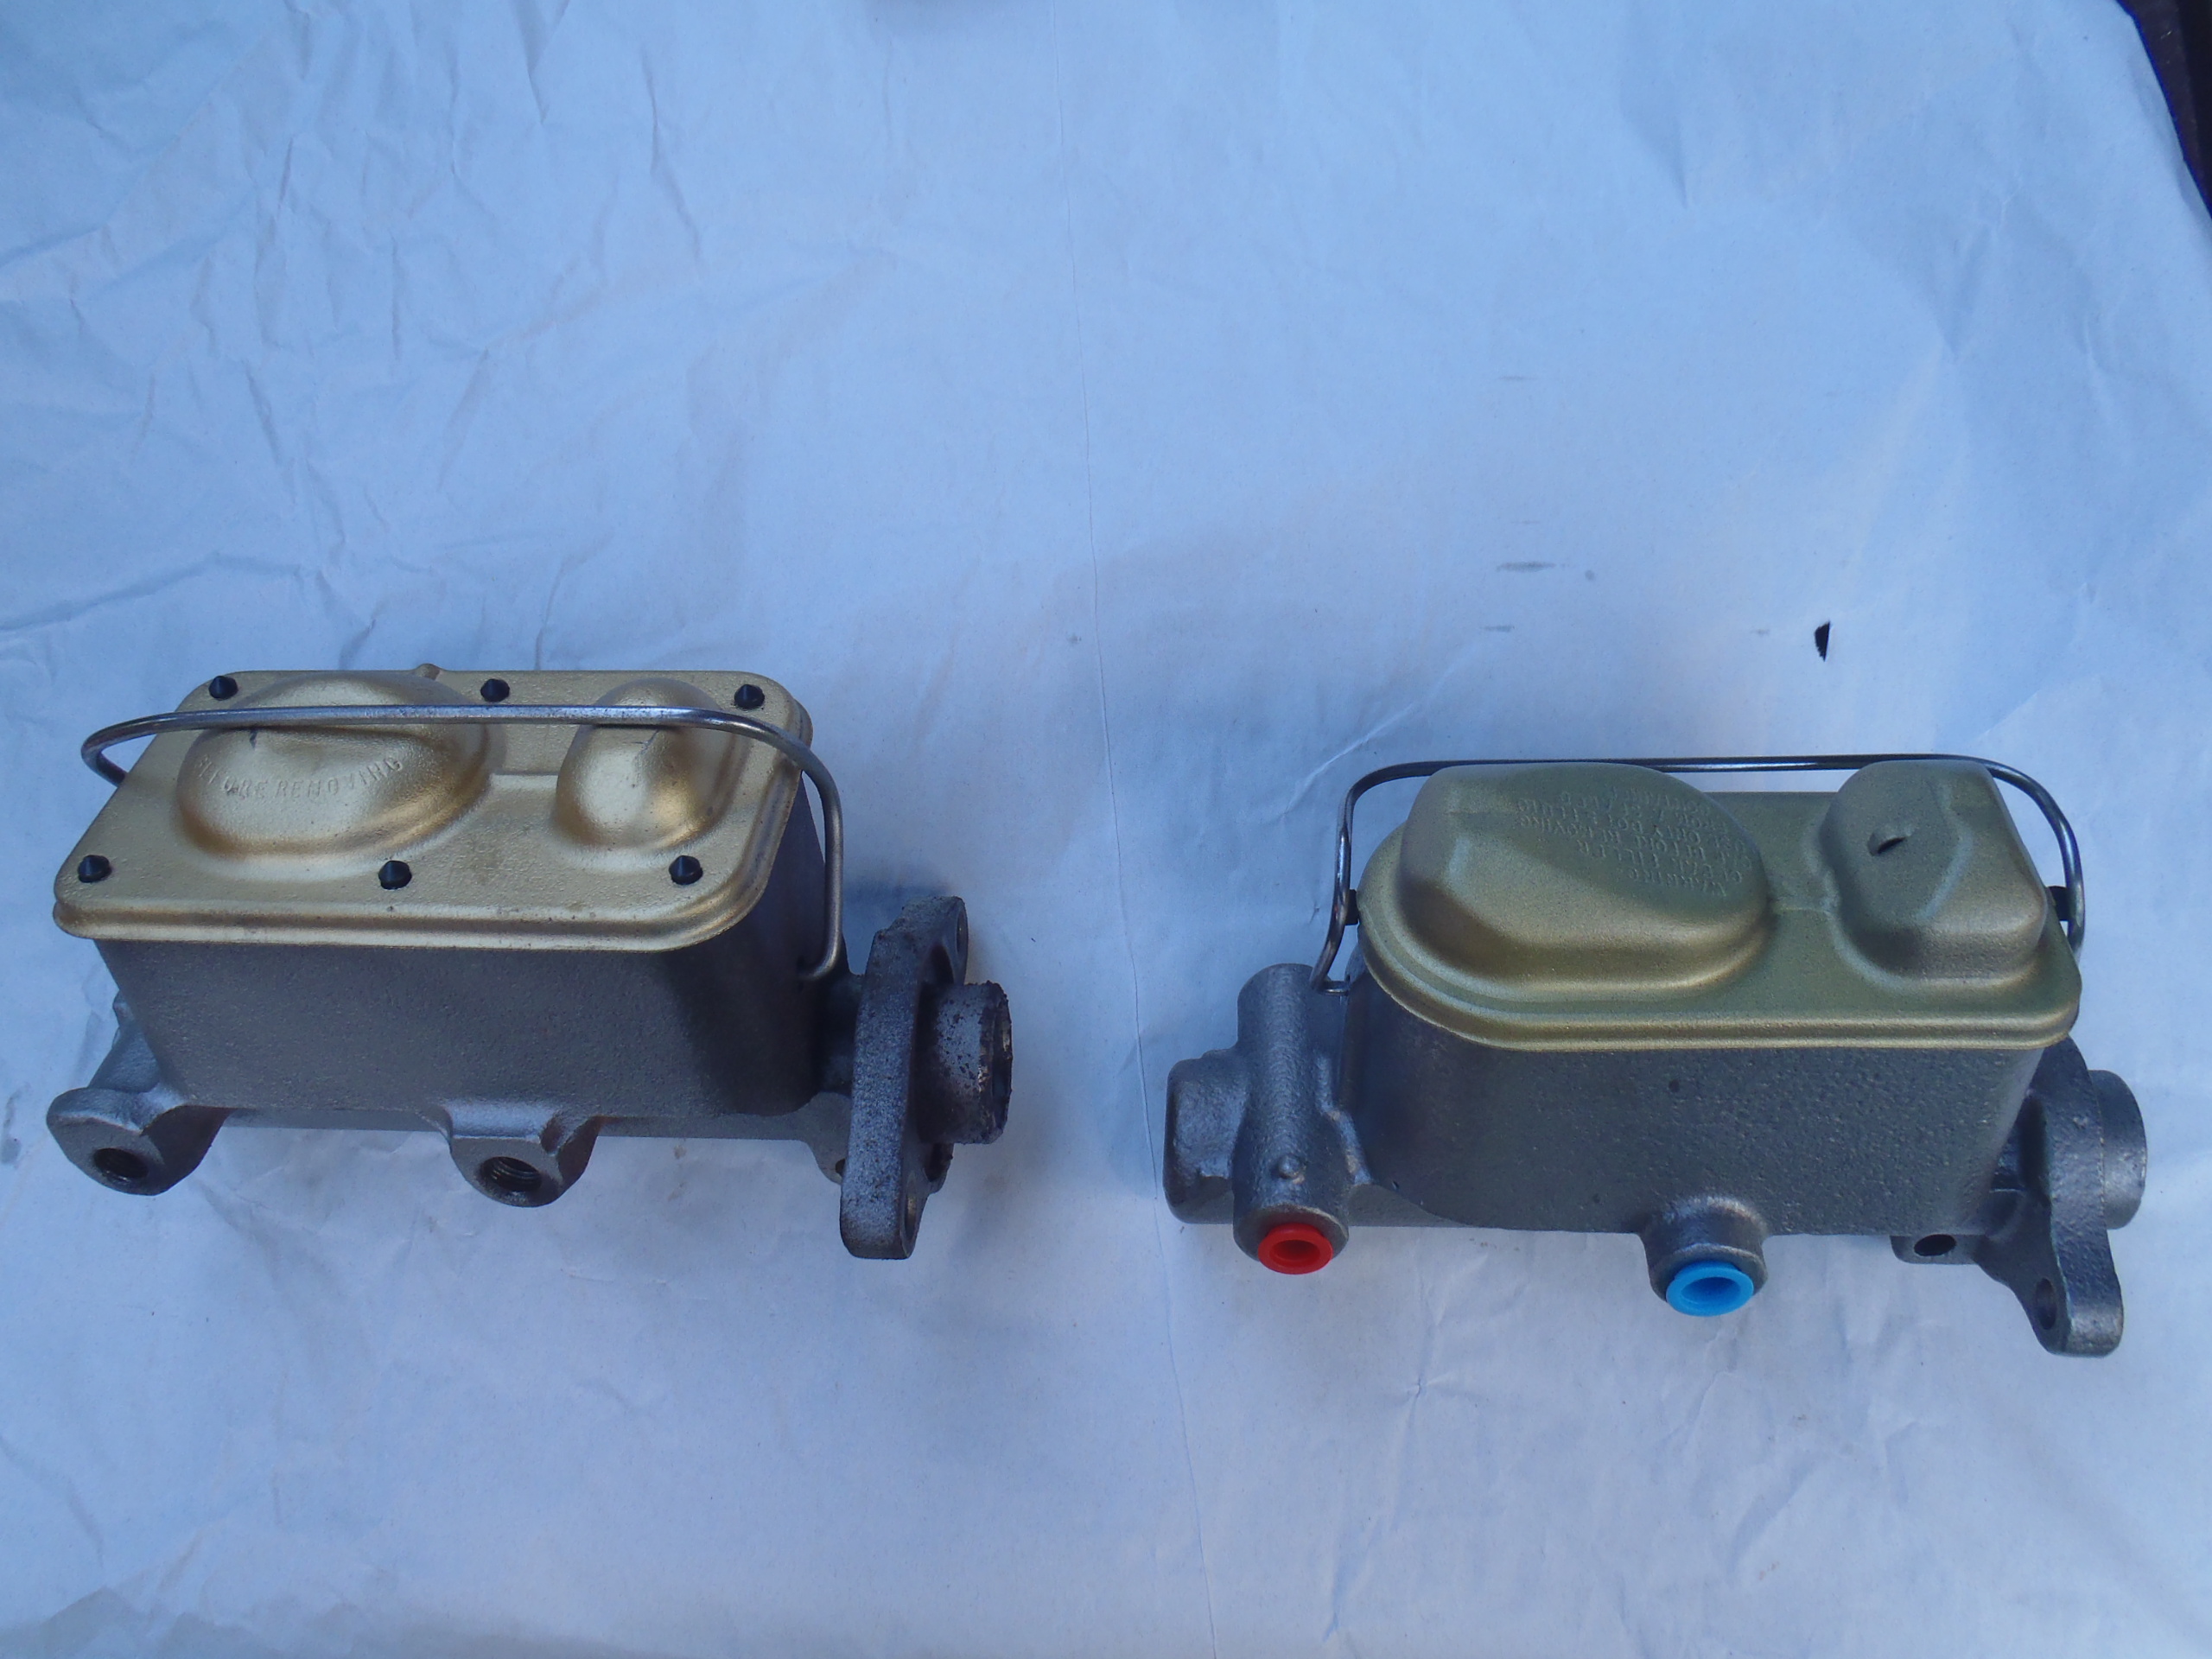
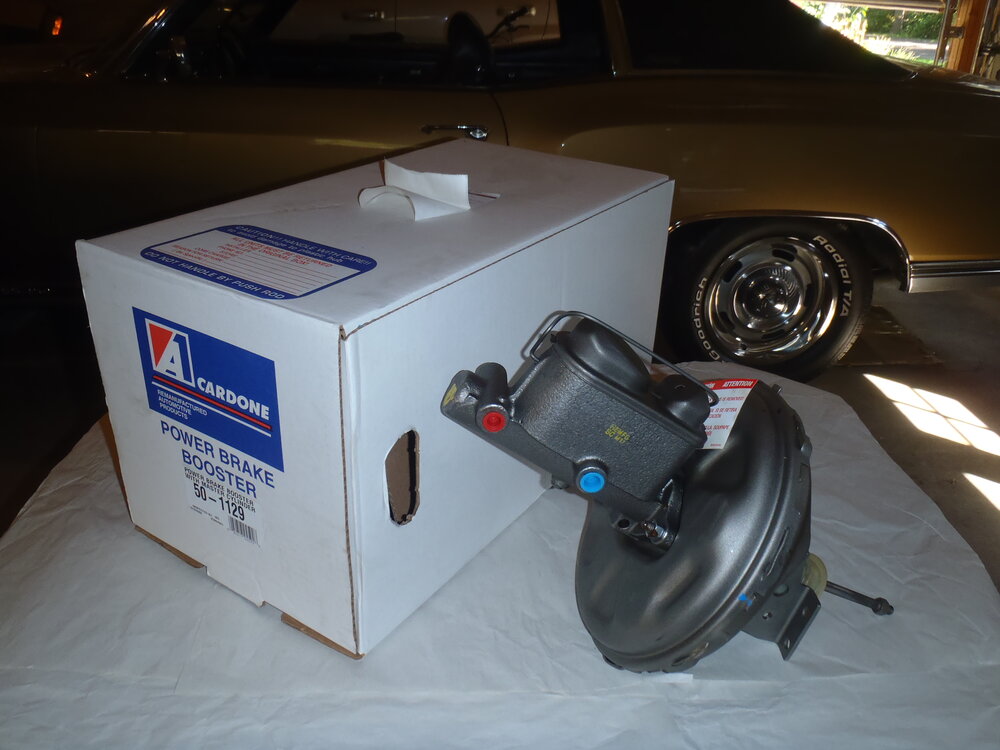
Grant, Some assembly plants used Delco Moraine master cylinder while others used a Bendix. They are functionally equivalent and interchangeable although each has a unique length actuator rod that must be used with it. When the Delco Moraine master that was on my '70 SS when I bought it (may or may not have been original) failed, I foolishly ordered a rebuilt master cylinder/booster assembly. The one I got from Cardone had a Bendix master attached and the correct actuator rod (photo below). The rebuilt assembly looked good and bolted right up but it absolutely would not prime. I finally removed it and inspected it closely. Sure enough it had been assembled with the wrong length piston so the cylinder could never get fluid from the reservoir because the transfer valve opening was covered by the piston throughout the normal stroke. I took it back to the parts store and they gladly replaced it with another Bendix unit that had the correct piston. It bench-primed easily and functioned correctly once installed. After all that hassle, I wish I had simply rebuilt the Delco Moraine unit myself - rebuild kits are available very reasonable. Frankly I far prefer the looks of the Delco Moraine unit (shown on the left in the photo below - Bendix unit is on the right). I was planning to rebuild the Delco and re-install it but sold my SS before I got that done. I agree that you would be better off staying away from a rebuilt unit. If you have a Delco, consider rebuilding it yourself or buying a new one with the bleeder taps on the line connector bosses. Good luck.

-
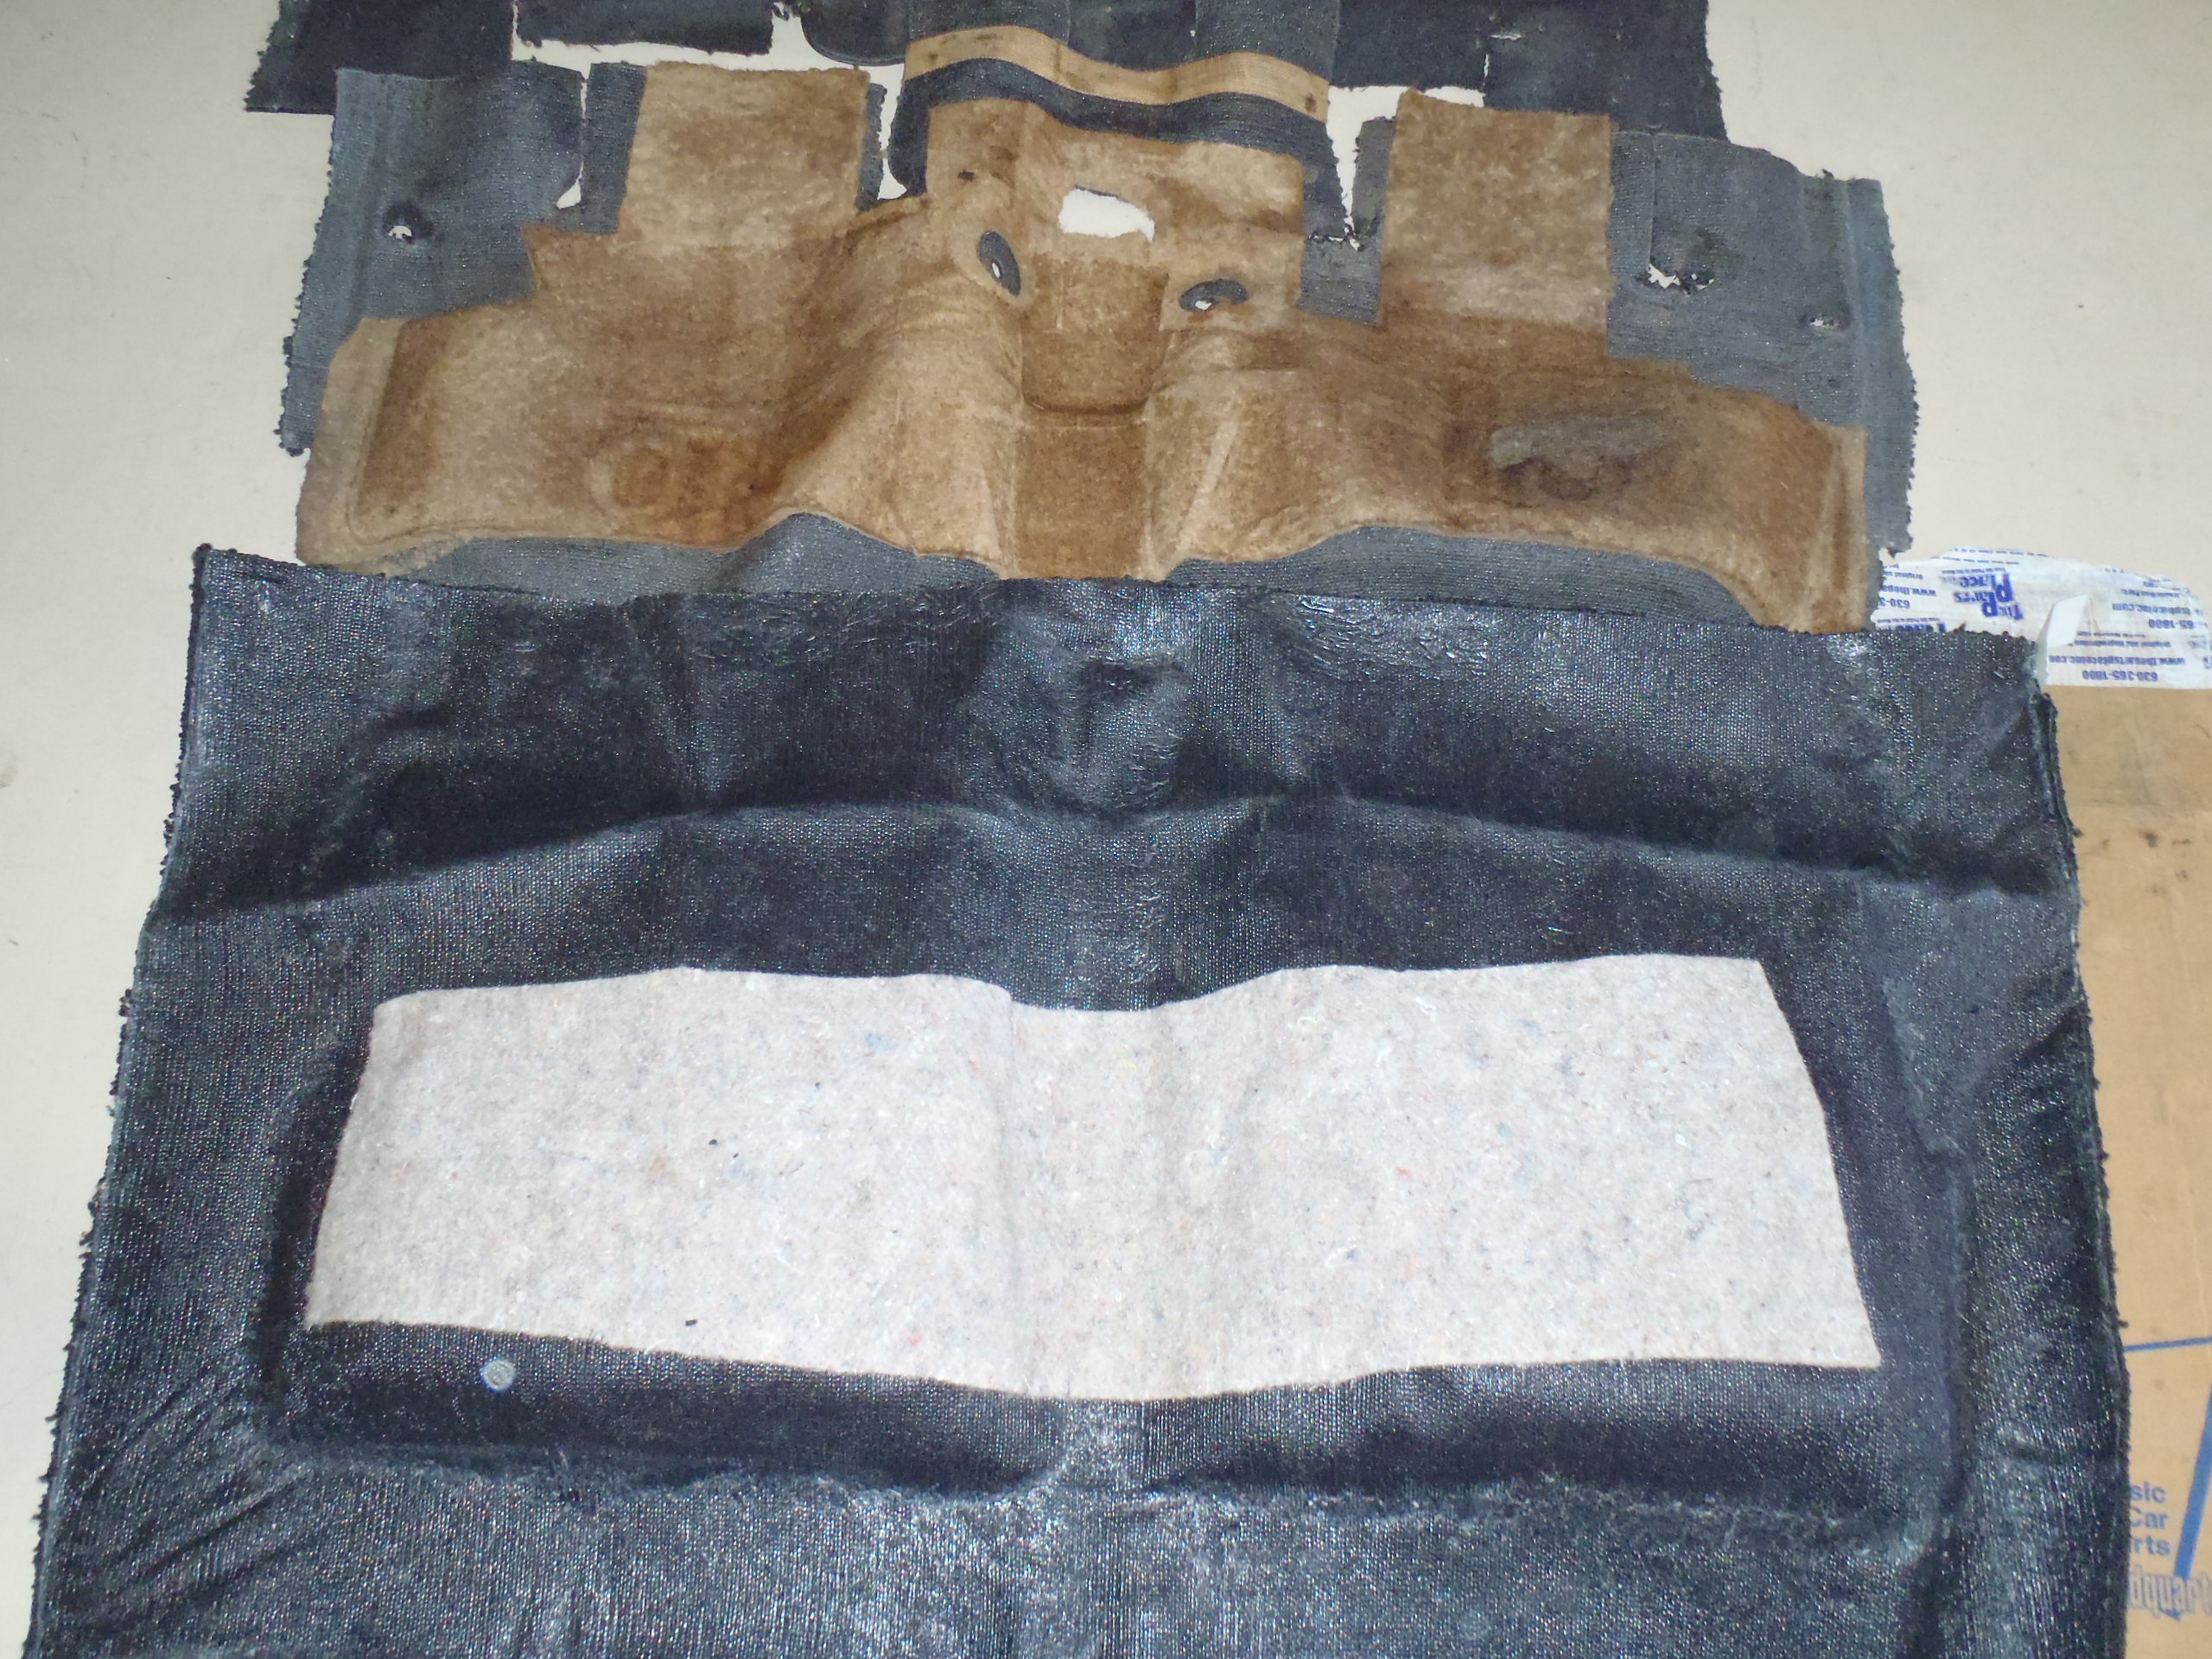
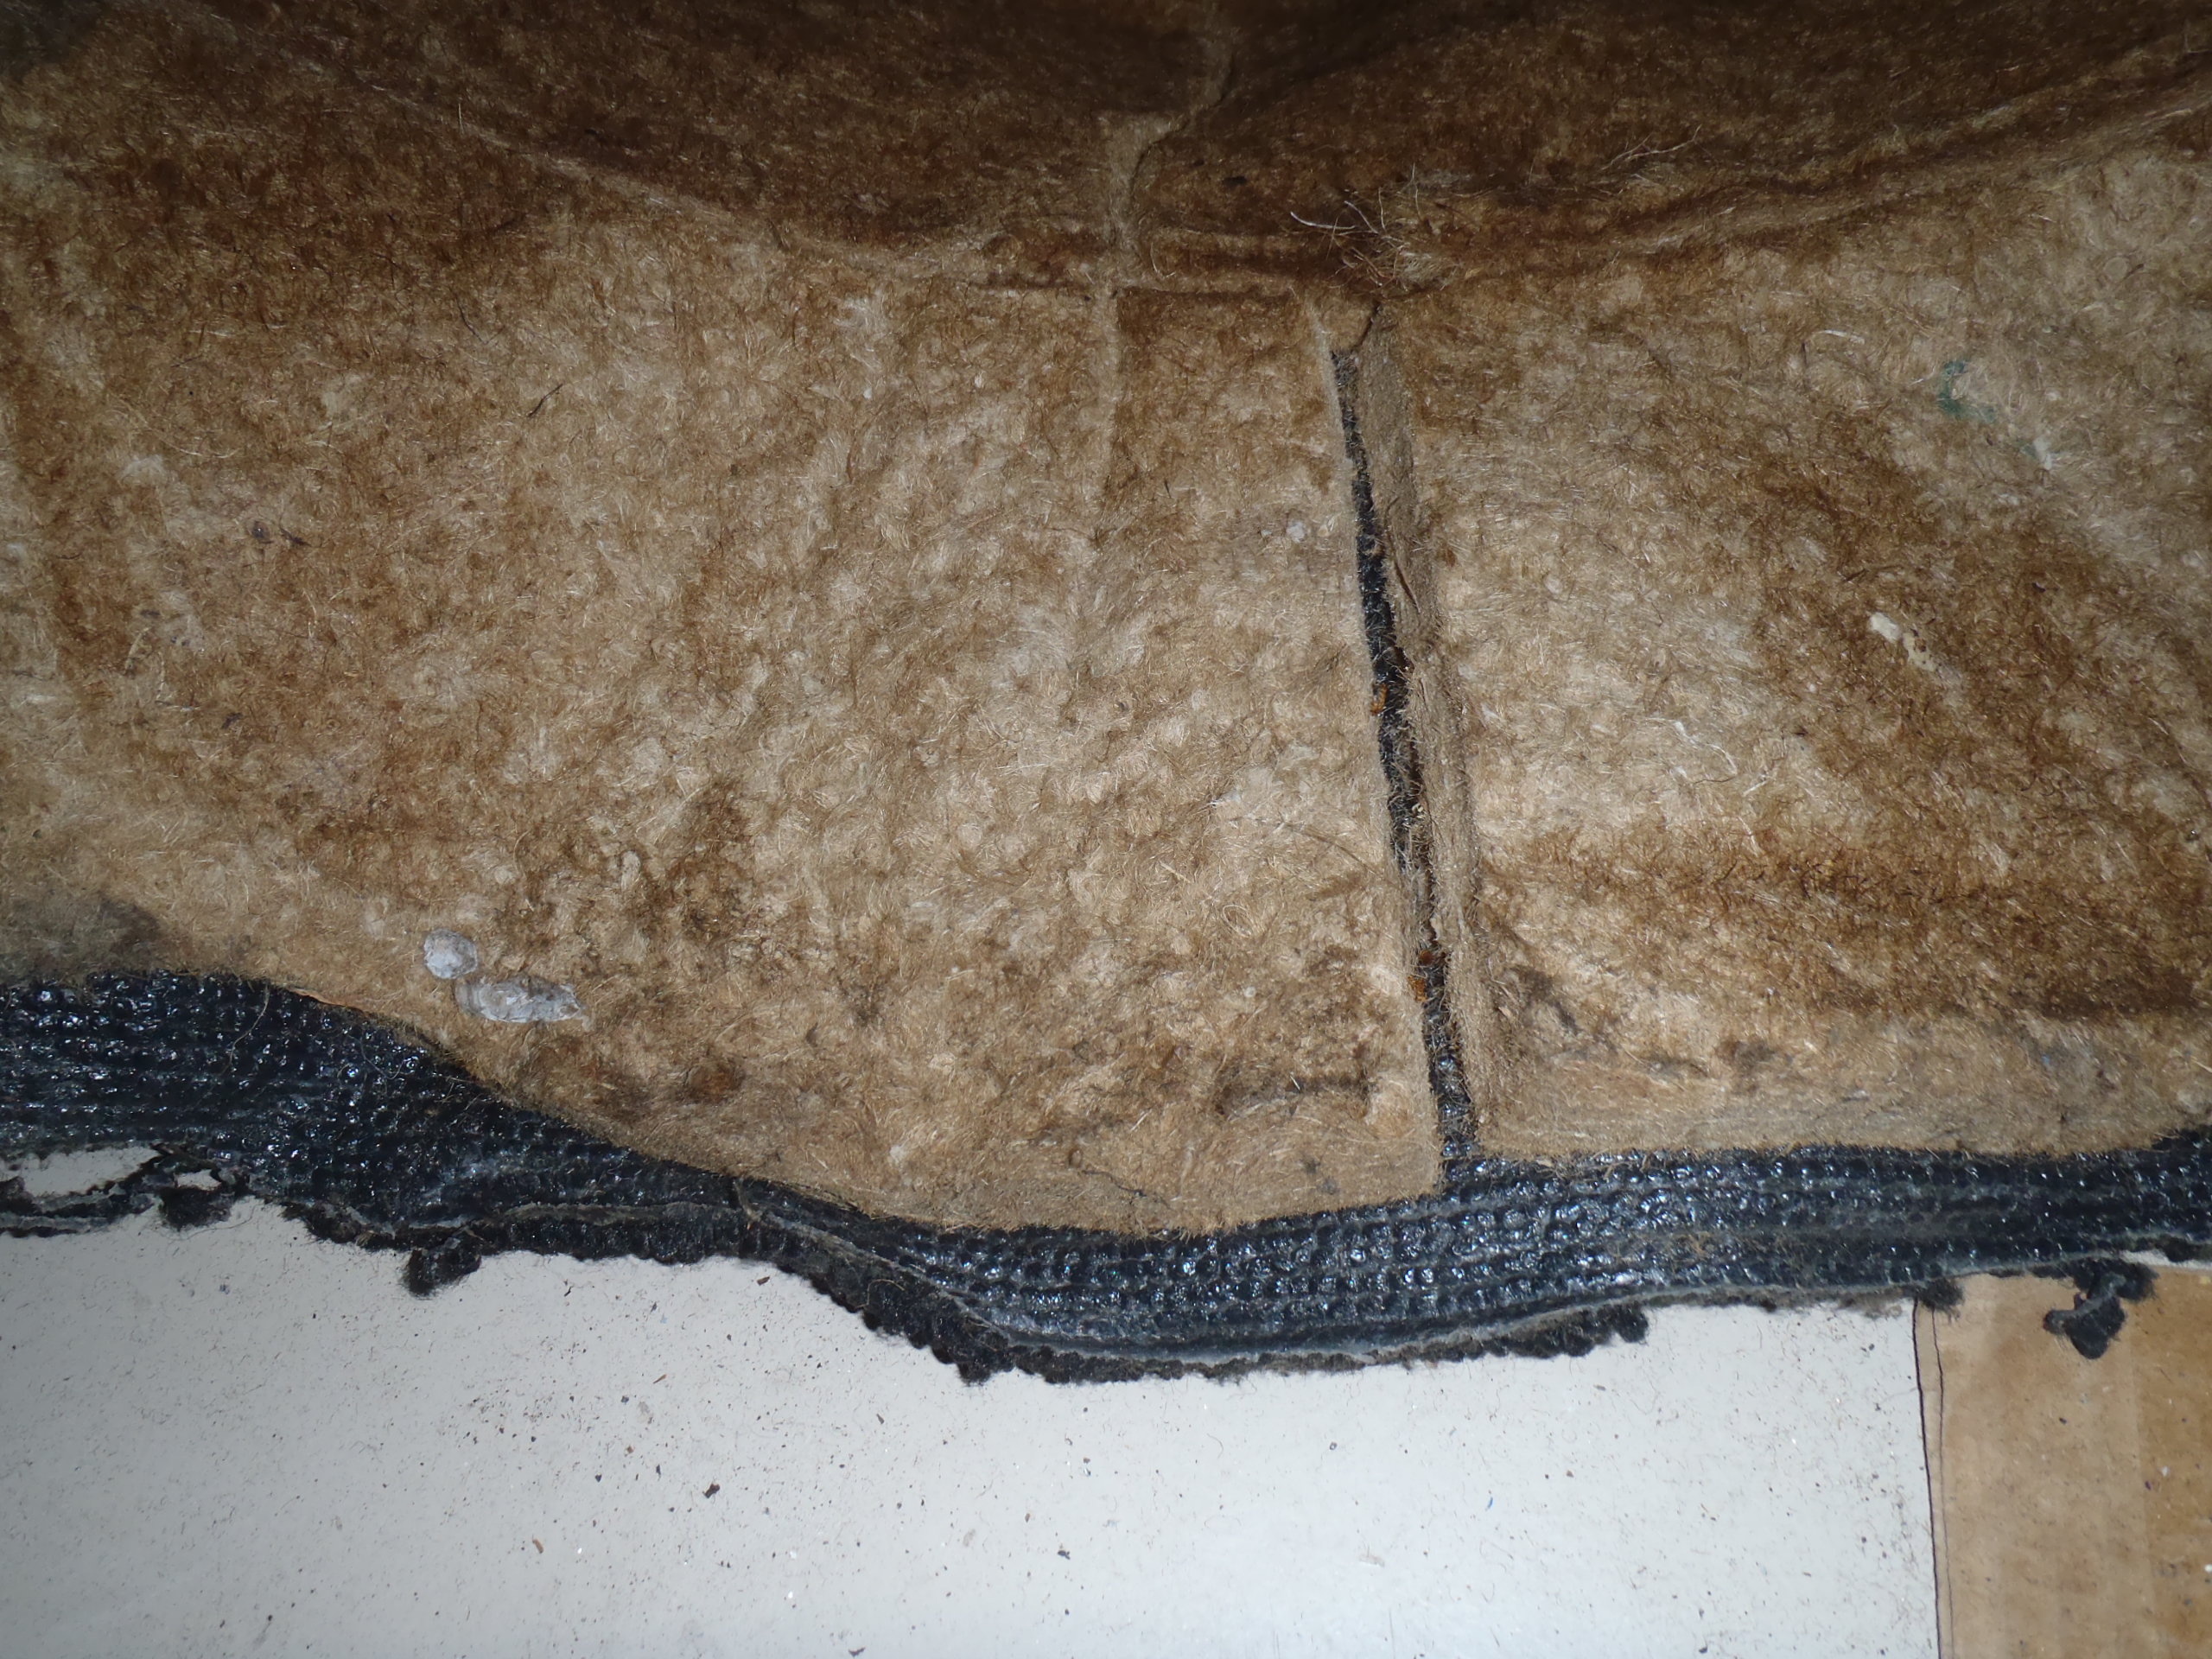
Hey, Anthony, Dynamat is a great product and still available, as are several alternatives with lesser known names and much lower price tags. Since it's going under the carpet anyway (and if budget is any concern), you might want to look at an unlikely alternative that I have used successfully. Frost King FV516 Duct Insulation Self Adhesive Foil & Foam comes in 12" wide, 15' long rolls and costs less than a fourth of typical Dynamat prices per square foot. I picked mine up at Home Depot but you can also order it on eBay if you don't mind paying shipping. Here's a couple of links: https://www.ebay.com/itm/143861344477?chn=ps&norover=1&mkevt=1&mkrid=711-213727-13078-0&mkcid=2&itemid=143861344477&targetid=4581115207302808&device=c&mktype=&googleloc=&poi=&campaignid=410490119&mkgroupid=1240249342282558&rlsatarget=pla-4581115207302808&abcId=9300491&merchantid=51291&msclkid=c3d71355df241c9c5dbc73df43ae62c8 https://www.ebay.com/itm/393194074439?chn=ps&norover=1&mkevt=1&mkrid=711-213727-13078-0&mkcid=2&itemid=393194074439&targetid=4580771609030758&device=c&mktype=&googleloc=&poi=&campaignid=410490118&mkgroupid=1234751784804585&rlsatarget=pla-4580771609030758&abcId=9300491&merchantid=51291&msclkid=3fb635efefb51111aee05565742517f0 Good luck with your project.
-
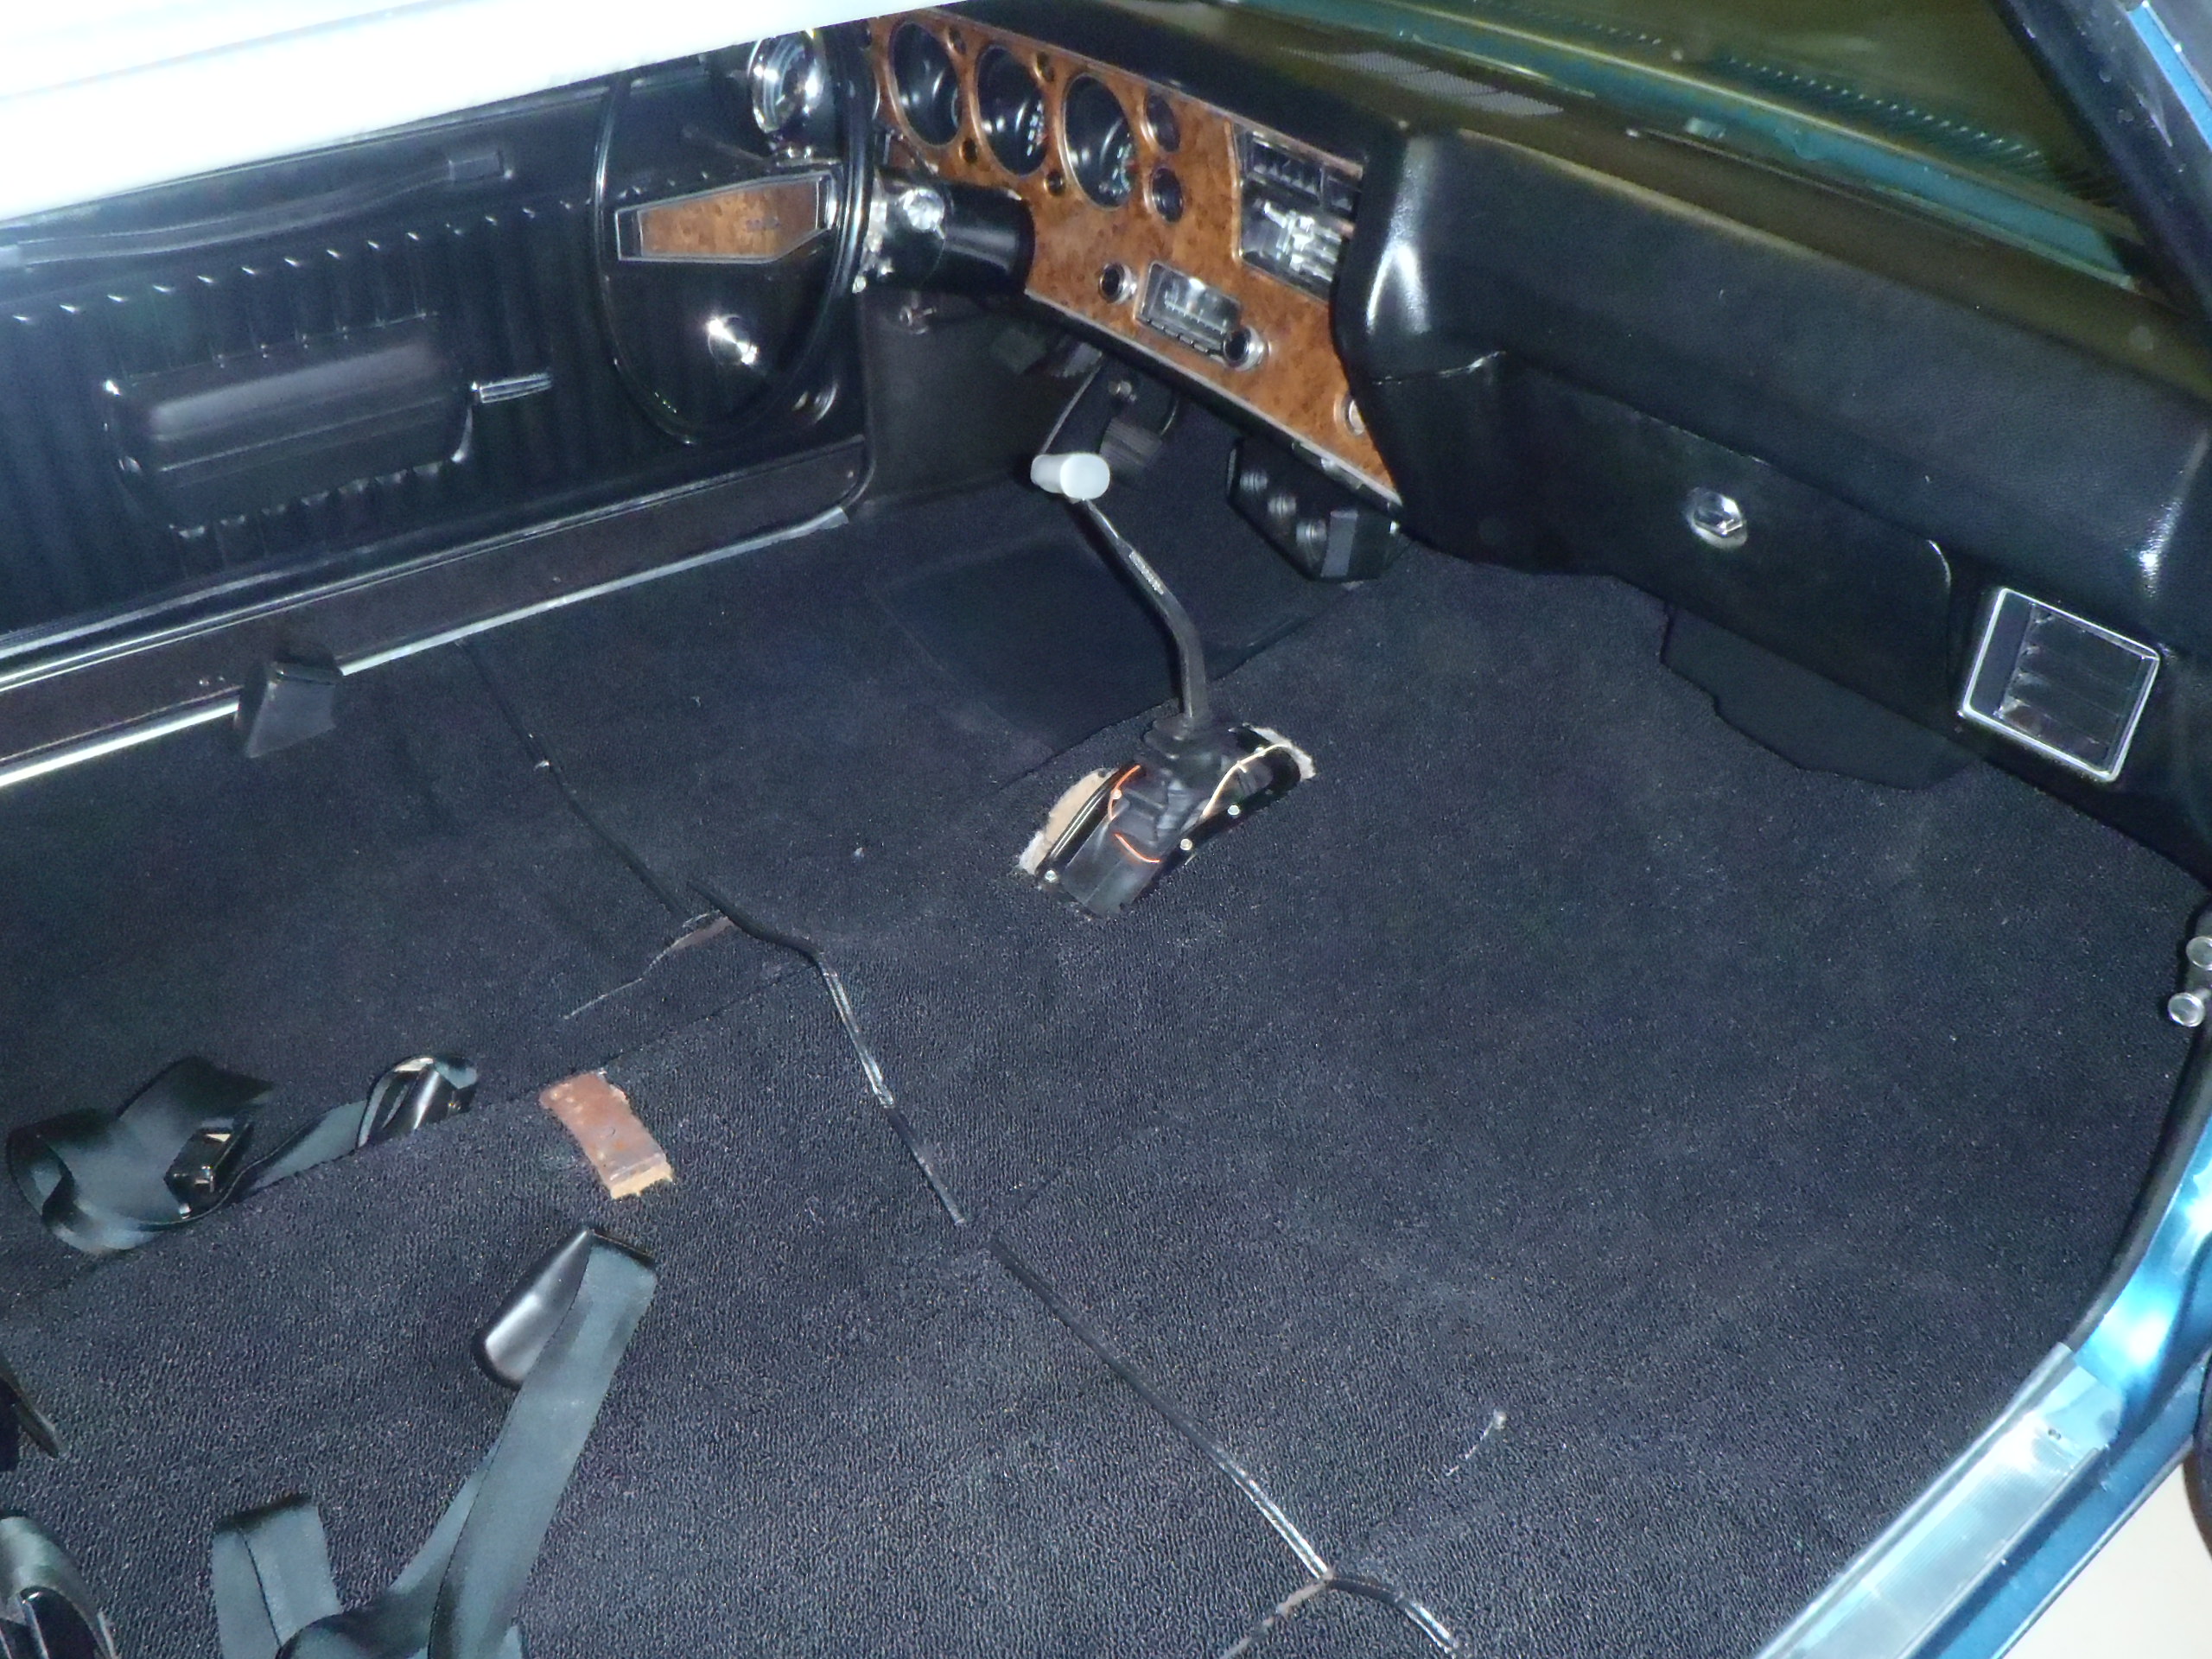
Replacing the carpet was the first major project I did after buying my first Monte eleven years ago. I ordered it from The Parts Place but it was ACC carpet according to the tags. Wish I had known about the mass backing then (assuming it was available). I actually removed the padding from the original carpet and used it as a carpet pad with the new carpet (and thin attached pad) installed on top. Regarding trimming your new carpet, I used the old original carpet at a pattern, laying it over the new carpet (finished side down on both pieces), carefully positioning it around seat, console and shifter cut-outs and pinning it in place with numerous small finish nails like a dress-maker pins a paper pattern to cloth material before cutting. I knew the original carpet fit perfectly so cutting the new carpet no more than a 1/2" proud allowed a for a good fit without further trimming. Good luck with your install. You will love the fresh new look and smell!


-
The dash lights are actually white LEDs. For '70 only, Chevy used green iridescent numerals and markings on the Monte Carlo dash instruments. The combination of white lite and green markings creates the green glow. '71 and '72 Montes have white numerals and markings but you could go with colored LEDs if you want a certain effect. If you are going to add gauges (like a tach, water temp, ammeter) to a '70 instrument cluster and want them to match, you need to specify gauges with the green tinted markings and numerals. I did the full gauge dash conversion so I don't know about just swapping a tach for the clock. I would think you would need a new printed circuit board but maybe someone has a slick conversion that is more of a direct replacement. The biggest part of the job (IMO) is removing the dash or at least pulling it out far enough to remove the instrument cluster. If you have never done that, I suggest you take your time and try not to damage it. Some folks are fast mechanics but I'd rather take things slow and try to do it right the first time (not that I always do, of course). I also tend to spread a project out over several days rather than trying to get it done in one session. Of all the projects I have done on my three '70s over the years, messing with the dash and fuse panel is my least favorite.
-
Beautiful! Great looking Monte!
-
Whatever visually appealing (and actually available) wheel/tire combos anyone cooks up still have to pass a practical "fit" test. You seem to be fairly set on the rims you want and both of them (front and rear) have zero (0) offset. Rear fitment is most critical on first gen Montes as there is limited outboard room (between the outside tire sidewall and the wheel opening lip of the rear quarter panel). Positive offset on the rear rims is usually needed with wider tires to move the wheel/tire assembly inboard where there is considerably more room. Of course, you can also trim the wheel opening lip if you are forced to and don't mind modifying your Monte's sheetmetal. You have stated that you are currently running 225/70-R15s all the way around and from the photo you provided it appears that they are mounted on stock 15x7 rallys. If so, the offset on those factory rims is +.30" (+7.62 mm). Now, if you go to https://tiresize.com/wheel-offset-calculator/ and enter your current tire and rim offset data into the "Original Setup" boxes, then you can enter the specs of whatever tire you want to compare (using 0 offset for your chosen rims) and visually see how they compare. Further, the box on the upper right will show you the exact dimensional changes to clearance outboard, above and inboard. I ran the comparison between your current setup and both the 275/50R17 and the 275/55R17 tires and found that either tire will cause your current sidewall clearance to be reduced by 1 1/4". You can easily check the clearance of your current setup to see if you can afford to give up a full 1.25". If not, you will either need rear rims with enough positive offset to give you more clearance (each +6mm offset = 1/4" additional backspace) or you may need to trim the wheel well opening lip. (While I have never done that, I have heard that 1" is the practical maximum amount that lip can be trimmed.) I run 275/60R15s on 8" rims with 5.0" backspace (+13 mm offset) and I have only 5/8" (.625") sidewall clearance to an untrimmed wheel well opening lip. If I mounted any 275 width R17 tire on your 9 inch 5" backspace (0 offset) rim, my outboard clearance would be reduced by 1/2" to 1/8" (.125'). That may be enough sidewall clearance for some folks, but I would never take that risk. Your call, of course, but you don't have to guess. Just compare future tire choices to your current wheel/tire setup using the specs of your desired rim and visually see the actual physical comparison using the tiresize.com wheel offset calculator. Good luck.
-
Hey, Joe, The kit with the actuators is the one I installed in my SS when I had it up in MN. I'm pretty sure I can find that box (I seldom throw anything away) but I don't get back up there until the 17th. Feel free to jog my memory to look for it if I don't remember. The kit I installed in my '70 here in Florida interfaced directly to my factory locks and did not come with new actuators. I'm pretty sure the instructions were specific to that kit but I'll check here, also.
-
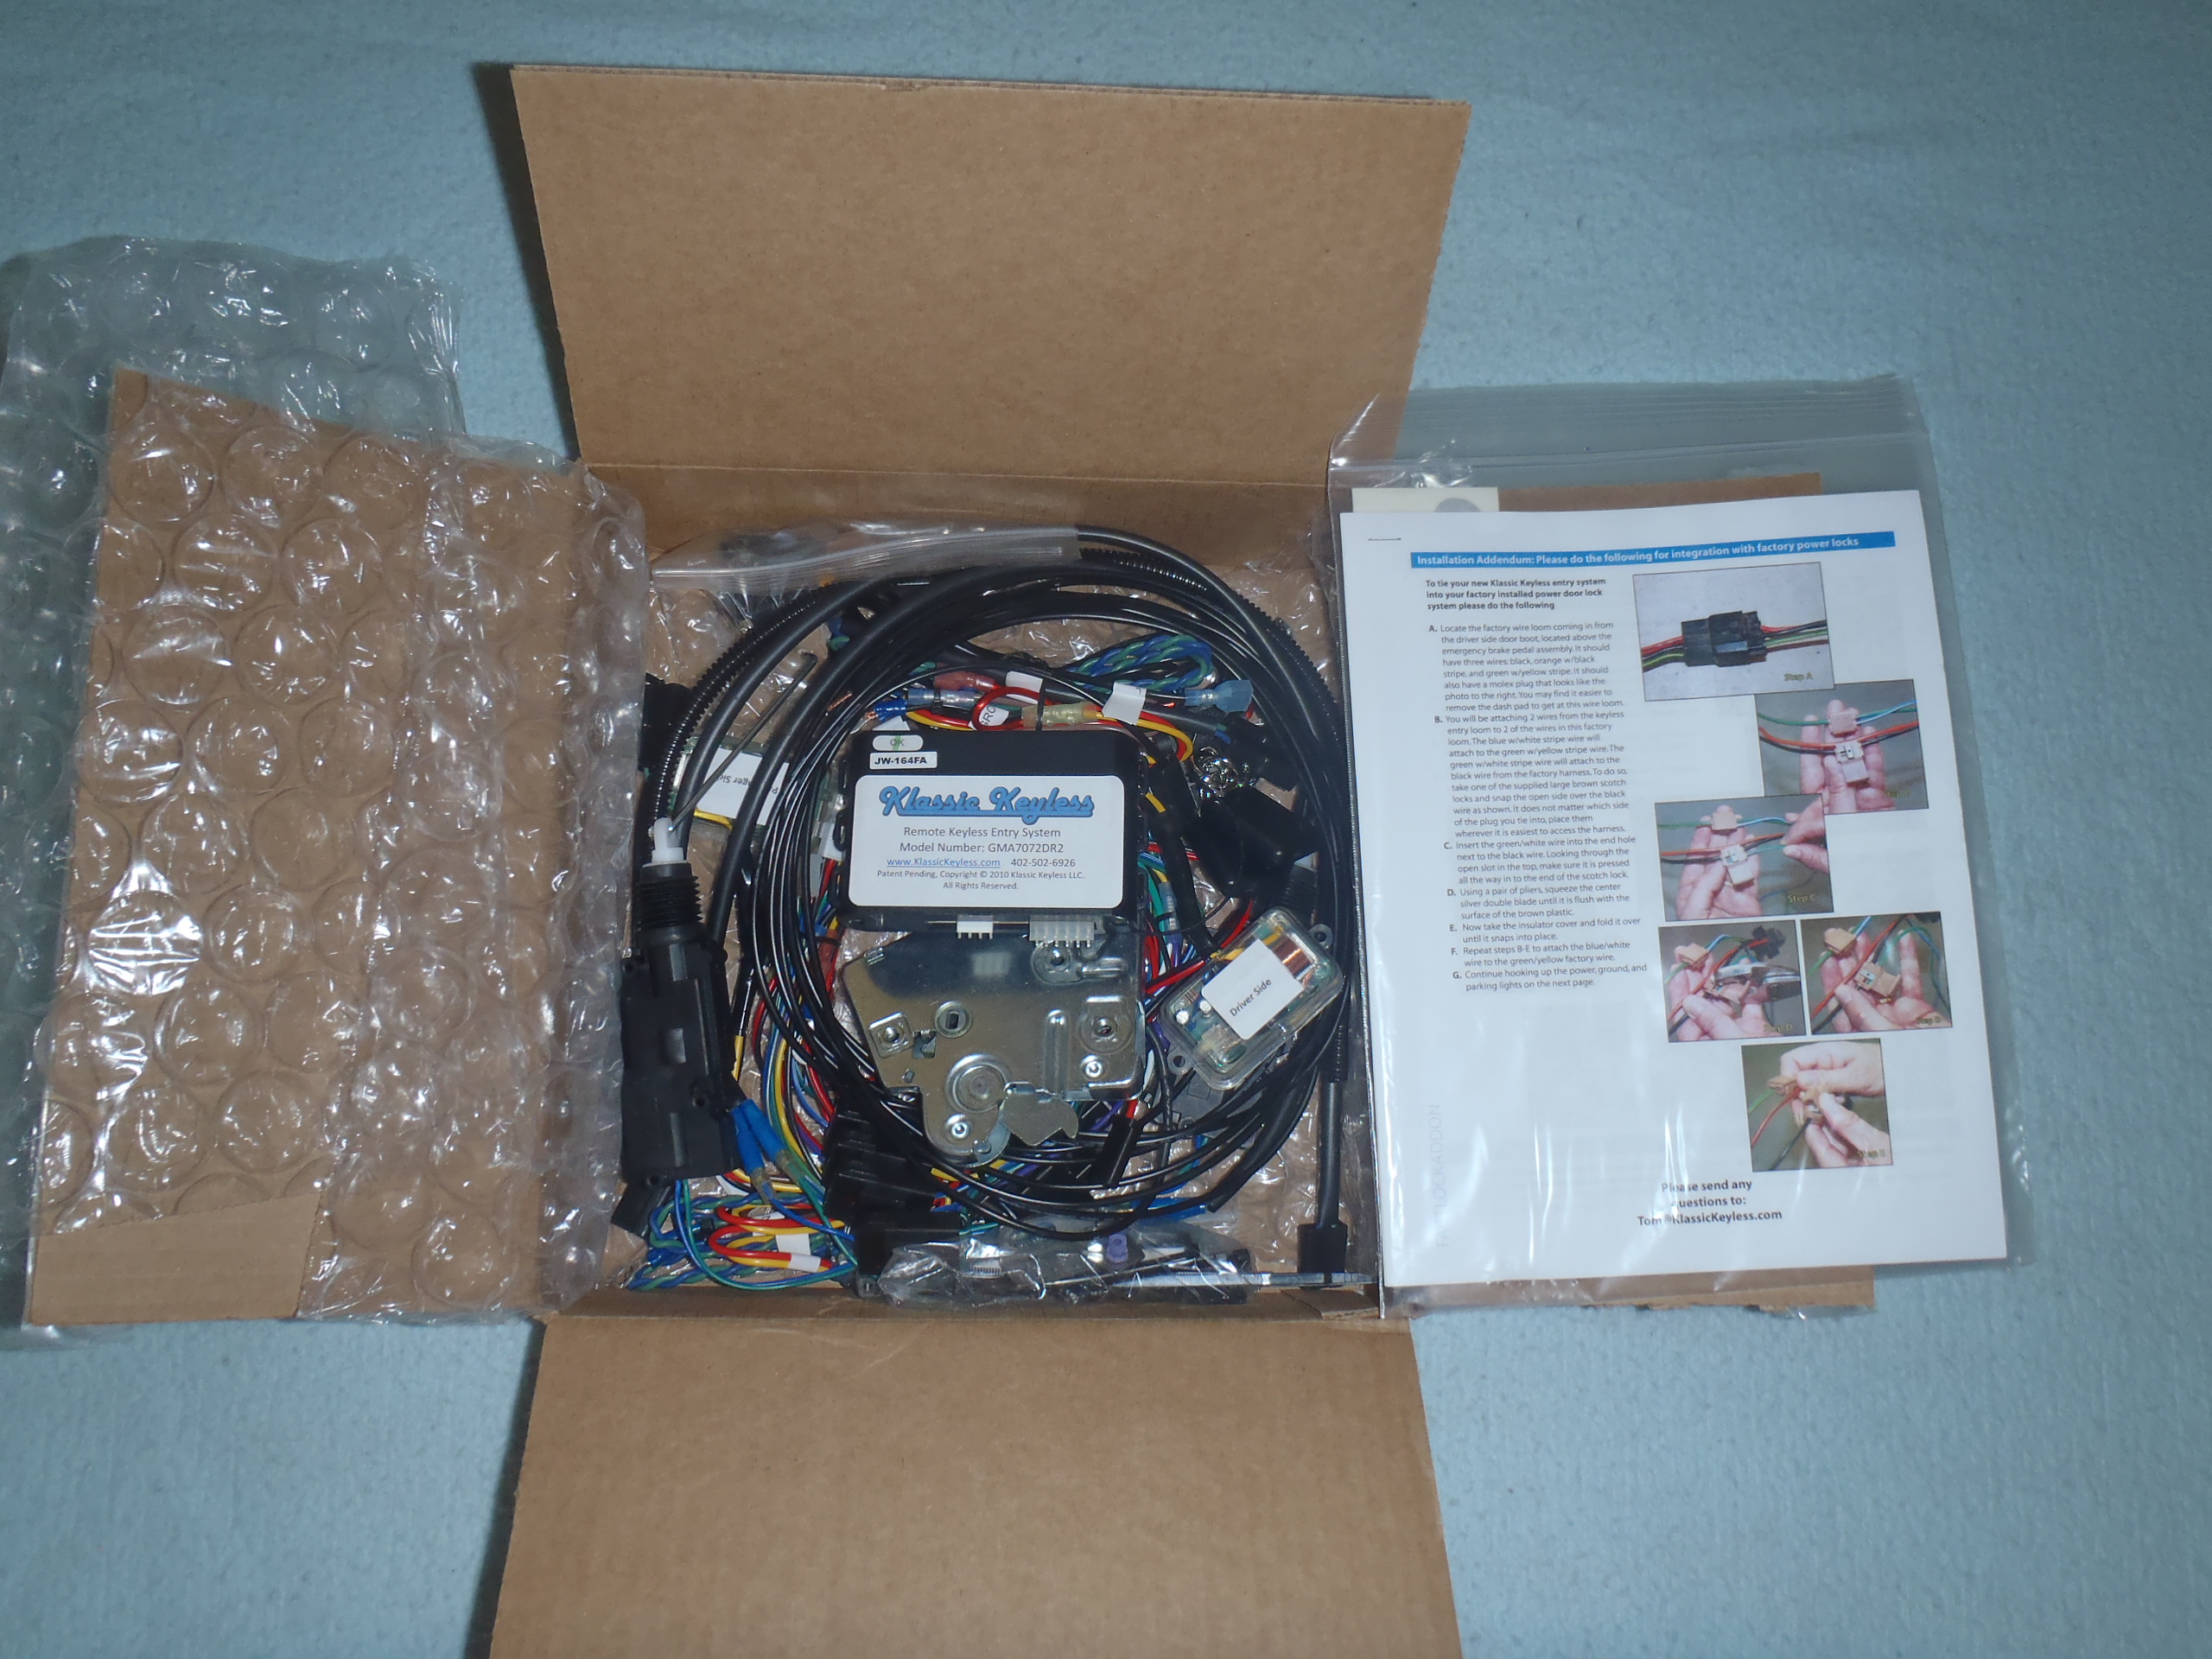
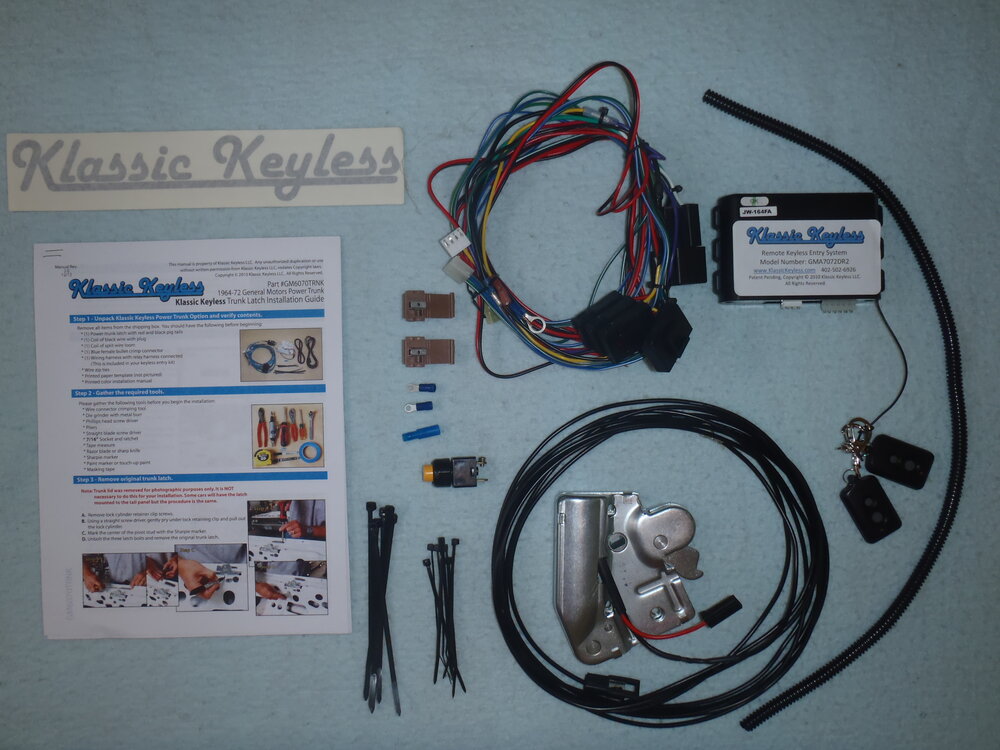
Hi, Grant, Sorry for the slow reply regarding factory power locks. I have gone two different routes on my '70s. On my 4-speed car, I first installed a factory power door lock setup taken out of a '72 (square corner door switches) which entails drilling mounting holes in the door, cutting the switch openings in the door panels and cutting a pass-through hole in the door and front cowling if you don't already have a wire path there. A couple years later I added a keyless entry system which interfaced directly to the factory system wiring under the dash. On my SS (which also wasn't built with factory power door locks), I skipped the installation of a factory system and installed a keyless entry system which came with the door actuators but no door switches. That install was relatively easier with no cutting of the door panels for manual switches. Both times I used the Remote Keyless Entry System from Klassic Keyless (Model No. GMA7072DR2). I also included the power trunk release with manual override button in both kits. Since I only used the remote key fob to lock/unlock the doors and trunk, I never use the door switches on the 4-speed car and never missed them on the SS either. Unless you just want to have that factory option on your restored Monte and since you plan to go keyless entry anyway, I suggest you don't need to go through the hassle of finding and installing a factory power door lock system - just go keyless from the beginning. No need to have those large, heavy factory solenoids in your doors when much smaller and lighter modern actuators will do the job just as well. I'm sure there are many choices of keyless entry systems on the market, but I would encourage you to at least check out the Klassic Keyless offerings at www.KlassicKeyless.com. Tom Pelchat is the owner and customizes his kits for specific models and years so they will fit and work properly. He uses top quality components, assembles and labels them professionally and includes extensive installation instructions with color photos. I have also installed his power seat back lock system in both 70s and have never had a problem or issue with any of his kits. Photos of the keyless entry kit for the SS are shown below. Good luck.


.JPG.191fcfc384144bc53c2db50791ffdfbf.JPG)