ss454-71 Posted October 13, 2015 Author Share Posted October 13, 2015 Started reassembling the chassis today. Baby steps. Got to get the frame off the lift. It's been there for a year now and garage space is tight. Quote Link to comment Share on other sites More sharing options...
LostnFound Posted October 13, 2015 Share Posted October 13, 2015 Started reassembling the chassis today. Baby steps. Got to get the frame off the lift. It's been there for a year now and garage space is tight. Sweet......better than new. Quote Link to comment Share on other sites More sharing options...
ss454-71 Posted October 14, 2015 Author Share Posted October 14, 2015 Put the front coils in tonight. The 2" drop springs are so much easier to install than stock. I basically pushed the bottom control arm up by hand and was able to start the ball joint nut. Quote Link to comment Share on other sites More sharing options...
ss454-71 Posted October 14, 2015 Author Share Posted October 14, 2015 I'm using these faux rivet head bolts on the ball joints. Not sure why but they look like a factory rivet at first glance but still isn't the same as a real rivet. I guess I could have bought the rivet dies but I didn't. Quote Link to comment Share on other sites More sharing options...
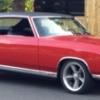
ss454-71 Posted October 15, 2015 Author Share Posted October 15, 2015 She is a roller again. Quote Link to comment Share on other sites More sharing options...
overdrive Posted October 16, 2015 Share Posted October 16, 2015 That's looking really nice. Great work! Dan Quote Link to comment Share on other sites More sharing options...
ss454-71 Posted October 18, 2015 Author Share Posted October 18, 2015 Dropped the body back on for winter storage. Quote Link to comment Share on other sites More sharing options...
ss454-71 Posted August 3, 2016 Author Share Posted August 3, 2016 Well now that the convertible is to a point where is goes down the road or just back into storage I can get back on the 70 SS. I decided to start the rear deck panel and package tray replacement. Going well so far. So much easier removing parts and reinstalling in comparison to installing a complete convertible tub. This seems tame in comparison. Quote Link to comment Share on other sites More sharing options...
ss454-71 Posted August 4, 2016 Author Share Posted August 4, 2016 Started fabricating up the window channel with the shrinker/stretcher. The first one is taking shape nicely. Rolled the top lip then had to pull the window trim out to create the correct radius. Quote Link to comment Share on other sites More sharing options...
71MonteCarloMD Posted August 5, 2016 Share Posted August 5, 2016 Nice! Quote Link to comment Share on other sites More sharing options...
BigdaddyT Posted August 5, 2016 Share Posted August 5, 2016 Man that's nice stuff! Quote Link to comment Share on other sites More sharing options...
lastss Posted August 5, 2016 Share Posted August 5, 2016 Awesome Talented Man Quote Link to comment Share on other sites More sharing options...
ss454-71 Posted August 6, 2016 Author Share Posted August 6, 2016 Well I can't take all the credit. Quote Link to comment Share on other sites More sharing options...
BigdaddyT Posted August 6, 2016 Share Posted August 6, 2016 No better time to start learning! Quote Link to comment Share on other sites More sharing options...
ss454-71 Posted August 9, 2016 Author Share Posted August 9, 2016 I always try and use as much of the original panels as possible when repairing rust so I ended up splicing in the AMD rear deck panel to the original. An added benifit was that I was able to retain the part # stamping and all the studs for the vinyl top. Luckily the rust was limited to the window chanel section. The window glass contours match good too. It added about 4 hours to the panel replacement but will be worth it in the end. Quote Link to comment Share on other sites More sharing options...
ss454-71 Posted September 24, 2016 Author Share Posted September 24, 2016 Took the engine to the machine shop to be cleaned and magged. Because the engine was disassembled for unknown reasons 25 years ago I was expecting the worst. Turns out the block and all castings are 100%. No cracks and still standard. Should clean up at .30 over. They can deck the block and stop short of the pad stamping too. The tonawanda stamp (CRN and build date) is the only number on the pad. The vin is on the bell housing flange next above the oil filter which many '70 Van Nuys Cars were located. Quote Link to comment Share on other sites More sharing options...
420ponies Posted September 25, 2016 Share Posted September 25, 2016 Just got the chance to read this thread. Amazing!! I sure hope you didn't sell the convertible. To find this car in the shape it was in... and to see it now as you are bringing it back to life. I can't wait to see this in person. All us upper New Yorkers should meet at the syracuse Nat'ls next year! Quote Link to comment Share on other sites More sharing options...
BigdaddyT Posted September 25, 2016 Share Posted September 25, 2016 This car has a cult following! Quote Link to comment Share on other sites More sharing options...
ss454-71 Posted September 26, 2016 Author Share Posted September 26, 2016 Just got the chance to read this thread. Amazing!! I sure hope you didn't sell the convertible. To find this car in the shape it was in... and to see it now as you are bringing it back to life. I can't wait to see this in person. All us upper New Yorkers should meet at the syracuse Nat'ls next year! Thanks for the encouragement! Perhaps the eastern meet can be at the Syracuse nats at some point. I'd try and bring both of my SS's and my brother would probably show up with the 71 SS I sold him. Quote Link to comment Share on other sites More sharing options...
ss454-71 Posted October 3, 2016 Author Share Posted October 3, 2016 Took a bonsai run to Fall Carlisle to get stainless steel fuel and break lines and ended up picking up a few other items to move the project along. Quote Link to comment Share on other sites More sharing options...
ss454-71 Posted October 3, 2016 Author Share Posted October 3, 2016 Pulled the body off the chassis so I can do the final assemble of the rolling chassis over the winter hopefully including engine and drive train. Quote Link to comment Share on other sites More sharing options...
monte70car Posted October 3, 2016 Share Posted October 3, 2016 Looks like you hit up Ausley's Chevelle and grab a radiator from them. Quote Link to comment Share on other sites More sharing options...
ss454-71 Posted October 4, 2016 Author Share Posted October 4, 2016 Looks like you hit up Ausley's Chevelle and grab a radiator from them. Good eye. Hope it's a good radiator. Looks nice but never used one of theirs before. Quote Link to comment Share on other sites More sharing options...
ss454-71 Posted October 6, 2016 Author Share Posted October 6, 2016 I plan to run a set of ladder bars for that vintage street look. Was going to run Lakewood but you can't run the rear sway bar with them. I found this set of bars that will allow for the rear sway bar. They may be NMW brand but not sure. They were a bright orange color originally. I fit them to the chassis before paint to prevent chips but I'm sure I will ding them up being as heavy and awkward to fit. It took some fiddling but finally got them to line up. Quote Link to comment Share on other sites More sharing options...
monte70car Posted October 6, 2016 Share Posted October 6, 2016 The reason I knew it was a radiator from Ausley's is I have the same type in my 72. the elec fans came from speedway motors for about $200 mounted in the shroud already. 1 Quote Link to comment Share on other sites More sharing options...

Recommended Posts
Join the conversation
You can post now and register later. If you have an account, sign in now to post with your account.