lastss
-
Posts
337 -
Joined
-
Last visited
-
Days Won
11
Content Type
Profiles
Articles
Forums
Gallery
Events
Everything posted by lastss
-
Did you try to tighten the front clutch to 10 lbs ? Don’t over tighten it’s a ceramic seal.
-
Lastss(Bob Lyman) and 2 more First Gens Local Show.
lastss replied to Michael Boyte's topic in SS 454
Many Thanks for the compliments. I made that shield to protect the hood pad from oil sling as no matter how many rebuilt compressors you buy they throw a little oil. I fabricated it from a piece of roof flashing already black from Home Depot and trimmed it out with door edge guard. Easy to make. Flashing only cost $1.00 each so have at it guys and thanks bob -
Bad brake booster & poor idling..........are they related?
lastss replied to NWmonte71's topic in Engine Tech
Easy enough to test disconnect the vacuum line to the booster and cap it off and see if your idle returns to normal, also check all other areas for vacuum leaks if you still have an issue, I use starting fulid but WD40 is safer. -
shim it with a washer or two?
-
I have a couple of NOS grills and they are Argent silver in that area.
-
Most of the reviews were on Summitt Racing site and was premature failure.
-
Petronics has issues
-
From what I read a few months back with quality control issues, I went with Accell at a much less price through Summitt Racing. Any Veterans can ask for a discount, must ask over the phone.
-
Nice, very interesting. Thanks for sharing.
-
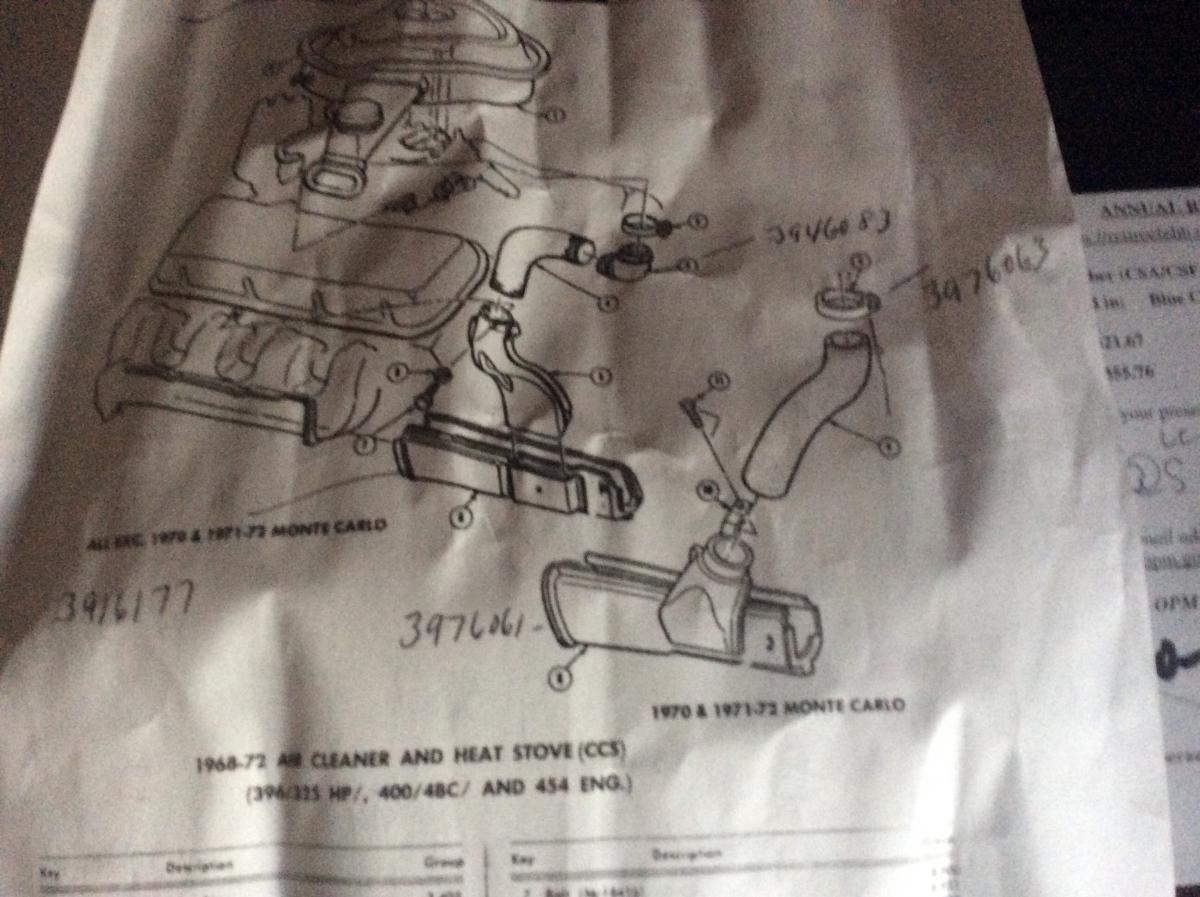
That’s 100% correct the one to the right is Monte Carlo.
-
The picture shows the 2 piece one on left and the right side picture shows the correct one it’s one piece, my pics not the best.
-
Ok I’m adding a picture from GM As you can see the correct heat stove for our SS is part number 3976061 and a flex heat tube. No elbow. And a clamp. BTW there was one on eBay just a day or so ago for $400 not mine. Hope this clears everything up. Bob
-
Radio shack and I don’t remember what it was, I had tried a few different ones. I do think I used the base resistance reading on the replacement one and added the more to what it’s was originally but I didn’t make any notes and memory is just not there.m
-
I put a resister in the wire at the sensor to get mine to read correctly.
-
After months of waiting,sent me covers with crooked stitching,glue overspray on rear seat cover, tried to get me to take a $100 discount. Big pain. Sent it all back.
-
We’re did you buy the tool set up for measuring the pinion depth?
-
Awesome, watch all the time, what a treat.
-
You need to tighten the nut using the old bar type torque wrench until it takes I think 40-45 lbs reading to turn the rear end. Look at some websites that sell posi units, like Yukon.
-
Awesome, your work is better than factory.
-
Also note these units even when working properly are very very slow to pump up to full pressure, that's why GM suggest to air air from an outside source to cut down on pump up time.
-
The GM tech books state to testityou should first use the fast fill valve and put in 100 lbs of air then use a vacuum source and it should pump up to about 120 lbs. I test my rebuilds of the car.with no compressed air. I have a guage I put on the output side and vacuum pump on the inlet. If working properly you will hear a sort of tick, tick sound back and forth over and over. A steady no tick means it's not working. Also to test the tank etc for leaks you pressurize the unit and have a vacuum hose attached from the inlet filter connection to the vacuum inlet fitting both tight fit, and submerge the whole unit in a bucket of water, look for any bubbles of course.
-
It works of the pcv valve hose which is Vacuum, if you pressurized the intake hose you most likely damaged it.
-
Awesome, high honor. Congratulations
-
Awesome.