Search the Community
Showing results for 'Diaphram'.
Found 17 results
-
It was Grant MacPhearson. Go to this link for the info: https://www.firstgenmc.com/forums/index.php?/search/&q=Diaphram&search_and_or=or rob
-

What did you do to your Monte Carlo today?
NavyCPO replied to Canuck's topic in General 70-72 Monte Carlo Forum
Well I didn't do a damn thing to my Monte today!!!! LOL I had to take a break from it for a while because it was consuming all of my time. Last thing I did do though was get the A/C serviced up and she didn't leak, and she IS blowing cold. I need to look at the HVAC Box under the dash though and the controls as I may have to replace some of the foam on the doors or vacuum lines etc as it isn't blowing as hard as it should be for the amount the blower is working. May have the heater door slightly open or leaky ducts or something. But at least I have some cold air now coming out. IT HAS BEEN HOT HOT HOT here and lately the humidity has been terrible. I've been working indoors on other projects (guitars, amps and stuff). But I think tomorrow I'll have to go out in the garage and bear the heat a bit while I put her back up on Jacks and pull the driveshaft and the tail housing off of the Transmission and see why my speedometer still won't work after checking everything else the only thing left is in the tail housing. I'm hoping the the gear clip is still there and just slipped off or something because the cruise control unit started getting stiff from lack of lubricant and age causing excessive binding on the speedometer gears. The white gear on the cable side looks good and the red gear in the tail shaft looks good but I need to pull the housing off to see where it's sitting on the shaft, because I think it's been pushed forward and isn't meshing with the white gear. Hopefully I can fix it and be done with that problem and have speedometer back. Then I need to see why my AC Fast Idle Solenoid is not working when I turn on the A/C. I haven't checked yet to see if I'm getting voltage there and it's just a bad solenoid or if I'll be chasing wires again. Need to look in the service manual wiring diagrams and see where it gets power from the Compressor side or the AC Control side, or somewhere else. Right now, I have to have the car idled way up high so it doesn't die when I kick on the A/C. And Also need to remove my windshield washer pump and see if I just need to replace the $3 diaphram kit in the pump or the pump motor itself. I did check the voltage there earlier and it was getting voltage so this problem I know is somewhere in the Pump Assy. I started on the replacement motor I am planning on putting in her, a 383 that I had in a '71 Nova I used to have. It needed cam bearings so I put the 355 back in the Nova and have had this 383 stored for several years now (6 or 7). Got me some cheap aluminum heads 200cc and gonna put the 2.02 Valves in them, and a flat tappet cam from a racing buddy of mine in the old Nova club He made a few passes on it and sent it to me as a gift and I've been holding it for a good project and think I'll use it on this one. Edelbrock single plane intake and Edelbrock 850 carb. Desktop Dyno says it should make about 450HP and I think my 8.2" rear end can handle that since it will probably only be about 360HP at the rear wheels and somewhere I read the 8.2" were good to about 400HP, I guess I'll find out. But it's still just a one legged rear end for now anyway. I will need a stall converter and gears for the cam, so I'll probably need to get a posi unit and some gears too. Cha-Ching, Cha-Ching!!! LOL Still needs Headers, dual exhaust, etc. I have a PLAN!!!!!! -
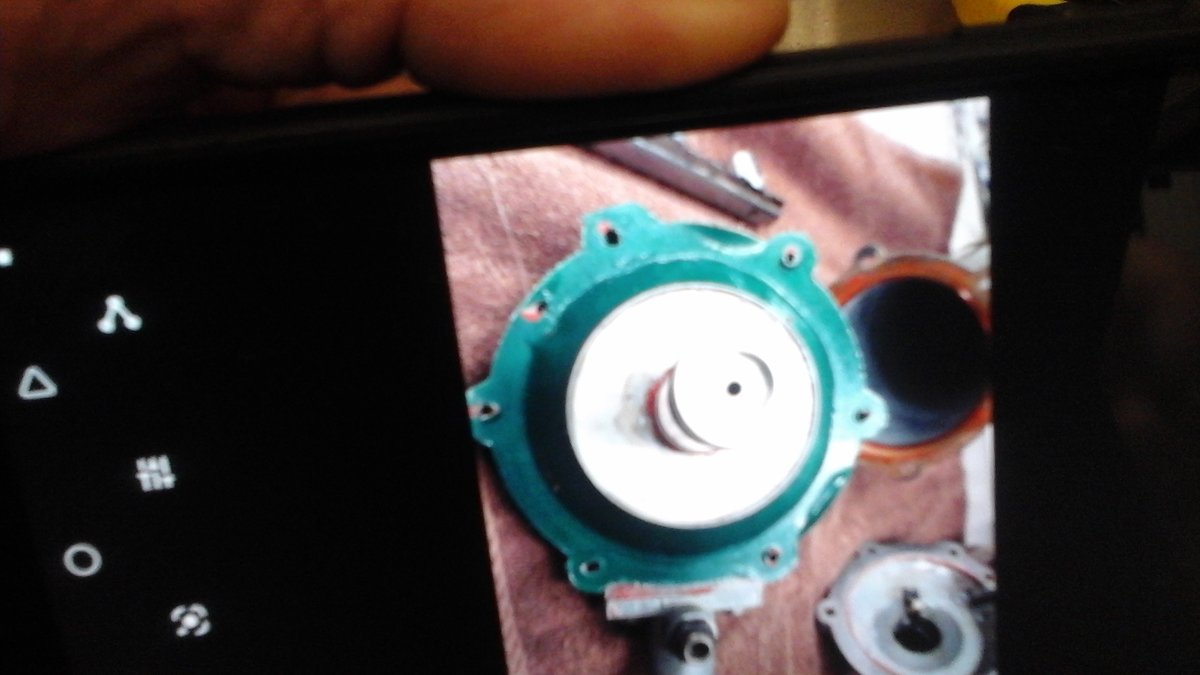
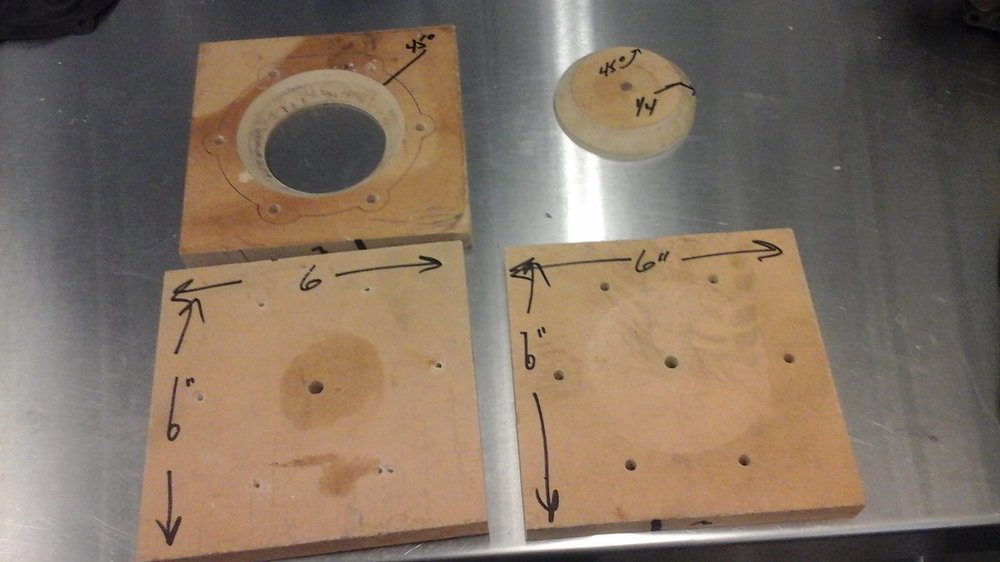
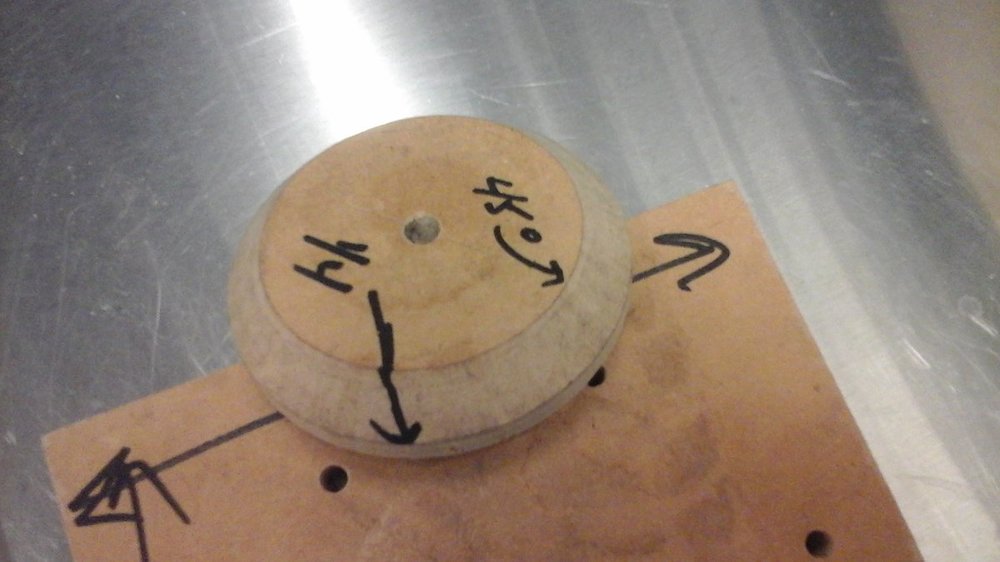
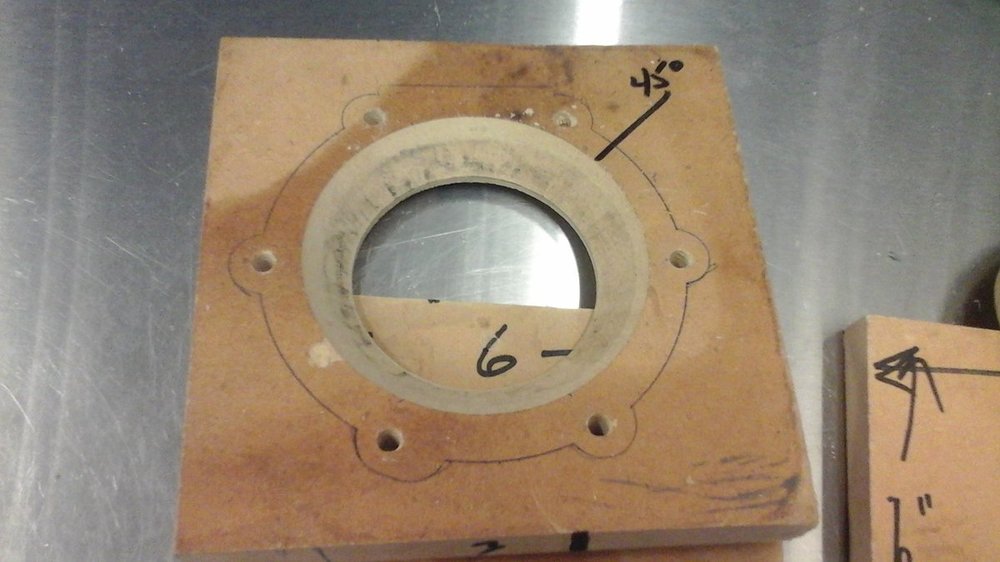
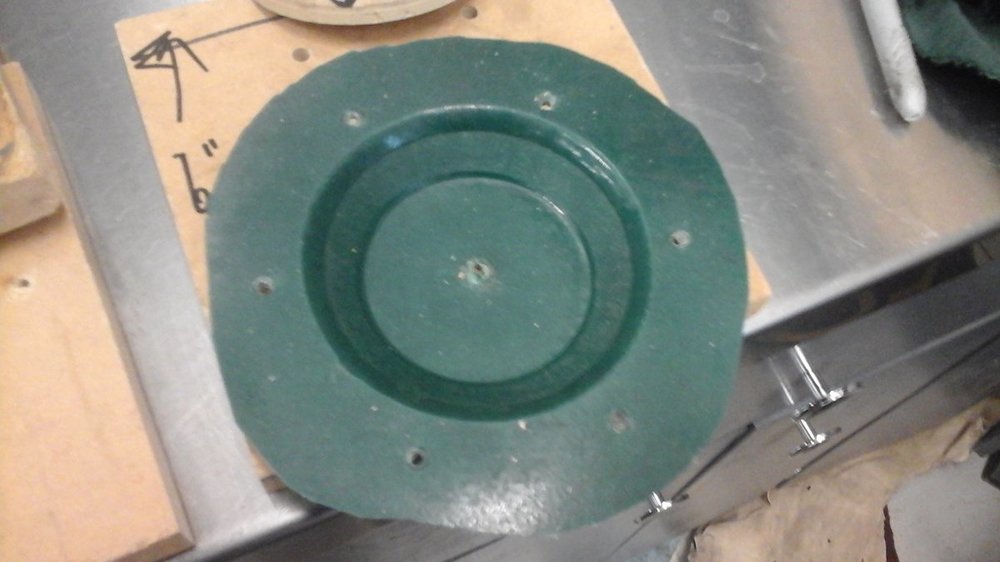
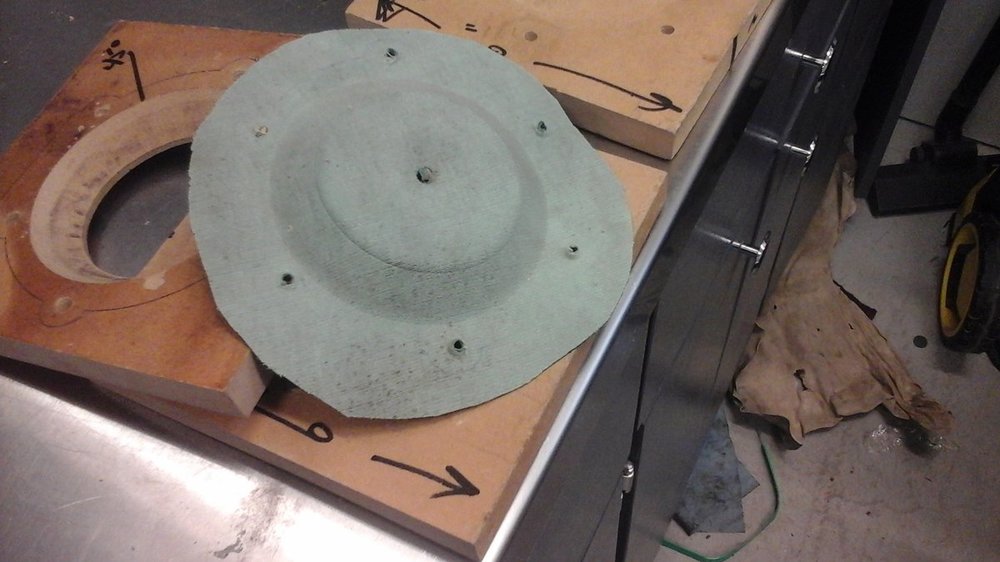
I have been testing a diaphram I made and it seems to be working so I thought I would post this in case anyone is interested. The only material I found that would work for me was a solvent wash glove. I made the mold from 3/4 inch MDF and placed it in a BBQ for 30 minutes. Hopefully the pictures help and if anyone has questions happy to help.

-
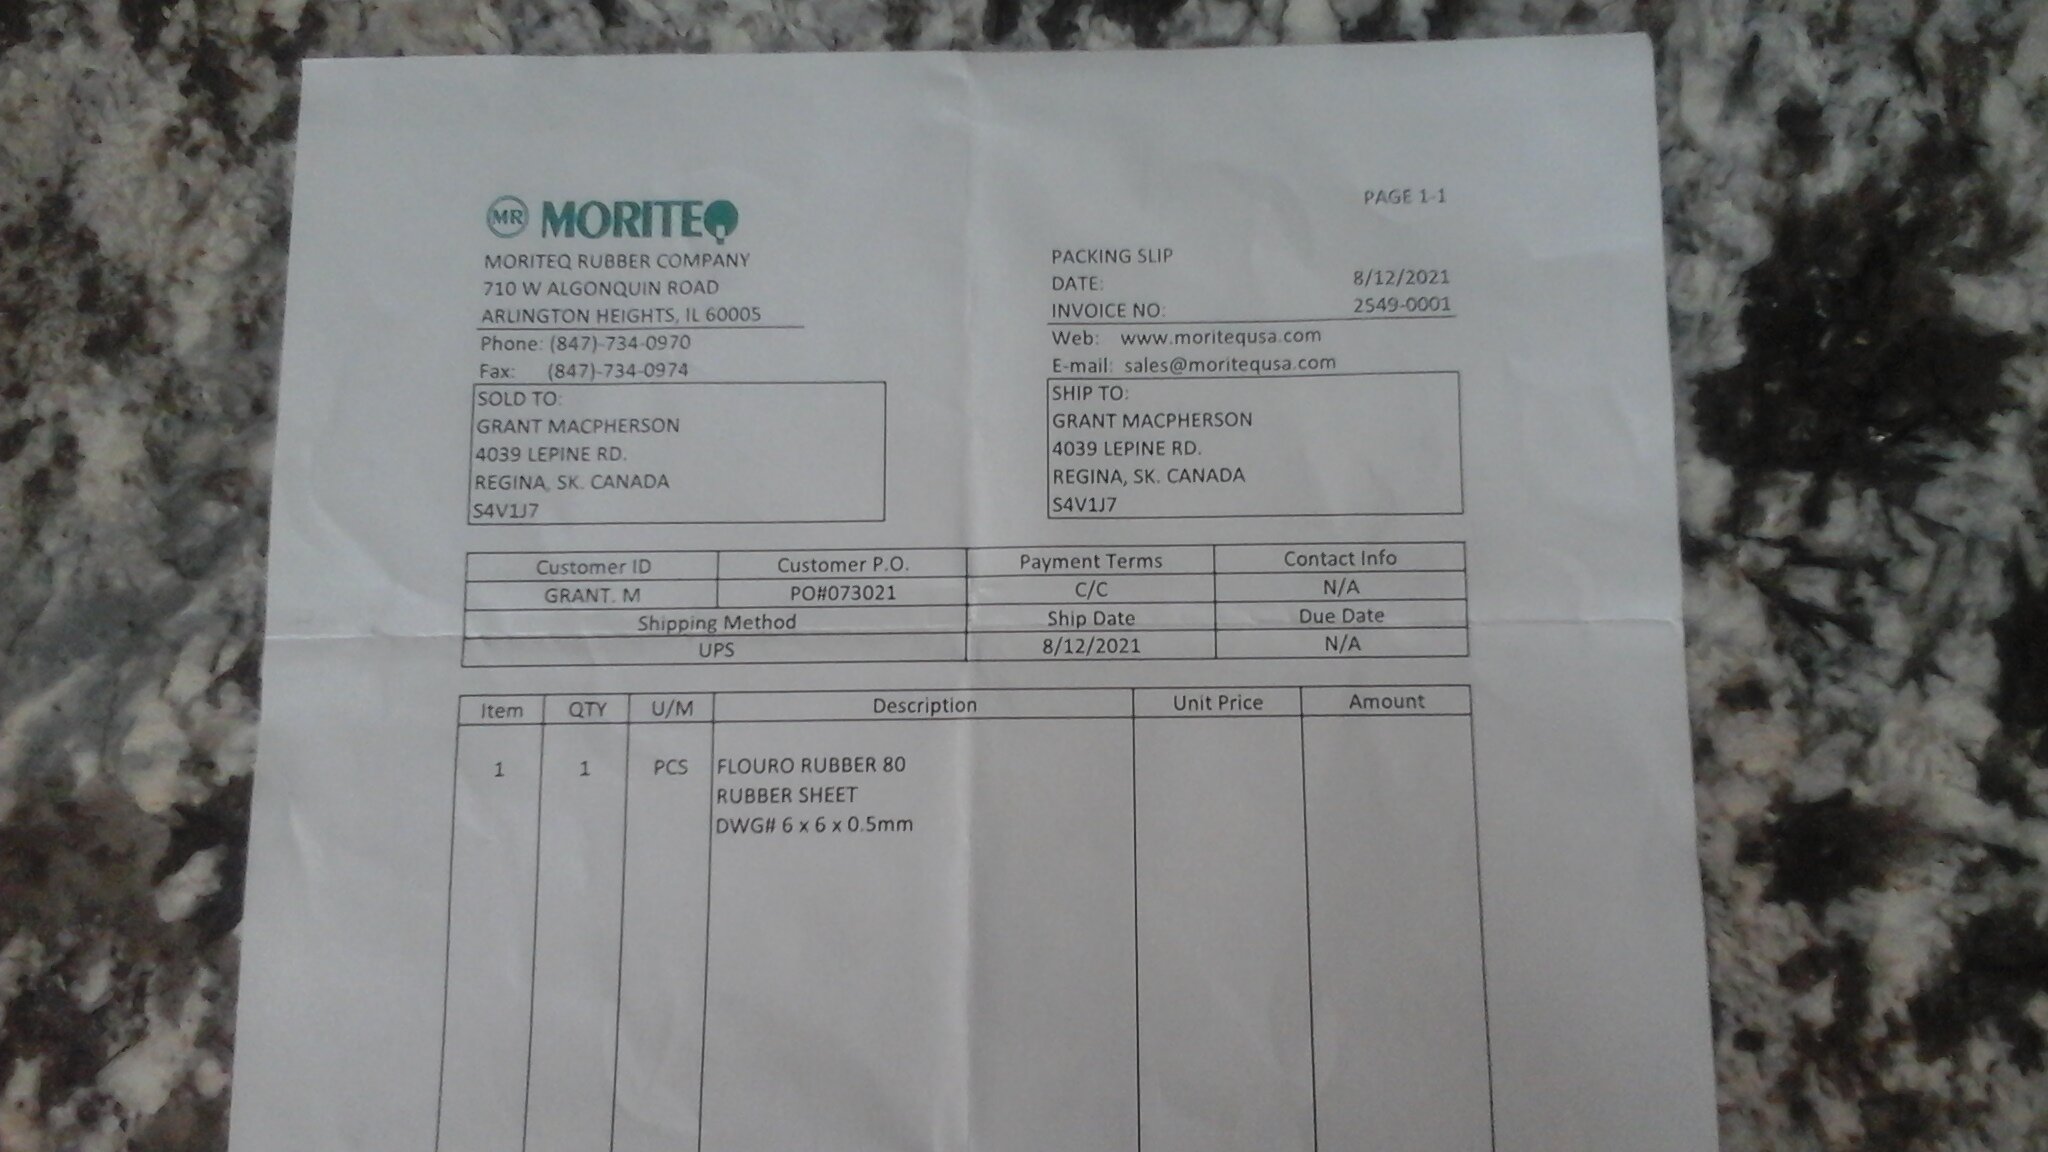
Hi Mark I have tried a couple of differant materials, one was the top of a solvent wash glove that was fabric and rubber combo. I built a mold and heated it to 300 for 1/2 hour, not sure how long it will work but ran it for 1 summer. I used a diaphram material for another one and it is more difficult to work with but probably will last forever. I heated this one as well but it didn't take on much of the mold shape and went quite flat again. Attached is the info. Hope that helps. Grant
-
I have just replaced rear springs, air shocks, rebuilt compressor, replaced diaphram and cleaned the control valve. If I uhook the control valve and move it up and down it seems to work properly but when it is hocked up it is in the lower position and drains off air, not enough adjustment to stop it. Is it possible to get the leveler out of adjustment? ride height now is 25" to wheel opening. thanks Grant
-
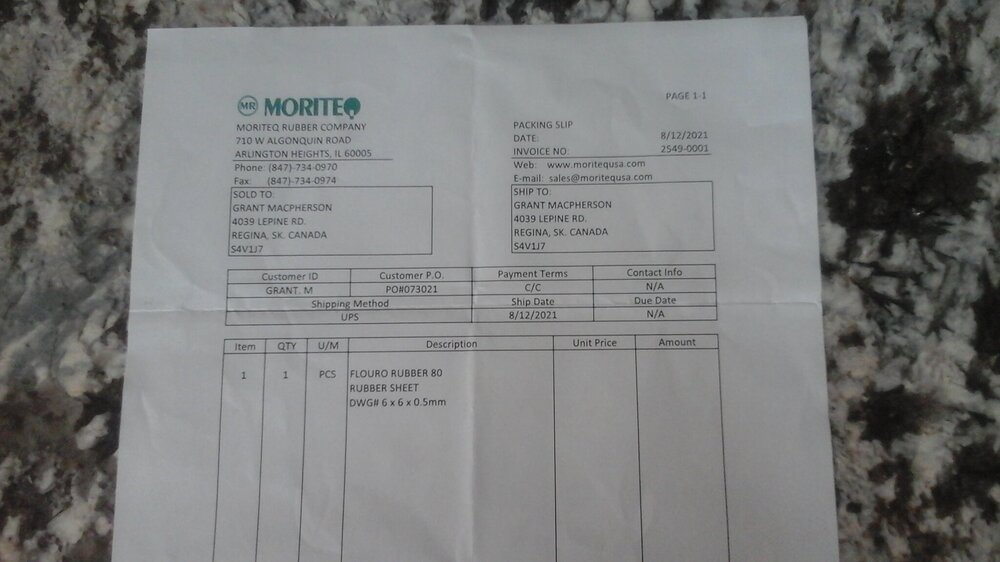
Thanks for the info,I have some parts coming from Bob and am teasting a diaphram I built, so far it seems to be working. I have to pull it apart again as there is a check valve leak so I can see how the diaphram is standing up.
-
looking for diaphram, or if someone has sucessfully built one would like any suggestions. thanks Grant
-
Mike: Your info is correct about needing a different flywheel for the ZZ4. The ZZ4 is externally balanced on the flywheel end of the crank due to the 1 piece rear main seal configuration. GM changed the bolt pattern to make sure us bozo's don't stick the wrong flywheel on and wreck stuff! Be sure your new flywheel has the same ring gear tooth count as you currently have (153 or 168 count) so it will play nicely with your current starter. If you get a used flywheel, get it surfaced before installing it. After you get a new flywheel, you can re-use your current pressure plate (clutch) and disk. They will bolt onto the new flywheel. The question is, what condition is your current clutch in? If you're satisfied that it's up to the task, stick it back in. If there is any concern, replace it. My personal preference is the McLeod diaphram type. Mcleodracing.com. I would call them personally and tell them what you're running and they will recommend a pressure plate and clutch combination that will get it done. Fair pricing and made in the USA! I've run Hayes before with good luck. I think Centerforce hangs their hat on name recognition and charges accordingly, not sure about Ram. One last thing...make sure your crankshaft has a pilot bushing for the manual transmission! Don't skip this step. Let us know how you like the ZZ4 compared to the 383. Scott
-
I bought brackets from Larry to mount my tank. Does anyone know how I can mount the tank side? From pictures on this site it looks like it had either steel threads or a threaded stud incased in rubber. I don't have the diaphram end mounting pieces either but that will be a lot easier to copy. Any help would be appreciated. Happy Fourth!
-
Seems I read something on the forums quite awhile ago that there may be a color scheme reference guide for restoring first gen Montes. If anyone knows a source of such information and is willing to share it, I would certainly appreciate knowing. My immediate need is to correctly (or at least closely) paint a remanufactured vacuum booster, master cylinder and proportioning valve assembly for my '70 SS car. The brakes worked but began to fade away at idle so I suspected the master cylinder needed rebuilding/replacing. After reading all the warnings about rebuilding a master cylinder, I decided to replace it and also replace the vacuum booster as an assembly so it would all be new. I did not consider the smaller diameter, dual diaphram boosters as I am trying to keep this car looking as close to original as is practical. The remanufactured unit has a Bendix master cylinder instead of the Delco unit, but my '70 Chasis Service Manual says they are completely interchangable and were both used in production (hope that is true). I realize that the factory booster may have been plated and not painted but this remanufacured unit already has a dull silver paint on it (and the master cylinder). I had painted my original booster gold because it was horribly discolored. I also painted my original Delco master cylinder and proportioning valve with Cast Blast which looks very much like virgin cast iron. Does anyone happen to know what the original factory coatings and colors were on these brake system components? Many thanks for any advice or references!
-
most kits I have bought has extra stuff in them so they cover a wider number of carb's. Usually in most kits the vac secondary diaphram is a separate part....at least for the 4150's I've used...haven't done a 4160 in a bazillion cat years...
-
I only thought this because a carb kit for a 4150 has two accelerator pumps and no dighram and a 4160 kit has a diaphram and one pump.
-
The diaphram we are all refering to is in the metal brake booster can behind the brake master cylinder. Easiest way to do is to start the car and pinch the hose off that goes in to the brake booster with a pair of pliers or vice-grips. The sound should go away. A lot of times it is the diaphram that needs replaced. You could try to rebuild it yourself (don't know about parts availability and it takes A LOT of torque to untwist the halves) or you could find a reasonable used one to use while you have a specialist rebuild the original. I don't know of any rehaps someone else can chime in. At any rate make sure your system is SAFE. Don't want to lose you or another Monte. Unless you promise to run over a Mime...............lol David
-
Greg usually, and I mean usually, it's the primary accelerator pump lever adjustment. Here's what Holley says.. The most common cause of a stumble is not having an adequate accelerator pump shot. The first thing to do is to look at the discharge nozzle and make sure you are getting a good strong pump shot. If not then you need to inspect the pump diaphram for a hole or tear. You will also need to make sure that the pump passage is clear from any trash or debris. First you will need to check the adjustment on the pump. To do this you will open the throttle all the way (WOT). Push the pump arm lever down and then adjust the pump override spring to obtain .015" clearance between the pump arm and lever. If you are having a stumble and no black smoke out the tailpipe then you will need to increase the shooter size. If it stumbles and you are getting black smoke from the tailpipe then it will be nessasary to decrease the shooter size. My experience is you just need to play with the lever adjustment, some like that .015 clearance, some don't... Dave
-
there are 4 screws that secure the acclerator pump housing but you have to pull the carb to get to them Royce. I would just pull the carb and give everything a good tightening. Sometimes a bowl leak can masquerade as a accel pump leak. Doubt if there are any gasket or diaphram problems, just needs to be tightened up...Dave
-
yeah i'll third that the torn AC line will cause a loss of vacuum there which will affect the vac. mod. also check the piece of rubber hose at the canister it self.. one other good check is to take a hand held vac. pump and put about 12-15 inches of vacuum on the canister and make sure it will hold vacuum.. (checks for a torn diaphram) don't go higher then about 20inches tho because you can rupture the diaphragm with too much vac.,
-
Priming is the key to the pumps. You should be able to hear it working with the engine off when you push the wash button. If it is making the popping noise, the pump is running but like any fluid pump, it won't work with air when it loses the prime. I think a wearing pump diaphram or loose or degraded hoses will cause the pump to lose it's prime, and make it difficult to use. they sell repair kits for the washer pumps that include a new diaphram and cap for it if your pump is electrically good. I have used them before on other GM products I have owned with no problems. Jim