MCfan
-
Posts
1,294 -
Joined
-
Last visited
-
Days Won
61
Content Type
Profiles
Articles
Forums
Gallery
Events
Everything posted by MCfan
-
Hmmmm ... looks familiar. IF it has a stock paint code and vinyl top, it could be a '70 in Astro Blue (25) with a dark blue vinyl top (like mine) or a '71 in Mulsanne Blue (26) with a blue vinyl top. No blue vinyl tops in '72.
-
Quarter panel clearance is the obvious consideration. Maybe some member here will have experience with that exact wheel and can get you in the ball park, but I can give you a comparison to my known rear tire/wheel combo using tiresize.com. I have 275/60-15s mounted on 15x8 rims with 5.5" backspace (+25 mm offset) with right at .6" clearance between the sidewall and untrimmed wheel well lip. A 275/45-18 is the same width and only .3" shorter, BUT when it is mounted on a 18x9.5 rim with only 5.25" backspace (which is zero offset) the tire comparison and wheel offset calculator say the sidewall will be .98" further outboard than my current setup. Clearly, that tire/rim combo would NOT work with my untrimmed wheel well opening because I only have .6" clearance. Maybe that combo will work with your trimmed wheel well opening but I am certain a 18x9.5 with greater backspace (positive offset) would be a better/safer fit. There is lots of room inboard for wider tires and rims on the rear of our first gen Montes, but very little extra room outboard. That means to get fat tires on wider rims to fit safely we need to move the combo inboard by using rims with positive offset - the wider the combo, the more offset is required. Every 6mm of positive offset increase the backspace dimension by 1/4".
-
Sorry, I thought you were asking if they would fit not how they will look.
-
Welcome to the club and forums, Mike! Great photo of a beautiful Monte! Thanks for representing our club and first gen Montes down under. Enjoy!
-
Tom, You are wise to search for answers to your questions regarding the fit of larger tires and wheels on the rear of our first gen Montes. There are a lot of members here who have trial and error experience that are also willing share what they have learned. But, there are also some excellent on-line tire size comparison tools and wheel offset calculators that will give you exact dimensional and visual comparisons for just about any combination you can imagine. I can recommend the Tiresizer.com site because their size comparison tool (https://tiresize.com/comparison/) and wheel offset calculator (https://tiresize.com/wheel-offset-calculator/) are both easy to use and give precise and highly visible results. There really is no need to ever guess or assume that some alternative tire/wheel combination will fit or not fit if you have a known starting point for your comparisons. By known starting point, I suggest getting (not guessing) the specific information of the tire/wheel combo you currently have installed on the rear of your Monte. For the wheel/rim, you need to know: 1. the bead mounting width (i.e. 6", 7", 8" etc.), Note: the actual rim width lip edge to lip edge is usually 1" greater which matters 2. the bead diameter (i.e. 14", 15" 17" etc.), the size of the tire mounted on your rim will tell you that (i.e. 275/60 - 15) 3. the backspace (i.e. 4", 4.5", 5" etc). which is the distance between the wheel mounting surface and the inside rim lip edge Example: If you have a 15 X 7 rim with the wheel mounting surface exactly centered, the backspace is (7+1)/2 = 4 inches (not 3.5") It is best to measure the backspace by removing the tire/wheel, laying it face down, putting a straightedge across the inside rim lip (not the tire) and measuring down to the mounting surface. For the tire you just need to know the size stamped on the side: tread width/series - bead diameter (i.e. 215/70-15) Some old tires use letters for the tread width that must be converted to millimeters for the tire comparison tool. Now look closely at the amount of clearance between the tire sidewall of your current combo and the inside of your quarter panel, especially at the lip of the wheel well opening. Measure it as closely and any way you can, even with hand/finger thickness - this will be critical in determining the backspace and offset needed for your new combo; Once you have all of the information above for your known tire/wheel combo, you are ready to use the online tire sizer and wheel offset tools. For the tire size comparison tool, just key the specs of your current tire into the Size 1 box and leave it alone. Then key into the Size 2 box the specs of the tire you are considering. Hit "compare" and it will give you the dimensional and visual comparison of the two tires including diameter (height), tread width, sidewall width, circumference, revs/mile, speedo correction, etc. Now click on the blue text that says, "Looking to Compare Wheel Offset?" If you have any question about the difference between offset and backspace, scroll down a bit and read their helpful definitions. They are related terms but different measurements. Key the tire and wheel specs from your known combo into the "Original Setup" boxes and the specs of the combo you are considering into the "New Setup" boxes. It will immediately give you a visual and dimensional comparison. Best of all it will tell you exactly how much closer you new larger combo will be to the top of your fender opening, inside frame/suspension and outside quarter panel. If that combo uses up all of your available clearance, you will need to try increasing amounts of positive wheel offset to move the combo inboard. Try different wheel offsets in the New Setup box until you see and read a safe amount of clearance with your quarter panel. To get the corresponding backspace spec, just scroll down to the Wheel Offset/Backspacing Chart at the bottom and study it carefully. Find your rim width and and chosen offset, then read the backspace at the top of that column above. For example: The 10 inch rim you are considering with only a 5" backspace will move that wheel/tire combo a full 2" outboard toward your quarter panel. Do you actually have that much clearance? I doubt it ... Even with a 5.5" backspace on that 10" rim the new wheel/tire combo will be 1.5" further outboard which may still be risky. I am running a 275/60-15 on a 15x8 rim with 5.5" backspacing and can just insert fingers of a flat hand between the sidewall and the wheel well opening lip. Again, if you are comparing to a known combo currently mounted on your Monte, you will know how much new wheel/tire width you can safely move outboard and the rest will have to be moved inboard with positive wheel offset/backspace or you won't be going anywhere very fast. I encourage you to give these online tools a try. Once you get the hang of it, you can compare a lot of possible combos and get the answers of what will work for you without taking any chances. Good luck.
-
His FGMCC ID is "Overdrive" so just send him a private message.
-
Grant, I believe Dan (Overdrive) makes a filter that is a dead ringer for the original.
-
Welcome to the club and forums, Clifford!! There are possibly others but your SS is the first Desert Sand '70 I remember seeing in this club - very appealing with the black vinyl top! Don't be shy about asking questions and sharing your progress.
-
Welcome to the club and forums, Ed! Your '71 is beautiful! Love the spoked wheels with blackwalls and the slightly raked stance! I'll bet she turns heads wherever you go. Is that a stock '71 Monte color - possibly Nevada Silver paint code 13)?
-
Wow, shocking turnaround, especially in this day and age!! That guy deserves a big ole tip!!
-
Don't have specs for '71 but the '70 specs for the 350 are: Intake Duration = 280* (Opens 28* BTC; Closes 72* ABC); Lift = .3900" Exhaust Duration = 288* (Opens 78* BBC; Closes 30* ATC); Lift = .4100"
-
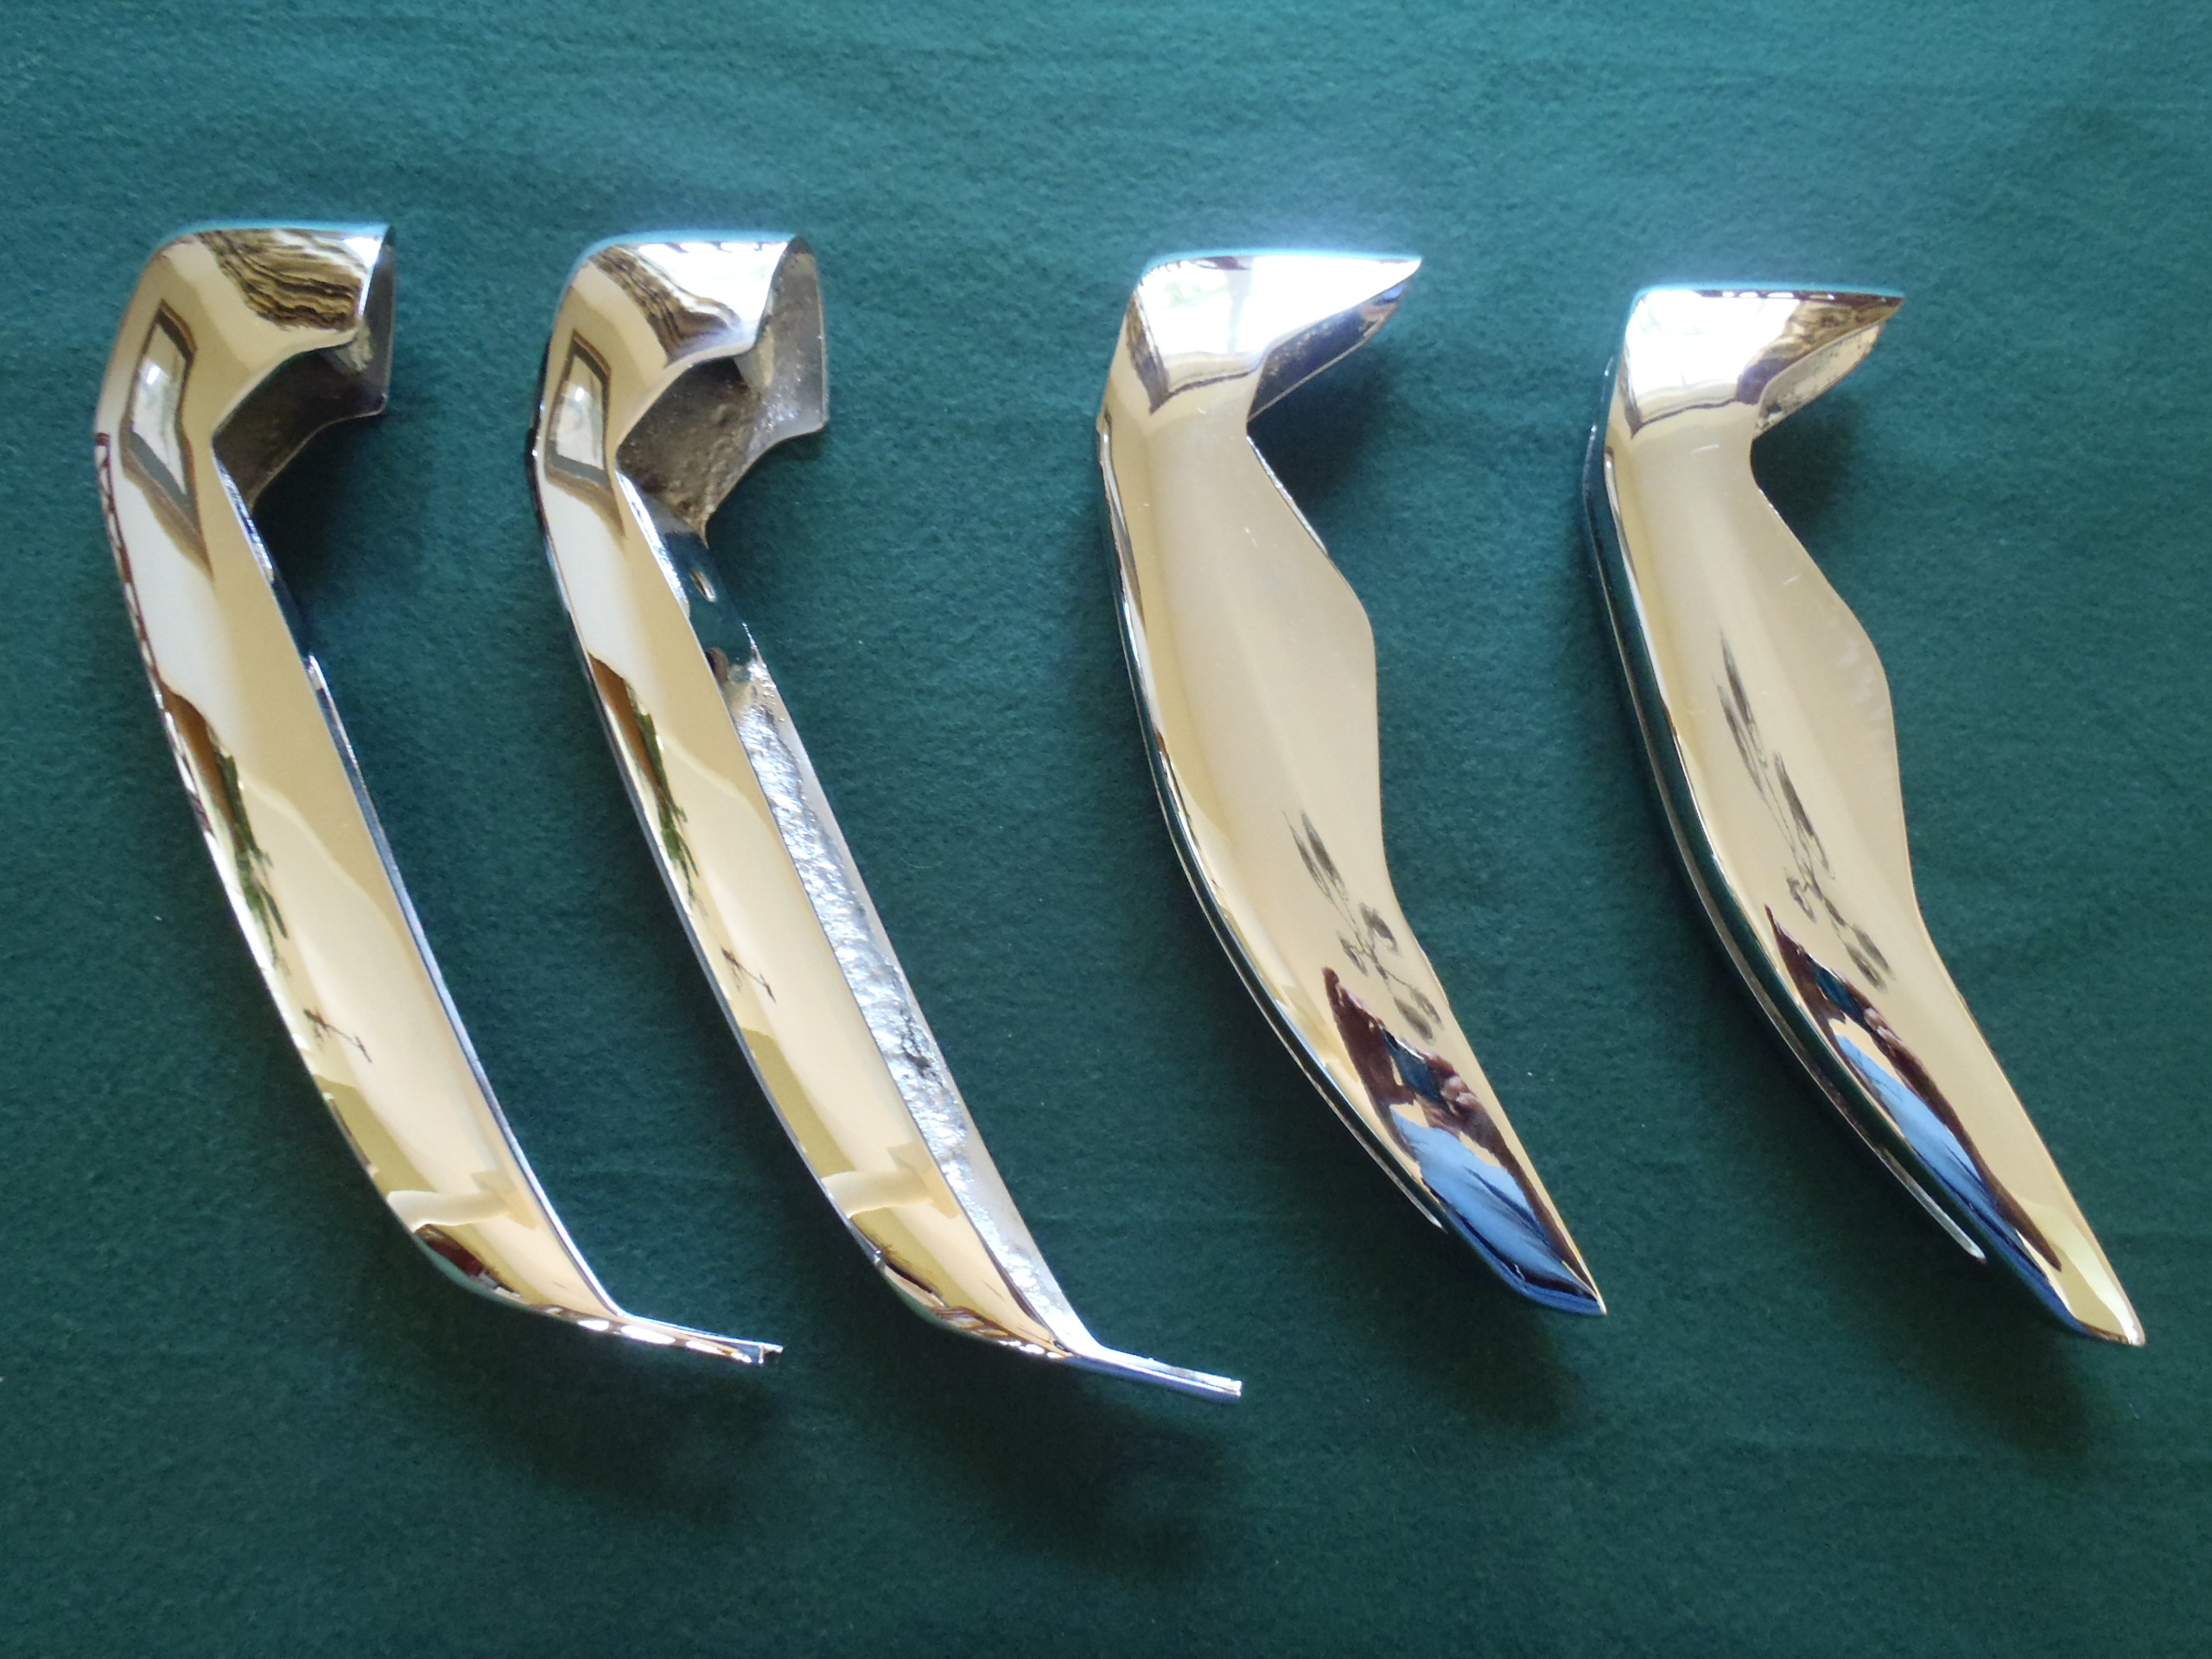
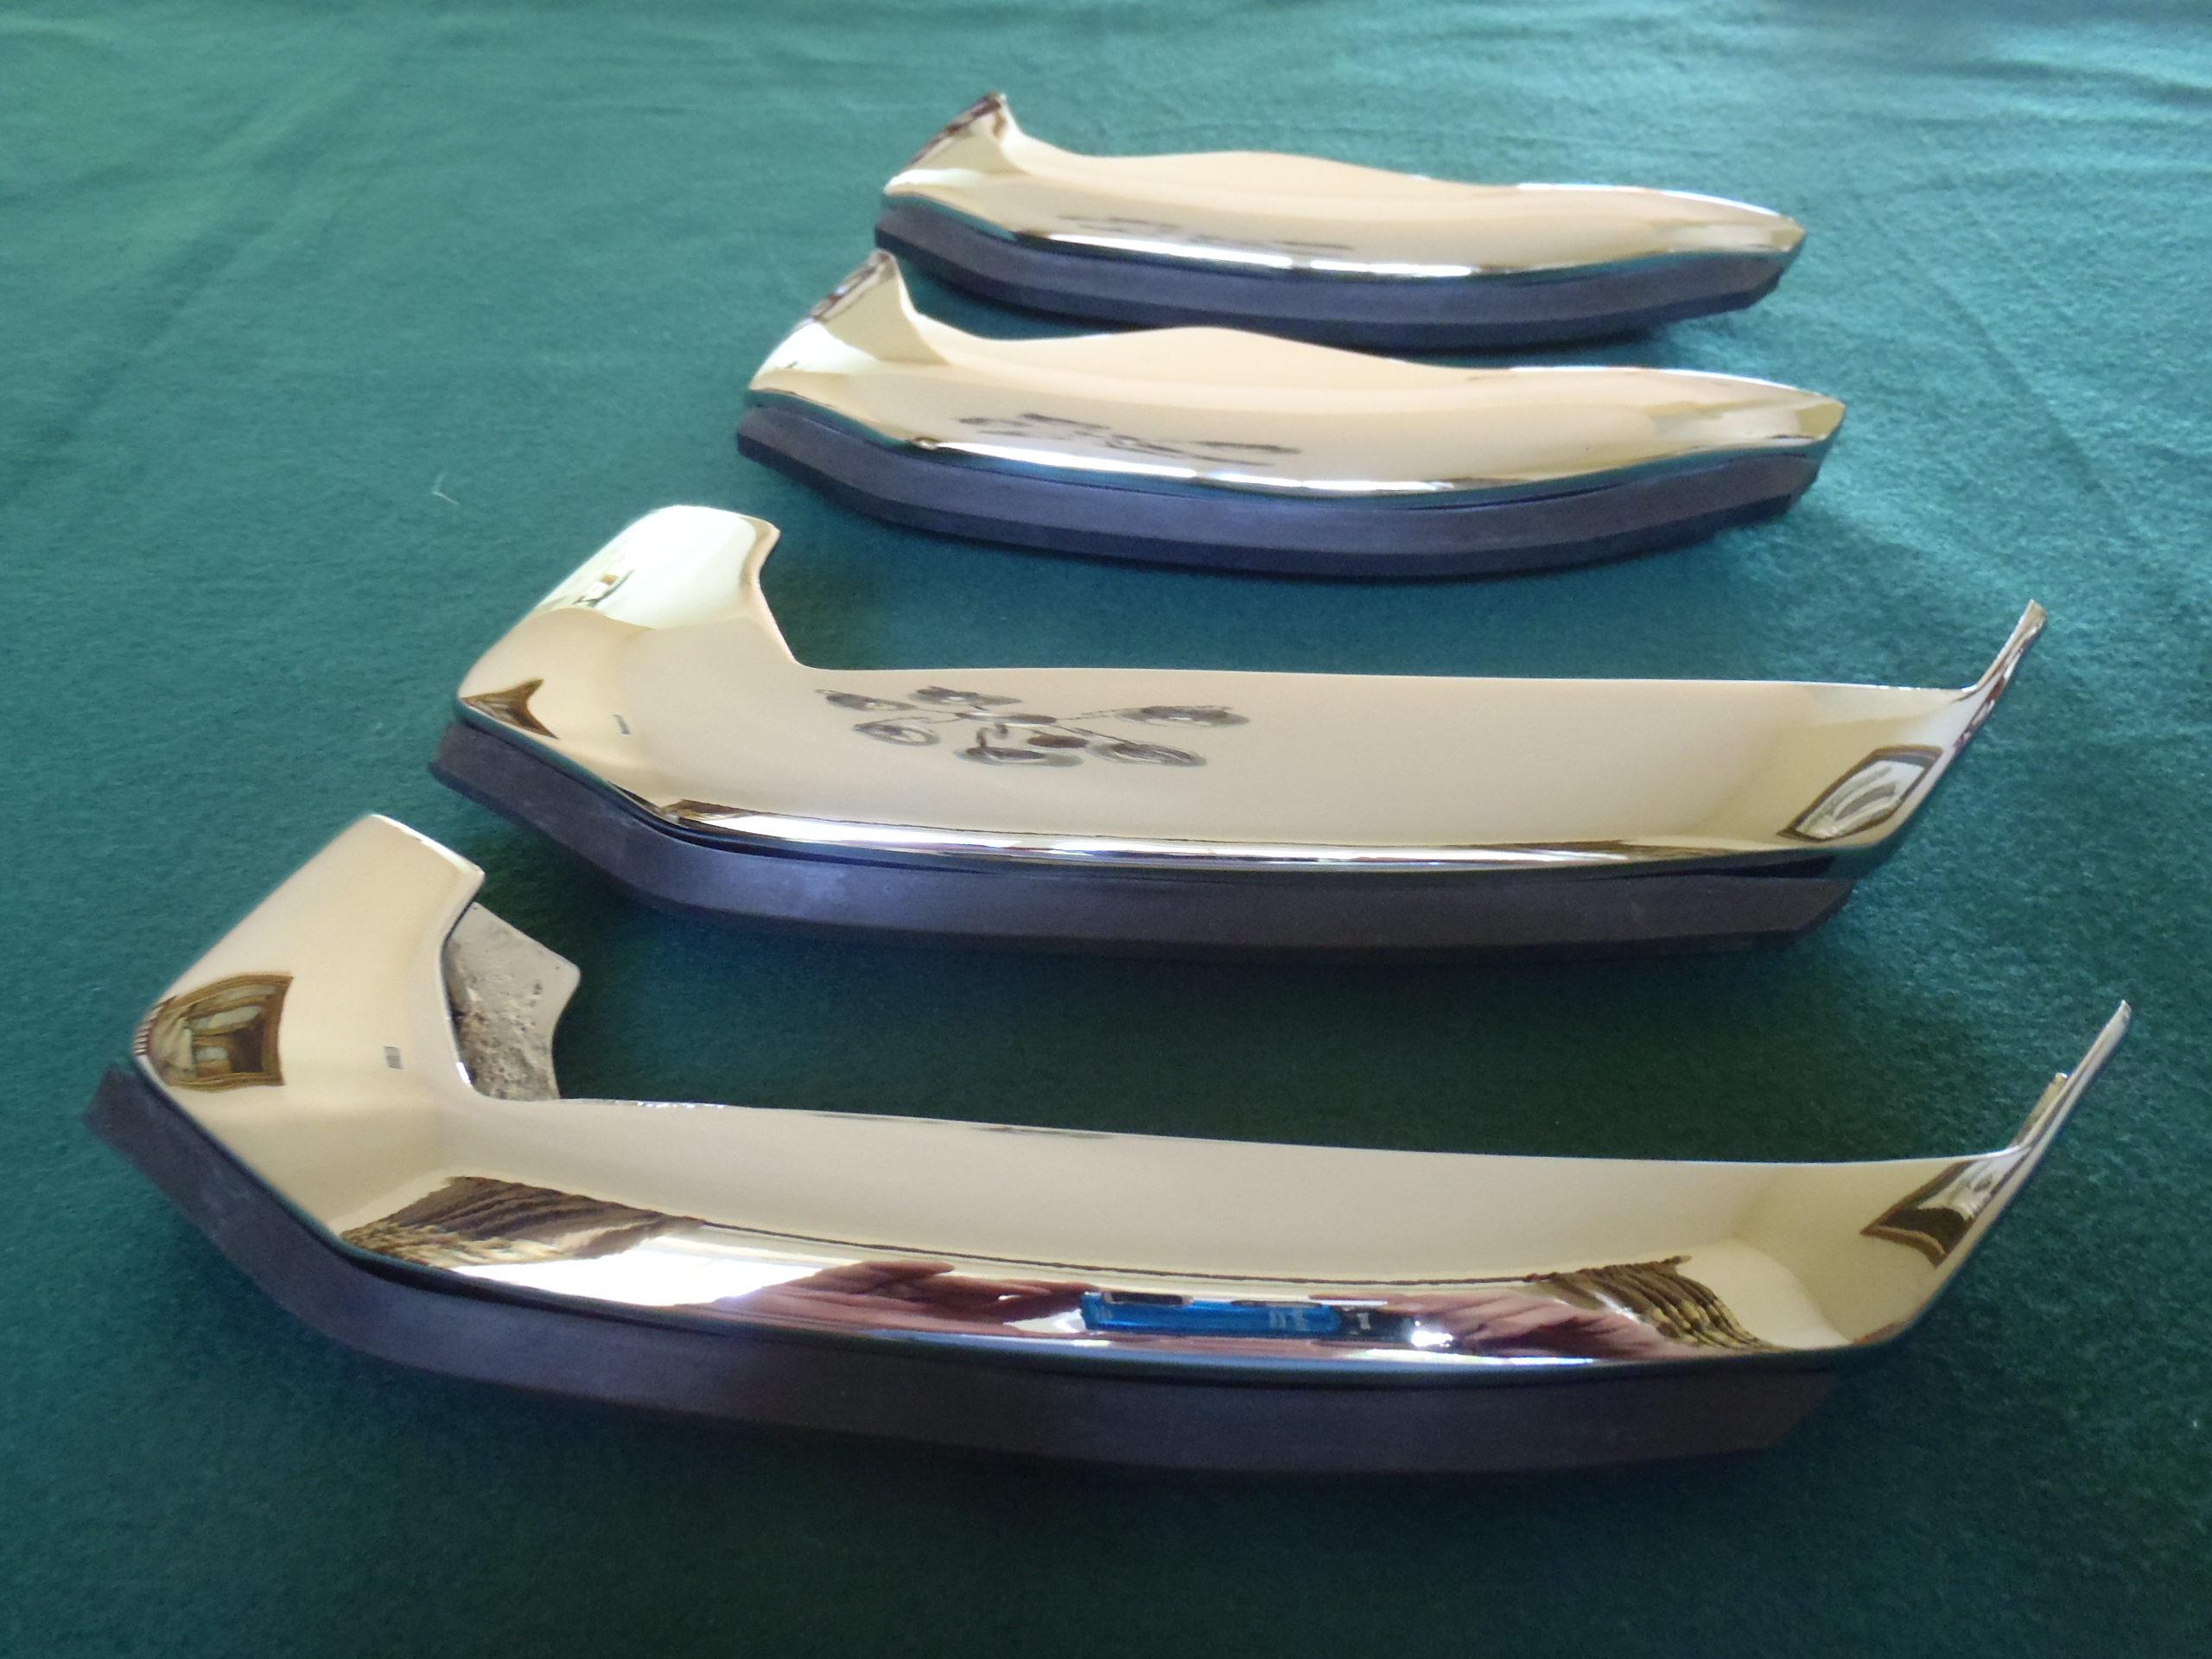
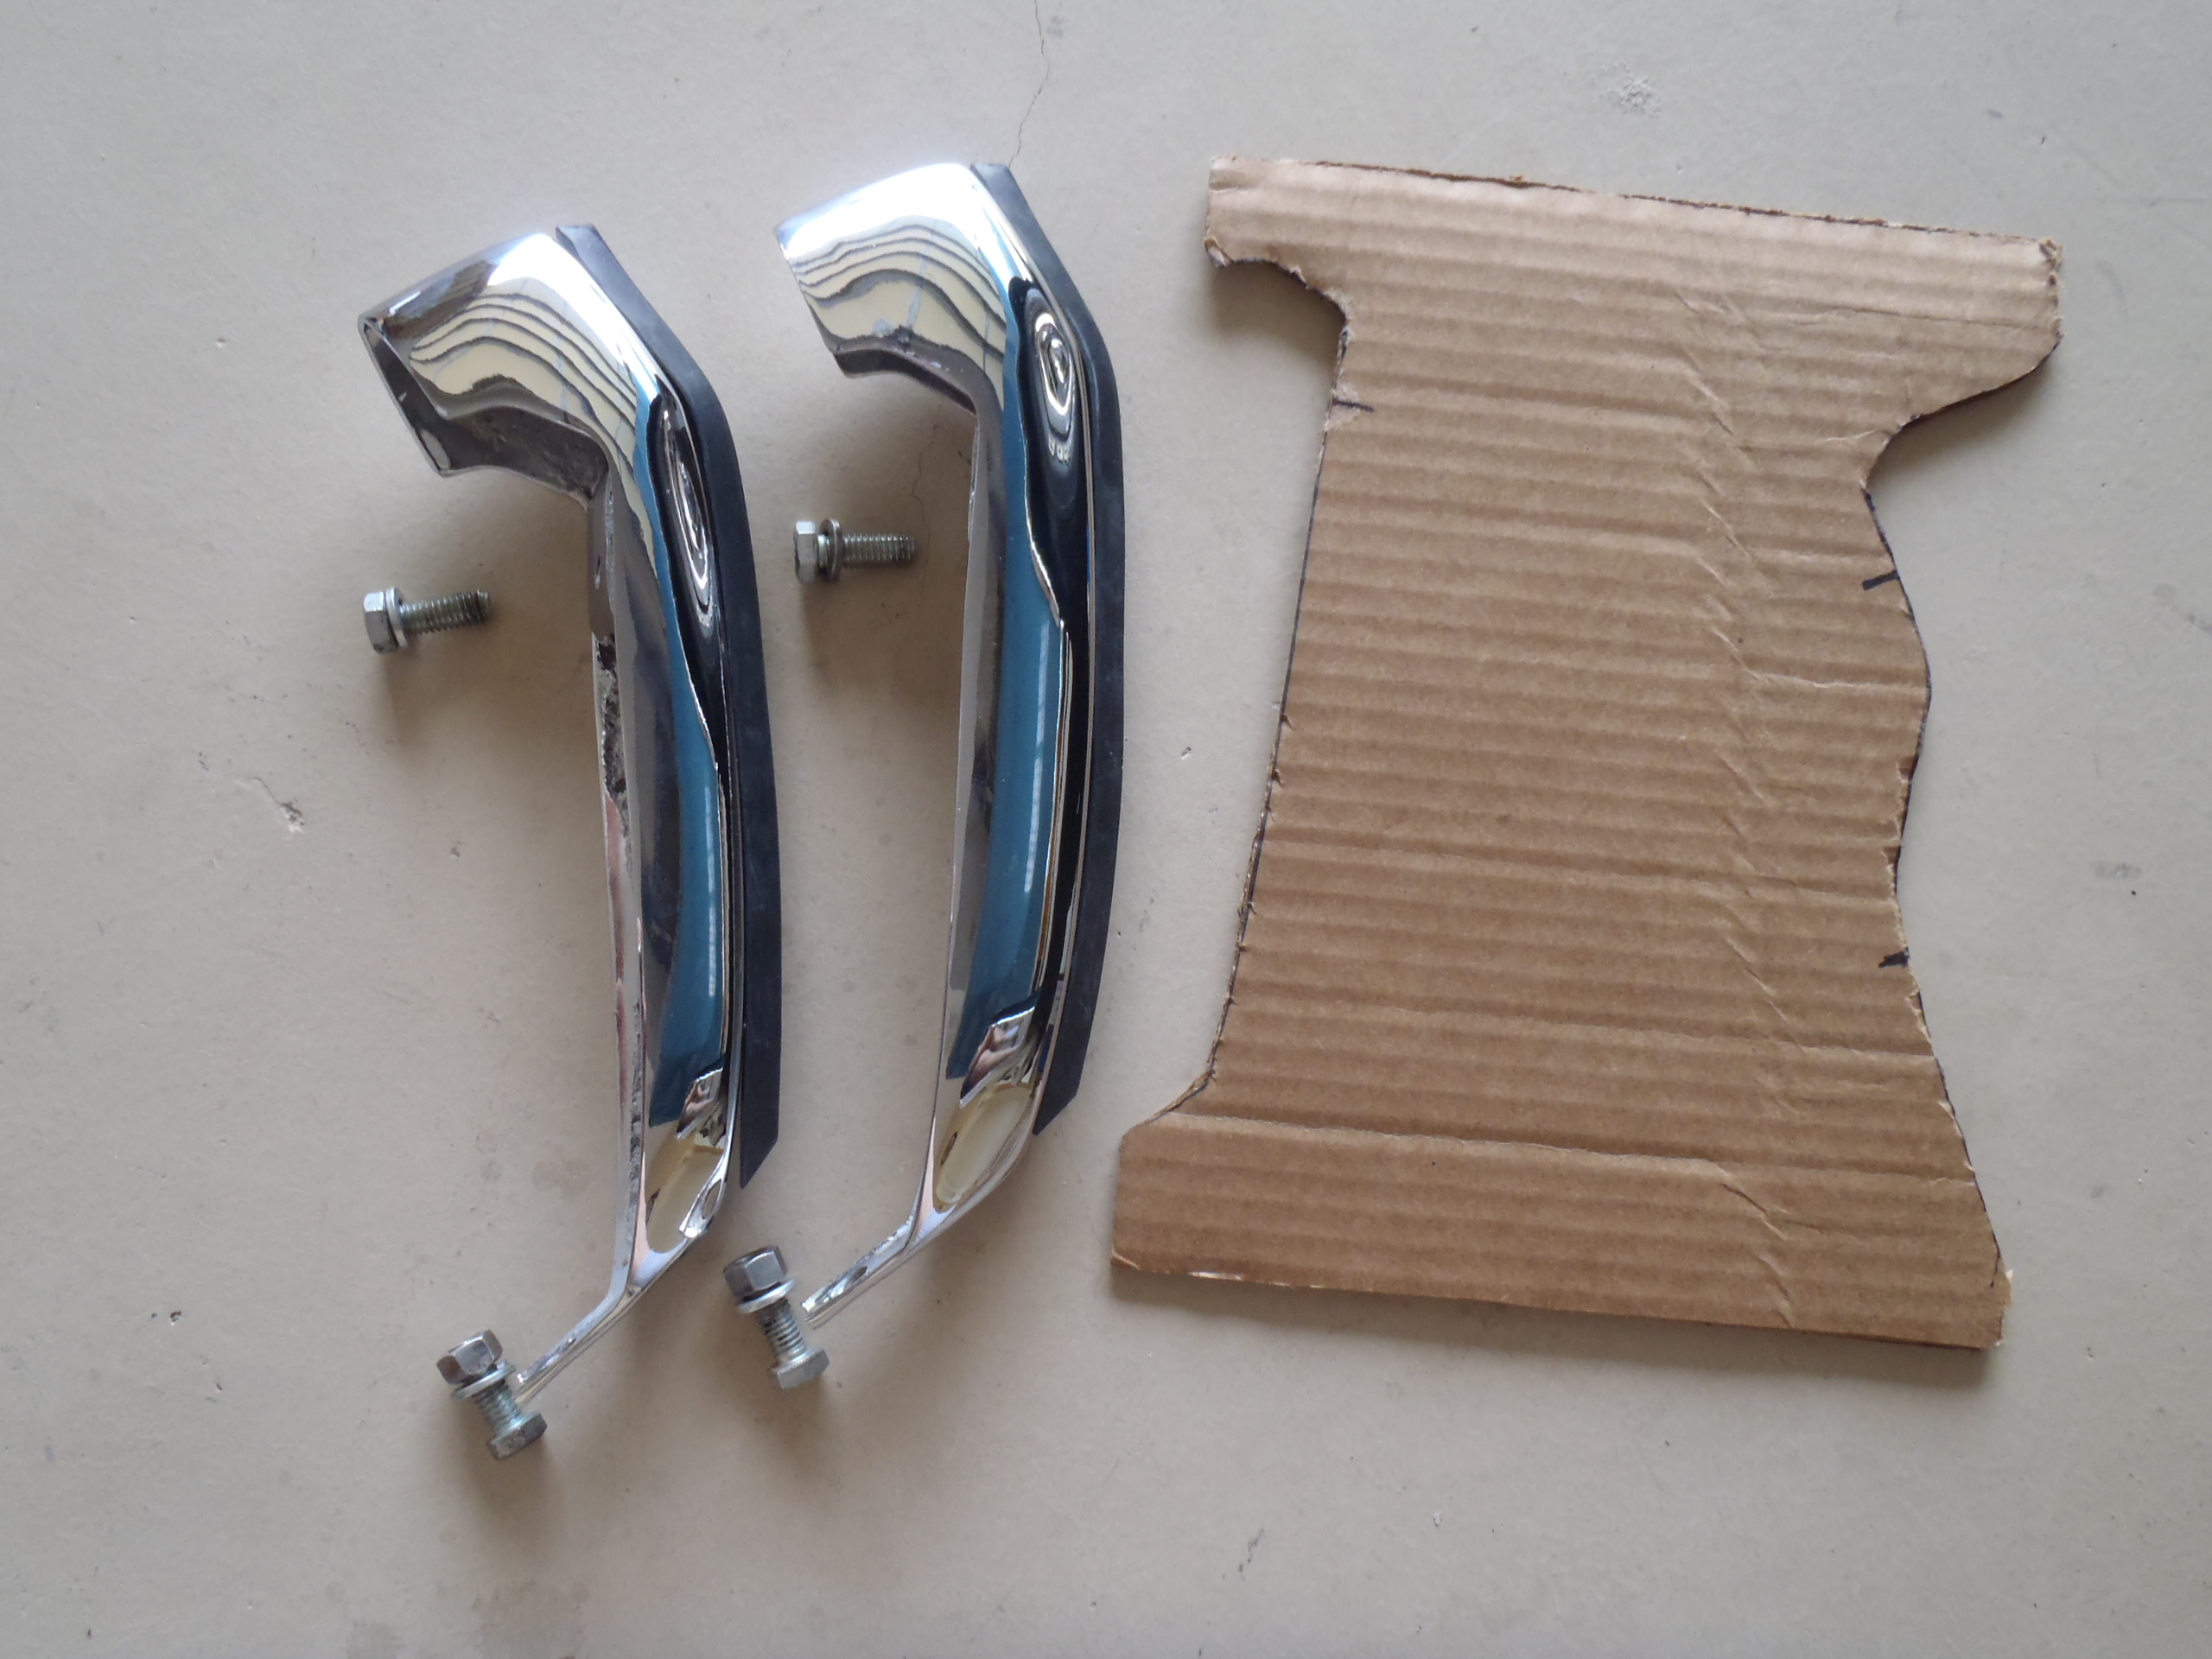
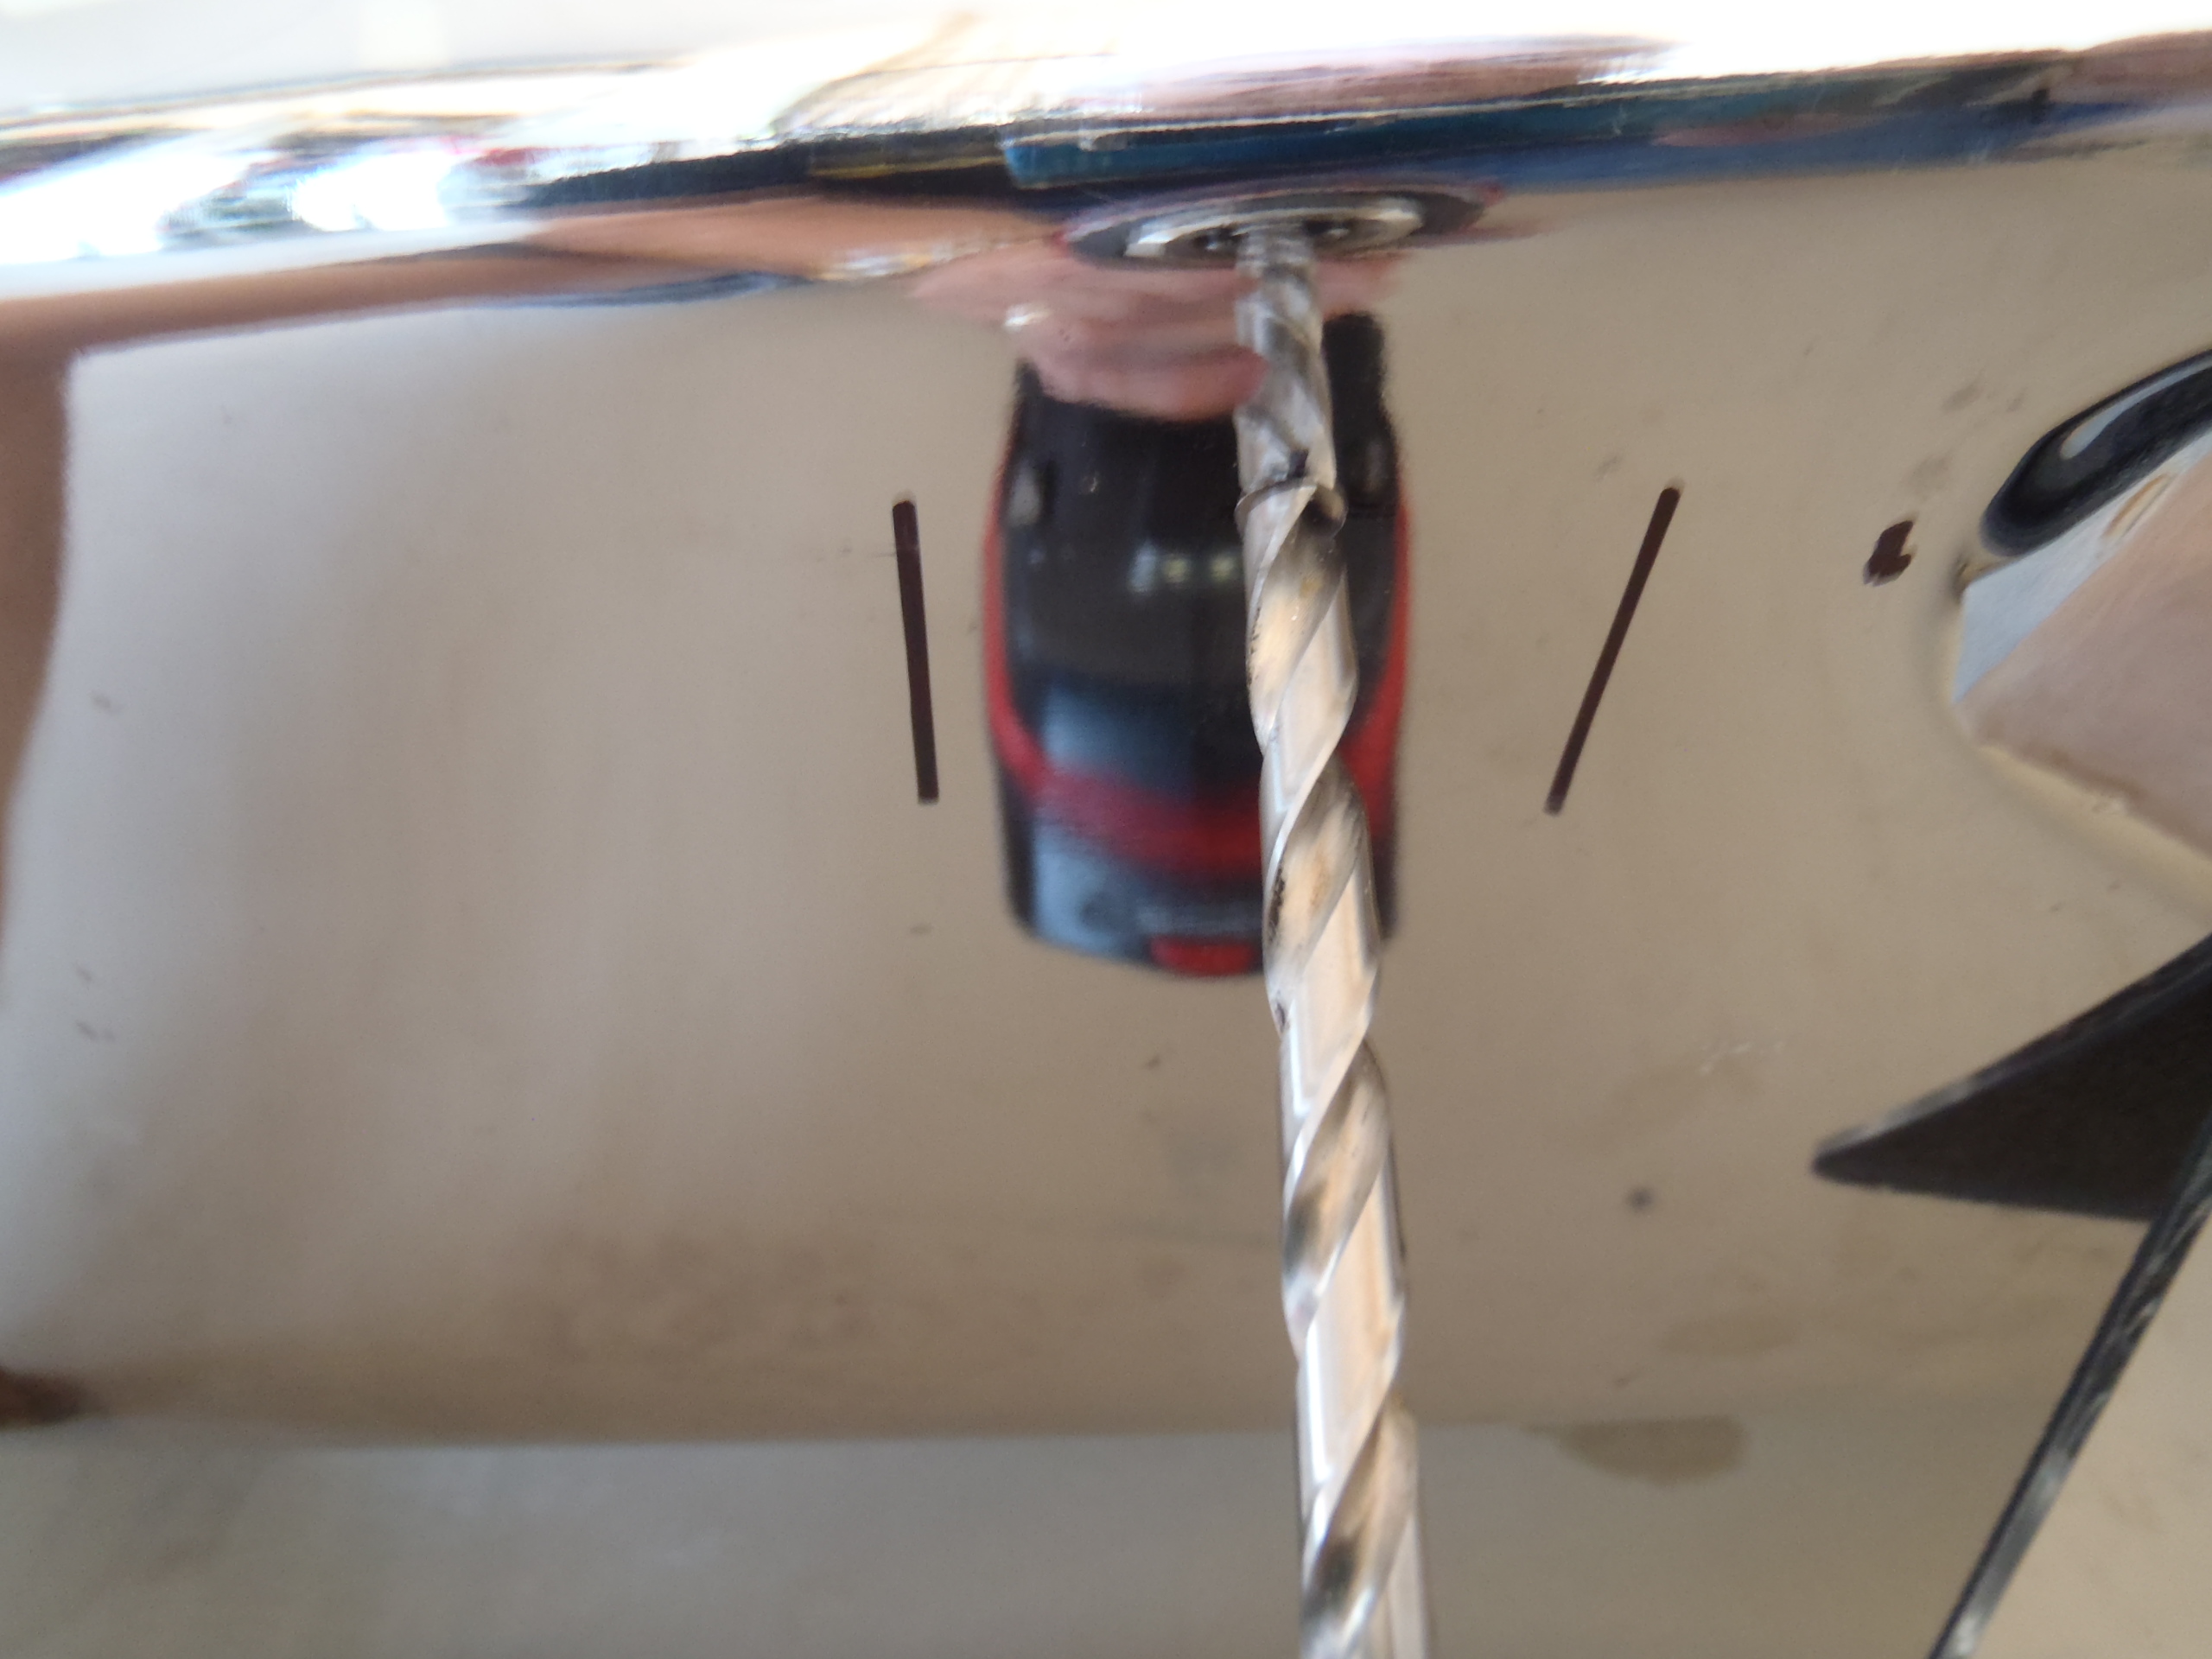
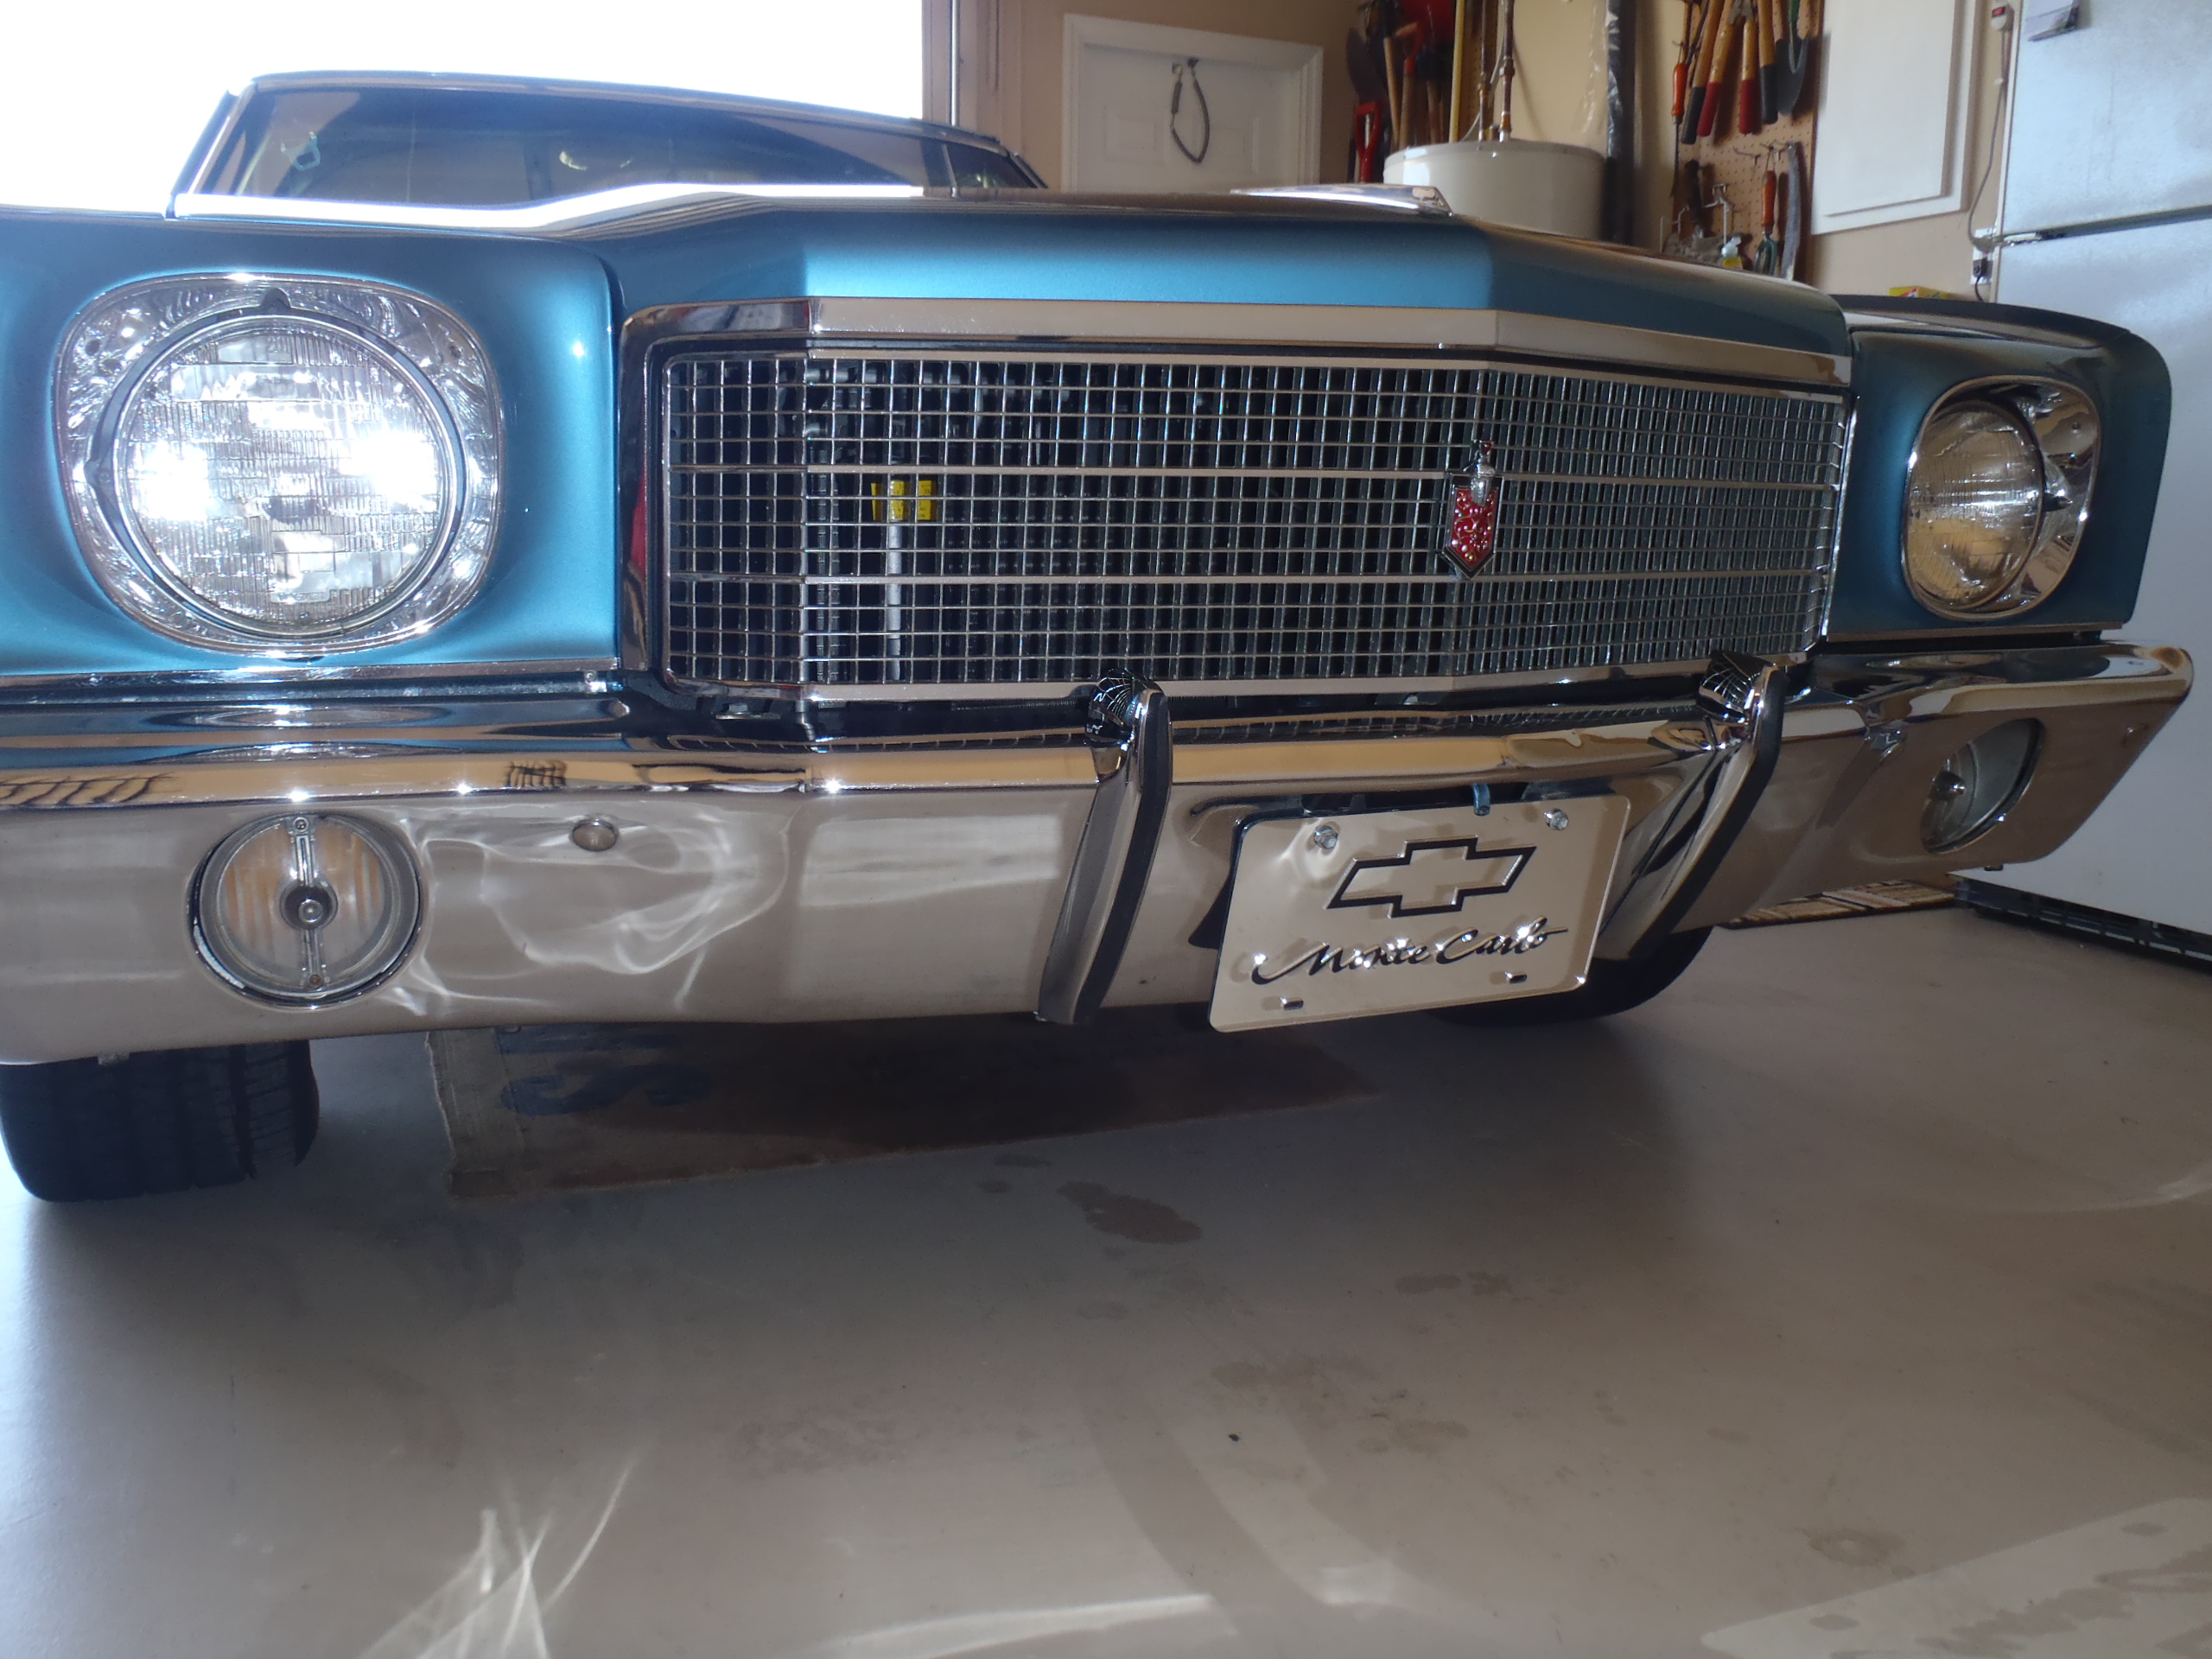
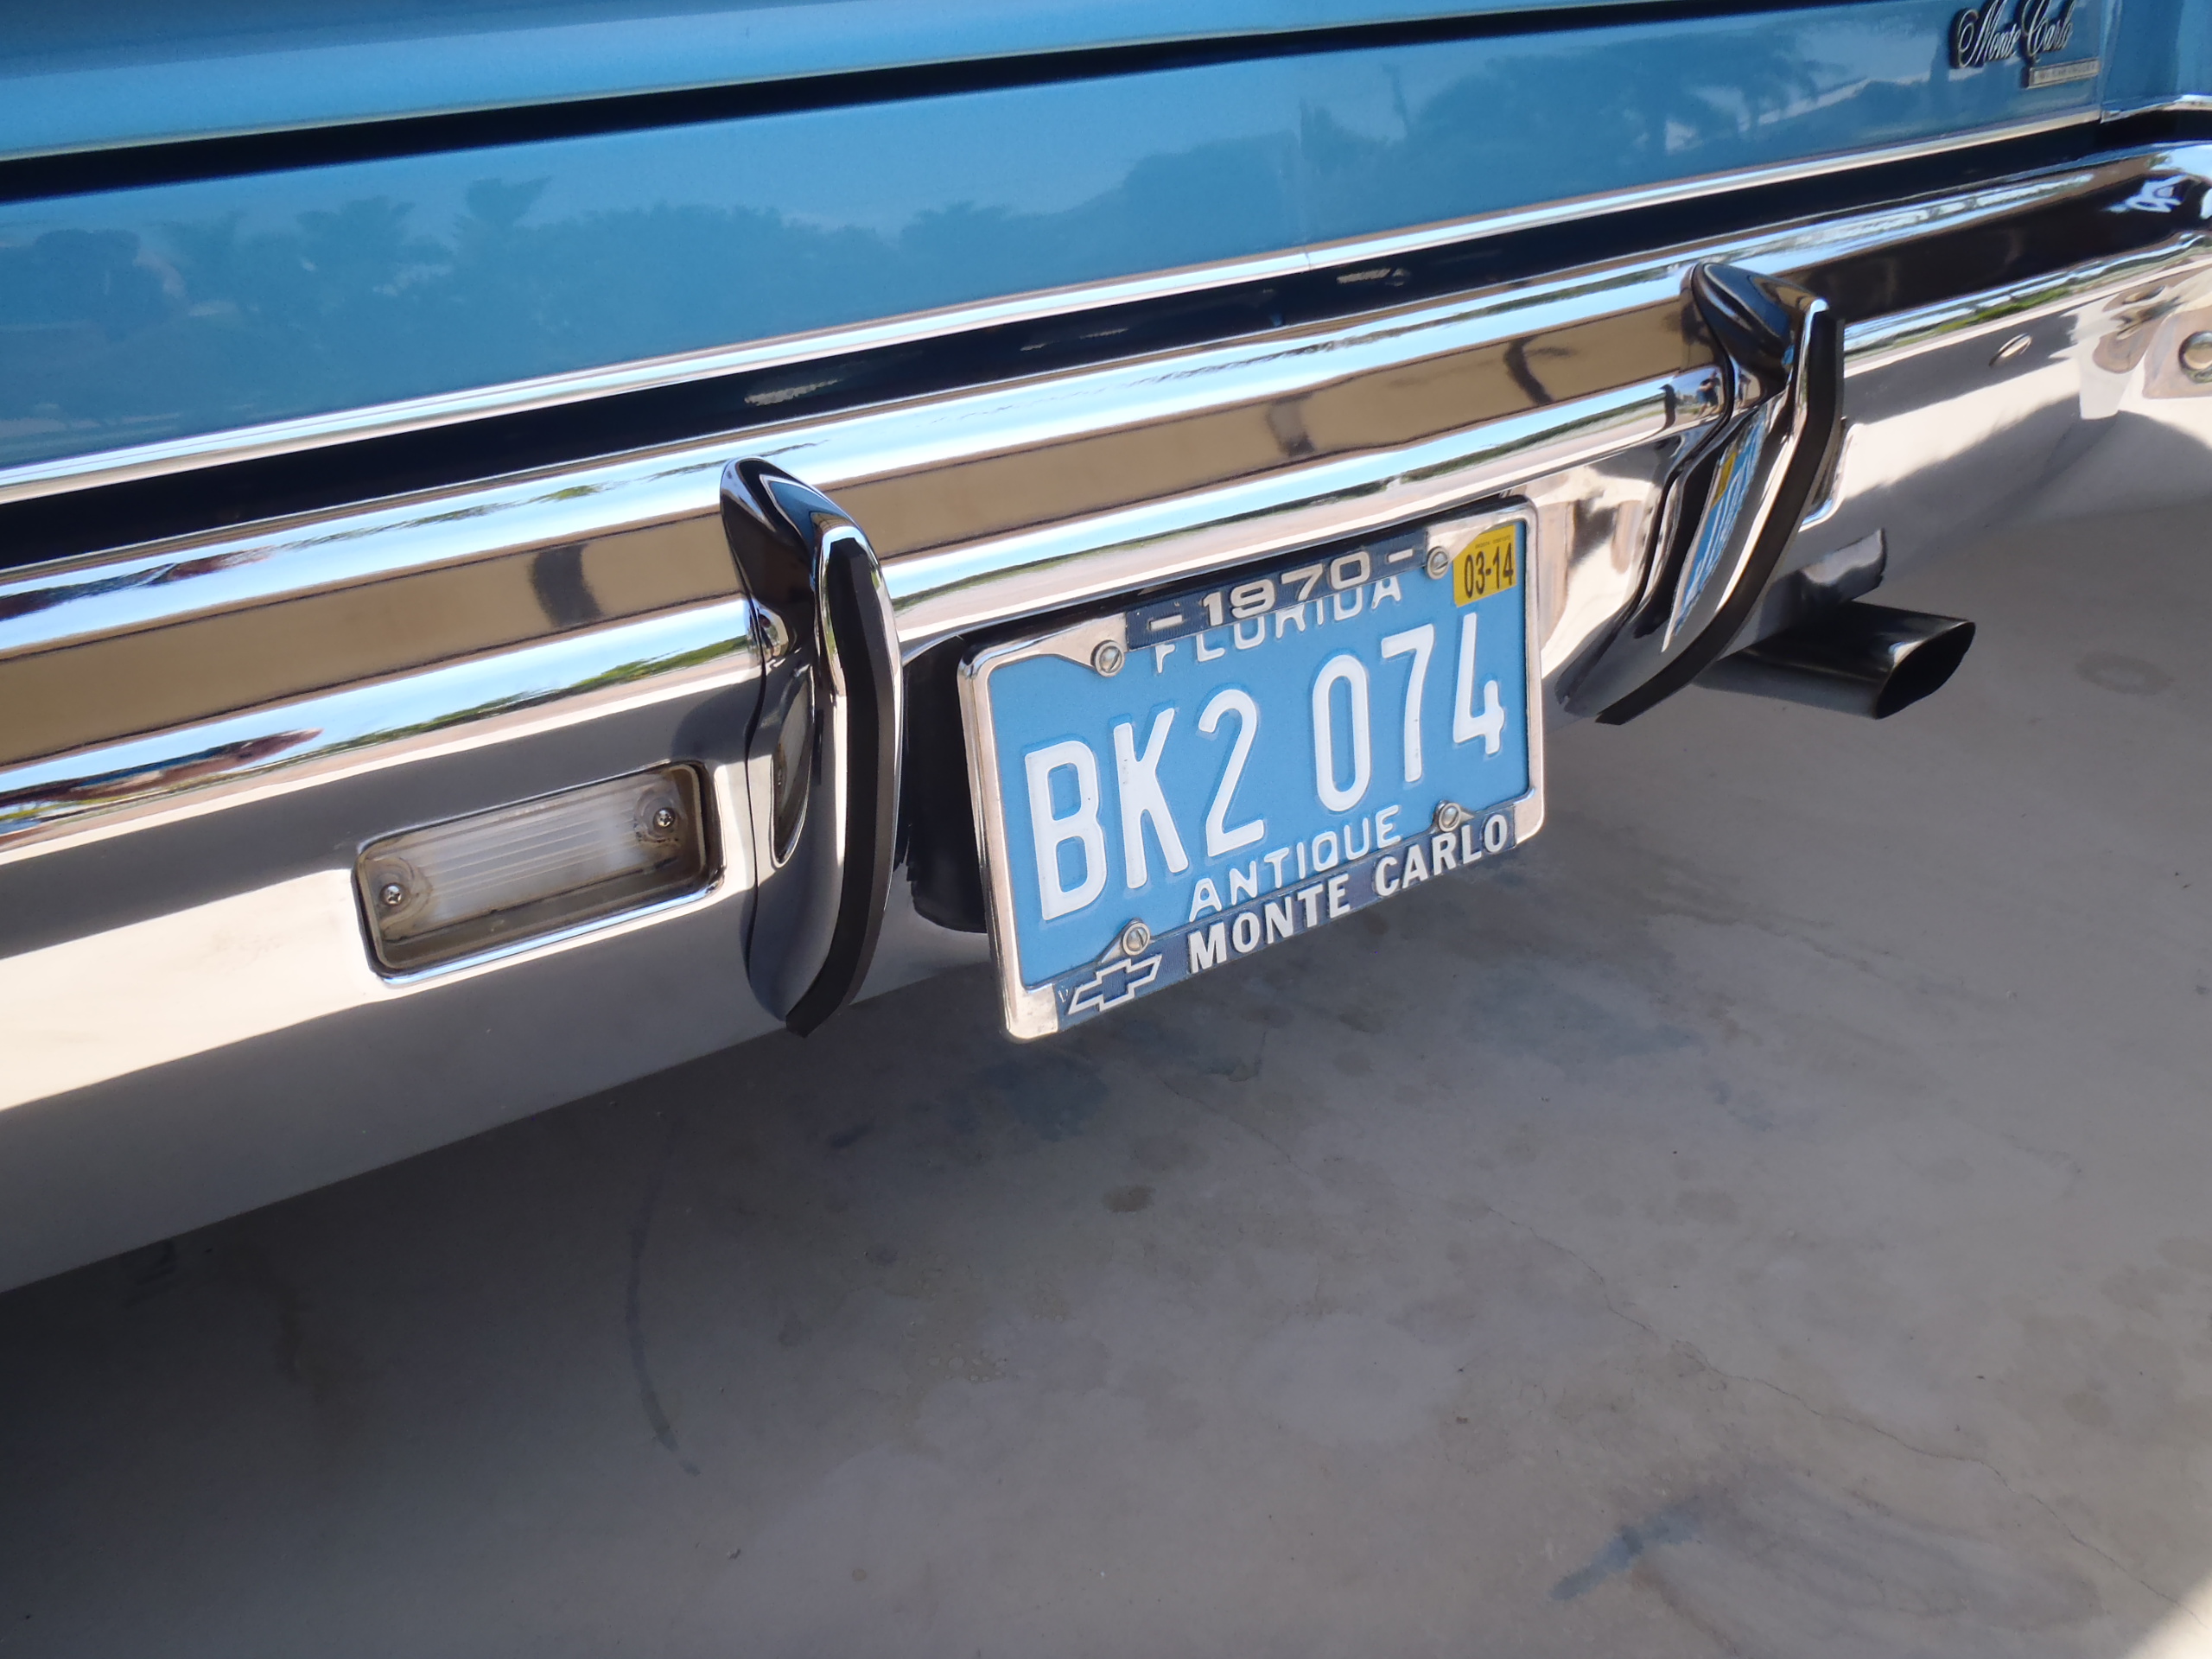
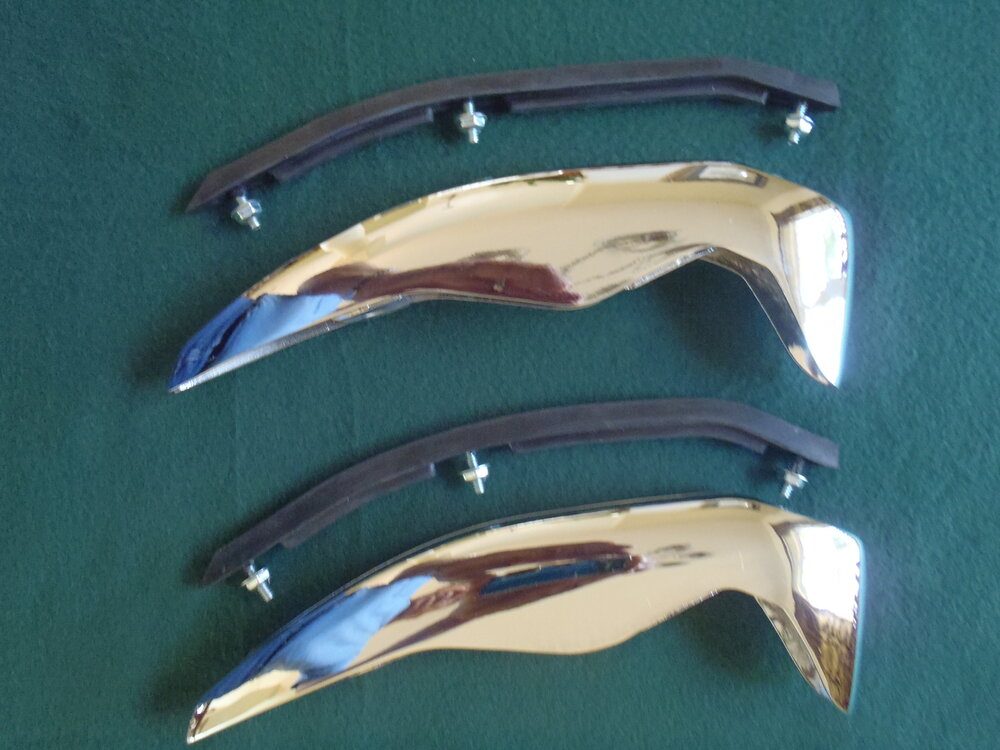
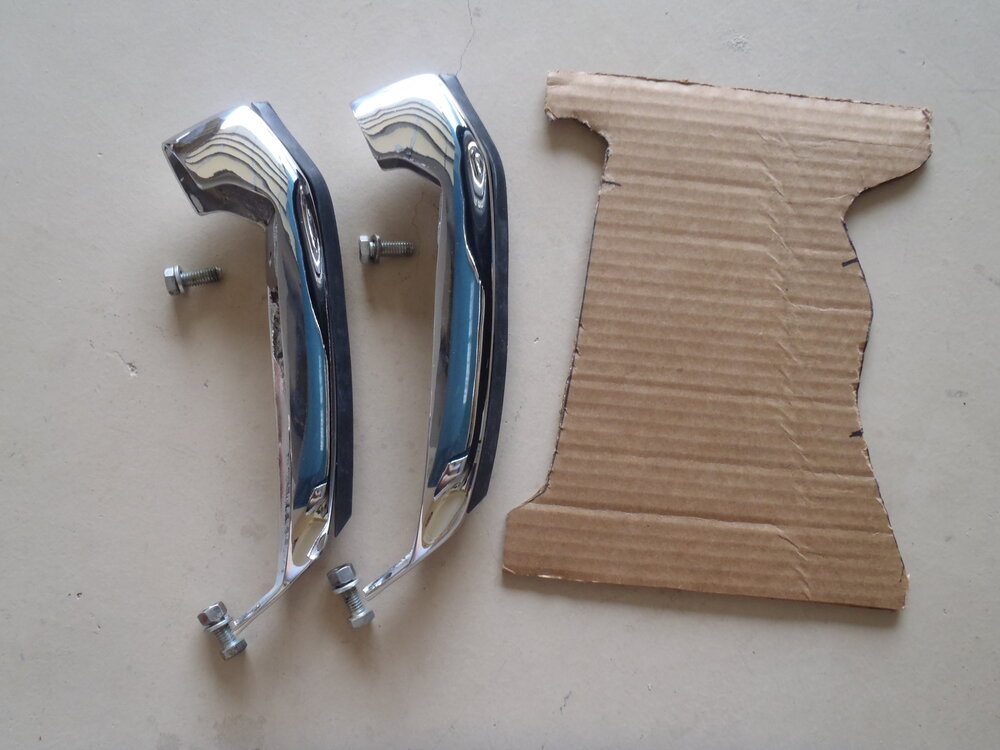
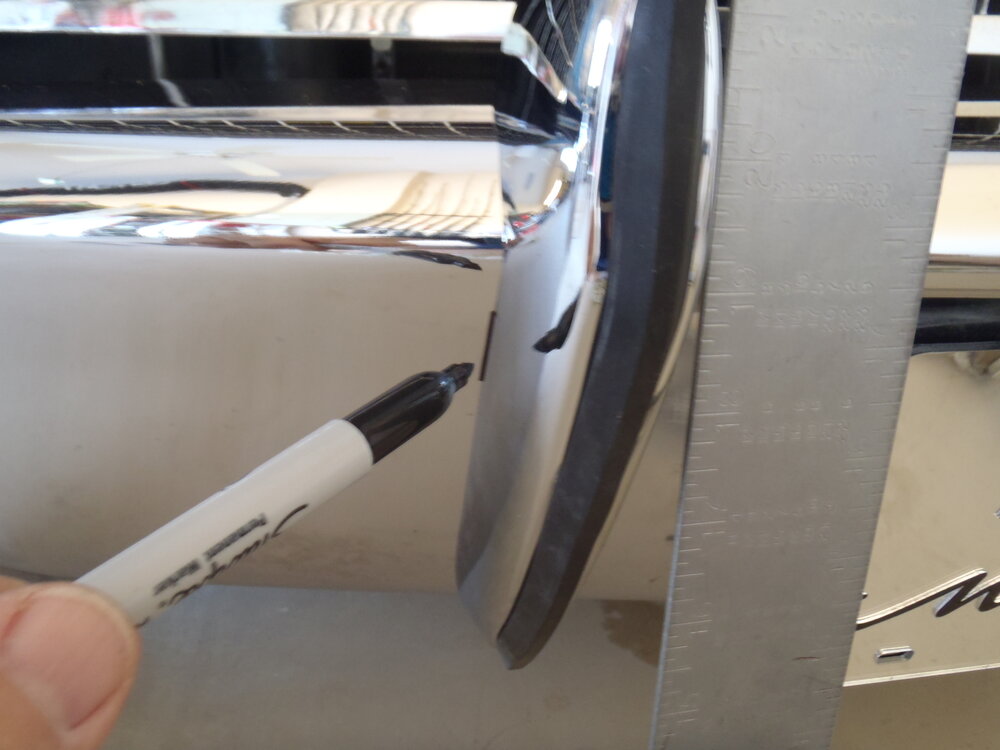
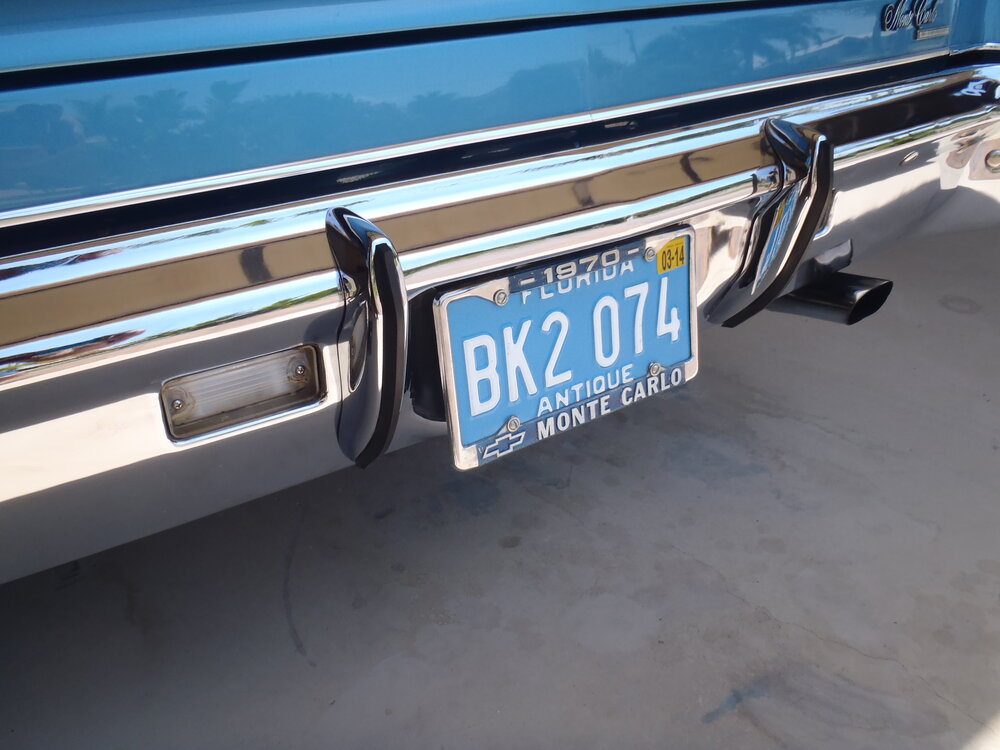
Hi, Ed, I don't think you can make a simpler and nicer upgrade to the appearance of a first gen Monte than to add front and rear bumper guards so I would encourage you to pursue such a project. There are a few NOS guards out there but they tend to be pretty pricey, of course. There are many more useful cores which can be re-chromed and assembled with new rubber inserts. I have actually used both methods on two '70s. You may find a driver quality set for a bit less, but if you can get a complete set (front and rear) of show quality guards for under $400, you have done very well. I have included some photos below of the set I had re-chromed ($75 plus tax and shipping each) and the new rubber inserts (around $25 a pair if I remember correctly). The most challenging (and important) part of this project is getting a total of six mounting holes drilled in your front and rear bumpers in exactly the correct locations (unless you happen to have a pre-drilled bumper, of course). It is almost imperative that you use templets and squares/levels/plumbs to get the correct vertical alignment and careful measuring to get the correct horizontal spacing. I have many more photos of both front and rear installations if you decide to do the project - just let me know. Good luck!


-
Welcome to the club and forums, Eric! In my opinion, you could not have chosen a more classic beauty than a first gen Monte to fulfill your wish for a big '70s coupe - well done! Hope you enjoy improving and driving your '72 - she looks real nice already! Thanks for representing our club in Germany. Don't be bashful about sharing photos, projects or questions - this is as congenial and helpful a group as you are likely to find online.
-
Wow, she's gorgeous, Mark, well done!! That's such an unusual color combo but very appealing - love the sandalwood interior. 32 years is a long time to stay with any project so congratulations on your perseverance. I see you work for Boeing. I also worked for them as a student engineer in the Wichita operation from '66 to '68. Welcome to the club and forums. Hope to see more of your beautiful SS in the future. Enjoy!
-
Ed, A 1" bore master cylinder will require less foot force (i.e. "softer" pedal) to generate the same brake line/wheel cylinder pressure than a 1 1/8" bore master cylinder. Pressure (P) = Force (F) / Area (A) so if the Area (3.1416 x Radius x Radius) of the bore goes up, so does the Force (applied to the master cylinder piston) to create the same Pressure. In this case, to generate a 100 psi line pressure, the 1" bore master cylinder would require 78.5 pounds of force while the 1 1/8" bore master cylinder would require 99.4 pounds of force or an increase of 26.5%. Although, your brake pedal gives you a lot of mechanical leverage in creating the force on the piston, the 1" bore master cylinder will definitely have a "softer" feel when braking than any larger bore. Of course, the larger bore sweeps more brake fluid volume so brake pedal travel will always be less than with a smaller diameter bore. If you have power brakes, the booster takes care of the additional force required by a larger bore and gives you a shorter brake pedal travel - nice tradeoff. If you don't have power brakes, the smaller master cylinder bore will require less foot force but a longer pedal travel given that the rest of the braking system remains the same. BTW, the factory spec on a '70 Monte Carlo master cylinder is a 1 1/8" bore and I would imagine it was the same on the '71.
-
Welcome to the club and forums, Richard! Your '71 SS is absolutely stunning - a great representative of first gen Monte survivors! That exterior color appears to be Cottonwood Green but it's sometime hard to tell from photos. I don't know how much of your own time and resources have gone into your car but somebody deserves a lot of credit for its immaculate condition - well done! The first owner (possibly you?) clearly wanted something special to order such a heavily optioned SS. Thanks for all of the photos - it would be great to hear the story of your nearly 50 year old beauty sometime, if you don't mind sharing.
-
What did you do to your Monte Carlo today?
MCfan replied to Canuck's topic in General 70-72 Monte Carlo Forum
Looks really sharp, Mark! Those wheels coordinate nicely with your black-wall tires and black vinyl top. Also, adds a mild racy flair to an elegant body style. Well done! -
Jon, I have the same sizes of Wheel Vintique rims on my '70 mated with 3" deep trim rings (#3002-A) along with no-logo reproduction derby caps (#1012) all from David's Rally Wheels Inc. in San Jose , CA (www.davidsrallywheels.com 1-800-901-9555). I found them both reasonably priced ($505 total shipped) and very good guys to do business with. Of course, that was ten years ago (how time flies!) so things (and certainly prices) may have changed. I have had no loose caps or rings or any other fitment issues with this combo. Good luck.


-
Looks good, Ron! Most jobs can be accomplished in various ways with various tools. Many require patience, determination and creativity. It's a good feeling to achieve the end result you wanted/needed. Congratulations!
-
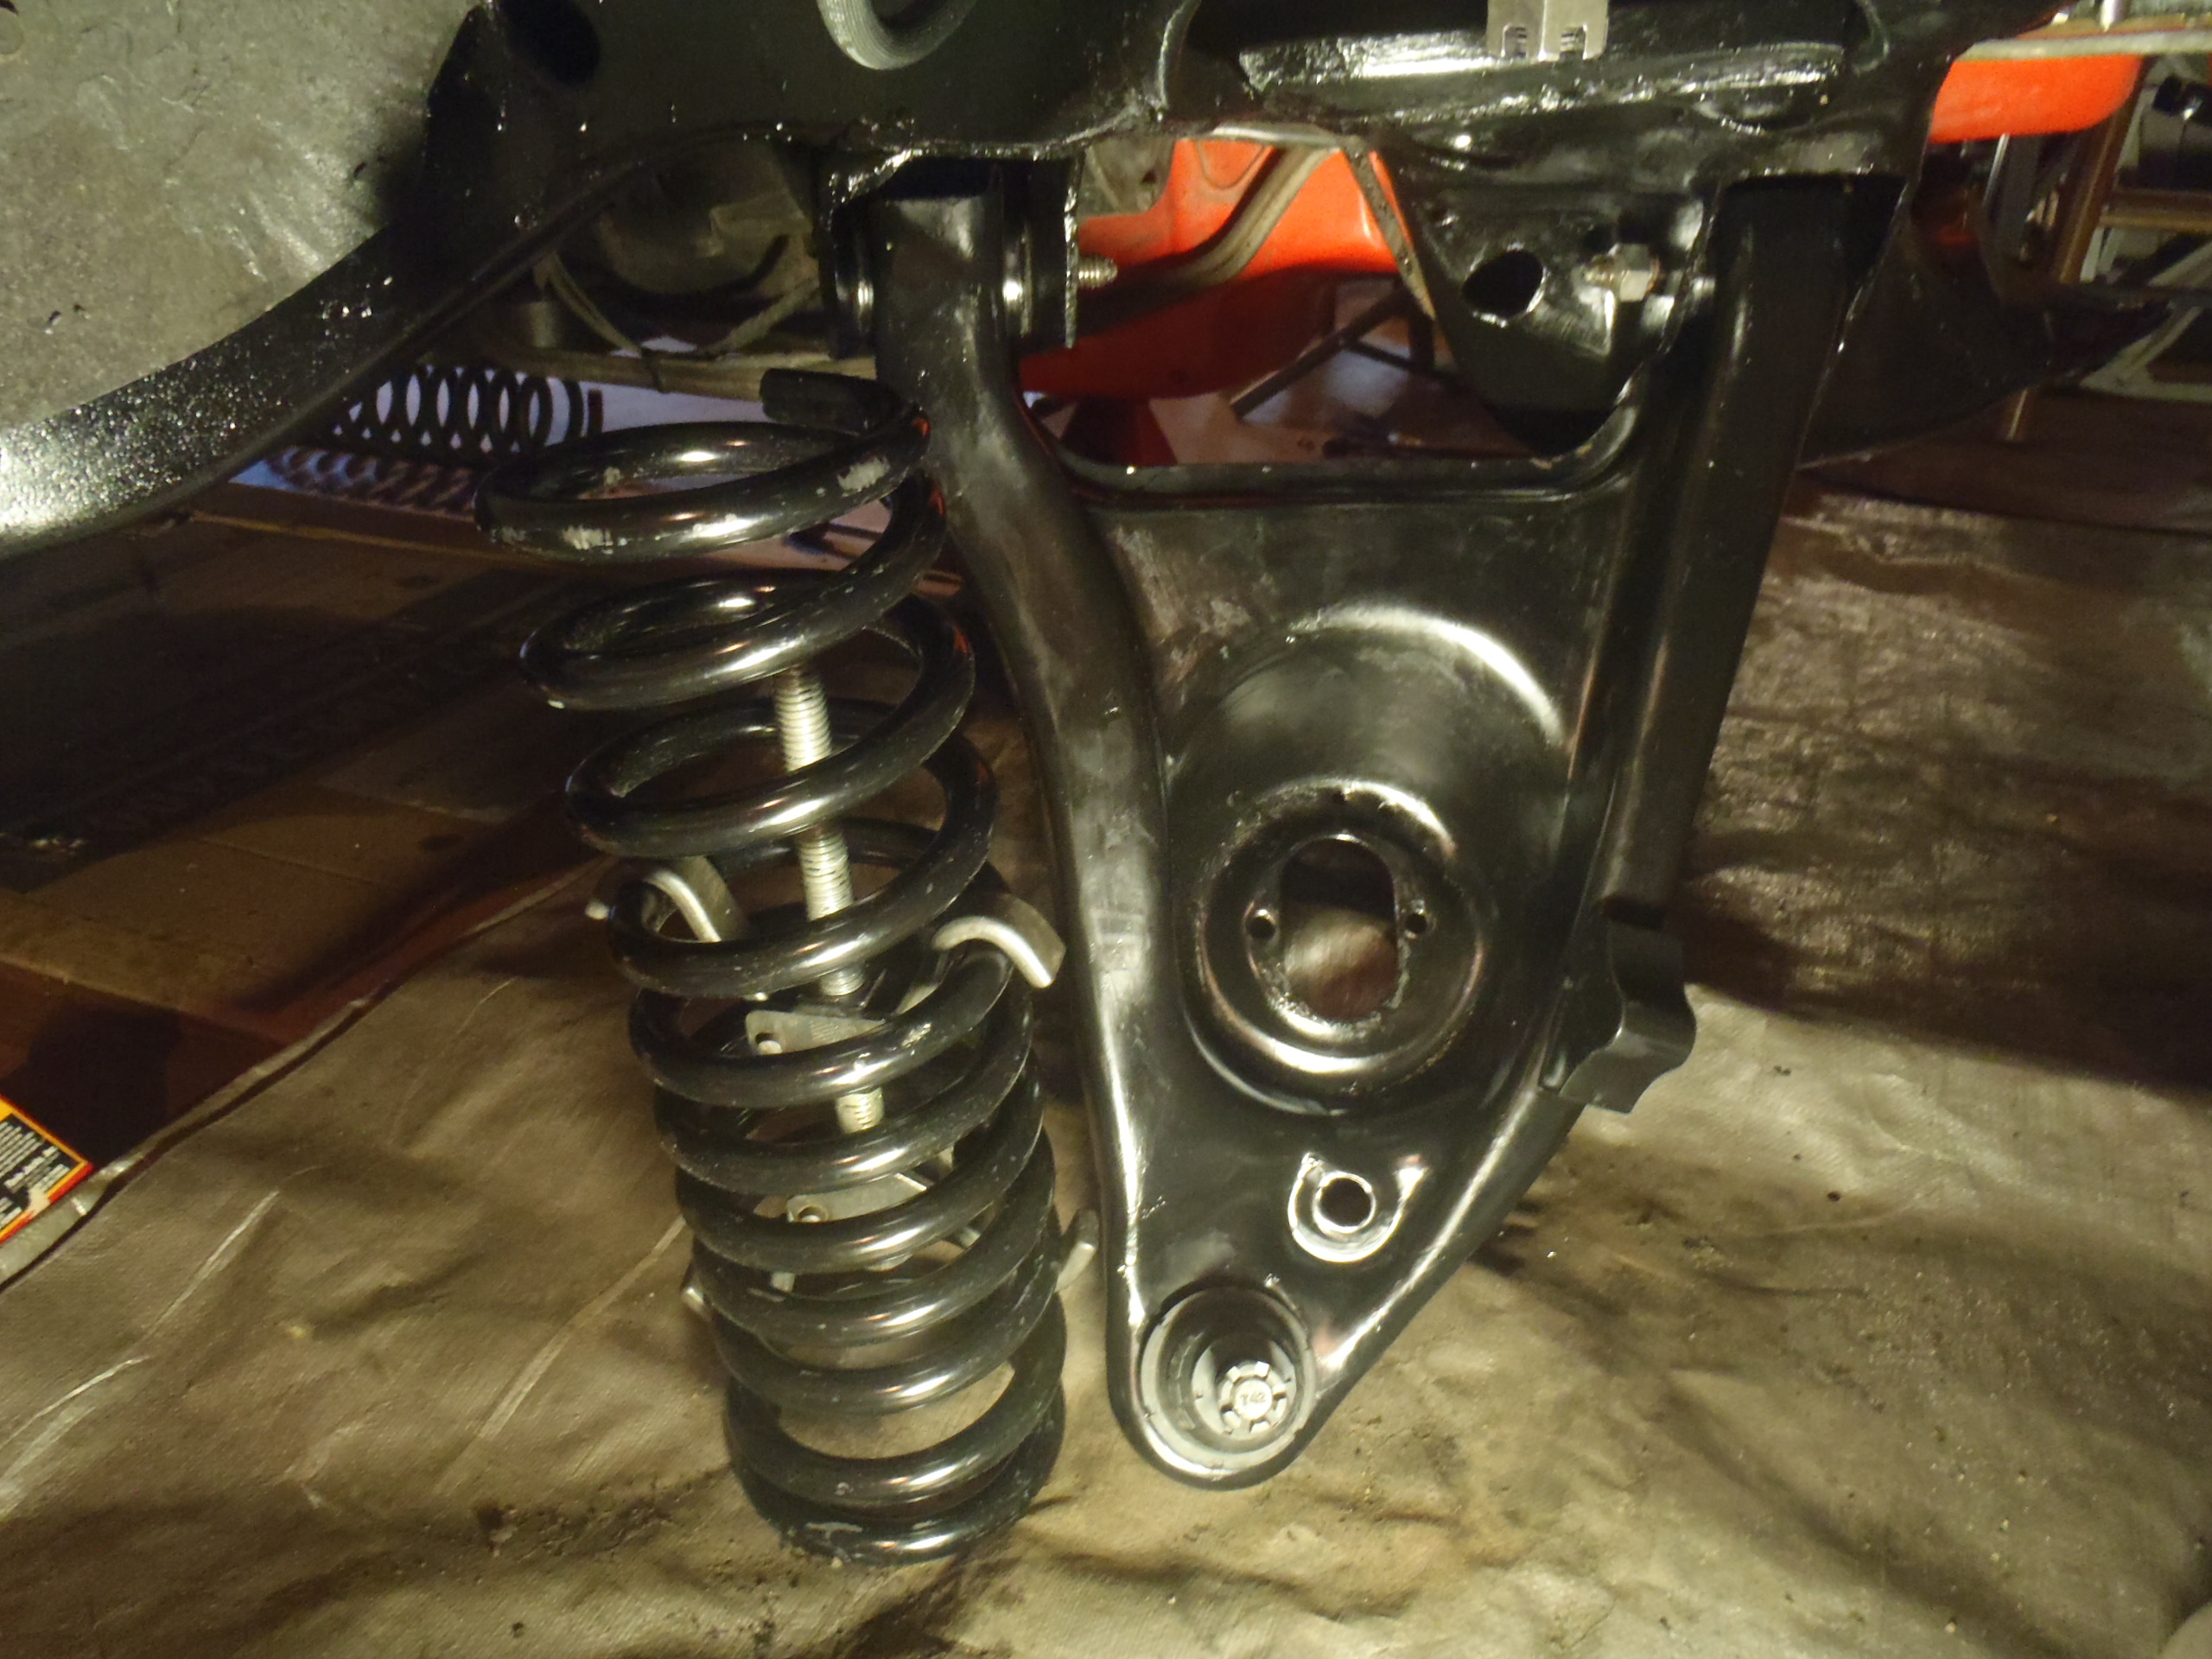
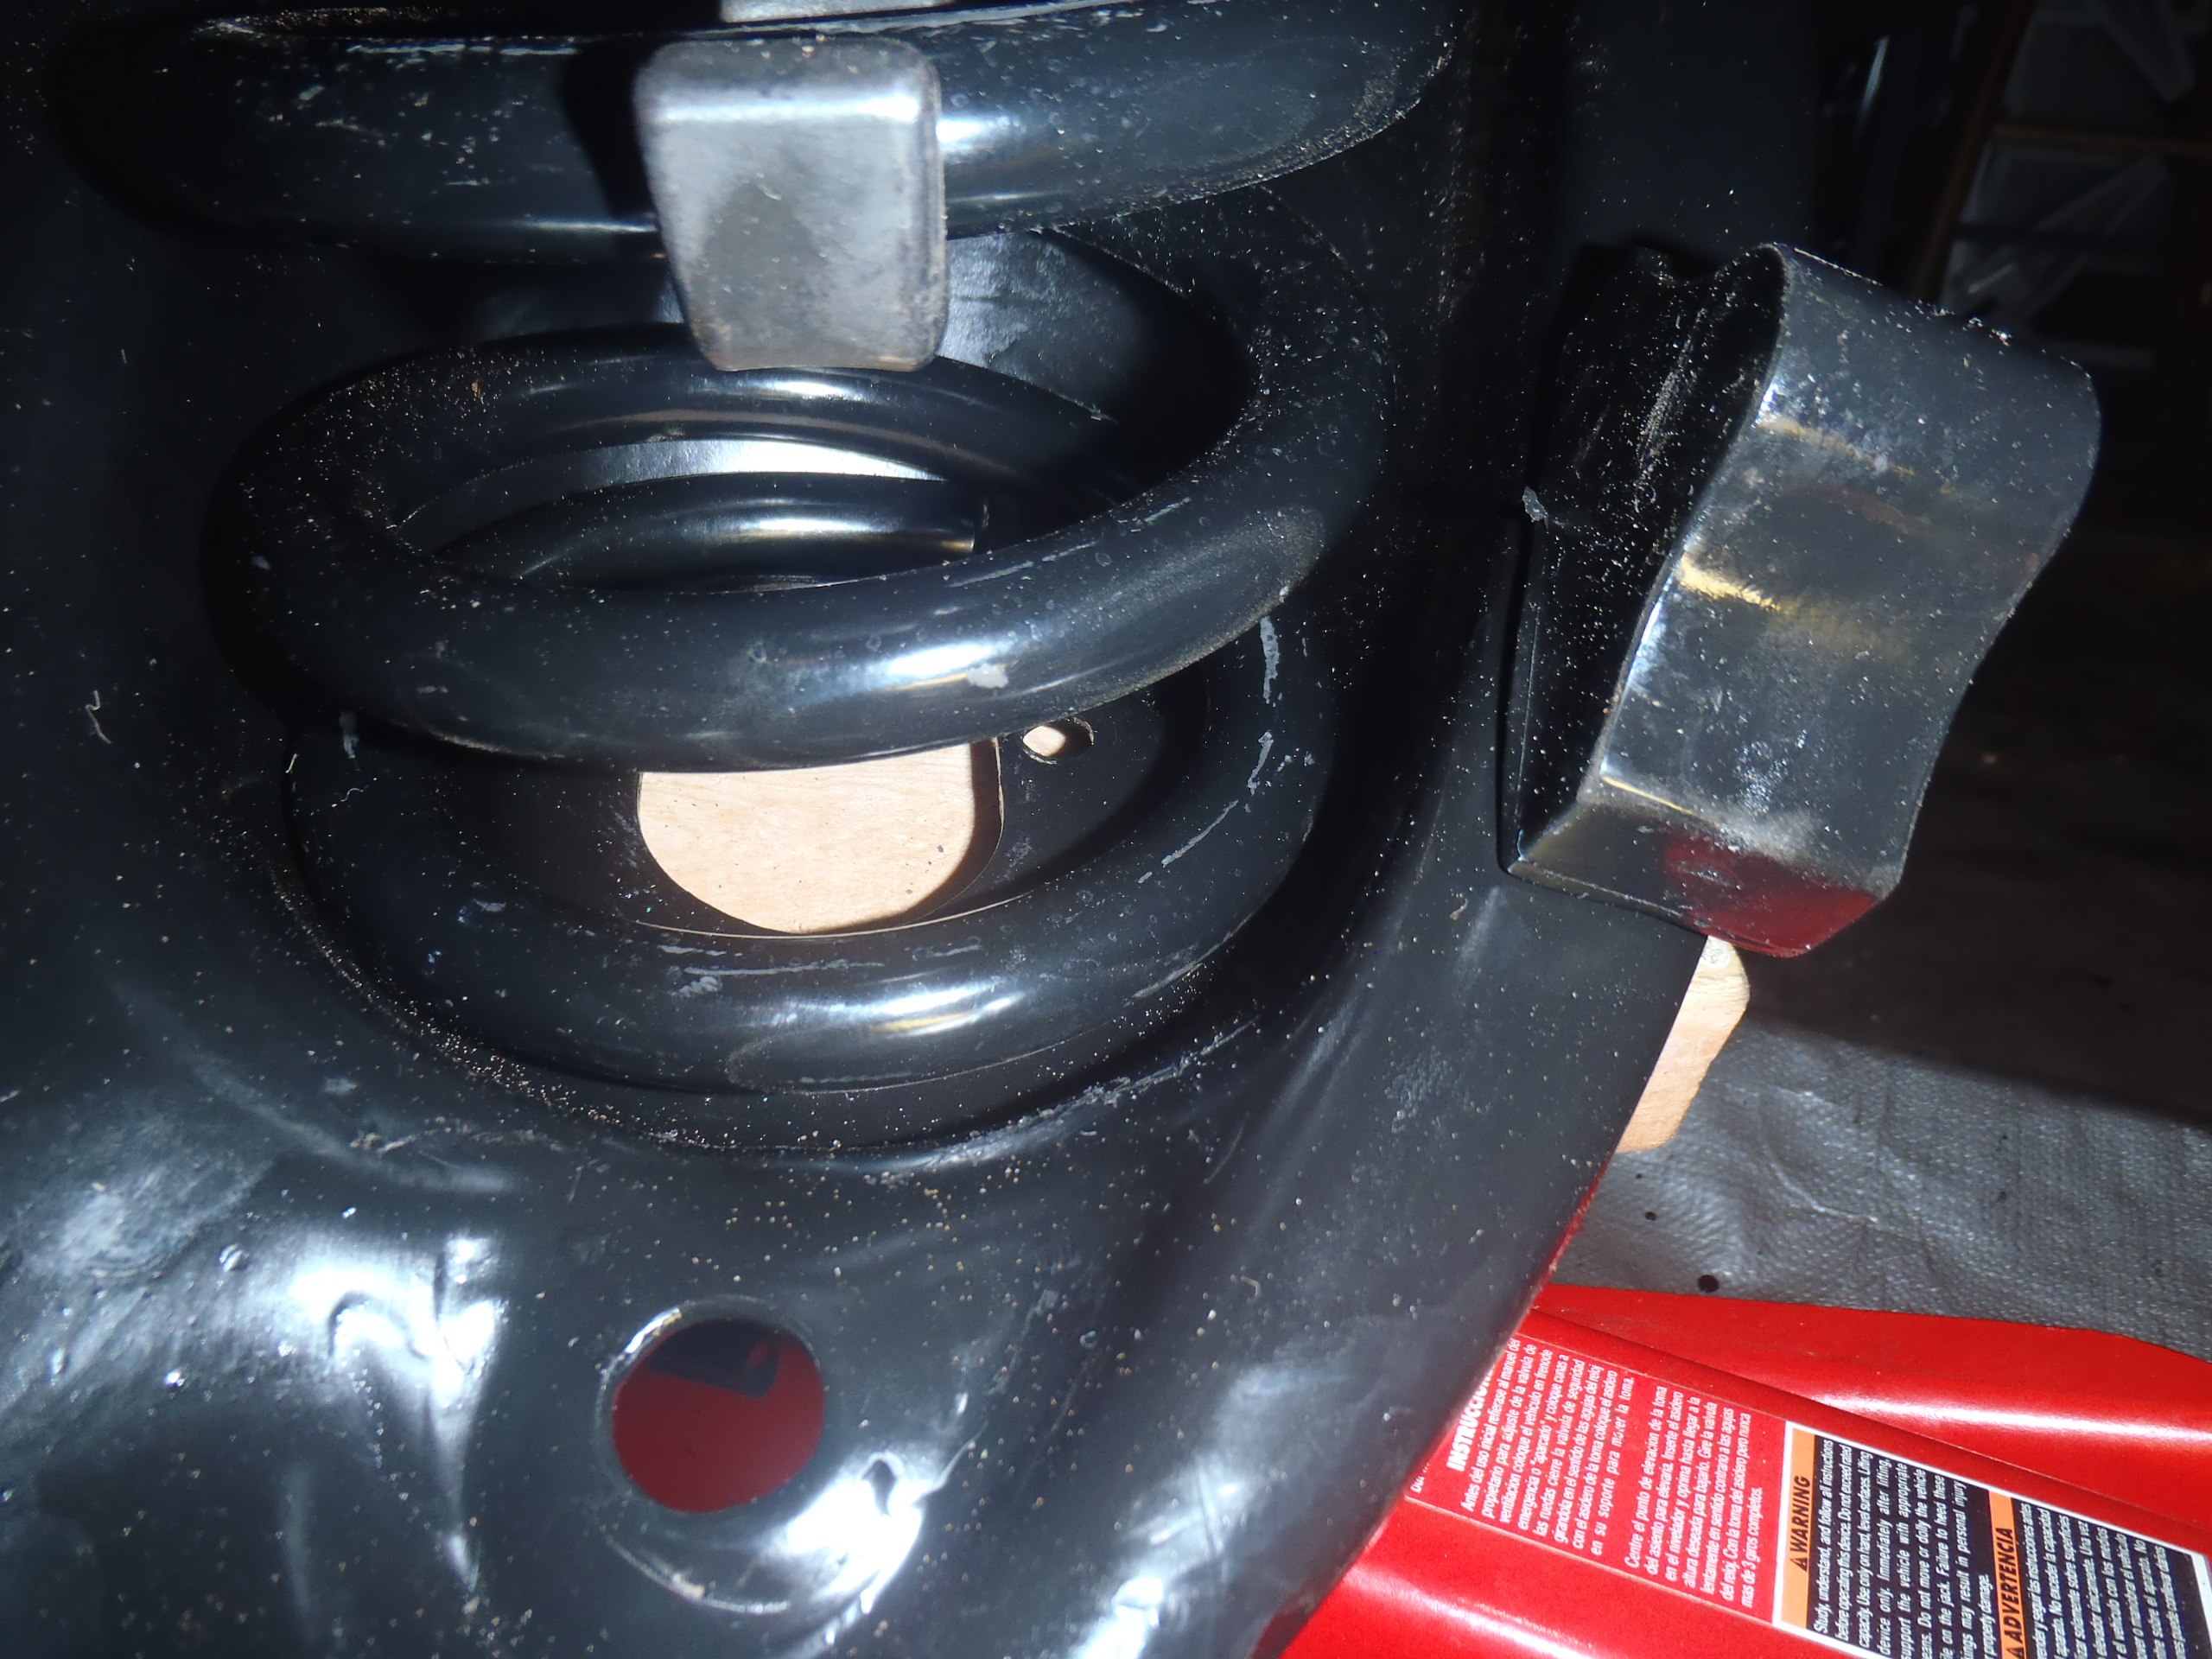
Ron, You may have already re-installed your front coil springs. If so, I hope it went well. Frankly, it took me several tries to find a workable (and safe) way to re-install the front coils when I rebuilt the front suspension of both of my '70s. Following are a couple of tips from my experience. 1. There is not adequate clearance to use external spring compressors so I used the internal type and positioned them in the lower half of the coil but still a couple coils up from the bottom as shown in the photo below. Be sure the hex drive head of the spring compressor is pointing down so you can disassemble it later and remove it from the shock mount opening in the lower control arm. BTW, since the free height of your springs is shorter at only 16" (stock height would be around 18"), you may not have to compress them as much to get them installed (assuming your lower control arms are already connected to the frame). 2. There are a couple of spring locator tabs on the underside of the frame up inside the spring pocket that the flat top of the coil spring must be correctly seated around (see photos below). It is very easy to get the top of the spring positioned between the tabs instead of around them (i.e. both tabs must be inside the coil spring). If not properly positioned the spring will rub against the spring pocket in the frame and you get to start over (ask me how I know this). 3. As already mentioned, the squared end of the coil must be positioned between the two holes in the spring pocket of the lower control arm so be sure you have the coil correctly indexed (i.e. clocked relative to the two holes) when you press the compressed coil into place because it will be almost impossible to rotate it once it has any load on it (see photos below). You may know or have discovered all of the above by yourself by now and, if so, please ignore these tips. But, if not, I hope they help. Good luck.


-
Welcome, John! Congratulations on your retirement! Six Saturdays in every week now - more time to enjoy working on and driving your Monte! That's a great looking '72! Very few original owner members in the club, at least that I am aware of. Hope you are able to get her out of moth balls and back on the road soon. Keep us posted on your progress.
-
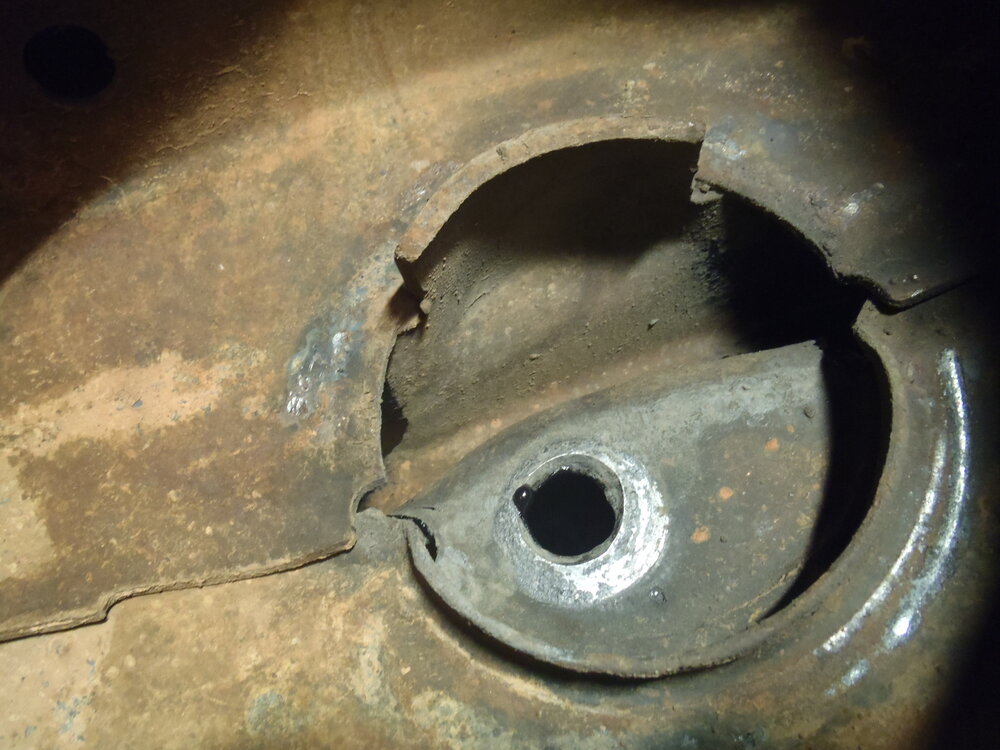
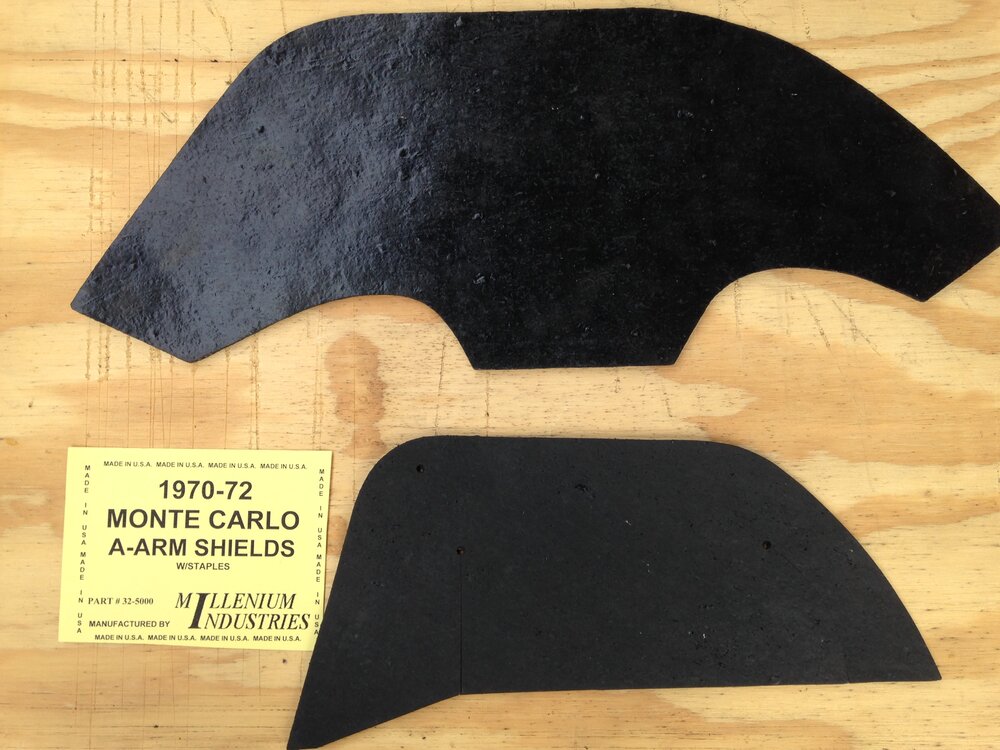
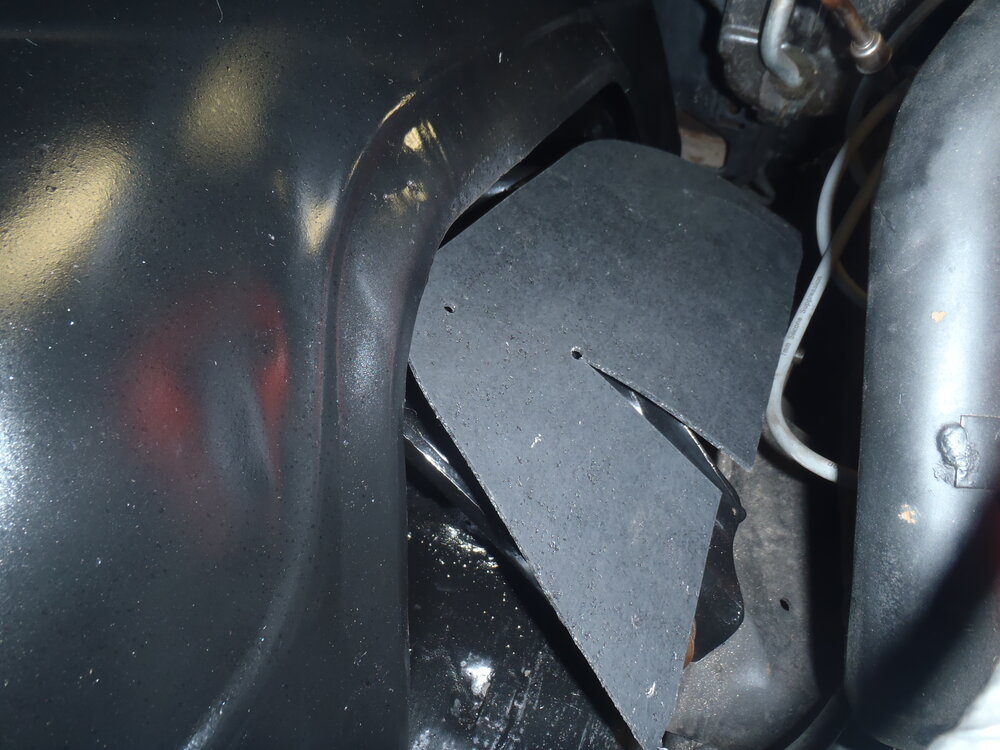
Pat, the rubber splash guards (aka A-arm dust shields) you receive in your gasket kit for OPG should fit your stock plastic inner fenders just fine. Be aware that they will not fit the Chevelle steel inner fenders (larger and different shaped A-arm opening) if you were planning to replace your stock fenders with those (see second and third photos below). They will fit new plastic replacement fenders from The Parts Place (which I personally recommend), however, as those fenders are made specifically for the Monte Carlo. BTW, I've never experienced nor heard of melting or burning problems with the stock dust shields (assuming they are installed correctly). Your stock dust shields are likely fastened to the fenders with metal staples and you should get some new staples with your new dust shields. When I re-installed my stock dust shields on new replacement plastic fenders, I just drilled several 1/8" holes around the mounting edge and used black plastic trim fasteners instead of the staples (see first photo) - faster, looks good and is easily removable if necessary. Good luck.

-
Very, very cool car and story!! Great find - just hiding in plain sight! Love all the mid-sixties cars, especially GM - lots of good looking models and strong performance options! Enjoy!!
-
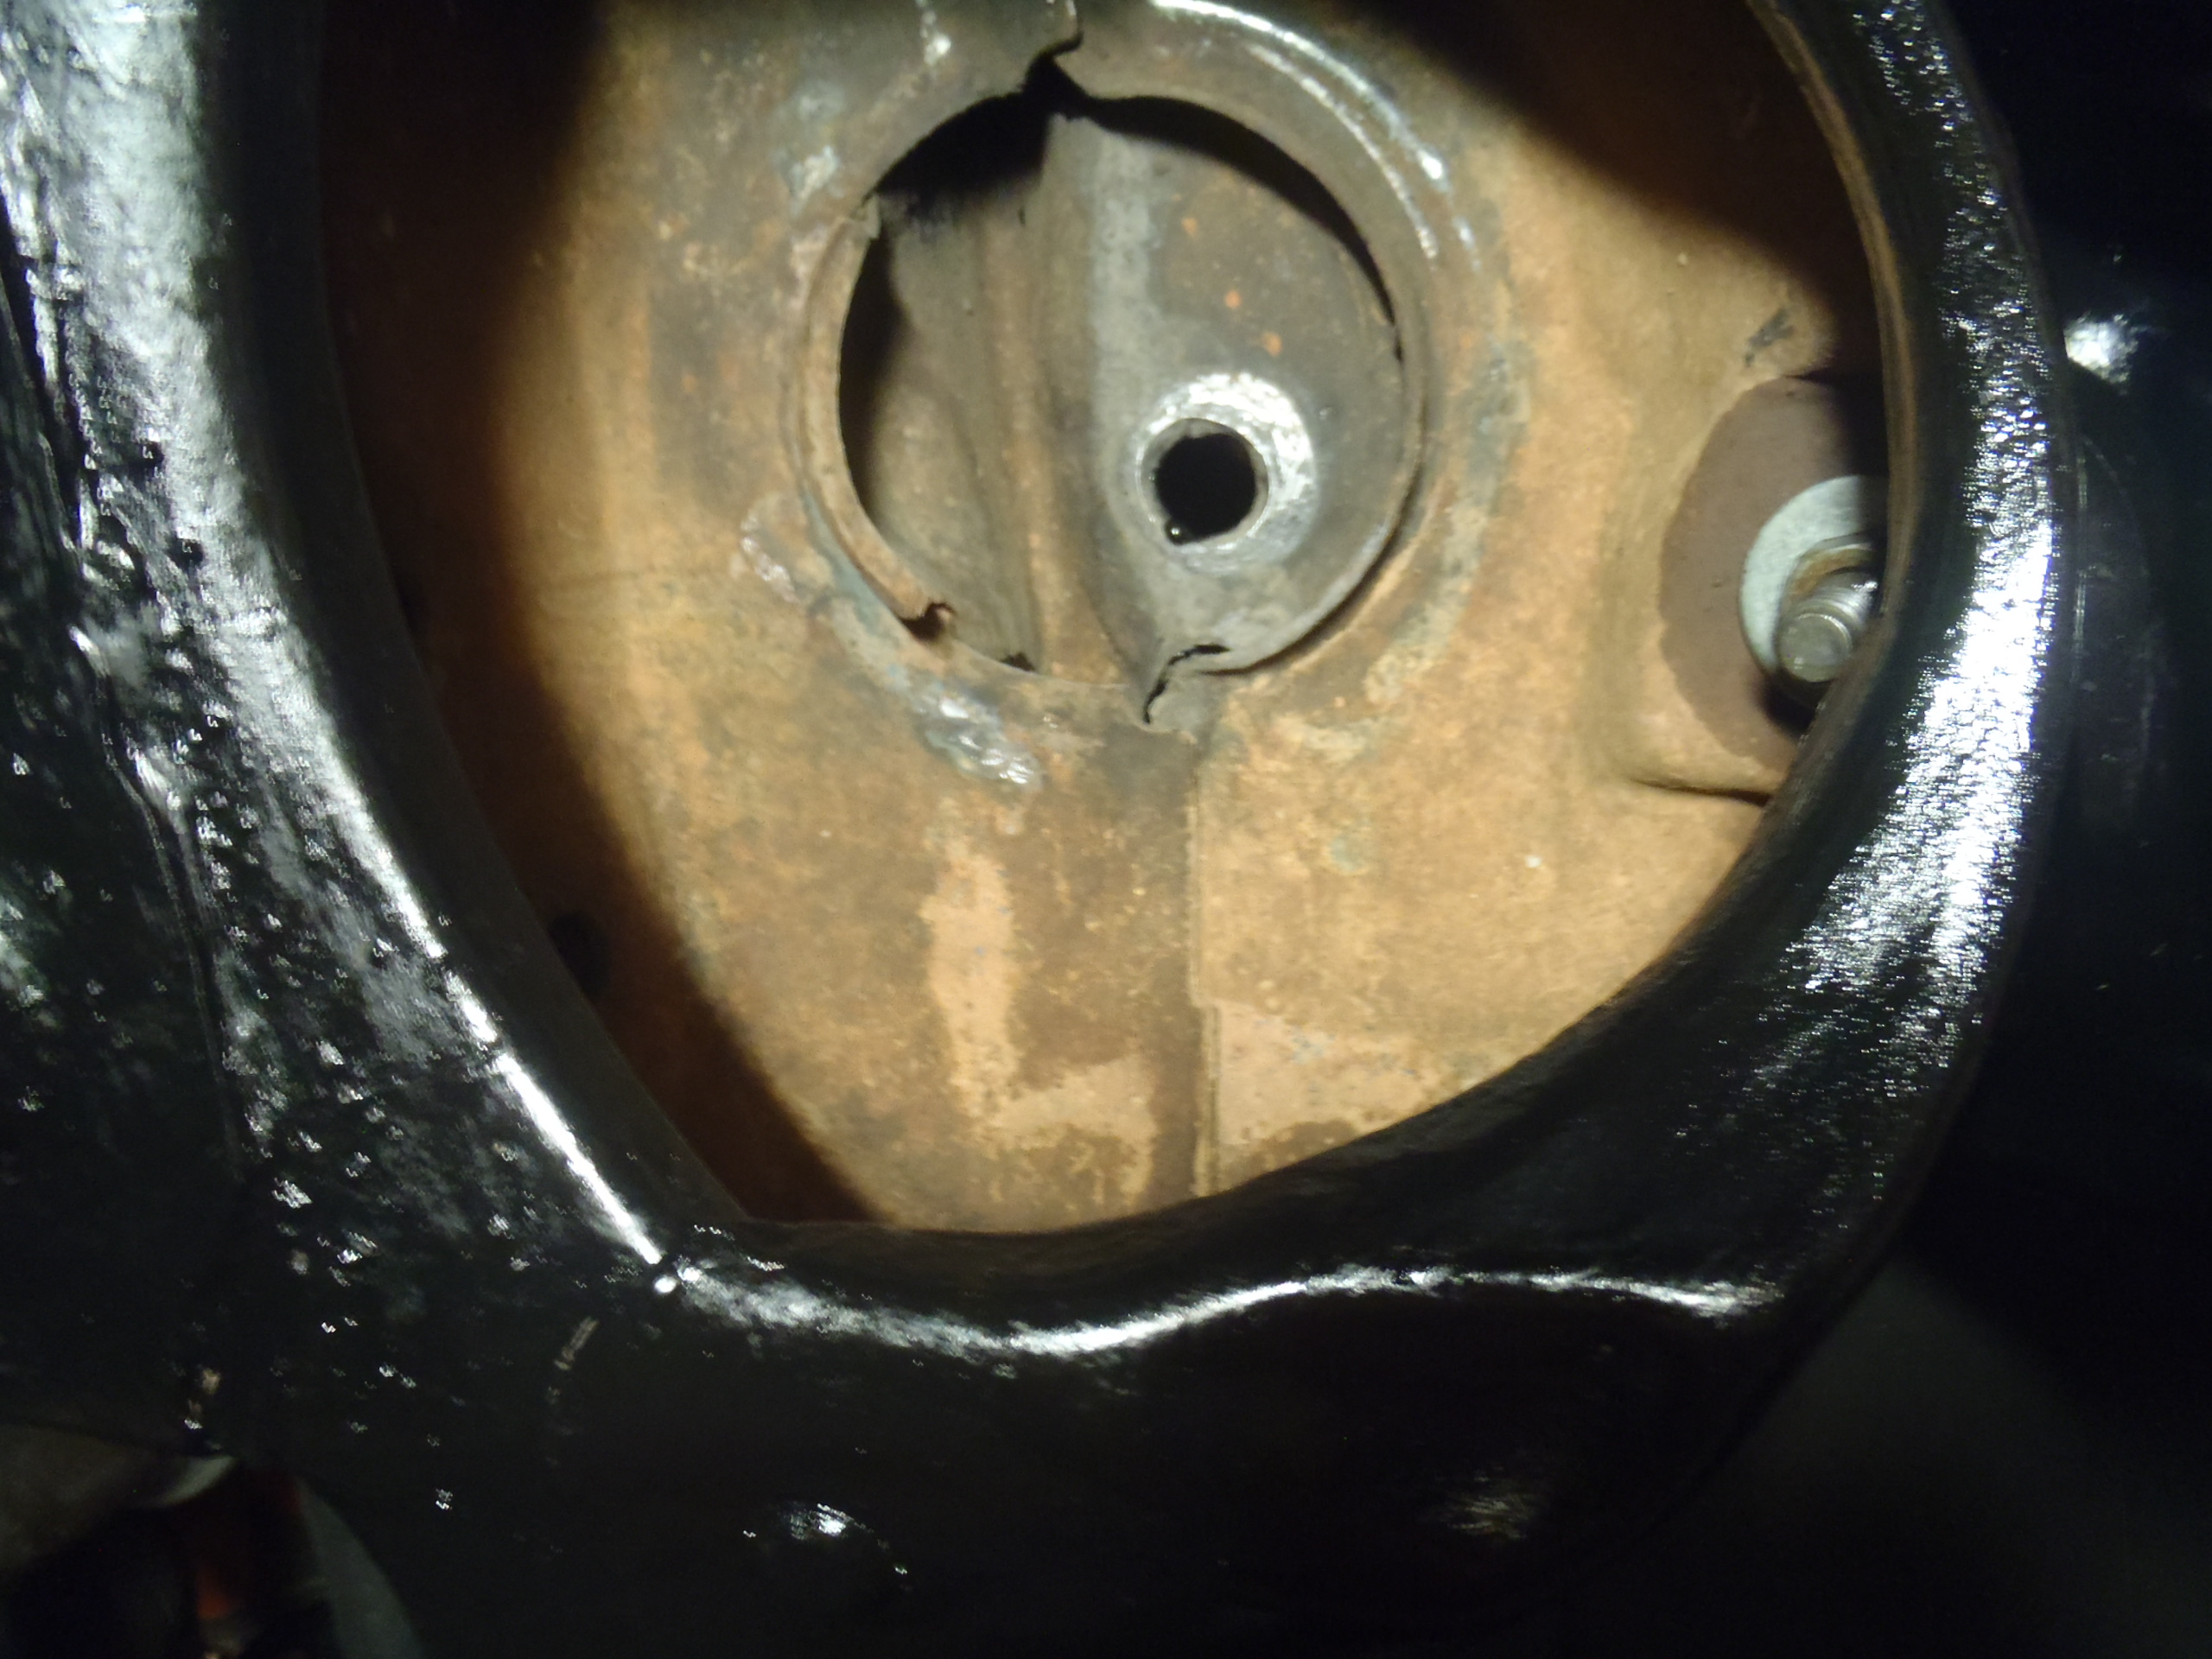
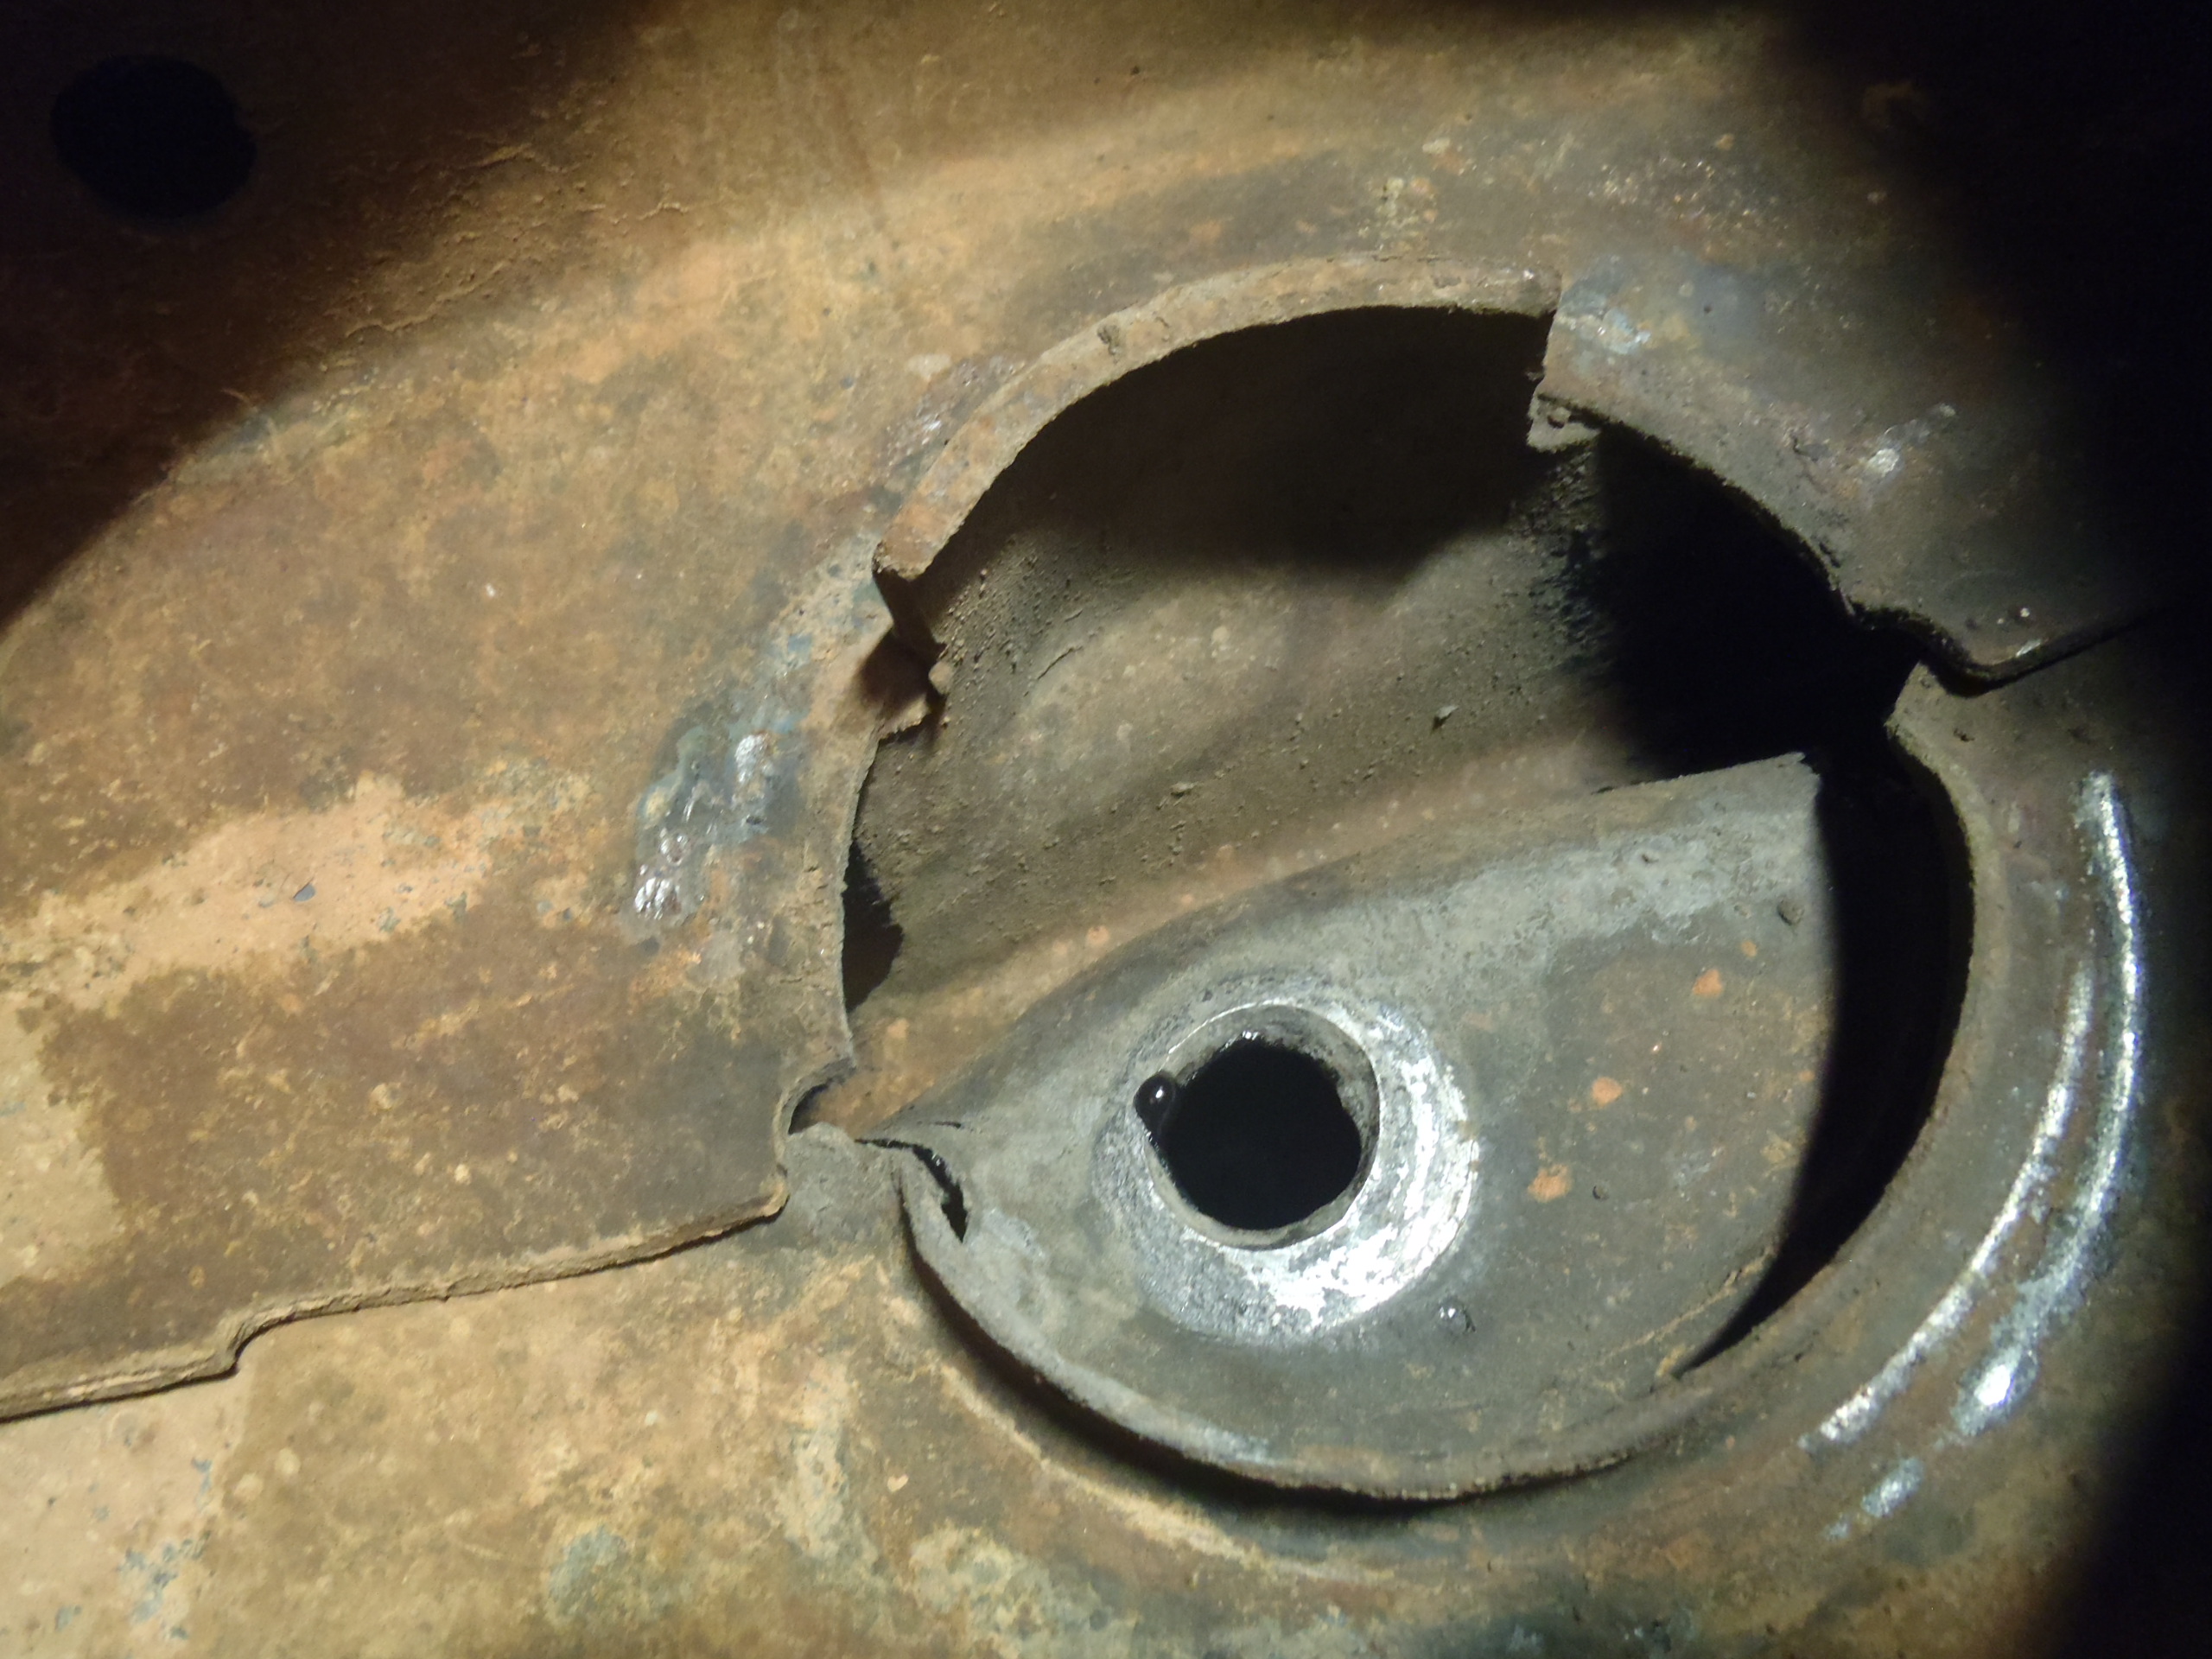
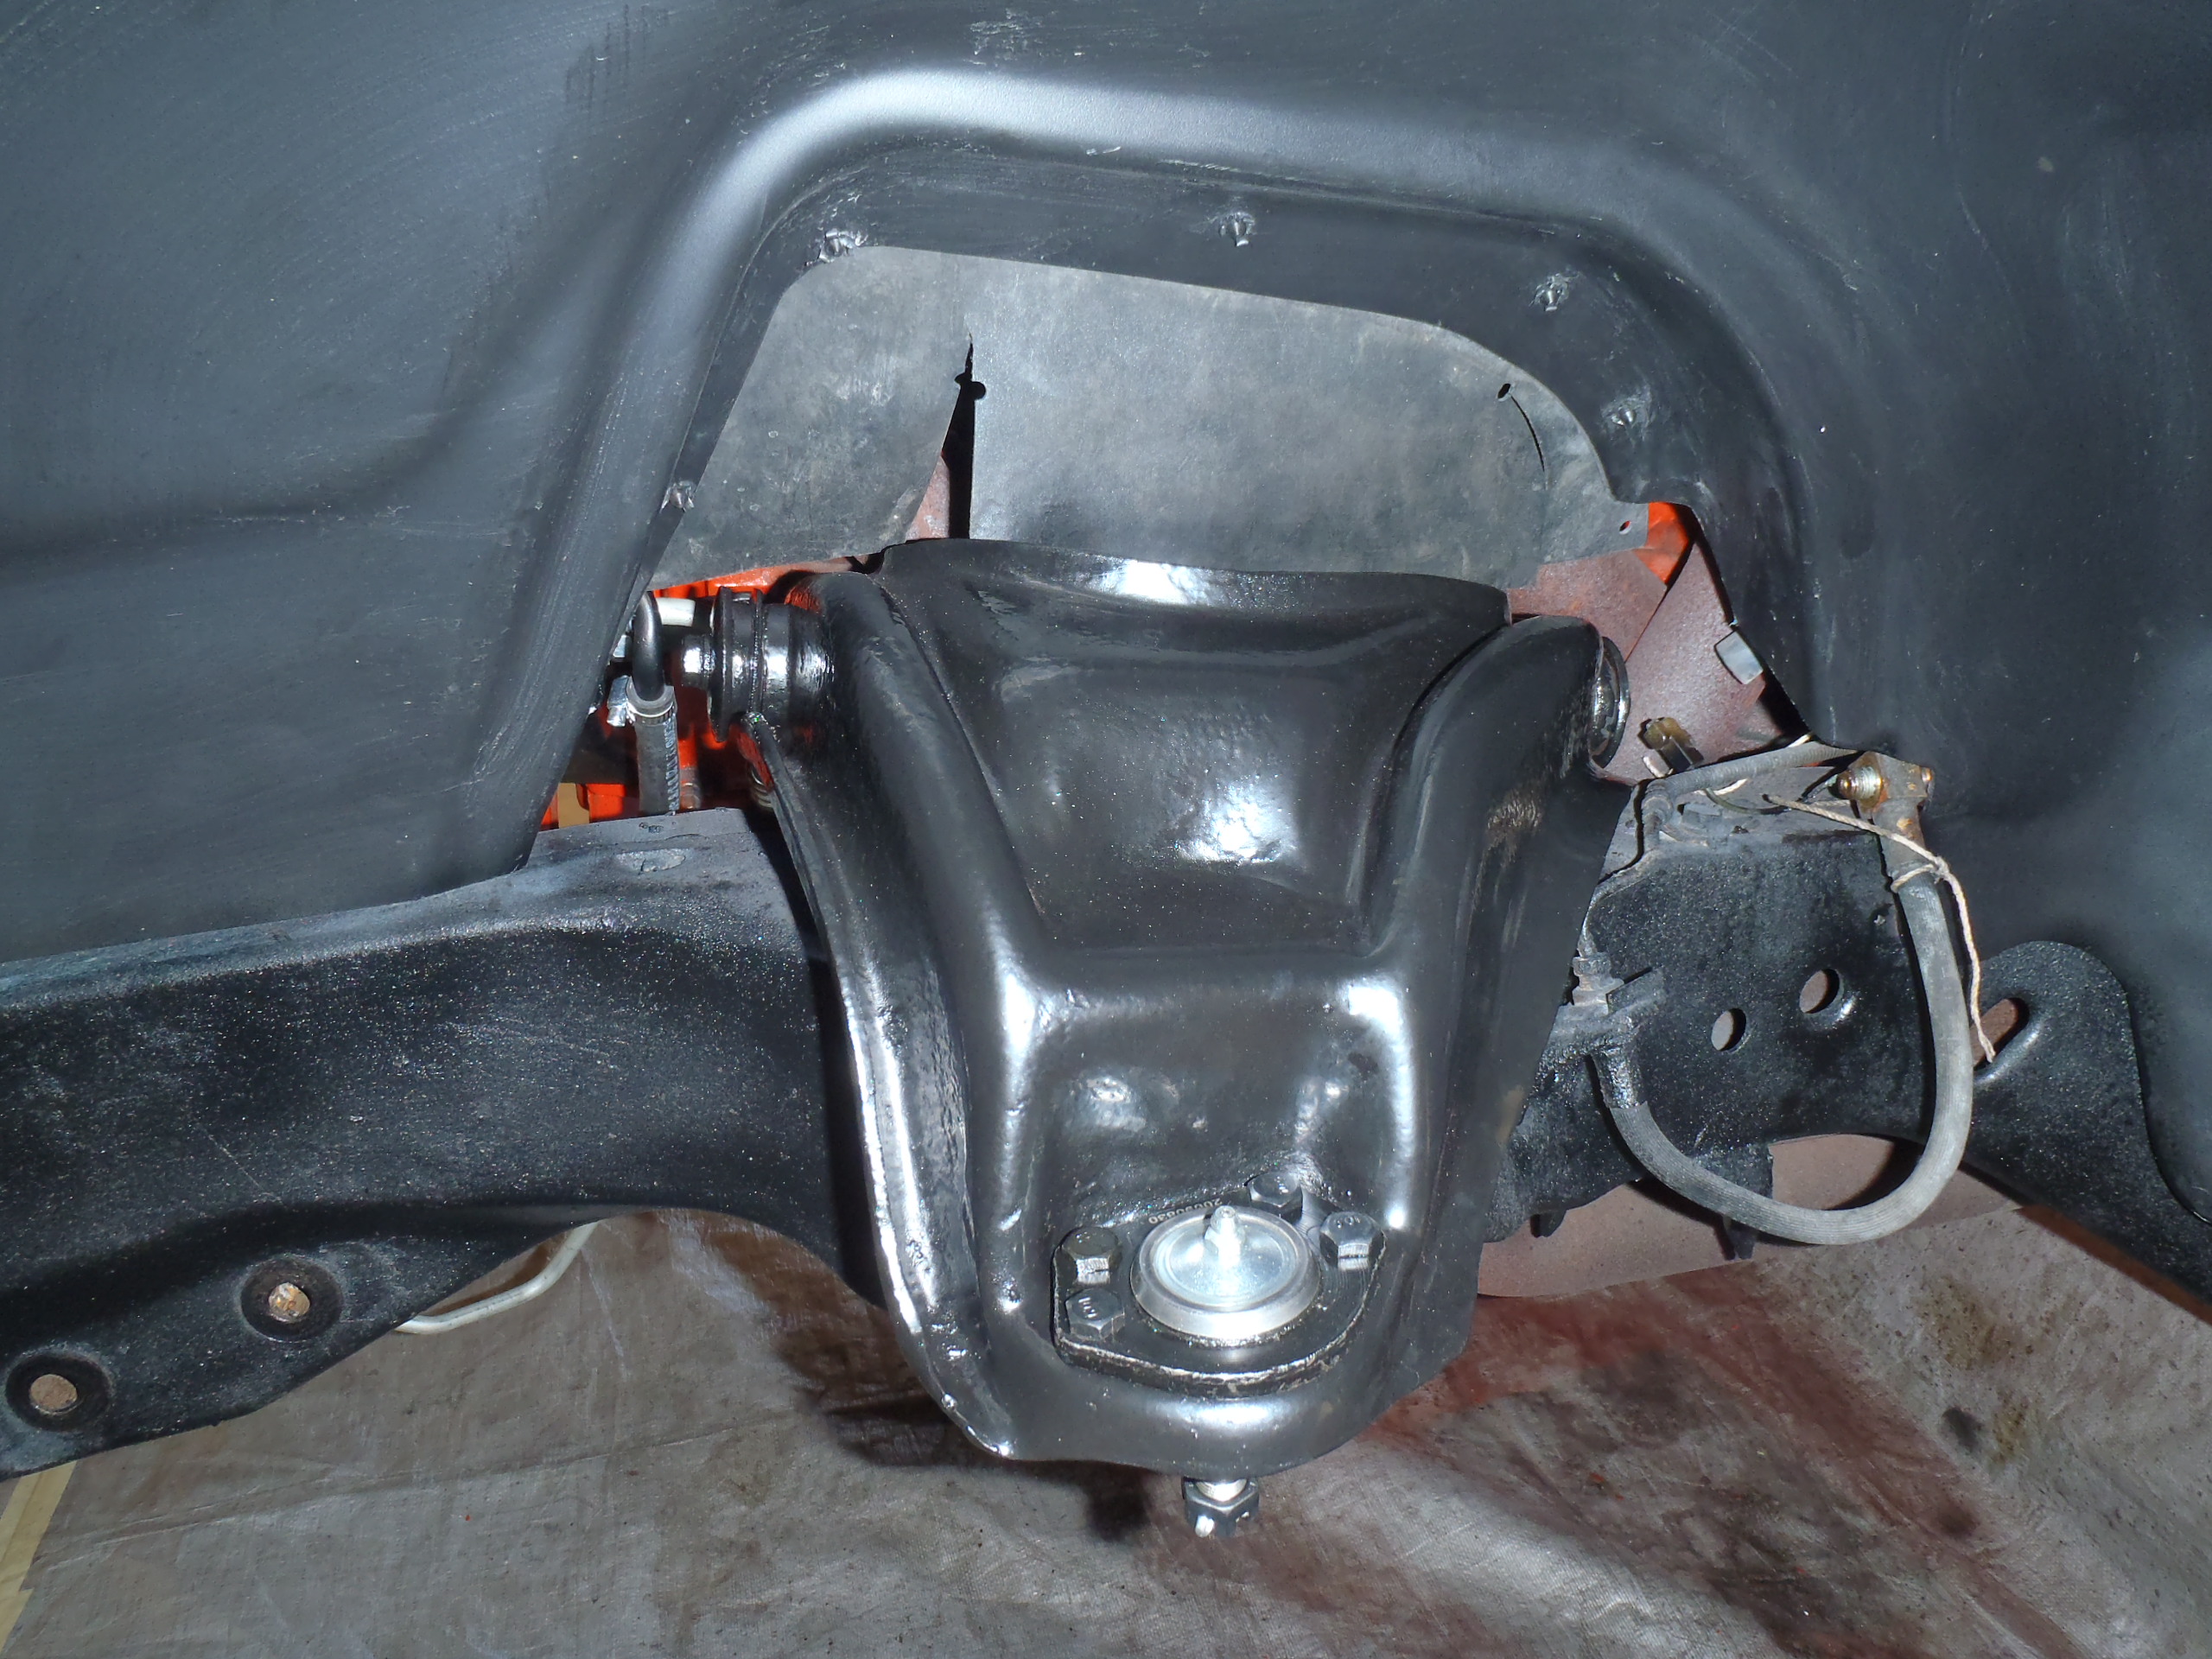
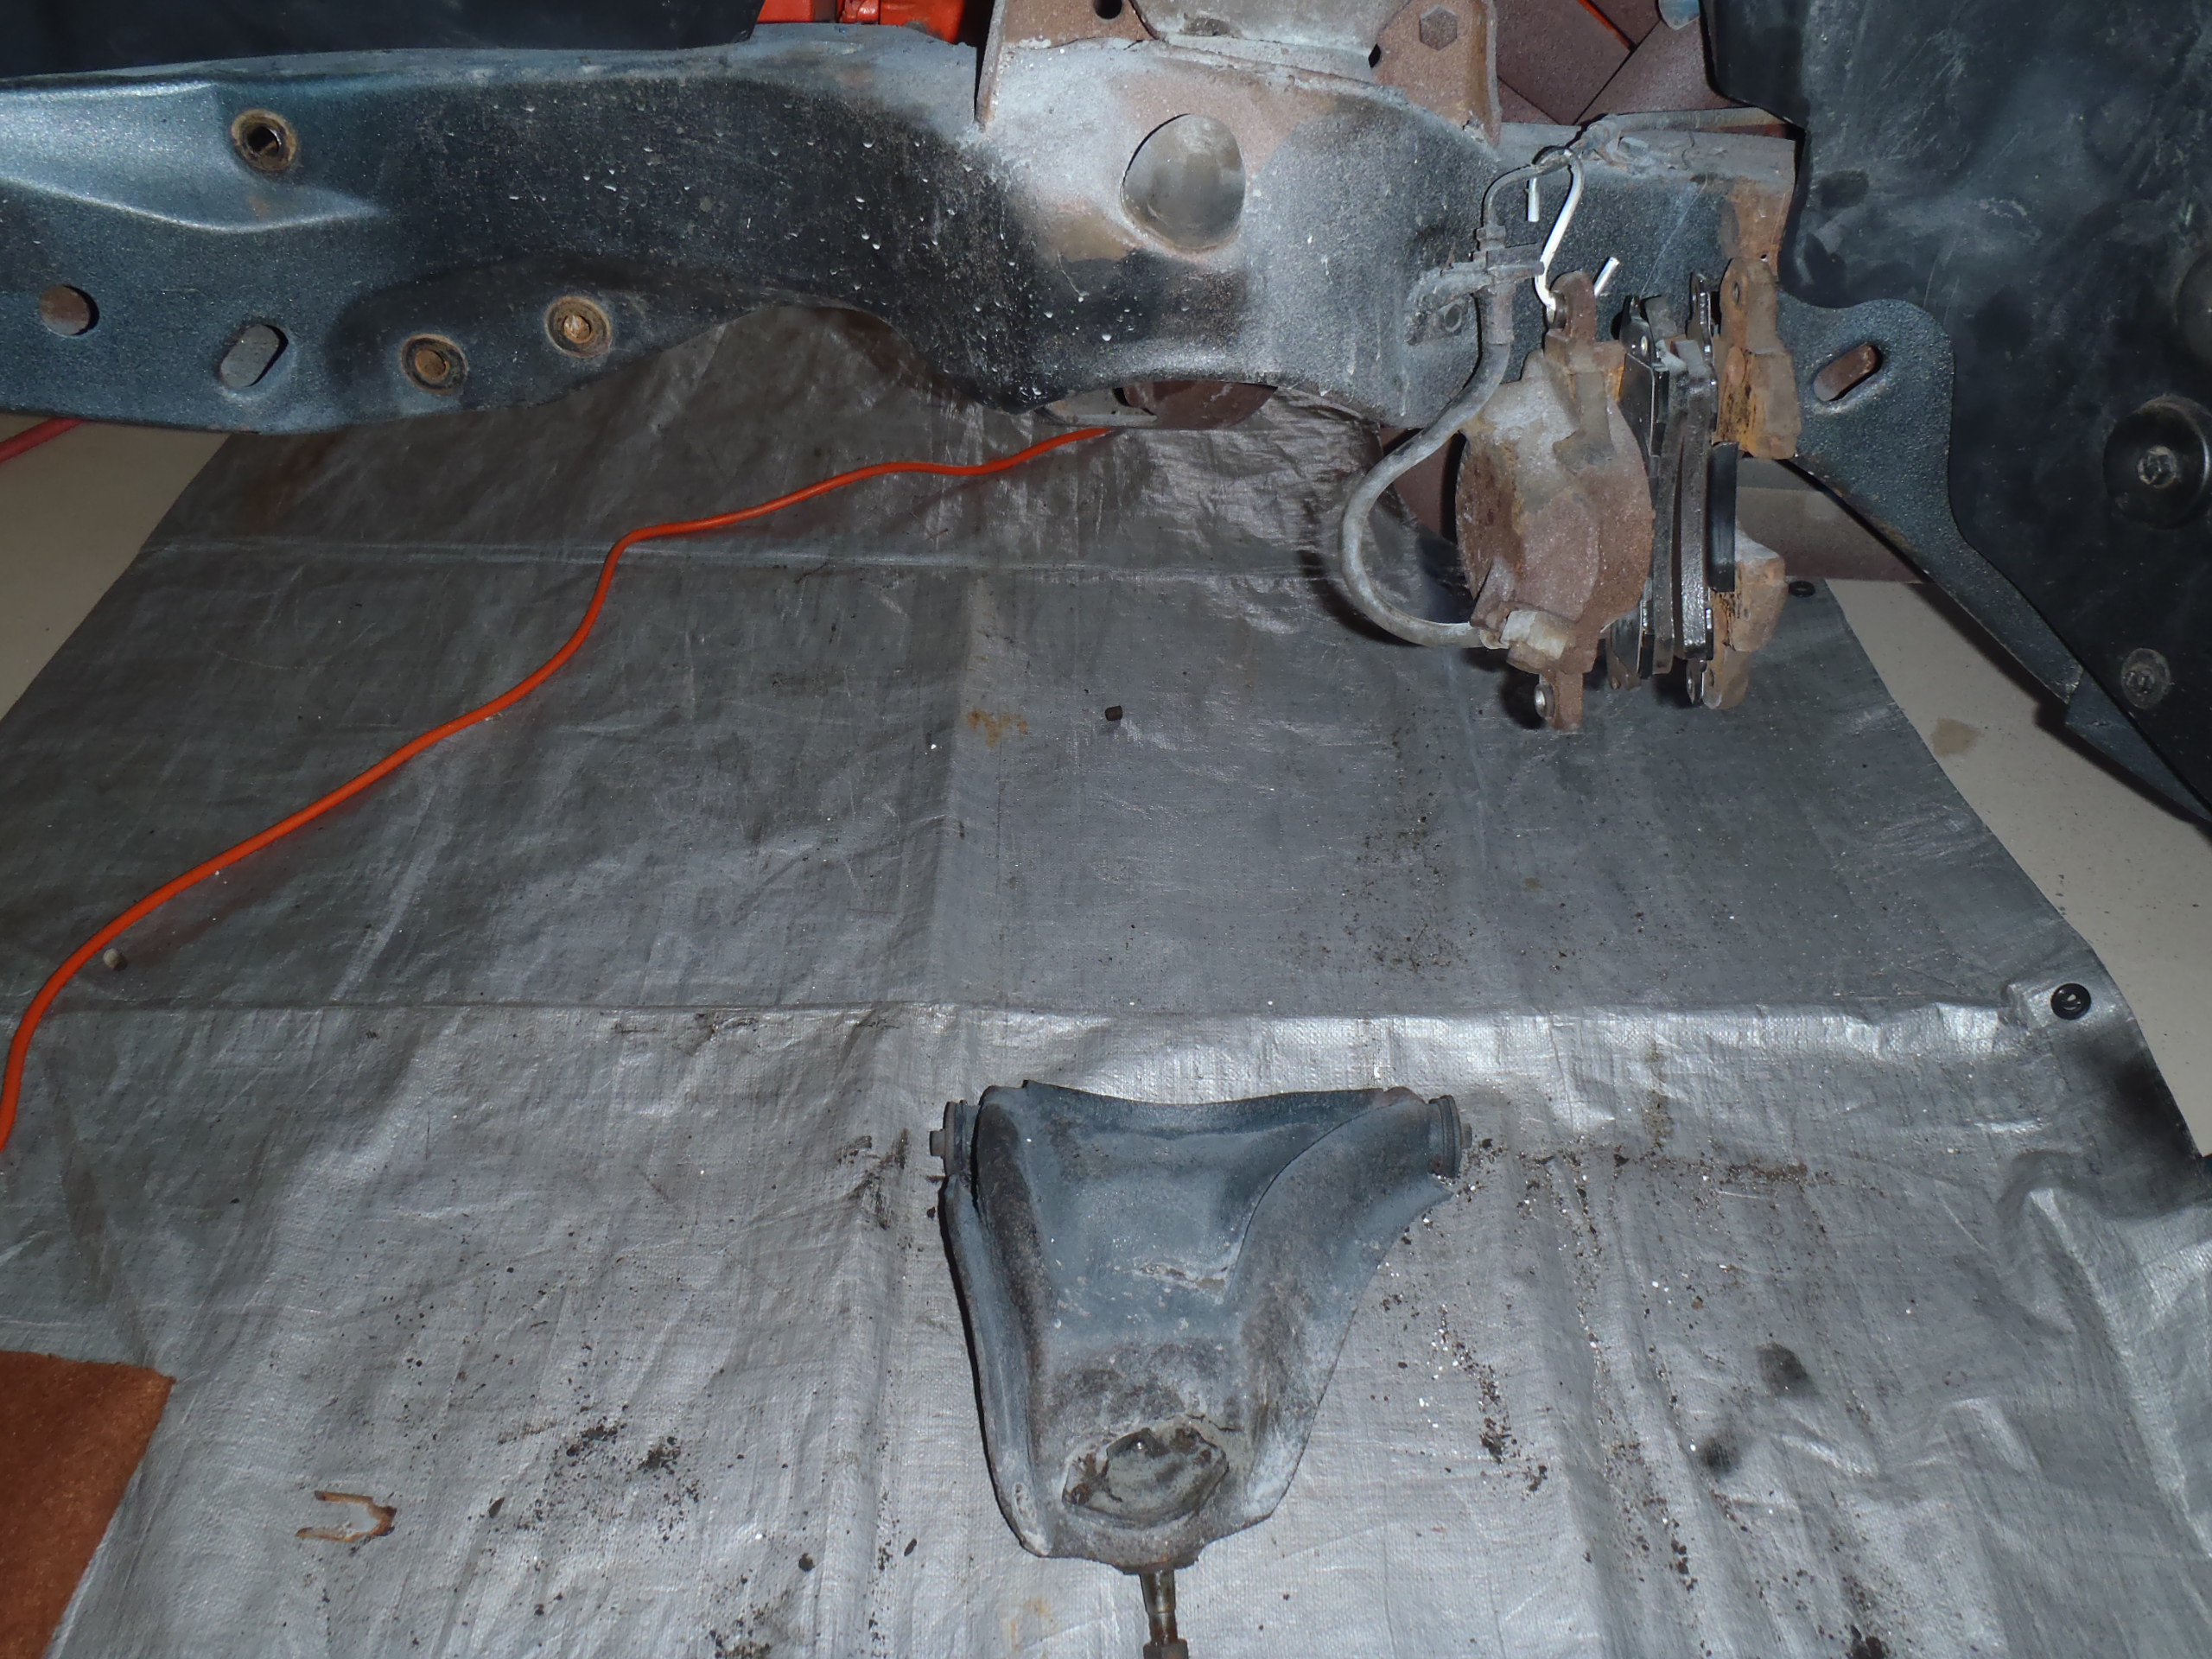
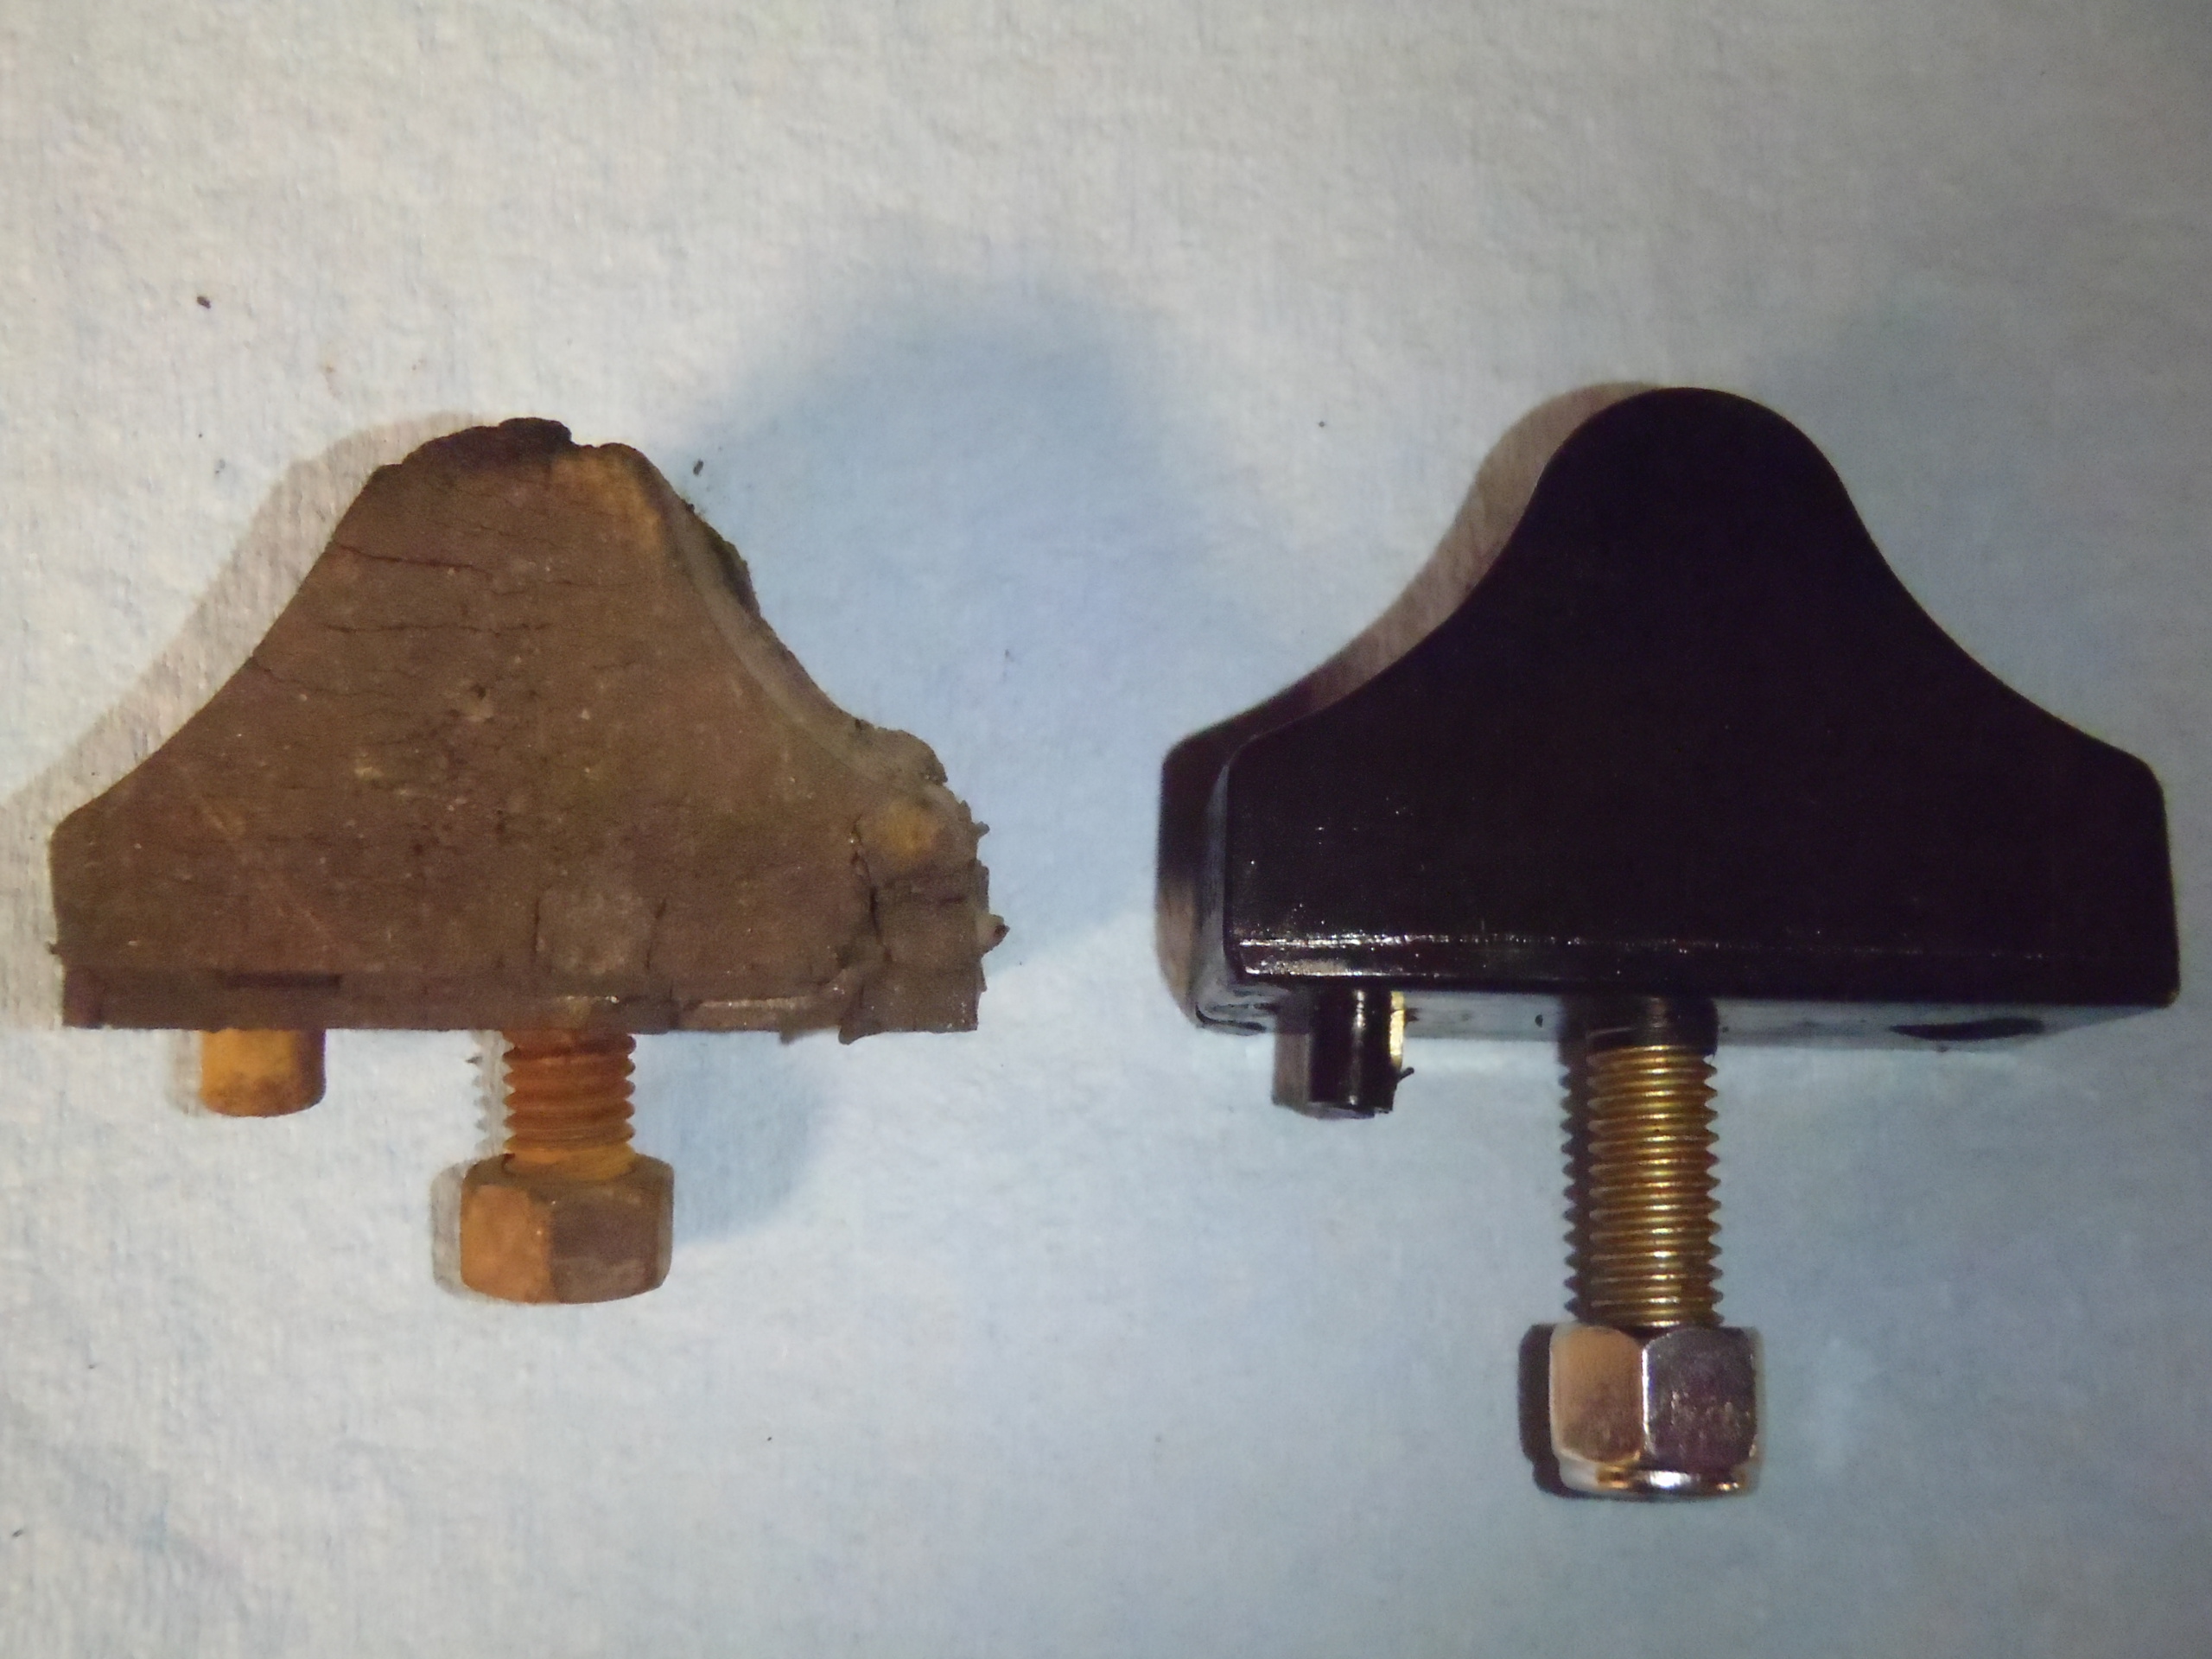
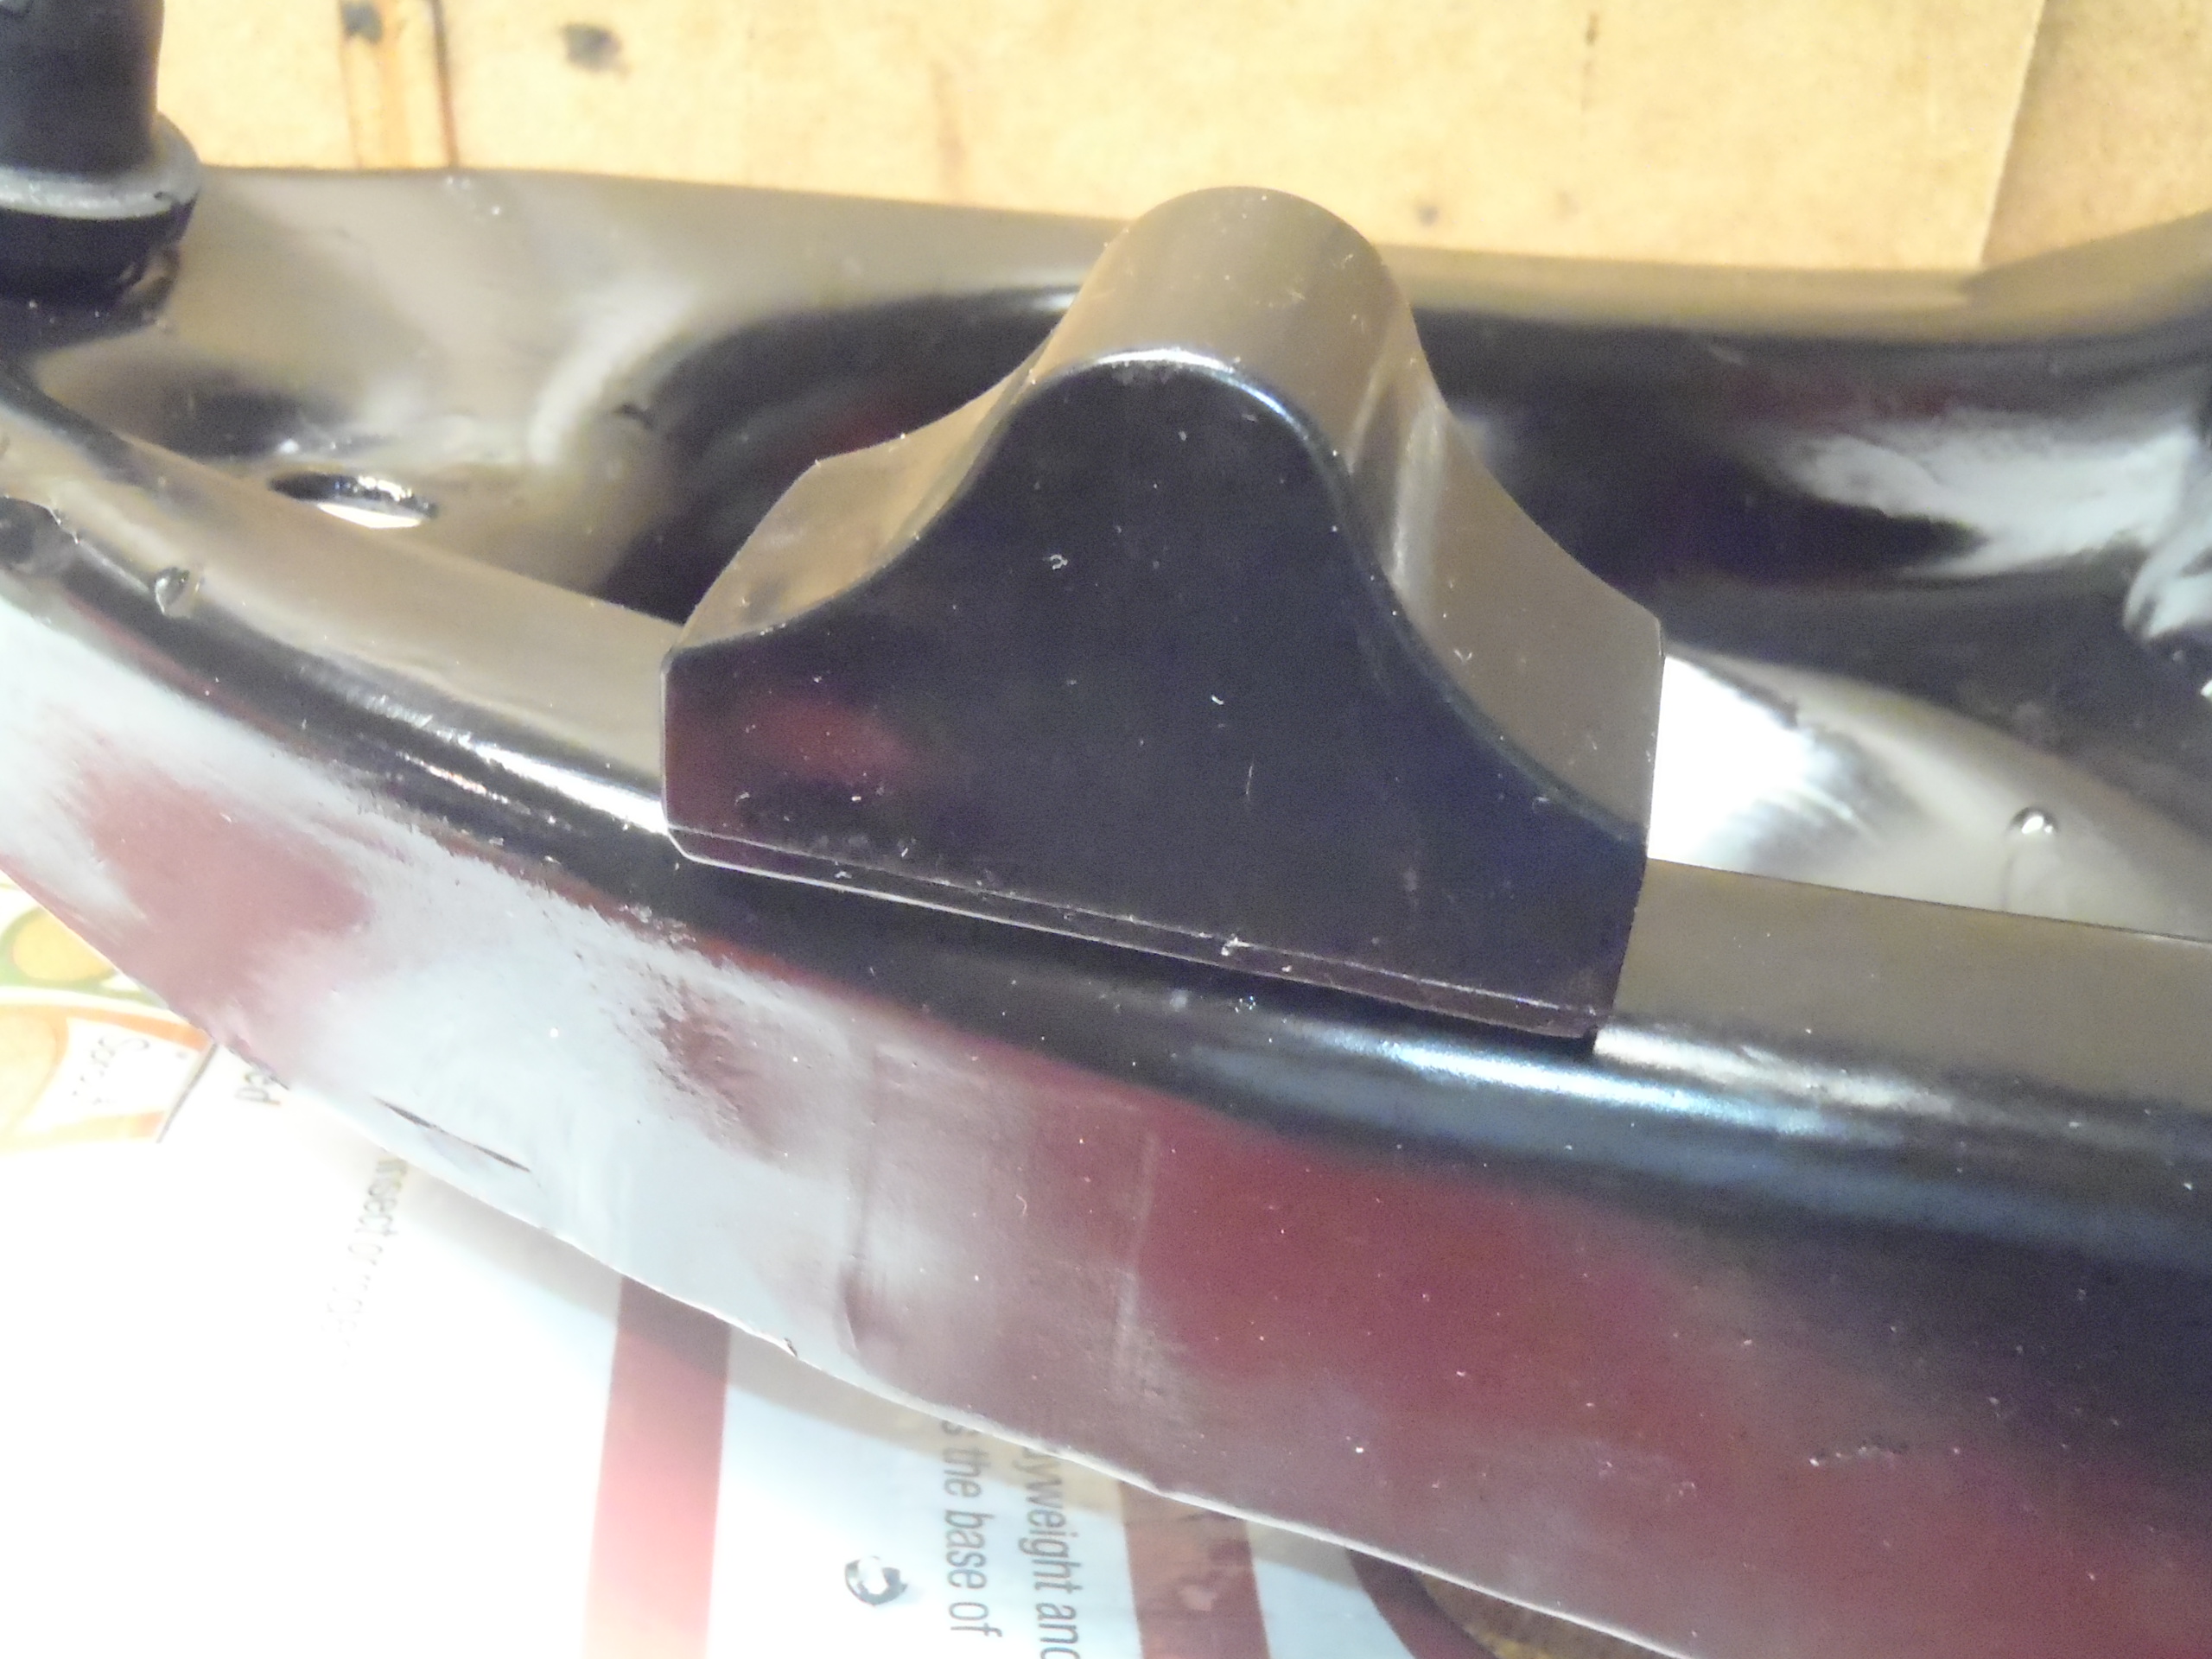
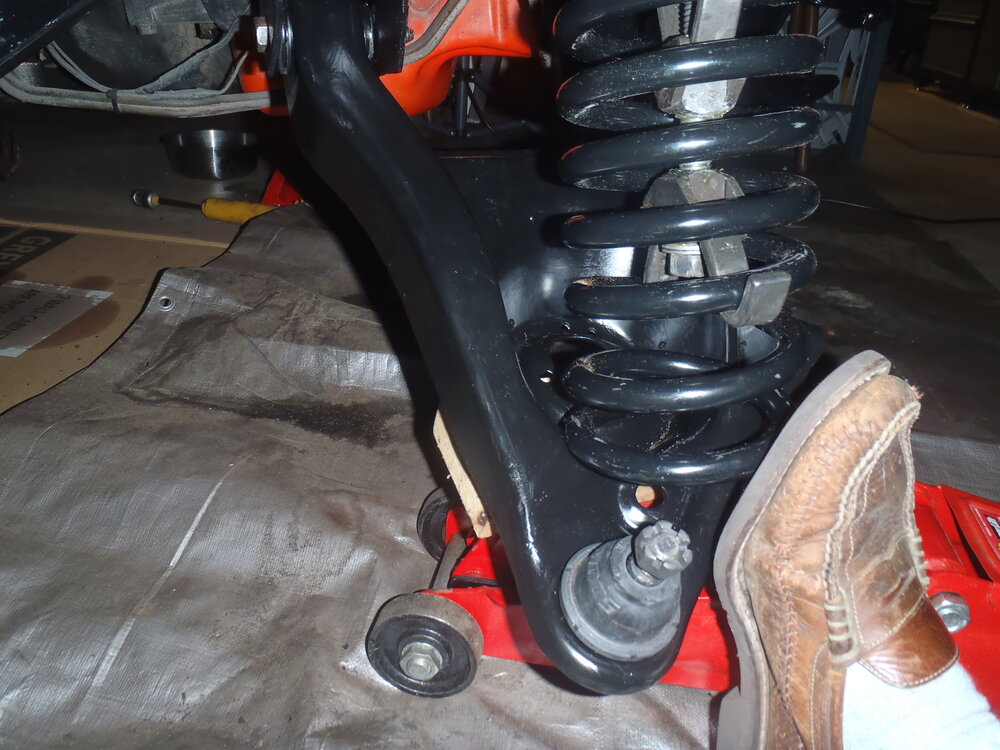
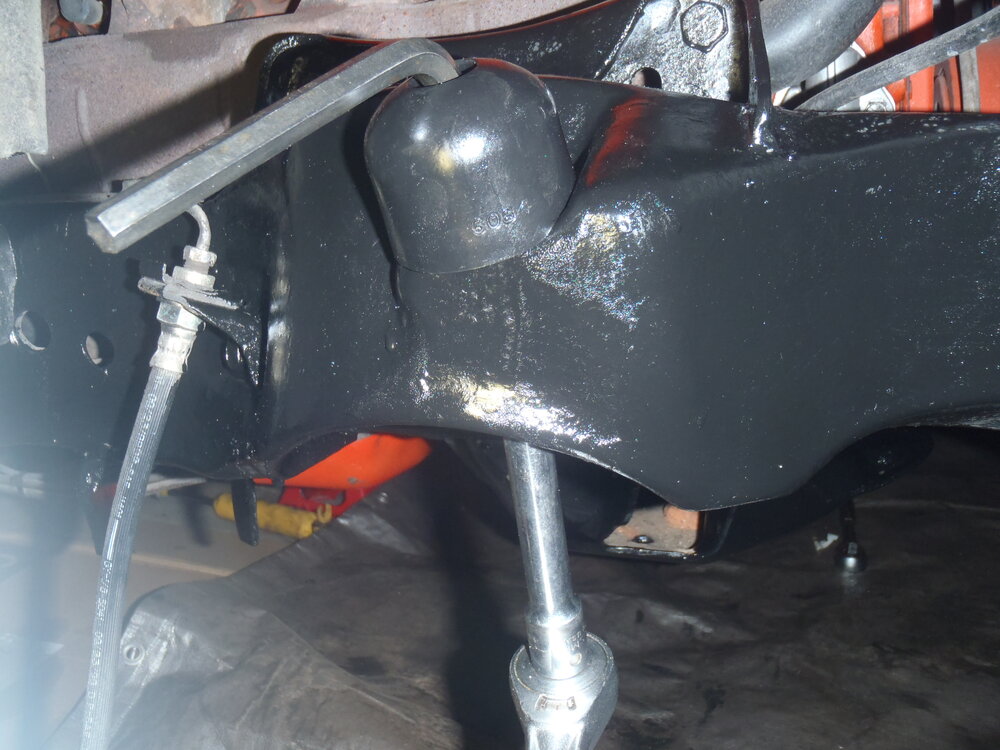
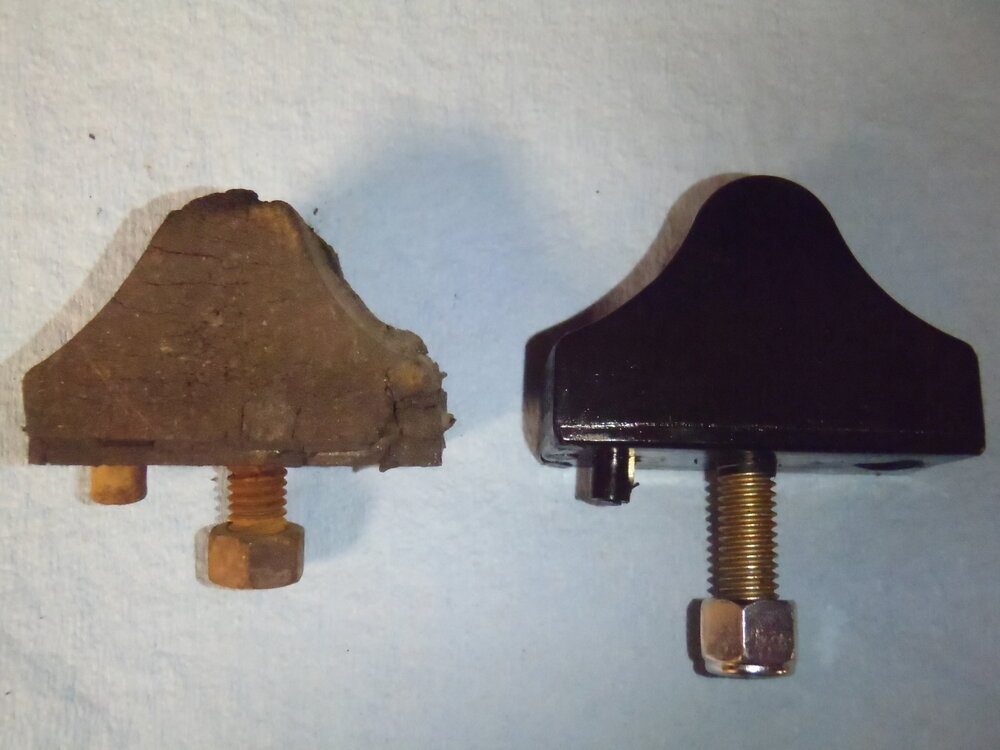
Jeff, I agree with others - it does appear to be a badly damaged/deteriorated upper control arm bumper. The first photo below shows where that bumper would normally be installed (easily visible after the upper control arm has been removed). Note the cone shaped bumper attached to the frame in the upper middle of the photo. Since its purpose is to cushion the downward movement of the upper control arm when the wheel assembly drops to the full extent of downward travel, I am wondering what conditions would have crushed the bumper you found on the floor? Maybe jacking the front end up by the frame so the front suspension is completely distended would have put more pressure on that bumper than its age and condition could handle. I doubt that normal driving conditions would crush that bumper because the front end would need to be coming off the ground (or nearly so) - unless you've been popping wheelies lately! 😄 The second photo shows the installation of a replacement bumper onto the re-painted frame during a frontend re-build. It might be possible to replace that bumper with the upper control arm in place but I've not tried that. The front wheel assembly (with the upper control arm) would need to be lifted relative to the frame to do so. The third and fourth photos show the lower control arm bumper (which may also need replacement on your Monte). It can be easily replaced since it bolts directly to the rear edge of the lower control arm, not the frame.


-
Welcome to the club and forums, Kent! I do believe you have one of the most stunningly beautiful first gen Montes I have ever seen!! I assume that is factory color code 45 Green Mist. If so, I don't see that very often but it looks perfect without a vinyl top and those wheels! It must turn heads wherever you go - I can understand why you love it. I don't know if there are any other club members near you by I know at least one other member who lives in Kentucky, Steve Redmyer (sredmyer). He has several first gen Montes and might appreciate a contact from you.