bigtankjones Posted April 17, 2019 Share Posted April 17, 2019 Looks really Great. Quote Link to comment Share on other sites More sharing options...
420ponies Posted April 18, 2019 Share Posted April 18, 2019 Man does this take me back. Looking good!! Keep up the good work!! Quote Link to comment Share on other sites More sharing options...
pab3589 Posted April 18, 2019 Author Share Posted April 18, 2019 Thank you all for the comments and looking. Here are the pics after painting tonight, its satin so will dull down quite a bit , pretty wet and glossy right now could probably leave in satin but going to try to do the spatter finish will send pics when I do that. Thanks for looking. Quote Link to comment Share on other sites More sharing options...
Leghome Posted April 18, 2019 Share Posted April 18, 2019 Pat when I redid my trunk I put a clear coat over the speckle paint to help protect it. The clear has helped to keep it from getting scratched up as bad. I also put black carpeting over the whole floor. Not factory but I do not care as my car is far from original and is pretty much as I purchased it 8 years ago except better. Quote Link to comment Share on other sites More sharing options...
pab3589 Posted April 19, 2019 Author Share Posted April 19, 2019 Thank you Larry I was debating doing that and would rather be safe then sorry. Did you clear it immediately or how long did you let the spatter cure for? Quote Link to comment Share on other sites More sharing options...
Leghome Posted April 19, 2019 Share Posted April 19, 2019 I waited over night for the splatter to totally dry and cure. The splatter paint I used was water based so it took so what longer to dry as the humidity was higher that time of the year Quote Link to comment Share on other sites More sharing options...
cny first gen 71 Posted April 19, 2019 Share Posted April 19, 2019 I used a satin clear on mine, it came out way better than the first time I did it without the clear. Quote Link to comment Share on other sites More sharing options...
pab3589 Posted April 19, 2019 Author Share Posted April 19, 2019 Thank you both , Satin clear it is . Quote Link to comment Share on other sites More sharing options...
pab3589 Posted April 23, 2019 Author Share Posted April 23, 2019 The trunk finally dried out and flattened out after a couple days. A couple cool nights in the shop took it a little longer . Finally got the spatter paint (black and aqua) 3 cans does not go very far. If it was not painted underneath it would have taken at least twice as much. Just did the trunk pans and trunk area did not do the inner quarter panel leaving them just black . As the spatter paint was drying,I started cleaning up and changing the interior color to black , Scrubbed with very fine scotchbrite pad and acetone , wiped down with acetone, Then sprayed with duplicolor adhesion promoter and top coated with duplicolor fabric and vinyl flat black. The sheen with the flat black fabric and vinyl came out really good more like a satin than a flat. I knew I didn't want gloss as it would be too glossy very happy with it so far many more pieces to do.Not sure how it will hold up but vs the price of the replacement panels in black I will give it a whirl. Will try to do the door panels also , what do I have to lose at this point. Some pictures below thanks for looking . A couple pics of the satin finally dried and flattened out A couple pics with the spatter paint just need to clear once it dries, looks better in person then in the pics. Before and after pics of the kick panels one may look a little shinier/ glossier not sure if it was the different can of paint or end of the can or what . may put another coat on see if I can match better or may not worry about it you will never really see the difference sitting under the dash anyway. Again doesn't look that far off in person the pic makes it look worse than it is. 1 Quote Link to comment Share on other sites More sharing options...
pab3589 Posted May 3, 2019 Author Share Posted May 3, 2019 Haven't updated in about a week , made a little progress working on front fenders , seems like the most work on the car so far they are taking much longer than I thought. Just a lot of small areas and stuff to get into and get cleaned up. Then got the inside primed and painted. Used the cold galv again to fight any rust and rustoleum semi gloss. Will hopefully have the outside primed this weekend fingers crossed and prime and block hood again. You will also see I took off radiator support and decided to get that cleaned up. I wasn't planning on doing that but at this point why stop now. I am probably about 8 bolts shy of the frame off at this point LOL. I Will hopefully sand blast and prime and paint rad support this coming weekend . As I am typing this I realize I have a ton to do this weekend and something probably won't get done. Also started cleaning up the front of the frame rails and get them primed and painted. I will be doing that as I go along. Once I get the car painted I will move it to the other garage with lift and do the front end bushings brakes etc while I have the front end off it and finish the frame as I dismantle A-arms etc and clean everything up. Hopefully will have more updates this weekend (Sunday??). As always here are some pics, thanks for looking. Inner Fender ground down and cleaned up wasn't too bad , Primed with the cold galv And then inside of fenders painted as well. Took the radiator support off , Left the radiator in the car so I didn't have to drain. Need to remove condenser and headlight buckets from support and sandblast Started cleaning up the frame rail in front of control arms and will finish up painting frame rail as I work back on the frame and once car is painted. Frame rail sprayed with rusty metal primer. Just a note its from spray gun , as I found looking through the Rustoleum SDS sheets that the Spray cans of Rustoleum Rusty Metal Primer do not contain zinc in them , and only the quart or gallons of them do. So just use that thinned with acetone as recommended. 1 Quote Link to comment Share on other sites More sharing options...
willie Posted May 3, 2019 Share Posted May 3, 2019 Nice work Pat, keep up the pace you are doing great!!!! Quote Link to comment Share on other sites More sharing options...
imr Posted May 3, 2019 Share Posted May 3, 2019 your moving along and all your pictures have me thinking what am I getting into. your doing a great job! Quote Link to comment Share on other sites More sharing options...
cny first gen 71 Posted May 3, 2019 Share Posted May 3, 2019 Nice progress keep up the good work. Quote Link to comment Share on other sites More sharing options...
pab3589 Posted May 4, 2019 Author Share Posted May 4, 2019 Wasn't planning on getting much done tonight (Friday)but needed to knock my weekend list down. Got the radiator support dismantled more and sand blasted, as well some of the pieces I got sand blasted. Ended up priming and painting and using the 2k urethane primer and a single stage urethane satin black we had from another project. Figured it would dry quicker and be a little more durable than the Rustoleum . Used that on the frame rail also. Will hopefully get the other frame rail cleaned up primed and painted tomorrow and can get the support back on the car by Sunday. I think I am doing the other frame rail with 2k primer before painting instead of the rustoleum rusty metal primer I used on the first one. So maybe 10 years from now I will let you know which primer held up better under the paint. Honestly hope they both do LOL. Here are some pics, paint is still wet so much glossier then will finish up. Will send those in the future of it flattened out but here it is for now thanks for looking. Here is this batch of items sand blasted, the pics look dark almost like the pieces are black but honest they were blasted LOL. Cleaning them up they are actually in better shape then I thought, Here they are all primed with the 2k primer And here they are painted with a single stage urethane, They will flatten out not a fan of the shiny black under the hood and such but it does look nice and clean I hope I made the right choice not being glossy LOL , We will see when they flatten out either way it will look nice cleaned up and well protected. and the frame rail , which I hope eventually will get the rest of the frame cleaned up and looking like this I will be thrilled. 1 Quote Link to comment Share on other sites More sharing options...
pab3589 Posted May 4, 2019 Author Share Posted May 4, 2019 A few more updates for today. Spent a couple hours on car today(Saturday) was delayed as I had some other stuff to get done first. Got the drivers side front frame rail cleaned up like the passenger side ,as well as the inner fender well extensions ,upper radiator support and the front bumper filler panel sandblasted primed and painted. Will hopefully have time tomorrow to get radiator support back in and get the hood primed again as well as get the fender body work done and primed. Here are some pics I know they are nothing real exciting but just taking progress pics for down the road someday just so people can see what exactly was done and proof that things were sandblasted cleaned stripped condition etc.. Here is the pretty rusty backside of the bumper filler , and of it cleaned up after sandblasting. Here is driver side frame rail cleaned up and painted ( forgot the primer pic) Upper radiator support and filler blasted , primed and painted and then just the inner fender well extensions again forgot the primer pic Quote Link to comment Share on other sites More sharing options...
MC1of80 Posted May 4, 2019 Share Posted May 4, 2019 Hey Pat! Great progress and work! Love the pics. IDK what color you are painting the Monte but idk if you know or not but the bumper filler is supposed to be a silver/argent color. Quote Link to comment Share on other sites More sharing options...
Rob Peters Posted May 5, 2019 Share Posted May 5, 2019 Patrick, I agree with Thomas. I was going to type the same thing regarding the bumper filler panel, it was painted argent silver from the factory. Of course if you are not going factory correct you should paint it as you wish. I also am enjoying the progress pictures you are sharing so please keep them coming. rob Quote Link to comment Share on other sites More sharing options...
Leghome Posted May 5, 2019 Share Posted May 5, 2019 We have a restorations hop near here (They,One More Time Rods and Restorations, did My 72 in 2013) that uses a black urethane on all cars that they put on the rotisserie after coating them with Lizard Skin. The product they use is XL Coatings Satin Black. When I pulled my motor I just used POR 15 on all of the frame rails and cross member before re installation Quote Link to comment Share on other sites More sharing options...
pab3589 Posted May 5, 2019 Author Share Posted May 5, 2019 Hey Thomas and Rob thank you for that info. I assumed it was the argent silver that I took off of it ,but I am painting the car black so I am "hoping" the black may look a little better than the silver ? For some reason the silver really bugged me and the car wont be totally original anyway as the colors are changing ,also bench to buckets etc.. I went with the satin to offset from the gloss which the car will be. So hopefully it looks ok if not I can always change again ,like I have nothing else to do LOL. I am wondering now if anyone else has painted theirs a different color? or matched car color etc ? PS Please don't revoke my membership for painting it black LOL 1 hour ago, Leghome said: We have a restorations hop near here (They,One More Time Rods and Restorations, did My 72 in 2013) that uses a black urethane on all cars that they put on the rotisserie after coating them with Lizard Skin. The product they use is XL Coatings Satin Black. When I pulled my motor I just used POR 15 on all of the frame rails and cross member before re installation Larry, hopefully I can do the frame in stages as I move through the car I wasn't sure what I was going with but so far I like it, hopefully it holds up. How Is yours holding up and the POR as well? Quote Link to comment Share on other sites More sharing options...
Leghome Posted May 5, 2019 Share Posted May 5, 2019 Mine is doing pretty well but a couple of spots I did not get as clean as I should have but those spots are hidden so the overall looks good at least I think so. Quote Link to comment Share on other sites More sharing options...
pab3589 Posted May 6, 2019 Author Share Posted May 6, 2019 Larry, Good to know thank you. Ok here is an update from weekend, didn't have a chance to post yesterday but got the radiator support buttoned up yesterday ( Sunday) dint quite get the fenders done almost ready for primer . but happy with progress for everything I had to get done this weekend. Here are some pics Thanks for looking . Should have cleaned up the dust before taking the pic and yes my motor got filthy now. As soon as all the sanding is done will get her blown off and cleaned up some. Here you can really see the black bumper filler ( club expulsion ?? LOL ) hopefully it will look good with the bumper and such on there . I am glad I did it though now. Quote Link to comment Share on other sites More sharing options...
pab3589 Posted May 20, 2019 Author Share Posted May 20, 2019 Haven't posted in a bit getting closer to paint got the fender work all finished up and finally in first coat of primer ready to start blocking, and the second round of primer on the hood ready for second round of blocking. Also the lower part of the dash painted black and some other little stuff here and there. Hers are some pics thanks for looking. Fenders all primed up. Hood primed Before and after of dash brown/tan to black and everything else a little dirtier right now. Quote Link to comment Share on other sites More sharing options...
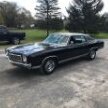
pab3589 Posted August 29, 2019 Author Share Posted August 29, 2019 Hello all, haven't updated in awhile with the summer months and a lot going it has slowed down a little and of course way behind schedule. Don't think I will be able to get it done for this fall and probably wont make it out until spring.. Not a lot to update over the past couple months as you would not really see the progress , because it was block sand prime block prime block prime repeat … but here are a few pics of where we are now, so far its looks really straight hopefully wont get any thane wave.. still have a ways to go but enjoy pics and thanks for looking. Here are a couple wet sanded and getting ready to paint Here are a couple with the black sealer on it Here it is in paint And here it is in clear with the wheels back on it getting ready to wet sand and buff as we get other pieces ready to paint as well. Quote Link to comment Share on other sites More sharing options...
MC1of80 Posted August 29, 2019 Share Posted August 29, 2019 Looking great! Love the pics and progress! Quote Link to comment Share on other sites More sharing options...
Rob Peters Posted August 29, 2019 Share Posted August 29, 2019 Looking beautiful Patrick, hopefully it will be done by June and you will be able to attend the 2020 FGNCC Eastern Meet for the 50th Anniversary of Monte Carlo celebration in Carlisle, Pa. rob Quote Link to comment Share on other sites More sharing options...

Recommended Posts
Join the conversation
You can post now and register later. If you have an account, sign in now to post with your account.