Its Just Me Posted June 20, 2015 Share Posted June 20, 2015 So, did you get over your brain f_rt to sell this project after the sheet metal work is complete? I hope so, cuz I really appreciate your vision & would like to see it completed! AWESOME work & we appreciate your dedication & time it takes to document your work and to show it to us! Keep it up. Scott 1 Link to comment Share on other sites More sharing options...
ss454-71 Posted June 21, 2015 Author Share Posted June 21, 2015 This sure has been a marathon project lasting over 20 years collecting all the parts. As with all hobby projects they always take the back burner to life. At this point the hobby vehicles/projects are deep and there is only so much time and money to go around but for now I'm in for the long haul. Link to comment Share on other sites More sharing options...
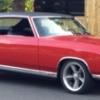
mightymouse Posted June 21, 2015 Share Posted June 21, 2015 What size wheels and tires or on the red monte. It looks great Link to comment Share on other sites More sharing options...
ss454-71 Posted June 22, 2015 Author Share Posted June 22, 2015 What size wheels and tires or on the red monte. It looks great Thanks they are 18x9.5 front and 18x10 rear. Link to comment Share on other sites More sharing options...
ss454-71 Posted June 22, 2015 Author Share Posted June 22, 2015 Welded up the Q-panel tops today. Now time to get out the grinder to cut down the welds. I used .023 wire and wet rags to keep the heat under control. I also plan on applying seam sealer to the back side of the welds to prevent moisture finding its way from beneath. Link to comment Share on other sites More sharing options...
Rob Peters Posted June 22, 2015 Share Posted June 22, 2015 Looks like a very productive day. rob Link to comment Share on other sites More sharing options...
mightymouse Posted June 22, 2015 Share Posted June 22, 2015 Do you remember what backspacing on the fronts. Also what size tires. Do they rub the swaybar? I'm going to run 18s and want the widest fronts that will fit without rubbing too much. Link to comment Share on other sites More sharing options...
ss454-71 Posted June 22, 2015 Author Share Posted June 22, 2015 Do you remember what backspacing on the fronts. Also what size tires. Do they rub the swaybar? I'm going to run 18s and want the widest fronts that will fit without rubbing too much. back space is 6.25" on the front. Link to comment Share on other sites More sharing options...
mightymouse Posted June 23, 2015 Share Posted June 23, 2015 Thanks. Link to comment Share on other sites More sharing options...
jeff70 Posted July 21, 2015 Share Posted July 21, 2015 Any updates? Link to comment Share on other sites More sharing options...
ss454-71 Posted October 3, 2015 Author Share Posted October 3, 2015 It only took about 10 years since the first cut but the body is almost complete welded back together. The quarter panel butt welds were welded on both sides and the outside ground flush. Then seam sealer was applied from underneath to avoid moisture entering from beneath and creating bubbles in the bodywork down the road. Link to comment Share on other sites More sharing options...
ss454-71 Posted October 3, 2015 Author Share Posted October 3, 2015 Here are shots of the entire assembly for the final time. Link to comment Share on other sites More sharing options...
ss454-71 Posted October 3, 2015 Author Share Posted October 3, 2015 This is after welding the tub all together. She isn't coming apart again and I can say officially it's a convertible. Link to comment Share on other sites More sharing options...
Rob Peters Posted October 3, 2015 Share Posted October 3, 2015 Very Nice Work!!!! Rob Link to comment Share on other sites More sharing options...
LostnFound Posted October 3, 2015 Share Posted October 3, 2015 Nice work.....I love the look of these cars as convertibles. Have you decided on a colour yet? Link to comment Share on other sites More sharing options...
ss454-71 Posted October 3, 2015 Author Share Posted October 3, 2015 Rear seat panels going in now. Link to comment Share on other sites More sharing options...
Jared Richey Posted October 3, 2015 Share Posted October 3, 2015 Cool stuff. I like these cars as Drop Tops.. Link to comment Share on other sites More sharing options...
7tonemonte Posted October 3, 2015 Share Posted October 3, 2015 Great work! I love it, very well planned every step of the way Link to comment Share on other sites More sharing options...
ss454-71 Posted October 4, 2015 Author Share Posted October 4, 2015 Thanks for the complements. Nothing is perfect but it seems to be coming together good. I dry fit the top and some of the trim panels and everything is lining up where it should. Link to comment Share on other sites More sharing options...
ss454-71 Posted October 13, 2015 Author Share Posted October 13, 2015 Nice work.....I love the look of these cars as convertibles. Have you decided on a colour yet? Thanks, Was going black but now that I have an original triple black 70 ss under way I'm not sure. Link to comment Share on other sites More sharing options...
ss454-71 Posted October 18, 2015 Author Share Posted October 18, 2015 Finally got the convertible off the 4 post. Also rearranging cars for winter hibernation. Link to comment Share on other sites More sharing options...
ss454-71 Posted October 24, 2015 Author Share Posted October 24, 2015 Pulled the body today and set it on a spare chassis. Then started to fit-up the convertible frame braces. First fitting went well but need some fine tuning. Link to comment Share on other sites More sharing options...
red/white04 Posted February 19, 2016 Share Posted February 19, 2016 bump! time for an update! Link to comment Share on other sites More sharing options...
lastss Posted February 19, 2016 Share Posted February 19, 2016 I want to win the lottery & buy it when it's done. What Awesome talent & Awesome nice guy & family. Yes we meet several times. Link to comment Share on other sites More sharing options...
420ponies Posted February 26, 2016 Share Posted February 26, 2016 Man, that is going to look good!! I have been following this build and am very impressed with it. going to be nice when it is done. You going to use those wheels? Link to comment Share on other sites More sharing options...

Recommended Posts